
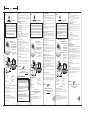
1) ALARM ON/OFF
2) TIME SET
3) ALARM SET
4) HOUR
5) MINUTE
6) ALARM MODE SWITCH
7) SNOOZE & LIGHT BUTTON
8) ALARM INDICATOR
9) PM INDICATOR
10) BATTERY COMPARTMENT
11) TEST BUTTON
12) HOUR FORMAT SWITCH
Features:
10
8
5
1
2
3
4
9
6
11
7
HOUR
24 12
12
1) HOW TO INSTALL BATTERIES
1.1 Remove the BATTERY COMPARTMENT (10), insert 1 AAA battery for the clock and
insert 2 AA batteries for the vibrator/alarm.
1.2 To insert the batteries, please observe the correct position of the polarity, as marked
inside the battery compartment.
2) WHEN TO REPLACE BATTERIES
2.1 When the LCD screen becomes dim, it is time to change the AAA battery.
2.2 When alarm sound quality becomes poor or volume is low or the vibrator is vibrating
very slow, it is usually an indication of weak batteries. Replace the weak batteries to
avoid any possible leakage.
SETTING CLOCK TIME AND ALARM TIME (see diagrams)
4) SETTING CLOCK TIME
4.1 Press and hold the TIME SET button (2), then press the Hour button (4) until the correct
hour is displayed. Remember to set the correct AM or PM. When PM time is registered,
a “P"(9) will appear on the display.
4.2 Press and hold the TIME SET button (2), then press the Minute button (5) until the
correct time is displayed.
4.3 Please use the hour format switch (12) to select 12 hour or 24 hour.
INSTALLATION
(See diagram for additional directions for settings)
English
Model SBP100
The Sonic Boom Alarm Clock Model SBP100 is warranted
against manufacturing defects in materials and workmanship for
one (1)year from the date of purchase. Within this period Sonic
Alert will repairor replace at our option the SBP100 without
charge for parts and labor. Simply send the SBP100 (postpaid)
and a copy of your sales slip as proof of purchase to:
Sonic Shaker Portable Vibrating Alarm Clock
SONIC ALERT'S 1 YEAR LIMITED WARRANTY
Sonic Alert Inc., 1050 E. Maple Road, Troy MI 48083
GENERAL DATA
Power: DC 3V(1.5Vx2 pieces AA SIZE) &
DC1.5V (1.5Vx1 pieces AA A SIZE)
IMPORTANT - Please read these instructions
carefully before use and retain
for future reference.
PORTABLE VIBRATING ALARM
CLOCK SBP100 DIAGRAMS &
OPERATING INSTRUCTIONS
3) MAINTENANCE
3.1 If the unit is not used for long period of time, remove all batteries to avoid any possible
leakage.
3.2 When traveling with this unit it is advised to remove the batteries for the vibrator/alarm
(2AA size) to avoid draining the batteries in the event light button is accidentally pressed
during travel.
Night Light (see diagram)
7) To read the clock time in the dark, press and hold the Light / Snooze Button (7)
5) SETTING ALARM TIME
5.1 Press and hold the ALARM SET button (3), then press the Hour button (4) until the
correct hour is displayed. Remember to set the correct AM or PM. When PM time is
registered, a "P"(9) will appear on the display.
5.2 Press and hold the ALARM SET button (3), then press the Minute button (5) until the
correct time is displayed.
6) Set the alarm time as indicated in Setting Alarm Time.
6.1 Set the Alarm ON/OFF Switch (1) to ON. Alarm indicator will appear in the top center
of the display (8) indicating the alarm function is on. The alarm is now set to turn on
automatically at the selected time.
6.2 You can select the alarm mode for waking, i.e. buzzer, vibrator, or buzzer and vibrator
by setting the Alarm Mode Switch (6) to your desired position.
6.3 With the alarm sounding, press the ALARM OFF (3) to turn off the alarm. The alarm
comes on again the next day at the same time.
6.4 With the alarm sounding, press the Snooze Button (7) after the alarm sounds, the alarm
will go off and will come on again in approximately 4 minutes. You may repeat this
cycle as many times as desired.
6.5 To stop the alarm permanently set the Alarm ON/OFF Switch (1)to OFF.
ALARM OPERATION (see diagrams)
Test Button
8) The test button (11) is used to demonstrate the buzzer and vibrator without setting the
alarm.To use the test button, slide the function switch to the desired position i.e.buzzer,
vibrator or buzz/vib and press the test button to experience the buzzer or the vibrator.
Recycling & the WEEE directive
At the end of their useful life, the packaging, product and batteries
should be disposed of via a suitable recycling centre. Do not
dispose of with your normal household waste. Do not burn.
All plastic and metal parts are recyclable. The printed circuit
sent to any PCB recovery contractor to recover some of the components
for any metals such as gold and silver.
board may be
Recycling
Local recycling: your local library or district council will also have
information about recycling in your area.
WEEE stands for Waste Electrical and Electronic Equipment
The Directive aims to reduce the waste arising from electrical and
equipment; and improve the environmental performance of all those involved in the
life cycle of electrical and electronic products.
electronic
eemarc
g
Telecom
Distributed by :
5 Swallow Court Swallowfields Welwyn Garden City
Hertfordshire, AL7 1SB
For product support: 01707 384438 www.geemarc.com
German
Der führende US-Hersteller von optischen Alarmsystemen
Modell SBP100
1 JAHR EINGESCHRÄNKTE GARANTIE VON SONIC ALERT
Für den Sonic Boom Wecker SBP100 gilt eine Garantie von einem
(1) Jahr für alle Verarbeitungs -und Materialfehler. Innerhalb dieses
Garantiezeitraums repariert oder ersetzt Sonic Alert nach eigenem
Ermessen den SBP100, ohne Kosten für Teile und Arbeit in
Rechnung zu stellen. Senden Sie den SBP100 (unter Übernahme
der Versandkosten) und eine Kopie Ihres Kaufbelegs einfach an:
Sonic Alert Inc., 1050 E. Maple Road, Troy MI 48083, USA
Sonic Shaker tragbarer Vibratorwecker Modell SBP100
ALLGEMEINE DATEN
Strom: 3 V GS (2 AA-Batterien 1,5 V) und
1,5 V GS (1 AAA-Batterie 1,5 V)
TRAGBARER VIBRATORWECKER
SBP100ABBILDUNGEN UND
BEDIENUNGSANLEITUNG
WICHTIG: Bitte lesen Sie diese Anleitung
vor der Verwendung sorgfältig
durch und bewahren Sie sie
zurspäteren Bezugnahme auf.
10
8
5
1
2
3
4
9
6
11
7
HOUR
24 12
12
1. ALARM ON/OFF
2. TIME SET
3. ALARM SET
4. STUNDEN
5. MINUTEN
6. WECKMODUSTASTE
7. SCHLUMMER- UND
BELEUCHTUNGSTASTE
Funktionen gemäß Abbildung oben:
8. WECKERINDIKATOR
9. VORMITTAGS-
/NACHMITTAGS-ANZEIGE
10. BATTERIEFACH
11) TEST TASTER
12) ZEITFORMAT SCHALTER
1) EINLEGEN DER BATTERIEN
1.1 Entfernen Sie die Abdeckung des BATTERIEFACHS (10), legen Sie 1 AAA-Batterie
für die Uhr und 2 AA-Batterien für den Vibrator/Wecker ein.
1.2 Achten Sie beim Einlegen auf die korrekte Polarität, wie im Inneren des Batteriefachs
angezeigt.
INSTALLATION
(Weitere Informationen zu Einstellungen sind auf der
Rückseite zu finden)
2) AUSWECHSELN DER BATTERIEN
2.1 Wenn der LCD-Bildschirm nicht mehr deutlich angezeigt wird, muss die AAA-Batterie
ausgewechselt werden
2.2 Wenn die Wecktonqualität oder Lautstärke nachlässt oder nur eine ganz langsame
Vibration erfolgt, müssen die Batterien ausgewechselt werden. Ersetzen Sie schwache
Batterien so bald wie möglich, um zu verhindern, dass Batterien im Gerät auslaufen.
3) WARTUNG
3.1 Wird das Gerät längere Zeit nicht verwendet, nehmen Sie alle Batterien heraus, um ein
Auslaufen zu vermeiden.
3.2 Es wird empfohlen, die Batterien für den Vibrator/Wecker (2 AA Batterien) auf Reisen
herauszunehmen, damit die Batterien nicht leer werden, wenn unterwegs aus Versehen
die Beleuchtungstaste gedrückt wird.
EINSTELLEN VON UHR- UND WECKZEIT(Abbildungen siehe Rückseite)
WECKBETRIEB (Abbildungen siehe Rückseite)
6) Stellen Sie die Weckzeit wie unter “Einstellen der Weckzeit”angegeben ein.
6.1 Stellen Sie die Taste Alarm ON/OFF (1) auf ON. Oben in der Mitte des Displays wird
der Weckerindikator angezeigt (8). Dies zeigt an, dass die Weckfunktion eingeschaltet
ist. Der Wecker ist nun gestellt.
6.2 Sie können den Weckmodus auf Weckton oder Vibrator bzw. Weckton und Vibrator
einstellen. Dazu verwenden Sie die Weckmodustaste (6).
6.3 Wenn der Wecker klingelt, kann er mit ALARM OFF (3) ausgeschaltet werden. Der
Wecker klingelt am nächsten Tag wieder zur selben Uhrzeit.
6.4 Wenn der Wecker klingelt, können Sie auf die Schlummertaste (7) drücken. Dadurch
wird er ausgeschaltet, klingelt aber in ca. 4 Minuten erneut. Sie können diesen Zyklus
beliebig oft wiederholen.
6.5 Um den Wecker permanent auszuschalten, stellen Sie die Taste Alarm ON/OFF (1) auf
OFF
Nachtbeleuchtung (Abbildung siehe Rückseite)
7) Um im Dunkeln die Uhrzeit zu sehen, drücken Sie die Beleuchtungs/Schlummertaste(7).
Testtaste
8) Mit der Testtaste können Sie den Weckton und die Vibratorfunktion testen, ohne den
Wecker zu stellen. Dazu schieben Sie den Funktionsschalter auf die gewünschte
Position (z. B. Weckton, Vibrator oder Weckung/Vibrator) und drücken die Testtaste.
5) EINSTELLEN DER WECKZEIT
5.1 Halten Sie die Taste ALARM SET (3) gedrückt, während Sie die Stundentaste (4)
drücken, bis die korrekte Stundenangabe angezeigt wird. Achten Sie dabei darauf, ob es
vor oder nach Mittag ist. Für Nachmittag/Abend wird auf dem Display ein “P” für PM
angezeigt (9).
5.2 Halten Sie die Taste ALARM SET (3) gedrückt, während Sie die Minutentaste (5)
drücken, bis die korrekte Uhrzeit angezeigt wird.
4) EINSTELLEN DER UHRZEIT
4.1 Halten Sie die Taste TIME SET (2) gedrückt, während Sie die Stundentaste (4)
drücken, bis die korrekte Stundenangabe angezeigt wird. Achten Sie dabei darauf, ob es
vor oder nach Mittag ist. Für Nachmittag/Abend wird auf dem Display ein “P” für PM
angezeigt (9).
4.2 Halten Sie die Taste TIME SET (2) gedrückt, während Sie die Minutentaste (5) drücken,
bis die korrekte Uhrzeit angezeigt wird.
4.3 Bitte benutzen Sie den Zeitformat Schalter (12) um zwischen dem 12 Stunden und dem
24 Stunden Format zu wählen.
Vertrieb:
eemarc
g
Telecom SA
Siemensstrasse 10, 53121 Bonn Germany
Tel: +49(0)228/ 7487090 Fax: +49(0)228/ 74870920
www.geemarc.com
Réveille-matin Sonic vibreur portatif
Français
Modèle SBP100
Numéro un américain des systèmes d'alerte visuelle
GARANTIE LIMITÉE D'UN AN DE SONIC ALERT
Le réveille-matin Sonic Boom modèle SBP100 est garanti contre
tout défaut de fabrication pièces et main d'œuvre pour un an à
compter de la date d'achat du produit. Durant cette période,
Sonic Alert s'engage à réparer ou remplacer à notre discrétion
l'appareil SBP100 sans frais de votre part. Faites nous parvenir
votre appareil par la poste (à vos frais) accompagné d'une copie
de votre preuve d'achat à l'adresse suivante :
Sonic Alert inc., 1050 E Maple Road, Troy, Michigan 48083
Important : Veuillez lire attentivement
les instructions qui suivent
avant d'utiliser votre
appareil, et conservez-les
pour vous y référer au
besoin.
Réveille-matin Sonic Alert
avec vibreur portatif
SBP100 Instructions
INFORMATION GÉNÉRALE
Alimentation: 2 piles AA de 1.5V &
1 pile AAA de 1.5V
10
8
5
1
2
3
4
9
6
11
7
HOUR
24 12
12
Fonctions :
1) Bouton d'alarme ON/OFF
2) Bouton de réglage de l'heure
3) Bouton de réglage de l'alarme
4) Bouton heure (HOUR)
5) Bouton minutes (MINUTE)
6) Bouton mode d'alarme
8) Indicateur d'alarme
9) Indicateur PM
10) Emplacement des piles
11) Bouton d'essai(TEST)
12)
7) Bouton SNOOZE et écran lumineux
Sélecteur de format de l'heure
1) COMMENT INSTALLER LES PILES
1.1 Enlever le couvercle du compartiment à piles(10), insérer 1 pile AAA pour l'horloge et
2 piles AA pour le vibreur/alarme
1.2 Pour insérer les piles, assurez-vous de respecter les polarités telles qu'indiquées dans le
fons du compartiment
INSTALLATION
2) QUAND REMPLACER LES PILES
2.1 Lorsque l'écran à cristaux liquides devient faible, il est temps de changer les piles AAA.
2.2 Lorsque le son de l'alarme devient faible, que le volume est bas ou que le vibreur est
lent, c'est habituellement un indice que les piles sont faibles. Remplacez-les pour éviter
tout écoulement dans l'appareil.
3) ENTRETIEN
3.1 Si l'appareil est inutilisé pour un certain temps, retirer les piles pour éviter tout
écoulement pouvant endommager l'appareil.
3.2 Lorsque vos voyagez avec l'appareil, il est recommandé de retirer les 2 piles AA du
vibreur/alarme pour éviter que les piles ne se vident si le bouton de luminosité de
l'écran est enfoncé par mégarde.
AJUSTEMENT DE L'HEURE ET DE L'ALARME
4) AJUSTEMENT DE L'HEURE
4.1 Gardez enfoncé le bouton TIME SET(2). Utilisez le bouton HOUR (4) pour régler à
l'heure désirée. Attention de bien régler les modes AM et PM. Un « P »(9) apparaîtra sur
l'écran en mode PM.
4.2 Maintenez enfoncé le bouton TIME SET (2). Utilisez le bouton MINUTE (5) pour régler
les minutes.
5) AJUSTEMENT DE L'ALARME
5.1 Maintenez enfoncé le bouton ALARM SET (3). Utilisez le bouton HOUR (4) pour
régler l'heure désirée. . Attention de bien régler les modes AM et PM. Un « P »(9)
apparaîtra sur l'écran en mode PM.
5.2 Maintenez enfoncé le bouton ALARM SET (3). Utilisez le bouton MINUTE (5) pour
régler les minutes.
4.3 Veuillez utiliser le sélecteur de format de l'heure (12) pour sélectionner un format
d'heure sur 12 ou 24 heures.
FONCTIONS DE L'ALARME
6) Ajustez l'heure de réveil désirée selon les directives
AJUSTEMENT DE L'ALARME
6.1 Mettez le bouton ALARM ON/OFF (1) en position ON. L'indicateur d'alarme apparaîtra
en haut au centre de l'écran(8). Ceci indiquera que l'alarme est en fonction. L'alarme est
maintenant prête à sonner automatiquement à l'heure désirée.
6.2 Vous pouvez choisir le type de sonnerie que vous désirez i.e. sonore (Buzz), vibreur ou
sonore/vibreur en positionnant le bouton ALARM MODE (6) à la position désirée.
6.3 Lorsque l'alarme est en fonction, pressez ALARM OFF (3) pour l'arrêter. L'alarme
sonnera de nouveau le lendemain à la même heure.
6.4 Lorsque l'alarme est en fonction, pressez le bouton SNOOZE(7). L'alarme s'arrêtera pour
4 minutes environ puis, sonnera de nouveau automatiquement. Vous pouvez répéter cette
opération aussi souvent que vous le désirez.
6.5 Si vous ne désirez pas vous servir de la fonction d'alarme, mettez le bouton ALARM ON
/OFF (1) en position OFF.
LUMINOSITÉ DE L'ÉCRAN
7) Pour lire l'heure dans l'obscurité, maintenir enfoncé le bouton LIGHT/SNOOZE (7).
BOUTON TEST
8) Le bouton TEST(11) vous permet d'essayer le vibreur et le son de l'alarme, sans même
programmer l'heure du réveille-matin. Pour utiliser le bouton test, vous n'avez
simplement qu'a régler le bouton de fonction mode d'alarme (6) à la position désirée ex.:
son (buzzer), vibreur (vibrator) ou les deux à la fois (buzzer/vibrator) et presser le
bouton TEST pour essayer la fonction sélectionnée.
Distribué par:
eemarc
g
Telecom SA
Parc de l’Etoile 2, rue Galilée 59760 Grande Synthe, France
tel: 03 28 58 75 75 fax: 03 28 58 75 76
www.geemarc.com
99.00 mm
210.00 mm
-
 1
1

dans d''autres langues
- English: Geemarc SBP100SS User guide
- Deutsch: Geemarc SBP100SS Benutzerhandbuch