Velp Scientifica RX3 Manuel utilisateur
- Catégorie
- Pistolets à chaleur
- Taper
- Manuel utilisateur

1
Instruction Manual
Manuale di istruzioni
Manuel d’instructions
Manual de instrucciones
Bedienungsanleitung
指导手册
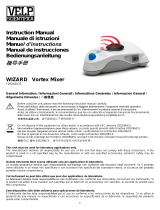
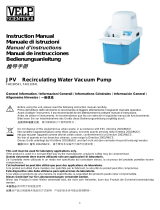
RX3 Vortex Mixer
F202A0171
General Information / Informazioni Generali / Informations Générales / Información General /
Allgemeine Hinweise / 一般信息
Before using the unit, please read the following instruction manual carefully.
Prima dell’utilizzo dello strumento si raccomanda di leggere attentamente il seguente manuale operativo.
Avant d’utiliser l’instrument, il est recommandé de lire attentivement le présent manuel d’instructions.
Antes de utilizar el instrumento, le recomendamos que lea con atención el siguiente manual de funcionamiento.
Bitte lesen Sie vor Inbetriebnahme des Geräts diese Bedienungsanleitung sorgfältig durch
在使用本装置之前,请仔细阅读以下使用说明书。
Do not dispose of this equipment as urban waste, in accordance with EEC directive 2002/96/CE.
Non smaltire l’apparecchiatura come rifiuto urbano, secondo quanto previsto dalla Direttiva 2002/96/CE.
Ne pas recycler l’appareil comme déchet solide urbain, conformément à la Directive 2002/96/CE.
No tirar el aparato en los desechos urbanos, como exige la Directiva 2002/96/CE.
Dieses Gerät unterliegt der Richtlinie 2002/96/EG und darf nicht mit dem normalen Hausmüll entsorgt werden.
根据 EEC 指令 2002/96/CE,请不要将本设备作为城市垃圾处理。
This unit must be used for laboratory applications only.
The manufacturer declines all responsibility for any use of the unit that does not comply with these instructions. If the
product is used in a not specified way by the manufacturer or with non specified accessories, product's safety may be
compromised.
Questo strumento deve essere utilizzato solo per applicazioni di laboratorio.
La società produttrice declina ogni responsabilità sull’impiego non conforme alle istruzioni degli strumenti. Se il prodotto
viene utilizzato in un modo non specificato o con accessori non specificati dal costruttore stesso, la sicurezza del prodotto
potrebbe essere compromessa.
Cet instrument ne peut être utilisé que pour des applications de laboratoire.
Le fabriquant décline toute responsabilité en cas d’utilisation non conforme aux instructions concernant ces instruments. Si
le produit est utilisé d'une manière non spécifiée par le fabricant ou accessoires non spécifiés, la sécurité du produit peut
être compromise.
Este dispositivo sólo debe utilizarse para aplicaciones de laboratorio.
El fabricante declina toda responsabilidad por el uso no conforme a las instrucciones de los dispositivos. Si se utiliza el
producto de una manera no especificada o con accesorios no especificados de el fabricante, la seguridad del producto
puede estar comprometida.

2
Dieses Gerät darf nur für Laboranwendungen verwendet werden.
Der Hersteller lehnt jede Haftung für unsachgemäße Verwendung oder Nichtbeachtung dieser Bedienungsanleitung ab.
Wenn das Produkt in einer Weise verwendet wird, die nicht vom Hersteller oder mit unsachgemäßer Zubehör angegeben ,
kann das Produkt die Sicherheit beeinträchtigt werden.
本装置必须仅用于实验室应用。
制造商对任何不符合这些说明的使用不承担任何责任。如果该产品以非制造商指定的方式使用或使用非指定的附件,产品的
安全性可能会受到影响。
This unit has been designed and manufactured in compliance with the following standards:
Lo strumento è stato progettato e costruito in accordo con le seguenti norme:
L’instrument a été conçu et fabriqué conformément aux normes suivantes:
El dispositivo se ha sido diseñado y fabricado de acuerdo con las siguientes normas:
Das Gerät wurde in Übereinstimmung mit folgenden Normen entwickelt und gebaut:
本装置的设计和制造符合以下标准。
Safety requirements for electrical equipment for measurement, control and for laboratory use
Prescrizioni di sicurezza per apparecchi elettrici di misura, controllo e per l’utilizzo in laboratorio
Règles de sécurité pour appareils électriques de mesurage, de régulation et de laboratoire
Prescripciones de seguridad para equipos eléctricos de medición, control y su uso en laboratorio
Sicherheitsbestimmungen für elektrische Mess-, Steuer-, Regel- und Laborgeräte
测量、控制和实验室用电气设备的安全要求
IEC/EN 61010-1
IEC/EN61010-2-051
Electrical equipment for laboratory use
UL 61010-1
General requirement - Canadian electrical code
CAN/CSA-C22.2 No.61010-1
VELP reserves the right to modify the characteristics of its products with the aim to constantly improving their quality.
Nell’impegno di migliorare costantemente la qualità dei prodotti, VELP si riserva la facoltà di variarne le caratteristiche.
Dans le but d’améliorer constamment la qualité de ses produits, VELP se réserve le droit d’apporter des modifications aux
caractéristiques de ceux-ci.
VELP se reserva el derecho de modificar las características de sus productos con el objetivo de mejorar constantemente su
calidad.
VELP behält sich zum Zwecke der ständigen Verbesserung der Produktqualität das Recht auf Änderung der
Geräteeigenschaften vor.
VELP 保留修改其产品特性的权利,目的是不断提高其质量。
Safety Regulations / Norme di Sicurezza / Consignes de Securité / Advertencias de Seguridad / Sicherheitshinweise
/ 安全条例
Connect the instrument using only the supplied external power supply The plug disconnects the instrument. Therefore, place
the instrument where it can be quickly disconnected.
Collegare lo strumento utilizzando solamente l’alimentatore esterno in dotazione. La spina disconnette dell’apparecchio.
Pertanto, posizionare l’apparecchio in modo che sia agevole disconnetterlo.
Branchez l'instrument en utilisant uniquement l'alimentation externe fournie. Le bouchon est le moyen de déconnexion de
l'appareil. Par conséquent, placer l'appareil où il peut être rapidement débranché.
Conecte el instrumento utilizando únicamente la fuente de alimentación externa suministrada. El tapón es el medio de
desconexión del dispositivo. No coloque el dispositivo en una forma que es difícil de desconectar.
Schließen Sie das Gerät nur mit dem mitgelieferten externen Netzteil an. Der Stecker trennt das Gerät. Daher Stellen Sie
das Instrument, wo es schnell getrennt werden kann.
仅使用提供的外部电源连接仪器 插头会断开仪器的连接。因此,请将仪器放在可以快速断开的地方。
Position the instrument on a flat surface, with a distance from the wall of 30 cm (at least).
Posizionare lo strumento su superfici piane, ad una distanza dalle pareti di almeno 30 cm.
Positionner l'appareil sur une surface plat, avec une distance de la paroi de 30 cm (au moins).
Coloque la unidad sobre una superficie plana, con una distancia de la pared de 30 cm (por lo menos).
Stellen Sie das Gerät auf einer ebenen Fläche mit einem Abstand zur Wand von 30 cm (mindestens).
将仪器放置在一个平坦的表面上,与墙壁的距离为 30 厘米(至少)。

3
Before placing the tube on the stirring cup, make sure that its cap is tightly closed to prevent sample leakage.
Prima di posizionare la provetta sulla coppetta di agitazione assicurarsi che il relativo tappo di chiusura della stessa sia ben
chiuso per evitare fuoriuscite di campione.
Avant de placer le tube sur le gobelet d'agitation, assurez-vous que son bouchon est bien fermé pour éviter toute fuite d'échantillon.
Antes de colocar el tubo en el vaso de agitación, asegúrese de que su tapa esté bien cerrada para evitar la fuga de la muestra.
Stellen Sie vor dem Aufsetzen des Röhrchens auf den Rührbecher sicher, dass dessen Kappe fest verschlossen ist, um ein
Austreten der Probe zu verhindern.
在将试管放在搅拌杯上之前,确保其盖子紧闭以防止样品泄漏。
The solution may release toxic, dangerous or poisonous gases. Adequate safety measures must be taken, in accordance
with the safety regulations in force, including the presence of hood and personal protective equipment (masks, gloves,
goggles, etc.).
Le sostanze in lavorazione potrebbero emanare gas tossici e/o pericolosi e/o velenosi. Adeguate misure di sicurezza
devono essere prese, in accordo con le normative di sicurezza dei prodotti in lavorazione e/o vigenti nei laboratori,
compresa la presenza di cappe aspiranti e mezzi di protezione individuale (maschere, guanti, occhiali, camici, ecc.).
La solution peut libérer gaz toxiques ou dangereux. Des mesures de sécurité adéquates doivent être prises, en conformité
avec les règlements de sécurité en vigueur, compris la présence de la hotte de laboratoire et équipements de protection
individuelle (masques, gants, lunettes, etc.).
Las sustancias pueden emitir tóxicos o peligrosos gas. Medidas de seguridad adecuadas deben ser adoptadas, de acuerdo
con las normas de seguridad vigentes en los laboratorios, incluyendo la presencia de la campana de humos y el equipo de
protección personal (mascarillas, guantes, gafas, etc.)
Die lösung kann giftige oder gefährliche Gase freigeben. Angemessene Sicherheitsmaßnahmen zu treffen, werden in
Übereinstimmung mit den geltenden Sicherheitsvorschriften, einschließlich der Anwesenheit Dunstabzug und persönliche
Schutzausrüstungen (Masken, Handschuhe, Schutzbrille, etc.).
溶液可能会释放出有毒、危险或有毒的气体。必须按照现行的安全规定采取适当的安全措施,包括配备头罩和个人防护设备
(口罩、手套、护目镜等)。
Do not use with explosive and dangerous materials for which the equipment is not designed. The stirrer must not be used in
explosive atmospheres.
Vietato l’uso con materiale esplosivo e pericoloso per cui l’apparecchio non è progettato. L’agitatore non può essere
impiegato in atmosfere esplosive.
Ne pas utiliser avec des matières explosives et dangereuses pour lesquelles l'équipement n'est pas conçu. L'agitateur ne
peut pas être utilisé dans des atmosphères explosives.
No debe utilizarse con materiales explosivos y peligrosos para los que el equipo no está diseñado. El agitador no puede ser
utilizado en ambientes explosivos.
Nicht mit explosivem Material zu verwenden, für die das Gerät nicht ausgelegt ist. Das Gerät kann nicht in
explosionsgefährdeten Bereichen eingesetzt werden.
请勿与设备未设计的爆炸性和危险性材料一起使用。搅拌器不得在爆炸性环境中使用。
Keep hand/arm vibration to a minimum (Directive 2002/44/EC) when operated manually:
- Keep the sample container as vertical as possible.
- Only exert the minimum pressure necessary for the mixing process.
- Use attachments for multiple samples when there is a large number of samples.
Ridurre al minimo le vibrazioni mano / braccio (Direttiva 2002/44 / CE) quando utilizzato manualmente:
- Mantenere il contenitore del campione il più verticale possibile.
- Esercitare solo la pressione minima necessaria per il processo di miscelazione.
- Utilizzare gli accessori per più campioni in presenza di un numero elevato di campioni.
Minimiser les vibrations des mains et des bras (directive 2002/44 / CE) en cas d'utilisation manuelle:
- Gardez le récipient de l'échantillon aussi vertical que possible.
- N'exercez que la pression minimale requise pour le processus de mélange.
- Utilisez les accessoires pour plusieurs échantillons en présence d'un grand nombre d'échantillons.
Minimizar las vibraciones de la mano/brazo (Directiva 2002/44/CE) cuando se utiliza manualmente:
- Mantenga el recipiente de la muestra lo más vertical posible.
- Ejercer sólo la presión mínima requerida para el proceso de mezcla.
- Utilice los accesorios para varias muestras en presencia de un gran número de muestras.
Minimieren Sie Hand/Arm-Vibrationen (Richtlinie 2002/44 / EG) bei manueller Anwendung:
- Halten Sie den Probenbehälter so senkrecht wie möglich.
- Üben Sie nur den für den Mischvorgang erforderlichen Mindestdruck aus.
- Verwenden Sie das Zubehör für mehrere Proben in Anwesenheit einer großen Anzahl von Proben.
手动操作时,将手/臂的振动保持在最低限度(指令 2002/44/EC)。
- 尽可能保持样品容器的垂直。
- 只施加混合过程中必要的最小压力。
- 当有大量的样品时,使用附件来处理多个样品。

4
Contents / Indice / Index / Índice / Inhalt / 内容
1. INTRODUCTION .............................................................................................................................................................. 5
2. ASSEMBLY AND INSTALLATION ................................................................................................................................... 5
2.1 ELECTRICAL CONNECTIONS .................................................................................................................................................................. 5
2.2 START-UP ........................................................................................................................................................................................ 5
2.3 INFORMATION ABOUT CONSTRUCTION MATERIALS ................................................................................................................................... 5
3. MAINTENANCE ............................................................................................................................................................... 5
3.1 CLEANING ........................................................................................................................................................................................ 5
4. TECHNICAL DATA .......................................................................................................................................................... 6
5. ACCESSORIES / SPARE PARTS ................................................................................................................................... 6
1. INTRODUZIONE .............................................................................................................................................................. 7
2. MONTAGGIO ED INSTALLAZIONE ................................................................................................................................ 7
2.1 COLLEGAMENTO ALLA RETE ELETTRICA ................................................................................................................................................... 7
2.2 AVVIO ............................................................................................................................................................................................. 7
2.3 INFORMAZIONI SUI MATERIALI DI COSTRUZIONE ....................................................................................................................................... 7
3. MANUTENZIONE ............................................................................................................................................................. 7
3.1 PULIZIA ........................................................................................................................................................................................... 7
4. CARATTERISTICHE TECNICHE .................................................................................................................................... 8
5. ACCESSORI / PARTI DI RICAMBIO ............................................................................................................................... 8
1. INTRODUCTION .............................................................................................................................................................. 9
2. MONTAGE ET INSTALLATION ....................................................................................................................................... 9
2.1 RACCORDEMENT AU RESEAU ELECTRIQUE ............................................................................................................................................... 9
2.2 MISE EN MARCHE .............................................................................................................................................................................. 9
2.3 INFORMATIONS SUR LES MATERIAUX DE FABRICATION ............................................................................................................................... 9
3. ENTRETIEN ..................................................................................................................................................................... 9
3.1 NETTOYAGE ..................................................................................................................................................................................... 9
4. CARACTÉRISTIQUES TECHNIQUES .......................................................................................................................... 10
5. ACCESSOIRES / PIECES DE RECHANGE.................................................................................................................. 10
1. INTRODUCCIÓN ........................................................................................................................................................... 11
2. MONTAJE E INSTALACIÓN .......................................................................................................................................... 11
2.1 CONEXIÓN A RED ELÉCTRICA .............................................................................................................................................................. 11
2.2 ENCENDIDO .................................................................................................................................................................................... 11
2.3 INFORMACIÓN SOBRE LOS MATERIALES DE FABRICACIÓN ......................................................................................................................... 11
3. MANTENIMIENTO ......................................................................................................................................................... 11
3.1 LIMPIEZA ....................................................................................................................................................................................... 11
4. CARACTERÍSTICAS TÉCNICAS .................................................................................................................................. 12
5. ACCESORIOS / REFACCIONES .................................................................................................................................. 12
1. EINFÜHRUNG ............................................................................................................................................................... 13
2. MONTAGE UND INSTALLATION .................................................................................................................................. 13
2.1 ANSCHLUSS AN DAS STROMNETZ ........................................................................................................................................................ 13
2.2 INBETRIEBNAHME ............................................................................................................................................................................ 13
2.3 INFORMATIONEN ZU DEN WERKSTOFFEN ............................................................................................................................................. 13
3. WARTUNG ..................................................................................................................................................................... 13
3.1 REINIGUNG .................................................................................................................................................................................... 13
4. TECHNISCHE MERKMALE ........................................................................................................................................... 14
5. ZUBEHÖR / ERSATZTEILE .......................................................................................................................................... 14
1. 简介 ................................................................................................................................................................................ 15
2. 装配和安装 ..................................................................................................................................................................... 15
2.1 电气连接 .................................................................................................................................................................................... 15
2.2 初创 ............................................................................................................................................................................................ 15
2.3 有关建筑材料的信息 ................................................................................................................................................................ 15
3. 保养 ................................................................................................................................................................................ 15
3.1 清洁 ............................................................................................................................................................................................ 15
4. 技术数据 ......................................................................................................................................................................... 16
5. 配件 / 备件 ...................................................................................................................................................................... 16
6. WIRING DIAGRAM / SCHEMA ELETTRICO / SCHÉMA ÉLECTRIQUE / ESQUEMA ELÉCTRICO / SCHALTPLAN / 接
线图 ................................................................................................................................................................................ 17
7. DECLARATION OF CONFORMITY / DICHIARAZIONE DI CONFORMITA / DECLARATION DE CONFORMITE /
DECLARACIÓN DE CONFORMIDAD / KONFORMITÄTSERKLÄRUNG / 符合性声明 ...................................... 18
8. DECLARATION OF CONFORMITY ........................................................................................................................ 19

5
1. Introduction
Mixing by spinning can be carried out quickly and safely by placing the tube containing the sample on the mixing cup head.
Mixing starts when the test-tube tube is placed on the mixing cup head.
The press-on fitting means that the mixing cup head can easily be replaced by A00000016.
2. Assembly and installation
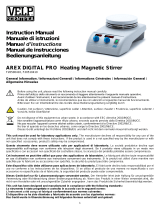
Check the integrity of the unit after unpacking. The box includes:
• RX3 Vortex Mixer with mixing cup head
• EU adapter plug • Power supply 100-240V/12V no plug
• Instruction manual
2.1 Electrical connections
After having unpacked the instrument, place the unit on the laboratory bench.
Before connecting the instrument to the power supply, make sure that the values on the rating plate correspond to those of
the power supply. Connect the unit to the power supply using the transformer supplied.
Ensure that the socket and the relative cut-off device conform to current safety norms and are easy to reach.
NOTE: in case of black-out, the device will not automatically restart after the break and reconnect the power supply.
2.2 Start-up
Check that the mixing cup head is correctly positioned. Use the on-off switch on the front of the unit to turn the unit on
(position “ON”). Mixing starts automatically when the tube is lightly pressed down on the mixing cup head.
2.3 Information about construction materials
Housing Zinc alloy/Polymer
Paint / Frontal control panel PET
Cup head SEBS
Feet PVC
Platform PP
Foamed part for platforms PE
3. Maintenance
No routine or extraordinary maintenance is necessary apart from periodically cleaning the unit as described in this manual.
In compliance with the product guarantee law, repairs to our units must be carried out in our factory, unless previously
agreed otherwise with local distributors. To replace the cup head, pull it upwards and off. The other push-fit accessories can
then be inserted. The instrument must be transported in its original packaging and any indications present on the original
packaging must be followed (e.g. palletized).
It is the responsibility of the user, to properly decontaminate the unit in case of hazardous substances remaining on the
surface or interior of the device. If in doubt about the compatibility of a cleaning or decontamination product, contact the
manufacturer or distributor.
3.1 Cleaning
Disconnect the unit from the power supply and use a cloth dampened with an non-inflammable non-aggressive detergent.
EN

6
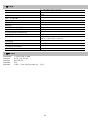
4. Technical data
Voltage
AC 100-240V (±10%); 50-60 Hz
Power input
12 VDC ; 13.4W
Current consumption
1.12A
Dimensions (WxHxD)
150x130x165 mm (5.9x5.1x6.5 in)
Weight
2.7 Kg (6.2 lb)
Speed range
3000 rpm
Spin diameter
4.5 mm (0.177 in)
Max. weight on the mixing cup head / accessories
0.5 kg (1.1 lb)
Operation mode
Touch
Level of electrical protection IEC/EN60529+A1
IP 42
Noise level
<< 80 dBa
Admitted temperature
Storage: -10…+60 °C (+14…+140 F°)
Working: 5°…+40 °C (+41...+104 °F)
Admitted humidity
Max. 80%
Overvoltage category
II
Pollution degree IEC/EN61010-1
2
Max. altitude
2000 m
5. Accessories / Spare parts
A00000016 Small rubber supporting plate Ø 50mm
10005195 Mixing cup head TX, ZX, RX
10005213 Knob 24D blue 10005880 Foot 28Dx5H antivibration
40001099 Switching VELP 100-240V/12V without plug

7
1. Introduzione
L’agitazione con movimento orbitale può essere effettuata in modo rapido e sicuro mediante l’appoggio della provetta
contenente il campione sull’apposita coppetta in materiale plastico. L’agitazione si avvia automaticamente alla pressione
della provetta sulla coppetta di agitazione. La coppetta di agitazione è facilmente intercambiabile mediante un innesto a
pressione polarizzato permettendo di alloggiare l’accessorio A00000016.
2. Montaggio ed installazione
Al ricevimento e dopo aver rimosso l’imballaggio controllare l’integrità dello strumento. La fornitura comprende:
• RX3 Vortex Mixer con coppetta
• Spina UE per alimentatore • Alimentatore 100-240V/12V senza spina
• Manuale di istruzioni
2.1 Collegamento alla rete elettrica
Dopo avere rimosso lo strumento dall’imballo, posizionarlo correttamente su un banco da laboratorio in modo che
l’alimentatore possa essere rimosso facilmente dalla presa di rete. Prima di collegare lo strumento alla rete di alimentazione
elettrica assicurarsi che l’interruttore generale sia in posizione “OFF” e verificare che i dati di targa dello strumento
corrispondano a quelli disponibili alla presa di energia elettrica. Collegare l'unità tramite il trasformatore in dotazione.
NOTA: in caso di black-out lo strumento non riparte automaticamente dopo l’interruzione e la riconnessione
all’alimentazione.
2.2 Avvio
Verificare che la coppetta in materiale plastico per l’alloggiamento della provetta sia inserita correttamente nell’apposita
sede. L’accensione dello strumento avviene mediante l’apposito interruttore generale (posizione “ON”). L’avvio
dell’agitazione si effettua automaticamente imprimendo una leggera pressione della provetta sulla coppetta di agitazione.
2.3 Informazioni sui materiali di costruzione
Scocca Zama/Polimero Piedini PVC
Verniciatura / Pannello comandi PET Piattaforma PP
Coppetta SEBS Espanso per piattaforme PE
3. Manutenzione
La manutenzione ordinaria e straordinaria non è prevista salvo la pulizia periodica dello strumento come descritto in questo
manuale. In conformità alla legge sulla garanzia dei prodotti, le riparazioni dei nostri strumenti devono essere eseguite
presso la nostra sede, salvo accordi diversi con i distributori locali. Il trasporto dello strumento tramite spedizionieri, corrieri o
altro, deve essere effettuato utilizzando l'imballo originale antiurto di cui lo strumento è dotato quando spedito da nuovo.
Seguire le istruzioni eventualmente riportate sullo stesso (es. pallettizzare).
È responsabilità dell'utente procedere alla decontaminazione dell'unità nel caso in cui sostanze pericolose rimangano sulla
superficie o all'interno del dispositivo. In caso di dubbi sulla compatibilità di un prodotto per la pulizia o la decontaminazione,
contattare il produttore o il distributore.
3.1 Pulizia
La pulizia dello strumento deve essere eseguita, dopo aver staccato l’alimentazione, con un panno inumidito con detergenti
non infiammabili e non aggressivi.
IT

8
4. Caratteristiche tecniche
Alimentazione
AC 100-240V (±10%); 50-60 Hz
Potenza assorbita
12 VDC ; 13.4W
Corrente assorbita
1.12A
Dimensioni (LxHxP)
150x130x165 mm
Peso
2.7 Kg
Ambito di regolazione velocità
3000 rpm
Diametro dell’orbita
4.5 mm
Peso max applicabile sulla coppetta / accessori
0.5 kg
Modalità di funzionamento
Touch
Grado di protezione elettrica IEC/EN60529+A1
IP 42
Rumorosità
<< 80 dBa
Temperatura ammessa
Stoccaggio: -10…+60 °C Ambiente: 5°…+40 °C
Umidità ammessa
Max. 80%
Categoria di sovratensione
II
Grado di inquinamento IEC/EN61010-1
2
Altitudine max
2000 m
5. Accessori / Parti di ricambio
A00000016 Piattaforma universale Ø 50mm
10005195 Coppetta di agitazione
10005213 Manopola 24D blu
10005880 Piedino 28Dx5H antivibrante
40001099 Alimentatore 100-240V/12V senza spina

9
1. Introduction
L’agitation par mouvement orbital peut être effectuée de façon sûre et rapide en plaçant l’éprouvette contenant l’échantillon
sur la coupelle en matériau plastique. L’agitation démarre automatiquement quand l’éprouvette exerce une pression sur la
coupelle d’agitation. La coupelle d’agitation est facilement interchangeable grâce à un enclenchement à pression.
2. Montage et installation
Lors de la réception et après avoir enlevé l’emballage, contrôler que l’instrument est intègre La fourniture comprend:
• RX3 Vortex Mixer avec coupelle
• Fiche UE pour alimentateur • Alimentateur 100-240V/12V sans fiche
• Manuel d’instructions
2.1 Raccordement au réseau électrique
Après avoir ôté l’instrument de son emballage, le positionner correctement sur un banc de laboratoire de façon à ce que
l’alimentateur puisse être enlevé facilement de la prise. Avant de brancher l’instrument au réseau d’alimentation électrique,
s’assurer que l’interrupteur général est sur la position “OFF” et vérifier que les données de la plaque de l’instrument
correspondent aux données disponibles à la prise d’alimentation. Branchez l'appareil à l'aide du transformateur fourni.
NB: en cas de panne de blackout, l'appareil ne redémarre pas automatiquement après la pause et reconnecter
l'alimentation.
2.2 Mise en marche
Vérifier que la coupelle en matériau plastique où on devra placer l’éprouvette est insérée correctement dans son logement.
On allume l’instrument moyennant son interrupteur général (position “ON”) placé sur le devant. Le démarrage de l’agitation
se fait automatiquement en exerçant une légère pression sur l’éprouvette sur la coupelle d’agitation.
2.3 Informations sur les matériaux de fabrication
Châssis Zama/Polymère
Peinture / Panneau commandes PET
Coupelle SEBS
Pieds PVC
Plateau PP
Polystyrène expansé pour plateaux PE
3. Entretien
Aucun entretien ordinaire ou extraordinaire n’est prévu excepté le nettoyage périodique de l’instrument comme décrit dans
le présent manuel. Conformément à la loi sur la garantie des produits, les réparations de nos instruments doivent être
effectuées dans nos ateliers, sauf accords différents avec les distributeurs locaux. L'instrument doit être transporté dans son
emballage d'origine et les indications présentes sur l'emballage d'origine doivent être suivies (par exemple palettisér).
Il est de la responsabilité de l'utilisateur de décontaminer correctement l'unité en cas de substances dangereuses restant
sur la surface ou à l'intérieur de l'appareil. En cas de doute sur la compatibilité d'un produit de nettoyage ou de
décontamination, contactez le fabricant ou le distributeur.
3.1 Nettoyage
Le nettoyage de l’instrument doit être effectué après avoir débranché l’appareil, à l’aide un chiffon légèrement imbibé de
détergent non inflammable et non agressif.
FR

10
4. Caractéristiques techniques
Alimentation
AC 100-240V (±10%); 50-60 Hz
Consommation d’ènergie
12 VDC ; 13.4W
Consommation de courant
1.12A
Dimensions (LxHxP)
150x130x165 mm
Poids
2.7 Kg
Ecart de réglage vitesse
3000 rpm
Diamètre de l’orbite
4.5 mm
Poids max applicable sur la coupelle / accessoires
0.5 kg
Modalité de fonctionnement
Touch
Degré de protection électrique IEC/EN60529+A1
IP 42
Niveau de bruit
<< 80 dBa
Température admise
Stockage: -10…+60 °C Milieu environnant: 5°…+40 °C
Humidité admise
Max. 80%
Catégorie de surtension
II
Degré de pollution IEC/EN61010-1
2
Altitude max
2000 m
5. Accessoires / Pièces de rechange
A00000016 Plateau universelle Ø 50mm
10005195 Coupelle TX, ZX, RX
10005213 Bouton 24D bleu 10005880 Pieds 28Dx5H
40001099 Alimentateur 100-240V/12V sans fiche

11
1. Introducción
La agitación con movimiento orbital puede llevarse a cabo rápidamente y con seguridad apoyando el tubo de ensayo que
contiene la muestra en el cabezal de material de plástico apropiado. La agitación se inicia automáticamente presionando el
tubo de ensayo en el cabezal de agitación. El cabezal de agitación es fácil de intercambiar a través de un encaje a presión
polarizado que permite acomodar diferentes el accesorio A00000016.
2. Montaje e instalación
Al recibir el producto, quitar el embalaje y comprobar la integridad del aparato. El suministro incluye:
• RX3 Vortex Mixer con cabezal
• Clavija UE para alimentador • Alimentador 100-240V/12V sin clavija
• Manual de instrucciones
2.1 Conexión a red eléctrica
Después de quitar el aparato del embalaje, hay que colocarlo correctamente sobre una mesa de laboratorio a una distancia
que permita desconectar fácilmente el alimentador de la toma de corriente. Antes de conectar el aparato a la red eléctrica
hay que asegurarse de que el interruptor general esté en posición "OFF" y comprobar que los datos de placa del aparato se
correspondan con los disponibles en la toma de energía eléctrica. Conectar la unidad con el transformador incluido.
NOTA: en caso de blackout, el dispositivo no se reiniciará automáticamente después de la pausa y volver a conectar la
fuente de alimentación.
2.2 Encendido
Comprobar que el cabezal de material plástico para el alojamiento del tubo de ensayo esté colocado correctamente en la
sede apropiada. El encendido del aparato se produce a través del interruptor general (posición “ON”) en la parte frontal. El
inicio de la agitación se produce automáticamente con una ligera presión del tubo de ensayo en el cabezal de agitación.
2.3 Información sobre los materiales de fabricación
Chasis Zamak/Polímetro
Pintura / Panel frontal mandos PET
Cabezal SEBS
Pies PVC
Plataforma PP
Expandido para plataformas PE
3. Mantenimiento
El mantenimiento ordinario y extraordinario no está previsto excepto para la limpieza periódica del aparato como se
describe en este manual. De acuerdo con la ley de garantía del producto, las reparaciones de nuestros aparatos se deben
llevar a cabo en nuestras instalaciones, a menos que se acuerde otra cosa con los distribuidores locales.
El equipo debe transportarse sólo en su embalaje original y todas las indicaciones presentes en el embalaje original debe
seguirse (por ejemplo, paletizado).
Es responsabilidad del usuario descontaminar la unidad en el caso de que haya restos de sustancias peligrosas tanto en la
superficie como en el interior del equipo. En caso de duda sobre la compatibilidad de los productos a usar para limpieza y/o
descontaminacion, contacte con su distribuidor o con fabricante.
3.1 Limpieza
La limpieza del aparato debe llevarse a cabo, después de desconectar la alimentación, con un paño húmedo con
detergentes no inflamables y no agresivos.
ES

12
4. Características técnicas
Fuente de alimentaciòn
AC 100-240V (±10%); 50-60 Hz
Entrada de alimentaciòn
12 VDC ; 13.4W
Consumo de corriente
1.12A
Dimensiones (LxHxP)
150x130x165 mm
Peso
2.7 Kg
Ámbito de ajuste velocidad
3000 rpm
Diámetro de la órbita
4.5 mm
Peso máx aplicable en el cabezal / accesorios
0.5 kg
Modo de funcionamiento
Touch
Grado de protección eléctrica IEC/EN60529+A1
IP 42
Nivel de ruido
<< 80 dBa
Temperatura admitida
Almacenamiento: -10…+60 °C Ambiente: 5°…+40 °C
Humedad admitida
Máx. 80%
Categoría de sobretensión
II
Grado de contaminación IEC/EN61010-1
2
Altitud máx
2000 m
5. Accesorios / Refacciones
A00000016 Plataforma universal Ø 50mm
10005195 Cabezal TX, ZX, RX
10005213 Pomo 24D 10005880 Pie 28Dx5H
40001099 Alimentador 100-240V/12V sin clavija

13
1. Einführung
Zum schnellen und sicheren Mischen/Schütteln durch kreisförmige Bewegung setzen Sie einfach das Reagenzglas mit der
Probe auf den Kunststoffteller. Der Mischvorgang startet automatisch beim Herunterdrücken des Schütteltellers mit dem
Reagenzglas.
2. Montage und Installation
Bitte überprüfen Sie nach dem Auspacken den einwandfreien Zustand des Gerätes. Im Lieferumfang sind enthalten:
• RX3 Vortex Mixer mit Schüttelteller
• EU-Stecker für Netzteil • Netzteil 100-240V/12V ohne Stecker
• Bedienungsanleitung
2.1 Anschluss an das Stromnetz
Stellen Sie das Gerät nach dem Entfernen der Verpackung auf die Laborbank.
Prüfen Sie vor Inbetriebnahme des Gerätes, dass Stromnetz und Frequenz den Angaben des Herstellers entsprechen und
der Netzschalter auf „OFF” steht. Dann schließen Sie das Gerät mit dem mitgelieferten Netzteil an das Stromnetz an.
Schließen Sie das Gerät mit dem Transformator geliefert.
HINWEIS: im Falle einer Ohnmacht, wird das Gerät nicht automatisch starten nach der Pause und schließen Sie das
Netzteil.
2.2 Inbetriebnahme
Überprüfen Sie, dass der Kunststoffteller zur Aufnahme des Reagenzglases korrekt aufgesetzt ist.
Schalten Sie das Gerät am Netzschalter (Position „ON”) auf der Vorderseite ein.
Im Touch-Betrieb startet der Mischvorgang durch leichtes Herunterdrücken des Schütteltellers mit dem Reagenzglas.
2.3 Informationen zu den Werkstoffen
Gehäuse Zamak/Polymer
Lackierung PET
Vorderes Bedienpanel PET
Schüttelteller SEBS
Füße PVC
Aufsatz PP
Schaumstoff für Aufsätze PE
3. Wartung
Abgesehen von einer regelmäßigen Reinigung gemäß der nachfolgenden Hinweise benötigt das Gerät keine gewöhnliche
oder außergewöhnliche Wartung. In Übereinstimmung mit dem Produkthaftungsgesetz müssen Reparatureingriffe an den
Geräten in unserem Hause durchgeführt werden, soweit keine anderweitigen Vereinbarungen mit den örtlichen Händlern
getroffen werden. Das Gerät muss in der Originalverpackung transportiert werden.
Es liegt in der Verantwortung des Benutzers, das Gerät ordnungsgemäß zu dekontaminieren, falls gefährliche Substanzen
auf der Oberfläche oder im Inneren des Geräts verbleiben. Wenn Sie Zweifel an der Verträglichkeit eines Reinigungs- oder
Dekontaminationsprodukts haben, wenden Sie sich an den Hersteller oder Händler.
3.1 Reinigung
Trennen Sie das Gerät zur Reinigung vom Stromnetz und verwenden Sie ein weiches Tuch mit einem sanften, nicht
entzündlichen Reiniger.
DE

14
4. Technische merkmale
Stromversorgung
AC 100-240V (±10%); 50-60 Hz
Eingangsleistung
12 VDC ; 13.4W
Stromaufnahme
1.12A
Außenmaße (BxHxT)
150x130x165 mm
Gewicht
2,7 kg
Geschwindigkeitsbereich
3000 rpm
Orbitaldurchmesser
4,5 mm
Max. Gewicht auf Schüttelteller / Accessoires
0,5 kg
Betriebsarten
Impulsaktivierung
Elektrischer Schutzgrad IEC/EN60529+A1
IP 42
Geräuschpegel
<< 80 dBa
Zulässige Temperatur
Aufbewahrung: -10…+60 °C Betrieb: 5°…+40 °C
Zulässige Feuchtigkeit
Max. 80%
Überspannungskategorie
II
Verschmutzungsgrad IEC/EN61010-1
2
Max. Betriebshöhe
2000 m
5. Zubehör / Ersatzteile
A00000016 Standardaufsatz Ø 50mm
10005195 Schüttelteller TX, ZX, RX
10005213 Drehknopf 24D 10005880 Fuß 28Dx5H
40001099 Netzteil 100-240V/12V ohne Stecker

15
1. 简介
将装样品的试管放在特制的塑料搅拌杯头上,可快速、安全地进行旋转搅拌
当试管放在混合杯头时,混合开始。
插拔安装意味着混合杯头可以很容易地被 A00000016 更换.
2. 装配和安装
拆包后检查主机的完整性。包括:
• 带搅拌杯头的 RX3 旋涡混合器
• 转换插头
• 电源 100-240V/12V,无插头
• 使用说明书
2.1 电气连接
拆开仪器后,将装置放在实验室的长凳上。
在将仪器连接到电源之前,请确保额定板上的值与电源值相对应。使用所提供的变压器将设备连接到电源。
确保插座和相对切断装置符合当前安全规范,并且易于到达。
注意: 在停电的情况下,设备在中断后不会自动重新启动并重新连接电源。
2.2 初创
检查混合杯头的位置是否正确。使用主机正面的开关打开单元(位置"打开")。当管子轻轻压在混合杯头上时,混合会自动开
始。
2.3 材料的信息
材质 锌合金/聚合物
油漆/正面控制面板 PET
杯头 SEBS
脚垫 PVC
平台 PP
平台的泡沫部分 PE
3. 保养
除了定期清洁本手册中描述的装置外,无需进行常规或特殊维护。
根据产品保证法,除非事先与当地经销商达成其他协议,否则我们工厂必须进行维修。要更换杯头,将其向上和向上拉开。
然后可以插入其他推合配件。 仪器必须以原始包装运输,并且必须遵循原始包装上的任何指示(例如托盘化)。
用户有责任在设备表面或内部残留有害物质的情况下,对装置进行适当净化。如对清洁或净化产品的兼容性有疑问,请联系
制造商或分销商。
3.1 清洁
将装置与电源断开,并使用用不可燃非腐蚀性洗涤剂的布。
中文

16
4. 技术数据
电压
AC 100-240V (±10%); 50-60 Hz
电源输入
12 VDC ; 13.4W
电流消耗
1.12A
尺寸(宽x高x深
150x130x165 mm (5.9x5.1x6.5 in)
重量
2.7 公斤(6.2 磅)
速度范围
3000 转
旋转直径
4.5 mm (0.177 in)
搅拌杯头/附件的最大重量
0.5 kg (1.1 磅)
操作模式
触摸
电气保护等级 IEC/EN60529+A1
IP 42
噪声水平
<< 80 dBa
允许的温度
存储: -10…+60 °C (+14…+140 F°)
工作: 5°…+40 °C (+41...+104 °F)
允许的湿度
最大。80%
过电压类别
II
污染程度 IEC/EN61010-1
2
最大海拔高度
2000 m
5. 配件 / 备件
A00000016 小型橡胶支撑板 φ 50mm
10005195 混合杯头 TX, ZX, RX
10005213 旋钮 24D 蓝色
10005880 脚垫
40001099 电源线,可切换 VELP 100-240V/12V,无插头

17
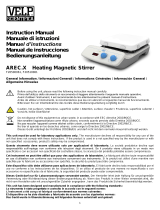
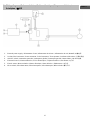
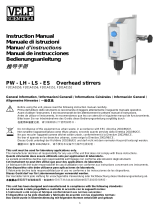
6. Wiring diagram / Schema elettrico / Schéma électrique / Esquema eléctrico /
Schaltplan / 接线图
1. External power supply / Alimentatore di rete / Alimentateur de réseau / Alimentador de red / Netzteil / 外部电源
2. Socket of the instrument / Presa strumento / Prise instrument / Toma aparato / Geräteanschlussdose / 仪器的插座
3. ON-OFF switch / Interruttore generale / Interrupteur général / Interruptor general / Netzschalter / ON-OFF 开关
4. Electronic board / Scheda elettronica / Fiche électronique / Tarjeta electrónica / Steckkarte / 电子板
5. Electric motor / Motore elettrico / Moteur électrique / Motor eléctrico / Elektromotor / 电动机
6. Micro-switch / Microinterruttore / Microinterrupteur / Microinterruptor / Mikroschalte / 微动开关
MULTI

18
7. Declaration of conformity / Dichiarazione di conformità / Déclaration de conformité /
Declaración de conformidad / Konformitätserklärung / 符合性声明
We, the manufacturer VELP Scientifica, under our responsibility declare that the product is manufactured in conformity with
the following standards:
Noi, casa costruttrice VELP SCIENTIFICA, dichiariamo sotto la ns. responsabilità che il prodotto è conforme alle seguenti
norme:
Nous, VELP Scientifica, déclarons sous notre responsabilité que le produit est conforme aux normes suivantes:
Nosotros casa fabricante, VELP Scientifica, declaramos bajo nuestra responsabilidad que el producto es conforme con las
siguientes normas:
Der Hersteller, VELP Scientifica, erklärt unter eigener Verantwortung, dass das Gerät mit folgenden Normen übereinstimmt:
我们,制造商 VELP Scientifica,根据我们的责任声明,该产品的生产符合以下标准。
EN 61010-1 EN61010-2-051 EN 61326-1
and satisfies the essential requirements of the following directives:
e soddisfa i requisiti essenziali delle direttive:
et qu’il satisfait les exigences essentielles des directives:
y cumple con los requisitos esenciales de las directivas:
und den Anforderungen folgender Richtlinien entspricht:
并满足以下指令的基本要求。
2006/42/EC
2014/30/EU
2015/863/EU (RoHS III)
2012/19/EU (WEEE)
plus modifications / più modifiche / plus modifications / más sucesivas modificaciones / in der jeweils gültigen Fassung / 加
上变化

19
8. Declaration of conformity
We, the manufacturer VELP Scientifica, under our responsibility declare that the product is manufactured in conformity with
the following regulations:
S.I. 2016/1101
Electrical Equipment (Safety) Regulations 2016
S.I. 2016/1091
Electromagnetic Compatibility Regulations 2016
according to the relevant designated standards:
EN 61010-1
Safety requirements for electrical equipment for measurement, control, and laboratory use
Part 1: General requirements
EN 61010-2-051
Particular requirements for laboratory equipment for mixing and stirring
EN 61326-1
Electrical equipment for measurement, control and laboratory use - EMC requirements -
Part 1: General requirements
and satisfies the essential requirements of regulations:
S.I. 2008/1597
Supply of Machinery (Safety) Regulations 2008
S.I. 2012/3032
Restriction of the Use of Certain Hazardous Substances in Electrical and Electronic
Equipment Regulations 2012
S.I. 2013/3113
Waste Electrical and Electronic Equipment Regulations 2013
plus modifications.

20
Thank you for having chosen VELP!
Established in 1983, VELP is today one of the world’s
leading manufacturer of analytical instruments and
laboratory equipment that has made an impact on the
world-wide market with Italian products renowned for
innovation, design and premium connectivity. VELP
works according to ISO 9001, ISO14001 and OHSAS
18001 Quality System Certification.
Our instruments are manufactured in Italy according
to the IEC 1010-1 and CE regulation.
Our product lines:
Grazie per aver scelto VELP!
Fondata nel 1983, VELP è oggi tra i leader mondiali nella
produzione di strumenti analitici e apparecchiature da
laboratorio grazie ai suoi prodotti italiani rinomati per
innovazione, design e connettività.
VELP opera secondo le norme della Certificazione del
Sistema Qualità ISO 9001, ISO14001 e OHSAS 18001.
Tutti i nostri strumenti vengono costruiti in Italia in
conformità alle norme internazionali IEC 1010-1 e alle
regole della marcatura CE.
Le nostre Linee di prodotti:
Analytical instruments
Elemental Analyzers
Digestion Units
Distillation Units
Solvent Extractors
Fiber Analyzers
Dietary Fiber Analyzers
Oxidation Stability Reactor
Consumables
Analytical Instruments
Analizzatori Elementari
Digestori e Mineralizzatori
Distillatori
Estrattori a Solventi
Estrattori di Fibra
Estrattori di Fibra Dietetica
Reattore di Ossidazione
Consumabili
Laboratory Equipment
Magnetic Stirrers
Heating Magnetic Stirrers
Heating Plates
Overhead stirrers
Vortex mixers
Homogenizers
COD Thermoreactors
BOD and Respirometers
Cooled Incubators
Flocculators
Overhead Shakers
Turbidimeter
Radiation Detector
Open Circulating Baths
Pumps
Laboratory Equipment
Agitatori Magnetici
Agitatori Magnetici Riscaldanti
Piastre Riscaldanti
Agitatori ad Asta
Agitatori Vortex
Omogeneizzatori
Termoreattori COD
BOD e Analizzatori Respirometrici
Frigotermostati e Incubatori
Flocculatori
Mescolatore Rotativo
Torbidimetro
Rilevatore di Radiazioni
Bagni Termostatici
Pompe
www.velp.com
VELP Scientifica Srl
20865 Usmate (MB) ITALY
Via Stazione, 16
Tel. +39 039 62 88 11
Fax. +39 039 62 88 120
Distributed by:
We respect the environment by printing our manuals on recycled paper.
Rispettiamo l’ambiente stampando i nostri manuali su carta riciclata.
10005585/B1
-
 1
1
-
 2
2
-
 3
3
-
 4
4
-
 5
5
-
 6
6
-
 7
7
-
 8
8
-
 9
9
-
 10
10
-
 11
11
-
 12
12
-
 13
13
-
 14
14
-
 15
15
-
 16
16
-
 17
17
-
 18
18
-
 19
19
-
 20
20


Velp Scientifica RX3 Manuel utilisateur
- Catégorie
- Pistolets à chaleur
- Taper
- Manuel utilisateur
dans d''autres langues
- italiano: Velp Scientifica RX3 Manuale utente
- English: Velp Scientifica RX3 User manual
- español: Velp Scientifica RX3 Manual de usuario
- Deutsch: Velp Scientifica RX3 Benutzerhandbuch
Documents connexes
-
 Velp Scientifica Vortex Wizard Manuel utilisateur
-
 Velp Scientifica ZX4 Manuel utilisateur
-
 Velp Scientifica Vortex Classic Manuel utilisateur
-
VELP Scientific VLP-SA20500425 Le manuel du propriétaire
-
 Velp Scientifica JPV Manuel utilisateur
-
 Velp Scientifica PW-LH-LS-ES Manuel utilisateur
-
 Velp Scientifica AMI4 Manuel utilisateur