D-Link D-Link DIR-819 Wireless AC750 Dual Band Router Guide d'installation
- Catégorie
- Les routeurs
- Taper
- Guide d'installation
Ce manuel convient également à

Wireless AC750 Dual Band Router
with High-Gain Antennas
Quick Install Guide
DIR-819

2
If any of the above items are missing, please contact your reseller.
DIR-819 AC750 Dual Band Router with High-Gain Antennas
Power Adapter
Ethernet Cable
Wi-Fi Conguration Card
Quick Install Guide
Network Requirements:
Web-based Conguration Requirements
Package Contents
Minimum Requirements
• An Ethernet-based broadband modem
• Computer, smartphone or tablet with a Web browser*
* We recommend using the latest available browser version for the best performance.

3
Hardware Overview
1Power LED A solid green light indicates a proper connection to the power supply.
22.4G LED A solid green light indicates the 2.4GHz wireless function is working
properly. This light will blink during data transmission.
35G LED A solid green light indicates the 5GHz wireless function is working properly.
This light will blink during data transmission.
4Internet LED A solid green light indicates a connection to the Internet port.
5WPS LED A solid green light indicates a successful connection using WPS. The light
will blink during the WPS process.
6Reset Button Press and hold the reset button with a paper clip for 10 seconds to reset the
router to the factory default settings.
7Power Button Press to power the router on and o.
8Power Port Connect the supplied power adapter.
9WPS Button
Press for 2 seconds to start the WPS process. The WPS LED will blink during
the process. The light will turn solid green when successfully connecting
to a device.
10 Internet Port Connect a broadband modem to this port using an Ethernet cable.
11 LAN Ports (1-4) Connect Ethernet devices such as computers, switches, and game consoles.
1 432 5
67 8 9 10 11

4
• Users with DSL providers - If you are using a PPPoE connection, you will need
your PPPoE user name and password. If you do not have this information, contact
your Internet provider. Do not proceed until you have this information.
• Users with Cable providers - Make sure you unplug the power to your modem.
In some cases, you may need to turn it o for up to 5 minutes.
• Advanced Users - If your Internet Service Provider (ISP) provided you with a
modem/router combo, you will need to set it to “bridge” mode so the DIR-819
router can work properly. Please contact your ISP or refer to the user manual for
your modem/router device.
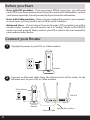
Before you Start
1Unplug the power to your DSL or Cable modem.
2Connect an Ethernet cable from the Internet port of the router to the
Ethernet port on your DSL or Cable modem.
Modem
Connect your Router
INTERNET
POWER POWER PORT WPS
4321
RESET
Ethernet Port
Modem
Ethernet Cable
DIR-819
Internet Port (yellow)

5
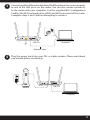
3Connect another Ethernet cable from the Ethernet port on your computer
to one of the LAN ports on the router. You can also connect wirelessly
to the router with your computer. Use the supplied Wi-Fi Conguration
Card for the Wi-Fi network name (SSID) and Wi-Fi password of the router.
Complete steps 4 and 5 before attempting to connect.
4Plug the power back into your DSL or cable modem. Please wait about
one minute before continuing.
INTERNET
POWER POWER PORT WPS
4321
RESET
INTERNET
POWER POWER PORT WPS
4321
RESET
Computer
Computer
Modem
Ethernet Cable
DIR-819
DIR-819

6
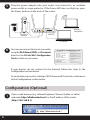
5Plug the power adapter into your router and connect to an available
power outlet or surge protector. If the Power LED does not light up, press
the Power button on the back of the router.
6
If your devices do not connect to the Internet, follow the steps in the
Conguration section below.
To customize your router’s settings (Wi-Fi Name and Password), continue on
to the Conguration section below
Open a web browser (e.g., Internet Explorer, Chrome, Firefox, or Safari)
and enter http://dlinkrouter.local./ or the IP address of the router
(http://192.168.0.1).
1
INTERNET
POWER POWER PORT WPS
4321
RESET
Computer
Modem DIR-819
Conguration (Optional)
1 2 3 4 INTERNET 12V --1.5A POWER WPS
Wireless
Computer*
D-Link Wi-Fi Conguration Card
Default Conguration
To congure your router, go to:
http://dlinkrouter.local.
Or http://192.168.0.1
Username: “Admin”
Password: “ “(leave the eld blank)
Wi-Fi Name(SSID) 2.4GHz:
dlink-XXXX
Wi-Fi Name (SSID) 5GHz:
dlink-XXXX-5GHz
Password: 0123456789
Wi-Fi Name(SSID) 2.4GHz
Wi-Fi Password:
Wi-Fi Name(SSID) 5GHz*:
Wi-Fi Password:
Your conguration
Username: ”Admin”
Password:
*For application models
DCCAROWIFI0010
You can now connect devices to your router
using the Wi-Fi Name (SSID) and Password
found on the D-Link Wi-Fi Conguration
Card or sticker on your router.

7
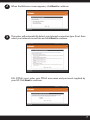
When the Welcome screen appears, click Next to continue.
2
The router will automatically detect your Internet connection type. If not, then
select your Internet connection and click Next to continue.
3
DSL (PPPoE) users enter your PPPoE user name and password supplied by
your ISP. Click Next to continue.

8
5
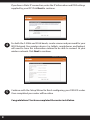
For both the 2.4GHz and 5GHz bands, create a name and password for your
Wi-Fi Network. Your wireless devices (i.e., tablets, smartphones, and laptops)
will need to have this information entered to be able to connect to your
wireless network. Click Next to continue.
Continue with the Setup Wizard to nish conguring your DIR-819 router.
Once completed your router will be online.
Congratulations! You have completed the router installation.
4
If you have a Static IP connection, enter the IP information and DNS settings
supplied by your ISP. Click Next to continue.

9
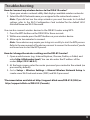
How do I connect my wireless devices to the DIR-819 router?
1. Open your wireless network utility that displays available wireless networks.
2. Select the Wi-Fi Network name you assigned in the wizard and connect.
Note: If you did not run the setup wizard or you reset the router to its default
settings, refer to the Wi-Fi Conguration Card included for the default Wi-Fi
Network Name and Wi-Fi Password.
You can also connect wireless devices to the DIR-819 router using WPS:
1. Press the WPS button on the DIR-819 for three seconds.
2. Within one minute press the WPS button on your wireless device.
3. Allow up to two minutes to connect.
Note: Some devices may require you to log in to a utility to start the WPS process.
Refer to the user manual of the device you want to connect to the router if you do
not know how to start the WPS process.
How do I change the wireless settings on the DIR-819 router?
1. Open a web browser (e.g., Internet Explorer, Chrome, Firefox, or Safari) and
enter http://dlinkrouter.local./ You can also enter the IP address of the
router (http://192.168.0.1).
2. At the login screen, enter the router password you created in the wizard (no
password by default).
3. Go to Setup > Wireless Settings > Manual Wireless Network Setup to
create a new Wi-Fi network name (SSID) and Wi-Fi password.
*Documentation available at http://support.dlink.com/DIR-819 (USA) or
http://support.dlink.ca/DIR-819 (Canada)
Troubleshooting

10
GPL Code Statement
This D-Link product includes software code developed by third parties, including
software code subject to the GNU General Public License (“GPL”) or GNU Lesser
General Public License (“LGPL”). As applicable, the terms of the GPL and LGPL,
and information on obtaining access to the GPL code and LGPL code used in this
product, are available to you at:
http://tsd.dlink.com.tw/GPL.asp
The GPL code and LGPL code used in this product is distributed WITHOUT ANY
WARRANTY and is subject to the copyrights of one or more authors. For details,
see the GPL code and the LGPL code for this product and the terms of the GPL and
LGPL.
Written Oer for GPL and LGPL Source Code
Where such specic license terms entitle you to the source code of such software,
D-Link will provide upon written request via email and/or traditional paper mail
the applicable GPL and LGPLsource code les via CD-ROM for a nominal cost to
cover shipping and media charges as allowed under the GPL and LGPL.
Please direct all inquiries to:
Email:
Snail Mail:
Attn: GPLSOURCE REQUEST
D-Link Systems, Inc.
14420 Myford Road, Suite 100
Irvine, CA 92606
GNU GENERAL PUBLIC LICENSE
Version 3, 29 June 2007
Copyright (C) 2007 Free Software Foundation, Inc. <http://fsf.org/>
View the full GPL Code Statement at http://www.gnu.org/licenses/gpl.html

11
Notes

12
©2021 D-Link Corporation/D-Link Systems, Inc. All rights reserved. D-Link and the D-Link logo are registered trademarks of D-Link
Corporation or its subsidiaries in the United States and other countries. iPhone, iPad, and iPod touch are registered trademarks of Apple
Inc. Android is a trademark of Google, Inc. Other trademarks are the property of their respective owners. Maximum wireless signal rate
derived from IEEE Standard 802.11ac, 802.11g, and 802.11n specications. Actual data throughput will vary. Network conditions and
environmental factors, including volume of network trac, building materials and construction, and network overhead, lower actual
data throughput rate. Environmental factors will adversely aect wireless signal range. Product specications, size and shape are subject
to change without notice, and actual product appearance may dier from that depicted on the packaging.
Visit www.dlink.com for more details.
Having trouble installing your new product? D-Link’s website contains the latest
user documentation and software updates for D-Link products. U.S. and Canadian
customers can contact D-Link Technical Support through our website.
United States
Internet: http://support.dlink.com
Canada
Internet: http://support.dlink.ca
Technical Support
Version 1.01(CA)_128x188
September 13, 2021
610000011633

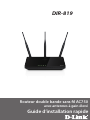
Routeur double bande sans l AC750
avec antennes à gain élevé
Guide d’installation rapide
DIR-819

2
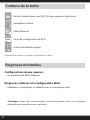
Contactez votre revendeur s’il manque l’un des éléments ci-dessus.
Routeur double bande sans l AC750 avec antennes à gain élevé
Adaptateur secteur
Câble Ethernet
Carte de conguration du Wi-Fi
Guide d’installation rapide
Contenu de la boîte
Conguration réseau requise:
Exigences relatives à la conguration Web:
• Ordinateur, smartphone ou tablette avec un navigateur web*
Exigences minimales
• Un modem haut débit Ethernet
*Remarque : Nous vous recommandons d’utiliser la dernière version du navigateur
disponible pour des performances optimales.

3
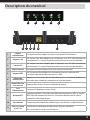
Description du matériel
1 432 5
67 8 9 10 11
1
Voyant
d’alimentation Un voyant vert xe indique une bonne connexion à l’alimentation
.
2Voyant 2.4G Un voyant vert xe indique que la fonction sans l 2.4GHz fonctionne
correctement. Ce voyant clignote pendant la transmission des données.
3Voyant 5G Un voyant vert xe indique que la fonction sans l 5GHz fonctionne
correctement. Ce voyant clignote pendant la transmission des données.
4
Voyant Internet Un voyant vert xe indique que le port Internet est connecté
.
5Voyant WPS Un voyant vert xe indique une connexion réussie en utilisant WPS.
Le voyant clignote pendant le processus WPS.
6
Bouton de
réinitialisation
Appuyez sur le bouton de réinitialisation avec un trombone pendant 10
secondes pour rétablir les paramètres d’usine du routeur.
7
Bouton de mise
sous tension Appuyez dessus pour allumer ou éteindre le routeur
.
8
Port
d’alimentation
Connectez l’adaptateur secteur fourni
.
9
Bouton WPS
Appuyez pendant 2 secondes pour démarrer le processus WPS. Le voyant
WPS clignote pendant le processus. La lumière devient vert lors de la
connexion à un périphérique.
10
Port Internet Connectez votre modem haut débit à ce port en utilisant un câble Ethernet
.
11
Ports du réseau
local (1-4)
Connectez des périphériques Ethernet tels que des ordinateurs,
des commutateurs et des consoles de jeu.

4
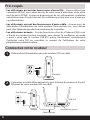
2Connectez un câble Ethernet entre le port Internet du routeur et le port
Ethernet de votre modem DSL ou câble.
Modem
INTERNET
POWER POWER PORT WPS
4321
RESET
Port Ethernet
Modem
Câble Ethernet
DIR-819
Port Internet (jaune)
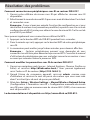
• Les utilisateurs qui ont des fournisseurs d’accès DSL - Si vous utilisez une
connexion PPPoE, vous aurez besoin de votre nom d’utilisateur et de votre
mot de passe PPPoE. Si vous ne disposez pas de ces informations, contactez
votre fournisseur d’accès Internet. Ne continuez pas tant que vous n’avez pas
ces informations.
• Les utilisateurs qui ont des fournisseurs d’accès câblé - Assurez-vous de
débrancher l’alimentation de votre modem. Dans certains cas, vous devrez
peut-être l’éteindre pendant un maximum de 5 minutes.
• Les utilisateurs avancés - Si votre fournisseur d’accès à l’internet (FAI) vous
a fourni un modem/routeur combiné, vous devrez le congurer en mode
« pont » pour que le routeur DIR-819 puisse fonctionner correctement.
Contactez votre FAI ou consultez le manuel de l’utilisateur de votre
périphérique modem/routeur.
Pré-requis
Connectez votre routeur
1Débranchez l'alimentation de votre modem DSL ou câble.

5
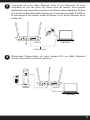
3
Connectez un autre câble Ethernet entre le port Ethernet de votre
ordinateur et l’un des ports du réseau local du routeur. Vous pouvez
également vous connecter au routeur sans l avec votre ordinateur. Utilisez
la carte de conguration Wi-Fi fourni pour le nom du réseau Wi-Fi (SSID) et
le mot de passe du routeur. Suivez les étapes 4 et 5 avant d’essayer de se
connecter.
4Rebranchez l’alimentation de votre modem DSL ou câble. Patientez
environ une minute avant de continuer.
INTERNET
POWER POWER PORT WPS
4321
RESET
INTERNET
POWER POWER PORT WPS
4321
RESET
Ordinateur
Ordinateur
Modem
Câble Ethernet
DIR-819
DIR-819

6
5Branchez l’adaptateur secteur à votre routeur, puis à une prise de courant
ou un parasurtenseur disponible. Si le voyant d’alimentation ne s’allume
pas, appuyez sur le bouton d’alimentation à l’arrière du routeur.
6
Si vos appareils ne se connectent pas à Internet, suivez les étapes de la
section de conguration ci-dessous.
Pour personnaliser les paramètres de votre routeur (nom Wi-Fi et mot de
passe), passez à la section Conguration ci-dessous.
INTERNET
POWER POWER PORT WPS
4321
RESET
Ordinateur
Modem
DIR-819
1 2 3 4 INTERNET 12V --1.5A POWER WPS
Ordinateur
sans l*
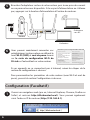
Ouvrez un navigateur web (par ex., Internet Explorer, Chrome, Firefox ou
Safari) et saisissez http://dlinkrouter.local./. Vous pouvez également
saisir l’adresse IP du routeur (http://192.168.0.1).
1
Conguration (Facultatif)
Vous pouvez maintenant connecter vos
périphériques à votre routeur en utilisant le
nom Wi-Fi (SSID) et mot de passe trouvé
sur la carte de conguration Wi-Fi de
D-Link ou l’autocollant sur votre routeur.
Informations pour la conguration Wi-Fi de D-Link
Conguration par défaut
Pour congurer votre routeur, allez à:
http://dlinkrouter.local.
Ou http://192.168.0.1
Nom d ’utilisateur: “Admin”
Mot de passe: “ “(laissez le champ vide)
Nom Wi-Fi Name(SSID) 2.4GHz:
dlink-XXXX
Nom Wi-Fi Name (SSID) 5GHz:
dlink-XXXX-5GHz
Mot de passe: 0123456789
Nom Wi-Fi (SSID) 2.4GHz
Mot de passe Wi-Fi:
Nom Wi-Fi (SSID) 5GHz*:
Mot de passe Wi-Fi:
Votre conguration
Nom d’utilisateur: ”Admin”
Mot de passe:
*Pour les modèles applicables
DCCAROWIFI0010

7
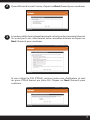
2
3
Quand l’écran d’accueil s’ouvre, cliquez sur Next (Suivant) pour continuer.
Le routeur détectera automatiquement votre type de connexion Internet.
Si ce n’est pas le cas, sélectionnez votre connexion Internet et cliquez sur
Next (Suivant) pour continuer.
Si vous utilisez le DSL (PPPoE), saisissez votre nom d’utilisateur et mot
de passe PPPoE fournis par votre FAI. Cliquez sur Next (Suivant) pour
continuer.

8
5
Pour les deux bandes 2,4 GHz et 5 GHz, créer un nom et mot de passe
pour votre réseau Wi-Fi. Vous devrez saisir ces informations sur vos
appareils sans l (par exemple, vos tablettes, téléphones intelligents et
ordinateurs portables) pour pouvoir vous connecter à votre réseau sans
l. Cliquez sur Next (Suivant) pour continuer.
Continuez l’assistant de conguration pour terminer la conguration de
votre routeur DIR-819. Une fois terminé votre routeur sera en ligne.
Félicitations! Vous avez terminé l’installation du routeur.
4
Si vous avez une connexion IP statique, saisissez les paramètres de
l’information et DNS IP fournies par votre FAI. Cliquez sur Next (Suivant)
pour continuer.
La page est en cours de chargement...
La page est en cours de chargement...
La page est en cours de chargement...
La page est en cours de chargement...
-
 1
1
-
 2
2
-
 3
3
-
 4
4
-
 5
5
-
 6
6
-
 7
7
-
 8
8
-
 9
9
-
 10
10
-
 11
11
-
 12
12
-
 13
13
-
 14
14
-
 15
15
-
 16
16
-
 17
17
-
 18
18
-
 19
19
-
 20
20
-
 21
21
-
 22
22
-
 23
23
-
 24
24


D-Link D-Link DIR-819 Wireless AC750 Dual Band Router Guide d'installation
- Catégorie
- Les routeurs
- Taper
- Guide d'installation
- Ce manuel convient également à
dans d''autres langues
Documents connexes
-
D-Link D-Link R32 AX3200 Smart Router Mode d'emploi
-
-
D-Link DIR-810 L Le manuel du propriétaire
-
D-Link DIR-818LW Quick Installation Manual
-
-
-
D-Link DIR-645 Le manuel du propriétaire