eufy Security SoloCam L20 Mode d'emploi
- Catégorie
- Éclairage de confort
- Taper
- Mode d'emploi

Anker Innovations Limited. All rights reserved. eufy Security and eufy Security Logo are
trademarks of Anker Innovations Limited, registered in the United States and other
countries. All other trademarks are the property of their respective owners.
51005002791 V03
QUICK
START GUIDE
SoloCam L20 / L40

EN 01
TABLE OF
CONTENTS
PRODUCT OVERVIEW 02
CHARGING SOLOCAM 03
SETTING UP SOLOCAM 04
05 MOUNTING SOLOCAM
08 NOTICE
English 01
Deutsch 11
Español 21
Français 31
Italiano 41
Nederlands 51
Português 61
71

02 EN EN 03
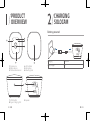
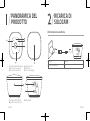
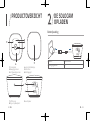
PRODUCT
OVERVIEW
1
2
35
4
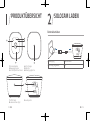
1. Camera Lens 4. LED Indicator
2. Motion Sensor 5. Microphone
3. Photosensitive Sensor 6. Mounting Hole
7. SYNC Button 9. Speaker
8. Type-C Charging Port
6
7
8
9
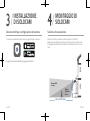
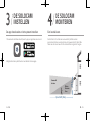
CHARGING
SOLOCAM
Battery-powered
Charging Solid blue
Fully charged Off

04 EN EN 05
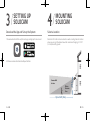
MOUNTING
SOLOCAM
Select a Location
SoloCam L20 / L40 can be mounted on a wall or ceiling. Select a location
where you can get the desired view. We recommend hanging it 7-10 ft
(2-3 m) above the ground.
Motion
Detection
Zone
Camera field
of view
Up to 26 ft (8 m)
7-10 ft
(2 - 3 m)
Motion
Detection
Zone
Camera field
of view
SETTING UP
SOLOCAM
Download the App and Set up the System
1. Download and install the eufy Security app, and sign up for an account.
2. Follow on-screen instructions to add your SoloCam .

06 EN EN 07
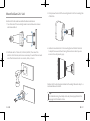
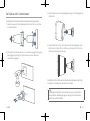
Mount SoloCam L20 / L40
SoloCam L20 / L40 can be mounted both outdoors and indoors.
1. Turn the knob of the mounting bracket counterclockwise to loosen
and disassemble it.
2. Drill holes with a 15/64 inch (5.99 mm) drill bit, then insert the
anchors into the holes; anchors are necessary for walls that are made
out of hard materials such as concrete, brick, or stucco.
3. Firmly screw the knob of the mounting bracket into the mounting hole
of SoloCam.
4. Hold and screw SoloCam to the mounting bracket. Rotate SoloCam
to adjust the view and check it using the live stream which you can
access in the eufy Security app.
SoloCam L20 / L40 can be also installed on the ceiling. Follow the steps 1-4
mentioned above to install it.
Tips:
For troubleshooting, check Help on the eufy Security app. Refer to the
app page for LED indicator status.

08 EN EN 09
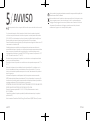
NOTICE
This product complies with the radio interference requirements of the European Community.
Hereby, Anker Innovations Limited declares that this device is in compliance with the essential
requirements and other relevant provisions of Directive 2014/53/EU. For the declaration of
conformity, visit the Web site: https://uk.eufylife.com/.
This product can be used across EU member states.
Due to the used enclosure material, the product shall only be connected to a USB Interface of
version 2.0 or higher.
The adapter shall be installed near the equipment and shall be easily accessible.Do not use
the Device in the environment at too high or too low temperature, never expose the Device
under strong sunshine or too wet environment.
The suitable temperature for T8122/T8123 and accessories is -20°C to 40°C (when charging:
0°C to 30°C).
When charging, please place the device in an environment that has a normal room
temperature and good ventilation.
It is recommended to charge the device in an environment with a temperature that ranges
from 5°C~25°C.
Please make sure to use only the charger provided by the manufacturer. When the
manufacturer does not provide the charger, please use a charger that complies with EU
regulations, otherwise it may cause danger and violate the authorization of the product and
warranty terms.
RF exposure information: The Maximum Permissible Exposure (MPE) level has been calculated
based on a distance of d=20 cm between the device and the human body. To maintain compliance
with RF exposure requirement, use product that maintain a 20cm distance between the device
and human body.
CAUTION RISK OF EXPLOSION IF BATTERY IS REPLACED BY AN INCORRECT TYPE. DISPOSE
OF USED BATTERIES ACCORDING TO THE INSTRUCTIONS
Wi-Fi Operating Frequency Range: 2412~2472MHz; Wi-Fi Max Output Power:19.38dBm
The following importer is the responsible party (contact for EU matters only)
Anker Innovations Deutschland GmbH I Georg-Muche-Strasse 3, 80807 Munich, Germany
This product is designed and manufactured with high quality materials and components,
which can be recycled and reused.
This symbol means the product must not be discarded as household waste, and should be
delivered to an appropriate collection facility for recycling. Proper disposal and recycling helps
protect natural resources, human health and the environment. For more information on disposal
and recycling of this product, contact your local municipality, disposal service, or the shop where
you bought this product.
This product complies with the radio interference requirements of the United Kingdom
Declaration of Conformity
Hereby, Anker Innovations Limited declares that this product is in compliance with Radio
Equipment Regulations 2017. The full text of the UK declaration of conformity is available at the
following internet address: https://uk.eufylife.com.
Anker Technology (UK) Ltd I Suite B, Fairgate House, 205 Kings Road, Tyseley, Birmingham, B11
2AA, United Kingdom

DE 11
INHALTS-
VERZEICHNIS
PRODUKTÜBERSICHT 12
SOLOCAM LADEN 13
SOLOCAM EINRICHTEN 14
15 SOLOCAM MONTIEREN
18 HINWEIS

12 DE DE 13
PRODUKTÜBERSICHT
1
2
35
4
1. Kameraobjektiv 4.LED-Anzeige
2.Bewegungssensor 5.Mikrofon
3.Lichtempfindlicher Sensor 6.Befestigungslöcher
7.SYNC-Taste 9.Lautsprecher
8.Ladeanschluss Typ C
6
7
8
9
SOLOCAM LADEN
Batteriebetrieben
Ladevorgang Blau leuchtend
Vollständig aufgeladen Aus

14 DE DE 15
SOLOCAM
EINRICHTEN
App herunterladen und System einrichten
1. Laden Sie die eufy Security-App herunter, installieren Sie sie und richten
Sie ein Konto ein.
2.Befolgen Sie die Anweisungen auf dem Bildschirm, um Ihre SoloCam
hinzuzufügen
SOLOCAM
MONTIEREN
Montageort auswählen
Die SoloCam L20/L40 kann an einer Wand oder Decke montiert werden.
Wählen Sie einen Ort, an dem Sie die gewünschte Ansicht erhalten. Wir
empfehlen, das Gerät 2 bis 3 m über dem Boden aufzuhängen.
Motion
Detection
Zone
Camera field
of view
Up to 26 ft (8 m)
7-10 ft
(2 - 3 m)
Motion
Detection
Zone
Camera field
of view

16 DE DE 17
SoloCam L20/L40 montieren
Die SoloCam L20/L40 kann im Außen- und Innenbereich montiert werden.
1. Drehen Sie den Knopf der Montagehalterung gegen den
Uhrzeigersinn, um sie zu lösen und zu zerlegen.
2. Bohren Sie Löcher mit einem 6-mm-Bohreinsatz, und stecken Sie
anschließend die Dübel in die Bohrungen. Dübel sind bei Wänden aus
harten Materialien wie Beton, Backstein oder Stuck erforderlich.
3. Schrauben Sie den Knopf der Montagehalterung fest in das
Montageloch der SoloCam.
4. Halten Sie die SoloCam fest, und schrauben Sie sie an die Halterung.
Drehen Sie die SoloCam, um die Ansicht anzupassen. Zum Prüfen der
Ansicht verwenden Sie den über die eufy Security-App zugänglichen
Live-Stream.
Die SoloCam L20/L40 kann auch an der Decke installiert werden. Befolgen
Sie zur Montage die oben genannten Schritte 1 bis 4.
Tipps:
Informationen zur Fehlerbehebung finden Sie in der Hilfe der eufy
Security-App. Informationen zum Status der LED-Anzeige finden Sie
auf der App-Seite.

18 DE DE 19
HINWEIS
Dieses Produkt erfüllt die Anforderungen der Europäischen Gemeinschaft an Funkstörungen.
Anker Innovations Limited erklärt hiermit, dass dieses Gerät die grundlegenden
Anforderungen und anderen relevanten Bestimmungen der Richtlinie 2014/53/EG erfüllt. Die
Konformitätserklärung finden Sie auf der Website: https://uk.eufylife.com/.
Dieses Produkt kann in den EU-Mitgliedstaaten verwendet werden.
Aufgrund des verwendeten Gehäusematerials darf das Produkt nur an eine USB-Schnittstelle
der Version 2.0 oder höher angeschlossen werden.
Das Netzteil muss in der Nähe des Geräts installiert werden und leicht zugänglich sein.
Verwenden Sie das Gerät nicht in Umgebungen mit zu hoher oder zu niedriger Temperatur;
setzen Sie das Gerät niemals starker Sonneneinstrahlung oder einer zu feuchten Umgebung
aus.
Die geeignete Temperatur für T8122/T8123 und das Zubehör ist -20°C bis 40°C (während
des Ladevorgangs: 0°C bis 30°C).
Stellen Sie das Gerät während des Ladevorgangs in einer Umgebung mit normaler
Raumtemperatur und angemessener Belüftung auf.
Es wird empfohlen, das Gerät in einer Umgebung mit einer Temperatur im Bereich von 5 ~25
zu laden.
Achten Sie darauf, ausschließlich das vom Hersteller mitgelieferte Ladegerät zu verwenden.
Wenn der Hersteller kein Ladegerät mitliefert, verwenden Sie ein Ladegerät, das den EU-
Vorschriften entspricht. Die Verwendung eines nicht zugelassenen Ladegeräts kann eine
Gefahr darstellen und die Garantiebedingungen verletzen.
Informationen zur HF-Exposition: Die maximal zulässige Exposition (MPE) wurde basierend auf
einem Abstand von d = 20 cm zwischen dem Gerät und dem menschlichen Körper berechnet. Um
die Anforderungen in Bezug auf die HF-Belastung zu erfüllen, muss zwischen dem Gerät und dem
menschlichen Körper ein Abstand von mindestens 20 cm bestehen.
VORSICHT! BEI AUSTAUSCH DES AKKUS DURCH EINEN UNGEEIGNETEN AKKUTYP BESTEHT
EXPLOSIONSGEFAHR. GEBRAUCHTE BATTERIEN ENTSPRECHEND DEN ANWEISUNGEN
ENTSORGEN.
WLAN-Betriebsfrequenzbereich: 2412 ~ 2472 MHz; max. WLAN-Ausgangsleistung:
19,38 dBm
Der folgende Importeur ist verantwortlich (nur für EU-Belange)
Anker Innovations Deutschland GmbH I Georg-Muche-Straße 3, 80807 München,
Deutschland
Dieses Produkt ist mit hochwertigen Materialien und Komponenten für Recycling und
Wiederverwertung konzipiert.
Dieses Symbol bedeutet, dass das Produkt nicht als Hausmüll entsorgt werden darf, sondern
einer angemessenen Sammelstelle für das Recycling zugeführt werden muss. Durch das
ordnungsgemäße Entsorgen und Recyceln tragen Sie zum Schutz natürlicher Ressourcen
und zur Vermeidung von Umwelt- und Gesundheitsschäden bei. Weitere Informationen zum
Entsorgen und Recyceln dieses Produkts erhalten Sie von Ihrer Gemeindeverwaltung, Ihrem
zuständigen Entsorgungsdienst oder dem Geschäft, in dem Sie dieses Produkt erworben
haben.

ES 21
TABLA DE
CONTENIDOS
DESCRIPCIÓN DEL PRODUCTO 22
CARGAR SOLOCAM 23
CONFIGURACIÓN DE SOLOCAM 24
25 MONTAJE DE SOLOCAM
28 AVISO

22 ES ES 23
DESCRIPCIÓN DEL
PRODUCTO
1
2
35
4
1. Objetivo de la cámara 4.Indicador LED
2.Sensor de movimiento 5.Micrófono
3.Sensor fotosensible 6.Orificio de montaje
7.Botón de sincronización 9.Altavoz
8.Puerto de carga tipo C
6
7
8
9
CARGAR SOLOCAM
Alimentación de batería
Cargando Azul fijo
Carga completa Apagado

24 ES ES 25
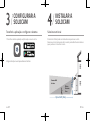
CONFIGURACIÓN
DE SOLOCAM
Descarga de la aplicación y configuración del
sistema
1. Descargue e instale la aplicación eufy Security y regístrese para obtener
una cuenta.
2.Siga las instrucciones en pantalla para agregar la SoloCam.
MONTAJE DE
SOLOCAM
Selección de la ubicación
SoloCam L20 / L40 se puede montar en una pared o en el techo.
Seleccione una ubicación desde la que obtenga la vista deseada. Se
recomienda instalar la cámara de 2 a 3 m por encima del suelo.
Motion
Detection
Zone
Camera field
of view
Up to 26 ft (8 m)
7-10 ft
(2 - 3 m)
Motion
Detection
Zone
Camera field
of view

26 ES ES 27
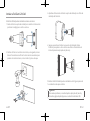
Montaje de SoloCam L20 / L40
SoloCam L20 / L40 se puede montar tanto en exteriores como en interiores.
1. Gire la perilla del soporte de montaje en sentido antihorario para
aflojarlo y desmontarlo.
2. Taladre orificios con una broca de 6 mm (15/64 pulg.) y, a
continuación, inserte los tacos en los orificios. Es necesario utilizar los
tacos en paredes construidas en materiales duros como hormigón,
ladrillo o estuco.
3. Atornille firmemente la perilla del soporte de montaje en el orificio de
montaje de SoloCam.
4. Sostenga la SoloCam y atorníllela al soporte de montaje. Gire la
SoloCam para ajustar la vista y compruebe la orientación usando la
transmisión en vivo, a la que puede acceder en la aplicación eufy Security.
SoloCam L20 / L40 también se puede instalar en el techo. Siga los pasos del
1 al 4 indicados anteriormente para realizar la instalación.
Consejos:
Para solucionar problemas, consulte la Ayuda en la aplicación eufy
Security. Visite la página de la aplicación para consultar el estado del
indicador LED.

28 ES ES 29
AVISO
Este producto cumple con los requisitos de radiointerferencias de la Comunidad Europea.
Por la presente, Anker Innovations Limited declara que este dispositivo cumple los requisitos
esenciales y otras disposiciones pertinentes de la Directiva 2014/53/UE. Para consultar la
declaración de conformidad, visite el sitio web: https://uk.eufylife.com/.
Este producto se puede utilizar en los países miembros de la UE.
Debido al material de la carcasa, el producto solo se debe conectar a una interfaz USB de
versión 2.0 o posterior.
El adaptador se debe instalar cerca del equipo y debe ser fácilmente accesible.No utilice
el dispositivo en entornos con temperaturas demasiado altas o bajas. Nunca exponga el
dispositivo a la luz solar intensa ni a entornos demasiado húmedos.
El rango de temperaturas adecuado para los modelos T8122/T8123 y sus accesorios es de
-20°C a 40°C (durante la carga: de 0°C a 30°C).
Cuando cargue el dispositivo, colóquelo en un entorno con una temperatura ambiente normal
y una ventilación adecuada.
Se recomienda cargar el dispositivo en un entorno con un rango de temperaturas de entre 5 y
25 .
Asegúrese de utilizar únicamente el cargador suministrado por el fabricante. Cuando el
fabricante no proporcione el cargador, utilice un cargador que cumpla con la normativa de la
UE; de lo contrario, podrían producirse daños e infracciones de la autorización del producto y
las condiciones de la garantía.
Información de exposición a RF: El nivel máximo de exposición permisible (MEP) se ha calculado en
función de una distancia de d = 20 cm entre el dispositivo y el cuerpo humano. Para preservar el
cumplimiento con el requisito de exposición a RF, utilice el producto manteniendo una distancia de
20 cm entre el dispositivo y el cuerpo humano.
PRECAUCIÓN: PUEDE EXISTIR RIESGO DE EXPLOSIÓN SI LA BATERÍA SE SUSTITUYE POR
OTRA DE UN TIPO INCORRECTO. DESECHE LAS BATERÍAS USADAS COMO SE INDICA EN LAS
INSTRUCCIONES.
Rango de frecuencia de funcionamiento de Wi-Fi: 2412~2472 MHz; Potencia de salida
máxima de Wi-Fi: 19,38dBm
El siguiente importador es la parte responsable (contacto solo para la UE)
Anker Innovations Deutschland GmbH I Georg-Muche-Strasse 3, 80807 Múnich, Alemania
Este producto se ha diseñado y fabricado con materiales y componentes de gran calidad
que pueden reciclarse y reutilizarse.
Este símbolo indica que el producto no debe desecharse como residuo doméstico, sino
que debe depositarse en unas instalaciones de recogida adecuadas para su reciclaje. La
eliminación y el reciclaje adecuados ayudan a proteger los recursos naturales, la salud
humana y el medio ambiente. Para obtener más información acerca de la eliminación y el
reciclaje de este producto, póngase en contacto con su ayuntamiento, el servicio de retirada
de desechos o la tienda donde compró el producto.

FR 31
TABLE DES
MATIÈRES
PRÉSENTATION DU PRODUIT 32
CHARGEMENT DE LA SOLOCAM 33
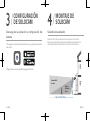
CONFIGURATION DE LA SOLOCAM 34
35 MONTAGE DE LA SOLOCAM
38 AVIS

32 FR FR 33
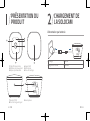
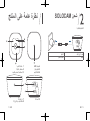
PRÉSENTATION DU
PRODUIT
1
2
35
4
1. Objectif de la caméra 4.Voyant LED
2.Détecteur de mouvement 5.Microphone
3.Capteur photosensible 6.Trou de montage
7.Bouton SYNC 9.Haut-parleur
8.Port de charge de type C
6
7
8
9
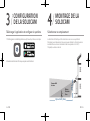
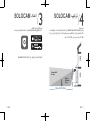
CHARGEMENT DE
LA SOLOCAM
Alimentation par batterie
En charge Bleu fixe
Chargement terminé Désactivé

34 FR FR 35
CONFIGURATION
DE LA SOLOCAM
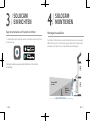
Télécharger l'application et configurer le système
1. Téléchargez et installez l'application eufy Security et créez un compte.
2.Suivez les instructions à l'écran pour ajouter votre SoloCam.
MONTAGE DE LA
SOLOCAM
Sélectionner un emplacement
La SoloCam L20/L40 peut être montée sur un mur ou au plafond.
Choisissez un emplacement où vous pouvez obtenir le champ de vision
souhaité. Nous vous recommandons de la suspendre à 2-3 m (7-
10 pieds) au-dessus du sol.
Motion
Detection
Zone
Camera field
of view
Up to 26 ft (8 m)
7-10 ft
(2 - 3 m)
Motion
Detection
Zone
Camera field
of view

36 FR FR 37
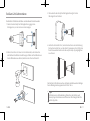
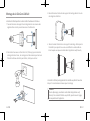
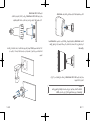
Montage de la SoloCam L20/L40
La SoloCam L20/L40 peut être montée à la fois à l'extérieur et à l'intérieur.
1. Tournez le bouton du support de montage dans le sens inverse des
aiguilles d'une montre pour le desserrer et la démonter.
2. Percez des trous avec un foret de 6 mm (15/64 po), puis insérez les
ancrages dans les trous ; les ancrages sont nécessaires pour les murs
faits de matériaux durs tels que le béton, la brique ou le stuc.
3. Vissez fermement le bouton du support de montage dans le trou de
montage de la SoloCam.
4. Tenez et vissez la SoloCam sur le support de montage. Faites pivoter
la SoloCam pour ajuster la vue en vous référant au rendu vidéo en
direct auquel vous pouvez accéder dans l'application eufy Security.
La SoloCam L20/L40 peut également être installée au plafond. Suivez les
étapes 1 à 4 mentionnées ci-dessus pour le montage.
Conseils :
Pour le dépannage, consultez la section Aide de l'application eufy
Security. Pour connaître l'état du voyant LED, reportez-vous à la page
correspondante de l'application.
La page est en cours de chargement...
La page est en cours de chargement...
La page est en cours de chargement...
La page est en cours de chargement...
La page est en cours de chargement...
La page est en cours de chargement...
La page est en cours de chargement...
La page est en cours de chargement...
La page est en cours de chargement...
La page est en cours de chargement...
La page est en cours de chargement...
La page est en cours de chargement...
La page est en cours de chargement...
La page est en cours de chargement...
La page est en cours de chargement...
La page est en cours de chargement...
La page est en cours de chargement...
La page est en cours de chargement...
La page est en cours de chargement...
La page est en cours de chargement...
La page est en cours de chargement...
La page est en cours de chargement...
-
 1
1
-
 2
2
-
 3
3
-
 4
4
-
 5
5
-
 6
6
-
 7
7
-
 8
8
-
 9
9
-
 10
10
-
 11
11
-
 12
12
-
 13
13
-
 14
14
-
 15
15
-
 16
16
-
 17
17
-
 18
18
-
 19
19
-
 20
20
-
 21
21
-
 22
22
-
 23
23
-
 24
24
-
 25
25
-
 26
26
-
 27
27
-
 28
28
-
 29
29
-
 30
30
-
 31
31
-
 32
32
-
 33
33
-
 34
34
-
 35
35
-
 36
36
-
 37
37
-
 38
38
-
 39
39
-
 40
40
-
 41
41
-
 42
42


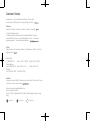
eufy Security SoloCam L20 Mode d'emploi
- Catégorie
- Éclairage de confort
- Taper
- Mode d'emploi
dans d''autres langues
- italiano: eufy Security SoloCam L20 Guida utente
- español: eufy Security SoloCam L20 Guía del usuario
- Deutsch: eufy Security SoloCam L20 Benutzerhandbuch
- Nederlands: eufy Security SoloCam L20 Gebruikershandleiding
- português: eufy Security SoloCam L20 Guia de usuario
Documents connexes
Autres documents
-
Eufy C210 Mode d'emploi
-
Eufy L20-L40 Mode d'emploi
-
Eufy SmartTrack Link Manuel utilisateur
-
Anker T8420S Mode d'emploi
-
Eufy Security Smart Track Link Manuel utilisateur
-
Eufy AM 2C Wire-Free HD Security Camera Set Mode d'emploi
-
Eufy T8920 Mode d'emploi
-
Eufy S350 Mode d'emploi
-
Eufy Backup Battery for HomeBase 2 Mode d'emploi
-