
EVEL
DÉSHUMIDIFICATEUR D'AIR PAR DESSICCATION
DESICCANT AIR DEHUMIDIFIER
LUFTENTFEUCHTER MIT ABSORPTIONSTROCKNUNGS-TECHNIK
GUIDE D’UTILISATION – USER MANUAL – BEDIENUNGSANLEITUNG
GEBRUIKSAANWIJZING – INSTRUKCJA OBSŁUGI – KÄYTTÖOHJE

EVEL
4
5
6
7
8
9
10
11
12
1
2
3
ON/OFF Speed Timer Humidity Clothes dryer Swing
AUTOAUTO
70%
60%
2 H
4 H
8 H
LOW
MID
HIGH
FULL
RUN
POWER
A
B
C
D E F H I
G
1 2
4
1 2 3
VIDANGE DU RÉSERVOIR / EMPTYING THE TANK / DEN TANK LEEREN / LEGEN VAN HET CONDENSRESERVOIR /
OPRÓŻNIANIE ZBIORNIKA / SÄILIÖN TYHJENNYS
PANNEAU DE CONTRÔLE / CONTROL PANEL / BEDIENFELD / BEDIENINGSPANEEL / PANEL CYFROWY / OHJAUSPANEELI
DRAINAGE CONTINU / CONTINUOUS DRAINAGE / KONTINUIERLICHE ENTWÄSSERUNG /
CONTINUE AFVOER / TRYB: CIAGŁE OSUSZANIE / JATKUVA TYHJENNYS
2 3

1. Lire attentivement les instructions avant
d’utiliser Evel.
2. Toute utilisation non recommandée par le
revendeur peut entraîner feu, surtension
électrique ou blesser des personnes.
3. Retirez le packaging et assurez-vous que
Evel n’est pas endommagé. En cas de
doute, ne pas utiliser l’appareil et contac-
ter votre revendeur.
4. Ne laissez pas les enfants jouer avec les
différentes pièces de l’emballage. Portez
une attention particulière pour une utilisa-
tion à proximité d’un enfant.
5. Avant d’utiliser Evel, assurez-vous que
le voltage indiqué sur le produit est
conforme à votre installation électrique.
6. Assurez-vous que la prise de l’ap-
pareil soit bien branchée : dans
le cas contraire, la prise pourrait
surchauffer.
7. Utiliser une extension de câble électrique
peut créer une surchauffe et causer des
risques de feux.
8. Ne pas débrancher le produit en tirant
sur le câble. Toujours débrancher Evel en
maintenant et en tirant la prise.
9. Ne pas couvrir ou insérer d’objet qui pour-
rait empêcher le ux d’air dans le venti-
lateur : cela pourrait entraîner des chocs
électriques ou endommager l’appareil.
Ne pas mettre les doigts dans l’arrivée ou
la sortie d’air de l’appareil sous peine de
dommages physiques.
10. Durant l’utilisation, laissez au moins un
espace de 50 cm à l’arrière, sur les côtés
et devant l’appareil.
11. An d’éviter tout choc électrique ou
incendie, ne pas utiliser d’eau, de dé-
tergent ou de produit inammable pour
nettoyer l’extérieur ou l’intérieur de l’ap-
pareil.
12. Ne pas utiliser d’insecticide en spray, de
parfum, ou tout autre spray inammable
autour de l’appareil lorsqu’il est en fonc-
tionnement.
13. Ne jamais utiliser Evel s’il existe un risque
de chute dans un liquide.
14. Assurez-vous que le produit soit placé
sur une surface plane et horizontale.
15. An d’éviter que de l’eau condense sur
et dans l’appareil, ne pas le placer à
proximité d’un climatiseur.
16. Ne pas utiliser Evel à l’extérieur.
17. Toujours débrancher Evel en cas de dé-
placement.
18. Toujours débrancher Evel lorsqu’il n’est
pas utilisé.
19. Gardez le produit propre et en bonnes
conditions d’utilisation.
20. Utilisez les pièces détachées recom-
mandées (des pièces non ofcielles
pourraient être dangereuses et annuler
la garantie).
21. Rangez Evel dans un endroit sec et
sécurisé, hors de portée des enfants.
22. Si le cordon d’alimentation est endom-
magé, il peut être remplacé par le re-
vendeur. Seules des personnes quali-
ées peuvent effectuer cette réparation.
23. Ce produit ne peut être utilisé par des
enfants de moins de 8 ans. Lisez atten-
tivement le manuel et utilisez Evel avec
précaution.
Merci d’avoir acheté le déshumidicateur Evel, un produit air&me. Nous espérons
qu’il vous donnera entière satisfaction et améliorera la qualité de votre air intérieur.
Comme pour tous les appareils ménagers électriques, il est important d’entretenir
cet appareil correctement an d’éviter d’éventuels dommages ou blessures. Merci
de lire attentivement les instructions avant de le mettre en fonctionnement et de
conserver cette notice pour référence ultérieure. La société WAF-direct décline
toute responsabilité pour les dommages causés par le non-respect de ce mode
d‘emploi. L‘appareil doit être utilisé uniquement dans le cadre domestique aux ns
décrites dans le présent mode d‘emploi. Une utilisation non conforme, ainsi que des
modications techniques de l‘appareil peuvent entraîner des risques pour la santé
et la vie.
FRANÇAIS
INFORMATIONS IMPORTANTES DE SÉCURITÉ
PRÉVENTION DES ACCIDENTS DOMESTIQUES
Pour prévenir de tous dangers ou chocs électriques, toujours débrancher le produit en cas
de non utilisation, de déplacement ou de nettoyage. En cas de réparation, rapprochez-vous
de personnes qualiées.
La sécurité de cet appareil est conforme aux règles techniques et aux normes en
vigueur au sein de l’UE.
Pour toute autre information ou renseignement, veuillez consulter notre site internet :
www.airandme.fr
Notre service client est à votre disposition à l’adresse suivante : [email protected]
Voltage
Dimensions
Poids net
Nombre de vitesses
Consommation électrique maximum
Surface maximale conseillée de déshumidication
Capacité du réservoir
Température de fonctionnement
Capacité de déshumidication
220-240 V
455 x 300 x 200 mm (H x L x P)
5,7 kg
3
650 W
90 m²
2,5 L
0°C - 35°C
7 L/jour (30°C, 80 % HR)
CARACTÉRISTIQUES TECHNIQUES
4 5

1 Poignée
2 Panneau de contrôle
3 Sortie d’air
4 Orice de drainage continu
5 Couvercle du réservoir d'eau
6 Flotteur
COMPOSANTS (VOIR PAGE 2)
PANNEAU DE CONTRÔLE (VOIR PAGE 3)
1. Branchez l’appareil.
• Tous les voyants lumineux du panneau de contrôle s’allument pendant 1 seconde, puis
s’éteignent.
• Dans le même temps, l’appareil sonne 3 fois.
• Lorsque l’appareil est sous tension, le voyant lumineux « Power » devient rouge.
2. Appuyez sur le bouton ON/OFF ( A) pour mettre l’appareil en marche. Le volet mobile
s’ouvre.
3. Appuyez à nouveau sur le bouton ON/OFF pour éteindre l’appareil.
• Le voyant lumineux « Power » devient rouge et les autres voyants lumineux s’éteignent.
• L’appareil continue de ventiler l’air durant 4 minutes après avoir été éteint, puis, le volet
mobile revient en position initiale et l’appareil s’arrête totalement.
Pratique : l’appareil enregistre les derniers réglages d’une utilisation à l’autre.
INSTRUCTIONS DE FONCTIONNEMENT
FONCTIONS PRINCIPALES
D BOUTON « VITESSE » : En appuyant plusieurs fois sur le bouton, vous pouvez ajuster le flux d’air
produit par l’appareil en choisissant parmi l’un des 3 modes : LOW (flux d’air faible), MED
(flux d’air moyen) ou HIGH (flux d’air fort).
E BOUTON « TIMER » : En appuyant plusieurs fois sur le bouton, vous pouvez sélectionner le temps
de fonctionnement : 2 heures, 4 heures ou 8 heures. En appuyant une fois supplémentaire,
vous pouvez annuler la fonction Timer et choisir de laisser l’appareil fonctionner en continu.
F BOUTON « HUMIDITÉ » : En appuyant plusieurs fois sur le bouton, vous pouvez choisir le taux
d’humidité parmi 3 options : HygroSmart®, 60 % ou 70 %.
• La fonction HygroSmart® ( G) vous permet de maintenir un taux d’humidité idéal dans l’air
(entre 40 % et 60 %). Le voyant lumineux clignote si le taux d'humidité dans l'air ambiant est
déjà inférieur à 40 %.
• Réglez l’appareil sur 60 % si vous souhaitez l’utiliser dans une cave de stockage.
• Réglez l’appareil sur 70 % si vous souhaitez l’utiliser dans une cave à vin.
Lorsque l’humidité de l’air ambiant est inférieure au taux d’humidité prédéfini, l’appareil cesse
de déshumidifier, mais son ventilateur continue de fonctionner. Lorsque l’humidité de l’air
ambiant est supérieure au taux d’humidité prédéfini, l’appareil se remet automatiquement
à déshumidifier.
Il est possible de combiner ces trois modes à la fois : choix de la vitesse, choix du temps de
déshumidification et choix du taux d’humidité.
H BOUTON « SÈCHE-LINGE » : En appuyant sur ce bouton, l’appareil fonctionne à vitesse
maximale. Il est possible de régler le Timer et de définir le taux d’humidité voulu, mais il n’est
pas possible de régler la vitesse.
Si vous ne réglez pas le Timer, l’appareil fonctionnera durant 10 heures consécutives,
s’arrêtera 1/2 heure pour éviter une surchauffe, puis redémarrera automatiquement.
I BOUTON « VOLET MOBILE » : Grâce à ce bouton, vous pouvez contrôler la mise en marche et
l’arrêt du volet mobile. En appuyant sur le bouton, le volet s’ouvre automatiquement. Vous
pouvez régler l’angle d’ouverture du volet en appuyant une seconde fois. Le volet mobile
peut s’ouvrir jusqu’à un angle de 90°.
7 Réservoir d'eau
8 Indicateur de remplissage du réservoir
9 Filtre amovible
10 Entrée d’air
11 Hygromètre intégré
12 Câble électrique
A Bouton ON/OFF
B Voyant lumineux « En fonctionnement »
C Voyant lumineux « Réservoir plein »
D Bouton « Vitesse »
E Bouton « Timer »
F Bouton « Humidité »
G Voyant lumineux « HygroSmart®
»
H Bouton « Sèche-linge »
I Bouton « Volet mobile »
VIDANGE DU RÉSERVOIR (VOIR PAGE 3)
L’appareil s’arrête automatiquement de fonctionner une fois que le réservoir de l’appareil est plein
et le voyant « Full » ( C) s’allume. Si vous avez programmé le Timer, l’appareil enregistre le temps
restant de fonctionnement. Après vidange du réservoir, l’appareil reprend le programme en cours.
1 Éteignez l’appareil puis tirez le réservoir.
2 Déclipsez le couvercle du réservoir d’eau.
3 Videz les condensats.
4 Replacez le couvercle du réservoir, puis repositionnez-le. Ensuite, appuyez sur le bouton ON/
OFF et choisissez le mode de fonctionnement souhaité.
Le déshumidificateur est équipé d’un capteur de positionnement du réservoir. Par sécurité, le
produit s’arrête si le réservoir est manquant ou mal positionné et les voyants « Power » et « Full »
s’allument.
PRÉCAUTIONS D’EMPLOI
• Veillez à ce que le produit soit placé sur une surface sèche et plane.
• Laissez au moins un espace de 50 cm à l’arrière, sur les côtés et devant l’appareil.
• Assurez-vous que le ltre amovible et le réservoir soient correctement positionnés et enfoncés.
• Ne retirez pas le otteur du réservoir, car cela empêcherait l’appareil de se mettre en marche.
6 7

• Assurez-vous que l’appareil soit éteint et débranché avant de réaliser toute manipulation.
• N’immergez pas l’appareil dans l’eau ou tout autre liquide.
• N’utilisez pas de produits corrosifs, abrasifs ou inammables pour nettoyer l’appareil.
NETTOYAGE DU FILTRE AMOVIBLE : Le ltre amovible capte les poussières et prolonge l’efcacité
de l’appareil. Il est recommandé de le laver tous les mois. Tirez sur la poignée du ltre amovible,
nettoyez-le à l’eau tiède et à l’aide d’une brosse douce, puis séchez-le et remettez-le en
place.
Attention à ne pas faire sécher le ltre en plein soleil ou à proximité d'une forte source de
chaleur.
NETTOYAGE DE L’APPAREIL : Utilisez un chiffon doux pour enlever la poussière au niveau des
entrées et des sorties d’air.
NETTOYAGE DU RÉSERVOIR : Retirez le réservoir de l'appareil et déclipsez le couvercle. Pour
éviter les dépôts calcaires, nettoyez le réservoir au moins une fois par mois avec un produit
approprié ou du vinaigre blanc.
STOCKAGE DE L'APPAREIL : Pour éviter toute prolifération de bactéries ou virus, ne stockez
jamais l’appareil avec de l’eau dans le réservoir et assurez-vous que l’intégralité de l’appareil
soit complètement sec.
1. Videz et lavez le réservoir d'eau de l'appareil.
2. Nettoyez les entrées et sorties d'air, ainsi que le ltre amovible de l'appareil.
3. Une fois les différents éléments correctement séchés, rangez le produit à l’abri de la poussière,
dans un endroit propre, sec et ventilé.
MAINTENANCE
FAQ
Problème Raison Solution
L'appareil ne
marche pas
> Le produit n’est pas
correctement branché
ou il y a un problème de
concordance électrique.
> Branchez correctement la prise en
vous assurant du voltage et
du bon fonctionnement du réseau
électrique.
Évitez les multiprises.
> Il y a un problème sur
le réseau électrique du
logement.
> Le réservoir est plein. > Videz le réservoir.
> Le réservoir n’est pas
correctement enclenché. > Poussez et enclenchez
correctement le réservoir.
Baisse de
performance
de l’appareil
(moins d’eau
dans le réservoir)
> Le ltre amovible est sale,
ce qui gêne le ux d’air. > Nettoyez le ltre amovible.
> L’entrée ou la sortie d’air
est bloquée par quelque
chose.
> Laissez au moins un espace de
50 cm à l’arrière, sur les côtés et
devant l’appareil.
> La température est trop
basse.
> En dessous de 0°C le produit
fonctionne en Mode « Anti-gel ».
Le produit ne peut donc pas
déshumidier au maximum de
sa capacité.
> Le taux d’humidité est déjà
bas.
Bruit anormal
> Quelque chose bloque le
ventilateur. > Assurez-vous qu’aucun objet
bloque le ux d’air.
> Le produit a un problème
de fonctionnement.
> Rapprochez-vous de votre
revendeur pour une prise en
charge SAV.
Fuite > L'appareil est incliné ou mal
immobilisé. > Placez l'appareil sur une surface
plane avant sa mise en marche.
Le ventilateur
fonctionne
encore alors que
l'appareil est
éteint
> L'appareil continue de
ventiler l'air pendant
4 minutes an de refroidir.
> Ce phénomène est normal,
et l'appareil s'arrête
automatiquement au bout de
4 minutes.
L'air qui sort
de l'appareil
est chaud et
odorant
> Lorsque la température
est élevée entre les
échangeurs thermiques
chaud et froid, il peut y
avoir une légère odeur.
> Ce phénomène est normal.
L'odeur émise est temporaire.
DRAINAGE CONTINU (VOIR PAGE 3)
Grâce au tuyau de drainage continu, l’appareil fonctionnera de façon autonome, sans avoir
besoin de vider le réservoir. Veillez à ce que le tuyau ne soit pas plié et à ce qu’il soit positionné
en pente descendante afin que l’eau puisse s’évacuer facilement. Ne pas modifier ni rallonger
le tuyau de drainage. Veillez à ce que le réservoir soit bien vide.
1. Éteignez l’appareil, retirez le réservoir, puis retirez le bouchon plastique de l’orifice permettant
de faire passer le tuyau de drainage continu ( 1).
2. Passez le tuyau dans l’ouverture prévue à cet effet, puis à l’intérieur de l’appareil, et
connectez le tuyau de drainage à l’embouchure de sortie d’eau ( 2).
3. Repositionnez le réservoir.
8 9

1. Please read all the instructions carefully
before using Evel.
2. Any use that is not recommended by the
reseller can lead to re, power surge or
can hurt people.
3. Remove the packaging and make sure
that Evel is not damaged. If in doubt, do
not use the appliance and contact your
reseller.
4. Do not let children play with the different
pieces of the packaging. Pay special at-
tention when using the appliance near a
child.
5. Before using Evel, make sure that the vol-
tage indicated on the product is in accor-
dance with your electrical installation.
6. Make sure that the socket is correct-
ly plugged: otherwise, the socket could
overheat.
7. Using an extension electric cable can
create overheating and re.
8. Do not pull on the power cord to unplug
the appliance. Always unplug Evel by hol-
ding and pulling on the socket.
9. Do not cover or put objects that can obs-
truct the fan air ow: it could cause elec-
trical shocks or damage the appliance.
Do not put ngers inside the air inlet or
outlet on pain of physical damage.
10. During operation, leave at least 50cm
behind, around and in front of the ap-
pliance.
11. To avoid any electrical shock or re, do
not use water, detergent or ammable
product to clean the outside or the inside
of the appliance.
12. Do not use insecticide spray, perfume or
any other ammable spray around the
appliance when it is in process.
13. Never use Evel if it can fall into a liquid.
14. Make sure the product is on a at and
horizontal surface.
15. To avoid water condensation on the
appliance, do not place it near an
air-conditioner.
16. Do not use Evel outdoors.
17. Always unplug Evel when moving it.
18. Always unplug Evel when you are not
using it.
19. Keep the product clean and in good
condition.
20. Use the recommended spare parts (non
ofcial parts could be dangerous and in-
validate the warranty).
21. Store Evel in a dry and safe place, away
from children.
22. If the power cord is damaged, it can be
changed by the reseller. Only qualied
persons can make this repair.
23. This product cannot be used by children
less than 8 years old. Please read care-
fully this user manual and use Evel with
caution.
Thank you for having purchased the Evel domestic air dehumidier, an air&me.
product. We hope that it will bring you complete satisfaction and improve your
indoor air quality.
As with all electrical appliances, it is important to maintain the appliance properly
in order to avoid any damage or injury. Please read these instructions carefully
before switching the appliance on and keep them for later reference. WAF-direct
society accepts no liability for any damage that is caused by noncompliance with
this instruction manual. The appliance is only to be used in the household for the
intended purposes described in this user manual. Using the appliance for other
purposes than the intended ones or performing technical changes to the appliance
could be hazardous for health and life.
ENGLISH
IMPORTANT SAFETY INSTRUCTIONS
DOMESTIC INJURY PREVENTION
To prevent from any danger or electrical shock, always unplug the product when you are
not using it, moving it or cleaning it. In case of repairs, approach the qualied persons.
The safety of this product conforms to the relevant norms and regulations in force in
the European Union.
For any further information, please visit our website: www.airandme.fr/en
Our customer service department is available at the following email address:
Voltage
Dimensions
Net weight
Number of speed
Maximal power consumption
Suitable for rooms up to
Water tank volume
Ambient temperature range
Dehumidication capacity
220-240 V
455 x 300 x 200 mm (H x W x D)
5,7 kg
3
650 W
90 m²
2,5 L
0°C - 35°C
7 L/day (30°C, 80 % RH)
TECHNICAL DATA
10 11

1. Plug the appliance.
• All luminous indicators of the control panel light for 1 second and then turn off.
• At the same time, the appliance produces 3 sound signals.
• When the appliance operational, the “Power” luminous indicator turns red.
2. Press the ON/OFF button ( A) to turn the appliance on. The movable ap opens.
3. Press the ON/OFF button (A) again to turn the appliance off.
• The “Power” luminous indicator turns red and the other luminous indicators turn off.
• The appliance continues to ventilate the air during 4 minutes after being turned off, then
the movable ap comes back to its initial position and the appliance stops completely.
Useful: the appliance retains the last settings from one use to another.
OPERATING INSTRUCTIONS
MAIN FUNCTIONS
D “SPEED” BUTTON: By pressing this button several times, you can adjust the air flow produced
by the appliance, selecting one of the three modes: LOW (low air flow), MED (medium air
flow) or HIGH (strong air flow).
E “TIMER” BUTTON: By pressing this button several times, you can select the operating time: 2
hours, 4 hours or 8 hours. By pressing it one more time, you can cancel the Timer function and
choose to let the appliance work continuously.
F “HUMIDITY” BUTTON: By pressing this button several times, you can choose the humidity rate
between three options: HygroSmart®, 60 % or 70 %.
• The HygroSmart® function ( G) enables you to maintain an ideal humidity rate in the air
(between 40% and 60%). The indicator light flashes if the humidity level in the ambient air is
already below 40%.
• Adjust the appliance on 60% if you want to use it in a cellar.
• Adjust the appliance on 70% if you want to use it in a wine cellar.
When the ambient air humidity is lower than the set humidity level, the appliance stops
dehumidifying, but its fan continues to operate. If the ambient humidity is higher than the
sethumidity level, the appliance automatically restarts dehumidifying.
It is possible to combine these three modes at the same time: choice of speed, choice of
dehumidification time and choice of humidity rate.
H “CLOTHES DRYER” BUTTON: By pressing this button, the appliance works at maximum speed.
It is possible to adjust the Timer and to define the desired humidity rate but it is not possible
to adjust the speed.
If you do not adjust the Timer, the appliance will work for 10 consecutive hours, will stop half
an hour to avoid overheating and then will automatically restart.
I “MOVABLE FLAP” BUTTON: Thanks to this button, you can control the switching on and the
stop of the movable flap. By pressing this button, the flap opens automatically. You can
adjust the opening angle of the flap by pressing it a second time. The movable flap can be
opened up to an angle of 90°.
1 Handle
2 Digital display
3 Air outlet
4 Continuous drainage hole
5 Water tank lid
6 Float
COMPONENTS (SEE PAGE 2)
7 Water tank
8 Filling the tank indicator
9 Removable lter
10 Air inlet
11 Built-in hygrometer
12 Electric cable
DIGITAL DISPLAY (SEE PAGE 3)
A ON/OFF button
B “In process” luminous indicator
C “Full tank” luminous indicator
D “Speed” button
E “Timer” button
F “Humidity” button
G “HygroSmart®” luminous indicator
H “Clothes dryer” button
I “Movable ap” button
EMPTYING THE TANK (SEE PAGE 3)
The appliance automatically stops working once the tank is full and the “Full” indicator ( C) lights.
If you had set the Timer, the appliance retains the remaining operating time. After having emptied
the tank, the appliance resumes the current program.
1 Turn the appliance off and pull the tank.
2 Unclip the water tank lid.
3 Empty the condensates.
4 Replace the tank lid and then replace the tank. Then, press the ON/OFF button and choose
the desired operating mode.
The dehumidifier is equipped with a tank positioning sensor. As a matter of security, the product
turns off if the tank is missing or not properly placed and the “Power” and “Full” indicators light.
USE PRECAUTIONS
• Make sure that the product is placed on a dry flat surface.
• Leave at least 50cm behind, around and in front of the appliance.
• Make sure the removable filter and the tank are properly positioned and pushed in.
• Do not remove the float from the tank because it will prevent the appliance from starting.
12 13

• Make sure that the appliance is off and unplug before performing any work.
• Do not immerse the appliance in water or in any other liquid.
• Do not use corrosive, abrasive or ammable products to clean the appliance.
CLEANING THE REMOVABLE FILTER: The removable lter captures dust and extends the appliance
efciency. It is recommended to clean it every month. Pull the handle of the removable lter,
clean it with warm water and a soft brush then dry it and reposition it.
Be careful not to dry the lter in direct sunlight or near a strong heat source.
CLEANING THE APPLIANCE: Use a soft cloth to remove dust at the air inlets and outlets.
CLEANING THE TANK: Remove the tank and unclip the lid. To avoid calc deposit, clean the tank
at least once a month with an appropriate product or with white vinegar.
STORAGE OF THE APPLIANCE: To avoid any bacteria or virus proliferation, never store the
appliance with water inside the tank and be sure that the appliance is perfectly dry.
1. Empty and clean the tank.
2. Clean the air inlets and outlets as well as the removable lter.
3. Once the different parts have dried properly, store the product in a place that is protected
against dust and that is clean, dry and ventilated.
MAINTENANCE
FAQ
Problem Reason Solution
The appliance
does not work
> The product is not correctly
plug or there is an electrical
problem. > Plug the socket correctly and
check the voltage and the good
functioning of your electrical
system..
> There is a problem on the
electrical system of your
house.
> The tank is full. > Empty the tank..
> The tank is not properly
placed.. > Push and place the tank properly.
Drop in the
appliance
performance
(less water in
the tank)
> The removable lter is dirty
what obstructs the air ow. > Clean the removable lter.
> The air inlet or outlet is
obstructed by something.
> Leave at least 50cm behind,
around and in front of the
appliance.
> Temperature is too low.
> Below 0°C the product works in
Defrost Mode. It cannot therefore
dehumidify to a maximum of its
capacity.
> Humidity rate is already low.
Abnormal noise
> Something obstructs the fan. > Make sure that no object obstructs
the air ow.
> The product has a
functioning problem. > Contact your reseller for service
support.
Leakage > The appliance is tilted or not
properly secured. > Place the appliance on a at
surface before the switching on.
The fan still
works when the
appliance is
turned off
> The appliance continues
to ventilate the air during 4
minutes to cool down.
> This is normal and the appliance
will automatically stop at the end
of the 4 minutes.
The air coming
out of the
appliance is hot
and smelly
> When temperature is high
between the hot and cold
heat exchangers, there may
be a slight smell.
> This is normal. The smell is
temporary.
CONTINUOUS DRAINAGE (SEE PAGE 3)
Thanks to the continuous drainage hose, the appliance will work independently without having
to empty the tank. Make sure the hose is not bent and that it is placed on a downward slope
so that water can easily drain away. Do not modify or extend the drainage hose. Make sure
that the tank is completely empty.
1. Turn the appliance off, remove the tank, and then remove the plastic cap from the hole for
the continuous drainage hose ( 1).
2. Pass the hose through the opening provided for this purpose and connect the drainage hose
to the water outlet opening ( 2).
3. Reposition the tank.
14 15

1. Lesen Sie die Gebrauchsanweisung sorg-
fältig durch, bevor Sie Evel benutzen.
2. Jede nicht vom Händler empfohlene
Verwendung kann zu Feuer, Stromschlag
oder Verletzungen von Personen führen.
3. Entfernen Sie die Verpackung und stellen
Sie sicher, dass Evel nicht beschädigt ist.
Im Zweifelsfall das Gerät nicht verwenden
und sich an Ihren Fachhändler wenden.
4. Lassen Sie Kinder nicht mit den verschie-
denen Teilen der Verpackung spielen.
Seien Sie besonders vorsichtig bei des
Verwendung, wenn Kinder in der Nähe
sind.
5. Bevor Sie Evel verwenden, vergewissern
Sie sich, dass die auf dem Produkt ange-
gebene Spannung mit Ihrer Elektroinstal-
lation übereinstimmt.
6. Vergewissern Sie sich, dass der Stecker
des Gerätes richtig angeschlossen ist, da
der Stecker sonst überhitzen kann.
7. Die Verwendung einer Verlängerung
des Netzkabels kann zu Überhitzung und
Brandgefahr führen.
8. Trennen Sie das Gerät nicht durch Ziehen
am Kabel. Trennen Sie Evel immer, indem
Sie den Stecker in der Hand halten und
ziehen.
9. Das Gerät nicht bedecken und keine
Gegenstände in das Gerät stecken, die
den Luftstrom des Ventilators verhindern
könnten: dies könnte einen elektrischen
Schlag verursachen oder das Gerät
beschädigen. Die Finger nicht in den Luf-
tein- oder -auslass des Gerätes stecken,
da dies zu körperlichen Schäden führen
kann.
10. Lassen Sie während des Gebrauchs min-
destens 50 cm Platz auf der Rückseite,
den Seiten und der Vorderseite des
Gerätes.
11. Um Stromschläge oder Brände zu ver-
meiden, verwenden Sie zur Reinigung
der Außen- oder Innenseite des Gerätes
kein Wasser, keine Reinigungsmittel oder
kein brennbares Produkt.
12. Verwenden Sie während des Betriebs
keine Insektizidsprays, Parfüms oder
andere feuergefährliche Sprays um das
Gerät herum.
13. Verwenden Sie Evel niemals, wenn die
Gefahr besteht, dass es in eine Flüssig-
keit fallen kann.
14. Achten Sie darauf, dass das Produkt auf
einer ebenen, horizontalen Fläche steht.
15. Um zu verhindern, dass Wasser auf und
in das Gerät kondensiert, stellen Sie es
nicht in die Nähe einer Klimaanlage auf.
16. Verwenden Sie Evel nicht im Freien.
17. Trennen Sie Evel immer vom Stromnetz,
wenn Sie unterwegs sind.
18. Trennen Sie Evel immer vom Stromnetz,
wenn das Gerät nicht in Gebrauch ist.
19. Achten Sie darauf, dass das Gerät sauber
ist und Ordnungsgemäß benutzt wird.
20. Verwenden Sie die empfohlenen Ersa-
tzteile (inofzielle Teile können gefährlich
sein und die Garantie erlöschen).
21. Lagern Sie Evel an einem trockenen und
sicheren Ort, außerhalb der Reichweite
von Kindern.
22. Wenn das Netzkabel beschädigt ist,
kann es vom Händler ausgetauscht wer-
den. Diese Reparatur darf nur von quali-
ziertem Personal durchgeführt werden.
23. Dieses Produkt darf nicht von Kindern
unter 8 Jahren verwendet werden. Lesen
Sie das Handbuch sorgfältig durch und
verwenden Sie Evel mit Sorgfalt.
Wir danken Ihnen für den Kauf des Evel-Luftentfeuchters, ein air&me. -Produkt.
Wir hoffen, das er sie zufriedenstellen wird und zur Verbesserung der Qualität Ihrer
Innenraumluft beitragen wird.
Wie bei allen elektrischen Geräten, ist es wichtig, dieses Gerät richtig zu warten,
um mögliche Verletzungen oder Beschädigungen zu vermeiden. Bitte lesen Sie
sorgfältig die Anweisungen vor der Inbetriebnahme und bewahren Sie die Anleitung
zum späteren Nachschlagen auf. Die Firma WAF-direct übernimmt keine Haftung für
Schäden, die durch Nichtbeachtung der Bedienungsanleitung verursacht werden.
Das Gerät darf nur in der häuslichen Umgebung für die in diesem Handbuch
beschriebenen Zwecke verwendet werden. Unsachgemäßer Gebrauch und
technische Änderungen am Gerät können zu Risiken für Gesundheit und Leben
führen.
DEUTSCH
WICHTIGE SICHERHEITSHINWEISE
VERHÜTUNG VON HAUSHALTSUNFÄLLEN
Um Gefahren oder Stromschläge zu vermeiden, trennen Sie das Gerät immer vom Stromnetz,
wenn es nicht benutzt, gereinigt oder an einen anderen Platz gestellt wird. Wenden Sie sich
im Reparaturfall an qualiziertes Fachpersonal.
Die Sicherheit dieses Gerätes entspricht den in der EU geltenden technischen Vor-
schriften und Normen.
Für weitere Informationen oder Anfragen besuchen Sie bitte unsere Website:
www.airandme.fr
Unser Kundendienst ist unter folgender Adresse erreichbar: [email protected]
Spannung
Abmessungen
Nettogewicht
Anzahl Geschwindigkeiten
Maximaler Stromverbrauch
Empfohlene maximale Entfeuchtungsäche
Wasserbehälterinhalt
Betriebstemperatur
Entfeuchtungskapazität
220-240 V
455 x 300 x 200 mm (H x B x T)
5,7 kg
3
650 W
90 m²
2,5 L
0°C - 35°C
7 L/Tag (30°C, 80 % relative Luftfeuchtigkeit)
TECHNISCHE DATEN
16 17

1. Schließen Sie das Gerät an.
• Alle LEDs des Bedienfelds leuchten 1 Sekunde lang auf und gehen dann wieder aus.
• Gleichzeitig läutet das Gerät dreimal.
• Wenn das Gerät eingeschaltet ist, leuchtet die Anzeige "Power" rot auf.
2. Drücken Sie die ON/OFF ( A) Taste, um das Gerät einzuschalten. Die bewegliche
Verschlussklappe öffnet sich.
3. Drücken Sie erneut auf die ON/OFF -Taste, um das Gerät auszuschalten.
• Die "Power"-Anzeige leuchtet rot auf und die anderen Leuchten erlöschen.
• Das Gerät belüftet nach dem Abschalten noch 4 Minuten lang, dann kehrt die bewegliche
Verschlussklappe in ihre Ausgangsposition zurück und das Gerät stoppt vollständig.
Praktisch: Das Gerät zeichnet die neuesten Einstellungen von einer Anwendung zur anderen auf.
BEDIENUNGSANLEITUNG
HAUPTFUNKTIONEN
D GESCHWINDIGKEITS-TASTE: Durch mehrfaches Drücken der Taste können Sie den vom Gerät
erzeugten Luftstrom einstellen, indem Sie einen der 3 Modi LOW (niedriger Luftstrom), MED
(mittlerer Luftstrom) oder HIGH (hoher Luftstrom) auswählen.
E TIMER-TASTE: Durch mehrmaliges Drücken der Taste können Sie die Betriebszeit auswählen:
2 Stunden, 4 Stunden oder 8 Stunden. Durch erneutes Drücken können Sie die Timerfunktion
abbrechen und das Gerät fortlaufend funktionnieren lassen.
F LUFTFEUCHTIGKEITS-TASTE: Durch mehrmaliges Drücken der Taste können Sie 3 Optionen
Luftfeuchtigkeit auswählen: HygroSmart®, 60% oder 70%.
• Mit der Funktion HygroSmart® ( G) können Sie die ideale Luftfeuchtigkeit (zwischen 40%
und 60%) aufrechterhalten. Die Kontrollleuchte blinkt, wenn die Luftfeuchtigkeit in der
Umgebungsluft bereits unter 40% liegt.
• Stellen Sie die Einheit auf 60% ein, wenn Sie es in einem Lagerkeller verwenden möchten.
• Stellen Sie die Einheit auf 70% ein, wenn Sie es in einem Weinkeller verwenden möchten.
Wenn die Luftfeuchtigkeit unter der eingestellten Luftfeuchtigkeit liegt, hört das Gerät auf
zu entfeuchten, aber sein Lüfter läuft weiter. Liegt die Umgebungsfeuchtigkeit über dem
Schwellenwert, startet das Gerät automatisch wieder die Entfeuchtung.
Es ist möglich, diese drei Modi gleichzeitig zu kombinieren: Wahl der Geschwindigkeit, Wahl der
Entfeuchtungsdauer und Wahl der Feuchtigkeit.
H WÄSCHETROCKNUNGS-TASTE: Durch Drücken dieser Taste arbeitet das Gerät mit maximaler
Geschwindigkeit. Es ist möglich, den Timer einzustellen und die gewünschte Luftfeuchtigkeit
einzustellen, aber es ist nicht möglich, die Geschwindigkeit auszuwählen.
Wenn Sie den Timer nicht einstellen, arbeitet das Gerät fortlaufend 10 Stunden lang,
stoppt dann für eine halbe Stunde, um eine Überhitzung zu vermeiden, und startet dann
automatisch neu.
I TASTE FÜR DIE BEWEGLICHE VERSCHLUSSKLAPPE: Mit dieser Taste können Sie das Ein- und
Ausschalten der beweglichen Verschlussklappe steuern. Durch Drücken der Taste öffnet sich
die Klappe automatisch. Sie können den Öffnungswinkel der Klappe durch erneutes Drücken
einstellen. Die bewegliche Verschlussklappe kann bis zu einem Winkel von 90° geöffnet werden.
1 Griff
2 Bedienfeld
3 Luftauslass
4 Öffnung für kontinuierliche Entwässerung
5 Wasserbehälterabdeckung
6 Schwimmer
BESTANDTEILE (SIEHE SEITE 2)
7 Wasserbehälter
8 Wasserbehälterfüllanzeige
9 Auswechselbarer Filter
10 Lufteinlass
11 Integriertes Hygrometer
12 Elektrisches Kabel
BEDIENFELD (SIEHE SEITE 3)
A BON/OFF-Taste
B Kontrollleuchte "In Betrieb"
C Kontrollleuchte "Wasserbehälter voll"
D Geschwindigkeitstaste
E Timer-Taste
F Luftfeuchtigkeits-Taste
G HygroSmart® Kontrollleuchte
H Wäschetrocknungs-Taste
I Taste für die bewegliche Verschlussklappe
ENLEERUNG DES WASSERBEHÄLTERS (SIEHE SEITE 3)
Das Gerät stoppt automatisch, sobald der Wasserbehälter des Geräts voll ist und die Anzeige "Full" ( C)
leuchtet. Wenn Sie den Timer programmiert haben, zeichnet das Gerät die verbleibende Betriebszeit
an. Nach dem Entleeren des Wasserbehälters setzt das Gerät das aktuelle Programm fort.
1 Schalten Sie das Gerät aus und ziehen Sie den Wasserbehälter heraus.
2 Nehmen Sie die Abdeckung des Wasserbehälters ab.
3 Leeren Sie das Kondensat.
4 Setzen Sie die Abdeckung des Wasserbehälters wieder auf und positionieren Sie ihn wieder in
das Gerät. Drücken Sie dann die ON/OFF -Taste und wählen Sie die gewünschte Betriebsart.
Der Entfeuchter ist mit einem Positionierungssensor des Wasserbehälters ausgestattet. Aus
Sicherheitsgründen stoppt das Produkt, wenn der Wasserbehälter fehlt oder falsch positioniert
ist und die Anzeigen "Power" und "Full" leuchten auf.
VORSICHTSMASSNAHMEN
• Achten Sie darauf, dass das Produkt auf einer trockenen und ebenen Fläche aufgestellt wird.
• Lassen Sie auf der Rückseite, den Seiten und der Vorderseite des Gerätes mindestens 50 cm Platz.
• Achten Sie darauf, dass der auswechselbare Filter und der Wasserbehälter richtig positioniert
und eingeschoben sind.
• Entfernen Sie den Schwimmer nicht aus dem Wasserbehälter, da dies den Start des Gerätes
verhindert.
18 19

• Stellen Sie sicher, dass das Gerät ausgeschaltet und vom Stromnetz getrennt ist, besor Sie es
in irgendeiner Weise manipulieren.
• Tauchen Sie das Gerät nicht in Wasser oder andere Flüssigkeiten.
• Zur Reinigung des Geräts keine korrosiven, abrasiven oder entammbaren Produkte verwenden.
REINIGUNG DES AUSWECHSELBAREN FILTERS: Der auswechselbare Filter fängt Staub auf und
erhöht die Efzienz des Gerätes. Es wird empfohlen, ihn jeden Monat zu säubern. Ziehen Sie an
dem Griff des auswechselbaren Filters, reinigen Sie ihn mit warmem Wasser und einer weichen
Bürste, trocknen Sie ihn dann und setzen Sie ihn wieder ein.
Achten Sie darauf, den Filter nicht in direkter Sonneneinstrahlung oder in der Nähe einer starken
Wärmequelle zu trocknen.
SAÜBERN DES GERÄTES: Benutzen Sie ein weiches Tuch um den Staub an den Luftein - und -
auslässen zu reinigen.
SAÜBERN DES WAASERBEHÄLTERS: Entfernen Sie den Wasserbehälter aus dem Gerät und nehmen
Sie die Abdeckung ab. Um Kalkablagerungen zu vermeiden, reinigen Sie den Wasserbehälter
mindestens einmal im Monat mit einem geeigneten Produkt oder mit weißem Essig.
LAGERUNG DES GERÄTES: Um jegliche Vermehrung von Bakterien oder Viren zu vermeiden,
lagern Sie das Gerät niemals mit Wasser im Wasserbehälter und stellen Sie sicher, dass das
gesamte Gerät vollständig trocken ist.
1. Entleeren und reinigen Sie den Wasserbehälter des Gerätes.
2. Reinigen Sie die Luftein- und -auslässe sowie den auswecheselbaren Filter des Gerätes.
3. Nachdem die verschiedenen Komponenten richtig getrocknet sind, lagern Sie das Produkt
an einem staubfreien, sauberen, trockenen und belüfteten Ort.
WARTUNG
FAQ
Problem Ursache Lösung
Das Gerät funktionniert
nicht
> Das Produkt ist nicht richtig
angeschlossen oder
es liegt ein elektrisches
Anpassungsproblem vor.
> Schließen Sie den Stecker
korrekt an und stellen Sie
sicher, dass die Spannung
korrekt ist, und dass das
Stromnetz ordnungsgemäß
funktioniert. Vermeiden Sie
Mehfachsteckdosen.
> Es gibt ein Problem mit dem
Stromnetz des Hauses.
> Der Wasserbehälter ist voll. > Leeren Sie den
Wasserbehälter.
> Der Wasserbehälter ist nicht
korrekt eingesetzt. > Rasten Sie den
Wasserbehälter korrekt ein.
Verminderte Leistung
des Gerätes
(weniger Wasser im
Wasserbehälter)
> Der auswechselbare Filter
ist verschmutzt, was den
Luftstrom behindert.
> Säubern Sie den
auswechselbaren Filter.
> Der Luftein- oder -auslass
wird durch etwas blockiert.
> Lassen Sie mindestens 50 cm
Platz auf der Rückseite, den
Seiten und der Vorderseite
des Gerätes
> Die Temperatur ist zu niedrig.
> Unter 0°C arbeitet das
Gerät im Frostschutzmodus.
Das Gerät kann daher
nicht bis zum Maximum
seiner Leistungsfähigkeit
entfeuchten.
> Die Luftfeuchtigkeit ist
bereits niedrig.
Ungewöhnliches
Geräusch
> Etwas bloquiert den
Ventilator. > Stellen Sie sicher, dass nichts
den Lufstrom verhindert.
> Das Gerät hat ein
Funktionsproblem.
> Wenden Sie sich an
den Kundendienst Ihres
Fachhändlers.
Leck >Das Gerät steht schief oder
schlecht.
> Stellen Sie das Gerät vor der
Inbetriebnahme auf eine
ebene Fläche.
Der Ventilator
funktioniert auch bei
ausges-
chaltetem
Gerät.
> Das Gerät belüftet weitere
4 Minuten, um selbst
abzukühlen.
> Das ist normal, und das Gerät
stoppt automatisch, nach 4
Minuten.
Die aus dem Gerät
austretende Luft ist
heiß und riecht etwas.
> Wenn die Temperatur
zwischen Warm- und
Kaltwärmetauscher hoch ist,
kann es zu einem leichten
Geruch kommen.
> Das ist normal. Der
enstandene Geruch ist
temporär.
KONTINUIERLICHE ENTWÄSSERUNG (SIEHE SEITE 3)
Dank des Abflussschlauches für kontinuierliche Entwässerung arbeitet das Gerät autonom, ohne
das Sie dabei den Wasserbehälter entleeren müssen. Achten Sie darauf, dass der Schlauch
nicht verbogen ist und dass er nach unten geneigt ist, damit das Wasser leicht abfließen kann.
Stellen Sie sicher, dass der Wasserbehälter tasächlich leer ist.
1. Schalten Sie das Gerät aus, entfernen Sie den Wasserbehälter und den Plastikverschluss an
der Öffnung für den kontinuirlichen Abflussschlauch ( 1).
2. Führen Sie den Schlauch durch die dafür vorgesehene Öffnung, dann in das Innere des
Gerätes und verbinden Sie ihn schließlich mit der Abflussöffnung.
3. Setzen Sie den Wasserbehälter wieder ein.
20 21

1. Lees de instructies aandachtig door voor-
dat u de luchtontvochtiger Evel in gebruik
neemt.
2. Elk gebruik dat afwijkt van het aanbevolen
gebruik kan brand, elektrische overspan-
ning of persoonlijk letsel veroorzaken.
3. Verwijder het verpakkingsmateriaal en
controleer of de luchtontvochtiger Evel
niet beschadigd is. Als u twijfels heeft over
de staat van het apparaat, neem het dan
niet in gebruik en contacteer de verko-
per.
4. Laat kinderen niet met de verschillende
verpakkingsonderdelen spelen. Let extra
goed op bij gebruik in de nabijheid van
kinderen.
5. Controleer of de spanning die op het ap-
paraat staat aangegeven overeenkomt
met die van uw elektriciteitsnet voordat
u de luchtontvochtiger Evel in gebruik
neemt.
6. Zorg ervoor dat de stekker goed in het
stopcontact zit. Als de stekker niet goed is
aangesloten, kan deze oververhit raken.
7. Het gebruik van elektrische verlengka-
bels kan oververhitting en brandgevaar
veroorzaken.
8. Trek niet aan het netsnoer om de stekker
uit het stopcontact te halen. Grijp de stek-
ker zelf vast en trek eraan om het nets-
noer uit het stopcontact te halen.
9. Steek geen voorwerpen in het apparaat.
Het apparaat niet afdekken en geen
voorwerpen aanbrengen of plaatsen die
de luchtstroom kunnen belemmeren. Dit
kan elektrische schokken of schade aan
het apparaat veroorzaken. Steek geen
vingers of voorwerpen in de luchtinlaat of
-uitlaat van het apparaat om lichamelijk
letsel te voorkomen.
10. Tijdens gebruik moet de minimale afs-
tand t.o.v. wanden en voorwerpen mins-
tens 50 cm zijn aan de achterzijde, zi-
jkanten en voorzijde van het apparaat.
11. Om brandgevaar en elektrische schok-
ken te voorkomen, gebruik geen water,
reinigingsmiddelen of ontvlambare pro-
ducten om de buiten- en binnenkant
van het apparaat te reinigen.
12. Gebruik geen insectenspray, parfum of
andere ontvlambare spray in de buurt
van het apparaat wanneer het in ge-
bruik is.
13. Gebruik het apparaat nooit als er gevaar
bestaat dat het in een vloeistof valt.
14. Zorg ervoor dat het apparaat op een
vlakke en horizontale ondergrond staat.
15. Plaats het apparaat niet in de buurt van
een airconditioner om te vermijden dat
er zich condenswater vormt op en in het
apparaat.
16. Gebruik de luchtontvochtiger Evel niet
buiten(shuis).
17. Haal de stekker steeds uit het stopcontact
wanneer u de luchtontvochtiger ver-
plaatst.
18. Haal de stekker steeds uit het stopcontact
wanneer de ontvochtiger niet in gebruik is.
19. Het apparaat moet schoon en in goede
staat worden gehouden.
20. Gebruik enkel aanbevolen reserveon-
derdelen (niet-ofciële onderdelen kun-
nen gevaarlijk zijn en de garantie ongel-
dig maken).
21. Bewaar de luchtontvochtiger Evel op
een droge en veilige plaats, buiten het
bereik van kinderen.
22. Het netsnoer kan bij beschadiging wor-
den vervangen door de verkoper. Deze
herstelling mag alleen worden uitge-
voerd door gekwaliceerde en deskun-
dige vakmensen.
23. Dit apparaat mag niet worden gebruikt
door kinderen jonger dan 8 jaar. Lees de
handleiding aandachtig door en wees
voorzichtig wanneer u de luchtontvoch-
tiger Evel in gebruik neemt.
Wij danken u voor de aankoop van de luchtontvochtiger Evel, een product van
air&me. Wij hopen dat u tevreden bent met uw aankoop en dat het apparaat zal
bijdragen aan de verbetering van de luchtkwaliteit in uw woning.
Net als voor elk ander elektrisch apparaat is een correct onderhoud belangrijk
om mogelijke verwondingen of schade te voorkomen. Lees de gebruiksaanwijzing
aandachtig door alvorens u het toestel in gebruik neemt en bewaar deze zorgvuldig.
De onderneming WAF-direct is niet aansprakelijk voor schade veroorzaakt door
niet-naleving van de gebruiksaanwijzing. Dit apparaat is bestemd voor privé-
en huishoudelijk gebruik, en voor de in deze gebruiksaanwijzing beschreven
doeleinden. Elk oneigenlijk gebruik en elke technische wijziging aan het apparaat
houdt een ernstig gevaar in voor de gezondheid.
NEDERLANDS
BELANGRIJKE VEILIGHEIDSVOORSCHRIFTEN
Om brandgevaar en elektrische schokken te voorkomen moet de stekker van het apparaat
steeds uit het stopcontact worden gehaald bij het reinigen en verplaatsen, en wanneer
het apparaat niet in gebruik is. Doe altijd een beroep op gekwaliceerde en deskundige
personen voor herstellingen
Netspanning
Afmetingen
Nettogewicht
Aantal snelheidsstanden
Maximaal elektrisch vermogen
Geschikt voor het ontvochtigen van ruimtes tot
Inhoud condensreservoir
Bedrijfstemperatuur
Ontvochtigingscapaciteit
220-240 V
455 x 300 x 200 mm (H x B x D)
5,7 kg
3
650 W
90 m²
2,5 L
0°C - 35°C
7 L/dag (30°C, 80 % relatieve vochtigheid)
TECHNISCHE GEGEVENS
ONGEVALLENPREVENTIE
De veiligheid van dit toestel is conform de geldende technische regels en normen
in de EU.
Voor alle verdere informatie of inlichtingen, gelieve onze website te bezoeken:
www.airandme.fr/en
Onze klantenservice is bereikbaar op het volgende adres: [email protected]
22 23

1. Sluit het apparaat aan op een stopcontact.
• Alle indicatielampjes op het bedieningspaneel lichten op gedurende 1 seconde, waarna
ze weer uitgaan.
• Tegelijkertijd weerklinkt 3 keer een geluidssignaal.
• Wanneer de luchtontvochtiger is aangesloten op het stopcontact, gaat het indicatielampje
'Power' rood branden.
2. Druk op de AAN/UIT-knop ( A) om het apparaat in te schakelen. De verstelbare luchtuitlaat
gaat open.
3. Druk nogmaals op de AAN/UIT-knop om het apparaat uit te schakelen.
• Het indicatielampje 'Power' gaat rood branden en de andere indicatielampjes gaan uit.
• Nadat de luchtontvochtiger is uitgeschakeld, blijft het apparaat gedurende 4 minuten
lucht ventileren. Vervolgens keert de verstelbare uitlaat terug naar de beginpositie en
stopt het apparaat volledig met werken.
Handig: het apparaat bewaart automatisch de laatst gebruikte instellingen voor een volgend
gebruik.
INGEBRUIKNAME
HOOFDFUNCTIES
D KNOP 'SNELHEID' : Druk verschillende keren op deze knop om de snelheid aan te passen
van de luchtstroom die wordt geproduceerd door het apparaat. U kunt kiezen tussen 3
verschillende snelheidsstanden: LOW (zwakke luchtstroom), MED (matige luchtstroom) of
HIGH (sterke luchtstroom).
E KNOP 'TIMER': Druk verschillende keren op deze knop om de tijdsduur van de ontvochtigings-
cyclus te kiezen: 2 uur, 4 uur of 8 uur. Druk nogmaals op de knop om de functie 'Timer' te
annuleren. Het apparaat blijft nu continu draaien.
F KNOP 'LUCHTVOCHTIGHEID': Druk verschillende keren op deze knop om de gewenste voch-
tigheidsgraad te kiezen. U kunt kiezen tussen 3 opties: HygroSmart®, 60% of 70%.
• In de HygroSmart®-modus ( G) wordt de luchtvochtigheid op het ideale peil gehouden
(tussen 40% en 60%). Het indicatielampje knippert als de luchtvochtigheid in de omge-
vingslucht al onder de 40% is.
• Stel de vochtigheidsgraad in op 60% als u de luchtontvochtiger wilt gebruiken in een opslagkelder.
• Stel de vochtigheidsgraad in op 70% als u de luchtontvochtiger wilt gebruiken in een wijnkelder.
Wanneer de luchtvochtigheid lager is dan het ingestelde vochtigheidsniveau, stopt het appa-
raat met ontvochtigen, maar de ventilator blijft werken. Als de luchtvochtigheid hoger is dan de
ingestelde luchtvochtigheid, start het apparaat automatisch opnieuw met de ontvochtiging.
Het is mogelijk om de drie functies tegelijk te combineren: keuze van de snelheid, keuze van de
tijdsduur van de ontvochtigingscyclus en keuze van de vochtigheidsgraad.
H KNOP 'WASDROOGFUNCTIE': Druk op deze knop om de luchtontvochtiger op volle snelheid
te laten draaien. In de wasdroogmodus kunt u de Timer en de vochtigheidsgraad instellen,
maar niet de snelheid kiezen.
Als u de Timer niet instelt, zal het apparaat gedurende 10 uur aan een stuk werken, ver-
volgens een half uur stoppen om oververhitting te voorkomen en vervolgens automatisch
opnieuw starten.
I KNOP 'VERSTELBARE LUCHTUITLAAT': Met deze knop kunt u de verstelbare luchtuitlaat bedie-
nen. Druk één keer op de knop om de verstelbare luchtuitlaat automatisch te openen. Druk
een tweede keer op de knop om de openingshoek te regelen. De verstelbare luchtuitlaat
kan worden geopend tot een hoek van 90°.
1 Handgreep
2 Bedieningspaneel
3 Luchtuitlaat
4 Opening voor continue afvoer
5 Deksel condensreservoir
6 Vlotter
ONDERDELEN (ZIE PAGINA 2)
7 Condensreservoir
8 Indicator voor waterniveau condensreservoir
9 Verwijderbare lter
10 Luchtinlaat
11 Ingebouwde hygrostaat
12 Netsnoer
BEDIENINGSPANEEL (ZIE PAGINA 3)
A AAN/UIT-knop
B Indicatielampje 'In bedrijf'
C Indicatielampje 'Condensreservoir vol'
D Knop 'Snelheid'
E Knop 'Timer'
F Knop 'Luchtvochtigheid'
G Indicatielampje 'HygroSmart®'
H Knop 'Wasdroogfunctie'
I Knop 'Verstelbare luchtuitlaat'
LEGEN VAN HET CONDENSRESERVOIR (ZIE PAGINA 3)
De luchtontvochtiger schakelt zichzelf automatisch uit wanneer het condensreservoir vol is en het
indicatielampje 'Full' ( C) gaat branden. Als de Timer actief is, slaat het apparaat de resterende tijd
van de ontvochtigingscyclus automatisch op. Nadat het condensreservoir is leeggemaakt, zal de
luchtontvochtiger het programma hervatten.
1 Schakel de luchtontvochtiger uit en trek het condensreservoir uit het apparaat.
2 Trek het deksel los van de bevestigingsclips van het condensreservoir.
3 Giet het condenswater weg.
4 Plaats het deksel terug op het reservoir en plaats daarna het reservoir terug in de luchtontvochti-
ger. Druk vervolgens op de AAN/UIT-knop en selecteer de gewenste ontvochtigingsmodus.
De ontvochtiger is uitgerust met een sensor voor de juiste positie van het condensreservoir. Uit
veiligheidsoverwegingen stopt het apparaat automatisch wanneer het reservoir ontbreekt of
slecht geplaatst is en de indicatielampjes 'Power' en 'Full' gaan branden.
VOORZORGSMAATREGELEN
• Zorg ervoor dat het apparaat op een droge en vlakke ondergrond staat.
• De minimale afstand t.o.v. wanden en voorwerpen moet minstens 50 cm zijn aan de
achterzijde, zijkanten en voorzijde van het apparaat.
• Zorg ervoor dat de verwijderbare filter en het condensreservoir correct geplaatst en
geïnstalleerd zijn.
• Verwijder de vlotter niet uit het condensreservoir. Zonder vlotter kan de luchtontvochtiger
niet worden ingeschakeld.
24 25

• Haal de stekker steeds uit het stopcontact voordat u werkzaamheden uitvoert aan het
apparaat.
• Dompel het apparaat niet onder in water of in een andere vloeistof.
• Gebruik geen bijtende, schurende of ontvlambare producten om het apparaat schoon te
maken.
REINIGING VERWIJDERBARE FILTER: De verwijderbare lter vangt stofdeeltjes op en verhoogt
de effectiviteit van het apparaat. Het is aanbevolen deze elke maand schoon te maken.
Trek de verwijderbare lter uit het apparaat met behulp van de handgreep. Maak vervolgens
de lter schoon met lauw water en een zachte borstel. Plaats de lter daarna terug in de
luchtontvochtiger.
Laat de lter niet drogen in direct zonlicht of in de buurt van een krachtige warmtebron.
REINIGING LUCHTONTVOCHTIGER: Gebruik een zachte vod om stofdeeltjes te verwijderen uit
de luchtinlaten en -uitlaten.
NETTOYAGE DU RÉSERVOIR : Trek het condensreservoir uit het apparaat en trek het deksel los
van de bevestigingsclips. Om kalkaanslag te voorkomen raden we aan het condensreservoir
minstens één keer per maand schoon te maken met een geschikt product of met witte azijn.
OPBERGING VAN HET APPARAAT: Verwijder al het water uit het condensreservoir en zorg ervoor
dat het apparaat volledig droog is wanneer u het opbergt. Dit voorkomt de verspreiding van
bacteriën en virussen.
1. Leeg het condensreservoir en spoel het goed uit.
2. Reinig de luchtinlaten, luchtuitlaten en verwijderbare lter van het apparaat.
3. Wanneer alle onderdelen helemaal droog zijn, kunt u het apparaat opbergen in een schone,
droge, stofvrije en goed geventileerde ruimte.
ONDERHOUD
FAQ
Probleem Oorzaak Oplossing
Het apparaat
start niet
> Het product is niet correct
aangesloten of de
spanning van het apparaat
komt niet overeen met de
netspanning.
> Controleer de netspanning
en het elektriciteitsnet. Steek
vervolgens de stekker opnieuw
in het stopcontact. Vermijd het
gebruik van tafelcontactdozen en
multistekkers.
> Er is een probleem met
het elektriciteitsnet van de
woning.
> Het condensreservoir is vol. > Leeg het condensreservoir.
> Het condensreservoir is niet
correct geïnstalleerd.
> Duw het reservoir op de
juiste manier terug in de
luchtontvochtiger.
Het apparaat
werkt minder
goed (minder
water in het
reservoir)
> De verwijderbare lter is
verontreinigd en belemmert
de luchtstroom.
> Maak de verwijderbare lter
schoon.
> De luchtinlaat of -uitlaat is
geblokkeerd.
> Laat minstens 50 cm ruimte vrij
aan de achterzijde, voorzijde en
zijkanten van het apparaat.
> De temperatuur is te laag.
> Bij een temperatuur onder
0°C wordt de "anti-vries"
-modus geactiveerd. Om
deze reden functioneert het
apparaat niet op maximale
ontvochtigingscapaciteit.
> De luchtvochtigheid in de
ruimte is al laag.
Abnormaal
geluid
> De ventilator is geblokkeerd. > Controleer of er voorwerpen zijn
die de luchtstroom hinderen of
belemmeren.
> Het apparaat functioneert
niet correct.
> Neem contact op met de
klantenservice van de winkel waar
u het apparaat hebt gekocht.
Het apparaat
lekt
> Het apparaat staat niet
recht of niet stabiel.
> Plaats het apparaat op een vlakke
ondergrond en start het opnieuw
op.
Het apparaat is
uitgeschakeld
maar de
ventilator blijft
draaien
> Nadat het apparaat is
uitgeschakeld, blijft het
gedurende 4 minuten lucht
ventileren om af te koelen.
> Dit is normaal en het apparaat
stopt na 4 minuten automatisch
met werken.
De lucht die uit
het apparaat
komt, is warm
en heeft een
geurtje
> Wanneer de temperatuur
tussen de warme en koude
warmtewisselaars hoog
is, kan er een lichte geur
ontstaan.
> Dit is normaal. Deze geur is tijdelijk.
CONTINUE AFVOER (ZIE PAGINA 3)
Dankzij de continue afvoer van het condenswater via de afvoerslang kan de ontvochtiger
blijven doorwerken zonder dat het condensreservoir hoeft te worden leeggemaakt. Zorg
ervoor dat de afvoerslang niet gebogen of geknikt is en in neerwaartse richting loopt, zodat
het water gemakkelijk naar beneden kan worden afgevoerd. De afvoerslang mag niet worden
verlengd, verdraaid of vervormd. Controleer of het condensreservoir leeg is.
1. Schakel de luchtontvochtiger uit en trek het condensreservoir uit het apparaat. Verwijder
vervolgens de plastic afsluitdop van de opening, zodat de afvoerslang ( 1) er doorheen
kan lopen.
2. Steek de afvoerslang door de hiervoor bestemde opening in de luchtontvochtiger en sluit
vervolgens de slang aan op de aansluiting voor continue afvoer ( 2), die zich binnenin het
apparaat bevindt.
3. Plaats het condensreservoir terug in de ontvochtiger.
26 27

1. Przeczytaj uważnie instrukcję przed pr-
zystąpieniem do uruchomienia Evel.
2. Każde działanie niezgodne z instrukcją
może wywołać pożar, przepięcie i grozić
uszczerbkiem na zdrowiu i życiu.
3. Wyjmij Evel z opakowania i sprawdź, czy
osuszacz nie jest uszkodzony. W razie wąt-
pliwości skontaktuj się ze sprzedawcą.
4. Dzieciom nie wolno bawić się ani opako-
waniem, ani urządzeniem. Zwróć szcze-
gólną uwagę, jeśli dziecko znajduje się w
pobliżu.
5. Urządzenie działa pod napięciem
określonym na opakowaniu i produkcie.
Należy sprawdzić, czy pasuje dla insta-
lacji elektrycznej, do której będzie po-
dłączone.
6. Upewnij się, czy wtyczka dobrze siedzi
gniazdku, aby nie dopuścić do przegrza-
nia.
7. Korzystanie z przedłużacza może wy-
wołać pożar lub przegrzanie instalacji
elektrycznej.
8. Aby odłączyć urządzenie od prądu nie
ciągnij za kabel, lecz chwyć za wtyczkę.
9. Nie przykrywaj urządzenia ani go nie
blokuj, zaburza to przepływ powietrza i
może spowodować porażenie prądem
lub innego rodzaju szkody. Nie wkładaj
do urządzenia żadnych przedmiotów.
10. Gdy urządzenie pracuje, pozostaw z
każdej jego strony co najmniej 50 cm
wolnej przestrzeni.
11. Aby uniknąć porażenia prądem elektry-
cznym, urządzenia nie należy narażać
na kontakt z wodą lub wilgotną powie-
rzchnią.
12. W pobliżu Evel nie stosuj sprayów, per-
fum ani innych łatwopalnych środków.
13. Evel nie może stać w miejscu zagrożo-
nym zalaniem wodą.
14. Nie stawiaj Evel w pobliżu klimatyzatora,
aby nie dopuścić do kondensacji wody.
15. Postaw Evel na płaskiej i równej powie-
rzchni.
16. Nie włączaj urządzenia na zewnątrz.
17. Gdy przenosisz urządzenie, zawsze wy-
jmuj wtyczkę z gniazdka.
18. Jeśli nie korzystasz z urządzenia, wyjmij
wtyczkę z gniazdka.
19. Utrzymuj urządzenie w czystości.
20. Korzystaj z zalecanych części zamienny-
ch. Części nieautoryzowane mogą oka-
zać się niebezpieczne i gwarancja ich
nie pokrywa!
21. Przechowuj Evel w suchym i bez-
piecznym miejscu, z daleka od dzieci.
22. W przypadku uszkodzenia kabla, skon-
taktuj się ze sprzedawcą i sięgnij po
usługę wykwalikowanego serwisanta.
23. Produkt nie jest odpowiedni dla dzieci
poniżej 8 roku życia.
Dziękujemy za zakup osuszacza powietrza Evel, marki air&me. Mamy nadzieję, że
przyniesie Ci pełną satysfakcję i poprawi jakość powietrza w pomieszczeniach.
Podobnie jak w przypadku wszystkich urządzeń elektrycznych, ważne jest
właściwe użytkowanie urządzenia, w celu uniknięcia wszelkiego rodzaju szkód i
obrażeń. Przed uruchomieniem urządzenia prosimy o zapoznanie się z instrukcją i
stosowanie się do wskazówek w niej zawartych. Nie ponosimy odpowiedzialności
za uszkodzenia wynikłe z użytkowania niezgodnego z niniejszą instrukcją obsługi.
Osuszacz jest przeznaczony do użytku domowego, w celach opisanych w instrukcji.
Wykorzystywanie go w innych celach może byc groźne dla zdrowia i życia.
POLSKI
ZASADY BEZPIECZEŃSTWA
ZAPOBIEGANIE WYPADKOM DOMOWYM
Dla zachowania bezpieczeństwa: gdy nie korzystasz z osuszacza, zawsze wyjmuj wtyczkę
z gniazdka. Rób tak również wtedy, gdy przesuwasz urządzenie lub chcesz je wyczyścić.
W przypadku konieczności naprawy, sięgnij po wykwalikowaną pomoc.
Produkt jest zgodny z normami i przepisami obowiązującymi w UE.
W celu uzyskania dodatkowych informacji prosimy odwiedzić naszą stronę:
www.oddychajswobodnie.pl
Dział obsługi klienta jest dostępny pod adresem e-mail:
Napięcie
Wymiary
Waga netto
Poziomy prędkości
Maksymalne zużycie energii
Odpowiedni do pomieszczeń
Pojemność zbiornika
Średni zakres temperatur
Wydajność
220-240 V
455 x 300 x 200 mm (W x S x G)
5,7 kg
3
650 W
90 m²
2,5 L
0°C - 35°C
7 L/dzień (30°C, 80 % wilgotność względna)
SPECYFIKACJA TECHNICZNA
28 29

1. Podłącz urządzenie do prądu.
• Wszystkie wskaźniki na panelu cyfrowym zaświecą się na 1 sekundę, a następnie zgasną.
• W tym samym momencie urządzenie wyda trzy sygnały dźwiękowe.
• Gdy urządzenie pracuje, wskaźnik “Zasilanie” jest podświetlony na czerwono.
2. Naciśnij ON/OFF ( A) aby włączyć urządzenie. Otworzy się klapka.
3. Naciśnij ON/OFF jeszcze raz, aby wyłączyć urządzenie.
• Wskaźnik “Zasilanie” podświetli się na czerwono, a pozostałe się wyłączą.
• Po wyłączeniu urządzenia wentylator będzie działał jeszcze przez 4 minuty, następnie
ruchoma klapka wróci na pozycję startową i urządzenie wyłączy się całkowicie.
Wskazówka: po wyłączeniu z prądu urządzenie zapamiętuje ustawienia.
INSTRUKCJA OBSŁUGI
GŁÓWNE FUNKCJE
D “PRĘDKOŚĆ”: Tym przyciskiem możesz dopasować siłę podmuchu powietrza do swoich
potrzeb. Naciśnij go kilka razy. Masz do wyboru trzy tryby: SŁABY (low) podmuch powietrza,
ŚREDNI (med) podmuch powietrza i SILNY (high) podmuch powietrza.
E “TIMER”: Tym przyciskiem wybierzesz czas pracy urządzenia (czas osuszania): 2 godz., 4 godz.
lub 8 godz. Jeśli naciśniesz go jeszcze raz, urządzenie przejdzie w tryb pracy ciągłej.
F “WILGOTNOŚĆ”: Tym przyciskiem możesz wybrać poziom wilgotności powietrza. Masz do
wyboru trzy opcje: HygroSmart®, 60 % lub 70 %.
• Funkcja HygroSmart® ( G) pozwala na utrzymanie idealnego poziomu wilgotności powietrza
(pomiędzy 40% a 60%). Lampka kontrolna miga, gdy poziom wilgotności w otaczającym
powietrzu wynosi już poniżej 40%.
• Ustaw urządzenie na 60%, jeśli chcesz korzystać z niego w piwnicy.
• Ustaw urządzenie na 70%, jeśli chcesz korzystać z niego w piwniczce na wino itp.
Gdy wilgotność powietrza otoczenia jest niższa niż ustawiony poziom wilgotności, osuszacz
przestaje suszyć powietrze, ale jego wentylator nadal działa. Gdy wilgotność powietrza w
otoczeniu jest wyższa niż ustawiony poziom wilgotności, urządzenie automatycznie uruchamia
się ponownie, aby osuszać.
Można łączyć wszystkie trzy funkcje: prędkość, czas osuszania oraz poziom wilgotności.
H “SUSZENIE PRANIA”: Po wybraniu tego przycisku urządzenie zacznie pracować przy najwyższej
prędkości. Możesz do tego dobrać pożądany czas pracy w tym trybie (TIMER-em) i wybrać
poziom wilgotności. Nie jest jednak w tym przypadku możliwe sterowanie prędkością. Jeśli
nie skorzystasz z funkcji „Timer”, urządzenie będzie pracowało przez kolejnych 10 godzin i
będzie się zatrzymywało na chwilę co pół godziny, aby nie dopuścić do przegrzania.
I “USTAWIENIE KIERUNKU WYLOTU POWIETRZA”: Ten przycisk steruje ruchomą klapką – jej
otwieraniem, zamykaniem i kątem otwarcia. Po wybraniu tego przycisku klapka otworzy się
automatycznie. Naciśnij przycisk jeszcze raz: możesz wybrać kąt otwarcia, a tym samym kąt
podmuchu powietrza.
1 Uchwyt
2 Panel cyfrowy
3 Kratka wylotowa
4 Otwór do węża na skropliny
5 Pokrywka zbiornika na wodę
6 Pływak
BUDOWA (PATRZ STRONA 2)
7 Zbiornik na wodę
8 Czujnik zbiornika na wodę
9 Filtr wymienny
10 Kratka wlotowa
11 Higrometr
12 Kabel
PANEL CYFROWY (PATRZ STRONA 3)
A Przycisk ON/OFF (zasilanie)
B Wskaźnik “Urządzenie w działaniu”
C Wskaźnik “Pełny zbiornik”
D Przycisk “Prędkość”
E Przycisk “Timer”
F Przycisk “Wilgotność”
G Wskaźnik “HygroSmart®”
H Przycisk “Suszenie prania”
I Przycisk “Ustawienie kierunku wylotu powietrza”
OPRÓŻNIANIE ZBIORNIKA (PATRZ STRONA 3)
Gdy zbiornik na skropliny się napełni, na panelu podświetli się wskaźnik “Pełny zbiornik” ( C) i
urządzenie automatycznie się wyłączy. Jeśli wcześniej ustawiłeś czas pracy urządzenia (TIMER),
do końca pozostałego czasu urządzenie wstrzyma pracę. Jeśli w tym czasie opróżnisz zbiornik, po
włożeniu go na miejsce urządzenie powróci do zadanego programu i wznowi pracę.
1 Wyłącz urządzenie i wyjmij zbiornik.
2 Odepnij pokrywę zbiornika.
3 Wylej wodę.
4 Zamocuj pokrywę zbiornika i włóż zbiornik z powrotem na miejsce. Następnie naciśnij ON/OFF
i wybierz pożądany tryb pracy urządzenia.
Osuszacz ma wmontowany czujnik pozycji zbiornika. Dla bezpieczeństwa urządzenie wyłącza
się, jeśli zbiornika nie ma albo został nieprawidłowo zamocowany. Podświetlają się przy tym
również wskaźniki zasilania (ON/OFF) oraz “Pełny zbiornik”.
ŚRODKI OSTROŻNOŚCI
• Upewnij się, czy urządzenie stoi na suchej i płaskiej powierzchni.
• Pozostaw co najmniej 50 cm z każdej strony urządzenia.
• Upewnij się, że filtr i zbiornik są prawidłowo zamontowane.
• Nie wyjmuj pływaka ze zbiornika, ponieważ chroni on urządzenie przed niepożądanym
uruchomieniem.
30 31

• Przed przystąpieniem do jakichkolwiek czynności upewnij się, że urządzenie jest wyłączone i
że wtyczka jest odłączona od gniazdka.
• Nie zanurzaj urządzenia w wodzie ani żadnym innym płynie.
• Do czyszczenia nie używaj żadnych żrących, łatwopalnych ani korodujących środków
czystości.
CZYSZCZENIE FILTRA: Wyjmowany ltr wychwytuje kurz i poprawia skuteczność urządzenia.
Zalecamy czyszczenie go raz w miesiącu. Wyjmij ltr za pomocą uchwytu, umyj go wodą i
miękką szczotką, a następnie włóż go z powrotem.
UWAGA: Nie susz ltra w pełnym słońcu ani w pobliżu źródła silnego ciepła.
CZYSZCZENIE URZĄDZENIA: Usuń kurz z powierzchni oraz z wlotu i wylotu powietrza za pomocą
delikatnej ściereczki.
CZYSZCZENIE ZBIORNIKA: Wyjmij zbiornik i zdejmij pokrywę. Myj zbiornik co najmniej raz w
miesiącu za pomocą roztworu wody i octu.
PRZECHOWYWANIE: Aby uniknąć namnażania się bakterii i wirusów, nie przechowuj urządzenia
ze zbiornikiem pełnym wody. Upewnij się, że urządzenie jest CAŁKOWICIE suche.
1. Opróżnij i umyj zbiornik.
2. Wyczyść ltr i wlot oraz wylot powietrza.
3. Po wysuszeniu wszystkich części urządzenia przechowuj je w miejscu zabezpieczonym przed
kurzem, suchym i dobrze wentylowanym.
UTRZYMANIE
FAQ
Problem Przyczyna Rozwiązanie
Urządzenie nie
działa
> Produkt nie jest prawidłowo
podłączony do prądu
lub pojawił się problem z
zasilaniem.
> Włóż wtyczkę do gniazdka
prawidłowo i sprawdź napięcie
oraz działanie sieci elektrycznej
w domu.
UWAGA: unikaj rozgałęźników!
> Sieć elektryczna w
twoim domu nie działa
prawidłowo.
> Zbiornik jest pełny. > Opróżnij zbiornik.
> Zbiornik nie został
prawidłowo zamocowany
w urządzeniu.
> Wyjmij zbiornik i zamocuj go
prawidłowo.
Spadek
efektywności
urządzenia
(mało wody
w zbiorniku)
> Filtr wyjmowany jest brudny,
co blokuje przepływ
powietrza. > Umyj ltr.
> Wlot powietrza jest czymś
zablokowany.
> Pozostaw z każdej strony
urządzenia co najmniej 50 cm.
wolnej przestrzeni.
> Temperatura jest zbyt niska.
> Poniżej 0°C urządzenie pracuje w
trybie Defrost. W związku z tym nie
może działać na maksymalnym
poziomie.
> Poziom wilgotności
powietrze już jest
odpowiednio niski.
Nietypowy
dźwięk
> Wentylator jest
zablokowany.
> Sprawdź, czy jakiś przedmiot nie
blokuje przepływu powietrza, jeśli
tak, usuń go.
> Pojawił się problem
z funkcjonowaniem
urządzenia. > Skontaktuj się ze sprzedawcą.
Przeciek
> Urządzenie jest przechylone
lub niezabezpieczone
odpowiednio.
> Umieść urządzenie na płaskiej
powierzchni i dopiero teraz je
włącz.
Wentylator stale
pracuje, mimo
że urządzenie
jest wyłączone
> Wentylator pracuje po
wyłączeniu jeszcze 4 minuty,
aby schłodzić urządzenie.
> To normalne działanie, urządzenie
automatycznie zatrzyma się po 4
minutach.
Powietrze
wydmuchiwane
przez urządzenie
jest gorące
i wydziela
nieprzyjemny
zapach
> Gdy temperatura
pomieszczenia jest wysoka,
wówczas pomiędzy
wymiennikami ciepła może
pojawić się nieprzyjemny
zapach.
> To normalny objaw, zapach jest
przejściowy.
TRYB : CIAGŁE OSUSZANIE (PATRZ STRONA 3)
Za pomocą węża na skropliny urządzenie może pracować w trybie ciągłym, bez konieczności
opróżniania zbiornika na wodę. Upewnij się, że wąż nie jest poskręcany i że został pociągnięty w
dół tak, aby woda mogła swobodnie spływać. Pamiętaj, że węża nie wolna niczym przedłużać
ani niczego w nim zmieniać. Upewnij się, że zbiornik jest pusty.
1. Wyłącz urządzenie, wyjmij zbiornik, a następnie usuń plastikową blendę z otworu na wąż ( 1).
2. Przeciągnij wąż przez otwór i zamocuj końcówkę do przyłącza, przez które będzie spływała
woda ( 2).
3. Mieść zbiornik z powrotem na miejsce.
32 33

1. Lue ohjeet huolella ennen Evel-laitteen
käyttöä.
2. Kaikki käytöt, joita valmistaja ei suosittele,
voivat aiheuttaa tulipalon, ylijännitteen tai
henkilövahinkoja.
3. Poista pakkaus ja varmista, että Evel-
laite ei ole vahingoittunut. Jos sinulla
on epäilyksiä, älä käytä laitetta ja ota
yhteyttä jälleenmyyjään.
4. Älä anna lasten leikkiä pakkauksen eri
osilla. Ole erityisen varovainen, kun käyttö
tapahtuu lasten läheisyydessä.
5. Ennen Evel-laitteen käyttöä on varmistet-
tava, että tuotteella ilmoitettu jännite vas-
taa sähköverkon jännitettä.
6. Varmista, että laitteen pistoke on kytketty:
muussa tapauksessa pistoke voi kuumen-
tua liikaa.
7. Jatkojohdon käyttö voi aiheuttaa ylikuu-
menemista ja tulipalovaaran.
8. Älä irrota laitetta sähköverkosta
vetämällä johdosta. Irrota Evel verkosta
aina pitämällä kiinni ja vetämällä pistok-
keesta.
9. Älä peitä ilman virtaamista puhaltimesta
tai laita siihen esineitä: se voi aiheuttaa
sähköiskuja tai vahingoittaa laitetta. Älä
laita sormia laitteen tulo- tai lähtöaukkoi-
hin, sillä se voi aiheuttaa fyysisiä vahinkoja.
10. Jätä 5o cm tilaa laitteen taakse ja sivuille
ja laitteen eteen.
11. Jotta sähköiskun tai tulipalon vaara voi-
daan välttää, älä käytä vettä, pesuai-
netta tai tulenarkaa puhdistusainetta pu-
hdistamaan laitteen sisä- tai ulkopintoja.
12. Älä käytä hyönteismyrkkyjä suihkeena,
hajusteena tai muita suihkeita toimivan
laitteen lähellä.
13. Älä koskaan käytä Evel-laitetta, jos
on olemassa vaara, että se putoaa
nesteeseen.
14. Varmista, että laite on asennettu kuivalle
ja tasaiselle pinnalle.
15. Jotta vesi ei tiivisty laitteen päälle tai
sisälle, sitä ei saa laittaa ilmastointi-
laitteen lähelle.
16. Älä käytä Evel-laitetta ulkona.
17. Irrota Evel aina sähköverkosta, kun siirrät
sitä.
18. Irrota Evel aina sähköverkosta, kun et
käytä sitä.
19. Pidä tuote puhtaana ja hyvässä
käyttökunnossa.
20. Käytä suositeltuja varaosia (virheelliset
varaosat voivat vaarallisia ja kumota
takuun).
21. Säilytä Evel-tuotetta kuivassa ja suoja-
tussa paikassa poissa lasten ulottuvilta.
22. Jos sähköjohto on vahingoittunut,
jälleenmyyjän on vaihdettava se. Vain
pätevät henkilöt saavat tehdä tämän
korjauksen.
23. Alle 8-vuotiaat lapset eivät saa käyttää
tätä laitetta. Lue ohjeet huolella ja käytä
Evel-laitetta varoen.
Kiitämme sinua siitä, että olet ostanut Evel-ilmankuivaajan, joka on air&me-tuote,
Toivomme, että olet siihen täysin tyytyväinen ja se parantaa sisäilmasi laatua.
Kuten kaikkien sähköisten kodinkoneiden kohdalla, tämän laitteen kunnollinen huolto
on tärkeää, jotta vammat ja vahingot voidaan välttää. Lue nämä ohjeet huolella
ennen käyttöä ja säilytä tämä ohje huolella myöhempää käyttöä. WAF-direct ei ota
vastuuta vahingoista, jotka aiheutuvat käyttöohjeen laiminlyömisestä. Laitetta saa
käyttää vain kotona tässä käyttöohjeessa kuvattuihin käyttötarkoituksiin. Virheellinen
käyttö sekä laitteeseen tehdyt tekniset muutokset voivat aiheuttaa terveysriskin ja
hengenvaaran.
SUOMI
TÄRKEITÄ TURVATIEDOTUKSIA
KODIN TAPATURMIEN EHKÄISY
Vaarojen ja sähköiskujen välttämiseksi tuote on aina irrotettava sähköverkosta, kun se ei ole
käytössä, siirrettäessä ja puhdistettaessa laitetta. Korjaustapauksissa on otettava yhteyttä
pätevään henkilöstöön.
Tämä laitteen turvallisuus vastaa Euroopan unionin teknisiä vaatimuksia ja normeja.
Jos kaipaat lisätietoja tai ohjeita, katso Internet-sivujamme: www.airandme.fr/en
Asiakaspalvelumme on käytettävissä seuraavassa osoitteessa: [email protected]
Jännite
Mitat
Nettopaino
Nopeuksien määrä
Sähkön maksimikulutus
IIman kosteuden poiston suositeltu maksimipinta-ala
Säiliön kapasiteetti
Käyttölämpötila
IIman kosteuden poiston kapasiteetti
220-240 V
455 x 300 x 200 mm (K x L x S)
5,7 kg
3
650 W
90 m²
2,5 L
0°C - 35°C
7 L/päivä (30°C, 80 % suhteellinen kosteus)
TEKNISET TIEDOT
34 35

1. Kytke laite sähköverkkoon.
• Ohjauspaneelin kaikki merkkivalot syttyvät 1 sekunniksi ja sammuvat sitten.
• Samaan aikaan laite antaa 3 äänimerkkiä.
• Kun laitteessa on virta, ”Power”-merkkivalo palaa punaisena.
2. Paina ON/OFF-painiketta ( A) käynnistääksesi laitteen. Liikkuva laippa aukeaa.
3. Paina uudestaan ON/OFF-painiketta sammuttaaksesi laitteen.
• Virran merkkivalo ”Power” syttyy palamaan punaisena ja muut merkkivalot sammuvat.
• Laite jatkaa ilman puhaltamista 4 minuutoin ajan sammutuksen jälkeen ja sitten liikkuva
laippa pala alkuasentoon ja laite sammuu kokonaan.
Käytännöllistä: laite tallentaa viimeiset käytön säädöt käytöstä toiseen.
KÄYTTÖOHJEET
PÄÄTOIMINNOT
D NOPEUSPAINIKE: Kun painat painiketta toistuvasti, voit säätää laitteen tuottamaa ilman
virtausta valitsemalla jonkin 3 käyttötavasta: LOW (heikko ilmavirtaus), MED (keskitasoinen
ilmavirtaus) tai HIGH (voimakas ilmavirtaus).
E ”TIMER”/AJASTINPAINIKE: Kun painat painiketta toistuvasti, voit säätää laitteen toiminta-
aikaa: 2 tuntia, 4 tuntia tai 8 tuntia. Kun painat vielä kerran, voit perua ajastintoiminnon ja
antaa laitteen toimia jatkuvassa käytössä.
F KOSTEUSPAINIKE: Kun painat painiketta toistuvasti, voit valita kosteustason 3 vaihtoehdosta:
HygroSmart®, 60% tai 70%.
• HygroSmart® ( G) takaa, että ilman kosteus pysyy ihanteellisella tasollla (välillä 40% ja 60%).
Merkkivalo vilkkuu, jos ilman ilman kosteus on jo alle 40%.
• Säädä laite 60%, jos haluat käyttää sitä varastointikellarissa.
• Säädä laite 70 %, jos haluat käyttää sitä viinikellarissa.
Kun ympäröivän ilman kosteus on alhaisempi kuin asetettu kosteustaso, laite lopettaa
ilmankuivauksen, mutta sen tuuletin jatkaa toimintaansa. Jos ympäristön kosteus on korkeampi
kuin asetettu kosteustaso, laite käynnistää ilmankuivauksen automaattisesti.
Nämä kolme käyttötapaa voi yhdistää: nopeusvalinta, kosteuden poiston ajan valinta ja
kosteustason valinta.
H PYYKINKUIVAUSPAINIKE: Kun painat tätä valitsinta, laite toimii maksimiteholla. Voit säätää
ajastinta ja määrittää halutun kosteustason, mutta nopeutta ei voi säätää.
Jos et säädä ajastinta, laite toimii 10 tuntia keskeytyksettä, sammuu 1/2 tunniksi
ylikuumenemisen välttämiseksi ja käynnistyy uudelleen automaattisesti.
I LIIKKUVA LAIPPA-PAINIKE: Tämän painikkeen avulla voit ohjata liikkuvan laipan käyntiä
ja sammutusta, Kun painat tätä painiketta, laippa aukeaa automaattisesti. Voit säätää
avauskulmaa painamalla kerran. Liikkuva laippa voi avautua aina 90° kulmaan saakka.
1 Kahva
2 Ohjauspaneeli
3 Ilman ulostulo
4 Jatkuvan juoksutuksen aukko
5 Vesisäiliön kansi
6 Uimuri
KOMPONENTIT (KATSO SIVUA 2)
7 Vesisäiliö
8 Säiliön täytön ilmaisin
9 Irrotettava suodatin
10 Ilman sisääntulo
11 Integroitu kosteusmittari
12 Sähkökaapeli
OHJAUSPANEELI (KATSO SIVUA 3)
A ON/OFF-valitsin
B Merkkivalo ”Käytössä”
C Merkkivalo ”Säiliö täynnä”
D Nopeuspainike
E Timer/ajastinpainike
F Kosteuspainike
G Merkkivalo ”HygroSmart®”
H Pyykinkuivauspainike
I Painike ”Liikkuva laippa”
SÄILIÖN TYHJENNYS (KATSO SIVUA 3)
Laite sammuu automaattisesti, kun sen säiliö on täysi ja merkkivalo ”Full” ( C) syttyy. Jos et ole
ohjelmoinut ajastinta, laite rekisteröi jäljellä olevan toiminta-ajan. Kun säiliö on tyhjennetty, laite
jatkaa käynnissä oleva ohjelmaa.
1 Sammuta laite ja ota säiliö pois.
2 Irrota vesisäiliön kansi.
3 Tyhjennä kondensaatiovesi.
4 Laita säiliön kansi takaisin ja sulje se. Paina sitten ON/OFF-painiketta ja valitse käyttötapa.
Kosteudenpoistaja on varustettu säiliön asentoanturilla. Turvallisuuden takia laite sammuu, jos
säiliö puuttuu tai on asennettu väärin ja merkkivalot ”Power” (virta) ja ”Täynnä” syttyvät.
KÄYTTÖVAROITUKSIA
• Varmista, että laite on asennettu kuivalle ja tasaiselle pinnalle.
• Jätä ainakin 50 cm laitteen taakse ja sivuille ja laitteen eteen.
• Varmista, että esisuodatin ja säiliö on asennettu oikein.
• Älä ota uimuria pois säilöstä, sillä se estäisi laitteen käynnistymisen.
36 37

• Varmista, että laite on sammunut ja irrotettu sähköverkosta ennen toimenpiteitä.
• Älä upota laitetta veteen tai muihin nesteisiin.
• Älä käytä syövyttäviä, hankaavia tai helposti syttyviä tuotteita laitteen puhdistamiseen.
IRROTETTAVAN SUODATTIMEN PUHDISTUS: Irrotettava suodatin poistaa pölyä ja pidentää laitteen
tehokasta käyttöaikaa. Se on syytä pestä kerran kuussa. Vedä irrotettavan säiliön kahvasta,
puhdista se haalealla vedellä ja pehmeällä harjalla, kuivaa se siten ja laita takaisin paikoilleen.
Huomio, älä kuivata suodatinta auringossa tai voimakkaan lämmönlähteen lähellä.
LAITTEEN PUHDISTUS: Käytä pehmeää kangasta poistaaksesi pölyn ilman sisääntulosta ja
lähdöstä.
SÄILIÖN PUHDISTUS: Irrota säiliö laitteesta ja irrota kansi. Puhdista säiliö, jotta siihen ei muodostu
kalkkikarstaa ainakin kerran kuussa sopivalla puhdistusaineella tai kirkkaalla etikalla.
LAITTEEN SÄILYTYS: Jotta bakteerit ja virukset eivät pääsisi leviämän, laitetta ei saa säilyttää
vettä säiliössä ja varmista, että koko laite on täysin kuiva.
1. Tyhjennä ja puhdista laitteen vesisäiliö.
2. Puhdista ilman tulo- ja lähtöaukot sekä laiteen irrotettava suodatin.
3. Kun eri elementit ovat kunnolla kuivuneet, laita tuote säilytykseen suojaan pölyltä puhtaaseen,
kuivaan ja hyvällä ilmanvaihdolla varustettuun paikkaan.
HOITO
USEIN TEHTYJÄ KYSYMYKSIÄ
Ongelma Syy Ratkaisu
Laite ei toimi
> Tuotetta ei ole kytketty
kunnolla tai sähkönsyöttö ei
vastaa laitetta.
> Kytke pistoke kunnolla ja varmista,
että sähköverkon jännite on
oikea ja se toimii kunnolla. Vältä
monihaaraisia johtoja.
> Asunnon sähköverkossa on
vikaa.
> Säiliö on täynnä. > Tyhjennä säiliö.
> Säiliötä ei ole kytketty oikein. > Työnnä ja kiinnitä säiliö kunnolla.
Laitteen teho
laskee
(vähemmän
vettä säiliössä)
> Irrotettava suodatin on
likaantunut ja se estää ilman
virtaamista. > Puhdista irrotettava suodatin.
> Jokin tukkii ilman tulon tai
lähdön. > Jätä 50 cm tilaa laitteen taakse ja
sivuille ja laitteen eteen.
> Lämpötila on liian matala.
> Kun lämpötila on alle
0°C, laite toimii ”Anti-gel”
-huurteenpoistokäytössä. Laite ei
siis voi poistaa kosteutta täydellä
teholla.
> Kosteustaso on jo liian
matala.
Epänormaalia
melua
> Jokin estää puhaltimen
toiminnan. > Varmista, että mikään este ei tuki
ilman virtausta.
> Tuotteessa on toimintahäiriö. > Käänny jälleen myyjän puoleen
jälkimyyntipalvelua varten.
Vuoto > Laite on kallellaan tai
huonosti paikoillaan. > Aseta laite vaakasuoralle tasolle
ennen käynnistämistä.
Puhallin toimii
edelleen,
vaikka laite on
sammutettu
> Laite puhaltaa ilmaa vielä
4 minuuttia jäähdytystä
varten.
> Tämä ilmiö on normaali ja laite
sammuu 4 minuutin kuluttua.
Laitteesta
tuleva ilma on
lämmintä ja
sillä on erityinen
tuoksu
> Kun lämpötila on korkea
kuuman ja kylmän
lämmönvaihtimen välillä,
voi muodostua heikkoa
tuoksua.
> Tämä ilmiö on normaali.
Tuoksu häviää ajan myötä.
JATKUVA JUOKSUTUS (KATSO SIVUA 3)
Jatkuvan juoksutuksen letkun asioista laite toimii autonomisesti ilman, että säiliötä tarvitsee
tyhjentää. Varo, että letku ei taitu ja aseta se alaspäiseen kulmaan, jotta vesi pääsee helposti
pois. Älä muuta tyhjennysjohtoa tai jatka sitä. Varmista, että säiliö on tyhjä.
1. Sammuta laite, poista säiliö irrota sitten muovikorkki aukolta, jonka kautta jatkuvan
juoksutuksen letkun voi vetää ( 1).
2. Vedä letku tätä varten varatun aukon kautta ja sitten laitteen sisälle, kytke juoksutusletku
veden ulos tuloon ( 2).
3. Aseta säiliö takaisin.
38 39
La page est en cours de chargement...
La page est en cours de chargement...
La page est en cours de chargement...
-
 1
1
-
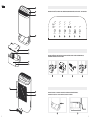 2
2
-
 3
3
-
 4
4
-
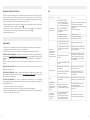 5
5
-
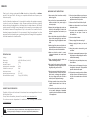 6
6
-
 7
7
-
 8
8
-
 9
9
-
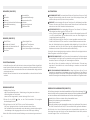 10
10
-
 11
11
-
 12
12
-
 13
13
-
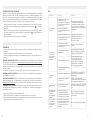 14
14
-
 15
15
-
 16
16
-
 17
17
-
 18
18
-
 19
19
-
 20
20
-
 21
21
-
 22
22
-
 23
23


Air&me air&me EVEL Manuel utilisateur
- Taper
- Manuel utilisateur
- Ce manuel convient également à
dans d''autres langues
- English: Air&me air&me EVEL User manual
- Deutsch: Air&me air&me EVEL Benutzerhandbuch
- Nederlands: Air&me air&me EVEL Handleiding
- polski: Air&me air&me EVEL Instrukcja obsługi
- suomi: Air&me air&me EVEL Ohjekirja
Documents connexes


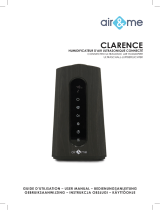
Autres documents
-
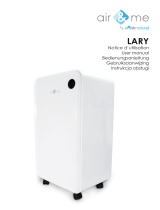 Air And Me air&me LARY Manuel utilisateur
-
 Air And Me AIROM Noir & Bois Le manuel du propriétaire
-
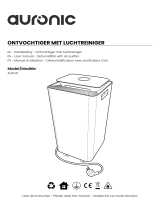 auronic AU3231 Manuel utilisateur
-
 Air And Me 91681610 Le manuel du propriétaire
-
 Air And Me Rohan connecté avec pompe intégrée Le manuel du propriétaire
-
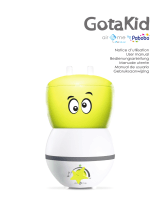 Air And Me 91323390 Mode d'emploi
-
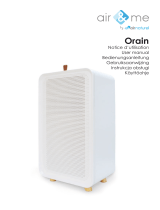 Air And Me ORAIN Noir Manuel utilisateur
-
Danby DPAC1011BL Manuel utilisateur
-
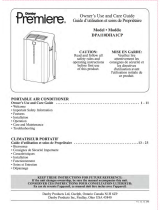 Premiere DPA110DHA1CP Owner's Use And Care Manual
-
 Air And Me ISAC NOIR Le manuel du propriétaire


