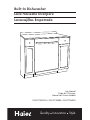
Haier DWL7075DBBB Manuel utilisateur
- Catégorie
- Lave-vaisselle
- Taper
- Manuel utilisateur
Ce manuel convient également à

Built-In Dishwasher
Lave-Vaisselle Incorpere
Lavavajillas Empotrado
Quality
n
Innovation
n
Style
User Manual
Guide de l'Utilisateur
Manual del Usuario Modelo

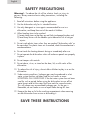
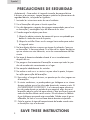
SAFETY PRECAUTIONS
Warning! – To reduce the risk of fire, electric shock, or injury to
persons, always exercise basic safety precautions, including the
following:
1. Read all instructions before using the appliance.
2. Use the dishwasher only for its intended function.
3. Use only detergents or rinse agents recommended for use in a
dishwasher, and keep them out of the reach of children.
4. When loading items to be washed:
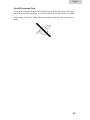
1) Locate sharp items so that they are not likely to damage the door seal;
2) Load sharp knives with the handles up to reduce the risk of cut-type
injuries.
5. Do not wash plastic items unless they are marked "dishwasher safe” or
the equivalent. For plastic items not so marked, check the manufacturer's
recommendations.
6. Do not touch the heating element during or immediately after use.
7. Do not operate the dishwasher unless all enclosure panels are properly
in place.
8. Do not tamper with controls.
9. Do not abuse, sit on, or stand on the door, lid, or dish racks of the
dishwasher.
10. To reduce the risk of injury, do not allow children to play in or on the
dishwasher.
11. Under certain conditions, hydrogen gas may be produced in a hot
water system that has not been used for two weeks or more.
HYDROGEN GAS IS EXPLOSIVE. If the hot water system has not been
used for such a period, before using the dishwasher turn on all hot
water faucets and let the water flow from each for several minutes,
This will release any accumulated hydrogen gas. As the gas is
flammable, do not smoke or use an open flame during this time.
12. Remove the door or lid to the washing compartment when removing
an old dishwasher from service or discarding it.
SAVE THESE INSTRUCTIONS
1
English

Thank you for using our Haier
product. This easy-to-use manual
will guide you in getting the best
performance from your Haier
dishwasher.
Remember to record the model and
serial number. They are on a label
in the dishwasher.
Model number
Serial number
Date of purchase
Staple your receipt to your manual. You will need it to obtain
warranty service.
2
English

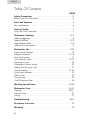
Table Of Contents
PAGE
Safety Precautions ......................................................................1-2
Before Using Your Dishwasher ..............................................................4
Parts and Features ........................................................................6
Parts and Features ...............................................................................6
Start-up Guide.................................................................................7
Using Your New Dishwasher ................................................................7
Dishwasher Loading ..................................................................8-13
Loading Suggestions ............................................................................8
Loading Top Rack ...........................................
........
............
.........
...9-10
Loading Bottom Rack .........................................
.................
...
.......11-12
Loading Silverware Basket ..................................................................13
Dishwasher Use .......................................................................13-23
Proper Use of Detergent .....................................................................14
Detergent Dispenser ......................................................................14-16
Rinse Aid Dispenser............................................................................17
Cycle Selection Charts ................................
.................
...
.......
.......18-19
Canceling a Cycle..............................................................................20
Changing a Cycle or Setting ..............................................................20
Adding Items During a Cycle ..............................................................21
Option Selections ..................................................
.........
..............21-22
Cycle Status Indicators........................................................................23
Wash System.....................................................................................23
Drying System ...................................................................................24
Overfill Protection Float ......................................................................24
Washing Special Items ............................................................25-26
Dishwasher Care .....................................................................26-27
Cleaning .....................................................................................26-27
Drain Air Gap...................................................................................27
Storing...........................................................................
............
.......27
Troubleshooting ....................................................
..............
.....28-31
Assistance or Service........................................................
..........
...32
Warranty .......................................................................................33
3
English

4
English
Before Using Your Dishwasher
freezing to avoid possible rupture of fill valve. Such ruptures are not covered
by the warranty. See "Storing" in the "Dishwasher Care" section for winter
storage information.
an area
suitable for its size and use.
on
the drain outlet) before installing. See Installation Instructions for complete
information.
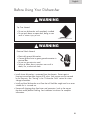
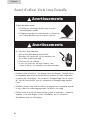
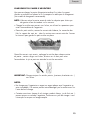
WARNING
WARNING
!
!
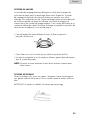
Tip Over Hazard
result in serious injury or cuts.
Electrical Shock Hazard
terminal box.
death, fire, or electrical shock.

For a grounded, cord-connected dishwasher:
The dishwasher must be grounded. In the event of a malfunction or
breakdown, grounding will reduce the risk of electric shock by providing a
path of least resistance for electric current. The dishwasher is equipped with a
cord having an equipment- grounding conductor and a grounding plug. The
plug must be plugged into an appropriate outlet that is installed and grounded
in accordance with all local codes and ordinances.
WARNING:
Improper connection of the equipment-grounding conductor can result in a risk
of electric shock. Check with a qualified electrician or service representative if
you are in doubt whether the dishwasher is properly grounded. Do not modify
the plug provided with the dishwasher; if it will not fit the outlet, have a proper
outlet installed by a qualified electrician.
For a permanently connected dishwasher:
The dishwasher must be connected to a grounded metal, permanent wiring
system, or an equipment- grounding conductor must be run with the circuit
conductors and connected to the equipment- grounding terminal or lead on the
dishwasher.
GROUNDING INSTRUCTIONS
5
English

6
English
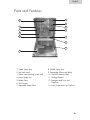
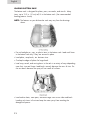
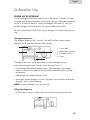
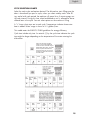
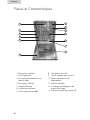
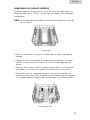
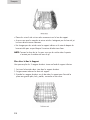
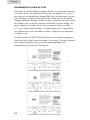
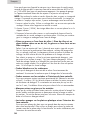
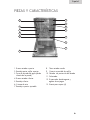
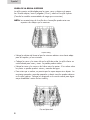
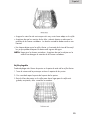
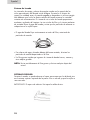
1. Upper Spray Arm
2. Top Rack Track
4. Lower Spray Arm
5. Bottom Rack
6. Vent System
7. Adjustable Upper Rack
8. Middle Spray Arm
9. Removable Silverware Basket
10. Overfill Protection Float
11. Heating Element
12. Detergent and Rinse Aid
Dispenser
Parts and Features
1
3
7
4
8
5
9
10
11
12
6
2
13

7
English
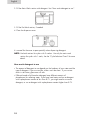
Before using your dishwasher, remove all packaging materials. Read this entire
Use and Care Guide. You will find important safety information and useful
operating tips.
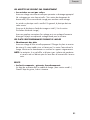
USING YOUR NEW DISHWASHER
1. Rinse aid is essential for good drying. Be sure to fill
the dispenser before you use your new dishwasher.
Each filling will last about 1 to 3 months depending
on your usage.
bones ) from dishes. You do not need to pre-rinse
your dishes.
space in between so water will reach the soiled surfaces. Make sure nothing
5. Close the door.
6. Press the desired cycle and option selections. The dishwasher starts filling
when you press any cycle selection. You can select options as the machine
Start-up Guide

8
English
LOADING SUGGESTIONS
Remove leftover food, bones, toothpicks and other hard items from the dishes
To conserve water and energy and save time, it is not necessary to rinse dishes
before putting them into the dishwasher. The wash module removes food par-
ticles from the water. The module contains a chopping device which will reduce
the size of food items.
NOTE: If hard items such as fruit seeds, nuts, and eggshells enter the wash
module, you might hear chopping, grinding, crunching, or buzzing
sounds. These sounds are normal when hard items enter the module.
wash module. Damage can occur.
results, water must be able to drain from all surfaces.
interior of the door if they are dropped or bumped.
interfere with the spray arm rotation.
cycle to keep dishes moist if you do not plan to wash them soon. Foods such as
eggs, rice, pasta, spinach and cooked cereals may be hard to remove if they
are left to dry over a period of time.
QUIET OPERATING TIPS
To avoid thumping/clattering noises during operation:
interior walls or interfere with the rotation of the spray arm.
NOTE: For built-in models, keep sink drain plugs closed during dishwasher
operation to prevent noise transfer through drains.
Dishwasher Loading

9
English
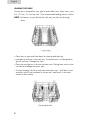
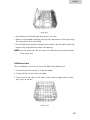
LOADING TOP RACK
The top rack is designed for cups, glasses and smaller items, Many items, up to
NOTE: The features on your dishwasher rack may vary from the drawings
shown.
glasses and cups. Damage can occur.
can lead to breakage and water spots.
and other utensils can be placed in the top rack. Load bowls in the center
section for best stability.

10
English
STEM GUARD WITH CUP SHELF
Fold down the extra shelf on the left or right side of the top rack to hold additional
cups, stemware or long items such as utensils and spatulas.
dishwasher operation. Damage may occur.
"dishwashe safe" are recommended.

11
English
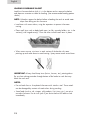
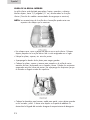
LOADING BOTTOM RACK
The bottom rack is designed for plates, pans, casseroles, and utensils. Many
loading patterns shown)
NOTE: The features on your dishwasher rack may vary from the drawings
shown.
in the bottom rack only if they are secured in place.
upon their size and shape. Load bowls securely between the rows of tines. Do
not nest bowls because the spray will not reach aIl surfaces.
Loading such items in front can keep the water spray from reaching the
detergent dispenser

12
English
because they might block the water inlet opening.
NOTE: Spin the spray arms. Be sure items in the basket do not stop the rotation
of the spray arms.
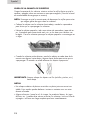
Fold-Down Rack
You can fold down two rows of tines at the back of the bottom rack.
1. Grasp the tip of the tine that is in the tine holder.
2. Gently pull the tine out of the tine holder.
3. Lay the row of tines down in the rack to make room for larger dishes, bowls,
pots, pans or roasters.

13
English
LOADING SILVERWARE BASKET
Load the silverware basket while it is in the bottom rack or remove the basket
shown)
NOTE: Unload or remove the basket before unloading the racks to avoid water
drops from falling on the silverware.
nesting.
pointing up and some down to avoid nesting. Spray cannot reach nested items.
IMPORTANT:
Be sure that nothing protrudes through bottom of the basket or rack that may
block the wash arm.
NOTES:
can be damaged by contact with each other during washing.
corrode silverware. Run a rinse cycle if you do not have a full load to wash
immediately.

14
English
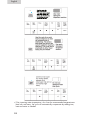
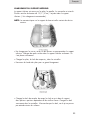
PROPER USE OF DETERGENT
Use only detergent specifically made for use in dishwasher. Cascade, Cascade
Complete and Electrasol Automatic Dishwashing Detergents have been approved
for use in all Haier dishwasher. Keep your detergent fresh and dry. Don't put
powder detergent into the dispenser until you're ready to wash dishes.
All wash cycles except RINSE ONLY require detergent in the main and pre-wash
cup.
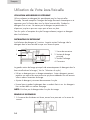
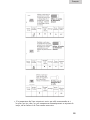
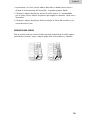
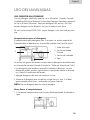
Detergent Dispenser
The detergent dispenser has 2 sections. The small Pre-Wash section empties
detergent into dishwasher when you close the door.
The larger Main wash section automatically empties detergent into the
excessive suds that can overflow out of the dishwasher and reduce washing
performance.
detergent results in better cleaning.
NOTE: Do not use detergent with a rinse cycle.
Filling the dispenser
1. If the dispenser cover is closed, open the cover by pushing the cover latch.
Dishwasher Use
1. Cover latch
2. Main Wash section
3. Pre-Wash section
4. Cover
1
3
4
2

English
15
2. Fill the Main Wash section with detergent. See "How much detergent to use."
3. Fill the Pre-Wash section, if needed.
4. Close the dispenser cover.
It is normal for the cover to open partially when dispensing detergent.
NOTE: Use both sections for cycles with 2 washes. Use only the main wash
section for cycles with 1 wash, See the "Cycle Selection Charts" for more
details.
How much detergent to use
type of detergent. If you use too little, dishes won't be clean . If you use too
much in soft water, glassware will etch.
phosphorous for softening water. If you have hard water and use a detergent
with a phosphorous content of less than 8.7%, you might need to use more
detergent, or use a detergent with a phosphorous content higher than 8.7%.

English
16
Soft to Medium Hard Water
0 to 6 grains per gallon
Medium to hard water
7 to 12 grains per gallon
Very Hard Water
13 grains per gallon and above
NOTE: It might be necessary to use
the Pots and Pans, or a normal cycle
with Hi- Temp Scrub, for best wash
performance with very hand water.
For normally soiled loads
section with 4 tsp.
section
NOTE: Fill the Pre-Wash section
halfway if dishes are
pre-rinsed or the water is
grains per gallon)
For heavily soiled loads
with 6 tsp.
For normal and heavily soiled loads
with 6 tsp.
For normally and heavily soiled loads
section
a higher setting. See "Rinse Aid
Dispenser" later in this section
NOTE: Fill amounts shown are for standard powdered detergent. Amounts may
vary if you use liquid or concentrated powdered detergent. Follow instruction on
the package when using liquid dishwasher detergent or concentrated powdered
detergent.
If you use detergent tablets, use one whole tablet in the Main Wash section only
for all loads and water hardness levels.
Water Hardness Amount of Detergent

17
English
RINSE AID DISPENSER
Rinse aids prevent water from forming droplets that can dry as spots or streaks.
They also improve drying by allowing water to drain off of the dishes during the
final rinse by releasing a small amount of the rinse aid into the rinse water. Your
dishwasher is designed to use a liquid rinse aid. Do not use a solid or bar-type.
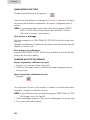
FILLING THE DISPENSER
-
tions, this will last for about three months. Rinse aid is released through an open-
ing in the dispenser. You do not need to wait until the dispenser is empty to refill
it. Try to keep it full, but be careful not to overfill it.
1. Make sure the dishwasher door is fully open.
2. Open the dispenser by pushing the cover latch.
3. Add rinse aid until the indicator window looks full.
4. Clean up any spilled rinse aid with a damp cloth.
5. Close the cover.
RINSE AID SETTING
The amount of rinse aid released into the final wash can be adjusted. The factory
setting is at 3. For most water conditions, set the adjuster to 1 or 2. If there are
TO ADJUST THE SETTING
Open the dispenser cover. Turn the adjuster inside the dispenser to the desired
setting.

18
English
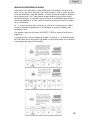
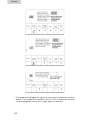
CYCLE SELECTION CHARTS
Select the wash cycle and options desired. The dishwasher starts filling once the
door is closed and you press a cycle, unless you select a delay wash. After fill-
ing, and a brief wash period, the machine will pause for a 5 minute energy sav-
ing soak interval. During this time, dried and baked on soil is softened for easier
removal later in the cycle. You can select options as the machine is filling.
A "•" shows what steps are in each cycle. Temperatures indicate where extra
heat is added. Water usage is shown in U.S. gallons/liters.
This model meets the ENERGY STAR® guidelines for energy efficiency.
Cycle time includes dry time. An asterisk (*) by the cycle time indicates the cycle
time might be longer depending on the temperature of the water entering the
dishwasher.
Use for all soil types and dish
loads. This cycle has additional
checks for soil in the water to give
added wash action time. The wash
action will pause several times
throughout the cycle, for up to 70
seconds, to check the soil level in
the wash water.
DWL3525�WHITE�VERSION-160780101
DWL4035�WHITE�VERSION-160860101
DWL7075�WHITE�VERSION -1608701010 1 2 0 4 0 0 0 1 7
E
D
C
B
567
PANTONE�427C
PANTONE�COOL GRAY 3C
BACKGROUND:WHITE�COLOR
BUTTON�BACKGROUND:PANTONE�427C
BUTTON TOP &�BOTTOM:PANTONE�COOL GRAY 3C
FONTS:PANTONE�COOL GRAY 9C
RED:PANTONE�RED�1805C
DWL3525�WHITE�VERSION-160780101
DWL4035�WHITE�VERSION-160860101
DWL7075�WHITE�VERSION -1608701010 1 2 0 4 0 0 0 1 7
4567
PANTONE�427C
PANTONE�COOL GRAY 3C
DWL3525�WHITE�VERSION-160780101
DWL4035�WHITE�VERSION-160860101
DWL7075�WHITE�VERSION -1608701010 1 2 0 4 0 0 0 1 7
4567
TRANSPARENT SMOKE
PANTONE�427C
PANTONE�COOL GRAY 3C
41
41
93

19
English
• If the incoming water temperature is less than the recommended temperature or
food soils are heavy, the cycle will automatically compensate by adding time,
heat and water as needed.
ITE�VERSION-160860101
ITE�VERSION -1608701010 1 2 0 4 0 0 0 1 7
USE�ONLY
PRE-RELEASE
REFERENCE
.�D�2004/04/02
456
TRANSPARENT SMOKE
GROUND:WHITE�COLOR
ON�BACKGROUND:PANTONE�427C
ON TOP &�BOTTOM:PANTONE�COOL GRAY 3C
S:PANTONE�COOL GRAY 9C
ANTONE�RED�1805C
D�WINDOW:WHITE�FROST.
MENT DISPLAY WINDOW:TRANSPARENT SMOKE
DWL3525�WHITE�VERSION-160780101
SION-160860101
SION -1608701010 1 2 0 4 0 0 0 1 7
456
WHITE�FROST(X16)
TRANSPARENT SMOKE
PANTONE�427C
PANTONE�COOL GRAY 3C
D:WHITE�COLOR
DWL3525�WHITE�VERSION-160780101
0860101
-1608701012 0 4 0 0 0 1 7
0
0
NOITPIRCSED�RETNE
DRAFT WHERE
MUST REMAINP
WITHIN�DIMENSIONS
SYMBOLS
QUALITY
ANGULAR
=
=
:ON�CE
RD :NW
HC :DK'
:RPPA
N
OITPIRCSED
VER
C
GENERAL
(UNLESS�SPECIFIED)
USE�ONLY
PRE-RELEASE
REFERENCE
3456
3456
1�PLACE
2�PLACES
3�PLACES
4�PLACES
WHITE�FROST(X16)
1
PANTONE�COOL GRAY 9C
TRANSPARENT SMOKE
PANTONE�427C
PANTONE�COOL GRAY 3C
TE�COLOR
ND:PANTONE�427C
TOM:PANTONE�COOL GRAY 3C
OOL GRAY 9C
D�1805C
E�FROST.
Y WINDOW:TRANSPARENT SMOKE
42*
20
La page est en cours de chargement...
La page est en cours de chargement...
La page est en cours de chargement...
La page est en cours de chargement...
La page est en cours de chargement...
La page est en cours de chargement...
La page est en cours de chargement...
La page est en cours de chargement...
La page est en cours de chargement...
La page est en cours de chargement...
La page est en cours de chargement...
La page est en cours de chargement...
La page est en cours de chargement...
La page est en cours de chargement...
La page est en cours de chargement...
La page est en cours de chargement...
La page est en cours de chargement...
La page est en cours de chargement...
La page est en cours de chargement...
La page est en cours de chargement...
La page est en cours de chargement...
La page est en cours de chargement...
La page est en cours de chargement...
La page est en cours de chargement...
La page est en cours de chargement...
La page est en cours de chargement...
La page est en cours de chargement...
La page est en cours de chargement...
La page est en cours de chargement...
La page est en cours de chargement...
La page est en cours de chargement...
La page est en cours de chargement...
La page est en cours de chargement...
La page est en cours de chargement...
La page est en cours de chargement...
La page est en cours de chargement...
La page est en cours de chargement...
La page est en cours de chargement...
La page est en cours de chargement...
La page est en cours de chargement...
La page est en cours de chargement...
La page est en cours de chargement...
La page est en cours de chargement...
La page est en cours de chargement...
La page est en cours de chargement...
La page est en cours de chargement...
La page est en cours de chargement...
La page est en cours de chargement...
La page est en cours de chargement...
La page est en cours de chargement...
La page est en cours de chargement...
La page est en cours de chargement...
La page est en cours de chargement...
La page est en cours de chargement...
La page est en cours de chargement...
La page est en cours de chargement...
La page est en cours de chargement...
La page est en cours de chargement...
La page est en cours de chargement...
La page est en cours de chargement...
La page est en cours de chargement...
La page est en cours de chargement...
La page est en cours de chargement...
La page est en cours de chargement...
La page est en cours de chargement...
La page est en cours de chargement...
La page est en cours de chargement...
La page est en cours de chargement...
La page est en cours de chargement...
La page est en cours de chargement...
La page est en cours de chargement...
La page est en cours de chargement...
La page est en cours de chargement...
La page est en cours de chargement...
La page est en cours de chargement...
La page est en cours de chargement...
La page est en cours de chargement...
La page est en cours de chargement...
La page est en cours de chargement...
La page est en cours de chargement...
-
 1
1
-
 2
2
-
 3
3
-
 4
4
-
 5
5
-
 6
6
-
 7
7
-
 8
8
-
 9
9
-
 10
10
-
 11
11
-
 12
12
-
 13
13
-
 14
14
-
 15
15
-
 16
16
-
 17
17
-
 18
18
-
 19
19
-
 20
20
-
 21
21
-
 22
22
-
 23
23
-
 24
24
-
 25
25
-
 26
26
-
 27
27
-
 28
28
-
 29
29
-
 30
30
-
 31
31
-
 32
32
-
 33
33
-
 34
34
-
 35
35
-
 36
36
-
 37
37
-
 38
38
-
 39
39
-
 40
40
-
 41
41
-
 42
42
-
 43
43
-
 44
44
-
 45
45
-
 46
46
-
 47
47
-
 48
48
-
 49
49
-
 50
50
-
 51
51
-
 52
52
-
 53
53
-
 54
54
-
 55
55
-
 56
56
-
 57
57
-
 58
58
-
 59
59
-
 60
60
-
 61
61
-
 62
62
-
 63
63
-
 64
64
-
 65
65
-
 66
66
-
 67
67
-
 68
68
-
 69
69
-
 70
70
-
 71
71
-
 72
72
-
 73
73
-
 74
74
-
 75
75
-
 76
76
-
 77
77
-
 78
78
-
 79
79
-
 80
80
-
 81
81
-
 82
82
-
 83
83
-
 84
84
-
 85
85
-
 86
86
-
 87
87
-
 88
88
-
 89
89
-
 90
90
-
 91
91
-
 92
92
-
 93
93
-
 94
94
-
 95
95
-
 96
96
-
 97
97
-
 98
98
-
 99
99
-
 100
100


Haier DWL7075DBBB Manuel utilisateur
- Catégorie
- Lave-vaisselle
- Taper
- Manuel utilisateur
- Ce manuel convient également à
dans d''autres langues
- English: Haier DWL7075DBBB User manual
- español: Haier DWL7075DBBB Manual de usuario
Documents connexes
Autres documents
-
Fagor LFA-74IT Manuel utilisateur
-
-
Estate TUD6900PQ0 Le manuel du propriétaire
-
CONTINENTAL EDISON CEFR3DTBLK Manuel utilisateur
-
KitchenAid KUDS24SE Manuel utilisateur
-
Kenmore 665-7436 Le manuel du propriétaire
-
Inglis IKU58660 Le manuel du propriétaire
-
Whirlpool GU1100XTLT1 Le manuel du propriétaire
-
Allied Brass PR-24E-ABR spécification