Panasonic NNE48NBMEPG Mode d'emploi
- Catégorie
- Micro-ondes
- Taper
- Mode d'emploi

Français
Nederlands
English
Operating Instructions (Original instructions)
Gebruiksaanwijzing
(Vertaling van de oorspronkelijke instructies)
Mode d’emploi (Traduction des instructions d’origine)
Microwave Oven
Magnetron
Four à Micro-ondes
Household Use Only
Uitsluitend voor huishoudelijk gebruik
Utilisation Domestique Uniquement


1EN
English
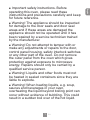
Important safety instructions. Before
operating this oven, please read these
instructions and precautions carefully and keep
for future reference.
Warning! The appliance should be inspected
for damage to the door seals and door seal
areas and if these areas are damaged the
appliance should not be operated until it has
been repaired by a service technician trained
by the manufacturer.
Warning! Do not attempt to tamper with or
make any adjustments or repairs to the door,
control panel housing, safety interlock switches
or any other part of the oven. Do not remove
the outer panel from the oven which gives
protection against exposure to microwave
energy. Repairs should only be carried by a
qualied service person.
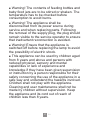
Warning! Liquids and other foods must not
be heated in sealed containers since they are
liable to explode.
Warning! When heating liquids, e.g. soup,
sauces and beverages in your oven,
overheating the liquid beyond boiling point can
occur without evidence of bubbling. This could
result in a sudden boil over of the hot liquid.

2EN
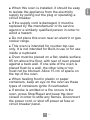
Warning! The contents of feeding bottles and
baby food jars are to be stirred or shaken. The
temperature has to be checked before
consumption to avoid burns.
Warning! The appliance shall be
disconnected from its power source during
service and when replacing parts. Following
the removal of the supply plug, the plug should
remain visible to the service operator to ensure
that inadvertent reconnection is avoided.
Warning! Ensure that the appliance is
switched off before replacing the lamp to avoid
the possibility of electric shock.
This appliance can be used by children aged
from 8 years and above and persons with
reduced physical, sensory and mental
capabilities or lack of experience and
knowledge if they have been given supervision
or instruction by a person responsible for their
safety concerning the use of the appliance in a
safe way and understand the hazards involved.
Children shall not play with the appliance.
Cleaning and user maintenance shall not be
made by children without supervision. Keep
the appliance and its cord out of reach of
children less than 8 years.

3EN
English
When this oven is installed, it should be easy
to isolate the appliance from the electricity
supply by pulling out the plug or operating a
circuit breaker.
If the supply cord is damaged, it must be
replaced by the manufacturer or its service
agent or a similarly qualied person in order to
avoid a hazard.
Do not place this oven near an electric or gas
cooker range.
This oven is intended for counter-top use
only. It is not intended for Built-in use or for use
inside a cupboard.
Oven must be placed on a at, stable surface
85 cm above the oor, with rear of oven placed
against a back wall. If one side of the oven is
placed ush to a wall, the other side or top
must not be blocked. Allow 15 cm of space on
the top of the oven.
When heating food in plastic or paper
containers, keep an eye on the oven as these
types of containers ignite if overheated.
If smoke is emitted or a re occurs in the
oven, press Stop/Reset and keep the door
closed in order to stie any ames. Disconnect
the power cord, or shut off power at fuse or
circuit breaker panel.

4EN
This appliance is intended to be used in
household and similar applications such as:
- staff kitchen areas in shops, ofces and other
working environments;
- farm houses;
- by clients in hotels, motels and other
residential environments;
- bed and breakfast type environments.
Do not cook eggs in their shells and whole
hard-boiled eggs by MICROWAVE. Pressure
may build up and the eggs may explode, even
after the microwave heating has ended.
Clean the inside of the oven, door seals and
door seal areas regularly. When food splatters
or spilled liquids adhere to the oven walls, door
seals and door seal areas wipe off with a damp
cloth. Mild detergent may be used if they get
very dirty. The use of harsh detergent or
abrasive is not recommended.
DO NOT USE COMMERCIAL OVEN
CLEANERS.
Failure to maintain the oven in a clean
condition could lead to deterioration of surfaces
that could affect the life of the appliance and
possibly result in a hazardous situation.
A steam cleaner is not to be used for cleaning.

5EN
English
Do not use harsh, abrasive cleaners or sharp
metal scrapers to clean the oven door glass
since they can scratch the surface, which may
result in shattering of the glass.
This appliance is not intended to be operated
by means of an external timer or separate
remote-control system.
Only use utensils that are suitable for use in
microwave ovens.
The microwave oven is intended for heating
food and beverages only. Take care when
heating foods low in moisture, e.g. bread
items, chocolate, biscuits and pastries. These
can easily burn, dry out or catch on re if
cooked too long. We do not recommend
heating foods low in moisture such as popcorn
or poppodums. Drying of food, newspapers or
clothing and heating of warming pads, slippers,
sponges, damp cloth, wheat bags, hot water
bottles and similar may lead to risk of injury,
ignition or re.
The oven lamp must be replaced by a
service technician trained by the manufacturer.
DO NOT attempt to remove the outer casing
from the oven.
Metal containers or dishes with metallic trim
should not be used during microwave cooking.
Sparking will occur.

6EN
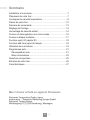
Thank you for purchasing a Panasonic appliance.
Panasonic Corporation Osaka, Japan
Importer: Panasonic Marketing Europe GmbH
Panasonic Testing Centre,
Winsbergring 15, 22525 Hamburg, Germany
Contents
Installation and connection ............................................. 7
Placement of your oven .................................................. 7
Important safety instructions........................................... 8
Parts of your oven ........................................................ 12
Control panel ................................................................ 13
Setting the clock ........................................................... 14
Child safety lock ........................................................... 14
Microwave cooking and defrosting ............................... 15
Multi-stage cooking....................................................... 17
Quick 30 feature .......................................................... 18
Add time feature ........................................................... 18
Using the timer ............................................................. 19
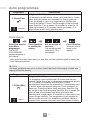
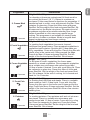
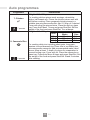
Auto programmes ......................................................... 21
Auto defrost .............................................................. 21
Auto menu ................................................................ 22
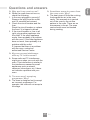
Questions and answers ................................................ 25
Care of your oven ......................................................... 26
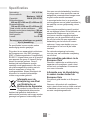
Specications ............................................................... 27

7EN
English
Examine your microwave oven
Unpack the oven, remove all
packing material, and examine the
oven for any damage such as
dents, broken door latches or
cracks in the door. If you nd any
damage, notify your dealer
immediately. Do not install a
damaged microwave oven.
Earthing instructions
Important!
THIS UNIT HAS TO BE PROPERLY
EARTHED FOR PERSONAL SAFETY.
If your AC outlet is not earthed, it is
the personal responsibility of the
customer to have it replaced with a
properly earthed wall socket.
Operation voltage
The voltage has to be the same as
specied on the label on the oven. If a
higher voltage than specied is used,
it may cause a re or other damages.
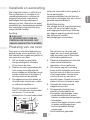
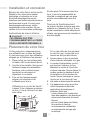
Installation and connection
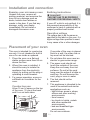
Placement of your oven
This oven is intended for counter-top
use only. It is not intended for built-in
use or for use inside a cupboard.
1. Place the oven on a at and
stable surface more than 85 cm
above the oor.
2. When this oven is installed, it
should be easy to isolate the
appliance from the electricity
supply by pulling out the plug or
operating a circuit breaker.
3. For proper operation, ensure a
sufcient air circulation for the
oven.
Counter-top use:
Allow 15 cm of space on the top
of the oven, 10 cm at the back
and 5 cm on both sides.
10 cm
15 cm
5 cm
5 cm
counter top
If one side of the oven is placed
ush to a wall, the other side or
top must not be blocked.
4. Do not place this oven near an
electric or gas cooker range.
5. The power cord should not
touch the outside of the oven.
Keep the cord away from hot
surfaces. Do not let the cord
hang over the edge of a table or
work top. Do not immerse the
cord, plug or oven in water.
6. The feet should not be
removed.
7. This appliance is intended to be
used in household and similar
applications such as:
- staff kitchen areas in shops,
ofces and other working
environments;
- farm houses;
- by clients in hotels, motels
and other residential
environments;
- bed and breakfast type
environments.
Do not use outdoors.

8EN
1. The door seals and seal areas
should be cleaned with a damp
cloth. The appliance should be
inspected for damage to the
door seals and door seal areas
and if these areas are damaged
the appliance should not be
operated until it has been
repaired by a service technician
trained by the manufacturer.
2. Do not attempt to tamper with
or make any adjustments or
repairs to the door, control
panel housing, safety interlock
switches or any other part of
the oven. Do not remove the
outer panel from the oven
which gives protection against
exposure to microwave energy.
Repairs should only be
carried out by a qualied
service person.
3. Do not operate this appliance if
it has a damaged CORD OR
PLUG, if it is not working
properly, or if it has been
damaged or dropped. It is
dangerous for anyone other
than a service technician
trained by the manufacturer to
perform repair service.
4. If the supply cord is damaged, it
must be replaced by the
manufacturer, its service agent
or a similarly qualied person in
order to avoid a hazard.
5. Liquids and other foods must
not be heated in sealed
containers since they are liable
to explode.
6. This appliance can be used by
children aged from 8 years and
above and persons with
reduced physical, sensory and
mental capabilities or lack of
experience and knowledge if
they have been given
supervision or instruction by a
person responsible for their
safety concerning the use of the
appliance in a safe way and
understand the hazards
involved. Children shall not play
with the appliance. Cleaning
and user maintenance shall not
be made by children without
supervision. Keep the appliance
and its cord out of reach of
children less than 8 years.
8. Avoid using the oven in high
humidity.
9. Do not block the air vents. If
these openings are blocked
during operation the oven may
overheat. In this case the oven
is protected by a thermal safety
device and resumes operation
only after cooling down.
10. This appliance is not intended
to be operated by means of an
external timer or separate
remote-control system.
Placement of your oven
Important safety instructions

9EN
English
Use of your oven
Do not use the oven for any reason
other than the preparation of food.
This oven is specically designed
to heat or cook food. Do not use
this oven to heat chemicals or
other non-food products.
Before use, check that utensils/
containers are suitable for use in
microwave ovens.
When the oven is not being used,
do not store any objects inside
the oven in case it is accidentally
turned on.
The appliance must not be
operated WITHOUT FOOD IN
THE OVEN. Operation in this
manner may damage the
appliance.
If smoke is emitted or a re
occurs in the oven, press Stop/
Reset and keep the door closed
in order to stie any ames.
Disconnect the power cord, or
shut off power at fuse or circuit
breaker panel.
Fan motor operation
After using the oven the fan motor
may rotate for a few minutes to
cool the electric components. This
is normal and you can take out
food even though the fan motor
operates. You can continue using
the oven during this time.
Oven light
When it becomes necessary to
replace the oven light, please
consult your dealer.
Accessories
The oven comes equipped with a
variety of accessories. Always
follow the directions given for use
of the accessories.
Glass tray
Do not operate the oven without
the roller ring and the glass tray
in place.
Never use another type of glass
tray than the one specially
designed for this oven.
If the glass tray is hot, let it cool
before cleaning or placing in water.
The glass tray can turn in either
direction.
If the food or cooking vessel on
the glass tray touches the oven
walls and stops the tray rotating,
the tray will automatically rotate
in the opposite direction. This is
normal.
Do not cook foods directly on the
glass tray unless indicated in
recipes. Always place food in a
microwave safe dish.
Roller ring
Do not remove the roller ring
from the cavity oor.
The roller ring and the oven oor
should be cleaned frequently to
prevent noise and build-up of
remaining food.
The roller ring must always be
used for cooking together with
the glass tray.

10 EN
If you accidentally remove the
roller ring, place the roller ring
gently into the hole in the centre
of the oven and locate it on the
spindle beneath.
Flat processing is applied on the
spindle to rmly hold the roller
ring during operation.
Cooking time
The cooking time depends on the
condition, temperature, amount of
food and on the type of cookware.
Begin with the minimum cooking
time to help prevent overcooking.
If the food is not sufciently
cooked you can always cook it
for a little longer.
Important!
If the recommended cooking
time is exceeded, the food will
be spoiled and in extreme
circumstances could catch re
and possibly damage the
interior of the oven.
Small quantities of foods
Small quantities of food or foods
with low moisture content can
burn, dry out or catch on re if
cooked too long. If materials
inside the oven should ignite,
keep the oven door closed, turn
the oven off and remove the plug
from the socket.
Foods low in moisture
The microwave oven is intended
for heating food and beverages
only. Take care when heating
foods low in moisture, e.g. bread
items, chocolate, biscuits and
pastries. These can easily burn,
dry out or catch on re if cooked
too long. We do not recommend
heating foods low in moisture
such as popcorn or poppodums.
Drying of food, newspapers or
clothing and heating of warming
pads, slippers, sponges, damp
cloth, wheat bags, hot water
bottles and similar may lead to
risk of injury, ignition or re.
Eggs
Do not cook eggs in their shells
and whole hard-boiled eggs by
MICROWAVE. Pressure may
build up and the eggs may
explode, even after the
microwave heating has ended.
Piercing skin
Food with non porous skins, such
as potatoes, egg yolks and
sausages must be pierced before
cooking by MICROWAVE to
prevent bursting.
Meat thermometer
Use a meat thermometer to
check the degree of cooking of
roasts and poultry only when the
meat has been removed from the
oven. Do not use a conventional
meat thermometer in the
microwave oven because it may
cause sparking.
Important safety instructions

11 EN
English
Liquids
When heating liquids, e.g. soup,
sauces and beverages in your
microwave oven, overheating the
liquid beyond boiling point can
occur without evidence of
bubbling. This could result in a
sudden boil over of the hot liquid.
To prevent this possibility the
following steps should be taken:
a Avoid using straight-sided
containers with narrow necks.
b Do not overheat.
c
Stir the liquid before placing the
container in the oven and again
halfway through the cooking time.
d After heating, allow it to stand
in the oven for a short time, stir
again before carefully removing
the container.
Paper/plastic
When heating food in plastic or
paper containers, keep an eye on
the oven as these types of
containers ignite if overheated.
Do not use recycled paper
products (e.g. Kitchen Roll)
unless the paper product is
labelled as safe for microwave
oven use. Recycled paper
products may contain impurities
which may cause sparks and/or
res during use.
Remove wire twist-ties from
roasting bags before placing the
bags in the oven.
Utensils/foil
Do not heat any closed cans or
bottles because they might
explode.
Metal containers or dishes with
metallic trim should not be used
during microwave cooking.
Sparking will occur.
If you use any aluminium foil,
meat spikes or metalware the
distance between them and the
oven walls and door should be at
least 2 cm to prevent sparking.
Feeding bottles/baby food jars
The top and teat or lid must be
removed from feeding bottles or
baby food jars before placing in
the oven.
The contents of feeding bottles
and baby food jars are to be
stirred or shaken.
The temperature has to be
checked before consumption to
avoid burns.

12 EN
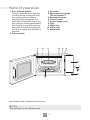
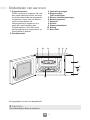
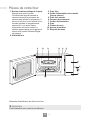
Parts of your oven
1. Door Release Button
Press to open the door. Opening
the door during cooking will stop
the cooking process without
cancelling the programme. It is
quite safe to open the door at any
time during a cooking programme
and there is no risk of microwave
exposure. Cooking resumes after
the door is closed and Start/Set is
pressed.
2. Oven window
3. Air vents
4. Microwave feed guide
(Do not remove.)
5. External air vents
6. Control panel
7. Power supply cord
8. Plug
9. Glass tray
10. Roller ring
11. Menu label
Note
This illustration is for reference only.
Identication label is attached on the oven.
2
911
10
3
6
8
4 3 5
7
1

13 EN
English
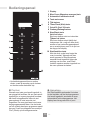
Control panel
1
2
3
4
6
8
9
7
10
5
• Your control panel may have
differences in appearance, but the
words on the pads and functionality
will be the same.
Beep sound
When a pad is pressed correctly a
beep will be heard. If a pad is pressed
and no beep is heard, the unit has not
or cannot accept the instruction. The
oven will beep twice between
programmed stages. At the end of any
complete programme, the oven will
beep 5 times and "End" will be
displayed.
1 Display window
2 Micro Power pad
3 Auto Defrost pad
4 Auto Menu pad
5 Time pads
6 Timer/Clock pad
7 Quick 30 pad
8 Up/Down pads
9 Stop/Reset pad
Before Cooking
One press clears your instructions.
During Cooking
One press temporarily stops the
cooking process. Another press
cancels all your instructions and a
dot or the time of day will appear in
the display.
10 Start/Set pad
One press allows oven to begin
operation. If door is opened or
Stop/Reset is pressed once during
oven operation, Start/Set must be
pressed again to restart oven.
Note
If Start/Set is not pressed for
6 minutes after cooking programme
setting, the oven will automatically
cancel the cooking programme. The
display will revert back to clock or dot.

14 EN
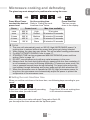
This feature will make the oven controls inoperable; however, the door can be
opened. Child safety lock can be set when the display shows a dot or the time.
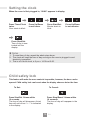
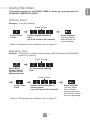
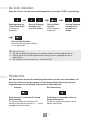
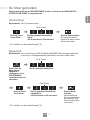
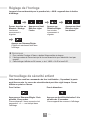
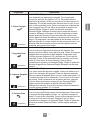
Setting the clock
Child safety lock
When the oven is rst plugged in, “88.88” appears in display.
Press Start/Set.
Time of day is now
locked into the
display.
Press Timer/Clock
twice.
Hour starts to blink.
Press Up/Down
to set hours. Press Start/Set.
Minute starts to
blink.
Press Up/Down
to set minutes.
Notes
1. To reset time of day, repeat the whole step above.
2. The clock will keep the time of day as long as the oven is plugged in and
electricity is supplied.
3. This is a 24 hour clock, ie 2 pm = 14:00 not 2:00.
Press Start/Set 3 times within
10 seconds.
The time of day will disappear. Actual
time will not be lost. ‘L ---’ is indicated
in the display.
To Set: To Cancel:
Press Stop/Reset 3 times within
10 seconds.
The time of day will reappear in the
display.

15 EN
English
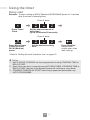
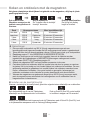
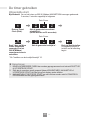
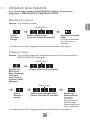
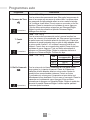
Microwave cooking and defrosting
The glass tray must always be in position when using the oven.
Press Micro Power
to select the desired
power level.
Set the cooking time.
Refer to “Setting the cook
time/timer time” below.
Press Start/Set.
The time counts
down in the display.
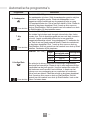
Press Power Level Max. time available
once 900 W High 30 minutes
twice 200 W Defrost 99 minutes 50 seconds
3 times 500 W Medium 99 minutes 50 seconds
4 times 400 W Low 99 minutes 50 seconds
5 times 100 W Warm 99 minutes 50 seconds
Notes
1. The oven will automatically work on 900 W (High) MICROWAVE power if a
cooking time is entered without the power level previously being selected.
2. While cooking, the glass tray may vibrate. This will not affect cooking performance.
3. For MULTI-STAGE COOKING, refer to page 17.
4. STANDING TIME can be programmed after MICROWAVE power and time
setting. Refer to page 19.
5. DO NOT use microwave only with any metal accessory in the oven.
6. Always check the food during defrosting by opening the door then restarting. It
is not necessary to cover food during defrosting. To ensure an even result, stir,
turn or separate several times during defrosting. For large joints and poultry,
turn halfway through defrosting and protect ends and tips with aluminium foil.
7. When the microwave oven is operated at 900 W (High) microwave power for
long time, the microwave oven automatically adjust the power to protect the
components of the microwave oven.
Setting the cook time/timer time
When you set the cook time or the timer time, use following keys according to your
needs.
Press each Time pad repeatedly according
to the time value you want to set.
Press Quick 30 to set cooking time
in 30 seconds increments.
After you enter a time value with each Time pad or Quick 30,
you can adjust the time values with the Up/Down pads.

16 EN
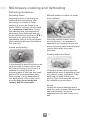
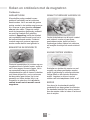
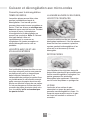
Defrosting Guidelines
Standing times
Individual portions of food may be
cooked almost immediately after
defrosting. It is normal for large
portions of food to be frozen in the
centre. Before cooking, allow to stand
for a minimum of one hour. During
this standing time, the temperature
becomes evenly distributed and the
food is defrosted by conduction. N.B. If
the food is not going to be cooked
immediately, store it in the refrigerator.
Never refreeze defrosted food without
rst cooking it.
Joints and poultry
It is preferable to place the joints on an
upturned plate or plastic rack so that
they are not resting in the juices. It is
essential to protect delicate or
projecting parts of this food with small
pieces of foil to prevent these parts
from cooking. It is not dangerous to
use small pieces of foil in your oven,
provided they do not come into
contact with the oven walls.
Minced meat or cubes of meat
and seafood
Since the outside of these foods
quickly defrosts, it is necessary to
separate them, break the blocks into
pieces frequently while defrosting and
remove them when they have
defrosted.
Small portions of food
Chops and chicken pieces must be
separated as soon as possible so that
they defrost evenly throughout. Fatty
parts and the ends defrost more
quickly. Place them near the centre of
the turntable or protect them.
Bread
Loaves will require standing time to
allow the centre to thaw. Standing time
can be shortened if slices are
separated and rolls and loaves cut in
half.
Microwave cooking and defrosting

17 EN
English
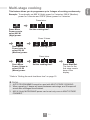
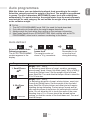
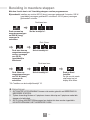
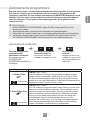
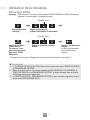
Multi-stage cooking
This feature allows you to programme up to 3 stages of cooking continuously.
Example: To continually set 900 W (High) power for 2 minutes, 500 W (Medium)
power for 3 minutes and 100 W (Warm) power for 2 minutes.
Press Micro
Power once to
select 900 W
(High) power.
Set the cooking time*.
Press twice.
Press Micro
Power twice to
select 500 W
(Medium) power.
Set the cooking time*.
Press 3 times.
Press Micro
Power 4 times to
select 100 W
(Warm) power.
Press Start/Set.
The time for the
rst stage counts
down in the
display.
Set the cooking time*.
Press twice.
* Refer to “Setting the cook time/timer time” on page 15.
Notes
1. AUTO PROGRAMMES cannot be used with MULTI-STAGE COOKING.
2. When operating, 2 beeps will sound between each stage, and 5 beeps will
sound after all stages have nished.
3. 900 W (High) MICROWAVE power can be set only once in MULTI-STAGE
COOKING.

18 EN
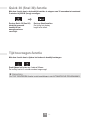
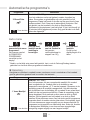
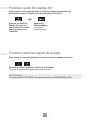
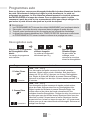
Quick 30 feature
This feature allows you to set cooking time in 30 seconds increments up to
5 minutes at 900 W (High) power.
Press Quick 30 until
the desired cooking
time appears in the
display.
Press Start/Set.
The time counts
down in the
display.
Add time feature
This feature allows you to add cooking time during cooking.
During cooking, press 1 min or 10 sec.
Cooking time will be added up to 5 minutes.
Note
ADD TIME feature is not available for AUTO PROGRAMMES.
La page est en cours de chargement...
La page est en cours de chargement...
La page est en cours de chargement...
La page est en cours de chargement...
La page est en cours de chargement...
La page est en cours de chargement...
La page est en cours de chargement...
La page est en cours de chargement...
La page est en cours de chargement...
La page est en cours de chargement...
La page est en cours de chargement...
La page est en cours de chargement...
La page est en cours de chargement...
La page est en cours de chargement...
La page est en cours de chargement...
La page est en cours de chargement...
La page est en cours de chargement...
La page est en cours de chargement...
La page est en cours de chargement...
La page est en cours de chargement...
La page est en cours de chargement...
La page est en cours de chargement...
La page est en cours de chargement...
La page est en cours de chargement...
La page est en cours de chargement...
La page est en cours de chargement...
La page est en cours de chargement...
La page est en cours de chargement...
La page est en cours de chargement...
La page est en cours de chargement...
La page est en cours de chargement...
La page est en cours de chargement...
La page est en cours de chargement...
La page est en cours de chargement...
La page est en cours de chargement...
La page est en cours de chargement...
La page est en cours de chargement...
La page est en cours de chargement...
La page est en cours de chargement...
La page est en cours de chargement...
La page est en cours de chargement...
La page est en cours de chargement...
La page est en cours de chargement...
La page est en cours de chargement...
La page est en cours de chargement...
La page est en cours de chargement...
La page est en cours de chargement...
La page est en cours de chargement...
La page est en cours de chargement...
La page est en cours de chargement...
La page est en cours de chargement...
La page est en cours de chargement...
La page est en cours de chargement...
La page est en cours de chargement...
La page est en cours de chargement...
La page est en cours de chargement...
La page est en cours de chargement...
La page est en cours de chargement...
La page est en cours de chargement...
La page est en cours de chargement...
La page est en cours de chargement...
La page est en cours de chargement...
La page est en cours de chargement...
La page est en cours de chargement...
La page est en cours de chargement...
La page est en cours de chargement...
La page est en cours de chargement...
La page est en cours de chargement...
-
 1
1
-
 2
2
-
 3
3
-
 4
4
-
 5
5
-
 6
6
-
 7
7
-
 8
8
-
 9
9
-
 10
10
-
 11
11
-
 12
12
-
 13
13
-
 14
14
-
 15
15
-
 16
16
-
 17
17
-
 18
18
-
 19
19
-
 20
20
-
 21
21
-
 22
22
-
 23
23
-
 24
24
-
 25
25
-
 26
26
-
 27
27
-
 28
28
-
 29
29
-
 30
30
-
 31
31
-
 32
32
-
 33
33
-
 34
34
-
 35
35
-
 36
36
-
 37
37
-
 38
38
-
 39
39
-
 40
40
-
 41
41
-
 42
42
-
 43
43
-
 44
44
-
 45
45
-
 46
46
-
 47
47
-
 48
48
-
 49
49
-
 50
50
-
 51
51
-
 52
52
-
 53
53
-
 54
54
-
 55
55
-
 56
56
-
 57
57
-
 58
58
-
 59
59
-
 60
60
-
 61
61
-
 62
62
-
 63
63
-
 64
64
-
 65
65
-
 66
66
-
 67
67
-
 68
68
-
 69
69
-
 70
70
-
 71
71
-
 72
72
-
 73
73
-
 74
74
-
 75
75
-
 76
76
-
 77
77
-
 78
78
-
 79
79
-
 80
80
-
 81
81
-
 82
82
-
 83
83
-
 84
84
-
 85
85
-
 86
86
-
 87
87
-
 88
88


Panasonic NNE48NBMEPG Mode d'emploi
- Catégorie
- Micro-ondes
- Taper
- Mode d'emploi
dans d''autres langues
- English: Panasonic NNE48NBMEPG Operating instructions
- Nederlands: Panasonic NNE48NBMEPG Handleiding