Sony HVL-F60RM Manuel utilisateur
- Catégorie
- La caméra clignote
- Taper
- Manuel utilisateur
Ce manuel convient également à

HVL-F60RM
4-735-282-12(1)
HVL-F60RM
4-735-282-12(1)
http://rd1.sony.net/help/ilc/1730/h_zz/
“Help Guide” (Web manual)
Refer to “Help Guide” for in-depth instructions
on the many functions of the flash.
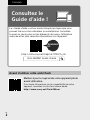
« Guide d'aide » (Manuel en ligne)
Consultez le « Guide d’aide » pour obtenir des
instructions détaillées au sujet des nombreuses
fonctions du flash.
Operating Instructions GB
Mode d’emploi FR
Flash

HVL-F60RM
4-735-282-11(1)
GB
2
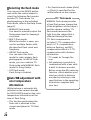
Check out the
Help Guide!
The “Help Guide” is an on-line manual that you can read on your
computer or smartphone. Refer to it for details on menu items,
advanced usage, and the latest information on the camera.
Scan
here
http://rd1.sony.net/help/ilc/1730/h_zz/
Before using this flash unit
Update the software of your camera to the latest
version before use.
Refer to the dedicated support site for information on
camera compatibility.
http://www.sony.net/flash/f60rm/
HVL-F60RM Help Guide
English

HVL-F60RM
4-735-282-11(1)
GB
3
GB
WARNING
To reduce the risk of fire or electric
shock,
1) do not expose the unit to rain or
moisture.
2) do not place objects filled with
liquids, such as vases, on the apparatus.
IEEE802.15.4
2400 MHz
< 3 mW e.i.r.p.
Do not touch the flashtube during
operation, it may become hot when
the flash fires.
This equipment complies with FCC/
IC radiation exposure limits set forth
for an uncontrolled environment and
meets the FCC radio frequency (RF)
Exposure Guidelines and RSS-102 of
the IC radio frequency (RF) Exposure
rules. This equipment has very low
levels of RF energy that are deemed
to comply without testing of specific
absorption ratio (SAR).
For Customers in the U.S.A.
For question regarding your product
or for the Sony Service Center nearest
you,
call 1-800-222-SONY (7669).
Declaration of Conformity
Trade Name: SONY
Model: HVL-F60RM
Responsible Party:
Sony Electronics Inc.
Address:
16535 Via Esprillo, San Diego,
CA 92127 U.S.A.
Telephone No.:
858-942-2230
This device complies with Part 15 of
the FCC Rules. Operation is subject
to the following two conditions: (1)
This device may not cause harmful
interference, and (2) this device
must accept any interference
received, including interference that
may cause undesired operation.
This equipment must not be co-
located or operated in conjunction
with any other antenna or
transmitter.
For Customers in Canada
This device complies with Industry
Canada’s licence-exempt RSSs.
Operation is subject to the following
two conditions:
(1) This device may not cause
interference; and
(2) This device must accept
any interference, including
interference that may cause
undesired operation of the device.
Hereby, Sony Corporation, declares
that this equipment is in compliance
Directive 2014/53/EU.
The full text of the EU declaration
of conformity is available at the
following internet address:
http://www.compliance.sony.de/
For Customers in Singapore
For Customers in Malaysia

HVL-F60RM
4-735-282-11(1)
GB
4
Table of Contents
Check out the Help Guide!....................................................... 2
Before use ................................................................................ 6
Before Photographing
Unpacking ................................................................................ 7
Locating parts and controls ..................................................... 7
Basic operations....................................................................... 9
Using the control wheel ................................................. 9
Using the Quick Navi screen .........................................10
Using the MENU screen ................................................. 12
Preparations ............................................................................ 14
Inserting batteries .........................................................14
Attaching/removing the flash unit to/from the camera ...15
Turning on the power to the flash unit ......................... 16
Pairing with a radio wireless commander/receiver
(for radio wireless flash photography) .....................18
Photographing
Photographing ........................................................................ 21
TTL flash photography ..................................................21
Wireless flash photography
(with radio wireless communications) .................... 23

HVL-F60RM
4-735-282-11(1)
GB
5
GB
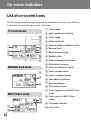
On-screen indicators
List of on-screen icons ........................................................... 26
TTL flash mode ............................................................. 26
MANUAL flash mode .................................................... 26
MULTI flash mode ......................................................... 26
Wireless commander mode (radio control) ..................27
Wireless receiver mode (radio control) .........................27
Wireless controller mode
(optical wireless communications) ...........................27
Wireless remote mode
(optical wireless communications) ...........................27
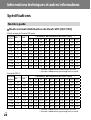
Technical and other information
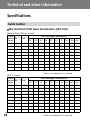
Specifications ......................................................................... 28
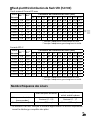
Guide number............................................................... 28
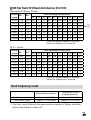
Flash frequency/count ................................................. 29
Other specifications ..................................................... 30

HVL-F60RM
4-735-282-11(1)
GB
6
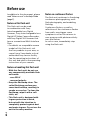
Before use
In addition to this document, please
read “Notes on use” in the Help Guide
(page 2).
Notes on this flash unit
This flash unit can be used
in combination with Sony
Interchangeable Lens Digital
Cameras, Sony Interchangeable Lens
Digital HD Video Camera Recorders,
and Sony Digital Still Cameras that
have a conventional Multi Interface
Shoe.
• For details on compatible camera
models of this flash unit, visit
the Sony website in your area, or
consult your Sony dealer or local
authorized Sony service facility.
• See the operating instructions of
this unit and refer to the operating
instructions of your camera.
Notes on handling this flash unit
• With this flash unit, do not use
any commercially available flash
units with:
–over 250 V
–reversed polarity
• Keep the flashlamp clean. The
soiled flashlamp surface may
cause heat buildup, resulting in
smoke or scorches. To clean the
flashlamp, wipe it with a soft
cloth, etc.
• This flash unit is designed with
ingress protection in mind,
but not with the intention to
completely protect against dust
and water ingress. Do not use the
unit in the rainy weather.
Notes on continuous flashes
The flash unit continues to fire during
continuous photographing, multi
flash photography, and modeling
flashing.
Continuous flashes, as well as
reflections of the continuous flashes
from walls, may trigger some
symptoms such as the seizures in
case a person with photosensitivity
sees the flashes.
In such a case, immediately stop
using the flash unit.

HVL-F60RM
4-735-282-11(1)
GB
GB
7
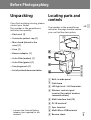
Before Photographing
Unpacking
If you find anything missing, please
contact your dealer.
The number in the parentheses
indicates the quantity.
•
Flash unit (1)
•
Connector protect cap (1)
•
Mini-stand (stored in the
case) (1)
•
Case (1)
•
Bounce adaptor (1)
•
Color filter (amber) (1)
•
Color filter (green) (1)
•
Carrying pouch (1)
•
Set of printed documentation
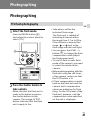
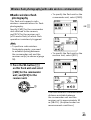
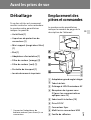
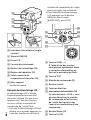
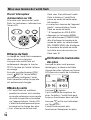
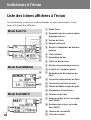
Locating parts and
controls
The number in the parentheses
indicates the page number where
you can find the description.
Built-in wide panel
Flashlamp
LED light unit / AF illuminator
Wireless control signal
receiver (for optical wireless
communications)
Multi Interface foot (15)
DC IN terminal*
Sync terminal
Multi/Micro USB terminal
Bounce sheet
* Connect the External Battery
Adaptor (not supplied) to this
terminal.

HVL-F60RM
4-735-282-11(1)
GB
8
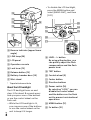
Bounce indicator (upper/lower
angle)
LINK lamp (24)
LCD panel
Operation console
Lock lever (15)
Release button (15)
Battery chamber door (14)
Mini-stand
* Tripod attachment hole
About the LCD backlight
The LCD backlight turns on and
stays lit for about 8 seconds every
time you press one of the buttons
or use the control wheel on the
flash unit.
• While the LCD backlight is lit,
you can press one of the buttons
or use the control wheel on the
unit to keep it lit longer.
• To disable the LCD backlight,
press the MENU button and
select [BACKLIGHT], and then
[OFF].
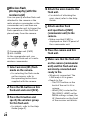
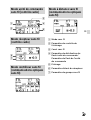
LEVEL -/+ button
By using either button, you
can quickly adjust the flash
compensation and the flash
power level.
TEST button
Control wheel (9)
Center button
Direction buttons
Power switch (16)
By selecting “LOCK,” you can
disable the control wheel
and the buttons on the flash
unit to prevent unintentional
operations.
MENU button (12)
Fn button (10)

HVL-F60RM
4-735-282-11(1)
GB
9
GB
Basic operations
Using the control wheel
By rotating the control wheel or
pressing the direction buttons, you
can move the focus or change the
setting item value on the Quick
Navi screen or the MENU screen.
Select the setting item of your
choice and press the center button
to enable the setting option.
To the direction buttons, the
following functions are assigned
at shipment. For details of the
individual functions, refer to the
Help Guide (page 2).
Operations Functions
Descriptions
Up ZOOM
Changes the
flash coverage
(zoom).
Down MODE
Changes the
flash mode.
Left –
No function
is assigned to
this button at
shipment. You
can assign a
function of your
choice to the
button.
Right
WL
MODE
Changes the
wireless mode.
To the control wheel, the individual
direction button, and the center
button, you can assign the
function of your choice. For details
of function assignment, refer to
the Help Guide (page 2).

HVL-F60RM
4-735-282-11(1)
GB
10
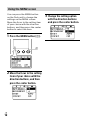
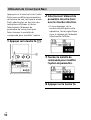
Using the Quick Navi screen
You can press the Fn button on the
flash unit to change the settings
for photography, such as the
selected flash mode, in accordance
with the on-screen indications.
Select the setting item of your
choice and rotate the control wheel
to change the setting option.
1
Press the Fn button (
).
2
Select the setting item
of your choice with the
direction buttons.
• Pressing the center button
following the above operation
displays the specific screen for
setting the selected item.
3
Rotate the control wheel to
change the setting option.
4
Press the Fn button.

HVL-F60RM
4-735-282-11(1)
GB
11
GB
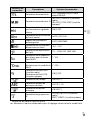
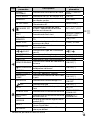
Setting items Descriptions Setting options
Flash mode setting
TTL(*)/MANUAL/MULTI/flash
off/GROUP
Wireless mode setting
WL OFF(*)/CMD/RCV (radio
control)
WL OFF(*)/CTRL/RMT (optical
control)
High-speed sync setting ON(*)/OFF
Flash coverage (zoom)
setting
AUTO(*)/20-200
Calling up pre-registered
settings
OFF(*)/MR1/MR2
Flash compensation setting -3.0 - +3.0
Flash power level setting 1/1 - 1/256, OFF, CMD LINK
Flash frequency setting for
MULTI flash mode
1 - 100
Flash count setting for
MULTI flash mode
2 - 100, --
CMD flash setting (radio
control)
CTRL flash setting (optical
control)
ON(*)/OFF
Lighting ratio setting ON/OFF(*)
Flash power level ratio
setting
OFF/1(*) - 16
Receiver remote setting ON/OFF(*)
Wireless group setting
OFF/A(*)/B/C/D/E (radio control)
RMT(*)/RMT2 (optical control)
* Factory default setting
The items and options available for setting vary depending on the flash mode.

HVL-F60RM
4-735-282-11(1)
GB
12
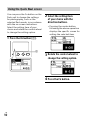
Using the MENU screen
You can press the MENU button
on the flash unit to change the
settings on the MENU screen.
Move the focus to the setting item
of your choice with the direction
buttons, and then press the center
button to select the item.
1
Press the MENU button (
).
2
Move the focus to the setting
item of your choice with the
direction buttons, and then
press the center button.
3
Change the setting option
with the direction buttons
and press the center button.

HVL-F60RM
4-735-282-11(1)
GB
13
GB
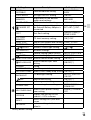
Groups
Setting items Descriptions Setting options
FLASH
DISTRIBUT.
Flash distribution setting
STD(*)/CENTER/
EVEN
LIGHT MODE LED light ON/OFF setting ON/OFF
MEMORY
Registration of the desired
modes and settings
MR1/MR2
AF LED LEVEL AF illuminator level setting HIGH/LOW(*)
CHARGE SET
Flash charge-up setting when
the External Battery Adaptor is
connected
EXT.+INT.(*)/EXT.
TEST Test-flash setting
GROUP/1TIME(*)/
3TIMES/4SEC
TTL LEVEL
MEMORY
TTL level memory setting ON(*)/OFF
LEVEL STEP Step of flash power level setting 0.3EV(*)/0.5EV
CUSTOM KEY Custom key settings -
/ SELECT Wireless control type setting (*)/
RECEIVER SET Receiver settings -
CH SET Channel setting (radio control) AUTO(*)/CH1-CH14
CH SET Channel setting (optical control) CH1(*)-CH4
REMOTE RELEASE Remote release mode setting ON/OFF(*)
WITH RELEASE
Remote release sync flash
setting
ON/OFF(*)
PAIRING Pairing -
PAIRED DEVICE List of the paired devices -
WL READY LAMP Wireless flash ready lamp setting ON/OFF(*)
BACKLIGHT
LCD backlight setting AUTO1(*)/AUTO2/
ON/OFF
BEEP
Beep sound setting
ON/OFF(*)
m/ft Flash range unit setting m(*)/ft
POWER SAVE
Power-saving timer setting 30SEC/3MIN(*)/
30MIN/OFF
WL POWER SAVE
Wireless flash power-saving
timer setting
60MIN(*)/240MIN/
OFF
VERSION
Displays the version for this
product's / RCV software
-
RESET
Resets settings for Quick Navi
screen
-
INITIALIZE
Restores settings to their
defaults
-
* Factory default setting

HVL-F60RM
4-735-282-11(1)
GB
14
Preparations
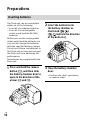
Inserting batteries
The flash unit can accommodate
either set of the following:
• Four AA-size alkaline batteries
• Four AA-size rechargeable
nickel-metal hydride (Ni-MH)
batteries
Before you use the rechargeable
nickel-metal hydride batteries, be
sure to fully charge the batteries
with the specified battery charger.
Do not use lithium-ion batteries in
this flash unit as they may prevent
the flash unit from delivering full
performance.
No batteries are supplied with the
flash unit.
1
Press and hold the release
button (
), and then slide
the battery chamber door to
open in the direction of the
arrows (
and
).
2
Insert the batteries into
the battery chamber as
illustrated (
).
(
indicate the direction
of the batteries.)
3
Close the battery chamber
door.
• Perform the step 1 operations
in reverse order.

HVL-F60RM
4-735-282-11(1)
GB
15
GB
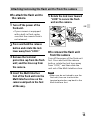
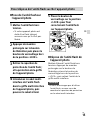
Attaching/removing the flash unit to/from the camera
To attach the flash unit to
the camera
1
Turn off the power of the
flash unit.
• If your camera is equipped
with a built-in flash, make
sure that the camera flash is
not released.
2
Press and hold the release
button and rotate the lock
lever away from “LOCK.”
3
Remove the terminal
protection cap from the flash
unit; and the shoe cap from
the camera.
4
Insert the Multi Interface
foot of the flash unit into the
Multi Interface shoe on the
camera and push in the foot
all the way.
5
Rotate the lock lever toward
“LOCK” to secure the flash
unit on the camera.
To remove the flash unit
from the camera
Turn off the power of the flash unit
first. Press and hold the release
button, rotate the lock lever away
from “LOCK,” and then slide the
unit out of the Multi Interface shoe.
Note
• When you do not intend to use the
flash unit, be sure to attach the
terminal protection cap back to the
Multi Interface foot.

HVL-F60RM
4-735-282-11(1)
GB
16
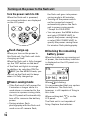
Turning on the power to the flash unit
Turn the power switch to ON.
When the flash unit is powered,
on-screen indicators are displayed
on the LCD panel.
Flash charge-up
When you turn on the power to
this flash unit, the flash unit starts
charging up itself.
When the flash unit is fully charged
up, the TEST button on the back
of the flash unit lights in orange.
In addition, by selecting [ON] for
[
BEEP] on the MENU screen, you
can set up the flash unit to beep
when it is fully charged up.
Power-saving mode
• If the flash unit is left unused for
3 minutes or longer while it is
used alone or connected to the
camera in a power-saving state,
the LCD panel will automatically
turn off to conserve the battery
power.
• During wireless flash
photography with the flash unit
used as an off-camera flash,
the flash unit goes into power-
saving mode in 60 minutes.
• Turning off the power switch
on the connected camera*
automatically places the flash
unit in power-saving mode.
* Except for DSLR-A100
• You can press the MENU button
and select [POWER SAVE] to
specify the power-saving timer,
or select [WL POWER SAVE] to
specify the power-saving timer
for wireless flash photography.
Checking the remaining
battery power
When the batteries are running out
of power, the low-battery indicator
is displayed on the LCD panel as a
warning.
When is blinking:
It is recommended that you replace
the batteries. The flash unit,
however, is still capable of firing in
this state.
When nothing but
is on the
LCD panel:
The flash unit is not capable of
firing. Replace the batteries.

GB
17
GB
HVL-F60RM
4-735-282-12(1)
Notes on continuous
flashes
If this flash unit fires in quick
succession for a short period of
time, its built-in safety circuit will
be triggered to suspend flash
firing. On the LCD panel,
/ is
displayed.
In addition, if the temperature
inside the flash unit rises further,
(overheat indicator) will light
on the LCD panel to indicate that
flash firing is disabled for a while.
In such a case, turn off the power
switch on the flash unit and leave
the flash unit unused for about 20
minutes to let it cool down.
Continuous flashes heat up the
batteries inside the flash unit. Take
extra care when you remove the
batteries.

HVL-F60RM
4-735-282-11(1)
GB
18
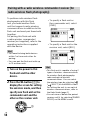
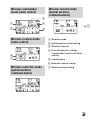
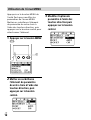
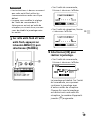
Pairing with a radio wireless commander/receiver (for
radio wireless flash photography)
To perform radio wireless flash
photography with this flash
unit, you need another flash
unit that supports radio wireless
communications in addition to this
flash unit and must pair them both
together.
For pairing this flash unit with
a radio wireless commander/
receiver (not supplied), refer to the
operating instructions supplied
with the device.
Hint
• You need to bring both devices
within 1 m from each other for
pairing.
• You can pair the flash unit with up
to 15 receiver units.
1
Turn on the power to this
flash unit and the other
device.
2
Press the WL button (
) to
display the screen for setting
the wireless mode, and then
specify one flash unit as the
commander unit and the
other as the receiver unit.
• To specify a flash unit as
the commander unit, select
[CMD].
• To specify a flash unit as the
receiver unit, select [RCV].
Hint
• This flash unit is capable of using 2
types of wireless communications
for wireless flash photography:
radio and optical wireless
communications. You can select
the wireless type by selecting [
/ SELECT] on the MENU screen.
For setting the unit to use optical
wireless communications, refer to
the Help Guide (page 2).
• You can view or delete the paired
receiver unit(s) by selecting [PAIRED
DEVICE] on the MENU screen.

HVL-F60RM
4-735-282-11(1)
GB
19
GB
Note
• The instructions provided so far
are based on the assumption that
this flash unit uses default radio
wireless communications.
• When you have changed the
setting of the commander unit and
specified it as a receiver unit, or vice
versa, be sure to reestablish paring
among the units.
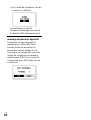
3
On this flash unit and the
other flash unit, press the
MENU button (
) and select
[PAIRING].
• On the commander unit, the
following screen is displayed.
• On the receiver unit, the
following screen is displayed.
4
Select [OK] to establish
pairing.
• On the commander unit, the
following screen is displayed.
Pairing is established. On the
commander unit, you can
continue pairing with other
receiver units. Every time pairing
is established with a receiver
unit, the number of paired
devices (
) increases.

HVL-F60RM
4-735-282-11(1)
GB
20
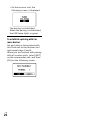
• On the receiver unit, the
following screen is displayed.
The pairing is established.
When the pairing is established,
the LINK lamp lights in green.
To establish a pairing with 2 or
more devices
Set each device to be paired with
this flash unit as the receiver unit
and repeat steps 3 and 4.
When you are finished with pairing
with all receiver units, select [EXIT]
on the commander unit, and then
[OK] on the following screen.
La page charge ...
La page charge ...
La page charge ...
La page charge ...
La page charge ...
La page charge ...
La page charge ...
La page charge ...
La page charge ...
La page charge ...
La page charge ...
La page charge ...
La page charge ...
La page charge ...
La page charge ...
La page charge ...
La page charge ...
La page charge ...
La page charge ...
La page charge ...
La page charge ...
La page charge ...
La page charge ...
La page charge ...
La page charge ...
La page charge ...
La page charge ...
La page charge ...
La page charge ...
La page charge ...
La page charge ...
La page charge ...
La page charge ...
La page charge ...
La page charge ...
La page charge ...
La page charge ...
La page charge ...
La page charge ...
La page charge ...
La page charge ...
La page charge ...
La page charge ...
La page charge ...
-
 1
1
-
 2
2
-
 3
3
-
 4
4
-
 5
5
-
 6
6
-
 7
7
-
 8
8
-
 9
9
-
 10
10
-
 11
11
-
 12
12
-
 13
13
-
 14
14
-
 15
15
-
 16
16
-
 17
17
-
 18
18
-
 19
19
-
 20
20
-
 21
21
-
 22
22
-
 23
23
-
 24
24
-
 25
25
-
 26
26
-
 27
27
-
 28
28
-
 29
29
-
 30
30
-
 31
31
-
 32
32
-
 33
33
-
 34
34
-
 35
35
-
 36
36
-
 37
37
-
 38
38
-
 39
39
-
 40
40
-
 41
41
-
 42
42
-
 43
43
-
 44
44
-
 45
45
-
 46
46
-
 47
47
-
 48
48
-
 49
49
-
 50
50
-
 51
51
-
 52
52
-
 53
53
-
 54
54
-
 55
55
-
 56
56
-
 57
57
-
 58
58
-
 59
59
-
 60
60
-
 61
61
-
 62
62
-
 63
63
-
 64
64


Sony HVL-F60RM Manuel utilisateur
- Catégorie
- La caméra clignote
- Taper
- Manuel utilisateur
- Ce manuel convient également à
dans d''autres langues
- English: Sony HVL-F60RM User manual
Documents connexes
-
Sony HVL-F45RM Manuel utilisateur
-
Sony FA-WRC1M Mode d'emploi
-
Sony HVL-F60M Manuel utilisateur
-
Sony HVL-F43AM Mode d'emploi
-
Sony HVL-F43M Manuel utilisateur
-
Sony HVL-F32M Manuel utilisateur
-
Sony HVL-F56AM Manuel utilisateur
-
-
-
Sony HVL-F42AM Le manuel du propriétaire