Hoover HHP70CAH011 Air Purifier Manuel utilisateur
- Catégorie
- Humidificateurs
- Taper
- Manuel utilisateur

®
USER MANUAL (GB) ............................. 2
MANUEL D’UTILISATION (FR) ............ 15
BEDIENUNGSANLEITUNG (DE) ......... 28
MANUALE PER L’UTENTE (IT) ........... 41
GEBRUIKSAANWIJZING (NL) ............. 54
MANUAL DE INSTRUÇÕES (PT) ........ 67
MANUAL DE USUARIO (ES) ............... 80
BRUGERVEJLEDNING (DK) ............... 93
BRUKERMANUAL (NO) ..................... 106
INSTRUKTIONSMANUAL (SE) .......... 119
KÄYTTÖOHJE (FI) ............................. 132
(RU) . 145
ΟΗΓΊΕΣ ΧΡΉΣΗΣ (GR) ........................ 158
INSTRUKCJA UŻYTKOWANIA (PL) . 171
NÁVOD K POUŽITÍ (CZ) ..................... 184
POUŽÍVATEĽSKÁ PRÍRUČKA (SK) .. 197
KULLANMA KILAVUZU (TR) ............. 210

2
GB
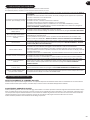
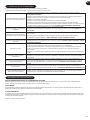
GENERAL SAFETY WARNINGS
This appliance should only be used for private household use, as described in this user guide.
Please ensure that this guide is fully understood before operating the appliance and keep for
future reference.
Check if the voltage and ratings indicated on the label of the appliance correspond to the local
power voltage before you connect the appliance.
If the power cord is damaged stop using the appliance immediately. To avoid a safety hazard,
an authorized HOOVER service engineer must replace the power cord.
Do not remove the plug by pulling the power cord.
Lay the supply cord so nobody will step on or trip over it.
Always switch off and unplug the appliance before moving or cleaning the appliance or any
maintenance task.
This appliance can be used by children aged from 8 years and above and persons with reduced
physical, sensory or mental capabilities or lack of experience and knowledge if they have been
given supervision or instruction concerning use of the appliance in a safe way and understand
the hazards involved. Children shall not play with the appliance.
Cleaning and user maintenance shall not be made by children without supervision.
The appliance does not remove carbon monoxide (CO) or radon (Rn). It cannot be used as
safety device in case of accidents with combustion processes and hazardous chemicals.
Do not continue to use your appliance if it appears faulty.
Do not block the air inlet or air outlet.
Do not insert your ngers or objects into the air outlet or the air inlet to prevent physical injury or
malfunctioning of the appliance.
Do not clean the appliance with water, any other liquid, or a (ammable) detergent, nor let them
enter the appliance to avoid electric shock and/ or a re hazard.
Do not spray any ammable materials such as insecticides or fragrance around the appliance.
This appliance is not a substitute for proper ventilation, regular vacuum cleaning, or use of an
extractor hood or fan while cooking.
Use only consumables, lters or spares recommended or supplied by HOOVER.
Make sure the lter is properly installed before you switch on the appliance.
Avoid knocking against the appliance (the air inlet and outlet in particular) with hard objects.
Keep the product dry.
Never tilt or empty the product during operation.
When the appliance is not used for a long time, bacteria may grow on the lters. Check the lters
after a long period of disuse. If the lters are very dirty, replace them.
HOOVER service: To ensure the continued safe and efcient operation of this appliance we
recommend that any servicing or repairs are only carried out by an authorized HOOVER service
engineer.
USING ENVIRONMENT
Place and use the product only on a dry, stable, level horizontal surface, so that tipping over is
excluded.
Leave at least 20cm free space behind and on both sides of the appliance and leave at least
30cm free space above the appliance.
To prevent interference, place the appliance at least 2m away from electrical appliances that
use airborne radio waves such as TVs, radios, and radio-controlled clocks.
Do not place anything on top of the appliance.
Do not use this appliance when you have used indoor smoke-type insect repellents or in places
with oily residues, burning incense, or chemical fumes.
Do not place the appliance in any of the following locations:

3
GB
• On hot surfaces, near hot surfaces, open re or in direct sunlight, near gas appliances,
heating devices or replaces;
• Next to or directly above heaters or air conditioning vents, doors, windows, extractor fans,
cookers or anywhere that it would be affected by draughts;
• In a bathroom or other areas where the product may be exposed to water splashes, dripping
or condensation (e.g. directly below an air conditioner or above an electric kettle);
• In an enclosed space (e.g. in or below a cupboard);
• In an area where the temperature could drop below –20°C or rise above 50°C;
• In a room with major temperature changes, in wet surroundings or in surroundings with high
ambient temperatures or high humidity, such as the bathroom, toilet, or kitchen;
• Where it would be obstructed, e.g. by curtains or furniture;
• Where dirt or dust could block the sensor.
CO MONITOR SAFETY INSTRUCTIONS
If CO alarm is activated, you should open all windows and doors (if safe to do so). Turn off all
fuel burning appliances if possible and then evacuate the property leaving the windows and
doors open. Get immediate medical help for anyone suffering the effects of carbon monoxide
poisoning. Do not re-enter the property until the alarm stops. The alarm will stop once the CO
has cleared. Do not use fuel burning appliances again until the CO source has been located
and rectied by a qualied technician.
Avoid using paint, thinners, solvent fumes, air fresheners, aerosol sprays or chemical cleaners
near the appliance. This may affect functioning of CO monitor.
To activate the CO monitor, connect the plug to a socket outlet. The CO Alert LED will display
green. When the CO monitor detects unsafe level of CO, the CO alarm will ring loudly and the
CO Alert button and Air Quality LED Ring will blink in red color. The alarm will continue to ring
until the detected CO reduces to a safe level.
Touch CO Alert Button for 3 seconds to test the CO Alarm function and the alarm will ring
loudly for 5 seconds. Test the alarm monthly and after prolonged absence from the building
(e.g. holidays). If the alarm fails to ring after touching the CO Alert Button for 3 seconds,
please contact the Hoover customer care center to arrange a qualied technician to repair the
fault.
If the display indicates that the CO sensor is faulty or end of life has been reached, please
contact the Hoover customer care center to arrange a qualied technician to replace the CO
sensor. The expected lifetime of the CO sensor is 7 years and must be replaced after this time.
Do not allow small children to press the CO Alert button for 3 seconds as they could be subject
to excessive noise when the alarm rings.
Operating Humidity:
Operating Temperature: 0°C to + 40°C
Carbon Monoxide affects the body by starving (suffocating) critical organs of oxygen.
When CO is inhaled it attaches to the hemoglobin in the blood that normally carries oxygen
throughout the body. CO permanently displaces the ability for oxygen molecules to attach
to the hemoglobin, thus reducing oxygen to vital organs. The concentration level and time
exposed to CO can vary its effects on the body, but experts agree even low levels of carbon
monoxide exposure over prolonged periods can have serious and lasting affects to anyone’s
overall health.
WARNING: THE CO ALARM IS DESIGNED TO PROTECT INDIVIDUALS FROM THE
ACUTE EFFECTS OF CARBON MONOXIDE EXPOSURE OR PREVENT THE CHRONIC
EFFECTS OF CARBON MONOXIDE EXPOSURE. IT WILL NOT FULLY SAFEGUARD
INDIVIDUALS WITH SPECIFIC MEDICAL CONDITIONS. IF IN DOUBT CONSULT A
MEDICAL PRACTITIONER.

4
The CO Monitor function is not to be used as, nor implied to be used as a substitute for an
EN 50291-1 UL-2034, CSA-6.19 or any other recognized standard certied carbon monoxide
alarm where Local or Regional Codes or legislation mandate their use. The CO Monitor
function is a supplemental carbon monoxide monitoring device only. Use of this device is at
the user’s discretion and implies the understanding and acceptance of its limitations to adhere
to codes or legislation where applicable.
This appliance should not be used as a substitute for proper installation, use and maintenance
of fuel burning appliances including appropriate ventilation and exhaust systems.
The CO monitor mobile and tablet notications require a functional Wi-Fi connection to
operate. They are not a substitute for a third-party emergency monitoring service.
DIFFUSER SAFETY INSTRUCTIONS
Use only aroma oil recommended or supplied by HOOVER.
Avoid using stand-alone humidier next to the air purier when using Diffuser function of
H-Essence.
Wipe any spillage of H-Essence immediately. Make sure to clean every corner of the product
that had contact with H-Essence.
HUMIDIFIER SAFETY INSTRUCTIONS
Clean the water tank every 3 days.
Use only distilled water to ll the water tank. Do not ll with other water, such as tap water,
mineral water, river water and so on.
The water in the water tank is not suitable for drinking. Do not drink this water and do not use
it to feed animals or to water plants. When you empty the water tank, pour the water down the
drain.
Do not put any substance other than distilled water in the water tank.
Do not put liquids with fragrances/perfume or H-Essence in the water tank.
Empty the tank and the housing and rell every three days.
Before relling, clean the tank and the housing with fresh tap water. Remove any
scale, deposits, or lm that have formed on the sides of the tank or on interior surfaces, and
wipe all surfaces dry.
Unplug the appliance during lling and cleaning.
Empty and clean the humidier before storage. Clean the humidier before next use.
Never leave water in the water tank and tank housing when the appliance is not in use.
Do not permit the area around the humidier to become damp or wet. If dampness occurs,
turn the output of the humidier down, use the humidier intermittently. Do not allow absorbent
materials such as carpeting, curtains, drapes or tablecloths to become damp.
If you need to move the appliance, disconnect the appliance from the power supply rst. Then
empty or remove the water tank. Carry the appliance vertically by the handles on both sides of
the appliance.
Avoid using stand-alone device which releases or sprays aroma oil next to the air purier when
using Humidier function.
Be aware that high humidity levels may encourage growth of biological organisms in the
environment.
WARNING: Micro-organisms that may be present in the water or in the environment where the
appliance is used or stored, can grow in the water reservoir and be blown in the air causing
very serious health risks when the water is not renewed and the tank or housing is not cleaned
properly every 3 days.
GB

5
The Environment
This appliance is marked according to the European directive 2012/19/EU on Waste Electrical and Electronic Equipment (WEEE). By
ensuring this product is disposed of correctly, you will help prevent potential negative consequences for the environment and human
health, which could otherwise be caused by inappropriate waste handling of this product.
The symbol on this appliance indicates that this appliance may not be treated as household waste. Instead it must be handed over
to the applicable collection point for the recycling of electrical and electronic equipment. Disposal must be carried out in accordance with local
environmental regulations for waste disposal. For more detailed information about treatment, recovery and recycling of this appliance, please
contact your local city ofce, your household and waste disposal service or the shop where you purchased the appliance.
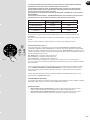
Wireless Parameters for Pairing
Technology Wi-Fi Bluetooth
Standard IEEE 802.11 b/g/n Bluetooth v4.2,BLE
Frequency Band(s) (MHz) 2401~2483 2402~2480
Maximum Power (mW) 100 10
Maximum RF power transmitted
in the frequency band 18.9 dBm
Hereby, Candy Hoover Group Srl declares that the radio equipment is in compliance with Directive 2014/53/EU. The full text of the EU declaration
of conformity is available at the following internet address: www.candy-group.com
CANDY HOOVER GROUP S.r.l. Via Privata Eden Fumagalli, 20861 Brugherio (MB) Italy
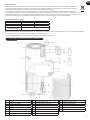
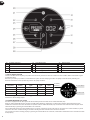
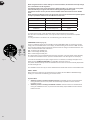
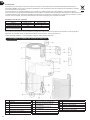
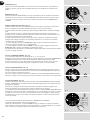
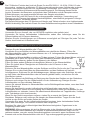
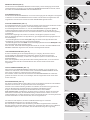
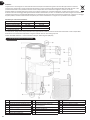
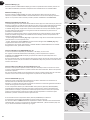
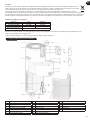
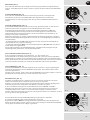
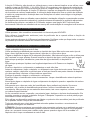
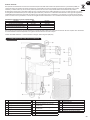
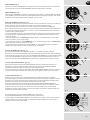
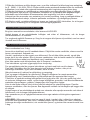
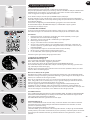
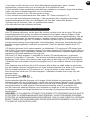
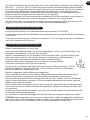
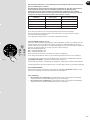
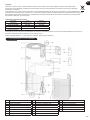
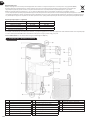
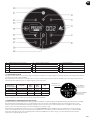
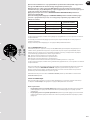
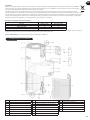
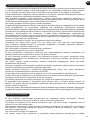
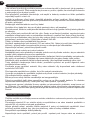
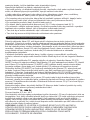
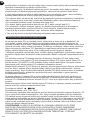
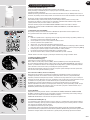
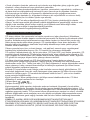
1. GETTING TO KNOW YOUR H-PURIFIER
1Control Panel / Display
2Air Outlet
3Product Carry Handle
4Filter Assembly
5Air Inlet Cover Handle
6Filter Release Switch
7Air Inlet Cover
8Humidier Handle
9Humidier Tank Housing
10 Humidier Water Tank
11 Humidier Water Tank Cover
12 Humidier Water Tank Inlet
13 Diffuser Window
14 Diffuser Cover
15 Diffuser Outlet
16 Humidier Outlet
17 Diffuser Unit
18 H-Essence Bottle (Green)
19 H-Biotics Bottle (Brown)
20 Power Cord & Plug
21 Storage Hook
22 Transportation Location
GB

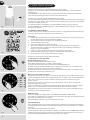
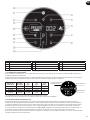
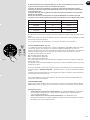
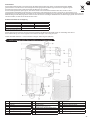
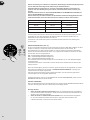
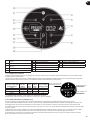
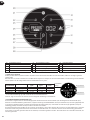
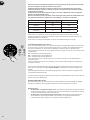
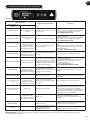
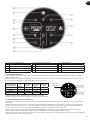
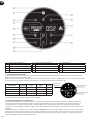
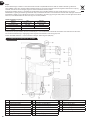
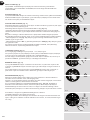
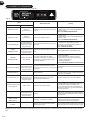
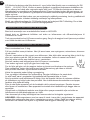
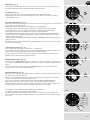
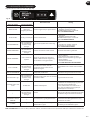
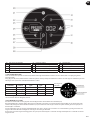
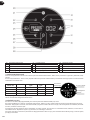
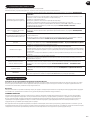
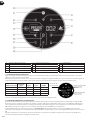
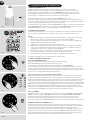
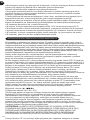
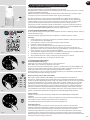
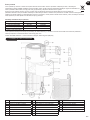
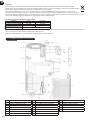
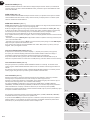
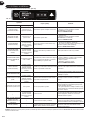
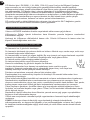
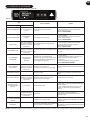
PM 2.5 020
6
Air Quality LED
Ring Color
Indoor Air
Quality
PM 10 value*
μg/m³
PM 2.5 value
μg/m³
GAS VOC
Level
GREEN Excellent 0-50 0-25 L1
YELLOW Satisfactory 50-80 25-50 L2
ORANGE Poor 80-160 50-100 L3
RED Very poor ≥ 160 ≥ 100 L4
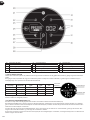
20 Air Quality LED Ring
21 Power Button
22 Child Lock Button
23 Digital Display
24 Information Button
25 Sleep Mode Button
26 Auto Mode Button
27 Humidier Button
28
Pollen Allergy Circle Lamp
29 Pollen Allergy Lamp
30 Diffuser Button
31 Max Mode Button
32 CO Alert Button & LED
33 Light Control Button
34 Wi-Fi Button
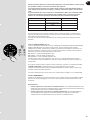
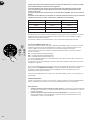
1.1 MULTI SENSOR SYSTEM
Thanks to the Multi Sensor System your product will continuously monitor the indoor air condition in terms of PM10, PM2.5 and Volatile Organic
Compounds (GAS).
Each time you switch your product on, the Multi Sensor System will start analyzing the indoor air quality and the Air Quality LED Ring will
illuminate with different colors representing real time air quality conditions.
* In Pollen Allergy mode, PM 10 values that trigger the air quality level will be lower to
minimize the risk for allergic people.
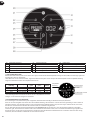
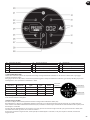
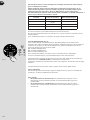
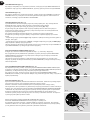
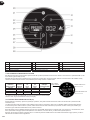
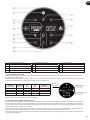
1.2 CARBON MONOXIDE (CO) ALERT
H-Purier is equipped with an alert system that will constantly monitor the indoor air for Carbon Monoxide (CO).
When the Carbon Monoxide alarm is activated, the AIR Quality LED Ring, Infomation & CO Alert button will ash red simultaniously and an
audible alarm will sound. The alarm will remain in operation until the Carbon Monoxide (CO) concentration has reduced to below 50 ppm unless
silenced manually by pressing the CO Alert Button for 3 seconds.
The CO Alert LED shows the working condition of the CO sensor. It appears in green color when the CO sensor is in normal condition, in yellow
color when the sensor is malfunctioning or exceeds its working life and in red color when CO alert is activated.
You can test if the alarm is working properly by pressing the CO Alert Button for 3 seconds, a loud buzzer sound will last for 5 seconds if the alarm
works properly.
Air Quality
LED Ring CO Alert Button
CO Alert LED
GB

7
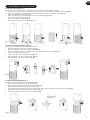
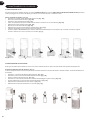
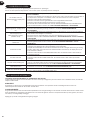
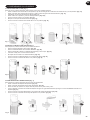
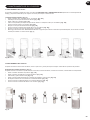
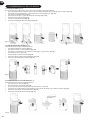
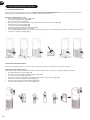
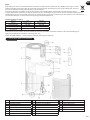
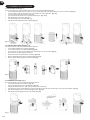
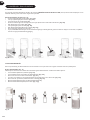
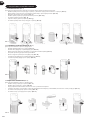
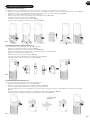
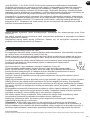
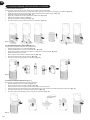
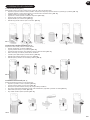
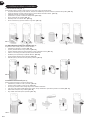
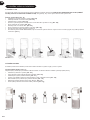
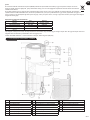
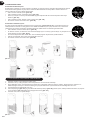
2. PREPARING YOUR H-PURIFIER
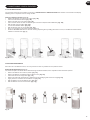
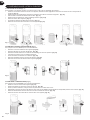
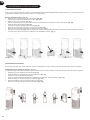
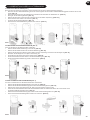
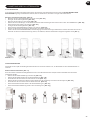
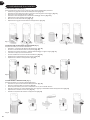
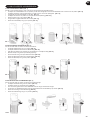
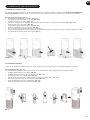
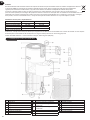
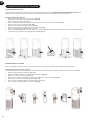
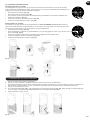
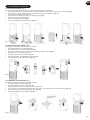
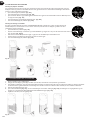
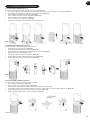
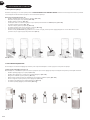
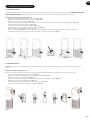
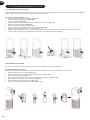
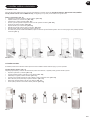
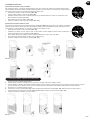
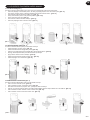
2.1 INSTALL THE FILTER [Fig. 1]
Before using your H-Purier product you will need to remove the Filter from its protective packaging:
• Remove the Air Inlet Cover from your product, grip the two Air Inlet Cover Handles and pull from the product.
[Fig. 1a]
• Remove the plug from the Transportation Location and release the cord from the Storage Hook. [Fig. 1b]
• Unlock the Filter Release Switch. [Fig. 1c]
• Remove the Filter from your product and remove the outer packaging. [Fig. 1d,e]
• Ret the Filter into your product. [Fig. 1f]
• Lock the Filter Release Switch. [Fig. 1g]
• Ret the Air Inlet Cover to your product. [Fig. 1h]
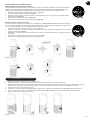
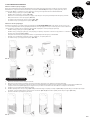
2.2 INSTALL THE DIFFUSER BOTTLE [Fig. 2]
To prepare your H-Purier product for the Diffuser function:
• Remove the Diffuser Cover from the product. [Fig. 2a]
• Remove the Diffuser Unit from the Diffuser Cover. [Fig. 2b]
• Remove the bottle of H-Essence or H-Biotics from the packaging and remove the cap. [Fig. 2c]
• Preserve the cap for future storage use.
• Tightly screw the bottle on the Diffuser unit. [Fig. 2d]
• Ret the Diffuser Unit into the Diffuser Cover. [Fig. 2e]
• Ret the Diffuser Cover into the product. [Fig. 2f]
2.3 PREPARE THE HUMIDIFIER [Fig. 3]
To prepare your H-Purier product for the Humidier function:
• Remove the Tank Housing from the product. [Fig. 3a]
• Remove the Tank Assembly from the Tank Housing. [Fig. 3b]
• Before the rst use clean all the parts with a dry soft cloth.
• Fill the tank through the Water Tank Inlet with distilled water until it reaches the MAX line indicated on the tank. [Fig. 3c]
• Ret the Tank Assembly into Tank Assembly Housing. [Fig. 3d]
• Ret the Tank Assembly Housing into your Product. [Fig. 3e]
Fig. 1
Fig. 3
GB
Fig. 2

8
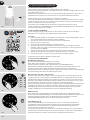
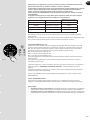
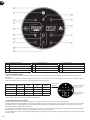
X1 PM10 090
X2 PM2.5 065
X3 L3GAS
X4 16TEMP
X5 36
HUMIDITY
X6 -
FILTER LIFE
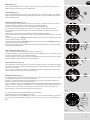
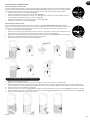
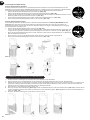
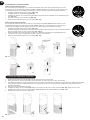
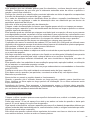
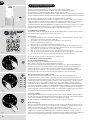
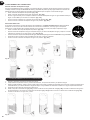
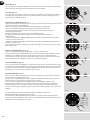
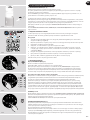
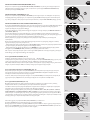
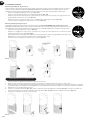
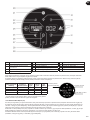
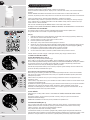
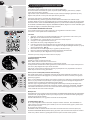
3. USING YOUR H-PURIFIER
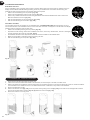
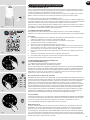
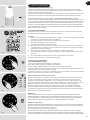
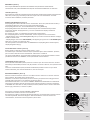
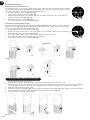
3.1 SWITCH ON THE PRODUCT [Fig. 4]:
Pull out the power cord from the cord reel and plug into a power supply.
All lights on the Control Panel / Display will fully illuminate for approximately 1 second to indicate a
succesful plug in.
The POWER button will be dimly lit and the CO Alert LED will be ON to indicate that the dedicated
sensor has started working to monitor the indoor Carbon Monoxide level.
To switch on your product, press the POWER button on the display.
The Air Quality LED Ring will illuminate through all colours in sequence whilst the sensors are analysing
the realtime air quality condition. After a few seconds, the Air Quality LED ring will select the appropriate
colour for the air quality at that time.
Your H-Purier product will immediately enter AUTO MODE and begin to purify the indoor air.
The AUTO MODE button, INFORMATION button, LIGHT CONTROL button and PM10 information on
the Display will illuminate.
3.2 CONNECT YOUR H-PURIFIER:
In order to access all the H-Puriers functions from anywhere, it is suggested to download the hOn App.
You will be able to control your product in the most efcient way.
Instructions:
1. Download the hOn application from the Apple App Store, Google Play or Huawey App Gallery. You
can also download it by scanning the QR code in [Fig. 5]
2. Open the APP, create an account with your e-mail and a password.
3. Conrm and log into the hOn App.
4. Ensure your mobile device is connected to Wi-Fi.
5. Ensure your H-Purier is switched on. Press and hold the Wi-Fi button on the display for 5
seconds, there will be an audible beep and the Wi-Fi button will start ashing to indicate it is
waiting for a connection. [Fig. 6]
6. Follow the in app instructions to connect your mobile device to your product.
7. When successfully paired, the Wi-Fi button on the product will remain illuminated.
8. To reset the Wi-Fi, press & hold the Wi-Fi button for 5 Secs.
H-Purier also works with Hey Google and Amazon Alexa.
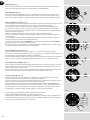
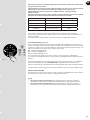
3.3 DISCOVER ALL THE FUNCTIONS
INFORMATION Function [Fig.7]:
There are 6 different data sets available to monitor:
PM10, PM2.5, GAS, Temperature, Humidity, and Filter Status.
To monitor each value simply press consecutively the INFORMATION button.
By default the display will show the PM10 data, the machine will remember user’s last selection and
maintain this selection the next time the product is switched on.
The GAS data will show a spinning cursor during the rst 3 minutes after product is switched on, while
the GAS sensor is performing a calibration cycle.
More info on PM 2.5, PM 10 and GAS:
PM indicates ne particles (not visible to the human eye) deriving mainly from outdoor pollution such as
vehicles and industrial emissions and potentially dangerous to our health in case of prolonged exposure.
PM 10 have a size up to 10 µm and are capable of penetrating the upper respiratory tract (nose,
trachea, pharynx).
PM 2.5 have a size up to 2.5 µm and given their small dimension, they can reach our lungs, thus
penetrating deeper into our body.
GAS VOC (volatile organic compounds) are volatile chemical compounds with the ability to evaporate
easily in the air at room temperature. Deodorants, detergents, glues, adhesives, cosmetics,
formaldehyde are just some of the VOCs that could be present in our homes but potentially harmful to
our health in case of prolonged exposure.
MODE Functions:
There are 3 available air purifying modes : AUTO MODE, MAX MODE & SLEEP MODE.
Auto mode is the default setting for your product when switched on, all modes can be selected manually
by pressing the related button on the display.
POLLEN ALLERGY mode can only be activated via the hOn app.
AUTO MODE [Fig. 8]:
This is the default mode of your H-Purier product when rst switched on. In Auto Mode, the H-Purier
automatically adjust its fan speed to the actual indoor air quality level to always guarantee an optimal air
purication.
This is the recommended setting for your product.
In AUTO mode, after 30 minutes of excellent air quality, your product will enter an ECO mode (Stand-by
function) by pausing the purifying function (fan), the Multi Sensor System will continue to analyse the
indoor air and automatically switch on the purifying function when required.
Fig. 4
Fig. 5
Fig. 7
Fig. 6
Fig. 8
GB

9
b
a
c
X1
X2
X3
X4
X5
SOFT
MEDIUM
CUSTOM
H-BIOTICS
OFF
X1 MIN 40
X2
X3
X4
MED 55
70
MAX
OFF
Fig. 12
Fig. 11
Fig. 10
Fig. 9
Fig. 13
Fig. 14
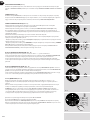
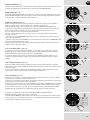
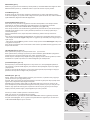
MAX MODE [Fig. 9]:
Press the MAX mode button on the display to activate air purifying at maximum power setting. To exit
MAX mode simply select AUTO mode or SLEEP mode.
SLEEP MODE [Fig. 10]:
Press the SLEEP mode button to activate air purifying at the lowest silent power setting. The SLEEP
mode button will be dimly lit and all other display lights will be off. This can be modied by pressing the
LIGHT CONTROL button.
POLLEN ALLERGY MODE: [Fig. 11]
The Pollen Allergy mode can only be activated via the hOn APP. You will rst be required to activate
and register a prole in the app, in order to create your Pollen Allergy Prole.
The Pollen Allergy mode works only when AUTO MODE is selected. [Fig. 11c]
In Pollen Allergy mode, the appliance continuously receives real time data from the APP about
the monitored pollen concentration outdoor, and works automatically to maximize pollen capturing
performance.
Once pollens are captured, they are inactivated to help alleviate allergic symptoms.
When Pollen Allergy mode is activated in the App, there are 2 possible notication lamps on the product
display:
- The Pollen Allergy Lamp is WHITE [Fig. 11a]: The appliance and the App are monitoring the presence
of pollens outdoor and there is no risk.
- The Pollen Allergy Lamp turns YELLOW and the Pollen Allergy Circle lamp is WHITE [Fig. 11b]: The
appliance and the APP have detected risk.
If the product is manually put into SLEEP mode or MAX mode whilst Pollen Allergy mode is activated,
the Pollen Allergy mode will stop.
LIGHT CONTROL Function: [Fig. 12]
There are 3 settings available for the display lighting On, Dim & Off.
To adjust the brightness of the display simply press the LIGHT CONTROL button on the display to cycle
through the 3 available options. ON is the default setting.
If OFF is selected, any other button will need to be pressed twice to activate, after one press, the lights
will become DIM, on second press the action will be activated.
CHILD LOCK Function: [Fig. 13]
Press and hold the CHILD LOCK button for 3 seconds to activate this function, an audible sound will be
heard when it has been activated and the CHILD LOCK button will remain illuminated. No other buttons
will work when activated.
To exit, simply press and hold the CHILD LOCK button for 3 seconds, an audible sound will be heard
conrm it is off and the button will no longer be illuminated.
DIFFUSER Function: [Fig. 14]
The diffuser spreads into the air of the room H-Essence or H-Biotics. H-Essence is the Hoover collection
of essential oils to release into the air enjoyable fragrances.
H-Biotics is a natural blend based on probiotics that keeps the room bio-hygenized by inhibiting the
growth of microorganims such as bacteria or microbes.
There are 4 different settings for the DIFFUSER function: SOFT, MEDIUM, CUSTOM & H-BIOTICS. To
activate this function simply press the Diffuser button on the Display, the default setting for this function
is SOFT, to select any of the other settings simply consecutively press the button to change to the
desired selection. The button will illuminate white when switched on.
It is recommended to use SOFT & MEDIUM settings for H-Essence.
CUSTOM setting can only be created on the hOn App.
When using H-Biotics, the setting MUST be on H-Biotics. Once user activates H-Biotics using the APP,
this will give an alert of “ACTIVATE H-BIOTICS” after 120 hours to ensure the use of H-Biotics every 5
days.
GB

10
X1
X2
X3
X4
X5
SOFT
MEDIUM
CUSTOM
H-BIOTICS
OFF
X1 MIN 40
X2
X3
X4
MED 55
70
MAX
OFF
When using H-Essence in certain settings or room environment, the GAS VOC level may change
due to the detection of the fragrances.
The Diffuser Function only works when the Air Quality LED Ring is on green color, it will pause
when the LED Ring is not green and continue working when it gets back to green.
The Diffuser function can only be used in AUTO & MAX modes and cannot be used in SLEEP
mode.
When activating the Diffuser function in AUTO mode, the main fan will work with a specic speed
to help to spread the H-Essence or the H-Biotics into the room.
Setting Diffusing Timing Cycle max duration
SOFT for 10 sec every 5 min 6 hours
MEDIUM for 90 sec every 3.5 min 6 hours
CUSTOM User Dened 6 hours
H-BIOTICS for 2 min every 4 min 6 hours
To switch off the function, press the diffuser button until OFF appears on the Display.
After each use of the Diffuser function, use a dry soft cloth to clean any residue from the product
surfaces.
To change the bottle in the diffuser unit, see ‘Maintaining your H-Purier’ section.
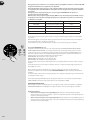
HUMIDIFIER Function: [Fig. 15]
There are 3 different settings for the Humidier function: MIN, MED & MAX. To activate this function
simply press the Humidier button on the display, the default setting for this function is MIN. To select
any of the other settings simply consecutively press the button to change to the desired selection. The
button will illuminate white when switched on.
MIN - Default Target Humidity 40%
MED - Default Target Humidity 55%
MAX - Default Target Humidity 70%
All 3 Target levels can be customised through the hOn app within a range of 30-80% Target Humidity.
To switch off the Humidier function, press the humidier button until OFF appears on the Display.
If the real time Humidity level is equal or higher than the one selected, a message will appear on the
display showing ‘HUMIDITY REACHED’. The Humidier Lamp will remain on.
The product will automatically activate the Humidier function when the real time Humidity drops below
the selected target level.
The Humidier function can only be used in SLEEP & AUTO modes and cannot be used in MAX mode.
REFILL ALERT:
When water level is lower than the minimum level, the display will show REFILL WATER message
blinking. For instructions see Maintaing your Purier section.
Important Note:
• When the product is working in Diffuser Function: If Humidier Function is selected without
turning off Diffuser Function, the product will automatically stop Diffuser Function and start
Humidier Function.
• When the product is working in Humidier Function: If Diffuser Function is selected without
turning off Humidier Function, the product will automatically stop Humidier Function and start
Diffuser Function.
Fig. 15
GB

11
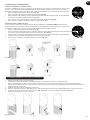
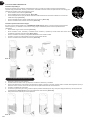
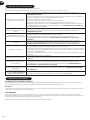
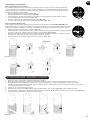
4.2 DIFFUSER MAINTENANCE
After each use of the Diffuser function, use a dry soft cloth to clean any residue from the product surfaces.
Diffuser Bottle Replacement: [Fig. 17]
The volume of liquid in the bottle can be checked through the Diffuser Window, when required the bottle should be replaced.
• Remove the diffuser cover from the product. [Fig. 17a]
• Remove the Diffuser Unit & Bottle from the diffuser cover. [Fig. 17b]
• Unscrew & remove the empty bottle. [Fig. 17c]
• Remove the new bottle of H-Essence or H-Biotics from the packaging and remove the cap. [Fig. 17d]
• Tightly screw the new bottle onto the diffuser unit. [Fig. 17e]
• Ret the diffuser unit into the diffuser cover. [Fig. 17f]
• Ret the Diffuser cover into the H-Purier. [Fig. 17g]
4.1 FILTER MAINTENANCE
Your H-Purier will monitor the condition of your lter. A CLEAN FILTER OR REPLACE FILTER alert will blink on the left side of the display
indicating action is required to clean or change the lter.
Cleaning / Replacing the Filter:
[Fig. 16]
• Remove the Air Inlet Cover from your product. [Fig. 16a]
• Unlock the Filter Release Switch. [Fig. 16b]
• Remove the Filter from your product. [Fig. 16c]
• Use a Vacuum Cleaner to clean the external layer of the Filter or Replace with a NEW lter. [Fig. 16d]
• Ret the Filter into the product. [Fig. 16e]
• Lock the Filter Release Switch. [Fig. 16f]
• Ret the Air Inlet Cover to your product. [Fig. 16g]
• Plug in your appliance to the power supply and switch on.
• Press the INFORMATION button to reset the Cleaning/ Replacing alert by holding the button for 3 secs, an audible alert will be heard to
indicate a successful reset. [Fig. 7]
4. MAINTAINING YOUR H-PURIFIER
Fig. 16
Fig. 17
GB

12
4.3 HUMIDIFIER MAINTENANCE
Rell Water Tank Alert:
For the Humidier to work a minimum level of water is required. When water level is lower than the minimum level, the
display will show REFILL WATER message blinking. There may be residual water in the Water Tank Housing. The
message will show anyway because of the minimum water level required.
• Remove the Tank Housing from the product. [Fig. 18a]
• Remove the Tank Assembly from the Tank Housing. [Fig. 18b]
• Remove any residual water and ll the tank through the Water Tank Inlet with distilled water until it reaches the
MAX line indicated on the tank. [Fig. 18c]
• Ret the Tank Assembly into the Tank Housing. [Fig. 18d]
• Ret the Tank Housing into the Product. [Fig. 18e]
Clean Water Tank Alert:
Your H-Purier will monitor the condition of your Humidier tank. A CLEAN WATER TANK alert will blink after 72 hours
from the last activation of the humidier function, if there is still water in the tank. It will appear on the left side of the display
indicating action is required to clean the water tank.
• Remove the Tank Body Housing from the product. [Fig. 18f]
• Seperate the Tank Housing, Water Tank and Water Tank Cover, remove any residual water, clean all 3 thoroughly
and dry completely with a soft dry cloth. [Fig. 18g,h,i]
• Re-assemble the Water Tank components, rell until it reaches the MAX line with distilled water.
• Make sure the product is swtched on before re-inserting the tank.
• Ret the Tank Housing into the product. [Fig. 18e]
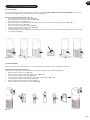
5. STORAGE OF YOUR H-PURIFIER
1. Switch off the H-Purier and unplug the power cord.
2. Clean all the internal and external surfaces of the H-Purier, the external layer of the Filter, the Water Tank.
3. Remove the bottle from the diffuser. Ret the original cap onto the bottle and store it to protect from direct light. Clean the surfaces of diffuser
unit and Diffuser Cover. Make sure there is no residual of H-Essence or H-Biotics on any surface of the H-Purier.
4. Ensure all components are dry.
5. Remove the Air Inlet Cover [Fig. 19a], reel in the power cord by pulling on the cord [Fig. 19b], t the cord into the Storage Hook and t the
plug into the Transportation Location. [Fig. 19c,d] Ret the Air Inlet Cover [Fig. 19e]
6. Store the H-Purier in a cool dry place.
Fig. 18
Fig. 19
GB

13
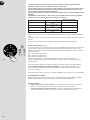
REPLACE
FILTER
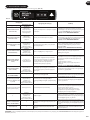
Fig. 20
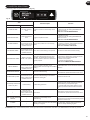
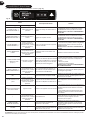
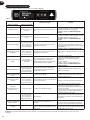
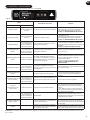
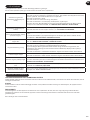
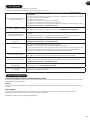
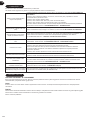
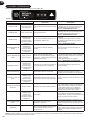
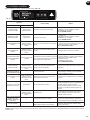
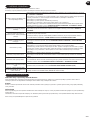
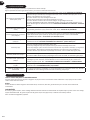
6. ALERTS & SOLUTIONS
The following codes may appear during use. [Fig. 20]
Alert Alert Description Solution
Alert on product Alert in APP
“CLEAN FILTER” Pre-Filter cleaning
Alert
Suggest to clean the external layer of the
Filter.
1. Clean the external layer of the Filter.
2. Reset the alert by holding INFORMATION
button for 3 secs.
Refer to 4.1 FILTER MAINTENANCE
“REPLACE FILTER” Filter replacement
Alert Suggest to replace the Filter.
1. Replace the Filter.
2. Reset the alert by holding INFORMATION
button for 3 secs.
Refer to 4.1 FILTER MAINTENANCE
“FILTER MISSING”
Error: an error
occurred with the air
purier, please check
possible solutions
Filter is not in position or is not correctly
locked
1. If lter is not present, put it back.
2. If lter is in position, check whether the Filter
Release Switch is on LOCK status.
Refer to 2.1 INSTALL THE FILTER
“NO WATER TANK”
Error: an error
occurred with the air
purier, please check
possible solutions
Water tank or tank housing is not present. Put back the water tank and tank housing.
“CLEAN WATER TANK” Water in the tank
needs to be replaced
3 days has passed since last time using
humidier, the tank/housing need to be
cleaned and water need to be replaced for
hygiene purpose.
1. Switch off the product.
2. Remove the tank/housing, clean the internal
surface of each component and rell.
3. Switch on the product.
4. Put back the tank/housing.
Refer to 4.3 HUMIDIFIER MAINTENANCE
“REFILL WATER”
Error: an error
occurred with the air
purier, please check
possible solutions
There is no water in the tank, or the
remaining water is not enough for humidier
working.
Rell distilled water in the tank until it reaches the
MAX line.
“PM SENSOR ERROR” / PM sensor malfunctioning PM sensor failure or sensor wire has not been
connected well, please call service center to x.
CO Alert LED is yellow
Error: an error
occurred with the air
purier, please check
possible solutions
CO sensor malfunctioning or CO sensor
exceeds its working life. Call service center to x.
Automatically switched off
without any alert Product falling Product falling protection
1. If product falls and there is water spilling,
unplug the power supply and wait for 48 hours
before switching on the product again.
2. If product falls without water spilling, lift the
product up and touch Power button to switch it
on.
/
Error: an error
occurred with the air
purier, please check
possible solutions
Motor failure Motor failure or motor wire has not been
connected well, please call service center to x.
“TEMP. & HUMI. SENSOR
ERROR” /Temperature and humidity sensor
malfunctioning
Temperature and humidity sensor failure or
sensor wire has not been connected well, please
call service center to x.
“PAUSE” /Diffuser working will pause when Air Quality
LED Ring is not green.
No need action. Diffuser working will resume
when Air Quality LED Ring is green.
ATTENTION: If any of these failures persist, contact your local Hoover representative. DO NOT try to disassemble the H-Purier by yourself.
GB

14
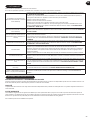
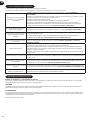
IMPORTANT INFORMATION
Hoover Spares and Consumables
Always replace parts with genuine Hoover spares. These are available from your local Hoover dealer or direct from Hoover. When ordering parts
always quote your model number.
Quality
Hoover’s factories have been independently assessed for quality. Our products are made using a quality system which meets the requirements of
ISO 9001.
Your Guarantee
The guarantee conditions for this appliance are as dened by our representative in the country in which it is sold. Details regarding these conditions
can be obtained from the dealer from whom the appliance was purchased. The bill of sale or receipt must be produced when making any claim
under the terms of this guarantee.
Subject to change without notice.
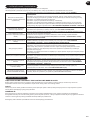
7. TROUBLESHOOTING
The following is a list of commonly encountered problems and solutions.
If any of these problems persist contact your local Hoover representative.
The Fan does not work (Control
Panel / Display Lights on)
• Check the alert showing on the display or in the app. If there is, refer to 6. ALERTS AND SOLUTIONS.
• Check if there are any obstructions in the fan. If there is, rst unplug the product, and clear them, or call
service center to clear.
• Check if the H-Purier is switched on.
• Check if the Filter is correctly installed and in locked status.
• Check if the H-Purier is in a completely vertical position and not leaning.
• The H-Purier may be in the ECO mode. You could press Sleep Mode Button or Max Mode Button to exit
the ECO mode. Refer to 3. USING YOUR H-PURIFIER – AUTO MODE.
The Fan does not work
(Control Panel / Display Lights off)
• Check if the H-Purier is plugged in and switched on.
• Check the alert showing in the app. If there is, refer to 6. ALERTS AND SOLUTIONS.
No lights on Control Panel / Display
(Fan working)
• In Sleep Mode, the default lights setting is off. You could press the Light Control Button to turn on the
lights.
• The lights may be switched off. Press the Light Control Button to turn on the lights. Refer to 3.USING
YOUR H-PURIFIER – SLEEP MODE / LIGHT CONTROL Function.
Buttons on the Control Panel do not
operate
• Child Lock may be activated. You could press and hold the CHILD LOCK button for 3 seconds to exit.
Refer to 3. USING YOUR H-PURIFIER – CHILD LOCK Function.
Air ow is weak
• Check if the protective packaging has been removed from the lter.
• Check if there are any obstructions in the Air Inlet Cover or Air Outlet.
• Remove the Air Inlet Cover and check the Filter condition. Clean the external layer or replace the Filter if
needed. You could check the Filter Life status in Display by pressing Information Button.
• Check if the H-Purier is in Sleep Mode. The Fan operates at reduced power in this mode.
H-Purier is operating loudly • Check if there are any obstructions in the H-Purier.
• Check if the H-Purier is running in Max Mode. The Fan operates at maximum power in this mode.
H-Purier operates loudly suddenly
• Check if the H-Purier is running in Auto Mode and the Air Quality LED Ring is not green. In Auto Mode,
the H-Purier automatically adjust its fan speed to the actual indoor air quality level. Refer to 3. USING
YOUR H-PURIFIER – AUTO MODE.
H-Purier makes a loud buzzer
sound all of a sudden
• The testing function of CO Alert button is activated by mis-operation. The sound will automatically stop
after 5 seconds. Refer to 1.2 CARBON MONOXIDE (CO) ALERT
“CLEAN WATER TANK” alert could
not be reset
• After cleaning the water tank / housing and relling, switch on the H-Purier. Do not insert the housing
until display shows “NO WATER TANK”.
GB

15
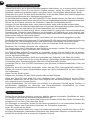
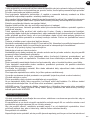
CONSIGNES GÉNÉRALES DE SÉCURITÉ
Cet appareil est uniquement conçu pour un usage privé, comme décrit dans ce manuel de
l’utilisateur. Veillez à lire et comprendre entièrement ce manuel avant de mettre en marche
l’appareil. Conservez le manuel pour l’avenir.
Vériez si la tension et les puissances indiquées sur l’étiquette de l’appareil correspondent à la
tension d’alimentation locale avant de brancher l’appareil.
Si le cordon d’alimentation est endommagé, arrêtez immédiatement d’utiliser l’appareil. Le cordon
d’alimentation doit être remplacé par un technicien de service agréé Hoover an d’éviter tout danger.
Ne débranchez pas l’appareil en tirant le cordon d’alimentation.
Posez le cordon d’alimentation de façon à ce que personne ne le piétine ou ne trébuche dessus.
Il convient de toujours éteindre et débrancher avant de déplacer, nettoyer ou entretenir l’appareil.
Cet appareil peut être utilisé par des enfants âgés d’au moins 8 ans et par des personnes ayant des
capacités physiques, sensorielles ou mentales réduites, ou n’ayant pas d’expérience ou de connaissances
en la matière. Ces dernières doivent recevoir des instructions sur l’utilisation de l’appareil en toute sécurité
et comprendre les risques impliqués. Les enfants ne doivent pas jouer avec l’appareil.
Le nettoyage et l’entretien ne devraient pas être effectués par des enfants sans supervision.
L’appareil n’élimine ni le monoxyde de carbone (CO) ni le radon (Rn). Il ne peut pas être utilisé
comme dispositif de sécurité en cas d’accidents avec des processus de combustion ou des produits
chimiques dangereux.
Ne continuez pas à utiliser votre appareil s’il semble défectueux.
Ne bloquez pas l’entrée ou la sortie de l’air.
N’enlez pas vos doigts ou des objets dans la sortie de l’air ou dans l’entrée de l’air pour éviter des
blessures ou un dysfonctionnement de l’appareil.
Ne nettoyez pas l’appareil avec de l’eau tout autre liquide ou détergent (inammable) et ne les
laissez pas non plus pénétrer dans l’appareil pour éviter tout risque d’électrocution et/ou d’incendie.
Ne vaporisez pas de produits inammables comme des insecticides ou des parfumeurs autour de
l’appareil.
Cet appareil ne remplace pas une ventilation correcte, un nettoyage régulier avec l’aspirateur ou
l’utilisation d’une hotte aspirante ou d’un ventilateur pendant que vous cuisinez.
N’utilisez que les consommables, les ltres et les pièces de rechange recommandés ou fournis par
HOOVER.
Assurez-vous que le ltre soit convenablement monté avant d’allumer l’appareil.
Évitez de frapper contre l’appareil (l’entrée et la sortie de l’air en particulier) avec des objets durs.
Gardez l’appareil sec.
N’inclinez ou ne videz jamais l’appareil pendant le fonctionnement.
Quand l’appareil n’est pas utilisé pendant longtemps, des bactéries peuvent proliférer sur les
ltres. Vériez les ltres après une longue période d’inutilisation. Si les ltres sont très sales,
remplacez-les.
Service Hoover : Pour assurer l’utilisation sûre et efcace de cet appareil, nous recommandons de
n’en coner l’entretien ou les réparations qu’à un réparateur HOOVER agréé.
ENVIRONNEMENT D’UTILISATION
Placez et utilisez l’appareil uniquement sur une surface sèche, stable et à l’horizontale an
d’éviter le basculement.
Laissez au moins 20 cm d’espace libre derrière et des deux côtés de l’appareil et laissez au
moins 30 cm d’espace libre au-dessus de l’appareil.
Pour éviter les interférences, placez l’appareil au moins à 2 m de tout appareil électrique qui
utilise les ondes radio aériennes comme les TV, les radios et les horloges radio-pilotées.
Ne placez rien sur l’appareil.
N’utilisez pas cet appareil quand vous avez utilisez des répulsifs pour insectes à fumée intérieure
ou dans des endroits avec des résidus d’huile, de l’encens brûlant ou des fumées chimiques.
Ne mettez pas l’appareil dans un des endroits suivants :
FR

16
• Sur des surfaces chaudes, à proximité de surfaces chaudes, d’un feu ouvert ou en plein
soleil, à proximité d’appareils à gaz, de dispositifs de chauffage ou de cheminées ;
• À côté ou directement au-dessus de radiateurs ou de climatiseurs, de portes, de fenêtres, de hottes
aspirantes, de cuisinières ou de tout autre endroit où il pourrait être affecté par des courants d’air ;
• Dans une salle de bain ou dans d’autres endroits où le produit peut être exposé à des
éclaboussures d’eau, des gouttes ou de la condensation (par exemple, directement sous un
climatiseur ou au-dessus d’une bouilloire électrique) ;
• Dans un espace clos (par exemple dans ou sous une armoire);
• Dans une zone ou la température pourrait chuter en dessous de -20°C ou monter au-dessus
de 50°C;
• Dans une pièce où les changements de température sont importants, dans un environnement
humide ou dans un environnement où la température ambiante ou l’humidité sont élevées,
comme la salle de bain, les toilettes ou la cuisine ;
• Où il pourrait être obstrué, par exemple par des rideaux ou des meubles;
• Où la saleté ou la poussière peuvent bloquer le capteur.
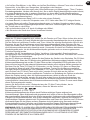
INSTRUCTIONS DE SÉCURITÉ DU CONTROLE DE CO
Si l’alerte de Monoxyde de Carbone est activée, vous devez ouvrir toutes les fenêtres et les portes
(si vous ne courez aucun risque). Éteignez tous les appareils à combustibles si possible et, ensuite,
évacuez les lieux en laissant les fenêtres et les portes ouvertes. Demandez de l’aide médicale
immédiatement pour toute personne souffrant des effets d’un empoisonnement au monoxyde de
carbone. Ne rentrez pas à nouveau sur les lieux tant que l’alarme est en marche. L’alarme s’arrêtera
une fois que le CO aura été éliminé. N’utilisez pas d’appareils à combustible à nouveau jusqu’à ce
que la source de CO n’a pas été localisée et remise en ordre par un technicien qualié.
Évitez d’utiliser de la peinture, des diluants, des fumées de solvants, des désodorisants, des
vaporisateurs ou des produits de nettoyage chimiques près de l’appareil. Cela pourrait affecter le
fonctionnement du détecteur de CO.
Pour activer le détecteur de CO, branchez l’appareil à une prise. Le voyant d’alerte LED de CO
sera verte. Lorsque le détecteur de CO détecte un niveau dangereux de CO, l’alarme CO retentit
bruyamment et le bouton d’alerte CO ainsi que l’anneau LED de qualité de l’air clignotent en rouge.
L’alarme continue de sonner jusqu’à ce que le détecteur de CO soit ramené à un niveau sûr.
Touchez le bouton [CO Alert] pendant 3 secondes pour tester la fonction détecteur de CO et
l’alarme retentira fortement pendant 5 secondes. Testez l’alarme tous les mois et après une
longue absence de l’immeuble (par exemple vacances). Si l’alarme ne retentit pas après avoir
touché le bouton [CO Alert] pendant 3 secondes, contactez le service clients Hoover pour xer un
rendez-vous avec un technicien qualié pour réparer l’anomalie.
Si l’afchage indique que le capteur de CO est défectueux ou que la n de vie a été atteinte,
veuillez contacter le centre d’assistance à la clientèle de Hoover pour qu’un technicien qualié
remplace le détecteur de CO. Le détecteur de CO a une durée de vie prévue de 7 ans période
après laquelle il doit être remplacé.
Veillez à ce que les enfants ne pressent pas le bouton CO Alert pendant 3 secondes car le bruit
de l’alarme pourrait être excessif pour eux.
Humidité de fonctionnement :
Température de fonctionnement : 0°C à + 40°C
Le monoxyde de carbone affecte le corps en affamant (étouffant) les organes vitaux en oxygène.
Quand le CO est inhalé, il s’attache à l’hémoglobine dans le sang qui, normalement, transporte
l’oxygène dans tout le corps. Le CO inhibe en permanence la capacité des molécules d’oxygène
de s’attacher à l’hémoglobine en réduisant, ainsi, l’apport d’oxygène aux organes vitaux. Le
niveau de concentration et le temps d’exposition au CO peuvent modier ses effets sur le corps
mais les experts sont tous d’accord sur le fait que même de faibles niveaux d’exposition de
monoxyde de carbone pendant des périodes prolongées peuvent avoir des effets graves et
durables sur la santé des personnes.
MISE EN GARDE : L’ALARME CO EST CONÇUE POUR PROTÉGER LES INDIVIDUS DES
EFFETS GRAVES DE L’EXPOSITION AU MONOXYDE DE CARBONE OU POUR ÉVITER
LES EFFETS CHRONIQUES DE L’EXPOSITION AU MONOXYDE DE CARBONE. ELLE
NE PRÉSERVERA PAS COMPLÈTEMENT LES INDIVIDUS AYANT DES CONDITIONS
MÉDICALES PARTICULIÈRES. EN CAS DE DOUTES, CONSULTEZ UN MÉDECIN.
FR

17
La fonction de contrôle de CO ne doit pas être utilisée comme, ni implicitement être utilisée
comme un substitut à un détecteur de monoxyde de carbone certié EN 50291-1, UL-2034,
CSA-6.19 ou toute autre norme reconnue lorsque les codes locaux ou régionaux ou la législation
imposent leur utilisation. La fonction de contrôle de CO est un dispositif supplémentaire de
surveillance du monoxyde de carbone uniquement. L’utilisation de ce dispositif est à la discrétion
de l’utilisateur et implique la compréhension et l’acceptation de ses limitations pour adhérer aux
codes ou aux normes, les cas échéant.
Cet appareil ne doit pas être utilisé comme substitut d’un montage, d’une utilisation et d’un
entretien corrects des appareils à combustible y compris une ventilation correcte et des systèmes
d’échappement.
Les notications sur téléphone portable et tablette du CO monitor nécessitent une connexion Wi-
pour fonctionner. Ils ne se substituent pas à un service de surveillance d’urgence par un tiers.
INSTRUCTIONS DE SÉCURITÉ DU DIFFUSEUR
Utilisez uniquement l’huile essentielle recommandée ou fournie par HOOVER.
Évitez d’utiliser un humidicateur près du puricateur d’air lorsque vous utilisez la fonction Diffuseur
de H-Essence.
Essuyez immédiatement tout déversement de H-Essence. Assurez-vous de nettoyez tous les coins
de l’appareil qui sont entrés en contact avec la H-Essence.
INSTRUCTIONS DE SÉCURITÉ DE L’HUMIDIFICATEUR
Nettoyez le réservoir d’eau tous les 3 jours.
Utilisez uniquement de l’eau distillée pour remplir le réservoir d’eau. Ne le remplissez pas avec
d’autres eaux, comme l’eau du robinet, l’eau minérale, l’eau de rivière, etc.
L’eau dans le réservoir d’eau n’est pas potable. Ne buvez pas cette eau et ne l’utilisez pas pour
la donner à boire aux animaux ou pour arroser les plantes. Quand vous videz le réservoir d’eau,
versez l’eau dans l’évier.
Ne mettez pas une substance autre que l’eau distillée dans le réservoir d’eau.
Ne mettez pas des liquides ayant des parfums ou H-Essence dans le réservoir d’eau.
Videz le réservoir et le boîtier et remplissez-les tous les trois jours.
Avant de remplir, nettoyez le réservoir et le boîtier avec de l’eau fraîche du robinet.
Enlevez tout tartre, dépôt ou lm qui s’est formé sur les côtés du réservoir ou sur les surfaces
intérieures et essuyez toutes les surfaces.
Pendant le remplissage et le nettoyage, débranchez l’appareil.
Videz et nettoyez l’humidicateur avant le stockage. Nettoyez l’humidicateur avant la prochaine
utilisation.
Ne laissez jamais d’eau dans le réservoir d’eau et le boîtier du réservoir lorsque l’appareil n’est
pas utilisé.
Ne laissez pas la zone autour de l’humidicateur devenir humide ou mouillée. En cas d’humidité,
tournez vers le bas la sortie de l’humidicateur, faites des pauses dans l’utilisation de
l’humidicateur. Ne laissez pas que des matériaux absorbants comme les tapis, les rideaux, les
tentures ou les nappes deviennent humides.
Si vous avez besoin de déplacer l’appareil, débranchez-le de l’alimentation électrique. Puis videz
ou retirez le réservoir d’eau. Portez l’appareil verticalement par les poignées situées de chaque
côté de celui-ci.
Évitez d’utiliser un diffuseur d’huiles essentielles près du puricateur d’air quand vous utilisez la
fonction Humidicateur.
Faites attention car les hauts niveaux d’humidité peuvent causer la prolifération d’organismes
biologiques dans l’environnement.
MISE EN GARDE : Des micro-organismes peuvent être présents dans l’eau ou dans
l’environnement quand l’appareil est utilisé ou stocké, peuvent proliférer dans le réservoir d’eau
et être répandus dans l’air en causant de sérieux risques pour la santé si vous ne changez pas
l’eau et vous ne nettoyez pas le réservoir convenablement tous les 3 jours.
FR

18
Environnement
Cet appareil porte des marques conformes à la directive européenne 2012/19/EU relative aux déchets d’équipements électriques et
électroniques (DEEE). Si vous jetez ce produit convenablement, vous contribuerez à éviter des conséquences potentiellement nuisibles
pour l’environnement et pour la santé.
Le symbole gurant sur cet appareil indique qu’il ne peut pas être considéré comme une ordure ménagère. Vous devez le déposer
dans un centre de recyclage des déchets électriques et électroniques. La déposition doit être effectuée conformément à la réglementation locale
en matière de déchets. Pour obtenir des compléments d’information sur le traitement, la récupération et le recyclage de cet appareil, veuillez
contacter votre municipalité, le service local d’élimination des ordures ménagères ou le revendeur de l’appareil.
Paramètres sans ls pour l’appairage
Technologie Wi- Bluetooth
Standard IEEE 802.11 b/g/n Bluetooth v4.2,BLE
Bande(s) de fréquence (MHz) 2401~2483 2402~2480
Puissance maximale (mW) 100 10
Puissance RF maximale trans-
mise sur la bande de fréquence 18.9 dBm
Par la présente, Candy Hoover Group Srl déclare que l’équipement radio est conforme à la directive 2014/53/UE. Le texte intégral de la
déclaration de conformité de l’UE est disponible à l’adresse internet suivante : www.candy-group.com.
CANDY HOOVER GROUP S.r.l. Via Privata Eden Fumagalli, 20861 Brugherio (MB) Italy
1. APPRENEZ À CONNAITRE VOTRE H-PURIFIER
1Panneau de commande / Ecran
2Sortie d’air
3Poignée de l’appareil
4Ensemble du ltre
5Poignée du couvercle de l’entrée de l’air
6Gâchette de détachement du ltre
7Couvercle de l’entrée de l’air
8Poignée de l’humidicateur
9Carter du réservoir de l’humidicateur
10 Réservoir d’eau de l’humidicateur
11 Couvercle du réservoir d’eau de
l’humidicateur
12 Entrée du réservoir d’eau de
l’humidicateur
13 Fenêtre du diffuseur
14 Couvercle du diffuseur
15 Prise du diffuseur
16 Sortie de l’humidicateur
17 Unité du diffuseur
18 Bouteille H-Essence (Vert)
19 Bouteille H-Biotics (Brun)
20 Cordon d’alimentation et che
21 Crochet de rangement
22 Emplacement de transport
FR

19
PM 2.5 020
Couleur du cercle
lumineux de la
qualité de l’air
Qualité de
l’air intérieur
Niveau PM
10*
μg/m³
Niveau PM
2.5
μg/m³
Niveau
COV
gazeux
VERT Excellent 0-50 0-25 L1
JAUNE Satisfaisant 50-80 25-50 L2
ORANGE Mauvaise 80-160 50-100 L3
ROUGE Très
mauvaise ≥ 160 ≥ 100 L4
20 Cercle lumineux LED de qualité de l’air
21 Bouton d’alimentation
22 Bouton Child Lock (sécurité pour enfants)
23 Écran numérique
24 Bouton d’informations
25 Bouton Sleep mode (mode veille)
26 Bouton mode Auto
27 Bouton Humidier (humidicateur)
28
Zone allergies au pollen
29 Voyant pour l’allergie au pollen
30 Bouton diffuseur
31 Bouton mode max
32 Bouton et Alerte LED CO
33 Bouton Commande lumière
34 Bouton Wi-Fi
1.1 SYSTÈME MULTI-DÉTECTEURS
Grâce au Système multi-détecteurs, votre produit surveille en permanence les conditions de l’air intérieur en matière de PM10, PM2.5 et de
Composés Organiques Volatils (GAZ).
Chaque fois que vous allumez votre produit, le Système multi-détecteurs commence à analyser la qualité de l’air intérieur et l’anneau LED de
qualité de l’air s’illumine de différentes couleurs représentant les conditions de qualité de l’air en temps réel.
* En mode Allergie au pollen, les niveaux de PM 10 qui déclenchent le niveau
de qualité de l’air seront plus faibles an de minimiser le risque pour les personnes allergiques.
1.2 ALERTE MONOXYDE DE CARBONE (CO)
H-Purier est équipé d’un système d’alerte qui contrôle en permanence la présence de monoxyde de carbone (CO) dans l’air intérieur.
Quand l’alarme de monoxyde de carbone est activée, le bouton du LED Ring de la qualité de l’air, d’informations et de la CO Alert clignotera
en rouge simultanément et une alarme retentira. L’alarme restera active jusqu’au moment où la concentration de monoxyde de carbone (CO)
descendra en dessous de 50 ppm à moins qu’elle ne soit arrêtée manuellEment en appuyant sur le bouton CO Alert pendant 3 secondes.
Le voyant d’alerte CO indique l’état de fonctionnement du capteur de CO. Il apparaît en vert lorsque le capteur de CO est en état normal, en
jaune lorsque le capteur présente un dysfonctionnement ou dépasse sa durée de vie et en rouge lorsque l’alerte CO est activée.
Vous pouvez tester le bon fonctionnement de l’alarme en appuyant sur le bouton CO Alert pendant 3 secondes, un bruit fort retentira pendant 5
secondes si l’alarme fonctionne correctement.
Cercle lumineux LED
de qualité de l’air Bouton Alerte CO
Alerte LED CO
FR

20
2. PRÉPARATION DE VOTRE H-PURIFIER
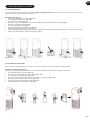
2.1 INSTALLER LE FILTRE [Fig. 1]
Avant d’utiliser votre appareil H-Purier, vous devrez retirer le ltre de son emballage de protection :
• Retirez le Couvercle de l’entrée de l’air de votre appareil, saisissez les deux poignées du couvercle de l’entrée de l’air et extrayez-les de
l’appareil.
[Fig. 1a]
• Retirez la che de l’emplacement de transport et détachez le cordon du crochet de rangement. [Fig. 1b]
• Déverrouillez la Gâchette de détachement du ltre. [Fig. 1c]
• Retirez le ltre de l’appareil et retirez l’emballage extérieur. [Fig. 1d,e]
• Remontez le ltre dans l’appareil. [Fig. 1f]
• Verrouillez la Gâchette de détachement du ltre. [Fig. 1g]
• Remontez le Couvercle de l’entrée de l’air à votre appareil. [Fig. 1h]
2.2 MONTEZ LA BOUTEILLE DU DIFFUSEUR [Fig. 2]
Pour préparer votre H-PURIFIER pour la fonction Diffuseur :
• Retirez le Couvercle du diffuseur de l’appareil. [Fig. 2a]
• Retirez le diffuseur du couvercle du diffuseur. [Fig. 2b]
• Retirez la bouteille H-Essence ou H-Biotics de l’emballage et retirez le capuchon. [Fig. 2c]
• Conservez le bouchon pour une utilisation ultérieure.
• Vissez fermement la bouteille sur le diffuseur. [Fig. 2d]
• Remontez le diffuseur dans le couvercle du diffuseur. [Fig. 2e]
• Remontez le Couvercle du diffuseur dans l’appareil. [Fig. 2f]
2.3 PRÉPARER L’HUMIDIFICATEUR [Fig. 3]
Pour préparer votre H-PURIFIER pour la fonction Humidicateur :
• Retirez le Carter du réservoir de l’appareil. [Fig. 3a]
• Retirez l’Ensemble du réservoir du Carter du réservoir. [Fig. 3b]
• Avant la première utilisation, nettoyez toutes les pièces avec un chiffon doux et sec.
• Remplissez le réservoir par l’entrée du réservoir d’eau avec de l’eau distillée jusqu’à atteindre la marque MAX présente sur le réservoir. [Fig. 3c]
• Remontez l’Ensemble du réservoir dans le Carter de l’ensemble du réservoir. [Fig. 3d]
• Remontez le Carter de l’ensemble du réservoir dans votre appareil. [Fig. 3e]
Fig. 1
Fig. 3
Fig. 2
FR
La page est en cours de chargement...
La page est en cours de chargement...
La page est en cours de chargement...
La page est en cours de chargement...
La page est en cours de chargement...
La page est en cours de chargement...
La page est en cours de chargement...
La page est en cours de chargement...
La page est en cours de chargement...
La page est en cours de chargement...
La page est en cours de chargement...
La page est en cours de chargement...
La page est en cours de chargement...
La page est en cours de chargement...
La page est en cours de chargement...
La page est en cours de chargement...
La page est en cours de chargement...
La page est en cours de chargement...
La page est en cours de chargement...
La page est en cours de chargement...
La page est en cours de chargement...
La page est en cours de chargement...
La page est en cours de chargement...
La page est en cours de chargement...
La page est en cours de chargement...
La page est en cours de chargement...
La page est en cours de chargement...
La page est en cours de chargement...
La page est en cours de chargement...
La page est en cours de chargement...
La page est en cours de chargement...
La page est en cours de chargement...
La page est en cours de chargement...
La page est en cours de chargement...
La page est en cours de chargement...
La page est en cours de chargement...
La page est en cours de chargement...
La page est en cours de chargement...
La page est en cours de chargement...
La page est en cours de chargement...
La page est en cours de chargement...
La page est en cours de chargement...
La page est en cours de chargement...
La page est en cours de chargement...
La page est en cours de chargement...
La page est en cours de chargement...
La page est en cours de chargement...
La page est en cours de chargement...
La page est en cours de chargement...
La page est en cours de chargement...
La page est en cours de chargement...
La page est en cours de chargement...
La page est en cours de chargement...
La page est en cours de chargement...
La page est en cours de chargement...
La page est en cours de chargement...
La page est en cours de chargement...
La page est en cours de chargement...
La page est en cours de chargement...
La page est en cours de chargement...
La page est en cours de chargement...
La page est en cours de chargement...
La page est en cours de chargement...
La page est en cours de chargement...
La page est en cours de chargement...
La page est en cours de chargement...
La page est en cours de chargement...
La page est en cours de chargement...
La page est en cours de chargement...
La page est en cours de chargement...
La page est en cours de chargement...
La page est en cours de chargement...
La page est en cours de chargement...
La page est en cours de chargement...
La page est en cours de chargement...
La page est en cours de chargement...
La page est en cours de chargement...
La page est en cours de chargement...
La page est en cours de chargement...
La page est en cours de chargement...
La page est en cours de chargement...
La page est en cours de chargement...
La page est en cours de chargement...
La page est en cours de chargement...
La page est en cours de chargement...
La page est en cours de chargement...
La page est en cours de chargement...
La page est en cours de chargement...
La page est en cours de chargement...
La page est en cours de chargement...
La page est en cours de chargement...
La page est en cours de chargement...
La page est en cours de chargement...
La page est en cours de chargement...
La page est en cours de chargement...
La page est en cours de chargement...
La page est en cours de chargement...
La page est en cours de chargement...
La page est en cours de chargement...
La page est en cours de chargement...
La page est en cours de chargement...
La page est en cours de chargement...
La page est en cours de chargement...
La page est en cours de chargement...
La page est en cours de chargement...
La page est en cours de chargement...
La page est en cours de chargement...
La page est en cours de chargement...
La page est en cours de chargement...
La page est en cours de chargement...
La page est en cours de chargement...
La page est en cours de chargement...
La page est en cours de chargement...
La page est en cours de chargement...
La page est en cours de chargement...
La page est en cours de chargement...
La page est en cours de chargement...
La page est en cours de chargement...
La page est en cours de chargement...
La page est en cours de chargement...
La page est en cours de chargement...
La page est en cours de chargement...
La page est en cours de chargement...
La page est en cours de chargement...
La page est en cours de chargement...
La page est en cours de chargement...
La page est en cours de chargement...
La page est en cours de chargement...
La page est en cours de chargement...
La page est en cours de chargement...
La page est en cours de chargement...
La page est en cours de chargement...
La page est en cours de chargement...
La page est en cours de chargement...
La page est en cours de chargement...
La page est en cours de chargement...
La page est en cours de chargement...
La page est en cours de chargement...
La page est en cours de chargement...
La page est en cours de chargement...
La page est en cours de chargement...
La page est en cours de chargement...
La page est en cours de chargement...
La page est en cours de chargement...
La page est en cours de chargement...
La page est en cours de chargement...
La page est en cours de chargement...
La page est en cours de chargement...
La page est en cours de chargement...
La page est en cours de chargement...
La page est en cours de chargement...
La page est en cours de chargement...
La page est en cours de chargement...
La page est en cours de chargement...
La page est en cours de chargement...
La page est en cours de chargement...
La page est en cours de chargement...
La page est en cours de chargement...
La page est en cours de chargement...
La page est en cours de chargement...
La page est en cours de chargement...
La page est en cours de chargement...
La page est en cours de chargement...
La page est en cours de chargement...
La page est en cours de chargement...
La page est en cours de chargement...
La page est en cours de chargement...
La page est en cours de chargement...
La page est en cours de chargement...
La page est en cours de chargement...
La page est en cours de chargement...
La page est en cours de chargement...
La page est en cours de chargement...
La page est en cours de chargement...
La page est en cours de chargement...
La page est en cours de chargement...
La page est en cours de chargement...
La page est en cours de chargement...
La page est en cours de chargement...
La page est en cours de chargement...
La page est en cours de chargement...
La page est en cours de chargement...
La page est en cours de chargement...
La page est en cours de chargement...
La page est en cours de chargement...
La page est en cours de chargement...
La page est en cours de chargement...
La page est en cours de chargement...
La page est en cours de chargement...
La page est en cours de chargement...
La page est en cours de chargement...
La page est en cours de chargement...
La page est en cours de chargement...
La page est en cours de chargement...
La page est en cours de chargement...
La page est en cours de chargement...
La page est en cours de chargement...
La page est en cours de chargement...
La page est en cours de chargement...
La page est en cours de chargement...
La page est en cours de chargement...
La page est en cours de chargement...
La page est en cours de chargement...
La page est en cours de chargement...
-
 1
1
-
 2
2
-
 3
3
-
 4
4
-
 5
5
-
 6
6
-
 7
7
-
 8
8
-
 9
9
-
 10
10
-
 11
11
-
 12
12
-
 13
13
-
 14
14
-
 15
15
-
 16
16
-
 17
17
-
 18
18
-
 19
19
-
 20
20
-
 21
21
-
 22
22
-
 23
23
-
 24
24
-
 25
25
-
 26
26
-
 27
27
-
 28
28
-
 29
29
-
 30
30
-
 31
31
-
 32
32
-
 33
33
-
 34
34
-
 35
35
-
 36
36
-
 37
37
-
 38
38
-
 39
39
-
 40
40
-
 41
41
-
 42
42
-
 43
43
-
 44
44
-
 45
45
-
 46
46
-
 47
47
-
 48
48
-
 49
49
-
 50
50
-
 51
51
-
 52
52
-
 53
53
-
 54
54
-
 55
55
-
 56
56
-
 57
57
-
 58
58
-
 59
59
-
 60
60
-
 61
61
-
 62
62
-
 63
63
-
 64
64
-
 65
65
-
 66
66
-
 67
67
-
 68
68
-
 69
69
-
 70
70
-
 71
71
-
 72
72
-
 73
73
-
 74
74
-
 75
75
-
 76
76
-
 77
77
-
 78
78
-
 79
79
-
 80
80
-
 81
81
-
 82
82
-
 83
83
-
 84
84
-
 85
85
-
 86
86
-
 87
87
-
 88
88
-
 89
89
-
 90
90
-
 91
91
-
 92
92
-
 93
93
-
 94
94
-
 95
95
-
 96
96
-
 97
97
-
 98
98
-
 99
99
-
 100
100
-
 101
101
-
 102
102
-
 103
103
-
 104
104
-
 105
105
-
 106
106
-
 107
107
-
 108
108
-
 109
109
-
 110
110
-
 111
111
-
 112
112
-
 113
113
-
 114
114
-
 115
115
-
 116
116
-
 117
117
-
 118
118
-
 119
119
-
 120
120
-
 121
121
-
 122
122
-
 123
123
-
 124
124
-
 125
125
-
 126
126
-
 127
127
-
 128
128
-
 129
129
-
 130
130
-
 131
131
-
 132
132
-
 133
133
-
 134
134
-
 135
135
-
 136
136
-
 137
137
-
 138
138
-
 139
139
-
 140
140
-
 141
141
-
 142
142
-
 143
143
-
 144
144
-
 145
145
-
 146
146
-
 147
147
-
 148
148
-
 149
149
-
 150
150
-
 151
151
-
 152
152
-
 153
153
-
 154
154
-
 155
155
-
 156
156
-
 157
157
-
 158
158
-
 159
159
-
 160
160
-
 161
161
-
 162
162
-
 163
163
-
 164
164
-
 165
165
-
 166
166
-
 167
167
-
 168
168
-
 169
169
-
 170
170
-
 171
171
-
 172
172
-
 173
173
-
 174
174
-
 175
175
-
 176
176
-
 177
177
-
 178
178
-
 179
179
-
 180
180
-
 181
181
-
 182
182
-
 183
183
-
 184
184
-
 185
185
-
 186
186
-
 187
187
-
 188
188
-
 189
189
-
 190
190
-
 191
191
-
 192
192
-
 193
193
-
 194
194
-
 195
195
-
 196
196
-
 197
197
-
 198
198
-
 199
199
-
 200
200
-
 201
201
-
 202
202
-
 203
203
-
 204
204
-
 205
205
-
 206
206
-
 207
207
-
 208
208
-
 209
209
-
 210
210
-
 211
211
-
 212
212
-
 213
213
-
 214
214
-
 215
215
-
 216
216
-
 217
217
-
 218
218
-
 219
219
-
 220
220
-
 221
221
-
 222
222
-
 223
223
-
 224
224


Hoover HHP70CAH011 Air Purifier Manuel utilisateur
- Catégorie
- Humidificateurs
- Taper
- Manuel utilisateur
dans d''autres langues
Documents connexes
Autres documents
-
Concept CA2010 Manuel utilisateur
-
NATURE & DECOUVERTES 15218150 Mode d'emploi
-
Candy FMBC P996 E0 Manuel utilisateur
-
Clorox 11030 Manuel utilisateur
-
Clorox 11020 Mode d'emploi
-
Laserliner AirMonitor PURE Manuel utilisateur
-
Laserliner 082.431A Manuel utilisateur
-
 Smartmi P2 Air Purifier Manuel utilisateur
-
LG PS-N550WP Le manuel du propriétaire
-
brondell PRF-51 Le manuel du propriétaire
