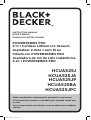
Black & Decker HCUA525BA Le manuel du propriétaire
- Catégorie
- Aspirateurs
- Taper
- Le manuel du propriétaire

Please read before returning this product for any reason.
Àlire avant de retourner ce produit pour quelque raison que
ce soit.
Lea el manual antes de devolver este producto por cualquier
motivo.
INSTRUCTION MANUAL
MODE D’EMPLOI
MANUAL DE INSTRUCCIONES
final page size: 8.5 x 5.5 in
POWERSERIES PRO
2 in 1 Cordless Lithium Ion Vacuum
Aspirateur 2 dans 1 sans fil au
lithium-ion POWERSERIES PRO
Aspiradora de Ion de Litio Inalámbrica
2 en 1 POWERSERIES PRO
HCUA525J
HCUA525JA
HCUA525JP
HCUA525BA
HCUA525JPC

ENGLISH
English (original instructions) 1
Français (traduction de la notice d’instructions originale) 12
Español (traducido de las instrucciones originales) 23
To register your new product, visit
www.BlackandDecker.com/NewOwner
Consulter le site Web www.BlackandDecker.com/NewOwner
pour enregistrer votre nouveau produit.
Visite www.BlackandDecker.com/NewOwner para registrar su
nuevo producto.
Thank you for choosing BLACK+DECKER!
If you have a question or experience a problem with your BLACK+DECKER
purchase, go to: http://www.blackanddecker.com/instantanswers
If you can’t find the answer or do not have access to the Internet,
call 1-800-544-6986 from 8 a.m. to 5 p.m. EST Mon. – Fri. to speak
with an agent. Please have the CATALOG NUMBER available when you call.

ENGLISH
1
English (original instructions)
DEFINITIONS: SAFETY ALERT SYMBOLS AND WORDS
This instruction manual uses the following safety alert symbols and words to alert you to hazardous situations and your risk
of personal injury or propertydamage.
DANGER: Indicates an imminently hazardous situation which, if not avoided, will result in death
or seriousinjury.
WARNING: Indicates a potentially hazardous situation which, if not avoided, could result in
death or seriousinjury.
CAUTION: Indicates a potentially hazardous situation which, if not avoided, may result in minor
or moderateinjury.
(Used without word) Indicates a safety relatedmessage.
NOTICE: Indicates a practice not related to personal injury which, if not avoided, may result in
propertydamage.
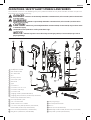
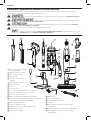
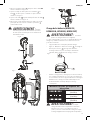
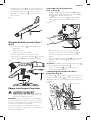
Fig. A
1
On/off power switch
2
Main handle/wand
3
Hose connector
4
Hose
5
Lift away canister
6
Chassis hose port
7
Floor head
8
Light
9
Dust canister
10
Dust canister release lever
11
Dust canister lid hinge
12
Dust canister lid
13
Charging station (HCUA525BA ONLY)
14
Charging port (HCUA525J, HCUA525JA, HCUA525J,
HCUA525JP, HCUA525JPC ONLY)
15
Accessory tool hose port
16
Tube extension latch
17
Handle/wand release button
18
3 in 1 Accesssory tool (HCUA525J, HCUA525JA,
HCUA525BA, HCUA525JP, HCUA525JPC)
19
Pet crevice tool (HCUA525JP, HCUA525JPC)
20
Long brush (HCUA525JA, HCUA525BA)
2
1
18
20
8
9
4
7
3
15
16
12
17
6
13
11
5
14
10
19
21
22
23
24
26
25
21
Jack plug charger
22
Dust compaction handle
23
Chassis
24
Pet beater bar (HCUA525JP)
25
Nozzle/flip out brush tool (HCUA525JA, HCUA525BA)
26
Low profile pet tool (HCUA525JPC)

ENGLISH
2
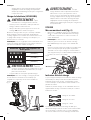
IMPORTANT SAFETY
INSTRUCTIONS
When using an electrical appliances, basic precautions should
always be followed, including the following:
READ ALL
INSTRUCTIONS BEFORE
USING THIS APPLIANCE.
WARNING: Read all safety warnings
and all instructions. Failure to follow the warnings
and instructions listed below may result in electric
shock, fire and/or seriousinjury.
WARNING: Some household dust
contains chemicals known to the State of California to
cause cancer, birth defects or other reproductive harm
such as asbestos and lead in lead basedpaint.
WARNING: Do not attempt to modify or
repair theappliance.
WARNING: Do not charge the battery
at ambient temperatures below 39°F (4°C) or above
104°F (40°C). Follow all charging instructions and do
not charge the appliance outside of the temperature
range specified in the instructions. Charging
improperly or at temperatures outside of the specified
range may damage the battery and increase risk
offire.
WARNING: To reduce the risk of fire,
electrical shock or injury:
• Shock Hazard. To protect against risk of electrical shock,
do not put charging base in water or otherliquid.
• Do not allow to be used as a toy. Close attention is
necessary when used by or nearchildren.
• Use only as described in this manual. Use only
manufacturer’s recommendedattachments.
• Do not use with damaged cord or plug. If appliance is
not working as it should, has been dropped, damaged,
left outdoors, or dropped into water, return it to a
servicecenter.
• Do not pull or carry by cord, use cord as a handle, close a
door on cord, or pull cord around sharp edges or corners.
Do not run appliance over cord. Keep cord away from
heatedsurfaces.
• Do not unplug by pulling on cord. To unplug, grasp the
plug, not thecord.
• Do not handle charger, including charger plug, and
charger terminals with wethands.
• Do not put any object into openings. Do not use with any
opening blocked; keep free of dust, lint, hair, and anything
that may reduce airflow.
• Keep hair, loose clothing, fingers, and all parts of body
away from openings and movingparts.
• Use extra care when cleaning onstairs.
• Do not use to pick up flammable or combustible liquids,
such as gasoline, or use in areas where they may
bepresent.
• Do not pick up anything that is burning or smoking, such
as cigarettes, matches, or hotashes.
• Do not use without dust bag and/or filters inplace.
• Do not charge the unitoutdoors.
• Use only the charger supplied by the manufacturer
torecharge.
• Do not incinerate the appliance even if it is severely
damaged. The batteries can explode in afire.
• This appliance is intended for household use only and not
for commercial or industrialuse.
• Do not allow the cord to hang over the edge of a table or
counter or touch hot surfaces. The unit should be placed
or mounted away from sinks and hotsurfaces.
• Plug the charger directly into an electricaloutlet.
• Use the charger only in a standard electrical outlet
(120V/60Hz).
• Unplug the charger from outlet before any routine
cleaning ormaintenance.
• Do not look into the air vents when the unit is switched
on, as sometimes there is a possibility of small debris being
discharged from the air vents, especially after cleaning
/ replacement of the filters as debris inside the unit can
bedisturbed.
• Leaks from battery cells can occur under extreme
conditions. If the liquid, which is a 20-35% solution of
potassium hydroxide, gets on the skin (1) wash quickly
with soap and water or (2) neutralize with a mild acid
such as lemon juice or vinegar. If the liquid gets into
the eyes, flush them immediately with clean water for a
minimum of 10 minutes. Seek medicalattention.
ADDITIONAL SAFETY WARNINGS
a ) Prevent unintentional starting. Ensure the
switch is in the off-position before picking up or
carrying the appliance. Carrying the appliance with
your finger on the switch or energizing appliance that
have the switch on invitesaccidents.
b ) Recharge only with the charger specified by the
manufacturer. A charger that is suitable for one type
of battery pack may create a risk of fire when used
with another batterypack.
c ) Do not use a battery pack or appliance that
is damaged or modified. Damaged or modified
WARNING! Read all safety warnings
and all instructions. Failure to follow the warnings
and instructions may result in electric shock, fire and/
or seriousinjury.
WARNING: To reduce the risk of injury,
read the instructionmanual.

ENGLISH
3
batteries may exhibit unpredictable behavior resulting
in fire, explosion or risk ofinjury.
d ) Do not expose a battery pack or appliance
to fire or excessive temperature. Exposure to
fire or temperature above 266°F (130°C) may
causeexplosion.
e ) Have servicing performed by a qualified repair
person using only identical replacement parts.
This will ensure that the safety of the product
ismaintained.
f ) Only for use with S010QU2300040 and SSC-
230040USchargers.
EMC requirements for all digital devices
This device complies with Part 15 of the FCC Rules and Industry
Canada License-exempt RSS standard(s). Operation is subject to the
following two conditions:
1 . This device may not cause harmful interference, and
2 . This device must accept any interference
received, including interference that may cause
undesiredoperation.
Changes or modifications not expressly approved by the party
responsible for compliance could void the user's authority to
operate theequipment.
This equipment has been tested and found to comply with
the limits for a Class B digital device, pursuant to Part15
of the FCC Rules. These limits are designed to provide
reasonable protection against harmful interference in a
residential installation. This equipment generates, uses, and
can radiate radio frequency energy and, if not installed and
used in accordance with the instructions, may cause harmful
interference to radio communications. However, there is no
guarantee that interference will not occur in a particular
installation. If this equipment does cause harmful interference
to radio or television reception, which can be determined by
turning the equipment off and on, the user is encouraged to
try to correct the interference by one of the following meaures:
ʵ Reorient or relocate the receivingantenna.
ʵ Increase the separation between the equipment
andreceiver.
ʵ Connect the equipment into an outlet on a circuit
different from that to which the receiver isconnected.
ʵ Consult the dealer or an experienced radio/TV
technician forhelp.
CAN ICES-3(B)/NMB-3(B)
SAVE THESE
INSTRUCTIONS
SYMBOLS
The label on your tool may include the following symbols. The
symbols and their definitions are as follows:
V ..............................volts
A .................................. amperes
Hz ................................hertz
W .................................watts
min .............................minutes
or AC ................ alternating current
or DC .......... direct current
n
o ............................... no load speed
..............................Class I Construction
(grounded)
...............................earthing terminal
.............................safety alert symbol
.............................. Class II Construction
(double insulated)
.../min or rpm. revolutions or reciprocation
per minute
Wh ..............................Watt Hours
ASSEMBLY
WARNING: Do not attempt to modify or
repair theappliance.
Intended use
Your BLACK+DECKER lithium ion cordless 2 in 1 canister
stick vacuum cleaner has been designed for light dry
vacuum cleaning purposes. This appliance is intended for
household useonly.
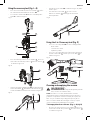
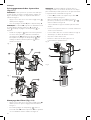
Assembly (Fig. A, B–D)
1. Align the main handle/wand
2
to the chassis
23
as
shown in FigureB.
2. Push the main handle/wand
2
into the chassis
23
as
shown in FigureB.
3. Fit the lift away canister
5
to the chassis
23
so it locks
into place as shown in FigureC.
4. Fit the hose
4
to the chassis hose port
6
as shown in
Figure.D.
5. To stand the unit upright, angle the chassis forward so
that it is standing straight up. The floor head
7
will hold
the chassis inplace.
WARNING: When not in use position the
upright unit with the rear of the chassis facing a wall
so that any inadvertent fall of the unit would contact
a wall and not people orpets.

ENGLISH
4
Fig. B
2
23
Fig. C
23
5
Fig. D
4
6
Charging the battery (HCUA525J,
HCUA525JA, HCUA525J, HCUA525JP)
WARNING: For use only with the
suppliedcharger.
From new, the rechargeable cells of the product need a
minimum charge time of 6 hours to ensure fullpower.
• The unit must be turned off in order to charge.
• Figure E - Plug the jack plug
21
of the charger into the
charging port
14
of the tool. Plug the charger into any
standard 120 Volt 60 Hz electricaloutlet.
Fig. E
21
• While charging, the charger may get warm, this
is perfectly normal and safe. It is safe to leave the
appliance connected to the charger indefinitely. The
charger automatically reduces power consumption
when charging iscomplete.
Battery Sensor LED Patterns
Battery Fault (All LEDs)
Charger Fault (All LEDs)
Battery Hot (All LEDs)
WARNING: Do not charge the battery
at ambient temperatures below 39°F (4°C) or above
104°F (40°C). Follow all charging instructions and do
not charge the appliance outside of the temperature
range specified in the instructions. Charging
improperly or at temperatures outside of the specified
range may damage the battery and increase risk
offire.
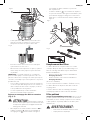
Charging the battery (HCUA525BA)
WARNING: For use only with the
suppliedcharger.
• Before first use, the battery must be charged for at least
6hours.
• Place the appliance on the charging station
13
whenever it is not in use as shown in FigureF.
Plug the charger into any standard 120 Volt 60 Hz electrical
outlet. The LED charging indicator will flash and increase in
sections. LEDs go out when fullycharged.
NOTE: The charging base is supplied with 2 screws and wall
plugs for securing it to a wall, providing extra stability, as
shown in FigureF.
Battery Sensor LED Patterns
Battery Fault (All LEDs)
Charger Fault (All LEDs)
Battery Hot (All LEDs)

ENGLISH
5
WARNING: Before charging, be sure to
empty all contents and dry thoroughly if needed to avoid
damage to yourappliance.
• The unit must be turned off in order tocharge.
NOTE: While charging, the charger may become warm. This
is normal and does not indicate a problem. The appliance
can be left connected to the chargerindefinitely.
Fig. F
13
WARNING: Do not charge the battery
at ambient temperatures below 39°F (4°C) or above
104°F (40°C). Follow all charging instructions and do
not charge the appliance outside of the temperature
range specified in the instructions. Charging
improperly or at temperatures outside of the specified
range may damage the battery and increase risk
offire.
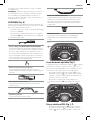
USE
Switching on and off (Fig. G)
• To switch ON, press the on/off switch
1
. The state of
charge indicator LEDs will illuminate and vacuum will
begin in AUTOSENSEmode.
NOTE: Unit starts in mid performancesetting.
• To switch OFF, press the on/off switch
1
.
• Return the product to the charger immediately after use
so that it will be ready and fully charged for the next
use. Ensure that the product is fully engaged with the
chargerplug or chargerbase.
Fig. G
1
State of charge indicator
This appliance include a state of charge indicator which
consists of three white LED lights that indicate the level
of charge remaining in the battery. This feature is only
activated when the vacuum is poweredon.
The state of charge indicator is an indication of approximate
levels of charge remaining in the battery pack according to
the followingindicators:
75–100% charged
51–74% charged
< 50% charged
The LED battery indicator displays the remaining charge
and warns you when the battery is low. The final LED will
flash continuously when there is only 1 minute of runtime
remaining. All LEDs will flash when the unit isdischarged.
NOTE: The state of charge indicator is only an indication
of the charge left on the battery. It does not indicate tool
functionality and is subject to variation based on product
components, temperature and end-userapplication.
AUTOSENSE (Fig. H)
The appliance is fitted with a unique floor sense feature. It
will automatically switch between low and high suction
modes as it detects the surface that is beingvacuumed.
• The appliance will default to using AUTOSENSE when
you turn the unitON.
• To turn off AUTOSENSE, first turn the unit ON then press
the AUTOSENSE button
35
to deactivate thefeature.
The features incorporated are:
FLOORSENSOR Touch Button
Intelligent floor sensor technology increases suction on carpets and
switches to Economy Mode for lighter tasks, such as hard floor cleaning,
thus optimising the battery run time this feature is active when the LED
is lit. In order to maximise runtime on all surfaces, switch this feature off
by touching area.
Power contol Touch Slider
Touch button panel allows you to control the level of power to the unit
from minimum to maximum by sliding finger along this area.
Beater bar Touch Button
Allows you to turn on and off the beater bar function by touching
this area.

ENGLISH
6
State of charge indicator
Allows you to monitor the level of power being used.
BATTERYSENSOR Indicator
The LED battery indicator displays the remaining charge and warns you
when the battery is low. The final LED will flash continuously when
there is only 1 minute of runtime remaining. All LEDs will flash when
the unit is discharged.
FILTERSENSOR
Smart sensor technology automatically detects (the symbol will light
red) when the filter becomes clogged and needs to be cleaned.
Fig. H
35
Adjustable suction force (Fig. I)
The appliance has an adjustable suction slider
37
. The
vacuum can be adjusted to operate at a lower suction level
to extend run time or higher suction level to pick up debris
that requires morepower.
• To increase suction slide your finger on the adjustable
suction slider
37
to the right as shown in Figure I.
Corresponding LEDs on the min/max indicator will
display the selected suction force.
• To decrease suction slide your finger on the adjustable
suction slider
37
to theleft.
Fig. I
37
Powered rotary brush and LED (Fig. J, Z)
• To engage the rotary brush
39
(Fig. Z) inside the floor
head
7
, depress the rotary brush ON/OFF button
38
as shown in Figure J. When the rotary brush is ON the
LED work light will illuminate to better see debris as
youvacuum.
• To disengage the rotary brush
39
, depress the rotary
brush ON/OFF button
38
a secondtime.
Fig. J
38
Removing and attaching the lift away
canister (Fig. K, L)
• To remove the lift away canister from the chassis,
press the lift away canister release button
41
to release
the lift away canister
5
from the chassis
23
hold the lift
away handle
36
and lift out the lift away canister
5
as
shown in FigureK.
• Release the hose connector
3
from the chassis hose
port
6
as shown in FigureL.
• To attach the lift away canister to the chassis, hold
the main lift off handle
36
and place the lift away
canister
5
onto the chassis and slide downward so the
canister locks into position as shown in FigureK.
• Connect the hose connector
3
to the chassis hose
port
6
as shown in FigureL.
Fig. K
41
23
36
5

ENGLISH
7
Using the accessory tool (Fig. L–O)
• Press the main handle/wand release button
17
to free
the main handle/wand from the chassis
23
.
• Free the hose connector
3
from the main body hose
port
6
as shown in FigureL.
Fig. L
23
4
5
3
6
17
• Press the lift away canister release button
41
to release
and remove the lift away canister
5
from the chassis
23
as shown in FigureM.
Fig. M
23
41
5
• Connect the hOSE CONNECTOR
3
TO THE ACCESSORY
TOOL HOSE PORT
15
ENSURING THAT THE LATCH
16
CLICKS SECURELY INTO PLACE AS SHOwn in FigureN.
Fig. N
3
4
16
15
• Extend the crevice tool
19
as shown in Figure O, until it
clicks inplace.
• To retract the crevice tool
19
press the crevice
tool release button
16
allowing it to return to its
normalposition.
Fig. O
19
16
Using the 3 in 1 Accessory tool (Fig. P)
• The 3-in-1 accessory tool
18
has threeconfigurations.
- Brushmode.
- Small crevicemode.
- Upholsterymode.
• The 3-in-1 accessory tool can be fitted either directly to
the hose connector
3
or to the pet crevice tool
19
as
shown in Figure P.
Fig. P
19
3
18
18
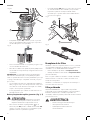
Cleaning and emptying the vacuum
WARNING: Projectile/Respiratory Hazard:
Never use the vac without itsfilter.
NOTE: The filter is re-usable, do not confuse it with a
disposable dust bag, and do not throw it away when the
product is emptied. We recommend that you replace the
filter every 6–9 months depending on frequency ofuse.
There are two methods of cleaning the canister, a quick
empty method and a thorough clean method.
To empty the dust canister (Fig. L, M, Q, R)
• Press the life away canister release button
41
to release
and remove the lift away canister
5
from the chassis
23
as shown in FigureM.

ENGLISH
8
• Release the hose connector
3
from the main body hose
port
6
as shown in FigureL.
Fig. Q
27
12
• Place the dust canister over a trash bin and press
the dust canister lid release button
27
to empty the
canister as shown in FigureQ.
• Push the compaction handle
22
down to empty the
contents of the dust canister
9
as shown in FigureR.
NOTE: The dust compaction handle
22
can also be used to
compact the contents of the dust canister
9
, doubling the
capacity of the dustcanister.
• Close the dust canister lid
12
, until it
“clicks” firmly
intoposition.
Compacting the contents of the dust
canister (Fig. R)
With the dust canister lid
12
closed, push the compacting
handle
22
down to compact the contents of the dust
canister
9
thus increasing its capacity as shown in FigureR.
Fig. R
22
9
12
Releasing the dust canister (Fig. R–T)
NOTE: The dust canister can be released either from the
unit while it is in chassis mode, as shown in Figure S, or
when being used in the lift away canister vac mode, as
shown in FigureT.
• Press the dust canister release lever
10
down to release
the dustbowl.
• Free the dust canister
9
from the lift away canister
vac
5
.
NOTE: The catch
34
ensures that the unit will be unable to
start when the dust canister
9
is not connected to the lift
away canister vac
5
or when the compaction handle
22
is
inoperation.
• Using the dust canister handle
35
and holding the
unit over a suitable waste receptacle, press the dust
canister release button
27
to release the dust canister
lid
12
and push the compacting handle
22
down to
empty the contents of the dust canister
9
as shown in
FigureR.
Fig. S
5
9
10
34
35
Fig. T
9
10
5
35
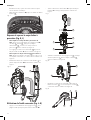
Cleaning the filters (Fig. S–X)
• Press the dust canister release lever
10
down to release
the dust canister as shown in FigureS.
• While holding the compaction handle
22
, lift the filter
assembly
28
from the dust canister
9
by rotating
counter-clockwise as shown in FigureU.
NOTE: A scented disc will be provided in foil packaging. This
is to be opened and the disc is to be placed in the bottom
of the pre-filter allowing for a pleasing odor to be released
when the appliance is inuse.
• The filter
29
can now be removed from the prefilter
30
as
shown in FigureV.
• The dust canister can be seperated into two parts,
9
and
40
, for a more thorough cleaning as shown in
FigureW.
• Shake or lightly brush any loose dust off filter.

ENGLISH
9
• Rinse out the dust canister with warm soapywater.
• Wash the filters with warm soapy water (Fig.X).
• Make sure the filters are dry
• Refit the filters into theappliance.
• Close the dust canister lid, until it
“clicks” firmly
intoposition.
Fig. U
9
28
22
Fig. V
30
29
9
40
Fig. W
• The dust canister
9
and filter can be washed in warm
soapy water. Allow to dry before placing back into
thevac.
Fig. X
• Refit the filters into the appliance and ensure that they
are correctlyseated.
• To replace dust canister, place it back onto the handle
until it “clicks” firmly intoposition.
IMPORTANT: Maximum dust collection will only be
obtained with a clean filter and an empty dust canister.
If dust begins to fall back out of the product after it is
switched off, this indicates that the canister is full and
requiresemptying.
• Wash the filters regularly using warm, soapy water and
ensure that it is completely dry before using again. The
cleaner the filter is, the better the product will perform.
• It is very important that the filter is correctly in position
beforeuse.
Removing and clearing the rotary brushes
(Fig. Y, Z)
CAUTION: To reduce the risk of injury from
moving parts, disconnect lift away canister before
cleaning orservicing.
• To remove the rotary brush unit
32
from the floor
head
7
Depress the release button
33
as shown in
Figure Y. The rotary brush unit will pop up from its
lockedposition.
• The rotary brush
39
can now be removed. The end
pieces are also removable allowing you to clear the
brushes from any hair or other debris that may have
accumulated as shown in FigureZ.
Fig. Y
7
32
33

ENGLISH
10
39
24
Fig. Z
Replacing the filters
The filters should be replaced every 6 to 9 months and
whenever worn or damaged. Replacement filters are
available from your BLACK+DECKERdealer.
Visit www.blackanddecker.com to locatedealers.
• Remove the old filters as describedin Cleaning
theFilters.
• Fit the new filters as describedin Cleaning the Filters.
(cat. no: VSPF10LC)
These fit all units. When these filters reach the end of their
lifespan they must be disposed of at a local recyclingcenter.
Filters are supplied in foil packaging which needs to be
removed prior to use.
Scented filter
BEFORE FIRST USE - remove bag from the scented pre-
filter. Reassemble per instructionsabove.
When the vacuum is turned on, the plastic scented filter will
emit an aroma to freshen the air.
WARNING:
• Causes mild skin irritation
• Toxic to aquatic life
• Harmful to aquatic life with long lastingeffects.
• Dispose of contents/ containers to an approved
waste disposalplant.
NOTE: When the plastic scented filter no longer lets off
the aroma, it can be an indication that the filter needs to
bereplaced.
MAINTENANCE
Use only mild soap and damp cloth to clean the vac. Never
let any liquid get inside the vac; never immerse any part of
the vac into aliquid.
WARNING: Make sure the vacuum is
completely dry before usingit.
IMPORTANT: To assure product SAFETY and RELIABILITY,
repairs, maintenance and adjustment (other than those
listed in this manual) should be performed by authorized
service centers or other qualified service organizations,
always using identical replacementparts.
TROUBLESHOOTING
If the product does not work, check the following:
• The charger was correctly plugged in for recharge. (It
feels slightly warm to the touch.)
• The charger cord is not damaged and is
correctlyattached.
• The charger is plugged into a working electricaloutlet.
• The switch is in the “OFF” position whencharging.
For assistance with your product, visit our website
www.blackanddecker.com for the location of the service
center nearest you or call the BLACK+DECKER help line at
1–800–544–6986.
ACCESSORIES
Recommended accessories for use with your appliance are
available from your local dealer or authorized service center.
If you need assistance regarding accessories, please call:
1-800-544-6986.
WARNING: The use of any accessory
not recommended for use with this appliance could
behazardous.
SERVICE INFORMATION
All
BLACK+DECKER
Service Centers are staffed with trained
personnel to provide customers with efficient and reliable
power tool service. Whether you need technical advice,
repair, or genuine factory replacement parts, contact the
BLACK+DECKER
location nearest you. To find your local
service location, call: 1-800-544-6986 or visit
www.blackanddecker.com
TWO-YEAR LIMITED WARRANTY
Black & Decker (U.S.) Inc. warranties this product to be free from
defects in material or workmanship for a period of two (2) years
following the date of purchase, provided that the product is used
in a home environment. This limited warranty does not cover
failures due to abuse, accidental damage or when repairs have
been made or attempted by anyone other than BLACK+DECKER
and its Authorized Service Centers. A defective product meeting
the warranty conditions set forth herein will be replaced or
repaired at no charge in either of two ways: The first, which
will result in exchanges only, is to return the product to the
retailer from whom it was purchased (provided that the store is
a participating retailer).Returns should be made within the time
period of the retailer’s policy for exchanges. Proof of purchase
may be required. Please check with the retailer for its specific
return policy regarding time limits for returns or exchanges.
The second option is to take or send the product (prepaid) to a
BLACK+DECKER owned or authorized Service Center for repair
or replacement at BLACK+DECKER’s option. Proof of purchase
may be required. BLACK+DECKER owned and authorized service
centers are listed online at www.blackanddecker.com. This
warranty does not apply to accessories. This warranty gives you
specific legal rights and you may have other rights which vary
from state to state. Should you have any questions, contact the
manager of your nearest BLACK+DECKER Service Center. This
product is not intended for commercial use, and accordingly,
such commercial use of this product will void this warranty. All
other guarantees, express or implied, are herebydisclaimed.

ENGLISH
11
LATIN AMERICA:
This warranty does not apply to products
sold in Latin America. For products sold in Latin America,
check country specific warranty information contained in
the packaging, call the local company or see the website for
suchinformation.
Imported by Black & Decker (U.S.) Inc.,
701 E. Joppa Rd.
Towson, MD 21286
BlackandDecker.com
1-800-544-6986

FRANÇAIS
12
Définitions: symboles et termes d'alarmes sécurité
Ces guides d'utilisation utilisent les symboles et termes d'alarmes sécurité suivants pour vous prévenir de situations
dangereuses et de risques de dommages corporels oumatériels.
DANGER : indique une situation dangereuse imminente qui, si elle n’est pas évitée, entraînera la mort ou
des blessuresgraves.
AVERTISSEMENT : indique une situation potentiellement dangereuse qui, si elle n’est pas évitée,
pourrait entraîner la mort ou des blessuresgraves.
ATTENTION : indique une situation potentiellement dangereuse qui, si elle n’est pas évitée, pourrait
entraîner des blessures légères oumodérées.
(Si utilisé sans aucun terme) Indique un message propre à lasécurité.
AVIS : indique une pratique ne posant aucun risque de dommages corporels mais qui par contre, si rien n’est
fait pour l’éviter, pourrait poser des risques de dommages matériels.
Français (traduction de la notice d’instructions originale)
Fig. A
1
Commutateur d’alimentation
En/Hors fonction
2
Poignée principale et tube
3
Prise de boyau flexible
4
Boyau flexible
5
Corps de bac à poussière
amovible
6
Port de flexible du bâti
7
Brosse à plancher
8
Lumière
9
Bac à poussière
10
Levier de déclenchement de bac à poussière
11
Charnière de couvercle du bac à poussière
12
Couvercle du bac à poussière
13
Poste de recharge (HCUA525BA SEULEMENT)
14
Port de recharge (HCUA525J, HCUA525JA, HCUA525J,
HCUA525JP, HCUA525JPC SEULEMENT)
15
Port de boyau d’accessoire
16
Verrou de rallonge de tube
17
Bouton de déclenchement de poignée/tube
18
Outil accessoire 3 en 1
19
Outil suceur extensible
20
Brosse longue
21
Fiche-jack du chargeur
22
Poignée du bac à poussière
23
Ossature
24
Brosse rotative pour animaux domestiques
(HCUA525JP)
25
Outil buse et brosse (HCUA525JA, HCUA525BA)
26
Outil à profil bas pour animaux domestiques
(HCUA525JPC)
2
1
18
20
8
9
4
7
3
15
16
12
17
6
13
11
5
14
10
19
21
22
23
24
26
25

FRANÇAIS
13
AVERTISSEMENT! lire tous
les avertissements de sécurité et toutes les
directives. Le non-respect des avertissements et des
directives pourrait se solder par un choc électrique, un
incendie et/ou une blessuregrave.
AVERTISSEMENT : afin de réduire le risque de
blessures, lire le mode d’emploi del’outil.
CONSIGNES
DE SÉCURITÉ
IMPORTANTES
Lors de l’utilisation d’appareils électriques, toujours observer
des précautions de base, notamment les suivantes :
LIRE TOUTES
LES CONSIGNES
AVANT D’UTILISER
L’APPAREIL
ÉLECTRIQUE.
AVERTISSEMENT : lire tous
les avertissements de sécurité et toutes les
consignes. Le non-respect des avertissements et des
directives ci-dessous peut entraîner des risques de
choc électrique, d’incendie ou de blessuresgraves.
AVERTISSEMENT : certaines
poussières domestiques contiennent des produits
chimiques identifiés par l’État de Californie comme
pouvant causer le cancer, des anomalies congénitales
et d’autres dangers pour la reproduction, tels que
l’amiante et le plomb contenu dans les peintures
auplomb.
AVERTISSEMENT : ne pas tenter
de modifier ou réparer l’appareil.
AVERTISSEMENT : ne pas
charger la batterie à des températures ambiantes
inférieures à 4 °C (39 °F) ou supérieures à 40 °C
(104°F). Suivez les instructions de recharge et ne pas
recharger l’appareil hors de la plage de températures
indiquée dans les instructions. Recharger de façon
inappropriée ou hors de la plage de températures
indiquée peut endommager le bloc-piles et augmenter
le risque d’incendie.
AVERTISSEMENT : afin de
réduire le risque d’incendie, de choc électrique ou
deblessure:
• Danger de choc électrique. Afin de vous protéger contre
le danger de choc électrique, ne pas mettre le poste de
recharge dans l’eau ou autreliquide.
• Ne pas permettre l’utilisation de l’appareil comme jouet.
Une étroite surveillance est nécessaire si l’appareil est
utilisé par des enfants ou près de ceux-ci.
• Utiliser l’appareil uniquement selon les indications
données dans le présent manuel. Utiliser uniquement les
accessoires recommandés par lefabricant.
• Ne pas utiliser l’appareil si sa fiche ou son cordon est
endommagé. Si un appareil ne fonctionne pas comme
il devrait, s’il est tombé au sol ou dans l’eau, s’il est
endommagé ou s’il a été laissé à l’extérieur, l’envoyer à un
centre deréparation.
• Ne pas tirer sur le cordon, ni transporter l’outil par le
cordon, ne pas utiliser le cordon comme poignée, ni
fermer une porte dessus, ni tirer le cordon contre des bords
tranchants ou des coins. Ne pas passer l’appareil sur le
cordon. Tenir le cordon éloigné des surfaceschauffées.
• Ne pas débrancher l’appareil en tirant sur son cordon.
Pour le débrancher, saisir la fiche et non lecordon.
• Ne pas manipuler la fiche si vous avez les mainsmouillées.
• Ne pas insérer d’objet dans les ouvertures de l’appareil. Ne
pas utiliser l’appareil si ses ouvertures sont bouchées; les
tenir exemptes de poussière, de peluche, de cheveux et de
toute chose pouvant réduire la circulation d’air.
• Tenir les cheveux, les vêtements, les doigts et toutes
les parties du corps à distance des ouvertures et des
piècesmobiles.
• Être très prudent lors du nettoyage desescaliers.
• Ne pas utiliser cet appareil pour ramasser des liquides
inflammables ou des combustibles comme de l’essence
et ne pas l’utiliser dans les endroits où ces substances
sontprésentes.
• Ne pas ramasser de matières brûlantes ou fumantes
comme des cigarettes, des allumettes ou des
cendreschaudes.
• Utiliser uniquement l’appareil si le sac à poussière, les
filtres ou les deux sont enplace.
• Ne pas charger l’appareil à l’extérieur.
• Utilisez seulement le chargeur fourni par le fabricant
pourrecharger.
• Ne pas brûler l’appareil même s’il est gravement
endommagé. Les piles peuvent exploser et causer
unincendie.
• L’appareil est conçu pour une utilisation domestique
seulement et non industrielle oucommerciale.
• Ne pas laisser le cordon pendre sur le bord d’une table ou
d’un comptoir, ni toucher des surfaces chaudes. L’appareil
doit être placé ou fixé loin de tout évier et de toute
surfacechaude.
• Brancher l’appareil directement dans une priseélectrique.
• Brancher uniquement l’appareil dans une prise électrique
d’automobilestandard.
• Débrancher l’appareil avant tout nettoyage ou entretien
deroutine.

FRANÇAIS
14
• Ne pas regarder dans les évents lorsque l’appareil est
en marche, car il arrive parfois que de petits débris
s’en échappent, surtout après un nettoyage ou un
remplacement de filtre qui aurait tendance à leslibérer.
• Sous conditions extrêmes, une fuite des cellules du bloc-
piles peut se produire. Si le liquide (qui est une solution
de 20 à 35% d’hydroxyde de potassium) se retrouve
sur l’épiderme, (1) laver sans attendre à l’eau et savon
et (2) neutraliser avec un produit légèrement acide
comme du jus de citron ou du vinaigre. Si de l’électrolyte
atteint les yeux, rincer à l’eau courante sur le champ
pour une durée minimum de 10minutes.. Solliciter une
attentionmédicale.
CONSIGNES DE SÉCURITÉ ADDITIONNELLES
a ) Prévention le démarrage intempestif. S'assurer
que le commutateur est en position Arrêt avant
de manipuler l'appareil. Transporter l’appareil avec
votre doigt sur l’interrupteur ou mettre sous tension
un appareil dont le commutateur de marche est fermé
favorise lesaccidents.
b ) Le recharger seulement avec le chargeur
spécifié par le fabricant. Un chargeur propre à un
type de bloc-piles peut créer des risques d’incendie
lorsqu’utilisé avec d’autres blocs-piles.
c ) Ne pas utiliser un bloc-piles ou un appareil
endommagé ou modifié. Un bloc-piles
endommagé ou modifié pourrait se comporter de
façon imprévisible et poser des risques d’incendie,
d’explosion ou de dommagescorporels.
d ) Ne pas exposer un bloc-piles ou un appareil au
feu, ou à des températures excessives. Toute
exposition au feu ou à des températures supérieures à
130°C (266°F) pose des risques d’explosion.
e ) Faire entretenir cet appareil par un réparateur
qualifié qui n’utilisera que des pièces de
rechange identiques. Cela permettra d’assurer
l’intégrité du produit et la sécurité de l’utilisateur.
f ) Uniquement pour utilisation avec le chargeur
S010QU2300040 et SSC-230040US.
Exigences de la EMC pour tous les
appareils numériques
Cet appareil est conforme à la Partie 15 des règles de la FCC
et aux normes exemptes de licence RSS d’Industrie Canada. Le
fonctionnement est assujetti à ces deux conditions:
1 . Cet appareil ne doit pas provoquer d’interférences
nuisibleset
2 . Cet appareil doit accepter les interférences reçues, y
compris les interférences susceptibles d’entraîner un
fonctionnementindésirable.
Tout changement ou toute modification non expressément
approuvé par la partie responsable de la conformité peut
entraîner l’annulation du droit accordé à l’utilisateur
d’opérerl’appareil.
Cette imprimante a été testée et est conforme aux limites des
appareils numériques de classe B, en vertu de la Partie15
des règles de la FCC. Ces limites sont prévues pour offrir une
protection raisonnable contre le brouillage préjudiciable
dans une installation résidentielle. Cet équipement génère,
utilise et peut émettre de l’énergie de radiofréquences et,
s’il n’est pas installé conformément aux instructions, peut
causer du brouillage préjudiciable aux communications
radio. Cependant, il n’y a aucune garantie que le brouillage
ne se produira pas durant une installation particulière.
Si cet équipement cause un brouillage préjudiciable à
la réception de la radio ou de la télévision, qui peut être
déterminé en allumant et en éteignant l’équipement, nous
encourageons l’utilisateur à corriger le brouillage par une des
mesuressuivantes:
ʵ Réorientez ou déplacez l’antenne deréception.
ʵ Augmentez la distance entre l’équipement et
lerécepteur.
ʵ Branchez l’équipement dans une prise sur un circuit
différent de celui auquel le récepteur estbranché.
ʵ Consultez le détaillant ou un technicien en radio/
télévision expérimenté pour de l’aide.
CAN ICES-3(B)/NMB-3(B)
CONSERVER CES
DIRECTIVES
SYMBOLES
L’étiquette apposée sur votre outil pourrait comprendre les
symboles suivants. Les symboles et leurs définitions sont
indiqués ci-après :
V..................................volts
A .................................ampères
Hz ...............................hertz
W ................................watts
min ............................minutes
ou AC ...............courant alternatif
ou DC ..........courant continu
n
o ...............................sous vide
.............................Construction de classe I
............................... borne de mise à la minute
(mis à la terre)
............................
Construction de classe II
...........................symbole d´avertissement
.../min .......................tours à la minute
Wh .................................Watt Heures
ASSEMBLAGE
AVERTISSEMENT : ne pas tenter
de modifier ou réparer l’appareil.
Usage Prévu
Votre aspirateur vertical sans fil au lithium-ion 2 dans1
grande capacité BLACK + DECKER a été conçu pour
nettoyage à sec. Cet appareil est conçu pour un usage
domestiqueseulement.
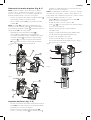
Assemblage (Fig. A, BD)
1. Aligner la poignée/tube
2
principale à l’ossature
23
comme montré à la FigureB.

FRANÇAIS
15
Fig. D
4
6
Charge de la batterie (HCUA525J,
HCUA525JA, HCUA525J, HCUA525JP)
AVERTISSEMENT : à n’utiliser
qu’avec le chargeur fourni avec l’appareil.
Les piles rechargeables neuves de ce dispositif doivent être
chargées pendant au moins 6 heures afin d’assurer une
puissance maximale.
• L'appareil doit être éteint pour pouvoir charger.
• Figure E - Brancher le connecteur mâle
21
du chargeur
dans la prise femelle
14
de l’appareil. Brancher
le chargeur dans une prise électrique standard de
120volts, 60 Hz. L’indicateur de charge s’allume.
Fig. E
21
• Durant le chargement, le chargeur peut devenir chaud;
ceci est tout à fait normal et ne présente aucun danger.
Il est sécuritaire de laisser l’appareil branché au chargeur
indéfiniment. Le chargeur réduit automatiquement
la consommation électrique lorsque la charge
estcomplète.
Modèles de DEL du capteur de
bloc-piles
Problèmes de bloc-piles
(Tout DELs)
Problèmes de chargeur
(Tout DELs)
Bloc-piles chaud
(Tout DELs)
AVERTISSEMENT : Ne pas
charger la batterie à des températures ambiantes
inférieures à 4 °C (39 °F) ou supérieures à 40 °C
(104°F). Suivez les instructions de recharge et ne pas
recharger l’appareil hors de la plage de températures
2. Pousser la poignée/tube
2
principale dans le bâti
23
comme montré à la FigureB.
3. Ajuster le corps de bac à poussière amovible
5
au
bâti
23
de sorte qu’il se verrouille en place comme
montré à la FigureC.
4. Ajuster le flexible
4
au port de boyau flexible du bâti
6
comme montré à la FigureD.
5. Pour mettre l’unité debout, incliner le bâti vers l’avant
pour qu’il soit à la verticale. La brosse à plancher
7
maintiendra lebâti.
AVERTISSEMENT : lorsque
non utilisé, placer le dos de l’unité face à un mur
de sorte qu’elle ne tombe pas sur un enfant ou un
animaldomestique.
Fig. B
2
23
Fig. C
23
5

FRANÇAIS
16
indiquée dans les instructions. Recharger de façon
inappropriée ou hors de la plage de températures
indiquée peut endommager le bloc-piles et augmenter
le risque d’incendie.
Charge de la batterie (HCUA525BA)
AVERTISSEMENT : pour
utilisation avec le chargeur fourniseulement.
• Avant la première utilisation, le bloc-piles doit être
chargé pendant au moins 6heures.
• Lorsque non utilisé, placez l’appareil sur sa base de
recharge
13
comme montré à la FigureF.
Brancher le chargeur dans une prise électrique 120 Volts
60Hz standard. La bande témoin DEL d’indication de
recharge clignotera et le nombre des témoins allumés sera
en progression. Lorsque la recharge sera complétée, la
bande lumineuse s’éteindra.
REMARQUE: Deux vis et goujons muraux sont fournis avec
la base de recharge pour la fixer au mur, pour la maintenir
plus fermement comme montré à la FigureF.
Modèles de DEL du capteur de
bloc-piles
Problèmes de bloc-piles
(Tout DELs)
Problèmes de chargeur
(Tout DELs)
Bloc-piles chaud
(Tout DELs)
AVERTISSEMENT : avant la
recharge, s’assurer de vider le bac à poussière et s’il y a
des traces d’humidité ou d’éclaboussures, les essuyer
pour éviter toutaccident.
• L'appareil doit être éteint pour pouvoir charger.
REMARQUE: Lors de la recharge, le chargeur pourrait
devenir chaud. C’est normal et cela n’indique pas
un problème. L’appareil peut être laissé raccordé au
chargeurindéfiniment.
Fig. F
13
AVERTISSEMENT : ne pas
charger la batterie à des températures ambiantes
inférieures à 4 °C (39 °F) ou supérieures à 40 °C
(104°F). Suivez les instructions de recharge et ne pas
recharger l’appareil hors de la plage de températures
indiquée dans les instructions. Recharger de façon
inappropriée ou hors de la plage de températures
indiquée peut endommager le bloc-piles et augmenter
le risque d’incendie.
UTILISER
Mise en marche et arrêt (Fig. G)
• Pour mettre en MARCHE, appuyer sur le bouton on/
off
1
. Les témoins DEL d’indication d’état de charge
s’allumeront et l’aspirateur se mettra en marche en
modeAUTOSENSE.
• REMARQUE: L’unité se mettra en marche lorsque le
bloc-piles passera au-dessus de 50% derecharge.
• Pour ARRÊTER l’appareil, appuyer sur le bouton on/
off
1
.
• Replacer l’aspirateur dans son chargeur immédiatement
après le travail pour qu’il soit prêt pour la prochaine
utilisation. S’assurer que le chargeur est bien branché
dans l’appareil ou que ses bornes font bien contact avec
les bornes de sa base derecharge.
Fig. G
1
Indicateur d’état de charge
Le présent appareil comprend un indicateur d’état de charge
de son bloc-piles comprenant trois témoins DEL blancs
indiquant son niveau de charge. Cette fonction s’active
seulement lorsque le commutateur d’alimentation est en
position demarche.
L’indicateur d’état de charge est une indication du niveau
approximatif de charge restant dans le bloc-piles selon les
indicateurs suivants:
Chargé de 75 à 100%
Chargé de 51 à 74%
Chargé de < 50%
Les DEL de l’indicateur d’état de charge du bloc-piles
affichent la charge résiduelle et vous avertissent d’un faible
niveau de charge. La dernière DEL se mettra à clignoter
une minute avant un niveau de décharge causant l’arrêt

FRANÇAIS
17
de l’aspirateur. À ce moment toutes les DEL se mettront
enclignotement.
REMARQUE: L’indicateur d’état de charge est seulement
une indication du niveau de charge restant dans le bloc-
piles. Il n’indique pas la fonctionnalité de l’appareil et
peut varier selon les accessoires utilisés, la température et
l’utilisation faite de l’appareil.
AUTOSENSE (Fig. H)
L’appareil est muni d’un dispositif de unique détection de
type de plancher. Il commutera entre les modes de succion
bas et élevé selon la surfacedétectée.
• Par défaut, l’appareil se mettra en détection AUTOSENSE
à sa mise enMARCHE.
• Pour désactiver cette fonction, appuyez sur le bouton
AUTOSENSE
35
alors que l’aspirateur sera enMARCHE.
Les attributs intégrés sont:
Bouton à effleurement DÉTECTEUR DE TYPE DE PLANCHER
La technologie de détection de type de plancher intelligente augmente
la succion sur les tapis et commute en mode économique pour les tâches
plus légères comme le nettoyage de couvre-planchers lisses et durs
pour prolonger la durée d’utilisation du bloc-piles. Cet attribut est actif
lorsque son témoin DEL est allumé. Pour désactiver cette fonction pour
demeurer en Mode D’économie et prolonger la durée d’utilisation du
bloc-piles, désactivez-la en touchant l’aire tactile.
Bouton de contrôle de puissance à glissière
Le tableau à bouton tactile sur l’unité vous permet de contrôler la
puissance d’aspiration du minimum au maximum en glissant un doigt sur
cette surface.
Bouton tactile de la brosse rotative
Vous permet de mettre en marche et d’arrêter la brosse rotative en
touchant cette icône.
Indicateur de puissance
Vous permet de surveiller la puissance utilisée.
Indicateur de CHARGE DU BLOC-PILES
Les DEL de l’indicateur d’état de charge du bloc-piles affichent la charge
résiduelle et vous avertissent d’un faible niveau de charge. La dernière
DEL se mettra à clignoter une minute avant d’un niveau de décharge
causant l’arrêt de l’aspirateur. À ce moment toutes les DEL se mettront
en clignotement.
DÉTECTEUR DE FILTRE
La technologie de capteur intelligent détecte automatiquement la
condition de filtre obstrué devant être nettoyé (l’icône s’allumera
en rouge).
Fig. H
35
Force de succion ajustable (Fig. I)
L’appareil possède une commande à glissière
37
de réglage
de la force de succion. La succion peut être ajustée à un
niveau plus bas pour prolonger la durée du bloc-piles ou à
un niveau plus élevé pour aspirer les plus grosdébris.
• Pour augmenter la succion, glissez votre doigt sur la
commande à glissière
37
vers la droite comme montré
à la figureI et la DEL correspondante de l’indicateur de
puissance min./max. s’allumera.
• Pour réduire la succion, glissez votre doigt sur la
commande à glissière
37
votre doigt vers lagauche.
Fig. I
37
Brosse rotative et DEL (Fig. J, Z)
• Pour activer la brosse rotative
39
(Fig.Z) à l’intérieur
de la brosse à plancher
7
, tapez sur l’icône de brosse
rotative
38
comme montré à la FigureJ. Lors de son

FRANÇAIS
18
fonctionnement, le phare de travail s’allumera pour
mieux voir l’aire ànettoyer.
• Pour désactiver la brosse
39
, tapez sur l’icône de brosse
rotative
38
.
Fig. J
38
Déposer et reposer le corps de bac à
poussière (Fig. K, L)
• Pour déposer le corps du bac à poussière du
bâti, appuyez sur le bouton de désengagement
41
du corps
5
du bâti
23
, agrippez la poignée
d’inclinaison
36
et soulevez le corps du bac à
poussière
5
comme montré à la FigureK.
• Désengagez le connecteur du flexible
3
du port de
boyau flexible du bâti
6
comme montré à la FigureL.
• Pour reposer le corps du bac à poussière dans le
bâti, agrippez la poignée du corps
36
et le glisser vers
le bas pour enclencher ses verrous comme montré à la
FigureK.
• Raccordez à nouveau le connecteur du flexible
3
au
port de boyau flexible
6
du bâti comme montré à la
FigureL.
Fig. K
41
23
36
5
Utilisation de l’outil accessoire (Fig. L–O)
• Appuyer sur le bouton de désengagement
17
de la
poignée/tube principale pour la libérer du bâti
23
.
• Sortir le connecteur du flexible
3
du port de boyau
flexible
6
du corps principal comme montré à la
FigureL.
Fig. L
23
4
5
3
6
17
• Actionner le bouton de désengagement
41
du corps
du bac à poussière
5
pour le déposer du bâti
23
comme montré à la FigureM.
Fig. M
23
41
9
• Raccorder le connecteur du flexible
3
au port de
l’outil accessoire
15
en s’assurant que le verrou
16
s’enclenche comme montré à la FigureN.
Fig. N
3
4
16
15
La page est en cours de chargement...
La page est en cours de chargement...
La page est en cours de chargement...
La page est en cours de chargement...
La page est en cours de chargement...
La page est en cours de chargement...
La page est en cours de chargement...
La page est en cours de chargement...
La page est en cours de chargement...
La page est en cours de chargement...
La page est en cours de chargement...
La page est en cours de chargement...
La page est en cours de chargement...
La page est en cours de chargement...
La page est en cours de chargement...
La page est en cours de chargement...
La page est en cours de chargement...
La page est en cours de chargement...
La page est en cours de chargement...
La page est en cours de chargement...
-
 1
1
-
 2
2
-
 3
3
-
 4
4
-
 5
5
-
 6
6
-
 7
7
-
 8
8
-
 9
9
-
 10
10
-
 11
11
-
 12
12
-
 13
13
-
 14
14
-
 15
15
-
 16
16
-
 17
17
-
 18
18
-
 19
19
-
 20
20
-
 21
21
-
 22
22
-
 23
23
-
 24
24
-
 25
25
-
 26
26
-
 27
27
-
 28
28
-
 29
29
-
 30
30
-
 31
31
-
 32
32
-
 33
33
-
 34
34
-
 35
35
-
 36
36
-
 37
37
-
 38
38
-
 39
39
-
 40
40


Black & Decker HCUA525BA Le manuel du propriétaire
- Catégorie
- Aspirateurs
- Taper
- Le manuel du propriétaire
dans d''autres langues
Documents connexes
-
Black & Decker BSV2020P Le manuel du propriétaire
-
-
Black & Decker HHVK320J10 Le manuel du propriétaire
-
-
Black & Decker HSVJ415JMBF71 Manuel utilisateur
-
-
Black & Decker HLVA325BP Manuel utilisateur
-
-
-
