GE Profile PGE29BYTFS Le manuel du propriétaire
- Catégorie
- Frigos
- Taper
- Le manuel du propriétaire

*Select Models Only
ENGLISH/FRANÇAIS/
ESPAÑOL
Write the model and serial
numbers here:
Model # _________________
Serial # _________________
Find these numbers on a label
on the left side, near the middle
of the refrigerator compartment.
49-1000713 Rev. 2 10-23
PGD, PGE and PAD
OWNER’S MANUAL &
INSTALLATION
INSTRUCTIONS
REFRIGERATORS
Bottom Freezer
GE is a trademark of the General Electric Company. Manufactured under trademark license.
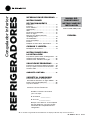
SAFETY INFORMATION .....3
OPERATING INSTRUCTIONS
Features ..........................6
Controls ..........................8
Sabbath Mode .....................8
Autofill* .........................10
WiFi .............................11
Demand Response ................ 12
Water Filter ...................... 13
Refrigerator Storage Options. . . . . . . 14
Climate Zone ..................... 16
Convertible Drawer ............... 16
Freezer .......................... 17
Automatic Icemaker ............... 19
CARE AND CLEANING ..... 20
Replacing the Lights .............. 21
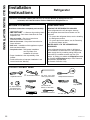
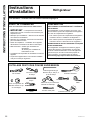
INSTALLATION INSTRUCTIONS
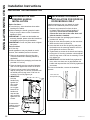
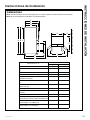
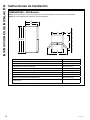
Preparing to Install the
Refrigerator ......................22
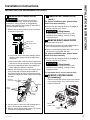
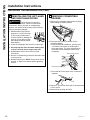
Installing the Refrigerator ..........26
Installing the Water Line ...........38
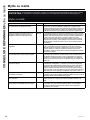
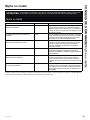
TROUBLESHOOTING ........ 41
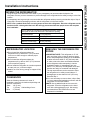
Normal Operating Conditions ...... 41
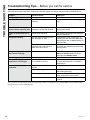
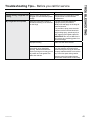
Troubleshooting Tips ..............42
Truth or Myth ....................44
LIMITED WARRANTY .......46
CONSUMER SUPPORT
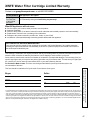
XWFE Water Filter Cartridge
Limited Warranty .................47
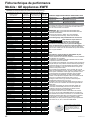
Performance Data Sheet ...........48
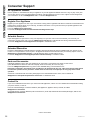
Consumer Support ................52

2 49-1000713 Rev. 2
THANK YOU FOR MAKING GE APPLIANCES A PART OF YOUR HOME.
Whether you grew up with GE Appliances, or this is your first, we’re happy to have you in the family.
We take pride in the craftsmanship, innovation and design that goes into every GE Appliances
product, and we think you will too. Among other things, registration of your appliance ensures that we
can deliver important product information and warranty details when you need them.
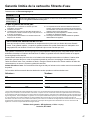
Register your GE appliance now online. Helpful websites and phone numbers are available in the
Consumer Support section of this Owner’s Manual. You may also mail in the pre-printed registration
card included in the packing material.

49-1000713 Rev. 2 3
SAFETY INFORMATION
READ AND SAVE THESE INSTRUCTIONS
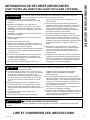
IMPORTANT SAFETY INFORMATION
READ ALL INSTRUCTIONS BEFORE USING THE APPLIANCE
WARNING To reduce the risk of fire, explosion, electric shock, or injury when using your refrigerator, follow
these basic safety precautions:
Ŷ 7KLVUHIULJHUDWRUPXVWEHSURSHUO\LQVWDOOHG
and located in accordance with the Installation
Instructions before it is used.
Ŷ 8QSOXJWKHUHIULJHUDWRUEHIRUHPDNLQJUHSDLUVRU
cleaning.
NOTE: Power to the refrigerator cannot be
disconnected by any setting on the cont rol panel.
NOTE: Repairs must be performed by a qualified
Service Professional.
Ŷ 5HSODFHDOOSDUWVDQGSDQHOVEHIRUHRSHUDWLQJ
Ŷ 'RQRWXVHDQH[WHQVLRQFRUG
Ŷ .HHSIODPPDEOHPDWHULDOVDQGYDSRUVDZD\IURPWKH
refrigerator.
Ŷ 'RQRWVWRUHH[SORVLYHVXEVWDQFHVVXFKDVDHURVRO
cans with a flammable propellant in this appliance.
Ŷ 7RSUHYHQWVXIIRFDWLRQDQGHQWUDSPHQWKD]DUGV
WRFKLOGUHQUHPRYHWKHUHIULJHUDWRUDQGIUHH]HU
doors from any refrigerator before disposing of it or
discontinuing its use.
Ŷ 7RDYRLGVHULRXVLQMXU\RUGHDWKFKLOGUHQVKRXOGQRW
stand on, or play in or with the appliance.
Ŷ &KLOGUHQDQGSHUVRQVZLWKUHGXFHGSK\VLFDOVHQVRU\
or mental capabilities or lack of experience and
knowledge can use this appliance only if they are
supervised or have been given instructions on safe
XVHDQGXQGHUVWDQGWKHKD]DUGVLQYROYHG
Ŷ 7KLVDSSOLDQFHLVLQWHQGHGWREHXVHGLQKRXVHKROG
and similar applications such as: staff kitchen areas
in shops, offices and other working environments;
farm houses; by clients in hotels, motels, bed
& breakfast and other residential environments;
catering and similar non-retail applications.
Ŷ &RQQHFWWRSRWDEOHZDWHUVXSSO\RQO\$FROGZDWHU
supply is required for automatic icemaker operation.
The water pressure must be between 40 and 120 psi
(275-827 kilopascals).
Ŷ 'RQRWDSSO\KDUVKFOHDQHUVWRWKHUHIULJHUDWRU
Certain cleaners will damage plastic which may
cause parts such as the door or door handles to
detach unexpectedly. See the Care and Cleaning
section in your Owner’s Manual for detailed
instructions.
CAUTION To reduce the risk of injury when using your refrigerator, follow these basic safety precautions:
Ŷ'RQRWFOHDQJODVVVKHOYHVRUFRYHUVZLWKZDUPZDWHU
when they are cold. Glass shelves and covers may
break if exposed to sudden temperature changes
or impact, such as bumping or dropping. Tempered
glass is designed to shatter into many small pieces if it
breaks.
Ŷ.HHSILQJHUVRXWRIWKH³SLQFKSRLQW´DUHDVFOHDUDQFHV
between the doors and between the doors and cabinet
are necessarily small. Be careful closing doors when
children are in the area.
Ŷ'RQRWUHIUHH]HIUR]HQIRRGVZKLFKKDYHWKDZHG
completely.
Ŷ'RQRWWRXFKWKHFROGVXUIDFHVLQWKHIUHH]HU
compartment when hands are damp or wet, skin may
stick to these extremely cold surfaces.
Ŷ,QIUHH]HUVZLWKDXWRPDWLFLFHPDNHUVDYRLGFRQWDFW
with the moving parts of the ejector mechanism, or
ZLWKWKHKHDWLQJHOHPHQWWKDWUHOHDVHVWKHFXEHV'R
not place fingers or hands on the automatic ice making
PHFKDQLVPZKLOHWKHIUHH]HULVSOXJJHGLQ
Ŷ8VHDVWXUG\JODVVZKHQGLVSHQVLQJLFHRQPRGHOV
with ice dispenser).
Ŷ,QVWDOOWKH$XWR)LOO3LWFKHUIXOO\LQLWVEDVHWRSUHYHQWLW
from falling out when the refrigerator door is opened.
The pitcher is heavy when full of water and could cause
injury if it falls out or is dropped.
WARNING FIRE OR EXPLOSION HAZARD
.HHSIODPPDEOHPDWHULDOVDQGYDSRUVDZD\IURPUHIULJHUDWRU)DLOXUHWRGRVRFDQUHVXOWLQILUHH[SORVLRQRUGHDWK

4 49-1000713 Rev. 2
SAFETY INFORMATION
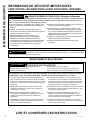
IMPORTANT SAFETY INFORMATION
READ ALL INSTRUCTIONS BEFORE USING THE APPLIANCE
READ AND SAVE THESE INSTRUCTIONS
Do not, under any circumstances, cut or remove the third (ground) prong from the power cord. For personal
safety, this appliance must be properly grounded.
ŶThe power cord of this appliance is equipped with
a 3-prong (grounding) plug which mates with a
VWDQGDUGSURQJJURXQGLQJZDOORXWOHWWRPLQLPL]H
WKHSRVVLELOLW\RIHOHFWULFVKRFNKD]DUGIURPWKLV
appliance.
ŶHave the wall outlet and circuit checked by a
qualified electrician to make sure the outlet is
properly grounded.
ŶWhere a standard 2-prong wall outlet is
encountered, it is your personal responsibility
and obligation to have it replaced with a properly
JURXQGHGSURQJZDOORXWOHW'RQRWXVHDQ
adapter.
ŶThe refrigerator should always be plugged into its
own individual electrical outlet which has a voltage
rating that matches the rating plate.
Ŷ$9ROW$&+]RUDPSIXVHG
grounded electrical supply is required. This provides
the best performance and also prevents overloading
house wiring circuits which could cause a fire
KD]DUGIURPRYHUKHDWHGZLUHV
ŶNever unplug your refrigerator by pulling on the
power cord. Always grip plug firmly and pull straight
out from the outlet.
ŶImmediately discontinue use of a damaged supply
cord. If the supply cord is damaged, it must be
replaced by a qualified service professional with an
DXWKRUL]HGVHUYLFHSDUWIURPWKHPDQXIDFWXUHU
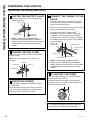
ŶWhen moving the refrigerator away from the wall, be
careful not to roll over or damage the power cord.
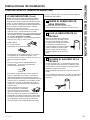
CONNECTING ELECTRICITY
WARNING ELECTRICAL SHOCK HAZARD
Plug into a grounded 3-prong outlet
'RQRWUHPRYHWKHJURXQGSURQJ
'RQRWXVHDQDGDSWHU
'RQRWXVHDQH[WHQVLRQFRUG
)DLOXUHWRIROORZWKHVHLQVWUXFWLRQVFDQUHVXOWLQ
death, fire, or electrical shock
WARNING FIRE OR EXPLOSION HAZARD Flammable Refrigerant
This appliance contains isobutane refrigerant,
also known as R600a, a natural gas with high
environmental compatibility. However, it is also
combustible. Adhere to the warnings below to
reduce the risk of injury or property damage.
Ŷ When handling, installing and operating the appliance,
care should be taken to avoid damage to the refrigerant
tubing.
Ŷ 6HUYLFHVKDOORQO\EHSHUIRUPHGE\DXWKRUL]HGVHUYLFH
SHUVRQQHO8VHRQO\PDQXIDFWXUHUDXWKRUL]HGVHUYLFH
parts.
Ŷ 'LVSRVHRIUHIULJHUDWRULQDFFRUGDQFHZLWK)HGHUDODQG
/RFDO5HJXODWLRQV)ODPPDEOHUHIULJHUDQWDQGLQVXODWLRQ
material used require special disposal procedures.
Contact your local authorities for the environmentally
safe disposal of your refrigerator.
Ŷ .HHSYHQWLODWLRQRSHQLQJVLQWKHDSSOLDQFHHQFORVXUHV
or in the built-in structure clear of obstruction.
Ŷ To remove frost,scrape with a plastic or wood spatula or
VFUDSHU'RQRWXVHDQLFHSLFNPHWDORUVKDUSHGJHG
LQVWUXPHQWDVLWPD\SXQFWXUHWKHIUHH]HUOLQHUDQGWKHQ
the flammable refrigerant tubing behind it.
Ŷ 'RQRWXVHHOHFWULFDODSSOLDQFHVLQVLGHWKHIRRGVWRUDJH
compartment of the appliance.
Ŷ 'RQRWXVHDQ\HOHFWULFDOGHYLFHLQGHIURVWLQJ\RXU
IUHH]HU
WARNING To reduce the risk associated with choking, do not allow children under 3 years of age to have
access to small parts during the installation of this product.

49-1000713 Rev. 2 5
IMPORTANT SAFETY INFORMATION
READ ALL INSTRUCTIONS BEFORE USING THE APPLIANCE
SAFETY INFORMATION
READ AND SAVE THESE INSTRUCTIONS
PROPER DISPOSAL OF YOUR OLD REFRIGERATOR
WARNING SUFFOCATION AND ENTRAPMENT HAZARD
)DLOXUHWRIROORZWKHVHGLVSRVDOLQVWUXFWLRQVFDQUHVXOWLQGHDWKRUVHULRXVLQMXU\
IMPORTANT: Child entrapment and suffocation
are not problems of the past. Junked or abandoned
refrigerators are still dangerous even if they will sit
IRU³MXVWDIHZGD\V´,I\RXDUHJHWWLQJULGRI\RXUROG
refrigerator, please follow the instructions below to help
prevent accidents.
Before You Throw Away Your Old Appliance
Ŷ7DNHRIIWKHIUHVKIRRGDQGIUHH]HUGRRUV
Ŷ Leave the shelves in place so that children may not
easily climb inside.
REFRIGERANT AND FOAM DISPOSAL:
'LVSRVHRIRUUHF\FOH\RXUDSSOLDQFHLQDFFRUGDQFHZLWK)HGHUDODQG/RFDO5HJXODWLRQV)ODPPDEOHUHIULJHUDQW
and insulation material used requires special disposal procedures. Contact your local authorities for the
environmentally safe disposal or recyling of your refrigerator.

6 49-1000713 Rev. 2
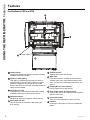
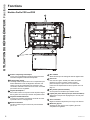
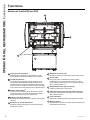
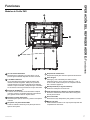
Features
USING THE REFRIGERATOR:)HDWXUHV
Autofill Pitcher
'HVLJQHGIRUKDQGVIUHHUHILOOLQJWRSURYLGHFRQVWDQWO\
available chilled filtered water.
Showcase LED lighting
/('OLJKWLQJLVSRVLWLRQHGWKURXJKRXWWKHLQWHULRUWR
VSRWOLJKWDUHDVLQWKHUHIULJHUDWRU/('VDUHORFDWHG
under the refrigerator door to light the convertible
GUDZHUDQG/('VDUHXQGHUWKHFRQYHUWLEOHGUDZHUWR
OLJKWWKHIUHH]HUGUDZHU
QuickSpace™ shelf
)XQFWLRQVDVDQRUPDOIXOOVL]HGVKHOIZKHQQHHGHG
and easily slides back to store tall items below.
Spillproof shelves
'HVLJQHGWRFDSWXUH\RXUVSLOOVIRUHDVLHUFOHDQXS
Removable door bin
Can be removed for those with a wall limiting the
door opening.
Climate zone bin
Separate bins for produce storage.
Water filter
)LOWHUVZDWHUDQGLFH&HUWLILHGWRUHGXFHFKORULQH
resistant cysts, lead, select pharmaceuticals, and
PRUH)RUHDV\ILOWHUUHSODFHPHQWLQVWUXFWLRQVVHH
page 13.
Rotating Bin (on some models)
Can be rotated out for easy access.
Door in Door Latch (on some models)
6TXHH]HWKHODWFKRQWKHXQGHUVLGHRIWKHKDQGOHWR
open the outer door.
Convertible drawer
Select the best temperature to store your food.
Icemaker
,FHVWRUDJHLQWKHXSSHUOHIW)UHH]HUFRPSDUWPHQW
drawer.
Profile Models PGD and PGE

49-1000713 Rev. 2 7
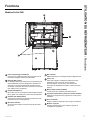
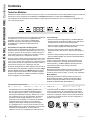
Features
USING THE REFRIGERATOR:)HDWXUHV
Autofill Pitcher
'HVLJQHGIRUKDQGVIUHHUHILOOLQJWRSURYLGHFRQVWDQWO\
available chilled filtered water.
Showcase LED lighting
/('OLJKWLQJLVSRVLWLRQHGWKURXJKRXWWKHLQWHULRUWR
VSRWOLJKWDUHDVLQWKHUHIULJHUDWRU/('VDUHORFDWHG
under the refrigerator door to light the convertible
GUDZHUDQG/('VDUHXQGHUWKHFRQYHUWLEOHGUDZHUWR
OLJKWWKHIUHH]HUGUDZHU
QuickSpace™ shelf
)XQFWLRQVDVDQRUPDOIXOOVL]HGVKHOIZKHQQHHGHG
and easily slides back to store tall items below.
Spillproof shelves
'HVLJQHGWRFDSWXUH\RXUVSLOOVIRUHDVLHUFOHDQXS
Removable door bin
Can be removed for those with a wall limiting the
door opening.
Climate zone bin
Separate bins for produce storage.
Water filter
)LOWHUVZDWHUDQGLFH&HUWLILHGWRUHGXFHFKORULQH
resistant cysts, lead, select pharmaceuticals, and
PRUH)RUHDV\ILOWHUUHSODFHPHQWLQVWUXFWLRQVVHH
page 13.
Rotating Bin (on some models)
Can be rotated out for easy access.
Door in Door Latch (on some models)
6TXHH]HWKHODWFKRQWKHXQGHUVLGHRIWKHKDQGOHWR
open the outer door.
Convertible Zone
Select the best temperature to store your food.
Icemaker
,FHVWRUDJHLQWKHXSSHUOHIW)UHH]HUFRPSDUWPHQW
drawer.
Profile Models PAD

8 49-1000713 Rev. 2
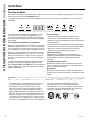
Controls
NOTE: The refrigerator is shipped with protective film
covering the temperature controls.
If this film was not removed during installation, remove
it now.
The temperature controls are preset in the factory at
)&IRUWKHUHIULJHUDWRUFRPSDUWPHQWDQG)
&IRUWKHIUHH]HUFRPSDUWPHQW$OORZKRXUVIRU
WKHWHPSHUDWXUHWRVWDELOL]HWRWKHSUHVHWUHFRPPHQGHG
settings.
To Change the Refrigerator Temperature:
3UHVV)ULGJHEXWWRQWRVFUROOWKURXJKDYDLODEOH
temperature settings 34°)°C) to 42°)°C). Note
the set temp will loop back to the lowest setting upon
indexing the Fridge button at the highest setting.
3UHVV)UHH]HUEXWWRQWRVFUROOWKURXJKDYDLODEOH
temperature settings -6°)°C) to 5°)°C). Note
the set temp will loop back to the lowest setting upon
indexing the Freezer button at the highest setting.
The cooling system can be turned off without shutting
off electrical power to the refrigerator. Press Fridge,
Freezer and Ice Maker buttons for 3 seconds to toggle
cooling system on/off. CS followed by OFF or ON will be
displayed.
Control Settings
Ɣ3UHVV)ULGJHDQG,FH0DNHUEXWWRQVIRUVHFRQGVWR
WRJJOHEHWZHHQ'RRU$ODUP2Q2II
Ɣ3UHVV,FH0DNHUEXWWRQWRWRJJOHLFHPDNHURQRII
Ɣ3UHVV:L)LEXWWRQWRWXUQ:L)LRQ3UHVVDQGKROG:L)L
EXWWRQIRUVHFRQGVWRWXUQ:L)LRII
Ɣ 3UHVV$XWR)LOO3LWFKHUEXWWRQWRWRJJOH$XWR)LOO3LWFKHU
on/off.
Fahrenheit / Celsius:
3UHVV)ULGJHRU)UHH]HUEXWWRQWRGLVSOD\WHPSWKHQ
SUHVVDQGKROG)UHH]HUDQG,FH0DNHUEXWWRQVIRU
VHFRQGVWRWRJJOHEHWZHHQ&HOVLXVDQG)DKUHQKHLW
Volume Control:
3UHVVDQGKROG)UHH]HUDQG$XWR)LOO3LWFKHUEXWWRQVIRU
VHFRQGVWRWRJJOHVRXQGOHYHOEHWZHHQ³+L´³/R´
DQG³2II´
Sabbath Mode:
3UHVVDQGKROG)UHH]HU,FH0DNHUDQG$XWR)LOO3LWFKHU
buttons for 3 seconds to toggle Sabbath Mode on/off.
All Models
We are continuously updating our software. Please reference the full owner's manual online for the latest
functionality at GEAppliances.com. In Canada, visit GEAppliances.ca.
7KHUHFRPPHQGHGWHPSHUDWXUHVHWWLQJVSUHVHWIURPWKHIDFWRU\DUH)&IRUWKHUHIULJHUDWRUDQG)&
IRUWKHIUHH]HU
Sabbath Mode OU (Orthodox Union) and CRC (Central Rabbinical Congress)
7KLVUHIULJHUDWRURIIHUVDQ28DQG&5&6DEEDWKPRGH
that complies with standards set forth by Orthodox
8QLRQWKH&HQWUDO5DEELQLFDO&RQJUHVVDQG+DODFKD
Tech, and is 100% certified to the highest halacha
VWDQGDUGV,QRUGHUWRHQDEOHWKH28DQG&5&6DEEDWK
PRGHDVHSDUDWH6KDEERV.HHSHUIRU5HIULJHUDWRUV
must be connected to the refrigerator. The Shabbos
.HHSHUFDQEHSXUFKDVHGIURP]PDQWHFKQRORJLHVFRP
RUJHDSSOLDQFHVFRP7KHRQO\ZD\WRHQDEOHWKH28
and CRC Sabbath mode is with the purchase of the
6KDEERV.HHSHUIRU5HIULJHUDWRUV7KH6KDEERV.HHSHU
connects to your refrigerator to automatically enable
Shabbos compatible modes each week and before every
holiday. The appropriate mode will automatically activate
based on the Jewish calendar date for your location.
:KHQWKH6KDEERV.HHSHULVSURSHUO\FRQQHFWHGWRWKH
UHIULJHUDWRUWKHGLVSOD\ZLOOVKRZ³6$´
ZMAN
TECH
NOLOGIES
¯¶·¯¬Ã²¹·º°¶¹¯Ã°´
USING THE REFRIGERATOR: Controls

49-1000713 Rev. 2 9
USING THE REFRIGERATOR: Controls
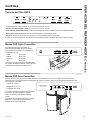
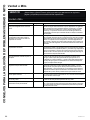
Controls
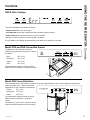
XWFE Filter Cartidge
7RS&RQWUROV'LVSOD\ZLOOLOOXPLQDWHDVIROORZV
• Replace Filter when 10% life remains
• Leak Detected when water is detected at filter indicating a leak is present.
• Expired Filter when the filter has been in use for 6 months
• Err when no filter is present or the wrong filter is installed
)RUDOOFRQGLWLRQVWKHGLVSOD\ZLOODXWRPDWLFDOO\UHVHWZKHQIDXOWFRQGLWLRQLVFRUUHFWHG
Model PGD and PGE Convertible Drawer
7HPSHUDWXUHLQWKH&RQYHUWLEOH'UDZHULV
selected by pressing the food item to be kept in
the drawer.
0HDW )°C)
%HYHUDJHV )°C)
6QDFNV )°C)
:LQH )°C)
The temperature setting is locked by default.
Button must be pressed for 3 seconds to unlock.
Model PAD Convertible Zone
The Convertible Zone control panel is in the top of the lower right-hand door and is used to adjust the temperature
RIWKHFRQYHUWLEOH]RQH6HOHFW\RXUGHVLUHG
temperature for this convertible compartment.
)UHH]HU )°C)
5HIULJHUDWRU )°C)
&KLOOHU )°C)
The temperature setting is locked by default.
Button must be pressed for 3 seconds to
unlock.
The Warmer (+) and Cooler (-) buttons can be
used to adjust the temperature of each setting.
Convertible Zone
Temp Select

10 49-1000713 Rev. 2
USING THE REFRIGERATOR: 'LVSHQVHU
Dispenser
AutoFill Pitcher
Place the lid onto the pitcher so that it fits securely. Align
the raised portion of the lid with the slot on the door and
slide the pitcher into the door until it fully drops down into
the pitcher tray.
The pitcher will automatically fill with water approximately
5 seconds after the door is closed. The pitcher will
QRWILOOZLWKZDWHUZKLOHWKHOHIWKDQG))GRRULVRSHQ
The pitcher will turn off automatically after filling to
approximately 60 ounces.
7KHSLWFKHULVGHVLJQHGWRPLQLPL]HVORVKLQJEXWEH
careful not to open or close door with excessive force to
avoid some water sloshing out of the pitcher spout.
The easiest method to remove the lid is to push up on
the back overhanging edge of the lid near the handle.
To Clean the AutoFill Pitcher
7KH$XWR)LOOSLWFKHUDQGOLGDUHGLVKZDVKHUVDIH7KH
lid should be placed in the top rack only and the pitcher
in the bottom rack of the dishwasher. Run on normal
wash.
7RPD[LPL]HSHUIRUPDQFHRI\RXU$XWR)LOOSLWFKHULWLV
recommended that you rinse it thoroughly after washing
to remove all soap residue.
,I\RXU$XWR)LOOSLWFKHUKDVEHHQLQFRQWDFWZLWKIRRG
that is likely to cause discoloration (e.g. tomato ketchup,
mustard), clean your pitcher promptly. This is to avoid
possible discoloration of your pitcher.
,I\RXZRXOGOLNHWRRUGHUDVHFRQGDU\$XWR)LOOSLWFKHUJR
to www.geapplianceparts.com

49-1000713 Rev. 2 11
USING THE REFRIGERATOR::L)L
WiFi (on some models)
(for customers in the United States, its territories, and Canada)
REGULATORY INFORMATION
FCC/IC Compliance Statement:
7KLVGHYLFHFRPSOLHVZLWK3DUWRIWKH)&&5XOHV2SHUDWLRQLVVXEMHFWWRWKHIROORZLQJWZRFRQGLWLRQV
1. This device may not cause harmful interference, and
2. This device must accept any interference received, including interference that may cause undesired operation.
This equipment has been tested and found to comply with the limits for a Class B digital device, pursuant to Part
RIWKH)&&5XOHV7KHVHOLPLWVDUHGHVLJQHGWRSURYLGHUHDVRQDEOHSURWHFWLRQDJDLQVWKDUPIXOLQWHUIHUHQFHLQD
residential installation. This equipment generates uses and can radiate radio frequency energy and, if not installed
and used in accordance with the instructions, may cause harmful interference to radio communications. However,
there is no guarantee that interference will not occur in a particular installation. If this equipment does cause harmful
interference to radio or television reception, which can be determined by turning the equipment off and on, the user
is encouraged to try to correct the interference by one or more of the following measures:
• Reorient or relocate the receiving antenna.
• Increase the separation between the equipment and receiver.
• Connect the equipment into an outlet on a circuit different from that to which the receiver is connected.
• Consult the dealer or an experienced radio/television technician for help.
Labelling: Changes or modifications to this unit not expressly approved by the manufacturer could void the user’s
authority to operate the equipment.
If your refrigerator has a Connected Appliance Information ODEHOWKHQLWFDQEHFRQQHFWHGWR\RXU:L)LQHWZRUN
allowing it to communicate with your mobile device for remote monitoring, control and notifications.
Please visit GEAppliances.com/connect to learn more about connected appliance features and learn what
connected appliance apps work with your mobile device.

12 49-1000713 Rev. 2
Demand Response (some models)
USING THE REFRIGERATOR:'HPDQG5HVSRQVH
7KLV3URGXFWKDV:L)LFDSDELOLW\DQGUHTXLUHV
Internet connectivity and a wireless router to enable
interconnection with an Energy Management System,
and/or with other external devices, systems or
applications.
What is Demand Response?
Some utilities vary their electricity rates based on the
WLPHRIGD\6RPHXWLOLWLHVRIIHU'HPDQG5HVSRQVH
programs to reduce energy usage during certain times
of the day. Some utilities may do both things. This
UHIULJHUDWRUKDVD'HPDQG5HVSRQVHIHDWXUHWRKHOS
control energy usage.
Using Demand Response without a Utility
Program
7KH'HPDQG5HVSRQVHIHDWXUHDOORZVWKHXVHUWRVKLIW
high energy features, like defrost, for a 4-hour window.
This window corresponds to the average peak energy
usage. This feature is enabled or disabled with the
SmartHQTM and requires the SmartHQTM to operate. It
does not depend on the local utility, or whether it varies
the electricity rates.
Demand Response with your Utility
,I\RXUXWLOLW\KDVDFRPSDWLEOH'HPDQG5HVSRQVH
program, and you are signed up with the utility, this
refrigerator can modify its energy usage based on
commands received from the utility. The SmartHQTM can
EHXVHGWRRYHUULGHWKH'HPDQG5HVSRQVHSURJUDP
if desired. Please note that there are many different
'HPDQG5HVSRQVHSURJUDPVDQGPDQ\DUHQRW
compatible with kitchen appliances. Please check with
your local utility.
The demand response level is displayed in the mobile
DSS'HOD\DSSOLDQFHORDGPRGH'$/UHGXFHVSRZHU
consumption by delaying defrost and ice production for
4 hours. Temporary appliance load reduction (TALR)
reduces the power consumption by delaying defrost, ice
production, and stopping cooling for 10 minutes.
Estimated energy consumption in Watt-hour(Wh) is
reported in the mobile app.
Installing Demand Response
Install the SmartHQTM per the instructions on the previous
SDJH6HOHFWWKH'HPDQG5HVSRQVHSDJHDQGFKRRVH
IURPWKHDYDLODEOH'HPDQG5HVSRQVHRSWLRQV7KH
app provides more information on the operation of each
'HPDQG5HVSRQVHRSWLRQ
Demand Response Communication Protocols
7KLVUHIULJHUDWRUXVHVWKHIROORZLQJ,(7)RSHQVWDQGDUG
SURWRFROVIRUWKH:L)LFRPPXQLFDWLRQ&RQVXOWWKHRQOLQH
user manual for the latest protocol updates:
Ŷhttps://mqtt.org/mqtt-specification/
Ŷhttp://docs.oasis-open.org/mqtt/mqtt/v3.1.1/os/
mqtt-v3.1.1-os.html
GE Appliances API for demand response:
Ŷ:ULWHGHPDQGUHVSRQGVWDWXV,QDFWLYH'$/DQG
TALR)
Ŷ*HWGHPDQGUHVSRQVHVWDWXV,QDFWLYH'$/7$/5RU
'HOD\'HIURVW
Ŷ*HWHVWLPDWHGHQHUJ\FRQVXPSWLRQLQ:DWWKRXU
Ŷ*HWHYHQWIRU'RRU2SHQ
Ŷ*HWHYHQWIRU+LJKWHPSHUDWXUHDOHUW
Ŷ:ULWHGHPDQGUHVSRQVH'$/RU7$/5VWDUWWLPHDQG
duration time period.
Ŷ*HWGHPDQGUHVSRQVH'$/RU7$/5VWDUWWLPHDQG
duration time period.
Ŷ'HOHWHGHPDQGUHVSRQVH'$/RU7$/5VFKHGXOH

49-1000713 Rev. 2 13
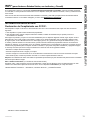
USING THE REFRIGERATOR: ;:)(:DWHU)LOWHU
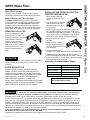
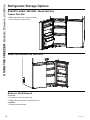
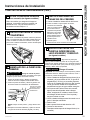
XWFE Water Filter
Water Filter Cartridge
The water filter cartridge is located in the left-hand
refrigerator door behind the rectangular access panel.
When to Replace the Filter Cartridge
The Replace Filter message on the control panel
will illuminate when the water filter cartridge needs to
be replaced soon. The Filter Expired message will
illuminate when the water filter cartridge needs to be
replaced. The water filter can be replaced earlier if the
flow of water to the dispenser or icemaker decreases.
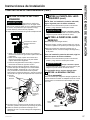
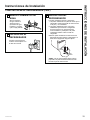
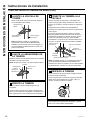
REMOVING THE FILTER
If you are replacing the filter,
first remove the previous one
by gently grasping the filter and
slowly turning it to the left,
about a ¼ turn. The filter
should automatically release
itself when you have rotated it
far enough to the left. A small
amount of water may drip
down.
CAUTION
If air has been trapped in the system, the filter cartridge
PD\EHHMHFWHGDVLWLVUHPRYHG8VHFDXWLRQZKHQ
removing.
FILTER BYPASS PLUG
To reduce the risk of property damage due to water
OHDNDJH\RX0867XVHWKHILOWHUE\SDVVSOXJZKHQD
replacement filter cartridge is not available. Some models
do not come equipped with the filter bypass plug. To obtain
a free bypass plug, call 800.GECARES and request
WR17X33825 filter bypass plug. In Canada, call
800.561.3344. The dispenser and icemaker will not operate
without either the filter or bypass plug installed. The bypass
plug is installed in the same way as a filter cartridge.
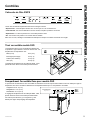
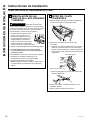
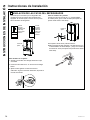
INSTALLING THE FILTER IN A BOTTOM
FREEZER REFRIGERATOR
1. Open the filter cartridge
housing by pulling the door
open.
2. Line up the ports on the filter
with the ports on the filter
cartridge holder, and gently
insert the filter.
6ORZO\WXUQWKHILOWHUWRWKHULJKWXQWLOLWVWRSV'2
NOT OVERTIGHTEN. As you turn the filter, it will
automatically adjust itself into position. The filter will
move about a ¼ turn or 90 degrees, until the filter
cannot be turned, and the label faces outward.
4. Slowly push the filter up into
the clips.
5. Close the filter cartridge
housing by gently pushing
the door closed until the tabs
lock into place.
6. Confirm that filter fault
condition is no longer present on the controls display.
7. Immediately after filter change, allow the pitcher to
autofill and empty pitcher into sink four times. This will
purge the new filter of normal black carbon dust that is
discharged during the initial use.
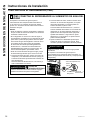
Application Guidelines/Water Supply
WARNING To reduce the risk associated with choking, do not allow children under 3 years of age to
have access to small parts during the installation of this product. The disposable filter cartridge should be
replaced every 6 months at the rated capacity, or sooner if a noticeable reduction in flow rate occurs.
)RUWKHPD[LPXPEHQHILWRI\RXUILOWUDWLRQV\VWHP*($SSOLDQFHVUHFRPPHQGVWKHXVHRI*($SSOLDQFHVEUDQGHG
ILOWHUVRQO\8VLQJ*($SSOLDQFHVEUDQGHGILOWHUVLQ*($SSOLDQFHVUHIULJHUDWRUVSURYLGHVRSWLPDOSHUIRUPDQFHDQG
UHOLDELOLW\*($SSOLDQFHVILOWHUVPHHWULJRURXVLQGXVWU\16)VWDQGDUGVIRUVDIHW\DQGTXDOLW\WKDWDUHLPSRUWDQWIRU
products that are filtering your water. GE Appliances and Hotpoint has not qualified non-GE Appliances-branded
filters for use in GE Appliances refrigerators and there is no assurance that non-GE Appliances-branded filters meet
GE Appliances standards for quality, performance and reliability.
If you have questions, or to order additional filter cartridges, visit our website at gewaterfilters.com. or call
GE Appliances Parts and Accessories, 877-959-8688.
Customers in Canada should consult the yellow pages for the nearest Camco Service Center.
6HUYLFH)ORZ 0.5 gpm (1.89 lpm)
Water Supply Potable Water
Water Pressure 25-120 psi (172-827 kPa)
Water Temperature ))&&
Capacity 170 gallons (643.5 liters)
Sign-up for TEXT REMINDERS by
texting REPLACE to 70543.

14 49-1000713 Rev. 2
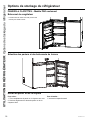
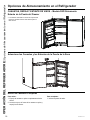
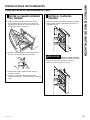
Refrigerator Storage Options
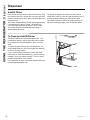
Rearranging the Shelves
Shelves in the refrigerator compartment are adjustable.
To remove:
Remove all items from the shelf.
Tilt the shelf up at the front.
Lift the shelf up at the back and bring the shelf out.
To replace:
While tilting the shelf up, insert the top hook at the
back of the shelf in a slot on the track.
Lower the front of the shelf until the bottom of the
shelf locks into place.
Spillproof Shelves
Spillproof shelves have special edges to help prevent
spills from dripping to lower shelves.
Quick Space Shelf
This shelf splits in half and slides under itself for storage of
tall items on the shelf below.
This shelf can be removed and replaced or relocated (just
like spillproof shelves).
NOTE: The back half of the Quick Space Shelf is not
adjustable.
USING THE REFRIGERATOR: Refrigerator Storage Options

49-1000713 Rev. 2 15
USING THE REFRIGERATOR: Refrigerator Storage Options
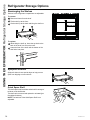
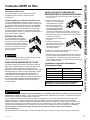
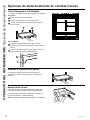
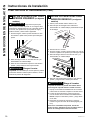
Refrigerator Storage Options
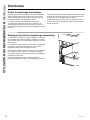
Left Door Bins
FIXED BIN
To remove: Lift the bin straight up, then pull out.
The ice maker door bins are not interchangeable, note the
location upon removal and replace the bin in its proper
location.
Right Door Bins (on some models)
FIXED BINS can easily be carried from refrigerator to
work area.
To remove: Lift bin straight up, then pull out.
ROTATING BIN:
To remove: Rotate bin outward then lift straight up. To
remove Place hand under metal base and lift up.
To remove Metal Base: Place hand under metal base
and lift up.
)L[HG%LQV
)L[HG%LQ
Remove
Rotating Bin
5HPRYH)L[HG%LQV Remove
Metal Base

16 49-1000713 Rev. 2
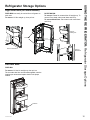
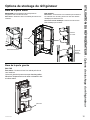
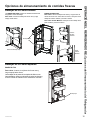
How to Remove and Replace Drawer Organizer
To remove:
1. Pull the drawer out to the stop position.
6OLJKWO\UDLVHWKHRUJDQL]HUWKHQURWDWHWRUHPRYH
To replace:
1. Place the back of the divider on the rear wall of the drawer.
5RWDWHWKHRUJDQL]HULQWRWKHGHVLUHGSRVLWLRQ
How to Remove and Replace Drawer
To remove:
1. Pull the drawer out to the stop position.
2. Remove the convertible drawer basket by lifting while
rotating the basket upward.
To replace:
1. Place drawer back in first and rotate drawer front down to
seat on slide.
2. Push the drawer in to closed position.
Convertible drawer basket will be loose if re-installed
EDFNZDUGV/RRNIRU³)5217´HPERVVWRKHOSZLWK
re-installation.
USING THE REFRIGERATOR:&OLPDWH=RQH&RQYHUWLEOH'UDZHU
Convertible Drawer
Climate Zone
.HHSIUXLWVDQGYHJHWDEOHVRUJDQL]HGLQVHSDUDWH
compartments for easy access.
Excess water that may accumulate in the bottom of the
drawers or under the drawers should be wiped dry.

49-1000713 Rev. 2 17
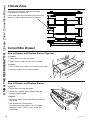
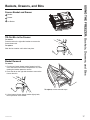
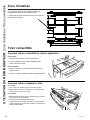
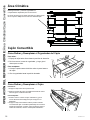
Freezer Basket and Drawer
Basket.
'UDZHU
Ice Bucket
Tilt-Out Bin in the Freezer
To remove:
Press the tab on the right side bracket to remove the
IUHH]HUGUDZHUELQ
To replace:
Slide bin into location until it locks into place.
Basket Removal
To remove:
3XOOWKHWRSIUHH]HUGUDZHUEDVNHWIRUZDUGXQWLOLWLV
RXWRIWKHWUDFNLQWKHIUHH]HUFRPSDUWPHQW/LIWZKLOH
rotating the basket upward to remove.
2. Press the tab on the right side bracket to remove the
IUHH]HUGRRUELQ
/LIWWKHERWWRPIUHH]HUGUDZHUEDVNHWVOLJKWO\EDFN
then up and out of the drawer.
To replace, reverse removal steps.
Baskets, Drawers, and Bins
USING THE FREEZER:%DVNHWV'UDZHUVDQG%LQV

18 49-1000713 Rev. 2
USING THE FREEZER:%DVNHWV'UDZHUVDQG%LQV
0LGGOHDQGERWWRPELQVRQWKHIUHH]HUGRRU
can be tilted out for easy access.
Freezer Door Bin
Select Zone Baskets and Door Bins
Basket or Shelf Removal
To remove:
1. Pull basket or shelf out all the way.
2. Slightly lift front of basket or shelf and pull out.
To replace:
1. Reverse the removal steps.
Refrigerator Storage Options
BASKETS, SHELF, AND BINS - Model PAD Only

49-1000713 Rev. 2 19
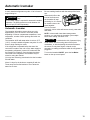
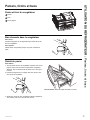
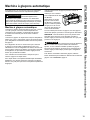
USING THE FREEZER: Automatic Icemaker
Automatic Icemaker
A newly installed refrigerator may take 12 to 24 hours to
begin making ice.
Automatic Icemaker
The icemaker will produce seven cubes per cycle
approximately 100–130 cubes in a 24-hour period,
GHSHQGLQJRQIUHH]HUFRPSDUWPHQWWHPSHUDWXUHURRP
temperature, number of door openings and other use
conditions.
7KHLFHPDNHUZLOOILOOZLWKZDWHUZKHQLWFRROVWR)
(-10°C). A newly installed refrigerator may take 12 to 24
hours to begin making ice cubes.
If the refrigerator is operated before the water line
connection is made to the unit or if the water supply to
an operating refrigerator is turned off, make sure that
the icemaker is turned off. Once the water has been
connected to the refrigerator, the icemaker may be
turned on using the controls.
<RXPD\KHDUDEX]]LQJVRXQGHDFKWLPHWKHLFHPDNHU
fills with water.
Allow 1-2 days for the bucket to completly fill with ice.
Throw away the first few batches of ice to allow the
water line to clear.
Be sure nothing interferes with the sweep of the feeler
arm.
When the bin fills to the
level of the feeler arm,
the icemaker will stop
producing ice. It is normal
for several cubes to be
joined together.
If ice is not used
frequently, old ice cubes will become cloudy, taste stale
and shrink.
NOTE: In homes with lower-than-average water
pressure, you may hear the icemaker cycle multiple
times when making one batch of ice.
CAUTION 7RPLQLPL]HWKHULVNRISHUVRQDOLQMXU\
avoid contact with the moving parts of the ejector
mechanism, or with the heating element that releases
WKHFXEHV'RQRWSODFHILQJHUVRUKDQGVRQWKH
automatic ice making mechanism while the refrigerator is
plugged in.
To turn the icemaker ON/OFF, press the Ice Maker
button on the top control panel.
WARNING Connect to potable water supply
only.
A cold water supply is required for automatic icemaker
operation. The water pressure must be between 40
and 120 psi (275-827 kilopascals).

20 49-1000713 Rev. 2
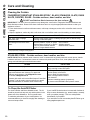
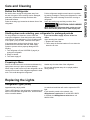
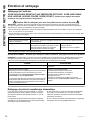
Care and Cleaning
To Clean the AutoFill Pitcher
7KH$XWR)LOO3LWFKHUDQGOLGDUHGLVKZDVKHUVDIH7KHOLG
should be placed in the top rack only and the pitcher in the
bottom rack of the dishwasher. Run on normal wash.
7RPD[LPL]HSHUIRUPDQFHRI\RXU$XWR)LOOSLWFKHULWLV
recommended that you rinse it thoroughly after washing to
remove all soap residue.
,I\RXU$XWR)LOO3LWFKHUKDVEHHQLQFRQWDFWZLWKIRRGWKDWLV
likely to cause discoloration (e.g. tomato ketchup, mustard),
clean your pitcher promptly. This is to avoid possible
discoloration of your pitcher.
,I\RXZRXOGOLNHWRRUGHUDVHFRQGDU\$XWR)LOO3LWFKHUJRWR
www.geapplianceparts.com.
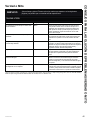
DO USE DO NOT USE
Soft, clean cloth or sponge
Microfiber cloth
Abrasive cloths, paper towels, scrubbing sponges (with or without soap),
scouring or steel wool pads
Mild detergent mixed with warm
water
Abrasive powders, liquids, or sprays
Window sprays, ammonia, or bleach
Citrus or plant oil-based cleaners
Acidic or vinegar-based cleaners
Oven cleaners
Alkaline cleaners
Stainless steel cleaners
DO NOT use Stainless Steel cleaners on the door surfaces.
IMPORTANT:7KHXVHRILQFRUUHFWSURGXFWVPD\GDPDJHWKHRXWHUILQLVKRI)LQJHUSULQW5HVLVWDQW6WDLQOHVVDQG
Black Stainless models. Please follow these instructions and use only the appropriate items below to clean your
appliance surfaces.
Ɣ&OHDQLQWHULRUH[WHULRUVXUIDFHVZLWKZDUPZDWHUPLOGVRDSRUGHWHUJHQWDQGDVRIWRUPLFURILEHUFORWKWRDYRLG
damage.
Ɣ:LSHWKHDSSOLDQFHVXUIDFHGU\ZLWKDVRIWFOHDQFORWKRUPLFURILEHUWRZHOWRDYRLGVWUHDNLQJRUZDWHUVSRWWLQJ
DO USE DO NOT USE
Soft, clean cloth or sponge Abrasive cloths, scrubbing sponges (with or without
soap), scouring or steel wool pads
Mild detergent mixed with warm water
$SSURYHGVWDLQOHVVVWHHOFOHDQHUV)RUDSSURYHG
stainless steel cleaners, visit GEAppliances.com.
In Canada: GEAppliances.ca
&OHDQHUVZLWKR[DOLFDFLGVXFKDV%DU.HHSHUV)ULHQG6RIW
Cleanser™ can be used to remove surface rust, tarnish
and small blemishes on stainless steel surfaces only.
Abrasive powders or sprays
Window Sprays or Ammonia
Citrus or plant oil-based cleaners
Acidic or vinegar-based cleaners
Oven cleaners
Cleaners containing acetone (propanone)
Any cleaner with WARNING about plastic contact
NOTE: DO NOT allow stainless steel cleaner to come in contact with any plastic parts such as trim pieces, handle
hardware and liners. If unintentional contact of cleaners with plastic parts does occur, clean plastic part with a
sponge and mild detergent mixed with warm water.
STAINLESS STEEL - Outside surfaces, door handles, and trim
FINGERPRINT RESISTANT STAINLESS STEEL*, BLACK STAINLESS, SLATE, DARK
SLATE, PAINTED, GLASS - Outside surfaces, door handles, and trim
Cleaning the Outside
*Easily wipe away smudges and fingerprints.
CARE AND CLEANING
La page est en cours de chargement...
La page est en cours de chargement...
La page est en cours de chargement...
La page est en cours de chargement...
La page est en cours de chargement...
La page est en cours de chargement...
La page est en cours de chargement...
La page est en cours de chargement...
La page est en cours de chargement...
La page est en cours de chargement...
La page est en cours de chargement...
La page est en cours de chargement...
La page est en cours de chargement...
La page est en cours de chargement...
La page est en cours de chargement...
La page est en cours de chargement...
La page est en cours de chargement...
La page est en cours de chargement...
La page est en cours de chargement...
La page est en cours de chargement...
La page est en cours de chargement...
La page est en cours de chargement...
La page est en cours de chargement...
La page est en cours de chargement...
La page est en cours de chargement...
La page est en cours de chargement...
La page est en cours de chargement...
La page est en cours de chargement...
La page est en cours de chargement...
La page est en cours de chargement...
La page est en cours de chargement...
La page est en cours de chargement...
La page est en cours de chargement...
La page est en cours de chargement...
La page est en cours de chargement...
La page est en cours de chargement...
La page est en cours de chargement...
La page est en cours de chargement...
La page est en cours de chargement...
La page est en cours de chargement...
La page est en cours de chargement...
La page est en cours de chargement...
La page est en cours de chargement...
La page est en cours de chargement...
La page est en cours de chargement...
La page est en cours de chargement...
La page est en cours de chargement...
La page est en cours de chargement...
La page est en cours de chargement...
La page est en cours de chargement...
La page est en cours de chargement...
La page est en cours de chargement...
La page est en cours de chargement...
La page est en cours de chargement...
La page est en cours de chargement...
La page est en cours de chargement...
La page est en cours de chargement...
La page est en cours de chargement...
La page est en cours de chargement...
La page est en cours de chargement...
La page est en cours de chargement...
La page est en cours de chargement...
La page est en cours de chargement...
La page est en cours de chargement...
La page est en cours de chargement...
La page est en cours de chargement...
La page est en cours de chargement...
La page est en cours de chargement...
La page est en cours de chargement...
La page est en cours de chargement...
La page est en cours de chargement...
La page est en cours de chargement...
La page est en cours de chargement...
La page est en cours de chargement...
La page est en cours de chargement...
La page est en cours de chargement...
La page est en cours de chargement...
La page est en cours de chargement...
La page est en cours de chargement...
La page est en cours de chargement...
La page est en cours de chargement...
La page est en cours de chargement...
La page est en cours de chargement...
La page est en cours de chargement...
La page est en cours de chargement...
La page est en cours de chargement...
La page est en cours de chargement...
La page est en cours de chargement...
La page est en cours de chargement...
La page est en cours de chargement...
La page est en cours de chargement...
La page est en cours de chargement...
La page est en cours de chargement...
La page est en cours de chargement...
La page est en cours de chargement...
La page est en cours de chargement...
La page est en cours de chargement...
La page est en cours de chargement...
La page est en cours de chargement...
La page est en cours de chargement...
La page est en cours de chargement...
La page est en cours de chargement...
La page est en cours de chargement...
La page est en cours de chargement...
La page est en cours de chargement...
La page est en cours de chargement...
La page est en cours de chargement...
La page est en cours de chargement...
La page est en cours de chargement...
La page est en cours de chargement...
La page est en cours de chargement...
La page est en cours de chargement...
La page est en cours de chargement...
La page est en cours de chargement...
La page est en cours de chargement...
La page est en cours de chargement...
La page est en cours de chargement...
La page est en cours de chargement...
La page est en cours de chargement...
La page est en cours de chargement...
La page est en cours de chargement...
La page est en cours de chargement...
La page est en cours de chargement...
La page est en cours de chargement...
La page est en cours de chargement...
La page est en cours de chargement...
La page est en cours de chargement...
La page est en cours de chargement...
La page est en cours de chargement...
La page est en cours de chargement...
La page est en cours de chargement...
La page est en cours de chargement...
La page est en cours de chargement...
La page est en cours de chargement...
La page est en cours de chargement...
La page est en cours de chargement...
-
 1
1
-
 2
2
-
 3
3
-
 4
4
-
 5
5
-
 6
6
-
 7
7
-
 8
8
-
 9
9
-
 10
10
-
 11
11
-
 12
12
-
 13
13
-
 14
14
-
 15
15
-
 16
16
-
 17
17
-
 18
18
-
 19
19
-
 20
20
-
 21
21
-
 22
22
-
 23
23
-
 24
24
-
 25
25
-
 26
26
-
 27
27
-
 28
28
-
 29
29
-
 30
30
-
 31
31
-
 32
32
-
 33
33
-
 34
34
-
 35
35
-
 36
36
-
 37
37
-
 38
38
-
 39
39
-
 40
40
-
 41
41
-
 42
42
-
 43
43
-
 44
44
-
 45
45
-
 46
46
-
 47
47
-
 48
48
-
 49
49
-
 50
50
-
 51
51
-
 52
52
-
 53
53
-
 54
54
-
 55
55
-
 56
56
-
 57
57
-
 58
58
-
 59
59
-
 60
60
-
 61
61
-
 62
62
-
 63
63
-
 64
64
-
 65
65
-
 66
66
-
 67
67
-
 68
68
-
 69
69
-
 70
70
-
 71
71
-
 72
72
-
 73
73
-
 74
74
-
 75
75
-
 76
76
-
 77
77
-
 78
78
-
 79
79
-
 80
80
-
 81
81
-
 82
82
-
 83
83
-
 84
84
-
 85
85
-
 86
86
-
 87
87
-
 88
88
-
 89
89
-
 90
90
-
 91
91
-
 92
92
-
 93
93
-
 94
94
-
 95
95
-
 96
96
-
 97
97
-
 98
98
-
 99
99
-
 100
100
-
 101
101
-
 102
102
-
 103
103
-
 104
104
-
 105
105
-
 106
106
-
 107
107
-
 108
108
-
 109
109
-
 110
110
-
 111
111
-
 112
112
-
 113
113
-
 114
114
-
 115
115
-
 116
116
-
 117
117
-
 118
118
-
 119
119
-
 120
120
-
 121
121
-
 122
122
-
 123
123
-
 124
124
-
 125
125
-
 126
126
-
 127
127
-
 128
128
-
 129
129
-
 130
130
-
 131
131
-
 132
132
-
 133
133
-
 134
134
-
 135
135
-
 136
136
-
 137
137
-
 138
138
-
 139
139
-
 140
140
-
 141
141
-
 142
142
-
 143
143
-
 144
144
-
 145
145
-
 146
146
-
 147
147
-
 148
148
-
 149
149
-
 150
150
-
 151
151
-
 152
152
-
 153
153
-
 154
154
-
 155
155
-
 156
156


GE Profile PGE29BYTFS Le manuel du propriétaire
- Catégorie
- Frigos
- Taper
- Le manuel du propriétaire