
COMFORT PLUS - COMFORT PLUS CRYSTAL
MADE IN ITALY
design & production
004277414 - rev.000
IT
MANUALE ISTRUZIONI CASSETTO FRONTALE INSERTI
UK
INSTRUCTIONS MANUAL FOR FRONT DRAWER INSERTS
FR
MANUEL D’INSTRUCTION DES PIÈCES ENCASTRABLES DU TIROIR FRONTAL
DE
BEDIENUNGSANLEITUNG VORDERE SCHUBLADE EINSATZSTÜCKE
ES
MANUAL DE INSTRUCCIONE CAJÓN FRONTAL INSERCIONES

ITALIANO ....................................................................................................................................................................................................... 3
KIT OPZIONALE CARICAMENTO PELLET FRONTALE ........................................................................................................................... 3
DuRANTE IL CARICO uTILIZZARE sEMPRE I guANTI DI PROTEZIONE. .......................................................................................... 3
COMPONENTI DEL KIT ................................................................................................................................................................................ 4
uTILIZZO DEL CAssETTO ........................................................................................................................................................................... 9
uTILIZZARE sEMPRE I guANTI DI PROTEZIONE! .................................................................................................................................. 9
ENgLIsH .......................................................................................................................................................................................................13
OPTIONAL FRONT PELLET LOADINg KIT .............................................................................................................................................13
WHILE LOADINg ALWAys usE sAFETy gLOvEs.................................................................................................................................13
COMPONENTs OF THE KIT ....................................................................................................................................................................... 14
usINg THE TRAy .........................................................................................................................................................................................19
ALWAys usE sAFETy gLOvEs! ...............................................................................................................................................................19
FRANÇAIs ....................................................................................................................................................................................................23
KIT OPTIONNEL POuR LE CHARgEMENT FRONTAL DEs gRANuLÉs ............................................................................................23
DuRANT LE CHARgEMENT TOujOuRs uTILIsER DEs gANTs DE PROTECTION. ........................................................................23
COMPOsANTs Du KIT ...............................................................................................................................................................................24
uTILIsATION Du TIROIR ...........................................................................................................................................................................29
TOujOuRs uTILIsER DEs gANTs DE PROTECTION ! ......................................................................................................................... 29
DEuTsCH .....................................................................................................................................................................................................33
OPTIONALEs KIT ZuM FRONTALEN LADEN DER PELLETs ...............................................................................................................33
WäHREND DEM LADEN IMMER sCHuTZHANDsCHuHE vERWENDEN. ........................................................................................33
KOMPONENTEN DEs KIT .......................................................................................................................................................................... 34
gEbRAuCH DER sCHubLADE .................................................................................................................................................................39
vERWENDEN sIE IMMER sCHuTZHANDsCHuHE! .............................................................................................................................39
EsPAñOL ......................................................................................................................................................................................................43
KIT OPCIONAL CARgA PELLET FRONTAL .............................................................................................................................................43
usE sIEMPRE guANTEs DE PROTECCIóN DuRANTE LA CARgA. ................................................................................................... 43
COMPONENTEs DEL KIT ...........................................................................................................................................................................44
usO DEL CAjóN ......................................................................................................................................................................................... 49
¡usE sIEMPRE guANTEs DE PROTECCIóN! ..........................................................................................................................................49
2

3ITALIANO
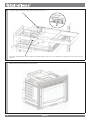
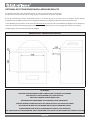
KIT OPZIONALE CARICAMENTO PELLET FRONTALE
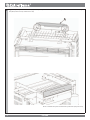
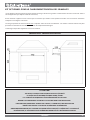
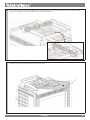
Il kit opzionale di caricamento pellet consente di caricare frontalmente il pellet all’interno del serbatoio senza
dover procedere con l’estrazione dell’inserto (operazione che richiede lo spegnimento della macchina).
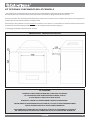
Prima di procedere con l’installazione dell’apparecchio è necessario assicurarsi che la struttura che rivestirà l’inserto garantisca
un foro con le misure minime indicate nelle gure sotto.
Nel immagini sono riportate le misure minime da rispettare tra l’inserto e il rivestimento: tali misure risultano necessarie per
permettere il corretto movimento della cornice e la sua rimozione dalla locazione originaria.
Il montaggio è possibile anche da inserto montato.
COMFORT PLUS - COMFORT PLUS CRYSTAL
ATTENZIONE:
ESEgUIRE LE INdICAZIONI SEMPRE NELLA MASSIMA SICUREZZA!
LA STUFA dEvE ESSERE COMPLETAMENTE FREddA, SPENTA
E SCOLLEgATA LA PRESA ELETTRICA dI RETE.
dURANTE IL CARICO UTILIZZARE SEMPRE I gUANTI dI PROTEZIONE.
PER UN CORRETTO FUNZIONAMENTO dELL’INSERTO, IL CASSETTO dEvE RIMANERE SEMPRE
CHIUSO TRANNE dURANTE LA FASE dI CARICO SERBATOIO.
SI RACCOMANdA dI NON CARICARE UNA qUANTITà dI PELLET SUPERIORE ALLA CAPACITà
dEL SERBATOIO, Ed EvITARE dI FAR CAdERE dEL PELLET ALL’INTERNO dEL PROdOTTO

4 ITALIANO
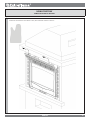
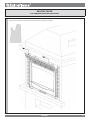
COMPONENTI dEL KIT 009278262-001

1
2
5ITALIANO
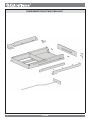
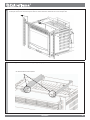
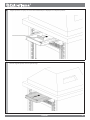
Per l’assemblaggio del kit, togliere la cornice superiore frontale sganciandola dalle 2 cornici laterali; per fare questo, sollevarla per
circa 10 mm e poi tirarla verso di se. Togliere successivamente le cornici laterali svitando le 2 viti per lato.
Fissare i supporti rotaia dx e sx con le le 2 viti (per supporto) già presenti nella macchina.
Viti autolettanti TSP/C 4,8x13

3
6 ITALIANO
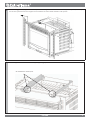
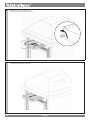
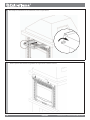
Agganciare poi la parete contenimento (A) pellet alla parete posteriore serbatoio del camino e poi ssarla con 2 viti autolettanti (per
lato) TE 4,2x13 tronche (in dotazione nel kit).
Parete contenimento pellet correttamente posizionata (lato posteriore).

4
5
7ITALIANO
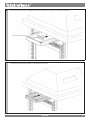
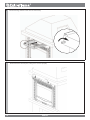
Fissare le rotaie con le viti metriche M5x8 TSP/C in dotazione (3 per rotaia) prestando particolare attenzione al disegno in
quanto le rotaie sono diverse tra loro: una per il lato destro e una per quello sinistro.
Inserire il kit caricamento pellet nelle rotaie appena ssate.

6
7
8 ITALIANO
Fissare la staa di ne corsa dx con 2 viti autolettanti 4.8 x 13.
Ripristinare le cornici laterali e successivamente la cornice superiore.
Fissare la staa di ne corsa sx con 2 viti autolettanti 4.2 x 9.5 tronche: per facilitare l’operazione, sfruttare la feritoia presente nel
supporto rotaia.

A
9ITALIANO
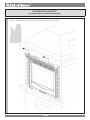
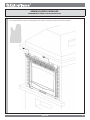
UTILIZZO dEL CASSETTO
UTILIZZARE SEMPRE I gUANTI dI PROTEZIONE!
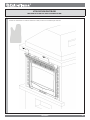
Togliere la cornice frontale. Sollevarla di circa 10 mm, inclinarla verso fuori e poi estrarla.

B
C
10 ITALIANO
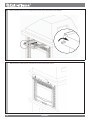
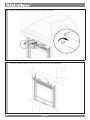
Estrarre il cassetto esterno no alla massima estensione.
Poi girare la bussola in senso antiorario.
Estrarre il cassettino di caricamento, no alla massima estensione.

D
E
11ITALIANO
A caricamento pellet ultimato, chiudere il cassettino di caricamento.
Caricare il pellet sul cassettino e utilizzare il raschietto in dotazione per spingerlo nel serbatoio retrostante.

F
G
12 ITALIANO
Girare la bussola in senso orario. Successivamente chiudere il cassetto esterno.
Riposizionare la cornice frontale assicurandosi di agganciarla in modo corretto.

13ENGLISH
OPTIONAL FRONT PELLET LOADING KIT
The optional front pellet loading kit allows for the pellets to be loaded into the tank from the front without having to remove
the insert (operation that requires switching o the machine).
Before installing the equipment, it is necessary to make sure that the structure that will cover the insert ensures a hole with the
minimum measurements indicated in the gures below.
The pictures show the minimum measurements between the insert and the cover: these measurements are necessary to allow
for the frame to move correctly and to be removed from its original position.
Assembly is possible even with the insert installed.
COmFORT PLUS - COmFORT PLUS CRYSTAL
WARNING:
ALWAYS FOLLOW ThE INSTRUCTIONS IN COmPLETE SAFETY!
ThE STOvE mUST bE COmPLETELY COLD, SWITChED OFF
AND DISCONNECTED FROm ThE ELECTRICAL OUTLET.
WhILE LOADING ALWAYS USE SAFETY GLOvES.
FOR ThE CORRECT OPERATION OF ThE INSERT, ThE TRAY mUST ALWAYS REmAIN
CLOSED EXCEPT FOR WhEN ThE TANK IS bEING LOADED.
WE RECOmmEND NOT LOADING AN AmOUNT OF PELLETS GREATER ThAN ThE CAPACITY
OF ThE TANK, AND AvOID DROPPING PELLETS INSIDE ThE PRODUCT

14 ENGLISH
COmPONENTS OF ThE KIT 009278262-001

1
2
15ENGLISH
To assemble the kit, remove the upper front frame by releasing it from the 2 lateral frames; to do this, lift it about 10 mm and then pull
it towards you. Then remove the lateral frames by unscrewing the 2 screws per side.
Secure the right and left rail supports with the 2 screws (per support) already present in the machine.
Self-threading screws TSP/C 4.8x13

3
16 ENGLISH
Then hook the pallet containment wall (A) to the rear tank wall of the hearth and then secure it in place by means of 2 truncated self-
threading screws (per side) TE 4.2x13 (included in the kit).
Pellet containment wall in correct position (at the back).

4
5
17ENGLISH
Secure the rails using the metric screws M5x8 TSP/C supplied (3 per rail) paying particular attention to the drawing as the rails
are dierent: one for the right side and one for the left side.
Insert the pellet loading kit into the rails.

6
7
18 ENGLISH
Secure the right end bracket using 2 self-threading screws 4.8 x 13.
Ret the lateral frames and then the upper frame.
Secure the left end bracket using 2 truncated self-threading screws 4.2 x 9.5: to facilitate this operation, use the slot in the rail
support.

A
19ENGLISH
USING ThE TRAY
ALWAYS USE SAFETY GLOvES!
Remove the front frame. Lift it about 10 mm, tilt it outwards and then remove it.

B
C
20 ENGLISH
Pull out the external tray all the way.
Then turn the bushing counter-clockwise.
Pull out the loading tray all the way.
La page est en cours de chargement...
La page est en cours de chargement...
La page est en cours de chargement...
La page est en cours de chargement...
La page est en cours de chargement...
La page est en cours de chargement...
La page est en cours de chargement...
La page est en cours de chargement...
La page est en cours de chargement...
La page est en cours de chargement...
La page est en cours de chargement...
La page est en cours de chargement...
La page est en cours de chargement...
La page est en cours de chargement...
La page est en cours de chargement...
La page est en cours de chargement...
La page est en cours de chargement...
La page est en cours de chargement...
La page est en cours de chargement...
La page est en cours de chargement...
La page est en cours de chargement...
La page est en cours de chargement...
La page est en cours de chargement...
La page est en cours de chargement...
La page est en cours de chargement...
La page est en cours de chargement...
La page est en cours de chargement...
La page est en cours de chargement...
La page est en cours de chargement...
La page est en cours de chargement...
La page est en cours de chargement...
La page est en cours de chargement...
-
 1
1
-
 2
2
-
 3
3
-
 4
4
-
 5
5
-
 6
6
-
 7
7
-
 8
8
-
 9
9
-
 10
10
-
 11
11
-
 12
12
-
 13
13
-
 14
14
-
 15
15
-
 16
16
-
 17
17
-
 18
18
-
 19
19
-
 20
20
-
 21
21
-
 22
22
-
 23
23
-
 24
24
-
 25
25
-
 26
26
-
 27
27
-
 28
28
-
 29
29
-
 30
30
-
 31
31
-
 32
32
-
 33
33
-
 34
34
-
 35
35
-
 36
36
-
 37
37
-
 38
38
-
 39
39
-
 40
40
-
 41
41
-
 42
42
-
 43
43
-
 44
44
-
 45
45
-
 46
46
-
 47
47
-
 48
48
-
 49
49
-
 50
50
-
 51
51
-
 52
52


Extraflame Front drawer for Comfort Inserts Le manuel du propriétaire
- Taper
- Le manuel du propriétaire
- Ce manuel convient également à
dans d''autres langues
Documents connexes
-
Extraflame Comfort Idro L80 Le manuel du propriétaire
-
-
-
-
-
-
Extraflame Upper / lateral pellet loading kit for Comfort P70 Air Le manuel du propriétaire
-
Extraflame INSERTO COMFORT P70 AIR Le manuel du propriétaire
-
Autres documents
-
HOMCOM 838-325V00AK Mode d'emploi
-
-
kleankin 834-544V80WT Mode d'emploi
-
-
-
-
EdilKamin PELLBOX SCF Le manuel du propriétaire
-
ADURO H1 Manuel utilisateur
-
-