
NOMAD 1 & 2 PERSON KAYAK
OWNER’S MANUAL
RL3601 / RL3602
®
Please Do Not Hesitate to
Contact Our Consumer Hotline
at
800-759-0977
with Any Questions That May
Arise During Assembly or
Use of This Product!

TABLE OF CONTENTS
ISO 6185 BOAT Type
III
INTRODUCTION ...........................................................................................................
INFLATING THE KAYAK ...............................................................................................
ASSEMBLY INSTRUCTIONS .......................................................................................
OPERATING INSTRUCTIONS .....................................................................................
MAINTENANCE AND STORAGE .................................................................................
TROUBLE SHOOTING ................................................................................................
WARRANTY .................................................................................................................
3
6
7
8
9
10
11
PARTS LIST ..................................................................................................................
4
SAFETY WARNINGS ....................................................................................................
5
2

3
INTRODUCTION
IMPORTANT! PLEASE READ THIS MANUAL CAREFULLY, AND IN ITS
ENTIRETY, BEFORE INFLATING, ASSEMBLING OR USING YOUR KAYAK.
Thank you for purchasing this inflatable kayak.
We work around the clock and around the globe to ensure that our products maintain
the highest possible quality. However, in the rare case of issues during assembly or use
of this product, please contact our Consumer Hotline at 800-759-0977 for immediate
assistance before contacting your retailer. Please read the warranty information at the
back of these assembly instructions for further details.
Familiarize yourself with the features of the kayak and ask for professional training if
you are inexperienced in handling this type of kayak. For your full enjoyment it is
important to follow proper safety procedures and rules of the waterway that apply to all
kayaks. Always check the local weather conditions before taking the kayak out. Do not
let yourself get caught out by currents in tidal inlets, open seas, small channels or
shallow water regions.
Always use good quality materials, of the correct specifications, whenever working
on the kayak. Maintenance work and repairs on the kayak should be done only by
qualified personnel.
IMPORTANT: Keep this manual in a dry place and give it to the new owner if you sell
the kayak.
If this is your first craft, or you are not familiar with this type of kayak, please make sure
that you get handling and operating experience before piloting this kayak. Your dealer,
national sailing federation or yacht club will be pleased to advise you of local sea
schools or competent instructors
.
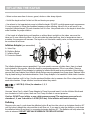
The following illustration will introduce details of the craft, any supplied equipment,
and its systems. Please familiarize yourself with each part of the craft before using it.

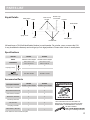
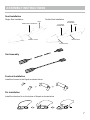
PARTS LIST
4
Spray Cover
Valve
Hook & Loop
for Seat
Seat
Fixed Buckle
Safety Rope
Repair Patch*, RLP1000
1 1
Removable Seat, RLP1001
1 2
EVA Footrest, RLP1002
1 2
Direction Fin, RLP1003
2 2
Foot Pump, RLP1004
1 1
Oar, RLP1005
1 2
Carry Bag, RLP1006
1 1
Item No.
RL3601 RL3602
Model
Nomad 1 Person Kayak Nomad 2 Person Kayak
277 x 77 x 34 cm
109" x 30.5" x 13.5"
Capacity (Person)
1 2
0 0
Max. Load Weight
231 LBS / 105 KG
Kayak Details
Valve
Hook & Loop
for Footrest
Footrest
Safety Rope
Grab Handle
Accessories/Parts
Specifications
Inflated Size
376 x 77 x 34 cm
148" x 30.5" x 13.5"
374 LBS / 170 KG
Description / Part No.
RL3601
Nomad 1 Person Kayak
RL3602
Nomad 2 Person Kayak
*Note: Adhesive is NOT included with patch.
Valve Wrench**, RLP1017
1 1
**The Valve Wrench is to be used ONLY for
tightening or changing the valve when the SUP
is DEFLATED. It should NEVER be used when
the SUP is inflated.
MAY CAUSE SERIOUS INJURY
See Pg. 6 for deflating Instructions.
!
WARNING
DO NOT USE
WHEN INFLATED
All boats have a CIN (Craft Identification Number) or serial number. Do not alter, cover or remove the CIN,
it may invalidate the warranty and could get you into legal problems. Please write it down in a safe place.

THANK YOU!
5
SAFETY WARNINGS
To enhance the enjoyment of your kayak and protect the safety of passengers and operators using
the kayak, always strictly observe the following safety warnings:
• This is not a life saving device. Use only under competent supervision. Never allow diving into or
from this product. Never leave in or near the water when not in use. Never tow with any vehicle. Adult
assembly and operation required.
• An adult should inflate the chambers in numbered order.
• Excessive inflation of the kayak can cause the chambers to burst or cause damage to the welded
seams. Not following the operator’s instructions, which may detail important inflation and assembly
sequences, can cause capsizing and drowning.
• Take a kayaking safety course and get hands-on training from your kayak dealer or local kayaking
authorities. Review all safety requirements regularly. Never navigate alone.
• A Personal Flotation Device (PFD) is required for each passenger. It is especially important that
children and non-swimmers wear a personal flotation device at all times. Children and non-swimmers
may need special instruction in the use of PFD.
• Be careful when stepping or climbing aboard the kayak. Step into the center of the kayak for
maximum stability. Distribute the weight of passengers, gear and accessories evenly so that the
kayak sits even front to back and side and to side. Uneven distribution of persons or loads in the
boat can cause capsizing and drowning.
• Do not use your kayak if you suspect a puncture or leak. It may be unsafe.
• WARNING: BEWARE OF OFFSHORE WINDS AND CURRENTS. These could be unsafe conditions.
• Follow these rules to avoid drowning, paralysis or other serious injuries.
• W
ARNING: It is the responsibility of the kayak operator to identify and obey all local and state laws
pertaining to kayak safety and required safety equipment. Please consult your local authorities to
ensure compliance.
• Do not allow unattended children in the kayak. Always make sure that at least one responsible adult
is supervising all children and those who don’t know how to swim at all times.
• Always maintain the proper kayak safety equipment in an easily accessible place in your kayak.
Indicate clearly emergency phone numbers as well as safety advisories and rules (such as “No
jumping or Diving”)
• The total number of persons and total weight shall not exceed the information printed on the kayak.
Do not exceed the maximum recommended capacities. Exceeding the data given on the capacity
plate can cause capsizing and drowning.

INFLATING THE KAYAK
6
• Select a clean area free of stones, gravel, sticks or other sharp objects.
• Unfold the kayak so that it’s laid out flat and locate your pump.
• Use a hand or foot operated air pump to inflate the kayak. DO NOT use high-pressure air compressors.
It’s very important to follow the numbered sequence when inflating: failure to do so will result in an
improperly inflated kayak. Fill each chamber until it is firm. Use printed ruler on the kayak to check the
main chamber for proper inflation.
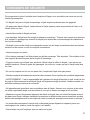
• If the kayak is inflated during cold weather or without direct sunlight on the tubes, care must be
taken not to over-inflate the tubes. As the air inside the tubes heats up, due to temperature rises or
sunshine, the pressure will increase. The kayak is not fitted with a safety valve, so the pressure must
be monitored at all times.
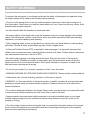
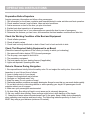
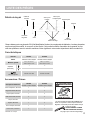
Inflation Adapter (pre-assembled)
A. Valve Cap
B. Deflation Button
C. Inflation Mouth
D. Protective Sheath
The Inflation Adapters are pre-assembled. If you ever need to remove or tighten them, there is a hand
tool included for this purpose. Inflate the kayak by numbered sequence. Do not over inflate. Remove
Valve Cap and attach Pump Adapter by inserting in Inflation Mouth and turning clockwise. After inflating,
remove the Pump Adapter from Inflation Mouth before removing adapter from pump hose. Replace Valve
Cap by hand turning in a clockwise direction. Note: Pump Adapter is not needed to inflate lower chamber.
Fill each chamber until it is firm. Use the enclosed flexible ruler to measure the 10cm rulers printed on
each side chamber. Proper inflation is achieved when they match.
AD
BC
1.45 PSI (0.10 bar) for chamber 1, 2, 3
Inflating
Unscrew Valve Cap A, attach Pump Adapter to Pump Hose and insert it into the Inflation Mouth and
turn clockwise to lock in place, then use Foot Pump to inflate to correct pressure.
Caution: DO NOT over inflate, or use a high-pressure pump! The maximum pressure for air
chambers 1, 2, and 3 should be 1.45 PSI (0.10 bar). Over inflation will lead to bursting.
Deflating
Remove valve cap A, push down the deflation button B and turn the valve in a clockwise direction 90°
until its locked, release the valve and the air will flow out. If you want to stop the deflation, push down
the deflation button B and turn it in a counter-clockwise direction 90°. The deflation will stop when the
valve is released. DO NOT USE VALVE WRENCH TO DEFLATE KAYAK.

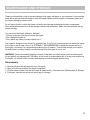
ASSEMBLY INSTRUCTIONS
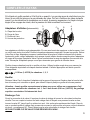
Seat Installation
Single Seat Installation Double Seat Installation
Oar Assembly
Front Seat
Fixed Buckle
Middle Seat Fixed Buckle
Middle Footrest
Valve
Back Seat
Fixed Buckle
Valve
Front Footrest
Back Footrest
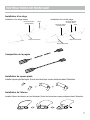
Footrest Installation
Install the footrest in the Kayak as shown below.
Fin Installation
Install the direction fin on the bottom of Kayak as shown below.
7

OPERATING INSTRUCTIONS
8
Preparation Before Departure
Acquire necessary information and inform other passengers:
1. Get information on local laws, regulation and hazards related to water activities and boat operation.
2. Check weather forecast, local currents, tides and wind conditions.
3. Advise someone on land of the time you plan to be back.
4. Explain basic boat operation to all passengers.
5. Be sure that at least one of your passengers can operate the boat in case of emergency.
6. Determine the distance you can cover, and remember that bad weather conditional can alter this.
Check the Working Condition of the Boat and Equipment
1. Check inflation pressure
2. Check all safety valves
3. Check load is evenly distributed on deck of boat: front to back and side to side.
Check That Required Safety Equipment is on Board
(Check the laws and regulations of the country or locality in which you’re boating)
1. One personal flotation device (PFD) for each passenger.
2. The air pump, oars repair kit and tool kit.
3. The mandatory equipment.
4. The boat papers and your boating license (if applicable).
5. Lights are required if operating after dark.
Rules to Observe During Navigation
1. Be responsible and strictly follow the safety rules. Do not neglect the safety rules, this could be
hazardous to your life and lives of others.
2. Learn to keep control of your kayak.
3. Respect local regulations and practices.
4. Navigate on “sheltered water” only.
5. Keep fire away. Do not smoke on board.
6. Remember weather conditions can rapidly deteriorate. Always be sure that you can reach shelter quickly.
7. Do not drink alcohol or take drugs before or while operating your kayak. All passengers should
maintain sobriety on all voyages.
8. Make sure your passengers remain seated.
9. No bow riding. Bow riding is illegal in most areas and is extremely dangerous.
10. Be very careful when landing. Arms and legs might be hurt while hanging off the kayak.
11. Always avoid areas where divers/swimmers are in the water. Keep a sharp lookout especially
when operating near beaches and launch sites. The Alpha flag indicates proximity of divers. You
MUST stay away a good distance (minimum 50 meters).

MAINTENANCE AND STORAGE
9
Clean your kayak after a trip to prevent damage from sand, salt water or sun exposure. Use a garden
hose with a sponge and mild soap to clean the kayak. Make sure the kayak is completely clean and
dry before storing to prevent mold.
Do not use solvents to clean the kayak, solvents may damage material and plastic components.
Store all kayak accessories in a dry storage location with ventilation. Make sure that all parts are dry
before storage.
You can store the kayak inflated or deflated.
• Choose a dry and cool place to store the kayak.
• Don’t hang the kayak up.
• Don’t place any heavy or sharp objects on it.
The kayak is designed to be stored for seasonal use. If you live in a seasonal area in which the kayak
will not be in use all year-round, it is STRONGLY RECOMMENDED to deflate the kayak and dry it
thoroughly, and store it in a protected area during the off-season. This will help extend your kayak’s
life and prevent a safety hazard from developing while the kayak is not in use.
WARNING: Certain household cleaning solvents, chemicals and other liquids (such as battery acid,
oil and petrol) can damage the PVS fabric. In the event of an accidental spill of a corrosive solvent on
the kayak, you should check for leaks and inspect structural integrity before using.
Disassembly
1. Remove all gear and accessories from the kayak
2. Open all valves and deflate the kayak completely.
3. Fold the kayak (make sure that the kayak is clean and dry. See above for “Maintenance & Storage”
4. Put kayak, oars and air pump into carry bag for storage.

TROUBLE SHOOTING
10
If the boat ever appears a bit soft, it might not be because of a leak. First, check to make sure the
valve caps are not loose. If all valves are in good condition, consider if the cause may by temperature
variation: if the boat was inflated during the day when the temperature is higher, i.e. 95º F (35º C),
and the air cooled down overnight, i.e. 77º F (25º C), the pressure on the hull can drop and the boat
will appear soft the next morning.
If the valves and temperature variation are not the reasons, you need to start looking for a leak:
1. Thoroughly check your boat for leaks. Any large leaks should be clearly visible.
2. For smaller leaks, pinpoint the location of the leak by spraying a mild soapy water solution over the
suspicious area. Any leak will produce bubbles.
3. Check valve system for leak.
Repairs
Small holes or punctures can be fixed with the repair patch included with the boat.
1. Find the leak.
2. Thoroughly clean the area surrounding the leak to remove any dirt or grime.
3. Cut a piece of repair material in a round shape, which should be larger than the damaged area.
4. Place the patch over the leak area and lightly trace an outline of the patch.
5. Apply patch adhesive (NOT included) to the underneath side of the patch and around the area to
be repaired. Coat these areas lightly, but completely, with glue.
6. After the glue has dried, place the patch on the damaged area and press firmly.
7. Allow 12 hours for repair to dry. After patch has dried, apply glue around the edges for a complete
seal, and let dry for 4 hours. Adhesive is NOT included.

1-YEAR LIMITED WARRANTY
This product is warranted to the original purchaser to be free from defects in material or workmanship
for a period of one year from the date of the original retail purchase.
This warranty does not cover defects or damage due to improper installation, alteration, accident or
any other event beyond the control of the manufacturer. Defects or damage resulting from misuse,
abuse or negligence will void this warranty. This warranty does not cover scratching or damage that
may result from normal usage.
This product is not intended for institutional or commercial use; the manufacturer does not assume
any liability for such use. Institutional or commercial use will void this warranty.
This warranty is nontransferable and is expressly limited to the repair or replacement of the defective
product. During the warranty period, the manufacturer shall repair or replace defective parts at no
cost to the purchaser. Shipping charges and insurance are not covered and are the responsibility of
the purchaser. Labor charges and related expenses for removal, installation or replacement of the
product or components are not covered under this warranty.
The manufacturer reserves the right to make substitutions to warranty claims if parts are unavailable
or obsolete.
The manufacturer shall not be liable for loss of use of the product or other consequential or incidental
costs, expenses or damages incurred by the consumer of any other use. The user assumes all risk of
injury resulting from the use of this product.
This warranty is expressly in lieu of all other warranties, expressed or implied, including warranties of
. Neither the manufac-
turer nor any of its representatives assumes any other liability in connection with this product.
All warranty claims must be made through the retailer where the product was originally
purchased. A purchase receipt or other proof of date of purchase will be required to process
all warranty claims. The model number and part numbers found within the assembly
instructions will be required when submitting any parts requests or warranty claims.
For further warranty information or inquiries, please call 800-759-0977
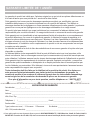
KAYAK WARRANTY REGISTRATION CARD
Date Purchased: _____/_____/_____
Name: _____________________________________________________________________________________
Address: ___________________________________________________________________________________
City/State/Zip: ______________________________________________________________________________
Phone: ( ) ____________________________________ Email: _____________________________________
Purchased from: ____________________________________________________________________________
Model Type (check one): �1 Person �2 Person Purchase Price: ______________________________
HIN/CIN (Serial No.): _________________________________________________________________________
Please ll out this warranty card completely and mail to: BLUE WAVE PRODUCTS, 1745 Wallace Ave. Suite B, St. Charles, IL 60174
IMPORTANT: HIN/CIN serial number, located on manual cover and kayak, must be included to activate warranty.

NOMAD 1 ET 2 PERSONNE MANUEL
DU PROPRIÉTAIRE DE KAYAK
RL3601 / RL3602
®
Contactez
notre
service à la clientèle au
800-759-0977
avec des questions sur le montage
ou l'utilisation de ce produit.

CONTENU
ISO 6185 BATEAU Type
III
PRÉFACE .....................................................................................................................
GONFLER LE KAYAK ................................................................................................
INSTRUCTIONS DE MONTAGE ..................................................................................
INSTRUCTIONS USAGE ..............................................................................................
ENTRETIEN ET CONSERVATION ...............................................................................
SOLUTIONS PROBLÈMES .........................................................................................
GARANTIE ...................................................................................................................
3
6
7
8
9
10
11
LISTE DES PIÈCES ......................................................................................................
4
CONSIGNES DE SÉCURITÉ ........................................................................................
5
2

3
PRÉFACE
IMPORTANT! VEUILLEZ LIRE, EN ENTIER, TOUTES LES INSTRUCTIONS
AVANT DE GONFLER, ASSEMBLER OU D'UTILISER VOTRE KAYAK.
Merci d'avoir acheté ce kayak gonflable.
Nous travaillons autour de l'horloge et du monde entier afin d'assurer que nos produits
maintenir la qualité la plus élevée possible. Toutefois, dans les rares cas de problèmes
lors du montage ou de l'utilisation de ce produit, s'il vous plaît communiquer avec notre
service à la clientèle au 800-759-0977 pour une assistance immédiate avant de
contacter votre revendeur. S'il vous plaît lire les informations de garantie à l'arrière de
ces instructions de montage pour plus de détails.
Familiarisez-vous avec les dispositifs du Kayak et du moteur et demandez de l’aide
d’une personne professionnelle si vous êtes inexpérimenté en manipulant ce type de
Kayak. Pour avoir du plaisir avec ce Kayak il est important suive les procédures de
sûreté et les règles appropriées de la voie d'eau qui appliquent à tous les Kayakx.
Vérifiez toujours les conditions du temps local avant de partir avec le Kayak. Ne vous
laissez pas attraper par des courants dans les admissions de marée, les mers
ouvertes, les petits canaux ou les régions d'eau peu profondes.
Vous devez toujours user les matériaux de bonne qualité et les caractéristiques correctes
toutes les fois que vous faite des travaille au Kayak.
IMPORTANT : Gardez ce manuel dans un endroit sec et en cas de vente du Kayak
passer ce manuel au nouveau propriétaire.
Si c'est votre premier Kayak, ou vous n'êtes pas au courant de ce type de Kayak,
assurez-vous svp que vous obtenez une expérience de manipulation et opérante avant
de conduire ce Kayak. Votre revendeur ou la fédération national de navigation ou club
d'yacht avec plaisir il vont vous donner des conseille quelle sont les écoles locales de
mer ou les instructeurs compétents.
L'illustration suivante présentera des détails du Kayak, de l'équipement fourni ou s'est
adaptée et de ses systèmes. Veuillez être au courant de chaque partie du Kayak avant
de l'employer.

LISTE DES PIÈCES
4
Couvercle
du gicleur
Valve
Velcro pour
le siège
Boucle de
fixation du siège
Câble de
sécurité
Pièce de réparation*, RLP1000
1 1
Sièges démontables, RLP1001
1 2
Repose-pieds, RLP1002
1 2
Ailette directionnelle, RLP1003
2 2
Pompe, RLP1004
1 1
Pagaies, RLP1005
1 2
Sac de transport, RLP1006
1 1
Item No.
RL3601 RL3602
Model
Nomad 1 Person Kayak Nomad 2 Person Kayak
277 x 77 x 34 cm
109" x 30.5" x 13.5"
Capacité
(Personne)
1 2
0 0
Max. Chargement
105 KG / 231 LBS
Détails de kayak
Valve
Velcro pour
le repose-pied
Repose-pied
Câble
de sécurité
Poignée
Accessoires / Pièces
Caractéristiques
Measure gonflée
376 x 77 x 34 cm
148" x 30.5" x 13.5"
170 KG / 374 LBS
Description / Référence
RL3601
Nomad 1 Person Kayak
RL3602
Nomad 2 Person Kayak
Clé de valve**, RLP1017
1 1
**La valve clé doit être utilisé SEULEMENT pour
serrer ou remplacer la valve lorsque le SUP est
dégonflé. Il ne devrait jamais être utilisée lorsque
le SUP est gonflé.
CELA POURRAIT CAUSER
DES BLESSURES GRAVES
Voir page 6 pour nstructions dégonflage.
!
WARNING
DO NOT USE
WHEN INFLATED
Chaque bateau porte une plaquette CIN (Craft Identification Number) et une plaquette de fabrication. Les deux plaquettes
ne peuvent pas être modifié, ou recouvrir ou être éliminé. Cela pourrait entraîner l’annulation de la garantie et vous
créer des problèmes avec les autorités maritimes. Notez également votre numéro séparément dans un endroit sûr.
*Adhésifs non compris

THANK YOU!
5
CONSIGNES DE SÉCURITÉ
Pour augmenter la joie et la sûreté dans l'emploie du Kayak, nous conseillons de suivre les avis de
sûreté rigoureusement.
• Ce Kayak n'est pas un Kayak de sauvetage. Kayak emploie seulement avec les pagaies!!
• Ne pas sautez dans le Kayak. Jamais laisser le Kayak inaperçu dans les proximités de l’eau ou le
laisser flotter sur l’eau.
• Jamais faire tomber le Kayak par terre.
• Les chambres d'air doivent être remplit en séquence numérique. Toujours tenir compte de la pression
d’air indiqué! Le gonflage trop excessif du Kayak peut faire éclater ou endommager les chambres et
les coutures soudées.
• Participé à un cours de sûreté, pour apprendre comme on doit réagir correctement dans les diverses
situations et de comme on doit se comporté correctement.
• Jamais naviguer tout seule.
• Pour chaque passager il doit être présent un gilet de sauvetage. Très important : Des enfants et des
non nageurs devraient toujours porter le gilet de sauvetage.
• Toujours monter sur le Kayak avec prudence. Monter dans le milieu du Kayak – ceci assure une
stabilité maximum. Diviser le poids des passagers, les outils etc. comme ça que le Kayak reste lisse
sur l’eau.
• En cas on suspecte un trou ou une perte d'air, l'emploie du Kayak n'est pas permis.
• Prendre compte de la forteresse du vent et les divers courants. Ceux-ci pu être des conditions dangereuses.
• AVERTISSEMENT : Il est la responsabilité de l'opérateur du Kayak d'identifier et obéir toutes les lois
du pays et d'état concernant la sûreté de Kayak et l'équipement exigé de sûreté. Veuillez consulter vos
autorités locales pour assurer la conformité.
• Ne permettez pas les enfants sans surveillance dans le Kayak. Assurez-vous toujours qu'au moins
un adulte responsable dirige tous les enfants et ceux qui ne savent pas nager à tout moment.
• Maintenez toujours l'équipement approprié de sûreté de Kayak dans un endroit facilement accessi-
ble dans votre Kayak. Indiquez clairement les numéros de téléphone de secours aussi bien que des
bulletins de renseignements et des règles de sûreté (comme par exemple"aucun sauter ou plonger")
• Le nombre de personnes et le poids total ne devraient jamais dépasser la capacité, parce que
surchargés et une violation contre les règles. (voir tabelle)
• Pneumatique on peut l'employer avec les mains ou le pied.

GONFLER LE KAYAK
6
Si le Kayak est gonflé pendant qu’il fait froid à ou quand il n’y a pas des rayon de soleil directe sur les
tubes, le soin doit être pris pour ne pas distendre les tubes. Car l'air à l'intérieur des tubes réchauffe
quand il y a des élévations de température ou du soleil, la pression augmentera. Le Kayak n'est pas
équipé d'une soupape de sûreté, ainsi la pression doit être surveillée à tout moment.
Adaptateur d'inflation (préassemblé)
A. Clapet de la valve
B. Purge de l’aire
C. Entrée de l’aire
D. Housse de protection
Les adaptateurs d'inflation sont préassemblés. Si vous avez besoin de supprimer ou de les serrer, il est
un outil à main inclus à cet effet. Gonfler le kayak par séquence numérotée. Ne pas trop gonfler. Retirer
Valve Cap et fixez Adaptateur pompe en insérant dans la bouche et l'inflation tournant vers la droite.
Après avoir gonflé, retirez l'adaptateur de la pompe à partir inflation bouche avant de retirer l'adaptateur
du tuyau de la pompe. Remplacer Valve Cap en tournant dans le sens des aiguilles d'une montre à la
main. Remarque: Adaptateur pompe ne est pas nécessaire pour gonfler la chambre basse.
Gonflez chaque chambre jusqu’à ce qu’elle soit dure. Utilisez la règle souple clos pour mesurer les
10cm dirigeants imprimées sur chaque chambre latérale. L'inflation appropriée est atteint quand ils
correspondent.
AD
BC
0.10 bar (1.45 PSI) for chambres 1, 2, 3
Gonfler
Dévissez Valve Cap A, branchez l'adaptateur de la pompe à la pompe et l'insérer dans la bouche infla-
tion et tournez pour verrouiller en place, puis utilisez Pompe à pied pour gonfler à la bonne pression.
Attention : Jamais gonflex excessivement et dans aucun cas utiliser un compresseur d'air!
La pression maximale des chambres à air 1, 2 et 3 doit être de 0,10 bar (1,45 PSI). Un gonflage
supérieur va entraîner l’éclatement du fond.
Décharger l’air
Ouvrir le couvercle de la valve A. Imprimer la valve de vidage et tourner la valve dans la direction
réveille. Pour un complet et surtout un facile vidage d'air du Kayak vous pressez la valve en bas,
tourner la valve 90° jusqu'à qu'il se relève tout seul. L'air sortira plus rapidement du Kayak. Dans le
cas on voudrait arrêter le vidage d'air, presser de nouveau la valve en bas et tourner contre la direction
du réveil - nouvellement 90°. Dans l'instant que la valve s'enchaîne le vidage d'air s'arrête.
NE PAS UTILISER CLÉ DE VALVE POUR DÉGONFLER KAYAK.

INSTRUCTIONS DE MONTAGE
Installation d'un siège
Installation d'un siège simple Installation d'un double siège
Composition de la pagaie
Boucle de fixation
du siège avant
Boucle de fixation
du siège milieu
Repose-pied milieu
Valve
Boucle de fixation
du siège arrière
Valve
Repose-pied avant
Repose-pied arrière
Installation de repose-pieds
Installez repose-pied de kayak. Suivre les instructions comme indiquées dans l’illustration.
Installation de l'aileron
Installez l’aileron de direction au fond du kayak. Suivre les instructions comme indiquées dans l’illustration.
7

INSTRUCTIONS USAGE
8
Préparation avant le départ
Procuré vous des informations successive et ensuite passer cette information aux passagers:
1. Informez vous successivement des lois locales, les règles et risques, que sont importante pour
des activités en eau et la navigation d’un bateau.
2. Informez vous quelle sont les prévisions de temps, les courants locaux et les conditions du vent.
3. Informé une personne de confidence qui reste sur terre, de quand vous avez intention de tourner.
4. On explique tous le Basics aux passagers.
5. Assurez vous qu'au moins 1 autre personne sait naviguer le bateau.
6. Jamais sous-estimer vos possibilités physiques et rappelez-vous que vous devez aussi calculer
la route de retour.
Avant de partir on contrôle le bateau et ses accessoires
1. Contrôler la pression d'air
2. Contrôler les valves.
3. Contrôler si le bateau et chargé uniforme.
Contrôler les accessoires de sûreté nécessaire du bateau
(Contrôlées les lois et les règles)
1. 1 Gilet de sauvetage pour chaque passager.
2. La pompe pneumatique, pagaie, kit- réparation.
3. Les dotations obligatoires.
4. Le bateau - Documents et la licence pour naviguer (en cas de nécessité).
5. Si vous voulez naviguer pendant las nuit, vous devez utiliser de l'éclairage.
S’il vous plait suivre les suivant règles pendant la navigation
1. Rester toujours conscient de votre responsabilité et toujours suivre les règles. Les règles de sûreté
doivent être suivi avec beaucoup d'attention. Des petits inattention pourrait vous mettre en danger et
aussi les autres.
2. Apprenez vous de tenir toujours le Kayak sous contrôle dans chaque situation.
3. Respecter les règles locales et les normes.
4. Naviguer seulement en eaux sûres.
5. Rappelez-vous que les conditions du temps peuvent changer dans un instant. Prenez toujours
connaissance de la zone, pour assurer que vous trouvées et vous rejoigne une place sûre.
6. Jamais consommer des alcooliques ou drogues, avant d'utiliser un Kayak. Tous les passagers
doivent rester aussi sobre pendant un voyage en Kayak.
7. Évitées feu ! Fumer prohibé !
8. Les passagers doivent rester assis pendant le voyage.
9. Naviguer en slalom n'est pas permis.
10. On doit être très attentif quand on a intention d'aborder. Les jambes et les bras peuvent être
blessé si on les laisse pendre à l'extérieure du Kayak.
11. Évitées des lieux, ou ils se trouvent des nageurs ou des plongeurs. Vous devez rester très attentif.
Dans les proximité d'une plage il est très important rester attentif. Le drapeau Alpha est le signe que
dans cette zone il y a beaucoup des plongeurs. MAINTENIR TOUJOURS LA DISTANCE (Min. 50 mètres)

ENTRETIEN ET CONSERVATION
9
Chaque fois que vous avez utilisé le bateau, vous devez le nettoyer pour éviter des dommages
causés par le sable, l'eau salée et le soleil. Pour le nettoyer vous pouvez utiliser le tube flexible d’irri-
gation, une éponge et un savon léger. Le bateau doit être complètement sec avant de le conserver,
pour éviter la formation de moisissure.
N'employez pas les dissolvants pour nettoyer le bateau, les dissolvants peuvent endommager les
matériels ou les components en plastique dans le système. Stockez tous les accessoires de bateau
dans un endroit sec de stockage avec la ventilation. Assurez-vous que toutes les pièces sont sèches
avant stockage.
Vous pouvez conserver le bateau gonflé ou dégonflé.
• On conseille de conserver le bateau seulement dans une place sèche et frais avec des tempéra-
tures plus.
• JAMAIS pendre le bateau.
• Vous ne posez pas des objets coupants ou lourds sur ou dans le bateau.
Le bateau est conçu pour être tenue en dépôt à la fin de saison. Si vous vivez dans une zone saisonnière
dans lequel le bateau ne sera pas en service pendant toute l'année, ON VOUS RECOMMANDE
VIVEMENT de dégonfler le bateau et de le sécher complètement, et le stocké dans un secteur
protégé pour la fine de saison. Ceci aidera à prolonger le plaisir de votre bateau et à empêcher les
risques de sécurité qui se peuvent développer alors que le bateau n'est pas en service.
AVERTISSEMENT: Certains solvants de nettoyage ménagers, les produits chimiques et autres
liquides (tels que l'acide de la batterie, de l'huile et de l'essence) peuvent endommager le tissu de
PVS. Dans le cas d'un déversement accidentel d'un solvant corrosif sur le kayak, vous devriez
vérifier les fuites et inspecter l'intégrité structurelle avant de l'utiliser.
Démontage
1. Enlevez tous les accessoires du bateau.
2. Vous ouvrez toutes les valves pour le vidage d'air du bateau.
3. Pliées le bateau. (Assurez-vous que le bateau est propre et sec. Voyez le chapitre ci-dessus
d'entretien et de stockage).
4. Bateau, pompe pneumatique, pagaie etc. mettre dans le sac de transport.
La page est en cours de chargement...
La page est en cours de chargement...
-
 1
1
-
 2
2
-
 3
3
-
 4
4
-
 5
5
-
 6
6
-
 7
7
-
 8
8
-
 9
9
-
 10
10
-
 11
11
-
 12
12
-
 13
13
-
 14
14
-
 15
15
-
 16
16
-
 17
17
-
 18
18
-
 19
19
-
 20
20
-
 21
21
-
 22
22


Blue Wave RL3601 Le manuel du propriétaire
- Taper
- Le manuel du propriétaire
- Ce manuel convient également à
dans d''autres langues
- English: Blue Wave RL3601 Owner's manual
Documents connexes
Autres documents
-
Sevylor SV320S-HF Le manuel du propriétaire
-
 Airhead AHIB-4 Le manuel du propriétaire
-
Aquaglide BLACKFOOT HB ANGLER SL Le manuel du propriétaire
-
Classic Accessories 20-335-150801-RT Mode d'emploi
-
Bestway 65077E Le manuel du propriétaire
-
Bestway 65132E Manuel utilisateur
-
Coleman Pointer Kayak Le manuel du propriétaire
-
-
Bestway 65131E Mode d'emploi
-
Pelican SENTINEL 120XR ANGLER Le manuel du propriétaire
