Danby DUF138E1WDD Le manuel du propriétaire
- Catégorie
- Congélateurs
- Taper
- Le manuel du propriétaire

OWNER’S USE AND CARE GUIDE
GUIDE D’UTILISATION ET D'ENTRETIEN
GUÍA DEL PROPRIETARIO DE UTILIZACION Y CUIDADO
MODEL • MODÈLE • MODELO
DANBY PRODUCTS LIMITED, ONTARIO, CANADA N1H 6Z9
DANBY PRODUCTS INC., FINDLAY, OHIO, USA 45840
2016.11.02
DUF138E1WDD
UPRIGHT FREEZER
CONGÉLATEUR VERTICAL
CONGELADOR VERTICAL

CONTENTS
TABLE DES MATIÈRES
ÍNDICE
UPRIGHT FREEZER
Owner’s Use and Care Guide..........................................1-10
• Welcome
• Safety Instructions
• Installation
• Operation
• Care and Maintenance
• Troubleshooting
• Waranty
CONGÉLATEUR VERTICAL
Guide d’utilisation et soin de propriètaire...................11-20
• Bienvenue
• Consignes de sécurité importantes
• Instructions d’installation
• Consignes d’utilisation
• Soins et entretien
• Dépannage
• Garantie
CONGELADOR VERTICAL
Guía de utilización y cuidado para el propietario.......21-30
• Bienvenido
• Instrucciones de seguridad importantes
• Instrucciones de instalacón
• Instrucciones operadoras
• Limpieza y mantenimiento
• Solución sugerida
• Garantia
CAUTION:
Read and follow all safety rules and oper-
ating instructions before fi rst use of this
product.
PRÉCAUTION :
Veuillez lire attentivement les consignes
de sécurité et les instructions d’utilisation
avant l’utilisation initiale de ce produit.
PRECAUCIÓN:
Lea y observe todas las reglas de seguri-
dad y las instrucciones de operación antes
de usar este producto por primera vez.
Model • Modèle • Modelo
DUF138E1WDD

1
Welcome
Welcome to the Danby family. We are proud of our quality products, and we believe in dependable service, like you will
find in this Owner’s Use and Care Guide, and like you will receive from our friendly customer service department. Best
of all, you will experience these values each and every time you use your Danby appliance. That is important, because
your new appliance will be a part of your family for a long time.
Note the information below; you will need this information to obtain service under warranty.
To receive service, you must provide the original receipt.
Model Number:
Serial Number:
Date of Purchase:
NEED HELP?
Before you call for service, here are a few things you can do to help
us serve you better:
Read this Owner’s Use and Care Guide:
It contains instructions to help you use and maintain your
appliance properly.
If you received a damaged appliance:
Immediately contact the retailer (or builder) that sold you the
appliance.
Save time and money:
Check the Troubleshooting section at the end of the guide before call-
ing. This section helps you solve common problems that may occur.
If you do need service, you can relax, knowing help is only a phone
call away.
1-800-26-
(1-800-263-2629)

Important Safety Information
READ AND FOLLOW ALL SAFETY INSTRUCTIONS
This appliance must be grounded. In the event of an electrical short circuit, grounding reduces the risk of
electrical shock by providing an escape wire for the electrical current.
ELECTRICAL REQUIREMENTS
WARNING
ELECTRICAL RATING: The serial rating plate indicates the
voltage and frequency the freezer is designed for.
Due to possible variations in line voltage (caused by overloading of circuits), it is advisable to install a separate fuse cir-
cuit from the meter panel. This will help to eliminate current fl uctuation which might cause motor trouble.
IMPORTANT WARNING
An empty freezer is a very dangerous attraction to children. Remove either the gasket or lid from
unused appliances, or take some other action that will guarantee it harmless.
DANGER: Risk of child entrapment. Before you throw away your old freezer:
• Take off doors.
• Leave the shelves in place so that children may not easily climb in.
DON’T WAIT! DO IT NOW!
WARNING! EXPLOSION HAZARD!
Risk of fi re or explosion due to puncturing of refrigerant tubing. Do not use sharp objects to aid in
defrost. Please handle with care. Keep fl ammable materials and vapors such as gasoline away from
the freezer. Use nonfl ammable cleaner.
Disposal of this unit should be in accordance with federal and local regulations.
Please ensure that component parts shall be replaced with like components and that servicing shall be done by
factory authorized service personnel, so as to minimize the risk of possible ignition due to incorrect parts or
improper service.
GROUNDING INSTRUCTIONS
This appliance is equipped with a cord having a grounding wire with a grounding plug. The plug must be plugged into an
outlet that is properly installed and grounded.
WARNING - Improper use of the grounding plug can result in a risk of electric shock. Consult a qualifi ed electrician or
service agent if the grounding instructions are not completely understood, or if doubt exists as to whether the appliance is
properly grounded.
DO NOT USE AN EXTENSION CORD
Use an exclusive 115V wall outlet. Do not connect your freezer to extension cords or together with another appliance in
the same wall outlet. Do not splice the cord.
SAVE THESE INSTRUCTIONS!
2

3
Important Safety Information
READ AND FOLLOW ALL SAFETY INSTRUCTIONS
WARNING
• Keep ventilation openings, in the appliance enclosure
or in the built-in structure, clear of obstruction.
• Do not use mechanical devices or other means to
accelerate the defrosting process, other than those
recommended by the manufacturer.
• Do not damage the refrigerant circuit.
• Do not use electrical appliances inside the food stor-
age compartments of the appliance, unless they are of
the type recommended by the manufacturer.
SAVE THESE INSTRUCTIONS!
• This appliance is not intended for use by persons (including children) whose physical, sensory or mental capabilities
may be different or reduced, or who lack experience or knowledge, unless such persons receive supervision or train-
ing to operate the appliance by a person responsible for their safety.
• Children should be supervised to ensure that they do not play with the appliance.
• Do not use extension cords or ungrounded (two prongs) adapters.
• If the supply cord is damaged, it must be replaced by the manufacturer, its service agent or similar qualifi ed person in
order to avoid hazard.
This unit is 71 cm (27.95 inches) wide by 155 cm (61.02 inches) high by 75 cm (29.53 inches) deep, please make sure
that you leave the minimum amount of space between the unit and all surrounding walls and vents (see location section).
Do not cover any of the ventilation openings with any material as the unit needs adequate space to breathe.

Installation Instructions
Remove exterior and interior packaging, wipe the outside thoroughly with a soft dry cloth and the inside with a wet, luke-
warm cloth. Avoid placing the unit in a narrow recess or near any heat source, direct sunlight, or moisture. Let air circulate
freely around the unit. Keep the rear of the unit 10.6 cm / 4 inches away from the wall, ensure there is 20.3 cm / 8 inches
of clearance between each side and the wall and ensure there is 30.5 cm / 12 inches of clearance between the top of the
unit and any cabinets or ceilings. This will allow proper air circulation.
1. Locate the freezer in such a manner that extension cords are not necessary.
2. Select a location with consistent year round temperatures. We do not recommend operating the freezer when sur-
rounding air temperature is below 5°C (41°F), though it will not harm the freezer to stand in any temperature below
5°C (41°F), provided the temperature control is set to avoid running the unit. In order to keep operating cost down, do
not place freezer near a stove, furnace, heat register or in direct sunlight. Avoid placing the unit in a damp or moist
area, such as basements.
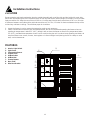
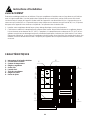
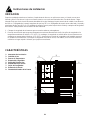
LOCATION
1. Interior Light Switch
2. Light Cover
3. Temperature Sensor
4. Freezer Shelf
5. Airfl ow Outlet
6. Airfl ow Inlet
7. Freezer Drawer
8. Door Shelf
9. Wire Door Basket
FEATURES
4
ĸ
ķ
Ĺ
ĺ
Ļ
ļ
Ľ
ľ
Ŀ

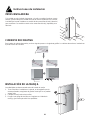
Installation Instructions
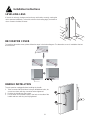
If the unit is not level, the doors and seal may not function correctly, causing the
unit to operate ineffi ciently. To level the unit turn the levelling leg(s) clockwise to
rise or counter-clockwise to lower.
LEVELLING LEGS
To install the decorative cover, please follow the steps in the below diagram. The decorative cover is installed at the bot-
tom of the unit.
DECORATIVE COVER
ķ
ĸ
The unit must be unplugged before installing the handle.
1. Take 2 screws and install them in the pre-drilled door holes, be
sure to turn them until they cannot be further tightened.
2. Position the handle over the screws.
3. Put the other set of handle screws in the hole on the side of the
handle and turn until they are fully tightened.
HANDLE INSTALLTION
ķ
ķ
ĸ
ĸ
Ĺ
Ĺ
5

Operating Instructions
The freezer is ready to operate as received, when connected to the power supply. After connecting to the power supply,
close the door and allow the freezer to operate. The unit will run from 1 to 2 hours (possibly longer, depending on condi-
tions) before operating temperature is reached. It will then start and stop (cycle) at fairly regular intervals. It is recommend-
ed that food not be placed in the freezer until you are satisfi ed that it is operating (cycling) regularly and no fi nal adjust-
ments are necessary (after running for 24 hours).
Once your freezer is starting and stopping (cycling) regularly, it is ready to freeze and store foods. The proper food
storage temperature is -18°C (0°F). Do not operate freezer at temperatures below -19°C (-3°F), as this does not improve
food preservation and only results in longer unit (cycle) running time. It is not advisable to freeze more than 1-1.4 kg / 2-3
pounds of food, per litre squared / cubic foot, in any 24 hour period. It will take 15 or more hours of running to freeze this
amount of food.
When adding fresh, unfrozen food packages, store them against the walls. The sensing bulb of the thermostat is fastened
to the liner wall on the “insulation side” of the freezer. In view of the value of the contents of your freezer, it is advisable to
inspect contents and check freezer operation regularly.
Note: This unit is not designed for outside installation, including installation anywhere that is not temperature controlled
(garages, porches, carports, etc.). Before connecting the appliance to an electrical power supply, let it stand 6 hours. This
will reduce the possibility of malfunctions in the cooling system due to transport handling.
STARTING THE FREEZER
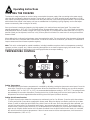
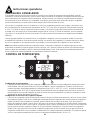
TEMPERATURE CONTROL
6
Setting Temperature:
• The temperature of the freezer compartment is controlled by adjusting / setting the thermostat control panel. Press the
arrow keys (3 and 8) to set / adjust the temperature. When the temperature icon is fl ashing, you can set the tempera-
ture between -16°C to -24°C (3°F to -11°F), the recommended temperature setting is -18°C (0°F). The setting will take
approximately 10 seconds to take effect. Pressing the lock key (4) will allow you to lock the control panel so that the
temperature cannot be changed without fi rst unlocking the control panel (child lock function).
Setting Quick Freeze Function:
• The quick freeze function allows the compressor to continuously run for 6 or 48 hours. Press the quick freeze button
(7) twice and hold for 3 seconds to engage quick freeze mode. When the display icon fl ashes, press the up or down
arrows (3 and 8) to adjust the quick freeze time, either 6 hours or 48 hours. Once the setting has been selected, you
can lock the control panel. For household “quick freeze,” we recommend setting it to 6 hours. To cancel the quick
freeze function, press the quick freeze key (7), the temperature icon will display -24, press the quick freeze button (7)
again to exit, the quick freeze function has now been cancelled. Once the quick freeze function ends or is cancelled,
the unit will revert to the last set temperature. If the unit cannot revert to the last set temperature, it will revert to the
default temperature (-18°C or 0°F).
1
2
3
4
5
6
7
8

TEMPERATURE CONTROL
Switching Between °C and °F:
• To switch between °C and °F, press the °C/°F key (6).
Freezer Alarm:
• Press the alarm button (5) to stop the alarm from sounding. The alarm will sound when the freezer has reached a
warmer temperature.
Operating Instructions
SOME IMPORTANT RULES FOR THE CORRECT USE OF
THE FREEZER
• Never place hot foods in the freezer.
• Never place spoiled foods in the unit.
• Don’t overload the unit.
• Don’t open the lid unless necessary.
• Should the freezer be stored without use for long periods, it
is suggested, after careful cleaning, to leave the lid open to
allow the air to circulate inside the unit in order to avoid the
possibility of condensation, mold or odors.
Care and Maintenance
DEFROSTING
This unit is equipped with a “Frost Free” type cooling system, which means you never have to defrost the freezer compart-
ment. Defrosting is done automatically by means of a defrost heating element and a defrost timer factory-programmed to
operate / cycle. The defrost water is routed into a defrost pan located directly above the compressor, where it then evapo-
rates.
CLEANING
Upon installation of your new appliance, it is recommended that it be cleaned thoroughly.
1. After removing the food and placing it somewhere where it will not thaw, turn the control to “OFF,” and unplug the unit.
2. Using a mild detergent and warm water solution, use a clean damp cloth or sponge to wipe the inside of the unit.
3. Do not use abrasive or harsh cleaners. Hand wash, rinse and dry all surfaces thoroughly. Do not use cleaning waxes,
detergents, bleach etc. on the unit. Never use paper towel, window spray, scouring cleansers or fl ammable cleaners
as they can scratch and damage the unit. Clean with a damp cloth and dry with a soft clean dry cloth.
7
If you cannot adjust the temperature of the freezer after plugging the unit in you must fi rst unlock the display by pressing
and holding the lock button until the unit chimes.
To lock your desired temperature settings press and hold the lock button until the unit chimes.
To unlock and adjust the current temperature settings press and hold the lock button until the unit chimes.
Note: 10-15 seconds after closing the freezer door the temperature will no longer be displayed. The temperature will reap-
pear on the display if the door is opened or if you make a change to the current settings.
DISPLAY LOCK AND UNLOCK

Care and Maintenance
VACATION TIME
For short vacation periods, leave the control knob at its normal setting. During longer absences,
1. remove all food,
2. disconnect power cord from electrical outlet,
3. defrost and clean the freezer thoroughly,
4. leave lid open to avoid possible formations of condensation, mold or odors.
ELECTRICAL AND MECHANICAL FAILURE
In the event of mechanical or electrical failure of the freezer, contact a service agent immediately and give complete infor-
mation of your freezer, the model number and serial number. These are shown on the serial plate located on the exterior
(rear) cabinet wall.
POWER FAILURE
Most power failures are corrected within an hour or two and will not affect your freezer temperatures. However, you should
minimize the number of lid openings while the power is off. During power failures of longer duration, take steps to protect
your food.
IF YOU MOVE
Remove or securely fasten down all loose items inside the unit. To avoid damaging the leveling legs, turn them all the way
into the base.
8

9
Troubleshooting
Occasionally, a minor problem may arise, and a service call may not be necessary - use this troubleshooting guide for
a possible solution. If the unit continues to operate improperly, call an authorized service depot or Danby’s Toll Free
Number for assistance.
Tel: 1-800-26- (1-800-263-2629)
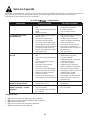
PROBLEM POSSIBLE CAUSE SOLUTION
Does not work • No power to unit
• Power cord is unplugged
• Wrong voltage is being used
• Check connection of power
cord to power source
• Plug in unit
• Use proper voltage
Freezer runs continuously • Temperature set too low
(cold)
• Lid is not closed
• Hot food was inserted
• Lid opened too long or too
often
• Close proximity to heat
source or direct sunlight
• Quick Freeze function is set
• Set temperature control to
warmer setting
• Close lid securely
• Be sure food is at room tem-
perature before inserting
• Minimize lid openings / dura-
tion
• Do not place unit close to
heat sources or direct sun-
light
• This is normal
Internal temperature not cold
enough
• No power to unit
• Power cord is unplugged
• Temperature set too high
(warm)
• Lid is not closed
• Hot food was inserted
• Lid opened too long or too
often
• Air fl ow obstruction
• Wrong voltage is being used.
• Close proximity to heat
source or direct sunlight
• Check connection of power
cord to power source
• Plug in unit
• Check setting and adjust as
needed
• Close lid securely
• Be sure that food is at room
temperature
• Minimize lid openings / dura-
tion
• Allow room for air to circulate
around unit
• Use proper voltage
• Do not place unit close to
heat sources or direct sun-
light
Temperature inside the unit is
too cold
• The temperature control is set
too cold
• Adjust the temperature set-
ting
Noises coming from the unit
(popping, cracking, gurgling)
• Parts are expanding and
contracting.
• Refrigerant is circulating in
the system
• This is normal
• This is normal
Error Codes:
• E2: Freezer temperature sensor failure.
• E5: Freezer defrosting sensor failure.
• E6: Communication failure.
• E7: Ambient temperature sensor failure.
• E9: Freezer high temperature.

LIMITED IN-HOME APPLIANCE WARRANTY
This quality product is warranted to be free from manufacturer’s defects in material and workmanship, provided that the unit is used under the normal operating
conditions intended by the manufacturer.
This warranty is available only to the person to whom the unit was originally sold by Danby Products Limited (Canada) or Danby Products Inc. (U.S.A.) (hereafter
“Danby”) or by an authorized distributor of Danby, and is non-transferable.
TERMS OF WARRANTY
Plastic parts, are warranted for thirty (30) days only from purchase date, with no extensions provided.
First Year
During the rst twelve (12) months, any functional parts of this product found to be defective, will be repaired or replaced, at warrantor’s
option, at no charge to the ORIGINAL purchaser.
To obtain
Danby reserves the right to limit the boundaries of “In Home Service” to the proximity of an Authorized Service Depot. Any app liance
Service
requiring service outside the limited boundaries of “In Home Service” , it will be the consumer’s responsibility to transport the appliance (at
their own expense) to the original retailer (point of purchase) or a service depot for repair. See “Boundaries of In Home Serv ice” below.
Contact your dealer from whom your unit was purchased, or contact your nearest authorized Danby service depot, where service
must be performed by a qualied service technician.
If service is performed on the units by anyone other than an authorized service depot, or the unit is used for commercial appli cation, all
obligations of Danby under this warranty shall be void.
Boundaries of
If the appliance is installed in a location that is 100 kilometers (62 miles) or more from the nearest service center your unit must be
In Home Service
delivered to the nearest authorized Danby Service Depot, as service must only be performed by a technician qualied and certif ied for
warranty service by Danby. Transportation charges to and from the service location are not protected by this warranty and are t he
responsibility of the purchaser.
Nothing within this warranty shall imply that Danby will be responsible or liable for any spoilage or damage to food or other c ontents of this appliance, whether due
to any defect of the appliance, or its use, whether proper or improper.
EXCLUSIONS
Save as herein provided, Danby, there are no other warranties, conditions, representations or guarantees, express or implied, m ade or intended by Danby or its
authorized distributors and all other warranties, conditions, representations or guarantees, including any warranties, conditio ns, representations or guarantees
under any Sale of Goods Act or like legislation or statue is hereby expressly excluded. Save as herein provided, Danby shall no t be responsible for any damages
to persons or property, including the unit itself, howsoever caused or any consequential damages arising from the malfunction o f the unit and by the purchase of
the unit, the purchaser does hereby agree to indemnify and hold harmless Danby from any claim for damages to persons or propert y caused by the unit.
GENERAL PROVISIONS
No warranty or insurance herein contained or set out shall apply when damage or repair is caused by any of the following:
1) Power failure.
2) Damage in transit or when moving the appliance.
3) Improper power supply such as low voltage, defective house wiring or inadequate fuses.
4) Accident, alteration, abuse or misuse of the appliance such as inadequate air circulation in the room or abnormal operating con ditions
(extremely high or low room temperature).
5) Use for commercial or industrial purposes (ie. If the appliance is not installed in a domestic residence).
6) Fire, water damage, theft, war, riot, hostility, acts of God such as hurricanes, oods etc.
7) Service calls resulting in customer education.
8) Improper Installation (ie. Building-in of a free standing appliance or using an appliance outdoors that is not approved for out door application).
Proof of purchase date will be required for warranty claims; so, please retain bills of sale. In the event warranty service is required, present this document to our
AUTHORIZED SERVICE DEPOT.
Danby Products Limited
PO Box 1778, Guelph, Ontario, Canada N1H 6Z9
Telephone: (519) 837-0920 FAX: (519) 837-0449
Danby Products Inc.
PO Box 669, Findlay, Ohio, U.S.A. 45840
Telephone: (419) 425-8627 FAX: (419) 425-8629
04/09
1-800-263-2629
Warranty Service
In-home
If the appliance is installed in a location that is 100 kilometres (62 miles) or more from the nearest
service centre your unit must be delivered to the nearest authorized Danby Service Depot, as service
must only be performed by a technician qualified and certified for warranty service by Danby. Transpor-
tation charges to and from the service location are not protected by this warranty and are the responsi-
bility of the purchaser.
During the first eighteen (18) months, any functional parts of this product found to be defective, will be
repaired or replaced, at warrantor’s option, at no charge to the ORIGINAL purchaser.
Danby reserves the right to limit the boundaries of “In Home Service” to the proximity of an Authorized
Service Depot. Any appliance requiring service outside the limited boundaries of “In Home Service”, it
will be the consumer’s responsibility to transport the appliance (at their own expense) to the original
retailer (point of purchase) or a service depot for repair. See “Boundaries of In Home Service” below.
Contact your dealer from whom your unit was purchased, or contact your nearest authorized Danby
service depot, where service must be performed by a qualified service technician. If service is performed
on the unit by anyone other than an authorized service depot, or the unit is used for commercial
application, all obligations of Danby under this warranty shall be void.
First 18 months
To obtain
service
Boundaries of
In Home Service
LIMITED IN-HOME APPLIANCE WARRANTY
This quality product is warranted to be free from manufacturer’s defects in material and workmanship, provided that the unit is
used under the normal operating conditions intended by the manufacturer.
This warranty is available only to the person to whom the unit was originally sold by Danby Products Limited (Canada) or
Danby Products Inc. (U.S.A.) (hereafter “Danby”) or by an authorized distributor of Danby, and is non-transferable.
TERMS OF WARRANTY
Plastic parts, are warranted for thirty (30) days only from purchase date, with no extensions provided.
Nothing within this warranty shall imply that Danby will be responsible or liable for any spoilage or damage to food or other
contents of this appliance, whether due to any defect of the appliance, or its use, whether proper or improper.
EXCLUSIONS
Save as herein provided, by Danby, there are no other warranties, conditions, representations or guarantees, express or
implied, made or intended by Danby or its authorized distributors and all other warranties, conditions, representations or
guarantees, including any warranties, conditions, representations or guarantees under any Sale of Goods Act or like legislation
or statute is hereby expressly excluded. Save as herein provided, Danby shall not be responsible for any damages to persons
or property, including the unit itself, howsoever caused or any consequential damages arising from the malfunction of the unit
and by the purchase of the unit, the purchaser does hereby agree to indemnify and hold harmless Danby from any claim for
damages to persons or property caused by the unit.
GENERAL PROVISIONS
No warranty or insurance herein contained or set out shall apply when damage or repair is caused by any of the following:
1) Power failure.
2) Damage in transit or when moving the appliance.
3) Improper power supply such as low voltage, defective house wiring or inadequate fuses.
4) Accident, alteration, abuse or misuse of the appliance such as inadequate air circulation in the room or abnormal operating
conditions (extremely high or low room temperature).
5) Use for commercial or industrial purposes (i.e., If the appliance is not installed in a domestic residence).
6) Fire, water damage, theft, war, riot, hostility, acts of God such as hurricanes, floods etc.
7) Service calls resulting in customer education.
8) Improper Installation (i.e., Building-in of a free standing appliance or using an appliance outdoors that is not approved for
outdoor application).
Proof of purchase date will be required for warranty claims; so, please retain bills of sale. In the event warranty service is
required, present this document to our AUTHORIZED SERVICE DEPOT.
Warranty Service
In-home
Danby Products Limited
PO Box 1778, Guelph, Ontario, Canada N1H 6Z9
Telephone: (519) 837-0920 FAX: (519) 837-0449
Danby Products Inc.
PO Box 669, Findlay, Ohio, U.S.A. 45840
Telephone: (419) 425-8627 FAX: (419) 425-8629
1-800-263-2629
07/14

11
Bienvenue
Bienvenue dans la famille Danby. Nous sommes fiers de la qualité de nos produits et nous croyons fermement au serv-
ice par une assistance fiable. Vous le découvrirez à la lecture de ce guide facile d’utilisation et vous en aurez la confir-
mation par notre service d’assistance à la clientèle. Mais ce qui est encore mieux, vous pourrez bénéficier de ces avan-
tages à chaque utilisation de votre appareil. Ceci est important parce que votre nouvel appareil fera partie de votre
famille pour longtemps.
Veuillez noter les informations ci-dessous; ces renseignements seront nécessaires si votre appareil a besoin
d’entretien ou pour les demandes de renseignements généraux. Pour bénéficier d’une opération de mainte-
nance ou de dépannage, le reçu original sera exigé.
Numéro de modèle :
Numéro de serie :
Date d’achat :
BESOIN D’ASSISTANCE ?
Veuillez trouver quelques conseils avant de faire appel à nos
services, cela nous aidera à mieux vous servir :
Lisez ce guide :
Il comprend des instructions pour l’utilisation et l’entretien
adapté de votre appareil.
Si votre nouvel appareil est endommagé :
Contactez immédiatement le revendeur (ou le fabricant).
Gagnez du temps et de l’argent :
Avant de faire appel à nos services, consultez à nouveau
la section « Dépannage ». Cette section vous aidera à
résoudre des problèmes courants.
Si une réparation est nécessaire, ne vous inquiétez pas, la
solution est au bout du fil.
1-800-26-
(1-800-263-2629)

Consignes de sécurité importantes
PRENDRE CONNAISSANCE DE TOUTES LES INFORMATIONS
RELATIVES À LA SÉCURITÉ AVANT D’UTILISER LE PRODUIT
Cet appareil doit être mis à la terre. En cas de courtcircuit, la mise à la terre réduit les risques de décharge
électrique en fournissant un échappatoire au courant électrique. L’appareil est muni d’un cordon électrique
comprenant un fi l de mise à la terre et une fi che de terre.
CONDITIONS ÉLECTRIQUES
ATTENTION
ÉNERGIÉ ÉLECTRIQUE : Le voltage et la fréquence requis pour
ce congélateur sont indiqués sur la plaque d’identifi cation.
Dû aux variations possibles sur la ligne de voltage (causé par une surcharge des circuits) il est recommandé d’installer
un circuit séparé avec fusibles à partir du panneau compteur. Ceci aidera à éliminer les fl uctuations du courant qui peu-
vent endommager le moteur.
AVERTISSEMENT IMPORTANT!
Un congélateur vide peut représenter un attrait dangereux aux enfants. Retirer le joint d’étanchéité, les loquets,
les couvercles ou portes des appareils ménagers inutilisés, ou prenez d’autres mesures qui assureront que
l’appareil ne posera aucun danger.
DANGER : Risque de piéger un enfant. Avant de mettre votre vieux congélateur ou réfrigérateur au rebut :
• Enlever les portes.
• Laisser les tablettes en place afi n que les enfants ne puissent pas facilement y entrer.
N’ATTENDEZ PAS! FAITES-LE IMMÉDIATEMENT!
AVERTISSEMENT! DANGER D’EXPLOSION!
Risque d’incendie ou d’explosion causé par la perforation de tuyaux frigorigènes. Ne jamais utiliser un objet
pointu pour assister au dégel. Manipuler avec soin. Garder les matériaux et vapeurs infl ammables comme de
l’essence loin du congélateur. Utiliser un nettoyant ininfl ammable.
La mise au rebut de cet item doit être faite selon les lois locales et fédérales.
Veuillez vous assurer que les pièces de rechange sont remplacées par des pièces similaires, et que l’entretien
soit effectué par un technicien agréé par l’usine, afi n réduire le risque d’incendie à cause de mauvaises pièces
ou d’entretien mal fait.
MISE À LA TERRE
L’appareil est muni d’un cordon électrique comprenant un fi l de mise à la terre et une fi che de terre. Branchez la fi che
dans une prise de courant correctement installée et mise à la terre.
AVERTISSEMENT - Une fi che de mise à la terre mal branchée peut entraîner un risque d’incendie, de choc électrique
ou de blessures aux personnes qui utilisent l’appareil. Si vous n’êtes pas certain que l’appareil est correctement mis à la
terre, consultez un préposé du service qualifi é.
N’UTILISER JAMAIS DE FIL DE RALLONGE
Brancher le congélateur à son propre curcuit de 115V. N’utilisez pas de rallonge électrique pour brancher votre congéla-
teur. Ne branchez pas le congéglateur à une prise femelle multiple qui sera également utilisée pour d’autres appareils
électriques. N’épissez pas le cordon électrique.
CONSERVEZ CES INSTRUCTIONS!
12

13
Consignes de sécurité importantes
PRENDRE CONNAISSANCE DE TOUTES LES INFORMATIONS
RELATIVES À LA SÉCURITÉ AVANT D’UTILISER LE PRODUIT
AVERTISSEMENT
• Les prises d’air de l’enceinte de l’appareil ou de la structure
encastré doivent être dégagées en tout temps.
• Ne pas utiliser d’appareils mécaniques ou autres moyens
pour accélérer le dégiverage que ceux recommandés par le
fabricant.
• Ne pas endommager le circuit frigorigène.
• Ne pas utiliser d’appareils électriques à l’intérieur du com-
partiment de conservation des aliments de cet appareil, sauf
s’ils sont du type recommandé par le fabricant.
CONSERVEZ CES INSTRUCTIONS!
• Ce dispositif n’est pas désigné d’être utilisé par des personnes (y compris enfants) dont le développement et capacité
physique, sensoriel ou mental est différente ou réduite, ou par les personnes qui manquent expérience ou connais-
sance sauf si ces personnes sont surveillés ou formés par une personne responsable de leur sécurité.
• Les enfants doivent être surveillés pour s’assurer qu’ils ne jouent pas avec l’appareil.
• Ne pas utiliser de rallonges et des adaptateurs (avec 2 prises) qui ne sont pas de mise à la terre.
• Pour éviter les risques, si le cordon est endommagé, il doit être remplacé par le fabricant, son agent de service ou
une personne qualifi ée.
Cette unité est 71 cm (27,95 pouces) de large par 155 cm (61,02 pouces) de haut par 75 cm (29,23 pouces) de profond-
eur; S’il vous plaît assurez-vous de laisser le dégagement minimum d’entre l’appareil et tous les murs environnants et les
ouvertures (voir l’emplacement). Ne couvrez pas les ouvertures de ventilation avec un matériau parce que l’unité a besoin
d’espace de respiration adéquate.

Instructions d’installation
Enlevez les emballages extérieurs et intérieurs. Essuyez complètement l’extérieur avec un linge doux sec et l’intérieur
avec un linge humide tiède. Il ne faut jamais situer l’appareil dans un recoin étroit, proche d’une source d’air chaud.
L’air doit circuler à l’entour de l’appareil. Gardez le dos de l’appareil à une distance de 10,6 cm / 4 pouces du mur, as-
surez-vous qu’il est de 20,3 cm / 8 pouce d’espace entre chaque murs et assurez-vous qu’il est de 30,5 cm / 12 pouces
d’espace entre l’appareil et les armoires ou le plafond. Ceci permettra une circulation d’air.
1. Installez votre congélateur de telle façon qu’une rallonge électrique ne soit pas nécessaire.
2. Choisissez un endroit où la température est uniforme toute l’année. Ne pas faire fontionner le congélateur lorsque
l’air environnant est au-dessous de 5°C (41°F). Cependant, si la température est au-dessous de 5°C (41°F) le con-
gélateur ne subira aucun dommage tant que le contrôle de température n’actionne pas l’unité motrice. Pour raison
d’économie d’électricité, ne pas placer le congélateur prés d’un poêle, d’une fournaise, d’un registre de chaleur, d’un
radiateur ou encore directement au soleil. Ne placer pas l’appareil dans un espace mouillé ou humide, comme les
sous-sols.
EMPLACEMENT
CARACTÉRISTIQUES
14
1. Interrupteur de la lumière intérieur
2. Couvercle de la lumière
3. Capteur du température
4. Étagère congélateur
5. Sortie d’air
6. L’entrée d’air
7. Tiroir du congélateur
8. Étagère du porte
9. Panier du porte
ĸ
ķ
Ĺ
ĺ
Ļ
ļ
Ľ
ľ
Ŀ

Si l’appareil n’est pas niveau, les portes et les joint ne pourraient pas fonctionner
correctement, ce qui rend l’appareil de fonctionner d’un manière ineffi cace. Pour
niveler l’appareil tourner la jambe nivellement vers la droite pour augmenter ou
dans le sens antihoraire pour abaisser.
PIEDS DE MIVELLEMENT
Pour installer le couvercle décoratif, s’il vous plaît suivez les étapes dans le tableau ci-dessous. Le couvercle décoratif est
installé sur le fond de l’appareil.
COUVERCLE DECORATIF
ķ
ĸ
L’appareil doit être débranché avant d’installer la poignée.
1. Prenez deux vis et installer sur la porte, dans les trous pré-percés,
assurez-vous de les pivoter jusqu’à ce qu’ils ne peuvent pas tirer
plus.
2. Placer la poignée sur les vis.
3. Placez l’autre vis de réglage dans le trou dans le côté de la poi-
gnée et tournez jusqu’à ce que serré.
INSTALLATION DU POIGINÉE
ķ
ķ
ĸ
ĸ
Ĺ
Ĺ
Instructions d’installation
15

Consignes d’utilisation
Le congélateur est prêt à opérer des qu’il à été branché sur une prise de courant électrique. Après le démarrage, fermez
la porte et laissez le congélateur fonctionner. L’unité motrice marchera d’une à deux heures avant que la température
d’opération soit atteinte. Elle repartira et s’arrêtera ensuite à des intervalles passablement réguliers. Il es recommandé de
ne pas placer d’alliments dans le congélateur tant que vous serez satistait du fonctionnement de l’appareil et qu’aucun
autre ajustement fi nal ne soit nécessaire (après fonctionner l’appareil pendant 24 heures).
Lorsque votre congélateur est en marche et qu’il s’arrête régulièrement, il est prêt à congeler et à conserver bous ali-
ments. -18°C (0°F) est une bonne température de stockage. Ne pas faire fonctionner le congélateur à des températures
au-dessous de -19°C (-3°F) étant donné que cela n’améliore pas la conservation des aliments et ne résulte qu’à faire
fonctionner plus longtemps l’unité motrice. Il est recommandé de ne pas geler plus de 1-1,4 kg / 2-3 livres de nourriture
par carré litres / pied cube, dans une période de 24 heures. Cela va prendre plus de 15 heures de fonctionnement pour
geler la quantité de nourriture.
Si on ajoute de la nourriture fraiche ou des paquets d’aliments non congelés, il est recommandé de les placer contre les
parois. L’élément sensible du termostat est apposé au mur de la cuve interne du « côté de l’isolation ». Du fait de la valeur
du contenu de votre congélateur, il est conseillé d’inspecter son contenu et son opération régulièrement.
Remarque : Cet appareil n’a pas été conçu pour une installation extérieur, incluant l’installation dans un endroit qui n’a
pas une température contrôlée (y compris les garages, les vérandas, les abris de voitures, etc.). Avant de brancher l’ap-
pareil à l’alimentation électrique, laissez-le reposer pendant environ 6 heures. Ce qui réduira la possibilité que le système
de refroidissement présente des dysfonctionnements en raisin de la manutention au cours du transport.
MISE EN MARCHE DU CONGÉLATEUR
CONTRÔLE DE LA TEMPÉRATURE
Régalage de la température :
• La température du congélateur est contrôlée en ajustant / réglage du panneau de commande du thermostat. Appuy-
ez sur les fl èches (3 et 8) pour régler / ajuster la température. Lorsque l’icône de température clignote, vous pouvez
régler la température entre -16°C à -24°C (3°F à -11°F), le réglage de température recommandée est de -18°C (0°F).
Ajustement prend environ 10 secondes pour prendre effet. En appuyant sur la clé de verrouillage (4) vous permettra
de verrouiller le panneau de commande pour que la température ne peut être modifi ée sans avoir d’abord déverrouillé
le panneau de commande (fonction de verrouillage enfant).
Régalage de la fonction de congélation rapide :
• La fonction de congélation rapide permet la compresseur de fonctionner en continu pendant 6 ou 48 heures. Appuyez
sur la button de congélation rapide (7) deux fois et pendant trois secondes pour activer la congélation rapide. Lor-
sque l’icône clignote sur l’écran, appuyez sur la fl èche vers le haut ou vers le bas (3 et 8) pour régler l’heure pour la
congélation rapide. Une fois que la confi guration est sélectionnée, vous pouvez verrouiller le panneau de commande.
Pour la maison “congélation rapide”, 6 heures est recommandé. Pour annuler, appuyez sur la congélation rapide
(7), l’icône indiquera la température -24, appuyez sur la touche de congélation rapide (7) pour quitter la fonction de
congélation rapide. Une fois que la fonction de congélation rapide se termine ou est annulé, l’appareil revient à la
dernière température de consigne. Si l’appareil ne peut pas revenir à la température réglée, il reviendra à la tempéra-
ture prédéterminée (-18°C ou 0°F).
1
2
3
4
5
6
7
8
16

17
CONTRÔLE DE LA TEMPÉRATURE
Consignes d’utilisation
Changer entre °C et °F :
• Pour changer entre °C et °F, appuyez sur la touche °C/°F (6).
Alarme du congélateur :
• Appuyez sur le bouton d’alarme (5) pour arrêter l’alarme sonore. L’alarme commencera lorsque le congélateur atteint
une température trop chaude.
DÉGIVRER
Ce réfrigérateur comprend un système de réfrigération « sans givre », ce qui signifi e que vous n’aurez jamais besoin de
dégivrer le congélateur. Le dégivrage se fait automatiquement à l’aide d’un élément chauffant de dégivrage et d’un
chronometre de dégivrage programme à l’usine. L’eau produite lors du dégivrage est acheminée vers un plateau de dé-
givrage situé directement au-dessus du compresseur, si bien qu’elle s’évapore.
NETTOYAGE
Après l’installation de votre nouvel appareil, il est recommandé de nettoyer soigneusement.
1. Après d’avoir enlevé la nourriture et le placer dans un endroit où il ne sera pas dégeler, tournez le bouton sur “OFF”
et débranchez l’appareil.
2. À l’aide d’un mélange de détergent doux et d’eau chaude, mouiller une serviette ou une éponge pour nettoyer l’in-
térieur de l’unité.
3. N’utilisez pas des nettoyants abrasifs. Rincer et sécher toutes les surfaces soigneusement. N’utiliser pas des cires de
nettoyage, détergents, eau de Javel, etc. sur l’appareil. N’utilisez jamais une serviette en papier, laveur de vitres, net-
toyants à récurer ou des nettoyants infl ammables car elles peuvent gratter et endommager l’appareil. Nettoyer avec
un serviette mouiller et séchez avec un chiffon doux et propre.
IMPORTANTES CONSIGNES DE SÉCURITÉ POUR L’UTILISATION DU CONGÉLATEUR
• Ne jamais ranger d’aliments chauds dans le congélateur.
• Ne jamais placer des aliments pourris dans le réfrigérateur.
• Ne jamais surcharger l’appareil.
• Ouvrir le couvercle seulement si nécessaire.
• Pour un rangement prolongé de l’appareil, il est suggéré de laver l’appareil, de laisser la porte ouverte afi n de fournir
une circulation d’air à l’intérieur du meuble et d’éviter le développement de condensation, de moisi et d’odeurs.
Soins et entretien
AFFICHAGE VERROUILLAGE ET DÉVERROUILLAGE
Si vous ne pouvez ajuster la température du congélateur après avoir branché l’appareil, vous devez d’abord déverrouiller
l’affi chage en appuyant sur le bouton de verrouillage jusqu’à ce que l’appareil sonne.
Pour verrouiller les paramètres de température souhaités, maintenez le bouton de verrouillage enfoncé jusqu’à ce que
l’appareil sonne.
Pour déverrouiller et régler les paramètres de température actuels, maintenez le bouton de verrouillage enfoncé jusqu’à
ce que l’unité sonne.
Remarque: 10-15 secondes après avoir fermé la porte du congélateur, la température ne sera plus affi chée. La tempéra-
ture réapparaît à l’écran si la porte est ouverte ou si vous modifi ez les paramètres actuels.

Soins et entretien
PENDANT LE VACANCES
Si vous prenez des vacances de courte durée, laissez le bouton de commande à son réglage normal. Si l’absence doit
durer longtemps,
1. enlever tous les aliments,
2. débranchez l’appareil de la prise murale,
3. nettoyez le congélateur complèment,
4. laisser la couvercle ouvert pour éviter les mauvaises odeurs.
PANNE ÉLECTRIQUE OU MÉCHANIQUE
S’il arrivait une panne électrique ou méchanique sur votre congélateur, communiquez immédiatement avec votre vendeur
en lui donnant l’information complète sur votre appareil, le numéro de modèle et le numéro de série. Ces numéros appa-
raissent sur la plaque d’indentifi cation à l’extérieur (sur la paroi arrière) de votre congélateur.
PANNE D’ÉLECTRICITÉ
La plupart des pannes d’électricité sont corrigées dans un délai d’une heure et n’ont pas d’effets sur la température du
congélateur. Il est nécessaire de réduire le nombre d’ouvertures du couvercle pendant une panne. Pendant les pannes
qui durent plus qu’une heure, prendre des mésures pour protéger vos aliments.
DÉMENAGEMENT
Enlever ou immobiliser toutes les pièces amovibles (c’-à-d; les clayettes) à l’intérieur du congélateur. Serrer les vis à
nivellement à la base afi n de ne pas les endommager.
18
La page est en cours de chargement...
La page est en cours de chargement...
La page est en cours de chargement...
La page est en cours de chargement...
La page est en cours de chargement...
La page est en cours de chargement...
La page est en cours de chargement...
La page est en cours de chargement...
La page est en cours de chargement...
La page est en cours de chargement...
La page est en cours de chargement...
La page est en cours de chargement...
La page est en cours de chargement...
La page est en cours de chargement...
La page est en cours de chargement...
La page est en cours de chargement...
-
 1
1
-
 2
2
-
 3
3
-
 4
4
-
 5
5
-
 6
6
-
 7
7
-
 8
8
-
 9
9
-
 10
10
-
 11
11
-
 12
12
-
 13
13
-
 14
14
-
 15
15
-
 16
16
-
 17
17
-
 18
18
-
 19
19
-
 20
20
-
 21
21
-
 22
22
-
 23
23
-
 24
24
-
 25
25
-
 26
26
-
 27
27
-
 28
28
-
 29
29
-
 30
30
-
 31
31
-
 32
32
-
 33
33
-
 34
34
-
 35
35
-
 36
36


Danby DUF138E1WDD Le manuel du propriétaire
- Catégorie
- Congélateurs
- Taper
- Le manuel du propriétaire
dans d''autres langues
- English: Danby DUF138E1WDD Owner's manual
- español: Danby DUF138E1WDD El manual del propietario