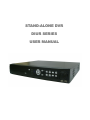
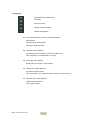
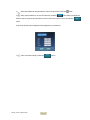
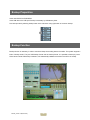
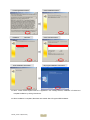
AIS DIUR series Manuel utilisateur
- Catégorie
- Enregistreurs vidéo numériques (DVR)
- Taper
- Manuel utilisateur

S
S
T
T
A
A
N
N
D
D
-
-
A
A
L
L
O
O
N
N
E
E
D
D
V
V
R
R
D
D
I
I
U
U
R
R
S
S
E
E
R
R
I
I
E
E
S
S
U
U
S
S
E
E
R
R
M
M
A
A
N
N
U
U
A
A
L
L

INDEX
System Introduction ___________________________________________________ 1
Warning _________________________________________________________________________ 2
DIUR Series System Components _____________________________________________________ 3
DIUR System Front / Back Panel _____________________________________________________ 3
Remote Controller Function _________________________________________________________ 13
DIUR System Connection __________________________________________________________ 14
DIUR Series Specification __________________________________________________________ 15
General Information __________________________________________________ 17
Precaution for Setup _______________________________________________________________ 18
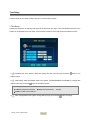
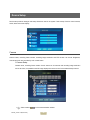
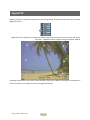
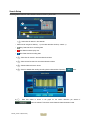
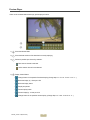
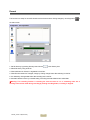
Initial Surveillance Screen __________________________________________________________ 21
Screen Introduction _____________________________________________________________ 21
DIUR Setup Configuration ____________________________________________ 25
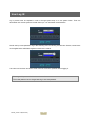
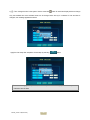
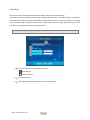
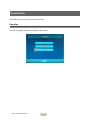
User Log IN _____________________________________________________________________ 26
Setup Configuration _______________________________________________________________ 27
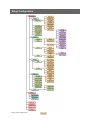
System Setup ________________________________________________________ 28
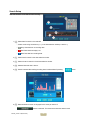
Menu __________________________________________________________________________ 29
System Setup ____________________________________________________________________ 30
Information ___________________________________________________________________ 30
Time Setup ____________________________________________________________________ 32
Disk Manager _________________________________________________________________ 36
User Setup ____________________________________________________________________ 41
Factory Setup __________________________________________________________________ 43
Log Off ______________________________________________________________________ 44
System Shutdown ______________________________________________________________ 44
Device Setup ____________________________________________________________________ 45
Camera _______________________________________________________________________ 45
Audio ________________________________________________________________________ 50
Alarm ________________________________________________________________________ 51
Screen Display Setup ____________________________________________________________ 55

Recording Setup __________________________________________________________________ 57
Setup ________________________________________________________________________ 58
Schedule Setup ________________________________________________________________ 60
Network Setup ___________________________________________________________________ 61
Network Setup _________________________________________________________________ 61
E-mail Notification Setup ________________________________________________________ 63
Web Server Setup ______________________________________________________________ 64
DDNS Setup __________________________________________________________________ 65
Event Notification Setup _________________________________________________________ 66
Event Information Search __________________________________________________________ 67
Sensor Log ____________________________________________________________________ 67
Camera Loss Log _______________________________________________________________ 68
System Log ___________________________________________________________________ 68
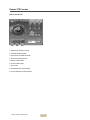
PTZ Function _______________________________________________________ 69
Digital PTZ _____________________________________________________________________ 70
Freeze Function __________________________________________________________________ 71
Dynamic PTZ ____________________________________________________________________ 71
Search Function _____________________________________________________ 73
Search Structure __________________________________________________________________ 74
Search Function __________________________________________________________________ 75
Search Menu ____________________________________________________________________ 75
Calendar Search __________________________________________________________________ 76
Operation _____________________________________________________________________ 76
Search Setup __________________________________________________________________ 77
Motion Search ___________________________________________________________________ 78
Operation _____________________________________________________________________ 78
Search Setup __________________________________________________________________ 79
Event Search ____________________________________________________________________ 80
Operation _____________________________________________________________________ 80
Search Setup __________________________________________________________________ 81
Search _________________________________________________________________________ 82
Search Menu ____________________________________________________________________ 83
Screen Division in Search Mode _____________________________________________________ 84

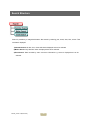
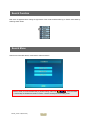
Backup Function _____________________________________________________ 85
Backup Preparation _______________________________________________________________ 86
Backup Function _________________________________________________________________ 86
Backup Process ________________________________________________________________ 87
Preview Player _________________________________________________________________ 89
Replay of Backup File ___________________________________________________________ 90
Remote Surveillance Function __________________________________________ 93
Remote Surveillance Program _______________________________________________________ 94
Program Installation ____________________________________________________________ 94
RS (Remote Surveillance) Environment Setup __________________________________________ 96
RS Program ON ________________________________________________________________ 96
Site Registration _______________________________________________________________ 97
Group Registration _____________________________________________________________ 98
USER Registration _____________________________________________________________ 99
System Setup _________________________________________________________________ 100
Record ______________________________________________________________________ 101
RS (Remote Surveillance) _________________________________________________________ 102
Site Connection _______________________________________________________________ 102
Remote Surveillance Function ____________________________________________________ 103
Remote PTZ Function __________________________________________________________ 106
System Control _______________________________________________________________ 107
Search Window _______________________________________________________________ 117
Backup ______________________________________________________________________ 119
Finish and Reset ______________________________________________________________ 122

Web Surveillance Function ___________________________________________ 123
Web Surveillance Program _________________________________________________________ 124
Static IP Connection ___________________________________________________________ 124
Dynamic IP Connection _________________________________________________________ 124
Security Warning ______________________________________________________________ 125
Connection and Termination _______________________________________________________ 126
Surveillance Screen ____________________________________________________________ 127
Sensor and Control Icon ________________________________________________________ 127
Camera Selection ______________________________________________________________ 128
Screen Division _______________________________________________________________ 128
PTZ Function ___________________________________________________________________ 128
Search Function _________________________________________________________________ 129
Surveillance Screen Search ________________________________________________________ 130

Manual_Version 2.00(20070416)
1
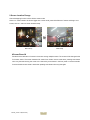
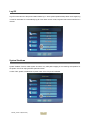
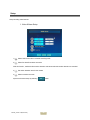
System Introduction

Manual_Version 2.00(20070416)
2
Warning
WARNING:
To prevent a risk of fire of electric shock, do not expose this product to rain or moisture.
•
This installation should be made by a qualified service person and should conform to all local codes.
•
This is a Class A product. In a domestic environment this product may cause radio interference in which case the
user may be required to take adequate measures.
z This system operates time using charge battery in the system. Use this system after
time setup in the beginning. Battery can be discharged completely if battery is not used for a long time
unplugged or moving the system during system operation. If system is reused after complete battery
discharge by plugging power supply, time will be the initial time setup status. The data in HDD that is
recorded with the date that is later than current time may be deleted in order to sync time. Therefore,
separate HDD and approve power supply and then do time setup and install HDD again and use the system
again.
z Enquire to the supplier or dealers if you have any question or defective goods for repair.
z Please read user manual carefully before starting the system.
z Do not open the system as it is, because the inside of the system has very sensitive substances to the
environment.
z Put the power cord safely and do not touch power cord with wet hands.
z Do not use loose plug outlet and damaged power cable.
z Do not touch exposed plug outlet to prevent electrical shock. If necessary, wear electricity-proof gloves.
z Exit power properly on the program before turning off the system with peripheral devices.
z Be cautious not to drop conductive objects in the ventilation area of power supply device and the inside of
the system.
z Do not disassemble or modify system.
z Do not put heavy objects on top of the system.
z Do not give shock to the system while on the move.
z Turn off the power switch right away if there is smoke or smell in the system. Consult with the supplier for the
advice of expertise.

Manual_Version 2.00(20070416)
3
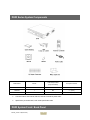
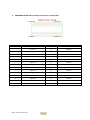
DIUR Series System Components
Model Name Mouse
Video Output Cable
(Loop Out Cable)
I/O Input Connector
DIUR104 1 N/A 2 (8 Pin)
DIUR108 1
N/A 2 (8 Pin)
DIUR116 1
1 (16 CH) 2 (8 Pin)
►
Common feature: User manual, SW CD, Remote Controller & power cable.
►
Specification per model name, refer model specification table
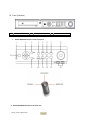
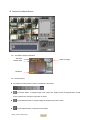
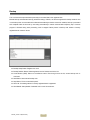
DIUR System Front / Back Panel

Manual_Version 2.00(20070416)
4
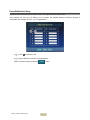
Front (Common)
①
Power Button
②
CD-R/W[DVD-R/W]
③
USB2.0 HOST PORT
1. Button & MOUSE function in the front panel
2. Button & MOUSE function in the front side
2
3
1

Manual_Version 2.00(20070416)
5
(1) LED group
Power LED: Red, Dark Green (2 Color ON/OFF/BLINK)
Red: Stand-by,
Red (Flickering): Booting status,
Dark Green: Operation status
HDD LED: Yellow (ON/OFF)
ON: Operation status is OK after access to the HDD access
OFF: Recognition is not fulfilled and can’t record
Alarm LED: Yellow (BLINK)
BLINK: When one sensor or more operates
Network LED: Yellow (ON/OFF)
ON: Cable connection is OK,
OFF: LAN cable is not connected or problem occurs in LAN environment.
Recording LED: Yellow (ON/OFF)
LED ON: Recording status,
OFF: STOP recording
Power ON/OFF & Standby Mode
Recording
Alarm Occurrence
Network Connection Status
HDD Recording Status

Manual_Version 2.00(20070416)
6
(2) Enter & Arrow button
1)
Enter
Button: Selection
This button is used for the menu item, division screen selection etc
Division screen: When pressing button, the channel is selected.
If double clicking the channel, it becomes full screen and becomes
previous divisionMode status if double click again.
MENU activation: Select item on the cursor
.’
Motion area setup: Select area on the cursor
2)
▲►▼◄
Arrow Button: Movement
This button is used for the menu item movement & Pan/Tile/Zoom control in PTZ mode.
Division mode: Channel movement in the screen
PTZ mode: PTZ or dynamic PTZ control in the screen
3)
MENU
Button: Enter to Menu Mode
System LOG ON Status: Display system setup menu in the screen
System LOG OFF Status: Display LOG ON screen
It is the same with the right button of the mouse for the above status
Motion Area Setup: Selection cancellation for the area of cursor (Enter button is used for the
selection)
4)
PTZ
Button: PTZ Mode Activation/ Cancellation.
It does not any function if PTZ module does not exist in LIVE mode.
Menu->Device->Camera>Dynamic PTZ
System Log Off status: LOG ON screen display
JOY STICK icon is displayed in the right bottom of the PTZ module setup channel indicating PTZ activation.
Arrow button is the Pan and Tilt function. Zoom in/out function are also activated.
5)
SEARCH
Button: Enter to Search mode
System Log Off status: LOG ON screen display
System Log On status: Search screen display
6)
SEQ
Button: Division page rotation activation / cancellation
Current division screen pages are displayed in order based on page rotation time setup.
Page rotation time setup : Refer system setup in DVR
Menu->Device->Display->Sequence->Main Monitor Dwell Time

Manual_Version 2.00(20070416)
7
If channel is not selected in the main monitor, it is not included in the sequence.
Menu->Device->Display->Sequence->Main Monitor
There is no change in case of 16 channels and 16 divisions mode.
7)
MODE
Button: Screen division mode change
Division mode from 1 to Maximum division are displayed in order e.g. 16channel 16 division.
The same when pressing the wheel button of the mouse
8)
JOG /
SHUTTLE
:
Jog / Shuttle.
JOG/SHUTTLE function is used in replay mode and do not have function in other mode.
JOG
: Device for Frame search. One frame is replayed to the forward direction per each movement of JOG
in case of the clockwise direction. Previous key frame is replayed per each movement of JOG in case of
backward replay mode. Key frame is the frame that has complete image in MPEG.
SHUTTLE
: Device for Ultra speed search. Forward and backward replay and control speed
±
1,
±
2,
±
4,
±
16,
±
32,
±
64,
±
128,
±
256 is possible. It operates by forward x1 speed by default. Audio is activated only
for
±
1 mode and key frame is replayed.
9)
ESC
Button: Cancellation
Menu mode is disappeared.
Return to the previous menu. (The same function with return button in menu)
10)
◄ / Zoom In
Button
Replay mode: Backward x1 times replay speed
PTZ Mode: Used for the screen Zoom in
11)
► / Zoom Out
Button
Replay mode: Forward x1 times replay speed
PTZ Mode: Used for the Screen Zoom out
Screen division mode is changed based on the sequence setup mode in
the current division screen
Single
4 division
6 division
8 division
9 division
10 division
13 division
16 division

Manual_Version 2.00(20070416)
8
12)
Button: Mute. Stop replay temporarily.
This function is used for replay mode only and no function except for replay mode.
13)
Q
Button: Emergency Recording Start/ Cancellation
Emergency recording records all channel by full frame recording (CIF) regardless of recording setup. It
records all channel continuously by maximum frame regardless of recording setup such as resolution,
sensor, motion etc. In case of this situation, current time is displayed by blue and dark green from yellow
color display. Resolution is CIF to maintain maximum frame. If selecting this function key, normal
recording mode is returns. It is very useful in case of emergency situation.
(3) USB 2.0 Port: External USB device connection.
Connect by Max.480Mbps with external USB device
1) Connectable device: USB stick memory, USB CD/RW and USB HDD for backup devices. 2) 10Mbps
(USB1.1) is possible to connect depending on the device of connection.
3) Be careful not to put metal pieces etc near the port connection area because power (5V) output exists in the
port.
(4)
I
I
R
R
r
r
e
e
c
c
e
e
i
i
v
v
e
e
r
r
IR (Infra Red) remote controller receiver
1) Receiver that receives signal for the system control and setup through remote controller

Manual_Version 2.00(20070416)
9
Back Panel [Model: DIUR116]
1. Port in the back side
ⓞ
Video Input [1~16]
①
VGA Video Output
②
Composite Video Output
③
S-Video Output
④
2-WAY AUDIO Input
⑤
NTSC/PAL Selection
⑥
USB2.0 HOST 2 PORTS
⑦
LAN Port
⑧
RS-232C Port
⑨
Sensor/Relay/RS-485
Connector
⑩
Loop Video Output [1-16]
⑪
Power [110~220V AC]
⑫
Spot Video Output
⑬
Audio Output
⑭
Audio Input[1~4]
⑮
Main Power Switch
⑧ RS-232C: Joystick etc
⑨
RS-485 : PAN/TILT Controller

Manual_Version 2.00(20070416)
10
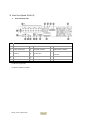
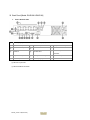
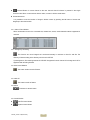
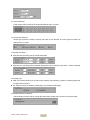
2. SENSOR/RELAY/RS-485 Input/Output Connector Pin Configuration
Pin No. Signal Name Pin No. Signal Name
1 Sensor 15 15 Sensor 14
2 Sensor 16 16 Sensor 13
3 Common 17 Sensor 12
4 Common 18 Sensor 11
5 Relay 1-A 19 Sensor 10
6 Relay 1-B 20 Sensor 9
7 Relay 2-A 21 Sensor 8
8 Relay 2-B 22 Sensor 7
9 Relay 3-A 23 Sensor 6
10 Relay 3-B 24 Sensor 5
11 Relay 4-A 25 Sensor 4
12 Relay 4-B 26 Sensor 3
13 RS-485+ 27 Sensor 2
14 RS-485- 28 Sensor 1
Pin No: 1 Pin No: 14
Pin No: 28 Pin No: 15

Manual_Version 2.00(20070416)
11
Back Panel [Model: DIUR108 & DIUR104]
1. Port in the back side
ⓞ
Video Input [1~8] EL-4008L/M Video Input (1~4) EL-4004L
①
VGA Video Output
②
S-Video Output
③
Composite Video Output
④
2-WAY AUDIO Input
⑤
NTSC/PAL Selection
⑥
USB2.0 HOST 2 PORTS
⑦
LAN Port
⑧
RS-232C Port
⑨
Sensor/Relay/RS-485
Connector
⑩
Loop Video Output
⑪
Power[110~220V AC]
⑫
Spot Video Output
⑬
Audio Output
⑭
Audio Input [1~4]
⑮
Main Power Switch
⑧ RS-232C: Joystick etc
⑨
RS-485: PAN/TILT Controller

Manual_Version 2.00(20070416)
12
2. SENSOR/RELAY/RS-485 Input/Output Connector Pin Configuration
Pin No. Signal Name Pin No. Signal Name
1 GND 9 Sensor 8
2 GND. 10 Sensor 7
3 Alarm NC 11 Sensor 6
4 Alarm NO 12 Sensor 5
5 Common 13 Sensor 4
6 NC 14 Sensor 3
7 RS-485+ 15 Sensor 2
8 RS-485- 16 Sensor 1
z NC : Not connected
3.
JOY Stick Connector Pin Configuration
Pin No. Signal Name Pin No. Signal Name
1 RS-422 TX- 6 NC
2 RS-422 TX+ 7 NC
3 RS-422 RX+ 8 NC
4 RS-422 RX- 9 NC
5 GND

Manual_Version 2.00(20070416)
13
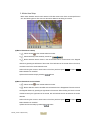
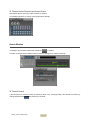
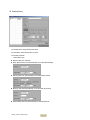
Remote Controller Function
*
Warning: Remote controller ID must be set to communicate with DVR system.
Remote controller ID setup
:
①
Press for ID button 3 seconds approximately (red LED flickers)
②
Input 2 digit ID number for DVR. (Menu->SYSTEM->Information->Controller ID)
③
Record setup by pressing
ID SET
button.
Power button
Controller ID
Setting
Set Controller ID
UP
Left
MENU
PTZ
Zoom In
Search
Run Sequence
Play backward
Play forward
Play fast
backward
Play one frame
backward
Play one frame
forward
Input Controller ID
Select function
Right
Pause
Back
Zoom Out
Screen Mode
Record
Play fast forward
Down

Manual_Version 2.00(20070416)
14
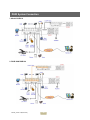
DIUR System Connection
1. Model: DIUR116
2.
DIUR 108& DIUR104

Manual_Version 2.00(20070416)
15
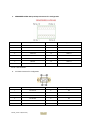
DIUR Series Specification
Model
DIUR104
DIUR108
DIUR116
Video
Camera input 4 8 16
Output 1 BNC, S-Video, VGA(OPTION)/1 SPOT/LOOP OUT
Audio
Audio input 4 RCA /1 2-WAY AUDIO
Output 1 RCA
Sensor In (NO, NC)/Alarm out 4/1 8/1 16/4
Operating System Embedded Linux OS
Display
Speed[NTSC/PAL] 120/100 fps 240/200 fps 480/400 fps
Resolution (Pixel) 704 X 480(NTSC), 704 X 576(PAL)
Split screen 1,4,SEQ 1,4,6,8,9,SEQ 1,4,6,8,9,10,13,16,SEQ
Zoom Digital x 2
others De-interlaced Video, Graphic OSD On/Off, HDD automatic Calculation and ETC
Recording
Compression MPEG-4 SP
Resolution (Pixel) 704x480, 704x240, 352x240 (NTSC) / 704x576, 704x288, 352x288(PAL)
Picture quality High, middle, low
Mode Continuous/Motion/Sensor/Sensor & Motion/Schedule
Speed
Total
NTSC
30 fps (704x480)
60 fps (704x240)
120fps (352x240)
60<30> fps(704x480)
120<60> fps(704x240)
240<120> fps(352x240)
120<60/30> fps(704x480)
240<120/60> fps(704x240)
480<240/120>fps(352x240)
PAL
25 fps (704x576)
50 fps (704x288)
100fps (352x288)
50<25>fps (704x576)
100<50>fps (704x288)
200<100>fps (352x288)
100<50/30> fps(704x576)
200<100/50> fps(704x288)
400<200/100> fps(352x288)
Each channel
NTSC Max30fps Max30<15> Max30<15,7>
PAL 25 fps Max25<12> Max25<12,6>
Water Marking Own Algorithm
La page est en cours de chargement...
La page est en cours de chargement...
La page est en cours de chargement...
La page est en cours de chargement...
La page est en cours de chargement...
La page est en cours de chargement...
La page est en cours de chargement...
La page est en cours de chargement...
La page est en cours de chargement...
La page est en cours de chargement...
La page est en cours de chargement...
La page est en cours de chargement...
La page est en cours de chargement...
La page est en cours de chargement...
La page est en cours de chargement...
La page est en cours de chargement...
La page est en cours de chargement...
La page est en cours de chargement...
La page est en cours de chargement...
La page est en cours de chargement...
La page est en cours de chargement...
La page est en cours de chargement...
La page est en cours de chargement...
La page est en cours de chargement...
La page est en cours de chargement...
La page est en cours de chargement...
La page est en cours de chargement...
La page est en cours de chargement...
La page est en cours de chargement...
La page est en cours de chargement...
La page est en cours de chargement...
La page est en cours de chargement...
La page est en cours de chargement...
La page est en cours de chargement...
La page est en cours de chargement...
La page est en cours de chargement...
La page est en cours de chargement...
La page est en cours de chargement...
La page est en cours de chargement...
La page est en cours de chargement...
La page est en cours de chargement...
La page est en cours de chargement...
La page est en cours de chargement...
La page est en cours de chargement...
La page est en cours de chargement...
La page est en cours de chargement...
La page est en cours de chargement...
La page est en cours de chargement...
La page est en cours de chargement...
La page est en cours de chargement...
La page est en cours de chargement...
La page est en cours de chargement...
La page est en cours de chargement...
La page est en cours de chargement...
La page est en cours de chargement...
La page est en cours de chargement...
La page est en cours de chargement...
La page est en cours de chargement...
La page est en cours de chargement...
La page est en cours de chargement...
La page est en cours de chargement...
La page est en cours de chargement...
La page est en cours de chargement...
La page est en cours de chargement...
La page est en cours de chargement...
La page est en cours de chargement...
La page est en cours de chargement...
La page est en cours de chargement...
La page est en cours de chargement...
La page est en cours de chargement...
La page est en cours de chargement...
La page est en cours de chargement...
La page est en cours de chargement...
La page est en cours de chargement...
La page est en cours de chargement...
La page est en cours de chargement...
La page est en cours de chargement...
La page est en cours de chargement...
La page est en cours de chargement...
La page est en cours de chargement...
La page est en cours de chargement...
La page est en cours de chargement...
La page est en cours de chargement...
La page est en cours de chargement...
La page est en cours de chargement...
La page est en cours de chargement...
La page est en cours de chargement...
La page est en cours de chargement...
La page est en cours de chargement...
La page est en cours de chargement...
La page est en cours de chargement...
La page est en cours de chargement...
La page est en cours de chargement...
La page est en cours de chargement...
La page est en cours de chargement...
La page est en cours de chargement...
La page est en cours de chargement...
La page est en cours de chargement...
La page est en cours de chargement...
La page est en cours de chargement...
La page est en cours de chargement...
La page est en cours de chargement...
La page est en cours de chargement...
La page est en cours de chargement...
La page est en cours de chargement...
La page est en cours de chargement...
La page est en cours de chargement...
La page est en cours de chargement...
La page est en cours de chargement...
La page est en cours de chargement...
La page est en cours de chargement...
La page est en cours de chargement...
La page est en cours de chargement...
La page est en cours de chargement...
La page est en cours de chargement...
-
 1
1
-
 2
2
-
 3
3
-
 4
4
-
 5
5
-
 6
6
-
 7
7
-
 8
8
-
 9
9
-
 10
10
-
 11
11
-
 12
12
-
 13
13
-
 14
14
-
 15
15
-
 16
16
-
 17
17
-
 18
18
-
 19
19
-
 20
20
-
 21
21
-
 22
22
-
 23
23
-
 24
24
-
 25
25
-
 26
26
-
 27
27
-
 28
28
-
 29
29
-
 30
30
-
 31
31
-
 32
32
-
 33
33
-
 34
34
-
 35
35
-
 36
36
-
 37
37
-
 38
38
-
 39
39
-
 40
40
-
 41
41
-
 42
42
-
 43
43
-
 44
44
-
 45
45
-
 46
46
-
 47
47
-
 48
48
-
 49
49
-
 50
50
-
 51
51
-
 52
52
-
 53
53
-
 54
54
-
 55
55
-
 56
56
-
 57
57
-
 58
58
-
 59
59
-
 60
60
-
 61
61
-
 62
62
-
 63
63
-
 64
64
-
 65
65
-
 66
66
-
 67
67
-
 68
68
-
 69
69
-
 70
70
-
 71
71
-
 72
72
-
 73
73
-
 74
74
-
 75
75
-
 76
76
-
 77
77
-
 78
78
-
 79
79
-
 80
80
-
 81
81
-
 82
82
-
 83
83
-
 84
84
-
 85
85
-
 86
86
-
 87
87
-
 88
88
-
 89
89
-
 90
90
-
 91
91
-
 92
92
-
 93
93
-
 94
94
-
 95
95
-
 96
96
-
 97
97
-
 98
98
-
 99
99
-
 100
100
-
 101
101
-
 102
102
-
 103
103
-
 104
104
-
 105
105
-
 106
106
-
 107
107
-
 108
108
-
 109
109
-
 110
110
-
 111
111
-
 112
112
-
 113
113
-
 114
114
-
 115
115
-
 116
116
-
 117
117
-
 118
118
-
 119
119
-
 120
120
-
 121
121
-
 122
122
-
 123
123
-
 124
124
-
 125
125
-
 126
126
-
 127
127
-
 128
128
-
 129
129
-
 130
130
-
 131
131
-
 132
132
-
 133
133
-
 134
134
-
 135
135


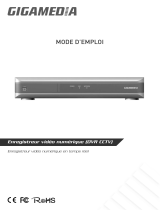
AIS DIUR series Manuel utilisateur
- Catégorie
- Enregistreurs vidéo numériques (DVR)
- Taper
- Manuel utilisateur
dans d''autres langues
- English: AIS DIUR series User manual
Autres documents
-
 SVAT Electronics CVP800 Manuel utilisateur
-
Nedis SEC-SETDVR30 Manuel utilisateur
-
Lorex L15LD420 Series Manuel utilisateur
-
Lorex Technology L15LD420 Series Manuel utilisateur
-
Eizo FDF2304W-IP Le manuel du propriétaire
-
 GIGAMEDIA GGM DVR Manuel utilisateur
-
Abus TVVR25000 Information produit
-
Lorex Technology LH3281001 Manuel utilisateur
-
-
Monacor DMR-184 Le manuel du propriétaire

