La page est en cours de chargement...

1
T
ABLE OF
C
ONTENTS
TABLE OF CONTENTS
Introduction .............................................................. 2
Features .................................................................. 3
System Requirements .............................................. 4
Package Contents.................................................... 5
Device Overview ...................................................... 6
Device Installation .................................................... 7
Technical Specifications ........................................... 9
Cables To Go One Year Warranty .......................... 10
Important Safety Information .................................. 11
TABLE DES MATIERES
Introduction ............................................................... 2
Fonctions .................................................................. 3
Configuration du système.......................................... 4
Contenu du pack ....................................................... 5
Vue générale du périphérique ................................... 6
Installation du périphérique ....................................... 7
Caractéristiques techniques ...................................... 9
Garantie d'un an Cables To Go ............................... 10
Informations de sécurité importantes ....................... 11
INDICE
Introducción .............................................................. 2
Características .......................................................... 3
Requisitos del sistema............................................... 4
Contenido del paquete .............................................. 5
Descripción general del dispositivo ............................ 6
Instalación del dispositivo .......................................... 7
Especificaciones técnicas .......................................... 9
Un año de garantía Cables to Go ............................ 10
Información de seguridad importante ....................... 11
La page est en cours de chargement...

3
F
EATURES
FEATURES
Adds two USB 3.0 SuperSpeed ports to your laptop
Supports USB 3.0 SuperSpeed data transfer rates
Power adapter ensures that connected devices receive
the proper amount of power for maximum performance
FONCTIONS
Ajoute deux ports USB 3.0 SuperSpeed à votre
ordinateur portable
Prend en charge les taux de transfert de données d’une
carte USB 3.0 SuperSpeed
Le cordon d’alimentation qui relie les systèmes reçoit la
bonne quantité de courant pour assurer un
fonctionnement maximum
CARACTERÍSTICAS
Agrega dos puertos USB 3.0 SuperSpeed a su laptop
Compatible con tasas de transferencia de datos USB
3.0 SuperSpeed
El adaptador de corriente garantiza que los
dispositivos conectados reciban la cantidad adecuada
de energía para obtener el máximo desempeño
La page est en cours de chargement...

5
P
ACKAGE
C
ONTENTS
PACKAGE CONTENTS
USB 3.0 SuperSpeed ExpressCard
Driver installation CD
USB to DC power cable (2 ft)
User’s manual
CONTENIDO DEL PAQUETE
Tarjeta ExpressCard USB 3.0 SuperSpeed
CD para instalación de controladores
Cable de corriente USB a DC (2 pies / 60 cm de
largo)
Manual del usuario
CONTENU DE L’ENSEMBLE
Carte USB 3.0 SuperSpeed ExpressCard
CD pilote d’installation
Câble d’alimentation CC à USB (2 pieds)
Guide d’utilisation

6
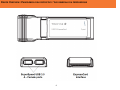
DEVICE OVERVIEW / PANORÁMICA DEL DISPOSITIVO
/ VUE GENERALE DU PERIPHERIQUE

7
DEVICE INSTALLATION
Note: The driver must be fully installed before the
ExpressCard is connected to the laptop
Step 1: Insert the driver CD, and then click on the Driver
Installation button. If you do not see the menu with the
driver installtion button shortly after inserting the CD,
then you will need to go to the My Computer/Computer
window to start the CD. Once you are at the My
Computer/Computer window, right-click on the CD drive,
and then select AutoRun. This should start the CD allow
you to access the menu.
Step 2: Read the End-User License Agreement, select I
accept the terms in the License Agreement, and then
click on the Next button
Step 3: On the next window, click on Browse, choose
the folder where you would like to install the driver, and
then click on the Install button.
Step 4: It will take some time for the driver software to
install. During this time, you may see Windows Software
Installation/Windows Security pop-up. Please click on
Continue Anyway to these messages.
Step 5: You will see one final window with a Finish
button. Click the Finish button to complete the
installation.
Step 6: Once you have clicked the Finish button to
complete the software installation connect the power
adapter to the power port on the ExpressCard, and then
connect the USB to DC power cable to any available
USB port on the computer.
Step 7: Connect the ExpressCard to an available
ExpressCard slot on the laptop.
Note: The laptop’s ExpressCard slot may be blocked by
a protective cover. Please reference your laptop’s
owner’s manual for specific instructions on removing any
protective covers from the laptop’s ExpressCard slot
INSTALACIÓN DEL DISPOSITIVO
Nota: Debe instalarse el controlador antes de conectar
la tarjeta ExpressCard a la laptop
Paso 1: Inserte el CD del controlador y después haga
clic en el botón Instalación del Controlador (Driver
Installation) Si no ve el menú con el botón de instalación
del controlador poco después de insertar el CD de
instalación, entonces necesitará ir a la ventana Mi
PC/Equipo para iniciar el CD. Una vez que esté en la
ventana Mi PC/Equipo, haga clic con el botón derecho
del ratón en la unidad de CD y seleccione AutoRun
(ejecutar automáticamente). Esto debería iniciar el CD
para permitirle acceder al menú.
Paso 2: Lea el Contrato de Licencia para el Usuario
Final, seleccione “Acepto los términos y condiciones” (I
accept the terms) y después haga clic en el botón
Siguiente (Next).
Paso 3: En la siguiente ventana haga clic en Examinar
(Browse), elija la carpeta en la que desea instalar el
controlador y después haga clic en el botón Instalar.
Paso 4: La instalación del controlador tomará algunos
minutos. Durante este tiempo, es posible que usted vea
aparecer ventanas de instalación de software y de
Seguridad de Windows. Por favor haga clic en Continuar
de Todas Formas (Continue Anyway)en estos mensajes
Paso 5: Usted verá una última ventana con un botón
Finalizar (Finish). Haga clic en el botón Finalizar para
terminar la instalación.
Paso 6: Después de hacer clic en el botón Finalizar para
completar la instalación del software, conecte el
adaptador de corriente al puerto de corriente en la tarjeta
ExpressCard y en seguida, conecte el cable de corriente
USB a DC en cualquiera de los puertos USB disponibles
en la computadora
Paso 7: Conecte la tarjeta ExpressCard en una entrada
ExpressCard disponible en la laptop.
Nota: Es posible que la entrada ExpressCard de la
laptop tenga una tapa protectora. Por favor consulte el
manual del propietario de su laptop para conocer las
instrucciones específicas para quitar la tapa protectora
de la entrada ExpressCard.
INSTALLATION DU PERIPHERIQUE
Remarque: Le pilote doit être entièrement installé avant
de connecter la carte ExpressCard à l’ordinateur
portable.
Etape 1: Insérez le CD-pilote, puis cliquez sur la fonction
Installation du pilote. Si vous ne voyez pas le menu
s’afficher après avoir inséré le CD, rendez-vous dans la
fenêtre Mon Ordinateur/Ordinateur pour lancer le CD.
Une fois que vous serez dans la fenêtre Mon
Ordinateur/Ordinateur, faites un double-clic droit sur le
lecteur CD, puis sélectionnez AutoRun. Ceci devrait
lancer le CD et vous donner accès au menu.
Etape 2: Lisez les termes du Contat de Licence
l’utilisteur final, sélectionnez J’accepte les termes du
contrat sous la rubrique J’accepte les termes du Contat
de Licence, puis cliquez sur Suivant.
Etape 3: A la fenêtre suivante, cliquez sur Parcourir pour
choisir le dossier dans lequel vous souhaitez installer le
pilote, puis cliquez sur la touche Installer.
Etape 4: L’installation du pilote peut durer quelques
minutes. Pendant cette période, vous pouvez voir
s’afficher une fenêtre contextuelle de sécurité Windows
Software Installation/Windows. Cliquez sur Poursuivre
pour passer ces messages.
Etape 5: Vous verrez s’afficher une dernière fenêtre
avec une touche Terminer. Cliquez sur Terminer pour
terminer l’ installation.
Etape 6: Une fois que vous avez cliqué sur le bouton
« Terminer » pour terminer l’installation du logiciel,
branchez l’adaptateur d’alimentation au point d’accès de
l’ExpressCard, puis branchez le câble d’alimentation CC
à USB à tout port USB disponible sur votre ordinateur.
Etape 7: Branchez la carte ExpressCard à l’un des
ports ExpressCard de l’ordinateur portable.
Remarque: L’entrée du port ExpressCard peut être
bloquée par un capuchon de protection. Consultez le
manuel d’utilisation de votre ordinateur portable pour
plus de renseignement à propos du capuchon de
protection du port ExpressCard
D
EVICE
I
NSTALLATION
La page est en cours de chargement...
La page est en cours de chargement...

10
At Cables To Go, we want you to be totally confident in your purchase. That is why we offer a one year warranty on this device.
If you experience problems due to workmanship or material defect for the duration of this warranty, we will repair or replace this
device. To request a Return Merchandise Authorization (RMA) number, contact customer service at 800-506-9607 or
www.cablestogo.com
En Cables To Go queremos que confíe completamente en su compra. Esa es la razón por la que ofrecemos un año de
garantía en este dispositivo. Si experimenta problemas debidos a mano de obra o defectos de material durante el periodo de
validez de esta garantía, repararemos o sustituiremos este dispositivo. Para solicitar un número de autorización de devolución
de mercancía, contacte con el servicio de atención al cliente en el número de teléfono 800-506-9607 o visite
www.cablestogo.com
Chez Cables To Go, nous voulons que vous soyez complètement satisfait de votre achat. C'est pourquoi vous bénéficiez d'un
an de garantie sur cet appareil. Si vous rencontrez des problèmes liés à des défauts matériels ou de fabrication pendant la
durée de cette garantie, nous réparerons ou remplacerons cet appareil. Pour demander un numéro d'autorisation de retour de
marchandise (ARM), contactez le service client au 800-506-9607 ou www.cablestogo.com
CABLES TO GO
®
ONE YEAR WARRANTY / UN AÑO DE GARANTÍA CABLES TO GO
®
/ GARANTIE D'UN AN DE CABLES
TO GO
®
La page est en cours de chargement...

12
For more information on this product or to check for updated drivers,
manuals or frequently asked questions please visit our website.
Para obtener más información sobre este producto o para comprobar controladores actualizados,
manuales o preguntas frecuentes, visite nuestro sitio web.
Pour plus d'informations concernant ce produit ou pour rechercher des pilotes actualisés,
des manuels ou des questions souvent posées, veuillez visiter notre site web.
www.cablestogo.com
V
ER
.
1.0.08.03.10
-
 1
1
-
 2
2
-
 3
3
-
 4
4
-
 5
5
-
 6
6
-
 7
7
-
 8
8
-
 9
9
-
 10
10
-
 11
11
-
 12
12
-
 13
13


dans d''autres langues
- English: C2G 29059 Owner's manual
- español: C2G 29059 El manual del propietario
Documents connexes
Autres documents
-
Trust 2-Port USB 3.0 ExpressCard Manuel utilisateur
-
-
LaCie D2 Quadra Guide d'installation
-
Belkin F4U023B Manuel utilisateur
-
Hama 00053321 Le manuel du propriétaire
-
Acer TravelMate P633-V Guide de démarrage rapide
-
Acer TRAVELMATE Guide de démarrage rapide
-
Acer TravelMate P643-M Guide de démarrage rapide
-
Acer TravelMate P453-MG Guide de démarrage rapide