
Quick start guide
EL51103/EL51203/EL51253/
EL51303/EL51353/EL51403/
EL51453/EL51503
DECT 6.0 cordless telephone
with caller ID/call waiting
Scan the QR code for
support information

Congratulations
on your purchase of this AT&T product. Before using this AT&T product, please read
the Important safety information section on pages 1-3 of this manual.
Both the model and serial numbers of your AT&T product can be found on the
bottom of the telephone base. Save your sales receipt and original packaging in
case it is necessary to return your telephone for warranty service.
For customer service, please visit our website at https://telephones.att.com
or call 1 (800) 222-3111. In Canada, dial 1 (866) 288-4268.
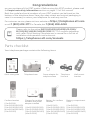
Parts checklist
Your telephone package contains the following items.
Telephone
line cord
Power adapter for
telephone base
Telephone baseQuick start guide
Cordless handset
(1 for EL51103)
(2 for EL51203/EL51253)
(3 for EL51303/EL51353)
(4 for EL51403/EL51453)
(5 for EL51503)
Charger for cordless
handset with power
adapter installed
(1 for EL51203/EL51253)
(2 for EL51303/EL51353)
(3 for EL51403/EL51453)
(4 for EL51503)
Battery for cordless
handset
(1 for EL51103)
(2 for EL51203/EL51253)
(3 for EL51303/EL51353)
(4 for EL51403/EL51453)
(5 for EL51503)
Battery compartment
cover
(1 for EL51103)
(2 for EL51203/EL51253)
(3 for EL51303/EL51353)
(4 for EL51403/EL51453)
(5 for EL51503)
Please refer to the online EL51103/EL51203/EL51253/EL51303/
EL51353/EL51403/EL51453/EL51503 DECT 6.0 cordless telephone
with caller ID/call waiting Complete user’s manual for a full set of
installation and operation instructions at
https://telephones.att.com/manuals.
Wall-mount
bracket
Quick start guide
EL51103/EL51203/EL51253/
EL51303/EL51353/EL51403/
EL51453/EL51503
DECT 6.0 cordless telephone
with caller ID/call waiting
Scan the QR code for
support information

1
Important safety information
This symbol is to alert you to important operating or servicing instructions
that may appear in this user’s manual. Always follow basic safety precautions
when using this product to reduce the risk of injury, re, or electric shock.
Safety information
fRead and understand all instructions in the user’s manual. Observe all markings on
the product.
fAvoid using a telephone during a thunderstorm. There may be a slight chance of
electric shock from lightning.
fDo not use a telephone in the vicinity of a gas leak. Under certain circumstances,
a spark may be created when the adapter is plugged into the power outlet, or
when the handset is replaced in its cradle. This is a common event associated with
the closing of any electrical circuit. In an inadequately ventilated environment,
the user should not plug the phone into a power outlet, nor put a charged
handset into the cradle where there are concentrations of ammable or ame-
supporting gases. A spark in such an environment could create a re or explosion.
Such environments might include: medical use of oxygen without adequate
ventilation; industrial gases (cleaning solvents; gasoline vapors; etc.); a leak of natural
gas; etc.
fDo not use this product near water or when you are wet. For example, do not use
it in a wet basement or shower, nor next to a swimming pool, bathtub, kitchen sink
and laundry tub. Do not use liquids or aerosol sprays for cleaning. If the product
comes in contact with any liquid, unplug any line or power cord immediately. Do not
plug the product back in until it has dried thoroughly.
fInstall this product in a protected location where no one can trip over any line or
power cords. Protect cords from damage or abrasion.
fIf this product does not operate normally, see the Troubleshooting section of the
online Complete user’s manual. If you cannot solve the problem, or if the product
is damaged, refer to the Limited warranty section (pages 24 - 26). Do not
open this product except as directed in your user’s manual. Opening the product or
reassembling it incorrectly may expose you to hazardous voltages or other risks.
fReplace batteries, only as described in your user’s manual (Page 6). Do not burn
or puncture batteries — they contain caustic chemicals.
fThis power adapter is intended to be correctly oriented in a vertical or oor mount
position. The prongs are not designed to hold the plug in place if it is plugged into a
ceiling or an under-the-table/cabinet outlet.
fFor pluggable equipment, the socket-outlet shall be installed near the equipment
and shall be easily accessible.
CAUTIONS:
fUse only the power adapter provided with this product. To obtain a replacement,
visit our website at https://telephones.att.com or call
1 (800) 222-3111. In Canada, dial 1 (866) 288-4268.

2
Important safety information
CAUTION: To prevent risk of re or battery explosion, replace with the correct
battery type. Dispose of used batteries according to the instructions.
fDisconnect the telephone line from the equipment before open the battery door.
Do not use the battery in following conditions:
fHigh or low extreme temperature during use, storage or transportation.
fReplacement of a battery with an incorrect type that can defeat a safeguard.
fDisposal of a battery into fire or a hot oven, or mechanically crushing or
cutting of a battery, that can result in an explosion.
fLeaving a battery in an extremely high temperature surrounding
environment that can result in an explosion or the leakage of flammable
liquid or gas.
fA battery subjected toextremely low air pressure that can result in an
explosion or the leakage of flammable liquid or gas.
fU
se only the supplied rechargeable battery or replacement battery (model
BT162342/BT262342).
To order, visit our website at
https://telephones.att.com, or call 1 (800) 222-3111. In
Canada, dial 1 (866) 288-4268.
fThe applied nameplate is located at the bottom or near of the product.
Especially about cordless telephones
fPrivacy: The same features that make a cordless telephone convenient create
some limitations. Telephone calls are transmitted between the telephone base
and the handset by radio waves, so there is a possibility that your cordless
telephone conversations could be intercepted by radio receiving equipment within
range of the cordless handset. For this reason, you should not think of cordless
telephone conversations as being as private as those on corded telephones.
fElectrical power: The telephone base of this cordless telephone must be
connected to a working electrical outlet which is not controlled by a wall switch.
Calls cannot be made from the handset if the telephone base is unplugged,
switched o or if the electrical power is interrupted.
fPotential TV interference: Some cordless telephones operate at frequencies
that may cause interference to TVs and VCRs. To minimize or prevent such
interference, do not place the telephone base of the cordless telephone near
or on top of a TV or VCR. If interference is experienced, moving the cordless
telephone farther away from the TV or VCR will oen reduce or eliminate the
interference.
fRechargeable batteries: This product contains nickel-metal hydride rechargeable
batteries. Exercise care in handling batteries in order not to create a short
circuit with conductive material such as rings, bracelets, and keys. The battery or
conductor may overheat and cause harm. Observe proper polarity between the
battery and the battery charger.
i

3
Important safety information
fNickel-metal hydride rechargeable batteries: Dispose of these batteries in a safe
manner. Do not burn or puncture. Like other batteries of this type, if burned or
punctured, they could release caustic material which could cause injury.
The RBRC Seal means that the manufacturer is voluntarily
participating in an industry program to collect and recycle nickel-
metal hydride rechargeable batteries when taken out of service
within the United States. These batteries may be taken to a
participating local retailer of replacement batteries or recycling
center. You may call 1-800-8-BATTERY® for locations accepting
spent Ni-MH batteries.
The RBRC Seal and 1-800-8-BATTERY® are registered trademarks of
Call2recycle, Inc.
Precautions for users of implanted cardiac pacemakers
Cardiac pacemakers (applies only to digital cordless telephones):
Wireless Technology Research, LLC (WTR), an independent research entity, led
a multidisciplinary evaluation of the interference between portable wireless
telephones and implanted cardiac pacemakers. Supported by the U.S. Food and
Drug Administration, WTR recommends to physicians that:
Pacemaker patients:
fShould keep wireless telephones at least six inches from the pacemaker.
fShould NOT place wireless telephones directly over the pacemaker, such as in a
breast pocket, when it is turned ON.
fShould use the wireless telephone at the ear opposite the pacemaker.
WTR’s evaluation did not identify any risk to bystanders with pacemakers from
other persons using wireless telephones.
ECO mode
This power conserving technology reduces power consumption for optimal battery
performance. The ECO mode activates automatically whenever the handset is
synchronized with the telephone base.
SAVE THESE INSTRUCTIONS

4
Table of contents
Important safety information ....................................................................................................1
Install ...........................................................................................................................................................5
Wall-mount installation (optional) ......................................................................................... 7
Handset overview ..............................................................................................................................8
Telephone base overview ............................................................................................................11
Initial basic settings ........................................................................................................................ 12
Date and time ................................................................................................................................12
Ringer volume ................................................................................................................................12
LCD language .................................................................................................................................12
Dial mode .......................................................................................................................................... 13
Temporary tone dialing ...........................................................................................................13
Set speed dial voicemail number .....................................................................................13
Operate ...................................................................................................................................................14
Directory ................................................................................................................................................15
Caller ID ................................................................................................................................................... 15
Review and dial a number in the call log ......................................................................15
Save a caller ID log entry to the directory .................................................................. 16
Delete a caller ID log entry .................................................................................................... 16
Erase missed calls indicator in the call log .................................................................16
Call block ................................................................................................................................................16
Block calls without number ..................................................................................................16
Add a call block entry ...............................................................................................................17
Review call block list .................................................................................................................. 17
Save a caller ID log entry to call block list ...................................................................17
Delete a call block entry .........................................................................................................17
Mute rst rings .............................................................................................................................. 17
For C-UL compliance ......................................................................................................................18
FCC Part 68 and ACTA ...................................................................................................................22
FCC Part 15 ............................................................................................................................................23
Limited warranty ............................................................................................................................. 24
Technical specications ...............................................................................................................27

5
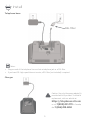
Telephone base
Notes:
f Plug one end of the telephone line cord into a telephone jack or a DSL lter.
f If you have DSL high-speed Internet service, a DSL lter (not included) is required.
Charger
Caution: Use only the power adapter(s)
provided with this product. To obtain a
replacement, visit our website at
https://telephones.att.com
or call 1 (800) 222-3111. In Canada,
dial 1 (866) 288-4268.
Install
DSL lter

6
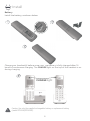
Battery
Install the battery, as shown below.
Caution: Use only the supplied rechargeable battery or replacement battery
(model BT162342/BT262342).
Charge your handset(s) before initial use. The battery is fully charged aer 16
hours of continuous charging. The CHARGE light on the top of the handset is on
during charging.
Install
THIS SIDE UP / CE CÔTÉ VERS LE HAUT
Battery Pack / Bloc-piles
BT162342/BT262342
(2.4V 300mAh Ni-MH)
WARNING / AVERTISSEMENT :
DO NOT BURN OR PUNCTURE BATTERIES.
NE PAS INCINÉRER OU PERCER LES PILES.
Made in China / Fabriqué en chine
BY1021
THIS S
Battery Pack / Bloc-pil
BT162342/BT262342
(2
WARNING / AVERTISSEMEN
DO NOT BURN OR PUNCTURE
NE PAS INCINÉRER OU PER
Made in China / Fabriqué
CHARGE light

7
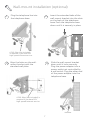
Wall-mount installation (optional)
Plug the telephone line into
the telephone base.
Align the holes on the wall-
mount bracket with the
standard wall plate.
Slide the wall-mount bracket
down until it locks securely.
Plug the power adapter into a
power outlet not controlled by
a wall switch. Plug the other end
of the power adapter into the
telephone base.
1
2
34
Insert the extended tabs of the
wall-mount bracket into the slots
on the back of the telephone
base. Push the telephone base
down until it is securely in place.
A DSL lter (not included)
is required if you have DSL
high-speed Internet service.
DSL lter
A DSL lter (not included) is
required if you have DSL
high-speed Internet service.

8
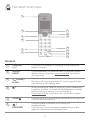
Handset
1CHARGE
light
fOn when the handset is charging in the telephone
base or charger.
2
REDIAL/
PAUSE
fPress repeatedly to view the last 10 numbers dialed.
fWhile entering numbers, press and hold to insert a
dialing pause.
3
PHONE/
FLASH
fPress to make or answer a call.
fDuring a call, press to answer an incoming call when
you receive a call waiting alert.
4
1 fWhile reviewing a caller ID log entry, press repeatedly
to add or remove 1 in front of the telephone number
before dialing or saving it in the directory.
fPress and hold to set or dial your voicemail number.
5
TONE fPress to switch to tone dialing temporarily during a call
if you have pulse service.
6/
SPEAKER
fPress to make or answer a call using the
speakerphone.
fPress to turn on the handset speakerphone, press
again to resume normal handset use.
Handset overview
1
2
3
4
5
6
7
8
9
10
11
12
13

9
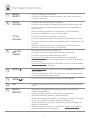
7
MENU/
SELECT
fPress to display the menu.
fOnce in the menu, press to select an item or save an
entry or setting.
8
p DIR/
VOLUME
fPress to scroll up while in menus.
fPress to increase the listening volume when on a call.
fPress to show directory entries when the handset is
not in use.
fWhile entering names or numbers in the directory,
press to move the cursor to the right.
q CID/
VOLUME
fPress to scroll down while in menus.
fPress to decrease the listening volume when on a call.
fPress to show the caller ID log when the handset is not
in use.
fWhile entering names or numbers in the directory,
press to move the cursor to the le.
9
OFF/
CANCEL
fDuring a call, press to hang up.
fPress to cancel an operation while in a menu.
fPress to return to the previous menu.
fPress and hold to exit menu display completely.
fWhen the handset is ringing, press to mute the ringer
temporarily.
fPress and hold while the handset is not in use to erase
the missed call indicator.
10 QUIET fPress and hold to set and turn on the QUIET mode, or
turn it o.
fWhen reviewing a caller ID log entry, press repeatedly
to view other dialing options.
11
OPER 0 fPress to insert a space while entering names.
12
INT fPress to initiate an intercom conversation or transfer
a call.
13 MUTE/
DELETE
fWhen the telephone is ringing, press to mute the
ringer temporarily.
fDuring a call, press to mute the microphone .
fWhile predialing, press to delete digits.
fWhile reviewing the redial list, directory, caller ID log or
block list, press to delete an individual entry.
fWhen entering names or numbers, press to delete a
digit or character.
fWhen entering names or numbers, press and hold to
erase all digits or characters.
Handset overview

10
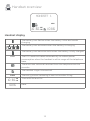
Handset display
The battery icon ashes when the battery is low and needs
charging.
The battery icon animates when the battery is charging.
The battery icon becomes solid when the battery is fully charged.
ECO The ECO mode activates automatically to reduce power
consumption when the handset is within range of the telephone
base.
There are new voicemail received from the telephone service
provider.
The handset ringer is turned o.
NEW The entry you are reviewing is new in the caller ID log.
10:30AM
PM
Time with AM and PM.
10/16 Date.
Handset overview
HANDSET 1
ECO NEW
10:30
PM
AM 10/16

11
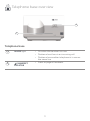
Telephone base
1
IN USE light fOn when the handset is in use.
fFlashes when there is an incoming call.
fFlashes when another telephone is in use on
the same line.
2/HANDSET
LOCATOR
fPress to page all handsets.
Telephone base overview
2
1

12
Aer you install your telephone or power returns following a power outage, the
handset will prompt you to set the date and time. To skip setting the date and time,
press OFF/CANCEL on the handset.
We recommend you program your telephone system before use. The following
are a few examples of common features to set before using the telephone. Refer
to the Handset and telephone settings in the Complete user’s manual for detailed
instructions on setting all telephone features.
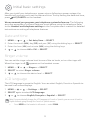
Date and time
1. MENU -> or -> Set date/time -> SELECT.
2. Enter the month (MM), day (DD) and year (YY) using the dialing keys -> SELECT.
3. Enter the hour (HH) and minute (MM) using the dialing keys.
4. or to choose AM or PM -> SELECT.
Ringer volume
You can set the ringer volume level to one of the six levels, or turn the ringer o.
When the ringer is o, appears on the handset screen.
1. MENU -> or -> Ringers -> SELECT.
2. SELECT to select Ringer volume.
3. or to choose the desire level -> SELECT.
LCD language
The LCD language is preset to English. You can select English, French or Spanish to
be used in all screen displays.
1. MENU -> or -> Settings -> SELECT.
2. SELECT again to select LCD language.
3. or to choose English, Français or Español -> SELECT.
Note: If you accidentally change the LCD language to French or Spanish, you can reset it back to
English without going through the French or Spanish menus.
f Press MENU on the handset in idle mode -> enter *364#.
Initial basic settings

13
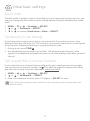
Dial mode
The dial mode is preset to touch-tone dialing. If you have pulse (rotary) service, you
need to change the dial mode to pulse dialing before using the telephone to make
a call.
1. MENU -> or -> Settings -> SELECT.
2. or -> Dial mode -> SELECT.
3. or to choose Touch-tone or Pulse -> SELECT.
Temporary tone dialing
If you have pulse (rotary) service only, you can switch from pulse to touch-tone
dialing temporarily during a call. This is useful if you need to send touch-tone signals
to access your telephone banking or long distance services.
1. During a call, press TONE .
2. Use the dialing keys to enter the number. The telephone sends touch-tone
signals. The telephone automatically returns to pulse dialing mode aer you end
the call.
Set speed dial voicemail number
If you subscribe to a voicemail service offered by your telephone service provider,
you can save the voicemail number to 1 on each handset for easy access. When
you want to retrieve voicemail messages, press and hold 1.
1. MENU -> or -> Settings -> SELECT.
2. or -> Voicemail # -> SELECT.
3. Enter the voicemail number (up to 30 digits) -> SELECT to save.
Note: Contact your telephone service provider for more information and assistance about your
voicemail service.
Initial basic settings

14
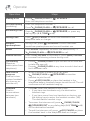
Operation Steps
Making a call Press
PHONE/FLASH or /SPEAKER ->
Enter the telephone number.
On-hook dialing
(predialing)
Enter the telephone number ->
Press
PHONE/FLASH or /SPEAKER to call.
Answering a call Press
PHONE/FLASH or /SPEAKER, or press any
dialing keys (0-9, TONE or #).
Ending a call Press
OFF/CANCEL or return the handset to the
telephone base or charger.
Handset
speakerphone During a call, press /SPEAKER to switch between
handsfree speakerphone and normal handset use.
Redial Press REDIAL repeatedly to select the desired entry ->
PHONE/FLASH or /SPEAKER to call.
Volume control Press qCID/VOLUME to decrease or press pDIR/VOLUME
to increase the listening volume during a call.
Call waiting
(Requires
subscription from
telephone)
f Press
PHONE/FLASH to put current call on hold and
to take the new call.
f Press
PHONE/FLASH at any time to switch back and
forth between calls.
Join a call in
progress
(Use up to two
system handsets
at a time on an
outside call.)
f When a handset is already on a call, press
PHONE/FLASH or /SPEAKER on another
handset to join the call.
f Press
OFF/CANCEL or place the handset in the
telephone base or handset charger to exit the call. The call
continues until all handsets hang up.
Intercom
(Use for
conversations
between two
handsets.)
f Press INT when the handset is not in use.
fIf you have two handsets only, the destination
handset rings.
fIf you have more than two handsets or devices, use
the dialing keys to enter the handset number (1-5).
The destination handset rings.
f To answer the intercom call, press
PHONE/FLASH,
/SPEAKER, INT or any dialing keys (0-9, TONE or #)
on the destination handset.
f To end the intercom call, press
OFF/CANCEL or place
the handset back in the telephone base or charger.
Operate

15
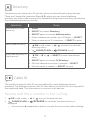
Directory
The directory can store up to 50 entries, which are shared by all system devices.
There are 9 speed dial locations (0 and 2-9) where you can store telephone
numbers you wish to dial more quickly. Speed dial assignments can only be selected
from the existing directory entries.
Operation Steps
Add an entry in the
directory
1. MENU.
2. SELECT to choose Directory.
3. SELECT again to choose Add new entry.
4. Enter a telephone number up to 30 digits -> SELECT.
5. Enter a name up to 15 characters -> SELECT to save.
Search/dial an entry 1. DIR in idle mode -> / to select the desired
directory entry.
2.
PHONE/FLASH or /SPEAKER to call.
Add a call log entry in
the directory 1. CID -> or -> SELECT to select the desired
entry.
2. SELECT again to choose To Directory.
3. Edit the telephone number if needed -> SELECT.
4. Edit the name if needed -> SELECT to save.
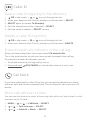
Caller ID
This product supports caller ID services oered by most telephone service
providers. The telephone stores caller ID information of the last 50 incoming calls in
the telephone base. This information is common to all devices.
Review and dial a number in the call log
1. CID in idle mode -> or to scroll through the list.
2.
PHONE/FLASH or /SPEAKER to call when the desired entry is
displayed.
fYou can press # repeatedly to add or remove 1 in the number before dialing.

16
Caller ID
If you have subscribed to caller ID service, you can set the telephone to block
unknown calls and certain undesired calls. The call block list can store up to 50
entries.
Block calls without number
You can use this feature to reject all incoming calls which are “out of area“ or with
numbers set to “Private“.
1. MENU -> or -> Call block -> SELECT.
2. or -> Calls w/o num -> SELECT.
3. or -> Unblock or Block -> SELECT.
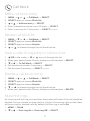
Save a caller ID log entry to the directory
1. CID in idle mode -> or to scroll through the list.
2. When your desired caller ID entry displays on the handset -> SELECT.
3. SELECT again to choose To Directory.
4. Edit the telephone number if needed -> SELECT.
5. Edit the name if needed -> SELECT to save.
Delete a caller ID log entry
1. CID in idle mode -> or to scroll through the list.
2. When your desired caller ID entry displays on the handset-> DELETE.
Erase missed calls indicator in the call log
When you have missed calls, the screen shows XX missed calls.
This is the total number of calls you have not yet reviewed in the call log.
To erase this missed call indicator, you can:
XScroll and review the call log one by one, or
XPress and hold
OFF/CANCEL on the handset when it is not in use.
Call block

17
Call block
Add a call block entry
1. MENU -> or -> Call block -> SELECT.
2. SELECT again to choose Block list.
3. or -> Add new entry -> SELECT.
4. Enter a telephone number up to 30 digits -> SELECT.
5. Enter a name up to 15 characters -> SELECT to save.
Review call block list
1. MENU -> or -> Call block -> SELECT.
2. SELECT again to choose Block list.
3. SELECT again to choose Review.
4. or to browse through the call block entries.
Save a caller ID log entry to call block list
1. CID in idle mode -> or to scroll through the list.
2. When your desired caller ID entry displays on the handset -> SELECT.
3. or -> To Call block -> SELECT.
4. Edit telephone number if necessary -> SELECT.
5. Edit the name if necessary -> SELECT to save.
Delete a call block entry
1. MENU -> or -> Call block -> SELECT.
2. SELECT again to choose Block list.
3. SELECT again to choose Review.
4. or to browse through the call block entries.
5. When your desired caller ID entry displays on the handset -> DELETE.
Mute rst rings
An incoming call will ring once and then the system will check if the call should be
blocked. You can choose to mute the rst ring for all incoming calls, so that there
will be no ring for blocked calls. By default, the rst ring is set to On.
1. MENU -> 7464#.
2. or -> First ring:On or First ring:O -> SELECT.

18
For C-UL compliance
In compliance with the bilingual requirements for safety, caution, and warning
markings of Canadian Federal and Provincial/Territorial statutes and regulations,
the French version of Important safety information is included.
Mesures de sécurité importantes
Ce symbole vous alertera d’informations importantes ou d’instructions
d’entretien pouvant apparaître dans ce guide d’utilisation. Respectez
toujours les mesures de sécurité et de sécurité de base lorsque vous utilisez
ce produit, an de réduire les risques de blessures, d’incendie, ou
d’électrocution.
Information relative à la sécurité
fVeuillez lire et comprendre toutes les instructions de ce guide d’utilisation.
Relectez toutes les inscriptions apparaissant sur le produit.
fÉvitez d’utiliser le téléphone pendant un orage. Il pourrait y avoir un faible risque
d’électrocution.
fN’utilisez pas un téléphone près d’une fuite de gaz. Dans certaines circonstances,
une ammèche pourrait se produire lorsque l’adaptateur est branché à une
prise de courant, ou lorsque le combiné est déposé sur son chargeur. Ceci
est un événement fréquent associé avec la fermeture d’un circuit électrique.
L’utilisateur ne devrait pas brancher un téléphone dans une prise de courant,
et ne devrait pas déposer un combiné chargé dans le chargeur, si le téléphone
se trouve dans un environnement comportant une concentration de gaz
inammables ou ignifuges, à moins de se trouver dans un endroit où la
ventilation est adéquate. Une ammèche dans de tels environnements pourrait
provoquer une explosion. De tels environnements peuvent comprendre :
les endroits où de l’oxygène à des ns médicales est utilisé sans ventilation
adéquate; des endroits où se trouvent des gaz industriels (dissolvants de
nettoyage, des vapeurs de gazoline, etc.), une fuite de gaz naturel, etc.
fN’utilisez pas ce produit près de l’eau ou lorsque vous êtes mouillés. Par
exemple, ne l’utilisez pas dans des sous-sols humides ou sous la douche, ou
près d’une piscine, d’un bain, d’un évier de cuisine, ou d’une cuve de lavage.
N’utilisez pas de liquides, ou de vaporisateurs aérosol de nettoyage. Si le
produit entre en contact avec du liquide, débranchez immédiatement le l
téléphonique ou le cordon d’alimentation. Ne rebranchez pas le produit avant
qu’il soit complètement sec.
fInstallez cet appareil dans un endroit protégé où personne ne peut trébucher sur
les cordons d’alimentation ou la ligne téléphonique. Protégez les câbles contre
les dommages ou l’abrasion.
fSi le produit ne fonctionne pas correctement, consultez la section Dépannage
(Troubleshooting) du guide d’utilisation. Si vous ne pouvez pas régler le
problème, ou si le produit est endommagé, consultez la section Garantie limitée
(Limited warranty) des pages 24-26. N’ouvrez pas ce produit, sauf tel
qu’indiqué dans le guide d’utilisation. L’ouverture du produit ou le remontage
inadéquat pourrait vous exposer à des tensions dangereuses ou autres dangers.
La page est en cours de chargement...
La page est en cours de chargement...
La page est en cours de chargement...
La page est en cours de chargement...
La page est en cours de chargement...
La page est en cours de chargement...
La page est en cours de chargement...
La page est en cours de chargement...
La page est en cours de chargement...
-
 1
1
-
 2
2
-
 3
3
-
 4
4
-
 5
5
-
 6
6
-
 7
7
-
 8
8
-
 9
9
-
 10
10
-
 11
11
-
 12
12
-
 13
13
-
 14
14
-
 15
15
-
 16
16
-
 17
17
-
 18
18
-
 19
19
-
 20
20
-
 21
21
-
 22
22
-
 23
23
-
 24
24
-
 25
25
-
 26
26
-
 27
27
-
 28
28
-
 29
29


dans d''autres langues
- English: AT&T EL51103 User guide
Documents connexes
-
AT&T CL83107 Mode d'emploi
-
-
-
AT&T CLP99547 Guide de démarrage rapide
-
-
-
AT&T DL72210 Le manuel du propriétaire
-
-