
1 DRAWER TABLE
ASSEMBLY INSTRUCTIONS
MODEL No. FLO130-16 / 26425000
FLO130-35 / 26025002
FLO130-86 / 26325008
FLO130-114 / 26225006
ATTENTION:
Some lettered parts listed on the instruction sheets may not be in
the parts bag, they may already be assembled.
TOOLS REQUIRED
(Not included)
Phillips Screwdriver
Page 1 of 2
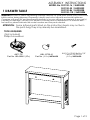
ANTI-TIP
Part No. HB-488UV (1Pc)
HBJ-10730-41
Part No.
(2 Pcs)
INSTALLED
BOLT CH. TRUSS 8x 32 x 7/8"
Part No. HCPP-078
(2 Pcs)
INSTALLED
Important:
Be sure to check all packing material carefully for small parts which may come loose
inside carton during shipment. Separate, identify and count all parts and metal hardware.
Compare with parts list and hardware illustrations to be sure all parts are present. If any part(s)
is missing or damage, contact your dealer's customer service deparment. For efficient and
fast service, please indicate the model number and the parts needed.

Back view
Furniture
ANTI-TIP BRAKET PART No
HB-488UV
WARNING INSTALL FURNITURE TIPPING RESTRAINT KIT
Warning Advertencia Avertissement
ANTI-TIP
Installation instructions:
This tip restraint must be attached to wall stub using 2” screw enclosed
1.Attach a bracket securely to the back top rail of the furniture using the 5/8” screw provided through the smaller hole.
2. Locate the other bracket on the wall over the wall stud and 2 inches below the mounting bracket secure to the back of
your unit. Attach to the wall stud using the 2’’ screw provided, through the smaller hole.
3. Place the furniture into position so both mounting brackets are vertically in line
4. Laces the end of the restraint strap though the larger hole in each mounting bracket. Bring both ends together and
slide the flat end through the looking end and flat draw it through until all slack is removed.
5. Confirm that the strap in securely laced and lacked.
Instrucciones de instalacion:
Este seguro contra volcado debe fijarse a un taco de pared con el tornillo de 2” que se incluye.
1. Coloque un soporte firmemente en la parte superior trasera del mueble ,usando el tornillo 5/8” que se proporciona y el
agujero mas pequeño
2. Ubique el otro soporte en la pared sobre un taco y 5cm (2pulg.) por debajo del soporte de montaje asegurado en la
parte bracera de la unidad .Fije al taco de pared usando el taco de 2’’ que incluye y el agujero mas pequeño .
3. Coloque el mueble en el sitio, de modo de modo que los dos soportes estén en una línea vertical.
4. Pase el extremo de una cinta de sujeción por el agujero más grande en cada soporte de montaje, una los dos
extremos y deslice el extremo plano por el lado del cierre, hasta que quede tenso.
5. Confirme que la cinta este bien asegurada.
Instructions d` installation:
Ce dispositif de sécurité doit être fixé au montai d` un mur a` l` aide de la vis de 5cm (2 po) fournie
1. fixer solidement un support a`la traversé supérieure du meuble, en passant la vis de 1,6cm (5/8 po) dans le plus petit
trou.
2. placer I` autre support sur un montant du mur, a` environ 5cm (po) plus bas, par rapport au premier support de fixation,
fixer ce support en passant la vis de 5cm (2 po) fournie dans le plus petit trou.
3. positionner le meuble afin d`aligner verticalement les deux supports de fixation
4. passer l`extrémité de i`attache dans les plus grands trous des deux supports. Joindre les extrémités insérer l`extrémité
plate dans le dispositif de blocage puis tirer au maximum pour desserrer.
5. vérifier que l`attache est solidement fixée et bloquée.
Page 2 of 2
-
 1
1
-
 2
2


ROOMS TO GO 26325008 Assembly Instructions
- Taper
- Assembly Instructions
dans d''autres langues
- English: ROOMS TO GO 26325008
- español: ROOMS TO GO 26325008
Documents connexes
-
ROOMS TO GO 27324994 Assembly Instructions
-
-
-
-
-
-
-