Scotts CS34016S Le manuel du propriétaire
- Catégorie
- Tronçonneuses électriques
- Taper
- Le manuel du propriétaire

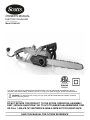
OWNER’S MANUAL
ELECTRIC CHAIN SAW
Copyright. All Rights Reserved.
Model CS34016S
Your chain saw has been engineered and manufactured to our high standard for dependability, ease of
operation, and operator safety. Properly cared for, it will give you years of rugged, trouble-free performance.
WARNING: To reduce the risk of injury, the user must read and understand the operator’s manual
before using this product.
Thank you for your purchase.
DO NOT RETURN THIS PRODUCT TO THE STORE. OPERATING, ASSEMBLY,
PART, SERVICE QUESTIONS? GO TO SCOTTS.AMERICANLAWNMOWER.COM,
OR CALL 1-800-618-7474 BETWEEN 8:00AM-5:00PM EST FOR ASSISTANCE.
SAVE THIS MANUAL FOR FUTURE REFERENCE
5006496

GENERAL POWER TOOL SAFETY WARNINGS
IMPORTANT SAFETY WARNINGS
2
Model CS34016S
WARNING: Read all safety warnings and instructions.
Failure to follow the warnings and instructions may result in
electric shock, fire and/or serious injury.
Save all warnings and instructions for future reference.
The term “power tool” in the warnings refers to your
mains-operated (corded) power tool or battery-operated
(cordless) power tool.
Work area safety
• Keep work area clean and well lit. Cluttered or dark
areas invite accidents.
• Do not operate power tools in explosive atmospheres,
such as in the presence of flammable liquids, gases or
dust. Power tools create sparks which may ignite the dust
or fumes.
• Keep children and bystanders away while operating a
power tool. Distractions can cause you to lose control.
Electrical safety
• Power tool plugs must match the outlet. Never modify
the plug in any way. Do not use any adapter plugs
with earthed (grounded) power tools. Unmodified plugs
and matching outlets will reduce risk of electric shock.
• Avoid body contact with earthed or grounded
surfaces such as pipes, radiators, ranges and
refrigerators. There is an increased risk of electric shock
if your body is earthed or grounded.
• Do not expose power tools to rain or wet conditions.
Water entering a power tool will increase the risk of
electric shock.
• Do not abuse the cord. Never use the cord for
carrying, pulling or unplugging the power tool. Keep
cord away from heat, oil, sharp edges or moving
parts. Damaged or entangled cords increase the risk of
electric shock.
• When operating a power tool outdoors, use an
extension cord suitable for outdoor use. Use of a cord
suitable for outdoor use reduces the risk of electric shock.
• If operating a power tool in a damp location is
unavoidable, use a ground fault circuit interrupter
(GFCI) protected supply. Use of a GFCI reduces the risk
of electric shock.
Personal safety
• Stay alert, watch what you are doing and use
common sense when operating a power tool. Do not
use a power tool while you are tired or under the
influence of drugs, alcohol or medication. A moment
of inattention while operating power tools may result in
serious personal injury.
• Use personal protective equipment. Always wear eye
protection. Protective equipment such as dust mask, non
-skid safety shoes, hard hat, or hearing protection used
for appropriate conditions will reduce personal injuries.
• Prevent unintentional starting. Ensure the switch is in
the off-position before connecting to power source
and/or battery pack, picking up or carrying the tool.
Carrying power tools with your finger on the switch or
energizing power tools that have the switch on invites
accidents.
• Remove any adjusting key or wrench before turning
the power tool on. A wrench or a key left attached to a
rotating part of the power tool may result in personal
injury.
• Do not overreach. Keep proper footing and balance at
all times. This enables better control of the power tool in
unexpected situations.
• Dress properly. Do not wear loose clothing or jewelry.
Keep your hair, clothing and gloves away from
moving parts. Loose clothes, jewelry or long hair can be
caught in moving parts.
• If devices are provided for the connection of dust
extraction and collection facilities, ensure these are
connected and properly used. Use of dust collection
can reduce dust-related hazards.
Power tool use and care
• Do not force the power tool. Use the correct power
tool for your application. The correct power tool will do
the job better and safer at the rate for which it was
designed.
• Do not use the power tool if the switch does not turn
it on and off. Any power tool that cannot be controlled
with the switch is dangerous and must be repaired.

GENERAL POWER TOOL SAFETY WARNINGS
• Disconnect the plug from the power source and/or the
battery pack from the power tool before making any
adjustments, changing accessories, or storing power
tools. Such preventive safety measures reduce the risk of
starting the power tool accidentally.
• Store idle power tools out of the reach of children and
do not allow persons unfamiliar with the power tool or
these instructions to operate the power tool. Power
tools are dangerous in the hands of untrained users.
• Maintain power tools. Check for misalignment or
binding of moving parts, breakage of parts and any
other condition that may affect the power tool’s
operation. If damaged, have the power tool repaired
before use. Many accidents are caused by poorly
maintained power tools.
• Keep cutting tools sharp and clean. Properly
maintained cutting tools with sharp cutting edges are less
likely to bind and are easier to control.
• Use the power tool, accessories and tool bits etc. in
accordance with these instructions, taking into
account the working conditions and the work to be
performed. Use of the power tool for operations different
from those intended could result in a hazardous situation.
Service
• Have your power tool serviced by a qualified repair
person using only identical replacement parts. This
will ensure that the safety of the power tool is
maintained.
• When servicing a power tool, use only identical
replacement parts. Follow instructions in the
Maintenance section of this manual. Use of
unauthorized parts or failure to follow Maintenance
instructions may create a risk of shock or injury.
CHAIN SAW SAFETY WARNINGS
• Keep all parts of the body away from the saw chain
when the chain saw is operating. Before you start the
chain saw, make sure the saw chain is not contacting
anything. A moment of inattention while operating chain
saws may cause entanglement of your clothing or body
with the saw chain.
• Always hold the chain saw with your right hand on the
rear handle and your left hand on the front handle.
Holding the chain saw with a reversed hand configuration
increases the risk of personal injury and should never be
done.
• Hold the power tool by insulated gripping surfaces
only, because the saw chain may contact hidden
wiring or its own cord. Saw chains contacting a live wire
may make exposed metal parts of the power tool live and
could give the operator an electric shock.
• Wear safety glasses and hearing protection. Further
protective equipment for head, hands, legs and feet is
recommended. Adequate protective clothing will reduce
personal injury by flying debris or accidental contact with
the saw chain.
• Do not operate a chain saw in a tree. Operation of a
chain saw while up in a tree may result in personal injury.
• Always keep proper footing and operate the chain saw
only when standing on fixed, secure and level surface.
Slippery or unstable surfaces such as ladders may cause a
loss of balance or control of the chain saw.
• When cutting a limb that is under tension be alert for
spring back. When the tension in the wood fibers is
released the spring loaded limb may strike the operator
and/or throw the chain saw out of control.
• Use extreme caution when cutting brush and
saplings. The slender material may catch the saw chain
and be whipped toward you or pull you off balance.
• Carry the chain saw by the front handle with the chain
saw switched off and away from your body. When
transporting or storing the chain saw always fit the
guide bar cover. Proper handling of the chain saw will
reduce the likelihood of accidental contact with the
moving saw chain.
• Follow instructions for lubricating, chain tensioning
and changing accessories. Improperly tensioned or
lubricated chain may either break or increase the chance
for kickback.
• Keep handles dry, clean, and free from oil and grease.
Greasy, oily handles are slippery causing loss of control.
• Cut wood only. Do not use chain saw for purposes
not intended. For example: do not use chain saw for
cutting plastic, masonry or non-wood building
materials. Use of the chain saw for operations different
than intended could result in a hazardous situation.
3
Model CS34016S

CHAIN SAW SAFETY WARNINGS
Causes and operator prevention of kickback:
Kickback may occur when the nose or tip of the guide bar
touches an object, or when the wood closes in and pinches
the saw chain in the cut.
Tip contact in some cases may cause a sudden reverse
reaction, kicking the guide bar up and back towards the
operator.
Pinching the saw chain along the top of the guide bar may
push the guide bar rapidly back towards the operator.
Either of these reactions may cause you to lose control of
the saw which could result in serious personal injury. Do not
rely exclusively upon the safety devices built into your saw.
As a chain saw user, you should take several steps to keep
your cutting jobs free from accident or injury.
Kickback is the result of tool misuse and/or incorrect
operating procedures or conditions and can be avoided by
taking proper precautions as given below:
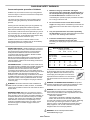
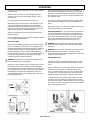
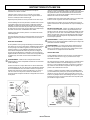
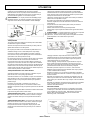
It is possible to tie the extension cord and power cord in a knot
to prevent them from becoming disconnected
during use. Make the knot as shown, then con-
nect the plug end of the power cord into the re-
ceptacle end of the extension cord. This method
can also be used to tie two extension cords to-
gether.
WARNING: CALIFORNIA PROPOSITION 65 This product
contains chemicals known to the State of California to cause
cancer and birth defects or other reproductive harm.
WARNING: Some dust and debris created by this product
could contain chemicals known to the State of California to
cause cancer, birth defects or other reproductive harm. Some
examples of these chemicals are:
-chemicals in fertilizers
-compounds in insecticides, herbicides and pesticides
-arsenic and chromium from chemically treated lumber
Your risk from exposure to these chemicals varies, depending
on how often you do this type of work. To reduce your
exposure, work in a well ventilated area and with approved
safety equipment, such as dust masks that are specially
designed to filter out microscopic particles.
WARNING: Cancer and Reproductive Harm -
www.P65Warnings.ca.gov.
DOUBLE INSULATION – Double Insulation is a concept in
safety in electric power tools, which eliminates the need for
the usual three-wire grounded power cord. All exposed
metal parts are isolated from the internal metal motor
components with protecting insulation. Double insulated
tools do not need to be grounded.
NOTE: The double insulated system is intended to protect
the user from shock resulting from a break in the tool’s
internal insulation. Observe all normal safety precautions to
avoid electrical shock.
POLARIZED PLUGS – To reduce the risk of electric shock,
this equipment has a polarized plug (one blade is wider than
the other). This equipment must be used with a suitable
polarized 2 wire or 3 wire extension cord. Polarized
connections will fit together only one way. Make sure that
the receptacle end of the extension cord has large and small
blade slot widths. If the plug does not fit fully into the
extension cord, reverse the plug. If it still does not fit, obtain
a suitable extension cord. If the extension cord does not fit
fully into the outlet, contact a qualified electrician to install
the proper outlet. Do not change the tool plug or extension
cord in any way.
WARNING: Use outdoor extension cords marked SW-A,
SOW-A, STW-A, STOW-A, SJW-A, SJTW-A, or SJTOWA.
These cords are rated for outdoor use and reduce the risk of
electric shock.
EXTENSION CORD. Make sure your extension cord is in
good condition. When using an extension cord be sure it is
heavy enough to carry the current your product will draw. An
undersized extension cord will cause a drop in line voltage
resulting in loss of power and overheating. The following
table shows the correct size to use depending on cord
length and nameplate ampere rating. If in doubt, use the
next heavier gage. The smaller the gage number, the
heavier the cord.
• Maintain a firm grip, with thumbs and fingers
encircling the chain saw handles, with both hands on
the saw and position your body and arm to allow you
to resist kickback forces. Kickback forces can be
controlled by the operator, if proper precautions are taken.
Do not let go of the chain saw.
• Do not overreach and do not cut above shoulder
height. This helps prevent unintended tip contact and ena-
bles better control of the chain saw in unexpected situa-
tions.
• Only use replacement bars and chains specified by
the manufacturer. Incorrect replacement bars and chains
may cause chain breakage and/or kickback.
• Follow the manufacturer’s sharpening and
maintenance instructions for the saw chain.
Decreasing the depth gauge height can lead to increased
kickback.
Minimum Gage for Cord Sets
Volts Total Length of cord in Feet
120V 0-25 26-50 51-100 101-150
Ampere Rating
More Not More American wire Gage
Than Than
0 - 6 18 16 16 14
6 - 10 18 16 14 12
10 - 12 16 16 14 12
12 - 16 14 12 Not Recommended
4
Model CS34016S

FEATURES
PRODUCT SPECIFICATIONS
CS34016S
Input……………………………….........120 Volt, 60 Hz, 13 Amp
Bar Length/Type………………………16” Bar / AP16-57-507P
Chain Length/Type…………………….16” Chain / ALP-50-57S
Weight………………………………………………………...12 lbs
- Automatic oiling pump system - Tool-less chain tensioning system - Oil level window - Rubber over molded handle -
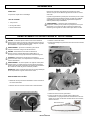
5
Model CS34016S
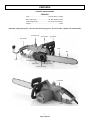
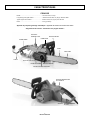
Rear Handle
Front Handle
Oil Tank Cover
Chain
Bar
Hand Guard
Cable
Lock Button
Trigger
Chain Cover
Chain Cover Knob
Tensioning Wheel
Cord Retainer
Oil Level Window

UNPACKING
This product requires no assembly.
PACKING LIST
- Chain Saw
- Blade Cover
- Instruction Manual
Carefully remove the product and any accessories from the
box. Make sure that all items listed in the packing list are
included.
Inspect the product carefully to make sure no breakage or
damage occurred during shipping. Do not discard the
packaging material until you have carefully inspected and
satisfactorily operated the product.
WARNING: If any parts are damaged or missing do not
operate this product until the parts are replaced. Failure to
heed this warning could result in serious personal injury. Call
1-800-618-7474 for assistance.
REPLACING THE GUIDE BAR AND CHAIN
DANGER: Never start the motor before installing the guide
bar, and chain. Without these parts in place, the clutch can
fly off or explode, exposing the user to possible serious injury.
WARNING: To avoid serious personal injury, read and
understand all the safety instructions provided.
DANGER: Before performing any maintenance, make sure
the tool is unplugged from the power supply. Failure to heed
this warning could result in serious personal injury.
CAUTION: Always wear gloves when handling the bar and
chain; these components are sharp and may contain burrs.
WARNING: Never touch or adjust the chain while the motor
is running. The saw chain is very sharp; always wear
protective gloves when performing maintenance to the chain
to avoid possible serious lacerations.
NOTE: When replacing the guide bar and chain, use only
identical replacement parts.
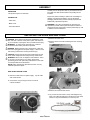
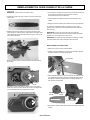
REPLACING THE SAW CHAIN
• Disconnect chain saw from power supply. Lay the chain
saw on flat surface.
• Unscrew the nut by turning the chain cover knob
counter-clockwise.
• Remove the chain cover.
• Remove the bar and chain assembly from the mounting
surface.
• Remove the old chain from the bar.
• Lay out the new saw chain in a loop and straighten any
kinks. The cutters should face in the direction of the chain
rotation. If they face backwards, turn the loop over.
ASSEMBLY
6
Model CS34016S
Chain Cover Chain Cover Knob

REPLACING THE GUIDE BAR AND CHAIN
7
Model CS34016S
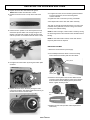
• Replace the chain drive links into the bar groove.
NOTE: Make certain of the direction of chain.
• Position the chain so there is a loop at the back of the
bar.
• Hold the chain in position on the bar and place the loop
around the sprocket. Raise it to an angle of approx..45
degrees. This will make it easier to place the saw chain
onto the sprocket. It is normal that the saw chain is slack.
• Pre-tighten the chain tension by turning the tension plate
clockwise.
• Replace the chain cover. Secure by turning the chain
cover knob clockwise. Only lightly tighten the knob as you
will still need to tension the saw chain.
TENSIONING THE SAW CHAIN
• To tighten the chain, turn the tensioning wheel clockwise.
To loosen the tension, turn the tensioning wheel
counter-clockwise.
• Tighten the chain cover knob by turning it clockwise.
• Re-adjust tension of the saw chain when necessary.
The chain is correctly tensioned when there is no sag on the
underside of the guide bar, the chain is snug, but it can be
turned by hand without binding.
NOTE: If chain is too tight, it will not rotate. Loosen by turning
the tensioning wheel. Ensure that the chain will rotate without
binding.
NOTE: A new chain tends to stretch, check chain tension
frequently and tension as required.
REPLACING THE BAR
• Disconnect chain saw from power supply.
• Use a Phillips head screw driver to remove the fixing
screw. Remove the tension plate from the old bar.
• Attach the tension plate to the new bar. Make sure the
round end of the clamping plate is placed in the direction
as shown below and the clamping bolt is placed at the
bottom. Tighten the fixing screw.
• Replace the saw chain (see Saw Chain Replacement
instructions)
Clamping plate
Round
end
Clamping bolt
Fixing screw
Tension plate
Tension plate

OPERATING
TO TURN THE TOOL ON
Push the lock button in with your thumb and then squeeze the
trigger with your fingers. (Once the tool is running, you can release
the lock button). To turn the tool OFF, release the trigger.
WARNING: To guard against injury, observe the following:
- Read instruction manual before using, save instruction manual.
- Keep hands away from chain.
- Keep hands on handles. Don’t overreach.
A good, firm grip on the saw with both hands will help you maintain
control. Don’t let go. Grip the rear handle with your right hand
whether you are right or left handed. Wrap the fingers of your left
hand over and around the front handlebar, and your left thumb
under the front handlebar.
WARNING: Do not operate chain saw in a tree, on a ladder, or on a
scaffold; this is extremely dangerous.
CAUTION: Chain coasts after turned off.
Do not use under wet conditions.
Use extreme caution when cutting small size brush, saplings or
limbs under tension, because slender and tense material may catch
the saw and be whipped toward you, pull you off balance or spring
back.
Do not cut vines and/or small underbrush.
WARNING: Do not allow familiarity with this type of tool to make
you careless. Remember that a careless fraction of a second is
sufficient to inflict serious injury.
Before you start the unit, make sure the chain saw is not contacting
any object.
WARNING: Do not cut trees near electrical wires or buildings.
Make sure you follow the instructions in maintenance for putting oil
in the chain saw.
CAUTION: Failure to lubricate the chain will cause damage to the
bar and chain. Use only a good quality bar and chain oil or, if not
available, unused SAE 30 weight motor oil may be substituted. One
minute of use will consume approx. 0.2 fl. oz. (6ml) of oil.
NOTE: It is normal for oil to seep from the saw when not in use. To
prevent seepage, empty the oil tank after each use. When storing
the unit for a long period of time (3 months or longer) be sure the
chain is lightly lubricated; this will prevent rust on the chain and bar
sprocket.
WARNING: Kickback may occur when the moving chain contacts
an object at the upper portion of the tip of the guide bar or when the
wood closes in and pinches the chain saw in the cut. Contact at the
upper portion of the tip of the guide bar can cause the chain to dig
into the object and stop the chain for an instant. The result is a
lightening fast, reverse reaction which kicks the guide bar up and
back toward the operator. If the chain saw is pinched along the top
of the guide bar, the guide bar can be driven rapidly back toward
the operator. Either of these reactions can cause loss of saw
control which can result in serious injury. Do not rely exclusively
upon the safety devices built into the saw. As a chain saw user, you
should take several steps to keep your cutting jobs free from
accident or injury.
WARNING: Do Not use the chain saw with any type of accessory
or attachment. Such usage might be hazardous.
The following precautions should be followed to minimize
kickback:
1. Always grip the saw firmly with both hands. Hold the saw
firmly with both hands when the unit is running. Place your
right hand on the rear handle and your left hand on the front
handle with your thumbs and fingers encircling the chain
saw handles. A firm grip together with a stiff left arm will help
you maintain control of the saw if kickback occurs.
2. Make sure that the area in which you are cutting is free from
obstructions. Do not let the nose of the guide bar contact a
log, branch, fence or any other obstruction that could be hit
while you are operating the saw.
3. Always cut with the unit running at full speed. Fully squeeze
the throttle trigger and maintain a steady cutting speed.
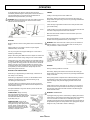
Push and Pull – This reaction force is always opposite to the
direction the chain is moving where wood contact is made. Thus,
the operator must be ready to control the PULL when cutting on
the bottom edge of the bar, and PUSH when cutting along the top
edge.
Wear non-slip gloves for maximum grip and protection.
Proper Cutting Stance
Weight should be balanced with both feet on solid ground.
Keep left arm with elbow locked in a “straight arm” position to
withstand any kickback force.
Your body should always be to the left of the chain line.
Basic Cutting Procedure
Small trees up to 6-7inches in diameter are usually cut in a single
cut. Large trees require notch cuts. Notch cuts determine the
direction the tree will fall.
WARNING: If the tree starts to fall in the wrong direction, or if the
saw gets caught or hung up during the fall, leave the saw and
save yourself.
WARNING: Periodically glance at the top of the tree during the
back-cut to assure the tree is going to fall in the desired direction.
Practice cutting a few small logs using the following technique to
get the “feel” of using the saw before you begin a major sawing
operation.
Take the proper stance in front of the wood with the saw off.
Squeeze the trigger and let the chain accelerate to full speed
before entering the cut.
Hold the saw firmly with both hands. Always keep your left hand
on the front handle and your right hand on the rear handle so that
your body is to the left of the chain line.
8
Model CS34016S

OPERATING
Keep the unit running the entire time you are cutting, maintain
a steady speed.
Allow the chain to cut for you; exert only light downward
pressure. If you force the cut, damage to the bar, chain, or
unit can result.
Do not put pressure on the saw at the end of the cut.
When felling a tree, keep everyone a safe distance from the
cutting area. During felling operations, the safe distance
should be at least twice the height of the largest trees in the
felling area. If the tree makes contact with any utility line, the
utility company should be notified immediately.
Always cut with both feet on solid ground to prevent being
pulled off balance.
Do not cut above chest height, as a saw held higher is difficult
to control against kickback forces.
FELLING A TREE
When bucking and felling operations are being performed by
two or more persons, at the same time, the felling operation
should be separated from the bucking operation by a distance
of at least twice the height of the tree being felled. Trees
should not be felled in a manner that would endanger any
person, strike any utility line or cause any property damage. If
the tree does make contact with any utility line, the utility
company should be notified immediately.
WARNING: Check the tree for damaged or dead branches
that could fall and hit you during felling.
Before any cuts are started, pick your escape route (or routes
in case the intended route is blocked); clear the immediate
area around the tree and make sure there are no obstructions
in your planned path of retreat. A clear path of safe retreat is
approximately 135 degrees from planned line of fall. The
retreat path should extend back and diagonally to the rear of
the expected line of fall.
Before felling is started, consider the force and direction of
the wind, the lean and balance of the tree, and the location of
large limbs. These things influence the direction in which the
tree will fall. Do not try to fell a tree along a line different from
its natural line of fall.
The chain saw operator should keep on the uphill side of the
terrain as the tree is likely to roll or slide downhill after it is
felled.
Remove dirt, stones, loose bark, nails, staples, and wire from
the tree where felling cuts are to be made.
NOTCHED UNDERCUT – Cut a notch about 1/3 diameter of
the tree, perpendicular to the direction of the fall. Make the
cuts of the notch so they intersect at a right angle to the line
of fall. This notch should be cleaned out to leave a straight
line. To keep the weight of the wood off the saw, always
make the lower cut of the notch before the upper cut.
WARNING: Do not fell trees during periods of high wind or
heavy precipitation. Wait to do your cutting until the hazard
has ended.
WARNING: Do not cut down trees having an extreme lean or
large trees that have rotten limbs, loose bark, or hollow
trunks. Have these trees pushed or dragged down with heavy
equipment, then cut them up.
FELLING BACK-CUT
The back-cut is always made level and horizontal, and at a
minimum of 2 inches (5cm) above the horizontal cut of the
notch.
Never cut through to the notch. Always leave a band of wood
between the notch and back-cut (approximately 2 inches
(5cm) or 1/10 the diameter of the tree). This is called “hinge”
or “hinge wood.” It controls the fall of the tree and prevents
slipping or twisting or shoot-back of the tree off the stump.
On large diameter trees, stop the back cut before it is deep
enough for the tree to either fall or settle back on the stump.
Then insert soft wooden or plastic wedges into the cut so they
do not touch the chain. The wedges can be driven in, little by
little, to help jack the tree over.
9
Model CS34016S

OPERATING
CUTTING INSTRUCTIONS
LIMBING
Limbing is removing branches from a fallen tree.
Work slowly, keeping both hands on the chain saw with a firm grip.
Always make sure your footing is secure and your weight is distributed
evenly on both feet.
Leave the larger support limbs under the tree to keep the tree off the
ground while cutting.
Limbs should be cut one at a time. Remove the cut limbs from the work
area often to help keep the work area clean and safe.
Branches under tension should be cut from the bottom up to avoid
binding the chain saw.
Keep the tree between you and the chain saw while limbing. Cut from
the side of the tree opposite the branch you are cutting.
WARNING: Never climb into a tree to limb or prune. Do not stand on
ladders, platforms, a log, or in any position which can cause you to
lose your balance or control of the saw.
PRUNING
Pruning is trimming limbs from a live tree.
Work slowly, keeping both hands on the chain saw with a firm grip.
Always make sure your footing is secure and your weight is distributed
evenly on both feet.
When pruning trees it is important not to make the finishing cut next to
the main limb or trunk until you have cut off the limb further out to
reduce the weight. This prevents stripping the bark from the main
member.
Under-buck the branch 1/3 through for your first cut. Your second cut
should over-buck to drop the branch off. Now make your finishing cut
smoothly and neatly against the main member so the bark will grow
back to seal the wound.
WARNING: SPRINGPOLES
A springpole is any log, branch, rooted stump, or sapling which is bent
under tension by other wood so that it springs back if the wood holding
it is cut or removed. On a fallen tree, a rooted stump has a high
potential of springing back to the upright position during the bucking cut
to separate the log from the stump. Watch out for springpoles, they are
dangerous. They could result in severe or fatal injury.
As the tree starts to fall, stop the chain saw and put it down
immediately. Retreat along the cleared path, but watch the action in
case something falls your way. Be alert for overhead limbs or
branches that may fall and watch your footing.
WARNING: Never cut through to the notch when making a back-cut.
The hinge controls the fall of the tree, this is a section of wood
between the notch and back-cut.
BUCKING
Bucking is the term used for cutting a fallen tree to the desired log
length.
Always make sure your footing is secure and your weight is
distributed evenly on both feet.
Cut only one log at a time. Support small logs on a saw horse or
another log while bucking.
Keep a clear cutting area. Make sure that no objects can contact the
guide bar nose and chain during cutting, this can cause kickback.
When bucking on a slope, always stand on the uphill side of the log.
To maintain complete control of the chain saw when cutting through
the log, release the cutting pressure near the end of the cut without
relaxing your grip on the chain saw handles. Do not let the chain
contact the ground. After completing the cut, wait for the saw chain
to stop before you move the chain saw. Always stop the motor
before moving from tree to tree.
BUCKING LOGS UNDER STRESS
When the log is supported along its entire length, it should be cut
from the top or over-bucking.
When the log is supported on one end, cut 1/3 diameter from the
underside or under-bucking. Then make the finishing cut by
over-bucking to meet the first cut.
As the log is being cut, it will tend to bend. The saw can become
pinched or hung in the log if you make the first cut deeper than 1/3
of the diameter of the log.
Give special attention to logs under stress to prevent the bar and
chain from pinching.
OVERBUCKING – Begin on the top
side of the log with the bottom of the
saw against the log; exert light pressure
downward. Note that the saw will tend
to pull away from you.
UNDER-BUCKING – Begin on the
under side of the log with the top of the
saw against the log; exert light pressure
upward. During under-bucking, the
saw will tend to push back at you. Be
prepared for this reaction and hold the
saw firmly to maintain control.
10
Model CS34016S
UNDERBUCKING
CUT LIMBS ONE AT A TIME AND LEAVE
SUPPORT LIMBS UNDER TREE UNTIL
LOG IS CUT
LOAD SECOND CUT
FIRST CUT
1/3 DIA.
FINISHING CUT
NOTCH
BACK CUT
HINGE
OVERBUCKING

CHAIN TENSION AND MAINTENANCE
CHAIN TENSION
Stop the engine before setting the chain tension. Make sure the guide
bar screw is loosened to finger tight, turn the tensioning wheel up or
down to tension the chain. A cold chain will be correctly tensioned
when there is no slack on the underside of the guide bar, the chain is
snug, but it can be turned by hand without binding.
Chain must be re-tensioned whenever the flats on the drive links hang
out of the bar groove.
During normal saw operation, the
temperature of the chain will
increase. The drive links of a
correctly tensioned warm chain will
hang approximately .050 in.
(1.25mm) out of the bar groove. Be
aware that chain tensioned while
warm, may be too tight upon
cooling. Check the “cold tension”
before next use.
NOTE: A new chain tends to stretch, check chain tension frequently
and tension as required.
CHAIN MAINTENANCE
CAUTION: Disconnect from the power supply and make sure the
chain has stopped before you do any work on the saw.
For smooth and fast cutting, chain needs to be maintained properly.
The chain requires sharpening when the wood chips are small and
powdery, the chain must be forced through the wood during cutting,
or the chain cuts to one side. During maintenance of your chain
remember:
- Improper filing angle of the side plate can increase the risk of
severe kickback.
- Raker (depth gauge) clearance.
- Too low increases the potential for kickback.
- Not low enough decreases cutting ability.
- If cutter teeth have hit hard objects such as nails and stones, or
have been abraded by mud or sand on the wood, have service dealer
sharpen chain.
NOTE: Inspect the drive sprocket for wear or damage when replacing
the chain. If signs of wear or damage are present in the areas indicat-
ed, have the drive sprocket replaced by a qualified individual. Call our
customer service help line at 1-800-618-7474 for assistance.
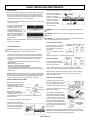
HOW TO SHARPEN THE CUTTERS
Be careful to file all cutters to the
specified angles and to the same
length, as fast cutting can be
obtained only when all cutters are
uniform.
Wear gloves for protection.
Properly tension the chain prior to
sharpening. Refer to “Chain
Tension Section” earlier in this manual. Do all of your filing at the
midpoint of the bar.
Use a 5/32 in. diameter round file and holder.
Keep the file level with the top
plate of the tooth. Do not let the
file dip or rock. Using light but
firm pressure, stroke towards
the front corner of the tooth.
Lift file away from the steel on each return stroke.
Put a few firm strokes on
every tooth. File all left hand
cutters in one direction.
Then move to the other side
and file the right hand
cutters in the opposite
direction. Occasionally
remove filing from the file
with a wire brush.
WARNING: Improper chain sharpening increases the potential of kick-
back.
WARNING: Failure to replace or repair damaged chain can cause seri-
ous injury.
WARNING: The saw chain is very sharp, always wear protective gloves
when performing maintenance to the chain.
TOP PLATE FILING ANGLE
Correct 30 degrees – File holders
are marked with guide marks to
align file properly to produce top
plate angle.
Less than 30 degrees – for cross
cutting.
More than 30 degrees – feathered edge dulls quickly.
SIDE PLATE ANGLE
Correct – 80 degrees produced
automatically if correct diameter
file is used in file holder.
Hook – “Grabs” and dulls quickly. Increases potential of kickback.
Results from using a file with a diameter too small, or file held too low.
Backward Slope – Needs too much feed pressure, causes excessive
wear to bar and chain. Results from using a file with a diameter too
large, or file held too high.
DEPTH GAUGE CLEARANCE
The depth gauge should be main-
tained at a clearance of .025 in. (0.6
mm). Use a depth gauge tool for
checking the depth gauge clearances.
Every time the chain is filed, check the
depth gauge clearance
Use a flat file and a depth gauge
jointer to lower all gauges uniformly.
Depth gauge jointers are available
in .020 in. to .035 in. (0.5 mm to 0.9
mm). Use a .025 in. (0.6 mm) depth
gauge jointer. After lowering each
depth gauge, restore original shape
by rounding the front. Be careful not to
damage adjoining drive links with the
edge of the file.
Depth gauges must be adjusted with the flat file in the same direction
the adjoining cutter was filed with the round file. Use care not to contact
cutter face with flat file when adjusting depth gauges.
Approx. .050 (1.25mm)
11
Model CS34016S

MAINTENANCE
If you drop the chain saw, carefully inspect it for damage. If the
blade is bent, housing cracked, or handles broken or if you see
any other condition that may affect the saw’s operation, call our
customer service line at 1-800-618-7474 for assistance.
Make sure the unit is disconnected from the power supply, then
use only mild soap and a damp cloth to clean the tool. Never let
any liquid get inside the tool; never immerse any part of the tool
into a liquid.
IMPORTANT: To assure product SAFETY and RELIABILITY,
repairs, maintenance and adjustment should be performed by a
qualified individual always using identical replacement parts.
CAUTION: Do not at any time let brake fluids, gasoline, petroleum
based products, penetrating oils, etc., come in contact with plastic
parts. They contain chemicals that can damage, weaken or
destroy plastic.
Ensure that the plastic bar cover is in place when storing.
Fertilizers and other garden chemicals contain agents which
greatly accelerate the corrosion of metals Do not store the tool on
or adjacent to fertilizers or chemicals.
For smooth and fast cutting, chain needs to be maintained
properly. The chain requires sharpening when the wood chips are
small and powdery, the chain must be forced through the wood
during cutting, or the chain cuts to one side. Refer to instructions
earlier in this manual for instructions on properly sharpening the
chain.
TROUBLESHOOTING
Possible Cause
- Extension cord not connected to the plug
- Cord not connected to power source
- Lock off button not fully depressed
Possible Solution
- Check extension cord is fully connected to tool
- Check extension cord is fully connected to a live receptacle
- Check that lock off is fully depressed prior to engaging trigger
switch
- Bar and chain running hot and
smoking
- Check tension for over-tight condition
- Chain oil tank empty
- Chain installed in wrong direction
- Adjust chain tension
- Fill tank with chain oil
- Reverse chain so that cutters face the right direction
- Chain tension too tight
- Check guide bar and chain for damage
- Motor runs but chain is not rotating - Adjust chain tension
- Replace damaged bar and chain with identical replacement
parts or contact our customer service center at 1-800-618-7474
for assistance.
LUBRICATION SYSTEM
BEFORE USING : Fill oil well with new quality bar and chain oil, or
if unavailable, unused SAE 30 weight motor oil may be substituted.
The chain is automatically lubricated.
Use only new bar and chain oil or unused SAE 30 weight motor oil
may be substituted. Never use wasted oil, low quality oil, or insufficient
oil. This could damage the pump; the bar and the chain which may
result in serious personal injury. Check oil level before each work
session, refill if less than ¼ full.
If the lubrication system does not work properly, check if the oil filter and
all oil-ways are clean and free from obstructions. If it is still not working,
call our customer service line at 1-800-618-7474 for assistance.
GUIDE BAR MAINTENANCE
When the guide bar shows signs of wear, reverse it on the saw to
distribute the wear for maximum bar life. The bar should be cleaned
every day of use and checked for wear and damage.
Feathering or burring of the bar rails is a normal process of bar wear.
Such faults should be smoothed with a file as soon as they occur.
A bar with any of the following faults should be replaced.
- Wear inside the bar rails which permits the chain to lay over sideways.
- Bent guide bar
- Cracked or broken rails
- Spread rails
In addition, guide bars with a sprocket at their tip must be lubricated
weekly with a grease syringe to extend the guide bar life. Using a
grease syringe, lubricate weekly in the lubricating hole.
Turn the guide bar and check that the lubrication holes and chain
groove are free from obstructions.
Problem
- Unit does not run
12
Model CS34016S

13
Model CS34016S
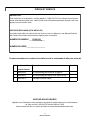
PARTS AND SERVICE
For parts or service, please call 1-800-618-7474 or visit us online at scotts.americanlawnmower.com.
Be sure to provide all relevant information when you call or visit.
REPAIR PARTS (KITS/ ITEMS)
The model/ serial number of this tool is found on a plate or label attached to the housing. Please
record the serial number in the space provided below.
MODEL NUMBER CS34016S____
SERIAL NUMBER________________
Always mention the model number when ordering kits/items for this tool.
No. Kit/Item Number Description QTY
1 CS34-SCA-1 Sprocket cover assembly kit 1
2 CS34-BCK-1 16" Bar & chain assembly kit 1
3 CS34-OTC-1 Oil cap assembly 1
CALL US FIRST !!
Call us first with questions about operating or maintaining your tool
at 1-800-618-7474 between 8:00 a.m. – 5:00 p.m. Eastern
Standard Time, or get assistance on scotts.americanlawnmower.com.

American Lawn Mower Company
The Great States Corporation
7444 Shadeland Station Way
Indianapolis, IN 46256 USA
Phone 1-800-618-7474
scotts.americanlawnmower.com
In a continued commitment to improve quality, the Manufacturer reserves the right
to make component changes or design changes when necessary.
Rev. 05/14/20
OWNER’S MANUAL
CS34016S ELECTRIC CHAIN SAW
Copyright. All Rights Reserved.
WARRANTY POLICY
Scotts Warranty policy
• 3 Year limited warranty on all Scotts corded power tools from date of purchase when used for personal, household, or family use.
The Great States Corp. (GSC) warrants to the original owner that this Scotts product and service part is free from defects in materials and
workmanship and agrees to repair or replace any defective product or part for the warranty period as stated above.
• Warranty voided if used for commercial or industrial purposes or any other improper use as determined by GSC.
• Warranty does not include repairs necessary due to operator’s abuse or negligence (including overloading the product beyond capacity
or immersion in water), or the failure to assemble, operate, maintain or store the product according to the instructions in the owner’s
manual.
• This warranty does not cover
Wear items, including but not limited to - drive belts & gears, tines, cutting blades, mower blades, saw chains, mulching blades,
blower fans, spool covers, trimmer line, blower and vacuum tubes, guide bars, high pressure hoses, wheels, handles, augers, worn
bags, power cables, and other items subject to wear over time.
Wear on batteries, including but not limited to – drops, wear and breakage on charger, exposure to extreme temperature swings
(hot or cold), battery left on charger too long, battery left uncharged for too long, and misuse or abuse of the battery.
• This warranty does not cover damage caused by cold, heat, rain, excessive humidity or other environmental extremes.
• This warranty does not cover normal deterioration of the exterior finish or normal wear and tear on the products including, but not limited
to scratches, cracks, dents, or damage caused by outside chemicals.
• This warranty is not transferable and only applies to new products sold directly from an authorized retailer. This warranty does not apply
to any product, new or used, purchased through unauthorized third-party channels. For information on authorized dealers, contact our
customer support hotline at 1-800-618-7474 (Mon-Fri 8am-5pm Est)
• Any incidental, indirect or consequential loss, damage, or expense that may result from any defect or malfunction of the products is not
covered by the warranty.
• The warranty does not include installation, assembly or normal adjustments explained in the operator’s manual. The expense of
delivering the product to the vendor and the expense of returning the product or replacement parts to the owner is not covered by the
warranty.
Additional Warranty Limitations
Some states do not allow the exclusion or limitation on how long an implied warranty lasts, so the above limitation may not apply to you.
Products sold damaged or incomplete, sold ―as is, or sold as reconditioned are not covered under the warranty.
Damage or liability caused by shipping, improper handling, improper assembly, incorrect voltage, improper wiring, improper maintenance,
improper modification or the use of accessories and/or attachments not specifically recommended is not covered by this warranty.
Proof of purchase, original dated sales receipt, must accompany all warranty claims.
For claims go to scotts.americanlawnmower.com or call our customer support hotline from 8am-5pm EST,
Mon-Fri at 1-800-618-7474

AVERTISSEMENT : afin d’éviter de se blesser, l’utilisateur doit lire et comprendre le manuel de l’utilisateur avant
d’utiliser ce produit.
CONSERVEZ CE MANUEL POUR POUVOIR LE CONSULTER ULTÉRIEUREMENT
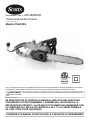
MANUEL DE L’UTILISATEUR
TRONÇONNEUSE ÉLECTRIQUE
Copyright. Tous droits réservés.
Modèle CS34016S
Votre tronçonneuse été conçue et fabriquée selon notre norme élevée de fiabilité, de facilité d’utilisation et de sécurité
de l’utilisateur. Correctement entretenue, elle vous procurera des années de service intensif et sans soucis.
Merci pour votre achat.
NE RENVOYEZ PAS CE PRODUIT AU MAGASIN. AVEZ-VOUS DES QUESTIONS
CONCERNANT LE FONCTIONNEMENT, L’ASSEMBLAGE, LES PIÈCES OU LA
RÉPARATION DU PRODUIT? ALLEZ SUR SCOTTS.AMERICANLAWNMOWER.COM,
OU COMPOSEZ LE 1-800-618-7474 ENTRE 08 h 00 et 17 h 00, HEURE NORMALE
DE L’EST, POUR TOUTE ASSISTANCE.
5006496

AVERTISSEMENTS RÈGLES DE SÉCURITÉ GÉNÉRALES RELATIVES AUX OUTILS ÉLECTRIQUES
AVERTISSEMENTS IMPORTANTS DE SÉCURITÉ
2
Modèle CS34016S
AVERTISSEMENT : Lire tous les avertissements et toutes les
instructions. Ne pas suivre l’ensemble des avertissements et des
instructions peut entraîner une électrocution, un incendie ou des
blessures graves.
Conserver les avertissements et les instructions à des fins de
référence ultérieure. Le terme « outil motorisé », utilisé dans tous les
avertissements ci-dessous désigne tout outil fonctionnant sur secteur
(câblé) ou sur piles (sans fil).
Sécurité du lieu de travail
• Garder le lieu de travail propre et bien éclairé. Les endroits
encombrés ou sombre s sont propices aux accidents.
• Ne pas utiliser d’outils électriques dans des atmosphères
explosives, par exemple en présence de liquides, gaz ou
poussières inflammables. Les outils électriques produisent des
étincelles risquant d’enflammer les poussières ou vapeurs.
• Garder les enfants et badauds à l’écart pendant l’utilisation
d’un outil électrique. Les distractions peuvent causer une perte
de contrôle.
Sécurité électrique
• Les fiches des outils électriques doivent correspondre à la
prise secteur utilisée. Ne jamais modifier la fiche, de quelque
façon que ce soit. Ne jamais utiliser d’adaptateurs de fiche
avec des outils mis à la terre. Les fiches et prises non
modifiées réduisent le risque de choc électrique.
• Éviter tout contact du corps avec des surfaces mises à la
terre, telles que tuyaux, radiateurs, cuisinières et
réfrigérateurs. Le risque de choc électrique est accru lorsque le
corps est mis à la terre.
• Ne pas exposer les outils électriques à l’eau ou l’humidité. La
pénétration d’eau dans ces outils accroît le risque de choc
électrique.
• Ne pas maltraiter le cordon d’alimentation. Ne jamais utiliser
le cordon d’alimentation pour transporter l’outil et ne jamais
débrancher ce dernier en tirant sur le cordon. Garder le
cordon à l’écart de la chaleur, de l’huile, des objets
tranchants et des pièces en mouvement. Un cordon
endommagé ou emmêlé accroît le risque de choc électrique.
• Pour les travaux à l’extérieur, utiliser un cordon
spécialement conçu à cet effet. Utiliser un cordon conçu pour
l’usage extrérieur pour réduire les risques de choc électrique.
• S’il est nécessaire d’utiliser l’outil électrique dans un endroit
humide, employer un dispositif interrupteur de défaut à la
terre (GFCI). L’utilisation d’un GFCI réduit le risque de décharge
électrique.
Sécurité personnelle
• Rester attentif, prêter attention au travail et faire preuve de
bon sens lors de l’utilisation de tout outil électrique. Ne
pas utiliser cet outil en état de fatigue ou sous l’influence
de l’alcool, de drogues ou de médicaments. Un moment
d’inattention pendant l’utilisation d’un outil électrique peut
entraîner des blessures graves.
• Utiliser l’équipement de sécurité. Toujours porter une
protection oculaire. L’équipement de sécurité, tel qu’un
masque filtrant, de chaussures de sécurité, d’un casque ou
d’une protection auditive, utilisé dans des conditions
appropriées réduira le risque de blessures.
• Éviter les démarrages accidentels. S’assurer que le
commutateur est en position d’arrêt avant de brancher
l’outil. Porter un outil avec le doigt sur son commutateur ou
brancher un outil dont le commutateur est en position de
marche peut causer un accident.
• Retirer les clés de réglage avant de mettre l’outil en
marche. Une clé laissée sur une pièce rotative de l’outil peut
causer des blessures.
• Ne pas travailler hors de portée. Toujours se tenir bien
campé et en équilibre. Ceci permettra de mieux contrôler
l’outil en cas de situation imprévue.
• Porter une tenue appropriée. Ne porter ni vêtements
amples, ni bijoux. Garder les cheveux, les vêtements et les
gants à l’écart des pièces en mouvement. Les vêtements
amples, bijoux et cheveux longs peuvent se prendre dans les
pièces en mouvement.
• Si les outils sont équipés de dispositifs de dépoussiérage,
s’assurer qu’ils sont connectés et correctement utilisés.
L’usage de ces dispositifs de dépoussiérage peut réduire les
dangers présentés par la poussière.
Utilisation et entretien des outils électriques
• Ne pas forcer l’outil. Utiliser l’outil approprié pour
l’application. Un outil approprié exécutera le travail mieux et
de façon moins dangereuse s’il est utilisé dans les limites pré-
vues.
• Ne pas utiliser l’outil si le commutateur ne permet pas de
le mettre en marche ou de l’arrêter. Tout outil qui ne peut
pas être contrôlé par son commutateur est dangereux et doit
être réparé.

AVERTISSEMENTS RÈGLES DE SÉCURITÉ GÉNÉRALES RELATIVES AUX OUTILS ÉLECTRIQUES
3
Modèle CS34016S
• Débrancher l’outil et/ou retirer le bloc-piles avant d’effectuer
des réglages, de changer d’accessoire ou de remiser l’outil.
Ces mesures de sécurité préventives réduisent les risques de
démarrage accidentel de l’outil.
• Ranger les outils motorisés hors de la portée des enfants et
ne laisser personne n’étant pas familiarisé avec l’outil ou ces
instructions utiliser l’outil. Dans les mains de personnes
n’ayant pas reçu des instructions adéquates, les outils sont
dangereux.
• Entretenir les outils motorisés. Vérifier qu’aucune pièce
mobile n’est mal alignée ou bloquée, qu’aucune pièce n’est
brisée et s’assurer qu’aucun autre problème ne risque
d’affecter le bon fonctionnement de l’outil. En cas de
dommages faire réparer l’outil avant de l’utiliser de nouveau.
Beaucoup d’accidents sont causés par des outils mal entretenus.
• Garder les outils bien affûtés et propres. Des outils
correctement entretenus et dont les tranchants sont bien affûtés
risquent moins de se bloquer et sont plus faciles à contrôler.
• Utiliser l’outil, les accessoires et embouts, etc.
conformément à ces instrutions pour les applications pour
lesquelles ils sont conçus, en tenant compte des
conditions et du type de travail à exécuter. L’usage d’un
outil motorisé pour des applications pour lesquelles il n’est pas
conçu peut être dangereux.
Dépannage
• Les réparat ions doivent être confiées à un technicien
qualifié, utilisant exclusivement des pièces identiques à
celles d’origine. Ceci assurera le maintien de la sécurité de
l’outil.
• Utiliser exclusivement des pièces identiques à celles
d’origine pour les réparations. Se conformer aux
instructions de la section Entretien de ce manuel. L’usage
de pièces non autorisées ou le non-respect des instructions
peut présenter des risques de choc électrique ou de blessures.
AVERTISSEMENTS DE SÉCURITÉ RELATIFS AU SCIE À CHAÎNE
• Éloigner toutes les parties du corps de la scie à chaîne
pendant que cette dernière fonctionne. Avant de démarrer la
scie à chaîne, s’assurer que la scie à chaîne n’est pas en
contact avec aucun objet. Un moment d’inattention pendant
l’utilisation de la scie à chaîne peut causer l’enchevêtrement des
vêtements ou toucher le corps.
• Toujours tenir la scie à chaîne en plaçant la main droite sur
la poignée arrière et la main gauche sur la poignée avant.
Tenir la scie à chaîne en inversant cette configuration des mains
augmente le risque de blessures et ne devrait jamais être faite.
• Tenir l’outil électrique seulement par les surfaces de prises
isolées, car la scie à chaîne peut toucher des câbles sous
tension. Le contact d’une scie à chaîne avec un fil sous tension
peut exposer les pièces métalliques de l’outil électrique et élec-
trocuter l’utilisateur.
• Porter des lunettes de sécurité et d’un serre-tête antibruit.
De plus, un équipement de protection pour la tête, les mains,
les jambes et les pieds est recommandé. Des vêtements de
protection adéquats réduiront le risque de blessures causées par
les objets projetés ou le contact accidentel avec la scie à chaîne.
• Ne jamais utiliser une scie à chaîne en se tenant perché
dans un arbre. L’utilisation d’une scie à chaîne en se tenant
perché dans un arbre peut causer des blessures.
• Toujours garder les pieds bien appuyés et faire
fonctionner la scie à chaîne seulement lorsque les pieds
sont sur une surface fixe, sécuritaire et à niveau. Les
surfaces glissantes ou instables, comme les échelles,
représentent un risque de déséquilibre et de perte de contrôle de
la scie à chaîne.
• Pendant la coupe d’une branche tendue, prendre garde au
rebond. Lorsque la tension des fibres du bois est relâchée, la
branche tendue peut frapper l’utilisation et/ou provoquer la
perte de contrôle de la scie à chaîne.
• Être très prudent lors de la coupe de buissons ou de
jeunes arbres. Les branches fines peuvent se coincer dans la
scie à chaînes et fouetter en direction de l’utilisateur et lui faire
perdre l’équilibre.
• Transporter la scie à chaîne par la poignée avant, avec
l’interrupteur positionné à OFF (éteint) et éloignée du
corps. Toujours installer le couvercle du guide-chaîne
pour transporter ou ranger la scie à chaîne. Une
manipulation adéquate de la scie à chaîne réduira le contact
accidentel habituel occasionné par le mouvement de la scie à
chaîne.
• Suivre les instructions de lubrification, de tension de
chaîne et de changement d’accessoires. Une tension ou
une lubrification inadéquate de la chaîne peut provoquer son
bris ou augmenter le risque de rebond.
• Garder les poignées sèches, propres et exemptes d’huile
ou de graisse. Les poignées graisseuses ou huileuses sont
glissantes et peuvent provoquer une perte de contrôle.
• Couper seulement du bois. Ne pas utiliser la scie à chaîne
pour des applications pour lesquelles elle n’est pas
conçue. Par exemple : ne pas utiliser la scie à chaîne pour
couper du plastique, de la maçonnerie ou des matériaux
de construction non dérivés du bois. L’utilisation de la scie
à chaîne pour des opérations autres que celles prévues
représente un risque de situation dangereuse.

DOUBLE ISOLATION – La double isolation est un concept de sécurité
des outils électriques, qui élimine le besoin d’un câble à trois
conducteurs avec terre. Toutes les pièces métalliques exposées sont
isolées des composants métalliques du moteur interne par une
isolation de protection. Il n’est pas nécessaire de raccorder les outils à
double isolation à la terre.
REMARQUE : le système à double isolation est conçu pour protéger
l’utilisateur d’une décharge électrique résultant d’une rupture dans
l’isolation interne de l’outil. Suivez toutes les consignes de sécurité
normales pour éviter une décharge électrique.
FICHES POLARISÉES – Afin de réduire le risque de décharge
électrique, cet équipement comporte une prise polarisée (une fiche
est plus large que l’autre). Cet équipement doit être utilisé avec une
rallonge adaptée polarisée à 2 ou 3 conducteurs. Les connexions
polarisées ne peuvent être effectuées que dans un sens. Assurez-vous
que la prise femelle de la rallonge comporte des emplacements pour
une fiche large et une fiche étroite. Si la prise ne s’adapte pas
entièrement dans la rallonge, inversez la prise. Si elle ne s’adapte
toujours pas, obtenez une rallonge appropriée. Si la rallonge ne
s’adapte pas entièrement dans la prise murale, contactez un électricien
qualifié pour installer la prise correcte. Ne changez en aucun cas la
prise de l’outil ou de la rallonge.
AVERTISSEMENT : utilisez des rallonges extérieures marquées
SW-A, SOW-A, STW-A, STOW-A, SJW-A, SJTW-A ou SJTOWA.
Ces câbles sont conçus pour une utilisation extérieure et réduisent
le risque de décharge électrique.
RALLONGE – Assurez-vous que la rallonge est en bon état. Lors de
l’utilisation d’une rallonge, assurez-vous qu’elle est d’un calibre
suffisant pour transmettre le courant appelé par le produit. Une rallonge
de calibre insuffisant provoquera une baisse de tension qui entraînera
une perte de puissance et une surchauffe. Le tableau suivant montre le
calibre correct à utiliser en fonction de la longueur du câble et de
l’intensité nominale de la plaque signalétique. En cas de doute, utilisez
le calibre immédiatement supérieur. Plus le numéro de calibre est bas,
plus le câble est lourd.
Il est possible de nouer la rallonge et le câble
d’alimentation afin de les empêcher de se
déconnecter pendant l’utilisation. Effectuez le
nœud comme montré, branchez ensuite la prise
du câble d’alimentation dans l’extrémité femelle
de la rallonge. Cette méthode peut également
être utilisée pour raccorder deux rallonges ensemble.
AVERTISSEMENT : Proposition 65 de la Californie: Ce produit
contient des agents chimiques connus dans l'État de la Californie
pour causer le cancer et des malformations congénitales ou autres
appareil reproducteur.
AVERTISSEMENT : l’État de Californie considère que certaines
poussières créées par ce produit contiennent des produits chimiques
qui sont cancérigènes et sont à l’origine de cancer, de malformations
congénitales et d’autres troubles de l’appareil reproducteur. Parmi
ces produits chimiques, citons :
-les composés d’engrais
-les composés d’insecticides, d’herbicides et de pesticides
-l’arsenic et le chrome du bois traité chimiquement.
Afin de réduire l’exposition à ces produits chimiques, portez un
équipement de sécurité homologué, comme un masque
anti-poussière spécialement conçu pour filtrer les particules
microscopiques.
4
Modèle CS34016S
Calibre minimum pour les ensembles de cables
Tension Longueur totale du câble en pieds
120 V 0-25 26-50 51-100 101-150
Intensité nominale
Supérieure Inférieure Calibre américain (AWG)
à à
0 - 6 18 16 16 14
6 - 10 18 16 14 12
10 - 12 16 16 14 12
AVERTISSEMENTS DE SÉCURITÉ RELATIFS AU SCIE À CHAÎNE
Causes du rebond et précautions à prendre:
Le rebond peut survenir lorsque le nez ou la pointe du guide-chaîne
touche un objet ou lorsque le bois se referme et se pince pendant la
coupe de la scie à chaîne.
Dans certains cas, le contact de la pointe avec un objet peut causer
une réaction inverse soudaine, projetant le guide-chaîne vers le haut et
l’arrière, en direction de l’opérateur.
Le pincement de la chaîne au haut du guide-chaîne peut causer une
projection rapide de la lame en arrière, en direction de l’utilisateur.
Chacune de ces deux réactions peut entraîner la perte de contrôle de
la scie et causer des blessures graves. Ne pas se fier
exclusivement aux dispositifs de sécurité intégrés à la scie. L’utilisateur
de la scie à chaîne doit prendre un certain nombre de précautions pour
éviter les accidents et les blessures.
Le rebond est causé par une utilisation et/ou des méthodes de travail
incorrectes et il peut être évité en prenant les précautions suivantes :
• Conserver une prise ferme en plaçant les pouces et les
doigts autour des poignées de la scie à chaîne, en gardant
les deux mains sur la scie et en positionnant le corps et le
bras de manière à résister à la force du rebond. S’il prend les
précautions nécessaires, l’utilisateur peut contrôler la force du
rebond. Ne pas échapper la scie à chaîne.
• Ne pas étirer le corps et ne pas faire de coupe au-dessus
des épaules. Ceci aidera à prévenir le contact involontaire de la
pointe et procurera un meilleur contrôle de la scie à chaîne lors
de situations inattendues.
• Utiliser seulement les guide-chaîne et les chaînes de
rechange mentionnées par le fabricant. Le remplacement des
guide-chaîne et de chaînes inadéquates peut provoquer le bris
et le rebond de la chaîne.
• Suivre les instructions d’affûtage et d’entretien fournies par
le fabricant de la scie à chaîne. La diminution du limiteur de
profondeur augmente le risque de rebond.

CARACTÉRISTIQUES
SPÉCIFICATIONS PRODUIT
CS34016S
Entrée………………..…………………………….... 120 Volt, 60 Hz, 13 Amp
Longueur/Type de guide-chaîne………………….. Guide-chaîne de 40,6 cm (16 po) / AP16-57-507P
Type/Longueur de la chaîne……………………… Chaîne de 40,6 cm (16 po) / ALP-50-57S
Poids…………………..……..……………………… 5.5 kg (12 livres)
- Systéme de pompe de graissage automatique - Système de tension de chaîne sans outil -
- Regard de niveau d’huile - Caoutchouc sur poignée moulée -
5
Modèle CS34016S
BOUCHON DU
RÉSERVOIR D’HUILE
CORDON
POIGNÉE ARRIÉRE
PROTECTION DE MAIN
POIGNÉE AVANT
CHAÎNE
GUIDE-CHAÎNE
BOUTON DE COUVERCLE DE CHAÎNE
MOLETTE DE SERRAGE
REGARD DE NIVEAU D'HUILE
BOUTON DE DÉVERROUILLAGE
DE LA GÂCHETTE
GÂCHETTE DISPOSITIF DE RETENUE
DE CÂBLE
COUVERCLE DE CHAÎNE

DANGER : ne démarrez jamais le moteur avant d’avoir installé le
guide-chaîne, la chaîne et le capot du guide-chaîne. Sans toutes ces
pièces en place, l’embrayage peut être projeté ou exploser, exposant
ainsi l’utilisateur à un risque de blessure grave.
AVERTISSEMENT : pour éviter une blessure grave, lisez et
comprenez toutes les consignes de sécurité fournies.
DANGER : avant d’effectuer une tâche de maintenance,
assurez-vous que l’outil est débranché de l’alimentation. Le
non-respect de cette consigne peut entraîner des blessures graves.
ATTENTION : portez toujours des gants pour manipuler le
guide-chaîne et la chaîne; ces composants sont coupants et peuvent
contenir des ébavures.
AVERTISSEMENT : ne touchez jamais ni ne réglez la chaîne quand
le moteur tourne. La chaîne de la tronçonneuse est très tranchante,
portez toujours des gants de protection pour effectuer la maintenance
de la chaîne afin d’éviter de graves lacerations possibles.
REMARQUE : utilisez uniquement des pièces de rechange identiques
lors du remplacement du guide-chaîne et de la chaîne.
REMPLACEMENT DE LA CHAÎNE
• Débrancher la tronçonneuse de l’alimentation. Posez la chaîne sur
une surface horizontale.
• Dévisser l’écrou en tournant le bouton dans le send antihoraire.
• Retirer le couvercle de chaîne.
• Enlevez l’assemblage du guide-chaîne et de la chaîne de la surface
de montage
• Retirez l’ancienne chaîne du guide-chaîne.
• Former une boucle avec la nouvelle chaîne et éliminer les
entortillements. Les gouges doivent être orientées dans le sens de
rotation de la chaîne. Si elles sont orientées dans le sens contraire,
retourner la boucle..
6
Modèle CS34016S
DÉBALLAGE
Ce produit ne requiert aucun assemblage.
LISTE DU CONTENU
• Tronçonneuse
• Étui du guide-chaîne
• Manuel d’instructions
Enlevez avec précaution le produit et les accessoires du carton.
Assurez-vous que tous les éléments figurant dans la liste du contenu
sont inclus.
Inspectez soigneusement le produit pour vous assurer que rien n’a été
cassé ou endommagé pendant le transport. Ne jetez pas le matériau
d'emballage tant que vous n'avez pas soigneusement inspecté et
utilisé le produit de façon satisfaisante.
AVERTISSEMENT : si des pièces sont endommagées ou
manquantes, n'utilisez pas ce produit tant que les pièces ne sont pas
remplacées. Le non respect de cette consigne peut entraîner des
blessures graves. Appelez le 1-800-618-7474 pour obtenir de l’aide.
REMPLACEMENT DU GUIDE-CHAÎNE ET DE LA CHAÎNE
ASSEMBLAGE
BOUTON DE COUVERCLE DE CHAÎNE COUVERCLE DE CHAÎNE
DIRECTION DE COUPE
La page est en cours de chargement...
La page est en cours de chargement...
La page est en cours de chargement...
La page est en cours de chargement...
La page est en cours de chargement...
La page est en cours de chargement...
La page est en cours de chargement...
La page est en cours de chargement...
La page est en cours de chargement...
La page est en cours de chargement...
La page est en cours de chargement...
La page est en cours de chargement...
La page est en cours de chargement...
La page est en cours de chargement...
La page est en cours de chargement...
La page est en cours de chargement...
La page est en cours de chargement...
La page est en cours de chargement...
La page est en cours de chargement...
La page est en cours de chargement...
La page est en cours de chargement...
La page est en cours de chargement...
-
 1
1
-
 2
2
-
 3
3
-
 4
4
-
 5
5
-
 6
6
-
 7
7
-
 8
8
-
 9
9
-
 10
10
-
 11
11
-
 12
12
-
 13
13
-
 14
14
-
 15
15
-
 16
16
-
 17
17
-
 18
18
-
 19
19
-
 20
20
-
 21
21
-
 22
22
-
 23
23
-
 24
24
-
 25
25
-
 26
26
-
 27
27
-
 28
28
-
 29
29
-
 30
30
-
 31
31
-
 32
32
-
 33
33
-
 34
34
-
 35
35
-
 36
36
-
 37
37
-
 38
38
-
 39
39
-
 40
40
-
 41
41
-
 42
42


Scotts CS34016S Le manuel du propriétaire
- Catégorie
- Tronçonneuses électriques
- Taper
- Le manuel du propriétaire
dans d''autres langues
- English: Scotts CS34016S Owner's manual