
E:\Works\4725865132\4725865132HTX9000FUC2\00COV-
HTX9000FUC2\010COV.fm
masterpage:
Right
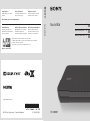
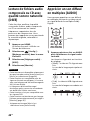
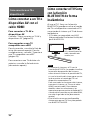
HT-X9000F
4-725-865-13(2)
Sound Bar
Sound Bar
HT-X9000F
Operating Instructions US
Manuel d’instructions FR
Manual de instrucciones ES
E:\Works\4725865132\4725865132HTX9000FUC2\00COV-
HTX9000FUC2\170BCO.fm
masterpage: Left
©2018 Sony Corporation Printed in Malaysia 4-725-865-13(2)
http://www.sony.net/
HT-X9000F
4-725-865-13(2)
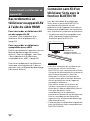
Support pages
Find information on software
updates:
Pages d’assistance
Trouvez des informations sur les
mises à jour de logiciel :
Páginas de soporte
Encuentre información sobre las
actualizaciones de software:
http://www.sony.com/soundbarsupport
Smartphone app
Support by Sony app - Find
information and get notification
about your product:
Appli de téléphone intelligent
Appli Support by Sony- Trouvez des
informations et obtenez des
notifications au sujet de votre produit:
Aplicación para smartphone
Aplicación “Support by Sony” -
Encuentre información y reciba
notificaciones de su producto:
https://sony.net/SBS
• News & Alerts / Nouvelles & Alertes / Noticias y alertas
• Software updates / Mises à jour de logiciel / Actualizaciones de software
• Tutorials / Tutoriels / Tutoriales
• Tips & Tricks / Trucs & Conseils / Sugerencias y trucos

2
US
Owner’s Record
The model and serial numbers are
located on the bottom of the Bar
Speaker. Record the serial numbers in
the space provided below. Refer to
them whenever you call upon your Sony
dealer regarding this product.
Model No. HT-X9000F
Serial No.
To reduce the risk of fire or electric
shock, do not expose this apparatus to
rain or moisture.
The unit is not disconnected from the
mains as long as it is connected to the
AC outlet, even if the unit itself has been
turned off.
To reduce the risk of fire, do not cover
the ventilation opening of the appliance
with newspapers, tablecloths, curtains,
etc.
Do not expose the appliance to naked
flame sources (for example, lighted
candles).
To reduce the risk of fire or electric
shock, do not expose this appliance to
dripping or splashing, and do not place
objects filled with liquids, such as vases,
on the appliance.
As the main plug is used to disconnect
the unit from the mains, connect the
unit to an easily accessible AC outlet.
Should you notice an abnormality in the
unit, disconnect the main plug from the
AC outlet immediately.
Do not install the appliance in a
confined space, such as a bookcase or
built-in cabinet.
CAUTION
Risk of explosion if the battery is
replaced by an incorrect type.
Do not expose batteries or appliances
with battery-installed to excessive
heat, such as sunshine and fire.
Indoor use only.
For the Bar Speaker
The nameplate is located on the bottom
of the Bar Speaker.
For the customers in the U.S.A.
The Caution Marking is put on the
Bottom Enclosure (For the Bar Speaker).
This symbol is intended to alert
the user to the presence of
uninsulated “dangerous
voltage” within the product’s
enclosure that may be of sufficient
magnitude to constitute a risk of electric
shock to persons.
This symbol is intended to alert
the user to the presence of
important operating and
maintenance (servicing)
instructions in the literature
accompanying the appliance.
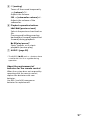
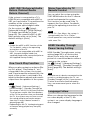
Important Safety Instructions
1) Read these instructions.
2) Keep these instructions.
3) Heed all warnings.
4) Follow all instructions.
5) Do not use this apparatus near
water.
6) Clean only with dry cloth.
7) Do not block any ventilation
openings. Install in accordance with
the manufacturer’s instructions.
WARNING

3
US
8) Do not install near any heat sources
such as radiators, heat registers,
stoves, or other apparatus (including
amplifiers) that produce heat.
9) Do not defeat the safety purpose of
the polarized or grounding-type
plug. A polarized plug has two
blades with one wider than the
other. A grounding type plug has
two blades and a third grounding
prong. The wide blade or the third
prong are provided for your safety. If
the provided plug does not fit into
your outlet, consult an electrician for
replacement of the obsolete outlet.
10) Protect the power cord from being
walked on or pinched particularly at
plugs, convenience receptacles, and
the point where they exit from the
apparatus.
11) Only use attachments/accessories
specified by the manufacturer.
12) Use only with the cart, stand, tripod,
bracket, or table specified by the
manufacturer, or sold with the
apparatus. When a cart is used, use
caution when moving the cart/
apparatus combination to avoid
injury from tip-over.
13) Unplug this apparatus during
lightning storms or when unused for
long periods of time.
14) Refer all servicing to qualified service
personnel. Servicing is required
when the apparatus has been
damaged in any way, such as power-
supply cord or plug is damaged,
liquid has been spilled or objects
have fallen into the apparatus, the
apparatus has been exposed to rain
or moisture, does not operate
normally, or has been dropped.
NOTE:
This equipment has been tested and
found to comply with the limits for a
Class B digital device, pursuant to Part
15 of the FCC Rules. These limits are
designed to provide reasonable
protection against harmful interference
in a residential installation. This
equipment generates, uses and can
radiate radio frequency energy and, if
not installed and used in accordance
with the instructions, may cause
harmful interference to radio
communications.
However, there is no guarantee that
interference will not occur in a particular
installation. If this equipment does
cause harmful interference to radio or
television reception, which can be
determined by turning the equipment
off and on, the user is encouraged to try
to correct the interference by one or
more of the following measures:
– Reorient or relocate the receiving
antenna.
– Increase the separation between the
equipment and receiver.
– Connect the equipment into an outlet
on a circuit different from that to
which the receiver is connected.
– Consult the dealer or an experienced
radio/TV technician for help.
Properly shielded and grounded cables
and connectors must be used for
connection to host computers and/or
peripherals in order to meet FCC
emission limits.
CAUTION
You are cautioned that any changes or
modifications not expressly approved in
this manual could void your authority to
operate this equipment.
This equipment must not be co-located
or operated in conjunction with any
other antenna or transmitter.
US

4
US
This equipment complies with FCC
radiation exposure limits set forth for an
uncontrolled environment and meets
the FCC radio frequency (RF) Exposure
Guidelines. This equipment should be
installed and operated keeping the
radiator at least 20cm or more away
from person’s body.
For the customers in Canada
Properly shielded and grounded cables
and connectors must be used for
connection to host computers and/or
peripherals.
This device complies with Industry
Canada’s licence-exempt RSSs.
Operation is subject to the following
two conditions:
This equipment complies with IC
radiation exposure limits set forth for an
uncontrolled environment and meets
RSS-102 of the IC radio frequency (RF)
Exposure rules. This equipment should
be installed and operated keeping the
radiator at least 20cm or more away
from person’s body.
(1) This device may not cause
interference; and
(2) This device must accept any
interference, including interference
that may cause undesired operation
of the device.

5
US
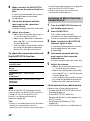
Table of Contents
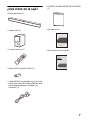
What’s in the Box .......................... 7
What You Can Do with the
System .....................................8
Guide to Parts and Controls ..........9
About the Home Menu ................ 14
Connecting to a TV or AV
Device
Connecting Sony TV with the
BLUETOOTH Function
Wirelessly .............................. 16
Connecting a TV with an Analog
Audio Cable ........................... 19
Connecting a 4K TV and 4K
Devices ..................................20
Connecting a TV Compatible with
eARC ...................................... 22
Preparing to Use the System
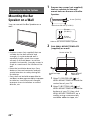
Mounting the Bar Speaker on a
Wall ........................................24
Performing the Wireless Connection
of the Subwoofer
(SECURE LINK) ........................26
When the TV Remote Control does
not Work ................................ 27
Watching Images
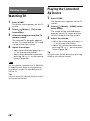
Watching TV ................................28
Playing the Connected AV
Device ....................................28
Listening to Music/Sound
Listening to Music/Sound with the
BLUETOOTH® Function ..........29
Listening to Music on a USB
Device .................................... 31
Listening to the Device Connected
with an Analog Audio
Cable ......................................32
Adjusting the Sound Quality
Enjoying Immersive Surround
Experience (VERTICAL S.) ......33
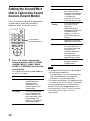
Setting the Sound Effect that is
Tailored to Sound Sources
(Sound Mode) ........................34
Making Dialogs Clearer
(VOICE) ...................................35
Enjoying Clear Sound with Low
Volume at Midnight
(NIGHT) ..................................35
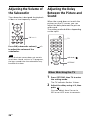
Adjusting the Volume of the
Subwoofer .............................36
Adjusting the Delay Between the
Picture and Sound .................36
Playing Compressed Audio Files or
CDs in Natural Sound Quality
(DSEE) ....................................38
Enjoying Multiplex Broadcast Sound
(AUDIO) ..................................38
Adjusting the Dialog Volume While
the DTS:X Content is Played
Back .......................................39
Using the Control for HDMI
Function
Using the Control for HDMI
Function ................................. 41
Using the “BRAVIA” Sync
Function .................................43
Changing the Settings
Customizing the Speaker Settings
for Surround Sound ...............44
Changing the Brightness of the
Indicators (DIMMER) ..............45
Saving Power in Standby
Mode .....................................45
Connecting to a
TV or AV Device
with the HDMI
Cable
Startup Guide
(separate
document)

6
US
Performing Easy Setup ............... 46
Performing Advanced Settings ...47
Updating the Software ................51
Troubleshooting
Troubleshooting ...........................52
Resetting the System .................. 58
Additional Information
Specifications .............................. 59
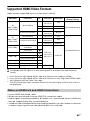
Playable Types of Audio Files ......61
Supported Input Audio
Formats ................................. 62
Supported HDMI Video
Formats ................................. 63
On BLUETOOTH
Communication .................... 65
END USER LICENSE
AGREEMENT .......................... 66
Precautions ................................. 70
Index .............................................73

7
US
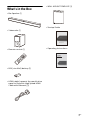
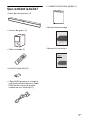
What’s in the Box
•Bar Speaker (1)
•Subwoofer (1)
• Remote control (1)
• R03 (size AAA) battery (2)
• HDMI cable (supports the specification
equal to Premium High Speed HDMI
Cable with Ethernet) (1)
• WALL MOUNT TEMPLATE (1)
•Startup Guide
• Operating Instructions
Startup Guide

8
US
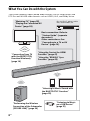
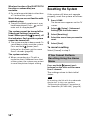
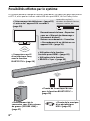
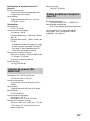
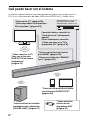
What You Can Do with the System
Blu-ray Disc™ player, cable
box, satellite box, etc.
“Watching TV” (page 28)
“Playing the Connected AV
Device” (page 28)
Basic connection: Refer to
“Startup Guide” (separate
document).
Other connections: See
“Connecting to a TV or AV
Device” (page 16).
“Using the Control for HDMI
Function” (page 41)
“Using the “BRAVIA” Sync
Function” (page 43)
“Listening to Music
on a USB Device”
(page 31)
“Listening to Music/Sound with
the BLUETOOTH® Function”
(page 29)
“Performing the Wireless
Connection of the Subwoofer
(SECURE LINK)” (page 26)
“Connecting Sony TV
with the BLUETOOTH
Function Wirelessly”
(page 16)
The system supports object-based audio formats such as Dolby Atmos and
DTS:X as well as HDR video formats such as HDR10, HLG, and Dolby Vision.

9
US
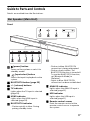
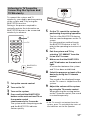
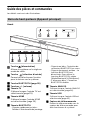
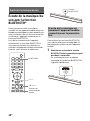
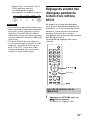
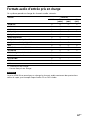
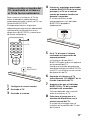
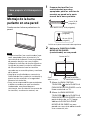
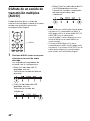
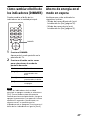
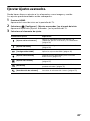
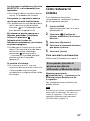
Guide to Parts and Controls
Details are omitted from the illustrations.
Front
(power) button
Turns on the system or sets it to
standby mode.
(input select) button
Selects the input for playback on the
system.
BLUETOOTH button (page 29)
+/– (volume) buttons
TV indicator
Lights when the TV input is selected
(page 28).
HDMI indicator
Lights when the HDMI input is
selected (page 28).
BLUETOOTH indicator
– Flashes quickly in blue: During
pairing standby status
– Flashes in blue: BLUETOOTH
connection is being attempted.
– Flashes slowly in blue: The
BLUETOOTH function is turned off.
To use the BLUETOOTH function,
set [Bluetooth Mode] to
[Receiver].
– Lights in blue: BLUETOOTH
connection has been established.
ANALOG indicator
Lights when the ANALOG input is
selected (page 32).
USB indicator
Lights when the USB input is
selected (page 31).
Remote control sensor
Point the remote control at the
remote control sensor to operate
the system.
Bar Speaker (Main Unit)

10
US
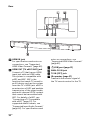
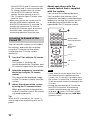
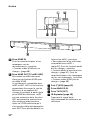
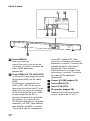
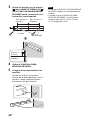
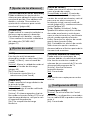
Rear
HDMI IN jack
For specifications and notes on
connections, see “Supported
HDMI Video Formats” (page 63).
HDMI OUT (TV eARC/ARC) jack
Connect a TV that has an HDMI
input jack with an HDMI cable.
The system is compatible with
eARC and ARC. ARC is the
function that sends TV sound to
an AV device such as the system
from the TV’s HDMI jack. eARC is
an extension of ARC and enables
transmission of the object audio
and multi-channel LPCM content
that cannot be transmitted with
ARC. For details of eARC, see
“Connecting a TV Compatible
with eARC” (page 22). For
supported audio formats, see
“Supported Input Audio Formats”
(page 62). For specifications and
notes on connections, see
“Supported HDMI Video Formats”
(page 63).
(USB) port (page 31)
ANALOG IN jack
TV IN (OPT) jack
IR repeater (page 27)
Transmits the remote signal of
the TV remote control to the TV.

11
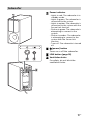
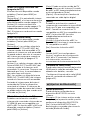
US
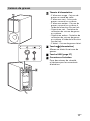
Power indicator
– Lights in red: The subwoofer is in
standby mode.
– Lights in green: The subwoofer is
connected to the system.
– Lights in amber: The subwoofer is
connected to the system with the
Secure Link function.
– Flashes in green: The subwoofer is
attempting to connect to the
system.
– Flashes in amber: The subwoofer
is attempting to connect to the
system with the Secure Link
function.
– Turns off: The subwoofer is turned
off.
(power) button
Turns on or off the subwoofer.
LINK button (page 26)
Ventilation holes
For safety, do not block the
ventilation holes.
Subwoofer

12
US
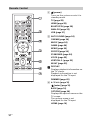
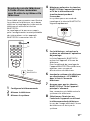
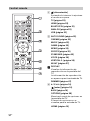
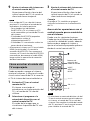
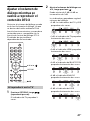
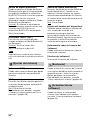
(power)
Turns on the system or sets it to
standby mode.
TV (page 28)
HDMI (page 28)
BLUETOOTH (page 30)
ANALOG (page 32)
USB (page 31)
AUTO SOUND (page 34)
CINEMA (page 34)
MUSIC (page 34)
GAME (page 34)
NEWS (page 34)
SPORTS (page 34)
STANDARD (page 34)
VOICE (page 35)
VERTICAL S. (page 33)
NIGHT (page 35)
DISPLAY
Displays playback information on
the TV screen.
Playback information is not
displayed for the TV input.
DIMMER (page 45)
/// (page 14)
(enter) (page 14)
BACK (page 14)
OPTIONS (page 36)
Displays the options menu on the
TV screen.
The options menu is not
displayed for the TV input.
HOME (page 14)
Remote Control

13
US
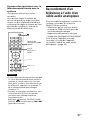
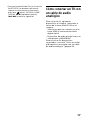
(muting)
Turns off the sound temporarily.
(volume) +*/–
Adjusts the volume.
SW (subwoofer volume) +/–
Adjusts the volume of the
subwoofer.
Playback operation buttons
/ (previous/next)
Selects the previous/next track or
file.
Pressing and holding searches
backward or forward (rewind/fast
forward) during playback.
(play/pause)*
Starts, pauses, or re-starts
playback (resume play).
AUDIO* (page 38)
*The AUDIO, , and + buttons have
a tactile dot. Use it as a guide during
operation.
About the replacement of
batteries for the remote control
When the system does not respond by
operating with the remote control,
replace two batteries with new
batteries.
Use R03 (size AAA) manganese
batteries for replacement.

14
US
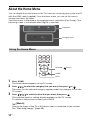
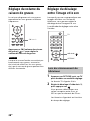
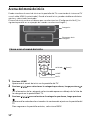
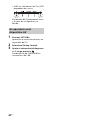
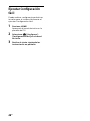
About the Home Menu
You can display the home menu on the TV screen by connecting the system and TV
with the HDMI cable (supplied). From the home menu, you can set the various
settings and select the input.
The home menu is displayed in the language that is selected in [Easy Setup]. (The
following screen is an example when English is selected.)
1 Press HOME.
The home menu appears on the TV screen.
2 Press // to select the category that you want, then press or .
The items for the selected category appear under the category list on the
TV screen.
3 Press /// to select the item that you want, then press .
The selected input or setting display appears on the TV screen.
To return to the previous screen, press BACK.
[Watch]
Selects the input of the TV or AV device that is connected to the system.
See “Watching Images” (page 28).
Using the Home Menu
Categories
Category items
HOME
BACK
///, (enter)

15
US
[Listen]
Selects the input of the audio device that is connected to the system.
See “Listening to Music/Sound” (page 29).
[Setup]
Performs the basic initial settings by using [Easy Setup] or various advanced
settings of the system.
See “Performing Easy Setup” (page 46) or “Performing Advanced Settings”
(page 47).
In these Operating Instructions, the operations are described as steps that are
operated on the home menu displayed on the TV screen by using the remote control
while the system and TV are connected with the HDMI cable (supplied).
The operating steps that select items on the TV screen by using /// and are
simplified in the following way.
Example: Select [Setup] - [Advanced Settings] on the home menu.
The operation that selects a category and category item by pressing /// and
is expressed as “select.” The category and category item are linked with “-.”
Example: Select [Speaker Settings] - [Manual Speaker Settings].
When repeating the operation that selects an item by pressing /// and , the
selected items are linked with “-.”
Tips
• You can use the buttons on the main unit if they have the same or similar names as those
on the remote control.
• Characters in brackets [ ] appear on the TV screen.
About the Steps Description

16
US
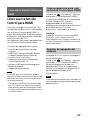
Connecting to a TV or AV
Device with the HDMI
Cable
To connect a 4K TV or 4K devices
See “Connecting a 4K TV and 4K
Devices” (page 20).
To connect a TV compatible with
eARC
For the connection, refer to Startup
Guide (separate document). For the
settings, see “Connecting a TV
Compatible with eARC” (page 22).
To connect to a TV other than the above,
refer to Startup Guide (separate
document).
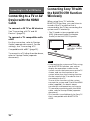
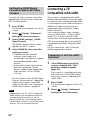
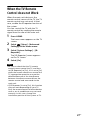
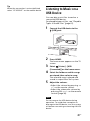
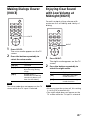
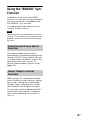
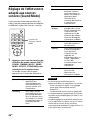
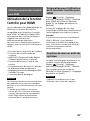
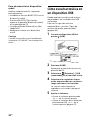
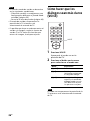
Connecting Sony TV with
the BLUETOOTH Function
Wirelessly
When using Sony TV* with the
BLUETOOTH function, you can listen to
sound of the TV or device that is
connected to the TV by connecting the
system and TV wirelessly.
* The TV needs to be compatible with
A2DP (Advanced Audio Distribution
Profile) of the BLUETOOTH profile.
• If connecting the system and TV by using
the BLUETOOTH function, you cannot
display the operation screen for the
system such as the home menu on the TV
screen, and use the function of the
system other than the listening function
for the sound of the TV or device that is
connected to the TV.
To use all the functions of the system,
connect the system and TV with the HDMI
cable (supplied). For details about
connections and operations to listen to
TV sound by connecting with the HDMI
cable, refer to Startup Guide (separate
document).
• This function is available only for Sony TV
that is compatible with BLUETOOTH
A2DP.
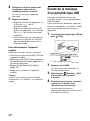
Connecting to a TV or AV Device
Notes
Blu-ray Disc player,
cable box, satellite
box, etc.

17
US
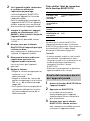
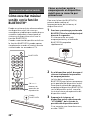
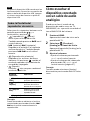
To connect the system and TV
wirelessly, you need to perform pairing
of the system and TV by using the
BLUETOOTH function.
Pairing is the process required to
mutually register the information on
BLUETOOTH devices to be connected
wirelessly in advance.
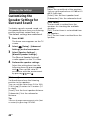
1 Set up the remote control.
2 Turn on the TV.
3 Turn on the system.
4 Press and hold the BLUETOOTH
button on the main unit and TV on
the remote control
simultaneously for 5 seconds.
The system enters the pairing mode
and the BLUETOOTH indicator
flashes quickly.
5 On the TV, search the system by
performing the pairing operation.
The list of the BLUETOOTH devices
that are searched appears on the TV
screen.
For the operation method to pair
the BLUETOOTH device to the TV,
refer to the operating instructions of
the TV.
6 Pair the system and TV by
selecting “HT-X9000F” from the
list on the TV screen.
7 Make sure that the BLUETOOTH
and TV indicators on the main unit
light.
A connection between the system
and TV has been established.
8 Select the program or input of the
device by using the TV remote
control.
The sound of the displayed image
on the TV screen is output from the
system.
9 Adjust the volume of the system
by using the TV remote control.
When pressing the muting button
on the TV remote control, the sound
is muted temporarily.
•If the TV sound is not output from the
system, press TV and check the status of
the indicators on the Bar Speaker.
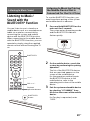
Listening to TV Sound by
Connecting the System and
TV Wirelessly
TV
BLUETOOTH
button
Notes

18
US
– The BLUETOOTH and TV indicators light:
The system and TV are connected and
TV sound is output from the system.
– The BLUETOOTH indicator flashes
quickly: Perform pairing on the TV.
– The TV indicator lights: Perform steps
from the start.
• When you connect the system and TV
with the HDMI cable (supplied), the
BLUETOOTH connection is canceled. To
connect the system and TV with the
BLUETOOTH function again, disconnect
the HDMI cable, then perform the
connecting operation from the start.
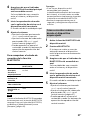
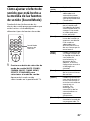
You can turn the system on/off, adjust
the volume, and mute the sound by
using the TV remote control when
connecting the TV to the system
wirelessly.
1 Turn the TV on with the TV remote
control.
The system is turned on by
interlocking with the TV power, and
TV sound is output from the system.
2 Select the program or input of the
device by using the TV remote
control.
The sound of the displayed image
on the TV screen is output from the
system.
3 Adjust the volume of the system
by using the TV remote control.
When pressing the muting button
on the TV remote control, the sound
is muted temporarily.
Tip
When the TV is turned off, the system is
also turned off by interlocking with the TV
power.
About operations with the
remote control that is supplied
with the system
You can use the following buttons.
You can adjust the volume of the
subwoofer, and adjust sound quality in
addition to turning the system on/off
and adjusting volume that can be
operated by the TV remote control.
• If you select the input other than TV on
the remote control supplied with the
system, the TV sound is not output from
the system. To output the TV sound, press
TV on the remote control to change to the
TV input.
• During the connecting the TV with the
BLUETOOTH function, the following
remote control buttons do not work.
///, (enter), OPTIONS, HOME,
DISPLAY, (play/pause), /
(previous/next)
Listening to Sound of the
Paired TV
Notes
SW +/–
+/–
Sound mode
selecting buttons
VOICE
VERTICAL S.
NIGHT

19
US
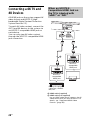
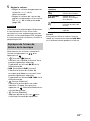
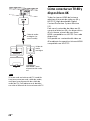
Connecting a TV with an
Analog Audio Cable
To connect the following devices to the
system, connect them via the ANALOG
IN jack on the system.
– TVs that do not have an HDMI jack and
optical digital output jack
– Portable audio devices such as
smartphones and WALKMAN®
For listening to the connected device,
see “Listening to the Device Connected
with an Analog Audio Cable” (page 32).
If the TV’s headphone jack also serves as
an audio output jack, check the audio
output settings of the TV. For details, refer
to the operating instructions of the TV.
Smartphone,
WALKMAN®, other
audio devices, etc.
TV
Analog
audio out
Analog audio cable
(not supplied)
Note

20
US
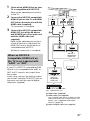
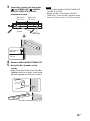
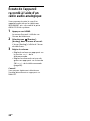
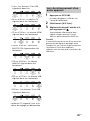
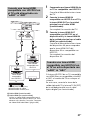
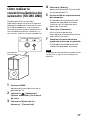
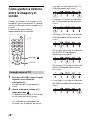
Connecting a 4K TV and
4K Devices
All HDMI jacks on the system support 4K
video format and HDCP2.2 (High-
bandwidth Digital Content Protection
System Revision 2.2).
To watch 4K video content, connect the
4K TV and 4K devices to the system via
an HDCP2.2-compatible HDMI jack on
each device.
You can only view 4K video content
through the HDCP2.2-compatible HDMI
jack connection.
HDMI cable (supplied)
HDMI cable (not supplied)
Use an HDMI cable which supports the 4K
video format that you want to watch. For
details, see “Supported HDMI Video
Formats” (page 63).
When an HDCP2.2-
Compatible HDMI Jack on
the TV is Labeled with
“eARC” or “ARC”
TV
eARC/ARC
HDCP2.2-
compatible
HDMI jack
Blu-ray Disc player,
cable box, satellite
box, etc.
HDCP2.2-
compatible
HDMI jack
TV
La page est en cours de chargement...
La page est en cours de chargement...
La page est en cours de chargement...
La page est en cours de chargement...
La page est en cours de chargement...
La page est en cours de chargement...
La page est en cours de chargement...
La page est en cours de chargement...
La page est en cours de chargement...
La page est en cours de chargement...
La page est en cours de chargement...
La page est en cours de chargement...
La page est en cours de chargement...
La page est en cours de chargement...
La page est en cours de chargement...
La page est en cours de chargement...
La page est en cours de chargement...
La page est en cours de chargement...
La page est en cours de chargement...
La page est en cours de chargement...
La page est en cours de chargement...
La page est en cours de chargement...
La page est en cours de chargement...
La page est en cours de chargement...
La page est en cours de chargement...
La page est en cours de chargement...
La page est en cours de chargement...
La page est en cours de chargement...
La page est en cours de chargement...
La page est en cours de chargement...
La page est en cours de chargement...
La page est en cours de chargement...
La page est en cours de chargement...
La page est en cours de chargement...
La page est en cours de chargement...
La page est en cours de chargement...
La page est en cours de chargement...
La page est en cours de chargement...
La page est en cours de chargement...
La page est en cours de chargement...
La page est en cours de chargement...
La page est en cours de chargement...
La page est en cours de chargement...
La page est en cours de chargement...
La page est en cours de chargement...
La page est en cours de chargement...
La page est en cours de chargement...
La page est en cours de chargement...
La page est en cours de chargement...
La page est en cours de chargement...
La page est en cours de chargement...
La page est en cours de chargement...
La page est en cours de chargement...
La page est en cours de chargement...
La page est en cours de chargement...
La page est en cours de chargement...
La page est en cours de chargement...
La page est en cours de chargement...
La page est en cours de chargement...
La page est en cours de chargement...
La page est en cours de chargement...
La page est en cours de chargement...
La page est en cours de chargement...
La page est en cours de chargement...
La page est en cours de chargement...
La page est en cours de chargement...
La page est en cours de chargement...
La page est en cours de chargement...
La page est en cours de chargement...
La page est en cours de chargement...
La page est en cours de chargement...
La page est en cours de chargement...
La page est en cours de chargement...
La page est en cours de chargement...
La page est en cours de chargement...
La page est en cours de chargement...
La page est en cours de chargement...
La page est en cours de chargement...
La page est en cours de chargement...
La page est en cours de chargement...
La page est en cours de chargement...
La page est en cours de chargement...
La page est en cours de chargement...
La page est en cours de chargement...
La page est en cours de chargement...
La page est en cours de chargement...
La page est en cours de chargement...
La page est en cours de chargement...
La page est en cours de chargement...
La page est en cours de chargement...
La page est en cours de chargement...
La page est en cours de chargement...
La page est en cours de chargement...
La page est en cours de chargement...
La page est en cours de chargement...
La page est en cours de chargement...
La page est en cours de chargement...
La page est en cours de chargement...
La page est en cours de chargement...
La page est en cours de chargement...
La page est en cours de chargement...
La page est en cours de chargement...
La page est en cours de chargement...
La page est en cours de chargement...
La page est en cours de chargement...
La page est en cours de chargement...
La page est en cours de chargement...
La page est en cours de chargement...
La page est en cours de chargement...
La page est en cours de chargement...
La page est en cours de chargement...
La page est en cours de chargement...
La page est en cours de chargement...
La page est en cours de chargement...
La page est en cours de chargement...
La page est en cours de chargement...
La page est en cours de chargement...
La page est en cours de chargement...
La page est en cours de chargement...
La page est en cours de chargement...
La page est en cours de chargement...
La page est en cours de chargement...
La page est en cours de chargement...
La page est en cours de chargement...
La page est en cours de chargement...
La page est en cours de chargement...
La page est en cours de chargement...
La page est en cours de chargement...
La page est en cours de chargement...
La page est en cours de chargement...
La page est en cours de chargement...
La page est en cours de chargement...
La page est en cours de chargement...
La page est en cours de chargement...
La page est en cours de chargement...
La page est en cours de chargement...
La page est en cours de chargement...
La page est en cours de chargement...
La page est en cours de chargement...
La page est en cours de chargement...
La page est en cours de chargement...
La page est en cours de chargement...
La page est en cours de chargement...
La page est en cours de chargement...
La page est en cours de chargement...
La page est en cours de chargement...
La page est en cours de chargement...
La page est en cours de chargement...
La page est en cours de chargement...
La page est en cours de chargement...
La page est en cours de chargement...
La page est en cours de chargement...
La page est en cours de chargement...
La page est en cours de chargement...
La page est en cours de chargement...
La page est en cours de chargement...
La page est en cours de chargement...
La page est en cours de chargement...
La page est en cours de chargement...
La page est en cours de chargement...
La page est en cours de chargement...
La page est en cours de chargement...
La page est en cours de chargement...
La page est en cours de chargement...
La page est en cours de chargement...
La page est en cours de chargement...
La page est en cours de chargement...
La page est en cours de chargement...
La page est en cours de chargement...
La page est en cours de chargement...
La page est en cours de chargement...
La page est en cours de chargement...
La page est en cours de chargement...
La page est en cours de chargement...
La page est en cours de chargement...
La page est en cours de chargement...
La page est en cours de chargement...
La page est en cours de chargement...
La page est en cours de chargement...
La page est en cours de chargement...
La page est en cours de chargement...
La page est en cours de chargement...
La page est en cours de chargement...
La page est en cours de chargement...
La page est en cours de chargement...
La page est en cours de chargement...
La page est en cours de chargement...
La page est en cours de chargement...
La page est en cours de chargement...
La page est en cours de chargement...
La page est en cours de chargement...
La page est en cours de chargement...
La page est en cours de chargement...
La page est en cours de chargement...
La page est en cours de chargement...
La page est en cours de chargement...
La page est en cours de chargement...
La page est en cours de chargement...
La page est en cours de chargement...
La page est en cours de chargement...
La page est en cours de chargement...
La page est en cours de chargement...
La page est en cours de chargement...
La page est en cours de chargement...
La page est en cours de chargement...
La page est en cours de chargement...
La page est en cours de chargement...
-
 1
1
-
 2
2
-
 3
3
-
 4
4
-
 5
5
-
 6
6
-
 7
7
-
 8
8
-
 9
9
-
 10
10
-
 11
11
-
 12
12
-
 13
13
-
 14
14
-
 15
15
-
 16
16
-
 17
17
-
 18
18
-
 19
19
-
 20
20
-
 21
21
-
 22
22
-
 23
23
-
 24
24
-
 25
25
-
 26
26
-
 27
27
-
 28
28
-
 29
29
-
 30
30
-
 31
31
-
 32
32
-
 33
33
-
 34
34
-
 35
35
-
 36
36
-
 37
37
-
 38
38
-
 39
39
-
 40
40
-
 41
41
-
 42
42
-
 43
43
-
 44
44
-
 45
45
-
 46
46
-
 47
47
-
 48
48
-
 49
49
-
 50
50
-
 51
51
-
 52
52
-
 53
53
-
 54
54
-
 55
55
-
 56
56
-
 57
57
-
 58
58
-
 59
59
-
 60
60
-
 61
61
-
 62
62
-
 63
63
-
 64
64
-
 65
65
-
 66
66
-
 67
67
-
 68
68
-
 69
69
-
 70
70
-
 71
71
-
 72
72
-
 73
73
-
 74
74
-
 75
75
-
 76
76
-
 77
77
-
 78
78
-
 79
79
-
 80
80
-
 81
81
-
 82
82
-
 83
83
-
 84
84
-
 85
85
-
 86
86
-
 87
87
-
 88
88
-
 89
89
-
 90
90
-
 91
91
-
 92
92
-
 93
93
-
 94
94
-
 95
95
-
 96
96
-
 97
97
-
 98
98
-
 99
99
-
 100
100
-
 101
101
-
 102
102
-
 103
103
-
 104
104
-
 105
105
-
 106
106
-
 107
107
-
 108
108
-
 109
109
-
 110
110
-
 111
111
-
 112
112
-
 113
113
-
 114
114
-
 115
115
-
 116
116
-
 117
117
-
 118
118
-
 119
119
-
 120
120
-
 121
121
-
 122
122
-
 123
123
-
 124
124
-
 125
125
-
 126
126
-
 127
127
-
 128
128
-
 129
129
-
 130
130
-
 131
131
-
 132
132
-
 133
133
-
 134
134
-
 135
135
-
 136
136
-
 137
137
-
 138
138
-
 139
139
-
 140
140
-
 141
141
-
 142
142
-
 143
143
-
 144
144
-
 145
145
-
 146
146
-
 147
147
-
 148
148
-
 149
149
-
 150
150
-
 151
151
-
 152
152
-
 153
153
-
 154
154
-
 155
155
-
 156
156
-
 157
157
-
 158
158
-
 159
159
-
 160
160
-
 161
161
-
 162
162
-
 163
163
-
 164
164
-
 165
165
-
 166
166
-
 167
167
-
 168
168
-
 169
169
-
 170
170
-
 171
171
-
 172
172
-
 173
173
-
 174
174
-
 175
175
-
 176
176
-
 177
177
-
 178
178
-
 179
179
-
 180
180
-
 181
181
-
 182
182
-
 183
183
-
 184
184
-
 185
185
-
 186
186
-
 187
187
-
 188
188
-
 189
189
-
 190
190
-
 191
191
-
 192
192
-
 193
193
-
 194
194
-
 195
195
-
 196
196
-
 197
197
-
 198
198
-
 199
199
-
 200
200
-
 201
201
-
 202
202
-
 203
203
-
 204
204
-
 205
205
-
 206
206
-
 207
207
-
 208
208
-
 209
209
-
 210
210
-
 211
211
-
 212
212
-
 213
213
-
 214
214
-
 215
215
-
 216
216
-
 217
217
-
 218
218
-
 219
219
-
 220
220
-
 221
221
-
 222
222
-
 223
223
-
 224
224
-
 225
225
-
 226
226
-
 227
227


