Valex 1493930 Le manuel du propriétaire
- Catégorie
- Tronçonneuses électriques
- Taper
- Le manuel du propriétaire

1493930
19.12.2007
ECS 36
Motosega
Chain saw
Scie à chaîne
Motosierra
Áëõóïðñßïíï çëåêôñéêü
SCHIO (VI) ITALY
ATTENZIONE! Prima di usare la macchina, leggete attentamente le istruzioni per l’uso
CAUTION! Before starting the machine, read the operating instructions carefully
ATTENTION! Avant la mise en service de la machine, lire scrupuleusement le mode d’emploi
ATENCIÓN! Antes de usar la máqiuna, leer atentamente las instrucciones de empleo
ÐÑÏÓÏ×Ç! Ðñéí ÷ñçóìïðïéÞóåôå ôï ìç÷Üíçìá äéáâÜóôå ðñïóåêôéêÜ ôéò ïäçãßåò ÷ñÞóçò
ISTRUZIONI D’USO
OPERATING INSTRUCTIONS
INSTRUCTIONS D’EMPLOI
INSTRUCCIONES PARA EL USO
ÏÄÇÃÉÅÓ ×ÑÇÓÇÓ


4
i
PRESCRIZIONI PER ISTRUZIONI
Vi ringraziamo per averci preferito nella scelta di questo pro-
dotto di seguito chiamato anche “utensile”.
Il Vostro nuovo apparecchio, prodotto secondo elevati standard
di qualità, Vi garantirà rendimento e sicurezza nel tempo.
ATTENZIONE! Prima di usare l’utensile, per eseguire corret-
tamente la messa in servizio, l’avviamento, l’uso, l’arresto
e la manutenzione, leggete ed applicate attentamente le
istruzioni di seguito riportate. Prima di iniziare il lavoro
prendete familiarità con i comandi e con il corretto uso
dell’utensile assicurandovi di saper arrestarlo in caso di
emergenza. L’uso improprio dell’utensile può provocare
gravi ferite o morte e danni alle cose. Pensate sempre alla
Vostra e altrui sicurezza e comportatevi di conseguenza.
Ogni altro impiego, diverso da quello indicato in queste
istruzioni, può recare danno all’utensile e costituire serio
pericolo per le persone e le cose.
ATTENZIONE! Il motore della motosega funziona esclusiva-
mente con miscela olio benzina con il 4% di olio. Nel caso
non si utilizzi questa miscela il motore si guasterà in modo
irreparabile con il decadimento immediato della garanzia.
Conservate con cura ed a portata di mano queste istruzioni
ed il foglio allegato in modo da poterle consultare in caso
di necessità.
DESCRIZIONE MACCHINA
1. Marmitta
2. Impugnatura posteriore
3. Paramano posteriore
4. Leva di accensione
5. Pulsante di sblocco leva di accensione
6. Tappo serbatoio olio
7. Impugnatura anteriore
8. Paramano anteriore / Leva freno catena - emergenza
9. Maniglia di avviamento.
10. Barra
11. Copribarra (se presente)
12. Catena
13. Paracolpi a denti
14. Tappo serbatoio carburante.
15. Vite di regolazione catena (se presente)
16. Perno di fissaggio barra
17. Dado fissaggio barra
18. Carter
19. Ruota dentata
20. Piolo tensionamento catena (se presente)
21. Scanalatura della barra
22. Foro inferiore della barra
23. Foro di passaggio olio
24. Leva comando aria.
25. Interruttore spegnimento motore
26. Gruppo frizione freno.
27. Motore a scoppio.
28. Leva apertura coperchio.
29. Spessore per imballaggio.
30. Candela di accensione.
31. Filtro aria.
DESCRIZIONE MARCHIATURE E SIMBOLI
1. Dati tecnici
2. Nome macchina
3. Marchiature
5. Attenzione
6. Leggete il manuale di utilizzo prima di utilizzare l’apparec-
chio
7. Indossate occhiali di protezione, cuffie antirumore e
maschere di protezione contro la polvere
8. Attenzione! Leggere le norme di sicurezza sui pericoli del
contraccolpo
9. Attenzione superfici calde.
10. Attenzione! Pericolo di incendio.
11. Attenzione! Indossate guanti a protezione. Indossate
scarpe di sicurezza.
12. Indicazione rumore
DOTAZIONE
La confezione contiene i seguenti prodotti:
- Motosega
- Una barra
- Una catena
- Manuale di uso e manutenzione (questo manuale)
- Certificato di conformità (annesso al presente manuale)
AVVERTENZE
1)PERICOLO DI INCENDIO ED ESPLOSIONE
ATTENZIONE! Pericolo di incendio ed esplosione, spegnete
sempre il motore prima di ogni rifornimento. Il carburante
e i suoi vapori sono facilmente infiammabili, fate attenzione
a non versarlo su superfici calde. Operate in un luogo ben
ventilato, non fumate, non avvicinate fiamme libere o oggetti
incandescenti.
Utilizzate occhiali di protezione e guanti antiacido. Non in-
gerite, non inalate i vapori emessi dal carburante e tenetelo
lontano dalla portata dei bambini. Evitare il contatto con la
pelle. In caso di contatto con gli occhi lavare con abbondante
acqua e consultare un medico.
ATTENZIONE! Non utilizzate la macchina in ambienti con
pericolo di esplosione e/o incendio, in locali chiusi, in
presenza di liquidi, gas, polveri, vapori, acidi ed elementi
infiammabili e/o esplosivi. Non utilizzate la macchina in
presenza di fonti incendianti quali fiamme libere, sigarette,
scintille ecc.
Quando usate la motosega deve essere presente un estintore
nelle vicinanze della zona di lavoro.
2)GAS DI SCARICO: PERICOLO DI AVVELENAMENTO
ATTENZIONE! Pericolo di avvelenamento. Il motore emette gas
velenoso, inodore e incolore contenente monossido di carbonio:
l’inalazione provoca nausea, svenimento e morte.
ATTENZIONE! Non far funzionare la macchina in ambienti
chiusi o poco ventilati. In caso di inalazione rivolgersi subito
ad un medico.
3)SUPERFICI CALDE: PERICOLO DI USTIONI
ATTENZIONE! Pericolo di ustioni. Durante il funzionamento
alcune superfici esterne della macchina possono raggiunge-
re temperature elevate, rimanendo tali anche per alcune ore

5
dopo l’arresto del motore. In particolare prestare attenzione
all’impianto di scarico dei gas e alle parti calde del motore
come la testata.
PRESCRIZIONI DI SICUREZZA
1. Mantenere l’area di lavoro pulita.
Iniziare le operazioni di taglio solamente dopo che l’area di
lavoro è stata pulita, quando si ha un appoggio sicuro e si
è determinata la via di ritirata rispetto all’albero in caduta.
2. Tenere in considerazione l’ambiente dell’area di lavoro.
Usare prudenza quando si tagliano cespugli ed arboscelli di
piccole dimensioni, in quanto il materiale tenero potrebbe
impigliarsi nella catena della motosega e colpirvi o sbi-
lanciarvi. Non utilizzare la motosega in ambienti dove c’è
pericolo di esplosioni, vicino a liquidi o gas infiammabili
3. Tenere lontano bambini e visitatori.
Bambini e visitatori devono essere mantenuti lontani
dall’area di lavoro e non devono toccare l’utensile.
4. Immagazzinaggio della motosega.
Quando non vengono utilizzati, gli utensili vanno riposti
in un luogo asciutto, in alto oppure in un luogo chiuso a
chiave, fuori dalla portata dei bambini.
5. Non mettere sotto sforzo la motosega.
Per un uso migliore e a garanzia di una maggiore sicurezza
bisogna assecondare il taglio senza esercitare eccessiva
pressione.
6. Utilizzo corretto dell’utensile.
Tagliare esclusivamente legno. Non utilizzare la motosega
su altri materiali.
7. Abbigliamento da utilizzare.
Non indossare indumenti larghi o gioielli in quanto potreb-
bero impigliarsi negli organi in movimento. Si consiglia
l’uso di calzature antiscivolo quando si lavora all’aperto.
Indossare cuffie di protezione per i capelli lunghi.
8. Utilizzare idonei mezzi di protezione individuale.
Utilizzare occhiali di protezione, scarpe di protezione,
abbigliamento comodo, guanti di protezione e protezioni
per l’udito e la testa.
9. Trasporto della motosega.
Trasportare la motosega spenta utilizzando l’impugnatura
posta sulla parte anteriore. Tenere le dita lontane dall’inter-
ruttore ed assicurarsi che la barra e la catena siano sul retro.
NB Montare la protezione della catena per evitare ferite.
10. Lavorare in sicurezza.
Utilizzare morsetti o cavalletti per lavorare in sicurezza.
11. Evitare movimenti insicuri.
Mantenere sempre un giusto appoggio ed un giusto
bilanciamento.
12. Conservare la motosega con cura.
Mantenere l’apparecchio affilato e pulito per avere migliori
prestazioni e maggiore sicurezza. Attenersi alle istruzioni
per la lubrificazione ed il cambio degli accessori. Mante-
nere le maniglie asciutte, pulite e prive di olio e grasso.
13. Spegnere la motosega.
Spegnere la motosega, tramite l’apposito comando, quando
non viene utilizzata, quando si pulisce, quando si tira o si
cambia la catena, quando si sostituiscono gli accessori.
14. Rimozione di chiavi.
Prima dell’utilizzo, accertarsi sempre di aver rimosso ogni
tipo di utensile dall’apparecchio.
15. Evitare avviamenti involontari.
Mai trasportare la motosega con il motore acceso. Assi-
curarsi che l'interruttore motore sia in posizione off.
16. Non distrarsi mai.
Fare attenzione a ciò che si sta facendo. Usare il buon sen-
so. Non usare la motosega quando ci si sente stanchi.
17. Controllare le parti danneggiate.
Prima di utilizzare l’apparecchio, vanno controllati con
attenzione la protezione, ed eventuali altri organi dan-
neggiati al fine di determinare se la motosega funzionerà
correttamente e svolgerà la funzione prevista. Controllare
l’allineamento degli organi in movimento, eventuali danni
ai componenti, verificare il montaggio ed altri aspetti che
potrebbero influire sul suo funzionamento. Qualora la pro-
tezione o altri elementi fossero danneggiati, è necessario
provvedere ad un’adeguata riparazione o sostituzione da
parte di un centro assistenza autorizzato, tranne il caso in
cui sia diversamente indicato nel manuale istruzioni. Non
utilizzare l’apparecchio se non funziona correttamente.
18. Attenzione!
L’utilizzo di accessori diversi da quelli consigliati nel pre-
sente manuale istruzioni può essere causa di infortuni.
19. Far riparare l’apparecchio da personale qualificato.
Questo elettroutensile è conforme ai requisiti di sicurezza
corrispondenti. Le riparazioni vanno eseguite da personale
qualificato utilizzando parti di ricambio originali. In caso
contrario, l’utente si può trovare in serio pericolo.
20. Protezione contro i contraccolpi.
ATTENZIONE! Vi possono essere contraccolpi se l’estremi-
tà o la punta della barra entrano in contatto con un oggetto
oppure quando il legno rimane impigliato nella catena della
motosega durante il taglio. Il contatto della punta, in alcuni
casi, può causare un contracolpo, spingendo rapidamente
la barra indietro verso l’utilizzatore. L’impigliamento della
catena lungo la parte superiore della barra può spingere
la barra rapidamente indietro verso l’utilizzatore. Entrambe
queste reazioni possono causare una perdita di controllo
della motosega e causare gravi danni all’operatore. È
importante rispettare le seguenti istruzioni per ridurre al
minimo il rischio di contraccolpi.
A. Afferrare saldamente la motosega: tenerla saldamente
con entrambe le mani quando il motore è in funzione,
la mano destra sull’impugnatura posteriore e la mano
sinistra sull’impugnatura anteriore.
B. Evitare movimenti insicuri.
C. Mantenere sempre un giusto appoggio ed un giusto
bilanciamento.
D. Accertarsi che l’estremità della barra non tocchi tronchi,
rami, il terreno oppure altri ostacoli.
E. Non tagliare ad un’altezza superiore alle spalle.
F. Utilizzare dispositivi, quali catena per ridurre i contraccolpi,
protezioni per la barra, freni per la catena e speciali barre
per ridurre i rischi associati ai contraccolpi.
G. Utilizzare esclusivamente barre e catene specificate dal
costruttore o equivalenti.
21. Carburante
Utilizzare esclusivamente miscela olio-benzina al 4%.
Utilizzare benzina senza Eurosuper con min. 90 ottani. Non
utilizzare miscele vecchie o sporche. I danni causati da
una errata alimentazione non sono coperti da garanzia.

6
o per attività commerciali. L’utensile può essere utilizzato per
svariati scopi, ad esempio: tagliare in tronchi la legna da
ardere, realizzare pali per steccati o frutteti, abbattere alberi
di piccole dimensioni,
eseguire la potatura al suolo, piccoli lavori di falegnameria...
N.B: questo apparecchio serve esclusivamente per tagliare
legno, non utilizzare su altri materiali.
ATTENZIONE! Maneggiando la catena usare sempre guanti
protettivi antitaglio.
BARRA E CATENA
1 Assemblaggio della barra, della catena e del carter (Fig. A)
- Porre la macchina su una superficie piana e togliere i dadi di
fissaggio (nr.17) e il carter (nr.18). Togliere anche lo spessore
in plastica (nr.29) inserito nei perni di fissaggio.
- Utilizzando un cacciavite, ruotare in senso antiorario la vite
di regolazione catena (nr.15) fino ad arrivare a fine corsa.
- Inserire la scanalatura della barra (nr.21) attraverso i perni
di fissaggio (nr.16) e fare passare la catena sopra la ruota
dentata (nr.19). In questa fase è importante centrare il piolo
di tiraggio (nr.20) sul foro inferiore della barra (nr.22).
- Inserire la catena sulla scanalatura della barra come in
Fig.A pos.2, facendo attenzione a rispettare il corretto senso
di direzione della catena.
- Montare il carter (nr.18) e, mantenendo sollevata verso l’alto
la punta della barra (usare guanti!), fissare in modo sicuro i
dadi (nr.17)
ATTENZIONE! Non usare la macchina prima di avere ten-
sionato la catena.
2 Tensionamento della catena (Fig.A)
ATTENZIONE! Prima di effettuare qualunque lavoro sull’ap-
parecchio spegnere il motore a scoppio.
ATTENZIONE! Indossare guanti protettivi antitaglio durante
questa operazione.
- Allentare di mezzo giro i dadi di fissaggio barra (nr.17)
- Usando un cacciavite, ruotare in senso orario la vite di rego-
lazione catena (nr.15) e tendere la catena fino a raggiungere
il corretto tensionamento.
NB: Controllo del corretto tensionamento: Si considera raggiunto il
corretto tensionamento quando si riesce a sollevare manualmen-
te la catena al centro della bara di 3-4 mm (Fig.C).
- Se la catena risultasse troppo tesa, allentare nuovamente i dadi
o il volantino (nr.17) e la vite di regolazione catena (nr.15) e
spingere la barra verso sinistra, in modo da farla rientrare.
- Ripetere la regolazione avendo cura di tirare meno la vite
(nr.15).
- A regolazione raggiunta, fissare in modo sicuro i dadi o il volantino
(nr.17) mantenendo sempre la punta della barra sollevata.
- Ripetere il controllo del corretto tensionamento.
ATTENZIONE! Durante i primi tagli, quando la macchina è ancora
nuova, la catena si allenterà abbastanza frequentemente, ma
questo è normale durante il periodo di rodaggio.
ATTENZIONE! Non lasciate mai la catena allentata perché
può uscire dalla barra mentre si sta tagliando.
ATTENZIONE! La catena troppo tesa potrebbe provocare
surriscaldamenti anomali e guasti. È vietato fare funzionare
la macchina senza olio lubrificante per la catena
PREPARAZIONE DELLA MISCELA
ATTENZIONE! Il motore della motosega funziona esclusiva-
22. Non utilizzare la motosega...
...nel caso in cui sia danneggiata, regolata in maniera
errata, oppure assemblata in maniera incompleta e non
sicura. Assicurarsi che la catena della motosega si fermi
quando viene rilasciata la leva. Non utilizzare la motosega
se la leva dell’accelleratore non funziona correttamente.
23. Non eseguire operazioni al di fuori della propria com-
petenza o esperienza.
24. Non utilizzare la motosega con una sola mano!
Questo può causare seri infortuni alle persone che lo
stanno aiutando e alle persone presenti nell’area. La
motosega è stata concepita per essere utilizzata con
entrambe le mani.
25. Lavorare con le mani asciutte, pulite e prive di olio o grasso.
26. Evitare che sporco, residui o segatura si fermino nel motore.
27 L’utilizzo della motosega dovrebbe essere riservato a
persone adulte ed adeguatamente qualificate.
28. La motosega è concepita per un uso non professionale.
Non è stata realizzata per lavori pesanti e continuativi.
29. Non sottoporre la motosega a lavori sovradimensionati
per i quali sarebbe necessario un apparecchio di maggiori
dimensioni.
30. Consultare le istruzioni del costruttore per:
- Affilatura della catena
- Tensionamento catena
- Funzionamento freno catena
- Lubrificazione e corretto funzionamento dell’oliatore
- Consigli sull’abbattimento
31. Prima dell’utilizzo controllare sempre il corretto tensio-
namento della catena.
Una catena troppo lenta rappresenta motivo di pericolo e
può provocare lesioni.
32. Chi utilizza l’utensile per la prima volta dovrebbe ricevere e
farsi dare istruzioni pratiche sull’uso di una sega a catena e sul-
l’equipaggiamento di protezione da parte di un operatore esperto.
Si raccomanda una pratica iniziale di taglio del legno su
cavalletti o intelaiature.
33. Tutte le operazioni di manutenzione sulla motosega
,diverse da quanto indicato nel manuale d’utilizzo e
nelle istruzioni per la manutenzione, vanno eseguite da
personale specializzato. Non eseguite riparazioni sulla
motosega da soli.
34. ATTENZIONE! Non rimuovere, modificare o rendere
inoperativo alcun dispositivo di sicurezza in dotazione con
l’apparecchio. Il freno della catena/Protezione per le mani è il
principale dispositivo di sicurezza. La motosega non funziona
se viene attivato il freno della catena.
35. La motosega è concepita per un uso non professionale e per
lavori tipo pulizia, potatura, taglio di legna per il fuoco, etc.
Non è stata concepita per un lungo utilizzo. Se si prevede di
utilizzarla per lunghi periodi, questo potrebbe determinare pro-
blemi di circolazione alle mani oppure causare vibrazioni.
36. Quando eseguite operazioni di abbattimento di alberi,
tenetevi almeno ad una distanza corrispondente a due volte
l’altezza dell’albero tra voi ed i vostri compagni di lavoro.
MESSA IN SERVIZIO
Questo utensile è stata concepito per uso non professionale e
non dovrebbe essere utilizzato per lavori pesanti e continuativi

7
mente con miscela olio benzina con il 4% di olio. Nel caso
non si utilizzi questa miscela il motore si guasterà in modo
irreparabile con il decadimento immediato della garanzia.
ATTENZIONE! Pericolo di incendio ed esplosione. Il car-
burante e i suoi vapori sono facilmente infiammabili, fate
attenzione a non versarlo su superfici calde. Operate in un
luogo ben ventilato, non fumate, non avvicinate fiamme
libere o oggetti incandescenti. Utilizzate occhiali di prote-
zione e guanti antiacido. Non ingerite, non inalate i vapori
emessi dal carburante e tenetelo lontano dalla portata dei
bambini. Evitare il contatto con la pelle. In caso di contatto
con gli occhi lavare con abbondante acqua e consultare
un medico.
ATTENZIONE! Non utilizzate la macchina in ambienti con
pericolo di esplosione e/o incendio, in locali chiusi, in
presenza di liquidi, gas, polveri, vapori, acidi ed elementi
infiammabili e/o esplosivi. Non utilizzate la macchina in
presenza di fonti incendianti quali fiamme libere, sigarette,
scintille ecc.
Come preparare la miscela olio benzina al 4 % di olio
(1:25)
Utilizzare per la miscela benzina per automobili senza piombo
(benzina verde o eurosuper) con un minimo di 90 ottani e olio
per motori a 2 tempi di qualità API TC . Utilizzando un conteni-
tore ed un misurino miscelare in un contenitore resistente alla
benzina 40 cc di olio ogni 1000 cc (1 litro) di benzina. Agitare
bene la miscela prima dell’uso. È consigliabile preparare una
quantità di miscela non superiore a quella necessaria per la
lavorazione. Lo stoccaggio della miscela per lunghi periodi,
ne comporta un rapido deterioramento, con conseguente
malfunzionamento del motore.
RIFORNIMENTO DELLA MACCHINA (Fig. A)
ATTENZIONE! pericolo di incendio ed esplosione. Effettuare
il rifornimento di carburante a macchina spenta. Lasciare
raffreddare la macchina prima di effettuare il rifornimento.
Se versato sulla macchina o sul pavimento, asciugare prima
di avviare la macchina.
ATTENZIONE! Il motore 2 tempi della motosega deve essere
alimentato esclusivamente con una miscela benzina olio
pari al 4 % di olio lubrificante. Non utilizzando miscela come
carburante il motore si danneggerà in modo irreparabile con
conseguente decadimento della garanzia.
ATTENZIONE! Ogni operazione deve essere effettuata con
il motore spento e l’interruttore di accensione motore in
posizione “stop” (Fig.A, 25).
Prima di aprire il tappo della benzina, per effettuare il
rifornimento, posizionare la motosega su di una superficie
piana con il tappo rivolto verso l’alto. Aprire il tappo (Fig.A,
14) svitandolo e riempire il serbatoio senza farlo tracimare,
fissare bene il tappo.
RIFORNIMENTO OLIO LUBRIFICANTE PER LA CATENA (Fig. A)
ATTENZIONE! Per il riempimento del serbatoio non
utilizzare olio vecchio o riciclato. Non mettere mai
in funzione l’ utensile senza olio perché ne verrebbe
compromessa la funzionalità e la sicurezza dell’ope-
ratore. L’utensile viene fornito con il serbatoio vuoto.
Prima di aprire il tappo dell’olio, per effettuare il riforni-
mento, posizionare la motosega su di una superficie piana
con il tappo rivolto verso l’alto.
- Svitare il tappo dell’olio (Fig.A nr.6) e riempire il serbatoio
con olio per catene biodegradabie reperibile nei negozi spe-
cializzati, ferramenta, negozi per macchine agricole, ecc...
- Riempire il serbatoio ad un livello massimo di 2 cm sotto al
tappo, facendo attenzione a non introdurre sporcizia, trucioli
o polvere al suo interno.
- Richiudere il tappo del serbatoio.
- ATTENZIONE! È molto importante pulire sempre l’utensile
(con un pennellino) nella zona del tappo, prima di eseguire
il rifornimento.
- ATTENZIONE! Il livello dell’olio deve essere controllato
frequentemente durante il funzionamento, per evitare che la
catena rimanga senza lubrificante. La mancanza di lubrifi-
cante provoca una rapida usura della catena e della barra.
Rabboccare l’olio almeno ad ogni pieno di miscela.
- ATTENZIONE! L’autonomia con un pieno d’olio può variare a
seconda di quanto è stata tirata la catena, dal tipo di legno
che si sta tagliando, dalla temperatura ambiente, dalla densità
dell’olio e dal modo di impiego.
AVVIAMENTO DEL MOTORE (FIG. A)
NOTA BENE ! Prima di procedere all’avviamento del motore
verificare che nel serbatoio ci sia una quantità sufficiente di
carburante.
La macchina è dotata di frizione centrifuga (26), con il motore
al minimo (non accellerato) la catena non gira. Per fermare la
rotazione degli organi di taglio è sufficiente rilasciare l’accelle-
ratore (4) in modo che il motore raggiunga il regime di minimo.
Il comando dell’accelleratore è dotata di una leva di blocco (5)
atta ad impedire l’avviamento involontario della catena.
ATTENZIONE! In fase di avviamento con motore freddo la
catena potrebbe mettersi in moto, azionare immediatamente
il comando dell’accelleratore.
Avviamento con motore freddo
1) Spostare l’interruttore accensione spegnimento (25) in
posizione “I”.
2) Attivare il freno catena spingendo il paramano (8) verso
la barra (10).
3) Spostare il comando aria (24) in posizione “close”.
4) Posizionare a terra la motosega in modo stabile verificando
con attenzione che la catena e la barra siano lontane da
qualsiasi oggetto o persona.
5) Mantenerla in posizione impugnando in modo saldo l'impu-
gnatura anteriore e bloccare la posteriore con il tallone del
piede destro (Fig.D).
6) Tirare la maniglia di avviamento (9) alcune volte per inne-
scare la pompa di alimentazione.
7) Riportare il comando aria (24) in posizione “open” e tirare in modo
deciso la maniglia di avviamento senza rilasciarla di scatto.
8) Dopo alcuni istanti dall’avviamento del motore, azionare a
fondo la leva dell'accelleratore (4) per sbloccarlo.
9) Con il motore al minimo, disattivare il freno catena tirando
il paramano (8) verso l’impugnatura posteriore.
Avviamento a motore caldo
1) Spostare l’interruttore accensione spegnimento (25) in
posizione “I”.
2) Posizionare a terra la motosega in modo stabile verificando
con attenzione che la catena e la barra siano lontane da
qualsiasi oggetto o persona.
3) Mantenerla in posizione impugnando in modo saldo l'impu-
gnatura anteriore e bloccare la posteriore con il tallone del

8
piede destro (Fig.D).
4) Tirare in modo deciso la maniglia di avviamento (9), fino
all’avviamento del motore, senza rilasciarla di scatto.
Nota bene: Con il motore caldo non chiudere l’aria.
SPEGNIMENTO DEL MOTORE (FIG.A)
- Rilasciare la leva dell'accelleratore (4) in modo che il motore
torni al regime di minimo e la catena si fermi.
- Posizionare il pulsante spegnimento motore (25) su “O”.
RODAGGIO
Per le prime 20 ore di funzionamento, non utilizzare la moto-
sega a pieno carico per lunghi periodi.
RODAGGIO DELLA CATENA
Prima di utilizzare la motosega per la prima volta, lubrificare
la catena e la sua guida sulla barra con olio lubrificante.
Controllare spesso la tensione della catena.
CARBURAZIONE
La carburazione è già regolata correttamente in fabbrica e non deve
essere registrata. In caso di difetti di carburazione pulire il filtro
dell’aria o far verificare, da un centro assistenza la motosega.
Nota bene: La carburazione può variare in funzione delle
condizioni meteo e/o dell’altitudine.
Le regolazioni di base del carburatore sono le seguenti:
- Vite L (Fig.A, Pos.1) di regolazione accellerazione avvitare
completamente e svitare di 1+1/4 (+/-1/8) di giro.
- Vite H di regolazione alla massima apertura della farfalla
avvitare completamente e svitare di 1+1/4 (+/-1/8) di giro.
- Vite T Vite di regolazione del minimo al regime di minimo la
catena non deve assolutamente muoversi.
FUNZIONAMENTO DEL FRENO CATENA DI
EMERGENZA (FIG.A)
Il freno della catena è un dispositivo di sicurezza che si attiva
esercitando una pressione contro il paramano anteriore (8). In
caso di contraccolpo, la mano dell’operatore colpisce il parama-
no attivando il freno catena. Quando viene azionato il freno della
catena, il movimento della catena si arresta entro 0,15 sec.
Lo scopo del freno catena è quello di ridurre il pericolo in caso
di contraccolpi.
Prima di utilizzare la motosega è necessario testare il freno
della catena nel modo seguente:
- Accertarsi che il freno della catena sia disattivato spingendo
il paramano anteriore (8) verso la maniglia posteriore.
- Posizionare la motosega su un piano solido e sgombro da oggetti.
- Accendere la motosega (vedi "Avviamento del motore").
- Con la motosega in funzione, attivare il freno della catena
ruotando il polso sinistro contro il paramano (8), senza
rilasciare la presa dall'impugnatura.
- La catena deve fermarsi all’istante.
- Rilasciare il comando dell’accelleratore e spegnere il motore.
N.B. Rilasciare immediatamente la leva di accensione.
ATTENZIONE! Qualora la catena non dovesse fermarsi
quando si attiva il freno, fare controllare la motosega presso
un centro assistenza autorizzato. Non utilizzare la motosega
se il freno catena non funziona!.
PRESCRIZIONI D’USO (FIG.A)
Avviamento della catena
Per avviare la catena è sufficiente, dopo aver acceso il motore,
premere la leva dell’accelleratore (4).
Arresto della catena
È sufficiente rilasciare la leva dell’accelleratore (4).
ATTENZIONE! A lavoro finito o durante le pause di lavora-
zione, spegnere sempre il motore.
ATTENZIONE! Per prevenire il contraccolpo impugnare
sempre entrambe le impugnature in modo sicuro ed evitare
sempre di tagliare con la punta della barra e di incastrare
la barra nel tronco tagliato.
ABBATTIMENTO E PROCEDURE DI SICUREZZA
Di seguito verranno trattati i seguenti argomenti:
1. Abbattimento in relazione alla capacità di taglio della
sega
2. Come controllare la direzione di caduta sotto taglio
3. Uso di cunei per l’abbattimento
4. Taglio dei rami (sramatura)
5. Taglio del tronco abbattuto
6. Preparazione ed uso delle vie di fuga
7. Limitazione d’accesso alle zone pericolose
8. Taglio del legno sui supporti
9. Effetto del suolo in pendenza
10. Precauzioni per le condizioni meteorologiche per le
persone circostanti ed eventuali regolamenti locali.
11. Consigli sugli indumenti di sicurezza
12. Consigli a colui che utilizza l’utensile per la prima volta.
1. Abbattimento in relazione alla capacità di taglio della
sega
Non eseguite tagli su diametri superiori alla lunghezza di taglio
utile (vedi dati tecnici).
È bene non esagerare con il diametro di taglio.
2. Come controllare la direzione di caduta sotto taglio
Di norma l’abbattimento consiste in due tagli principali, l’in-
taglio (C Fig.1) e il taglio vero e proprio (D Fig.1), necessario
per la caduta dell’albero.
- Iniziare con l’intaglio superiore (C) sul lato dell’albero che
guarda la direzione di caduta (E)
- L’intaglio deve avere una profondità (F) pari a circa ¼ del
diametro del tronco.
- Dopo l’intaglio, eseguire il taglio vero e proprio (D) dall’altra
parte dell’albero a 3-5 cm sopra l’altezza dell’intaglio (Fig.1).
- non camminare davanti all’albero dal lato di caduta quando
si è già fatto l’intaglio.
FIG. 1
D
C
F
E
1/4
3/4
3.5cm

9
2. Tronco sostenuto su una estremità:
Tagliare prima dal basso per 1/3 di tronco e poi dall’alto verso
il basso fino a congiungersi con il taglio precedente. (Fig.5).
2
1
FIG. 5
1
2
3. Tronco sostenuto da entrambe le estremità:
Tagliare prima dall’alto per 1/3 di tronco e poi dal basso verso
l’alto fino a congiungersi con il taglio precedente. (Fig.6).
6. Preparazione ed uso delle vie di fuga
-
ATTENZIONE!
Prima di iniziare le operazioni di taglio bisogna
scegliere la direzione di caduta, identificare le vie di fuga, liberare
le vie di fuga dagli ostacoli.
N.B: La direzione di caduta viene definita mediante l’in-
taglio
- Le vie di fuga per l’operatore sono schematizzate nella (Fig. 7).
a) Direzione dell’abbattimento
b) area pericolosa
c) via di fuga
a
c
c
b
b
7. Limitazione d’accesso alle zone pericolose
Se l’area in cui si sta lavorando permette un scarsa visibilità
della zona di caduta dell’albero è bene delimitare l’accesso
dell’area con appositi segnali e cartelli di pericolo.
8. Taglio del legno sui supporti (cavalletti)
Per poter lavorare con facilità e in sicurezza, è importante
mantenere un corretta posizione :
- Distribuire il peso su entrambi i piedi.
- Tenere la motosega alla vostra destra durante il taglio
- Tenere il braccio sinistro il più diritto possibile.
9. Effetto del suolo in pendenza
-
ATTENZIONE!
Quando si sta abbattendo un albero su un piano
inclinato, l’operatore deve posizionarsi sul lato in salita del terreno
in quanto l’albero rotolerà a valle una volta tagliato.
-
ATTENZIONE!
Prima di procedere con il taglio finale control-
lare che nell’area di caduta non ci siano persone, animali, cose.
-
ATTENZIONE!
Quando l’albero inizia a cadere, estrarre
la motosega dal taglio, posare la motosega a terra e lasciare
velocemente la zona lungo la via di fuga.
3. Uso di cunei per l’abbattimento
- Utilizzare cunei di legno o di plastica (G Fig.2) per im-
pedire che la barra o la catena rimangano impigliatii nel
tronco.
-
ATTENZIONE!
Quando l’albero inizia a cadere, estrarre
la motosega dal taglio, posare la motosega a terra e lasciare
velocemente la zona lungo la via di fuga.
4. Taglio dei rami (sramatura)
Premessa:
Questa operazione consiste nel tagliare i rami dell’albero
abbattuto.
Nota: non tagliare i rami che sostengono l’albero abbattuto
prima di averlo tagliato a pezzi. (Fig.3)
-
ATTENZIONE!
non salire mai sul tronco per tagliare.
5. Taglio del tronco abbattuto
Premessa:
Questa operazione consiste nel tagliare il tronco abbattuto
in vari pezzi.
Di seguito sono indicati i metodi di taglio in funzione della
posizione del tronco abbattuto:
1. Tronco sostenuto su tutta la sua lunghezza:
Tagliare dall’alto verso il basso (Fig. 4).
G
H
FIG. 2
A
FIG. 3
FI
G
. 4
1
2
FIG. 6
2
1

10
10. Precauzioni per le condizioni meteorologiche, per le
persone circostanti ed eventuali regolamenti locali.
-
ATTENZIONE!
Non utilizzare l’utensile con condizioni ambientali
avverse come per esempio poggia, neve, scarsa visibilità, vicino a
cavi o reti elettriche o dove c’è pericolo di esplosioni.
11. Consigli sugli indumenti di sicurezza
Per la protezione dai rischi residui presenti nell’uso dell’utensile,
si devono utilizzare adeguati indumenti ed accessori. In genere
i dispositivi da utilizzare sono:
- Pantaloni con imbottitura antitaglio
- Giacca colorata per assicurare la visibilità dell’operatore
- Ghette resistenti al taglio e calzatura con suola antiscivolo,
punta antischiacciamento e antitaglio.
- Guanti antitaglio e, eventualmente , antivibranti per lo
smorzamento delle vibrazioni.
- Casco con visiera, per la protezione dai rami in caduta e
dalla proiezione di materiali.
- Cuffia insonorizzante per la protezione dell’udito.
12. Consigli a colui che utilizza l’utensile per la prima volta
Colui che utilizza l’utensile per la prima volta dovrebbe rice-
vere istruzioni pratiche inerenti all’uso di una sega a catena,
sull’equipaggiamento, da parte di un operatore esperto, e
la pratica iniziale dovrebbe essere il taglio del legno su un
cavalletto o intelaiatura.
MANUTENZIONE E PULIZIA
ATTENZIONE! Ogni operazione indicata di seguito deve
essere effettuata con il motore spento e il filo della candela
staccato.
ATTENZIONE! In caso di dubbi consultare un centro assi-
stenza autorizzato.
ATTENZIONE! Per interventi non contemplati di seguito
consultare un centro assistenza autorizzato.
Abbiate cura della vostra macchina e pulitela regolarmente, vi ga-
rantirete una perfetta efficienza ed una lunga durata della stessa.
Pulite la macchina con una spazzola morbida o un panno.
Non spruzzate o bagnate d’acqua la macchina.
Non usate sostanze infiammabili, detergenti o solventi vari,
potreste rovinare irrimediabilmente la macchina. Le parti in
plastica sono aggredibili da agenti chimici.
Barra e catena
- Tendere la catena quando è necessario
- Fare eseguire affilatura e manutenzione della catena da
un’officina specializzata quando è necessario.
- Girare la barra di 180° dopo un uso prolungato e quando si
sostituisce la catena, in modo da creare un'usura uniforme
di tutta la barra.
- Lubrificare o ingrassare periodicamente il cuscinetto posto
sulla punta della barra.
- Tenere costantemente puliti i passaggi olio sulla barra.
- Sostituire la catena quando, dopo varie affilature, la lunghezza
del dente ha raggiunto 3-4 mm o quando le maglie della
catena si saranno usurate. (Tipo catena: vedi dati tecnici)
- Sostituire la barra nel caso abbia subito deformazioni o
danneggiamenti. (Tipo barra: vedi dati tecnici)
Filtro dell’aria
Pulire ogni un mese o 15 ore di funzionamento, eventualmente
sostituire.
Nel caso di utilizzo in ambienti polverosi ridurre gli intervalli
di pulizia.
1 Aprire la leva apertura coperchio (Fig.A, 28) e togliere il
coperchio
2 Togliere l’elemento filtrante (Fig.A, 31).
3 Lavarlo con acqua e sapone e risciacquarlo perfettamente.
4 Lasciarlo asciugare.
5 Rimettere al suo posto il filtro e richiudere il coperchio.
Candela (Fig.A, 30)
Controllare ogni mese o 25 ore di funzionamento eventual-
mente sostituire.
Per il tipo di candela vedere i dati tecnici.
1 Togliere la pipetta e svitare la candela con l’apposita chiave.
2 Esaminare la candela e nel caso fossero presenti residui
carboniosi eliminarli con una spazzola metallica. Se l’elettro-
do fosse eccessivamente usurato o l’isolante danneggiato,
sostituire la candela.
3 Misurare la distanza tra gli elettrodi, deve essere compresa
tra 0,6 e 0,7 mm.
4 Riavvitare la candela a mano.
5 Fissare tramite apposita chiave per circa ¼ di giro con
candela usata, di circa ½ giro con candela nuova.
RICERCA GUASTI
Il motore non parte
- L’interruttore accensione motore è in posizione stop: portarlo
su " I ".
- Non c’è miscela nel serbatoio: metterla.
- C’è sporco o acqua nel serbatoio del carburante: pulirlo.
- La candela non fa scintille: è sporca usurata o difettosa,
pulirla o sostituirla.
- La candela non fa scintille: rivolgersi ad un centro assistenza
autorizzato.
- Altro: rivolgersi ad un centro di assistenza autorizzato.
Il motore parte e poi si spegne
- Carico applicato eccessivo: ridurre il carico sugli organi di taglio.
- La candela è difettosa: sostituirla.
- Non è stata utilizzata miscela olio benzina provocando gravi
danni al motore far verificare la macchina presso un centro
di assistenza autorizzato. Attenzione danni dovuti a questo
tipo di negligenza non sono coperti dalla garanzia.
- Altro: rivolgersi ad un centro assistenza autorizzato.
La catena non gira
- Controllare che il paramano anteriore non sia abbassato:
spingere verso il motore il paramano anteriore.
Catena e barra si surriscaldano
- Manca olio nel serbatoio: riempire
- Catena troppo tesa: allentare catena.
- Ugello dell’olio o canale otturato: pulire.
Catena asciutta
- Manca olio nel serbatoio: riempire d’olio
Il freno a catena non funziona
- Meccanismo del paramano difettoso: contattare centro assistenza.
L’utensile non taglia bene, si inceppa o batte
- Catena allentata: regolare la tensione della catena.
- Catena consumata: affilare o sostituire.
- Catena difettosa: sostituire.
Si forma una macchia d’olio sotto l’utensile
- L’ utensile non è stata pulito e la segatura rilascia l’olio
accumulato durante il taglio: pulire l’utensile togliendo la

11
segatura dal carter.
La barra si allenta
- Le viti sono state fissate male: assicurarsi che le viti siano
fissate energicamente.
RIMESSAGGIO
ATTENZIONE! Superfici calde. Alcune parti rimangono a
temperature elevate anche per alcune ore dopo l’arresto
della macchina; attendete il raffreddamento completo prima
dell’immagazzinamento.
ATTENZIONE! Assicurarsi che l’ambiente non sia umido e
polveroso.
1. Togliere tutto il carburante dal serbatoio.
2. Versare qualche goccia di olio motore nel foro della can-
dela, rimettere la candela e mettere il motore in posizione
di compressione.
3. Riporre la macchina in posizione stabile, sicura e lontana
dalla portata dei bambini.
DEMOLIZIONE
Per la salvaguardia dell’ambiente procedete secondo le leggi
vigenti del luogo in cui vi trovate.
ATTENZIONE! Prima di demolire la macchina scaricate
completamente il serbatoio carburante.
Non gettate l’imballo nei rifiuti ma portatelo ad un punto di
raccolta per il riciclaggio.
Quando la macchina non è più utilizzabile ne riparabile,
procedete allo smontaggio delle parti per lo smaltimento
differenziato dei rifiuti.
Tutti i componenti plastici riportano una sigla identificatrice del
materiale di cui sono composti, questa servirà in futuro per il
riciclaggio dello stesso.
Non smaltite l’olio esausto con i rifiuti domestici ma conse-
gnatelo negli appositi centri di raccolta.
GARANZIA
Il prodotto è tutelato a norma di legge contro ogni non con-
formità rispetto alle caratteristiche dichiarate purché sia stato
utilizzato esclusivamente nel modo descritto nel presente
manuale d’uso, non sia stato manomesso in alcun modo,
non sia stato riparato da personale non autorizzato e si siano
utilizzati solamente ricambi originali. Sono inoltre esclusi
problemi dovuti a normale usura. Consegnate il prodotto al
rivenditore o ad un centro di assistenza autorizzato, esibendo
la prova di acquisto.
DICHIARAZIONE DI CONFORMITA’
La ditta indicata in etichetta dichiara sotto la propria responsabilità
che il prodotto ivi citato è conforme ai requisiti essenziali di sicu-
rezza e salute contenuti nelle seguenti direttive europee: 98/37/CE,
2004/108/CE, 2005/88/CE e le loro successive modifiche.
Per la direttiva 2005/88/CE vedere tabella punti 17-16.
Bruno Anzolin
DATI TECNICI
1. Cilindrata motore
2. Potenza motore
3. Minima velocità di rotazione raccomandata (minimo)
4. Massima velocità di rotazione raccomandata (con utensile
di taglio innestato)
5. Capacità serbatoio combustibile
6. Capacità serbatoio olio catena
7. Numero denti pignone di guida
8. Lunghezza della barra
9. Lunghezza utile di taglio
10. Passo catena
11. Spessore dente di guida della catena
12. Tipo catena
13. Tipo barra
14. Vibrazione a livello dell’impugnatura
15. Livello di pressione acustica al posto operatore LpA
(ISO3744)
16. Livello di potenza sonora garantito Lw(A)
17. Procedura di valutazione della conformità seguita allegato:
18. Luogo e data della dichiarazione
19. Peso macchina
20. Tipo di candela di accensione
1 35,2 cm3
2 1,5 kW (8500 min-1)
3 3000 min-1
4 10000 min-1
5 400 cm3
6 220 cm3
76
8 416 mm
9 320 mm
10 9,53 mm (3/8")
11 1,27 mm (0,05")
12 OREGON 91VG052/91VG053
13 TRILINK HH1-50-52P/416 mm
14 12 m/s2
15 104 dB(A)
16 116 dB(A)
17 V
18 Schio 24.08.2006
19 5,1 kg
20 Torch L7RTC, NGK BPMR7A, Champion RCJ7Y

12
g
USER INSTRUCTIONS
We thank you for having purchased this product that will
hereafter also be referred to as “tool”.
Your new tool has been manufactured according to the hi-
ghest quality standards, guaranteeing you long term service
and safety.
WARNING! Before using the tool, in order to ensure that
correct commissioning, start-up, use, stopping and main-
tenance are carried out correctly, please read carefully and
apply the following instructions. Before beginning work, you
should be familiar with the controls and safe use of this tool.
Make sure you know how to stop it in case of an emergency.
Incorrect use of this tool could result in serious injury or
death and damage to property. Always consider your safety
and the safety of others and act accordingly.
Any use of this tool other than those indicated in these
instructions may damage the tool and create serious risk
to both people and property.
WARNING! The chain saw engine works exclusively with a
mix of oil and petrol with 4% oil. If this mixture is not used,
irreparable damage will be caused to the engine with imme-
diate loss of warranty. Please keep these instructions and
the attached sheet in a safe place and have them available
for further reference if needed.
MACHINE DESCRIPTION
1. Exhaust
2. Rear handgrip
3. Rear hand guard
4. Start lever
5. Start lever release button
6. Oil tank cap
7. Front hand grip
8. Front hand guard/ emergency chain brake lever
9. Start handle
10. Bar
11. Bar cover (where fitted)
12. Chain
13. Spike bumper
14. Fuel tank cap
15. Chain adjustment screw (where fitted)
16. Bar fixing pin
17. Bar fixing nut
18. Housing
19. Sprocket
20. Chain tension pin (if present)
21. Bar groove
22. Bar lower hole
23. Oil hole
24. Air control lever.
25. Engine off switch
26. Brake clutch unit
27. Internal combustion engine
28. Open cover lever.
29. Spacer for packaging
30. Spark plug
31. Air filter
DESCRIPTION OF MARKS AND SYMBOLS
1. Technical data
2. Machine name
3. Marks
5. IMPORTANT!
6. Read the operating manual before using this tool
7. Always wear eye protection, ear plugs, and dust masks.
8. IMPORTANT! Read the safety measures to be taken in
order to avoid the danger of kickback
9. Important! Hot surfaces.
10. IMPORTANT! Risk of fire.
11. IMPORTANT! Always wear protective gloves. Always wear
protective shoes.
12. Noise level
EQUIPMENT
The packaging contains the following items:
- Chain saw
- A bar
- A chain
- Operator’s use and maintenance manual (this manual)
- Conformity certificate (attached to this manual)
WARNING!
1) DANGER OF FIRE AND EXPLOSION
WARNING! Risk of fire and explosion! Always switch the
engine off before refilling. The fuel and its fumes are highly
inflammable. Do not pour the fuel onto hot surfaces. Work
in a well ventilated area, do not smoke and keep away from
naked flames and incandescent objects.
Use protective eyewear and anti-acid heavy duty gloves. Do
not swallow, do not inhale the fumes given off by the fuel
and keep it out of the reach of children. Avoid contact with
the skin. In case of contact with the eyes wash with water
and seek medical advice.
WARNING! Do not use the machine in areas with a risk of
explosion and/or fire, in indoor areas or in the presence
of inflammable and/or explosive liquids, gases, powders,
vapours, acids or elements. Do not use the machine in the
presence of incendiary sources such as naked flames,
cigarettes, sparks, etc.
An extinguisher must be located near the work area when
using the chain saw.
2) EXHAUST GAS: RISK OF POISONING
WARNING! Risk of poisoning. The engine gives off poisonous,
odourless and colourless gas containing carbon monoxide:
inhalation may cause nausea, fainting and death.
WARNING! Do not operate the machine in indoor or poorly
ventilated environments. In case of inhalation seek medical
attention immediately.
3) HOT SURFACES: RISK OF BURNS
WARNING! Risk of burns. During use, some external surfa-
ces of the machine may reach high temperatures, and may
remain hot for several hours after stopping the engine. Pay
particular attention to the exhaust system and the hot parts
of the engine, such as the cylinder head.

13
SAFETY REGULATIONS
1. Keep the work area clean.
Begin cutting operations only after having cleaned the
work area. There must also be a firm support. Do not
begin working until you have established a plan to escape
from the falling tree.
2. Consider the work area environment carefully.
Be cautious when cutting bushes and small saplings as
their tender consistency may cause them to become
entangled in the chain, hitting you or throwing you off
balance. Never use the chain saw in areas where there
is a danger of explosion, or near flammable liquids or
gases.
3. Keep children and other visitors at a safe distance.
Children and other visitors must maintain a safe distance
from the work area and must not touch the tool.
4. Storing the chain saw.
When not being used, these tools must be stored in a dry
place, on a high shelf or in a locked cupboard out of the
reach of children.
5. Do not force the chain saw or subject it to excessive
pressure.
In order to guarantee better performance and safety the cut
must be followed through without exerting excessive
pressure on the saw.
6. Correct use of this tool.
Use this tool only to cut wood. Do not use the chain saw
on other materials.
7. Safe clothing.
Do not wear loose-fitting clothing or jewellery that may
become entangled in the moving parts of the chain saw. It
is recommended that you use anti-slip safety shoes when
working outdoors. Always wear protective caps for long
hair.
8. Use appropriate personal protective equipment.
Use safety glasses, safety shoes, comfortable clothing,
protective gloves, and ear and head protection.
9. Transporting the chain saw.
When not in use, transport the chain saw by using the
front hand grip. Keep your fingers away from the switch
and ensure that the bar and the chain are on the back
side. NB: Use the chain guard in order to avoid injury.
10. Working in safety.
Use clamps and trestles to work in safety.
11. Avoid unsafe movements.
Always make sure that your stance is supported and
balanced.
12. Maintain your chain saw carefully.
Keep the tool sharpened and clean for better performance
and safety. Follow the instruction for lubrication and
changing the accessories. Keep the handles clean, dry,
and free from oil and grease.
13. Switch off the chain saw.
Switch off the chain saw using the relevant control when
not in use, when cleaning, when tensioning or changing
the chain, or when replacing accessories.
14. Removing the keys.
Before using, always check that all tools have been
removed from the chain saw.
15. Avoid accidental starts.
Never transport the chain saw with the engine switched
on. Ensure that the engine switch is in the off position.
16. Always pay attention.
Always concentrate fully on what you are doing. Use
common sense. Never use the chain saw when feeling
tired or drowsy.
17. Check the damaged parts.
Before using the chain saw, always check the safety featu-
res and other potentially damaged or worn parts carefully
in order to determine if the chain saw is capable of functio-
ning correctly and long enough to complete the task at
hand. Check the alignment of the moving parts, potentially
damaged components, the general assembly, and other
aspects that may influence correct operation. If ever the
protective components or other elements are damaged,
you must have them properly repaired or replaced by an
authorised customer service centre unless otherwise
indicated in this instruction manual. Do not use the tool
if it is not working correctly.
18. IMPORTANT!
The use of accessories other than those recommended in
this instruction manual may cause accidents or injury.
19. Have the chain saw repaired only by qualified professional
technicians.
This electric tool complies with all required safety standar-
ds. Repairs must be carried out by qualified technicians
and only original spare parts must be used. Otherwise,
the operator may face serious danger when using this
tool.
20. Protection from kickbacks.
WARNING! There may be kickbacks if the end or the
top of the bar come into contact with an object or when
wood becomes lodged in the chain of the chain saw
during cutting. In some cases this contact may cause
kickbacks, pushing the bar forcefully backwards towards
the operator. The snagging of the chain along the upper
part of the bar may push the bar forcefully backwards
towards the operator. Both of these reactions may result
in a loss of control or cause serious injury to the operator.
It is very important to follow the instructions below very
carefully in order to minimize the risk of kickback.
A. Hold the chain saw firmly: hold it firmly with both hands
when the engine is running, with your right hand on the
rear hand grip and your left hand on the front hand grip.
B. Avoid unsafe movements.
C. Always make sure that your stance is supported and
balanced.
D. Check that the tip of the bar does not touch trunks,
branches, the ground or other obstacles.
E. Do not cut branches higher than shoulder height.
F. Use equipment like chains, bar protection, chain brakes,
and special bars to reduce risks associated with kick-
backs.
G. Use only bars and chains specified by the manufacturer
or equivalents.
21. Fuel
Only use an oil-petrol mixture with 4% oil. Use petrol
without Eurosuper with min. 90 octanes. Do not use old
or dirty mixtures. Any damage caused by incorrect fuel
usage is not covered by the warranty.
22. Do not use the chain saw…
… if it is damaged, inadequately regulated, or assembled
incompletely or unsafely. Check that the chain of the
chain saw stops when the lever is released. Do not use
the chain saw if the accelerator lever does not function
correctly.
23. Do not carry out operations or repairs for which you have

14
no competence and experience.
24. Do not use the chain saw with only one hand!
This may cause serious injury to the people helping you or
those in the immediate area. The chain saw was designed
to be used with both hands.
25. Keep your hands clean, dry, and free from oil and grea-
se.
26. Do not leave dirt, residue or sawdust in the engine.
27 The chain saw must be used only by adults who are
adequately qualified.
28. The chain saw was designed for non-professional use.
It was not designed for heavy duty or continuous jobs.
29. Do not use the chain saw for oversized jobs that would
require larger equipment.
30. Cosult the manufacturer’s instructions for:
- Sharpening the chain
- Adjusting chain tension
- Chain brake operation
- Lubrication and correct functioning of the oiler.
- Suggestions for felling trees
31. Before use, always check that the tension of the chain has
been properly adjusted.
A chain that is too loose may be dangerous and cause
injury.
32. Whoever is using the tool for the first time should ensure
that he/she has been given practical instructions on the
use of a chain saw and on protection equipment from an
expert.
It is advisable to begin practice cuts on wood supported
by trestles or other supports.
33. All the maintenance operations on the chain saw other than
those indicated in the operating manual and maintenance
instructions must be carried out by specialised personnel.
Do not attempt to carry out repairs on the chain saw
yourself.
34. WARNING! Do not remove, modify, or disengage any
safety device on the chain saw. The chain brake/ hand
guards are the main safety features. The chain saw does
not work if the chain brake has been disengaged.
35. This chain saw was designed for non-professional use and
for jobs like cleaning, pruning, cutting firewood, etc. It was
not designed for long-term use. If you are planning to use
this saw for long periods of time, it may cause circulation
problems with your hands or cause vibrations.
36. When felling trees, maintain a distance of at least twice the
height of the tree between yourself and your colleagues.
STARTING UP
This tool was designed for non-professional use and should not
be used for heavy duty or continuous jobs or for commercial
activities. The tool may be used for various purposes. For
example: cutting up firewood, making poles for fences or fruit
trees, felling small trees,
ground pruning, small carpentry jobs…
N.B.: this tool is made only to cut wood and must not be used
on other materials.
WARNING! Always use protective gloves when handling
the chain.
BAR AND CHAIN
1 Assembly of the bar, the chain, and the housing (Fig. A)
- Place the chain saw on a flat surface and remove the nuts
(nr. 17) and the housing (nr. 18). Also remove the plastic
spacer (nr. 29) inserted in the fixing pins.
- Using a screwdriver, turn the chain adjustment screw coun-
ter-clockwise (nr. 15) until the end of the screw.
- Slip the bar groove (nr. 21) over the fixing pins (nr. 16) and
pass the chain over the sprocket (nr.19) During this phase
it is important to centre the tensioning pin (nr. 20) on the
lower hole of the bar (nr.22).
- Insert the chain in the bar grooves as in Fig.A pos.2, making
sure to respect the correct direction of the chain.
- Assemble the housing (nr. 18) and, holding the nose of the
bar upwards (using gloves!), fix the nuts (nr.17) tightly.
WARNING! Do not use the chain saw before tensioning
the chain.
2 Tensioning the chain (Fig. A)
WARNING! Before carrying out any work on the tool, switch
off the internal combustion engine.
WARNING! Wear heavy-duty protective gloves while car-
rying out this operation.
- Loosen the bar fixing nuts half a turn (nr. 17).
- Using a screwdriver, turn the chain adjustment screw
clockwise (nr.15) until the chain has reached the correct
tension.
N.B.: Checking the correct tension. The correct tension is
reached when you are able to manually lift the chain 3-4
mm to the centre of the bar (Fig.C).
- If the chain is too tense, loosen the nuts or the wheel (nr.
17) and the chain adjustment screw (nr.15) and push the
bar leftwards in such a way as to make it slip into place.
- Repeat the adjustment taking care to tighten the screws less
(nr. 15).
- When the chain has been adjusted, fix the nuts or the wheel
securely (nr.17), always holding the nose of the bar upwar-
ds.
- Check for the correct tension again.
WARNING! During the first cuts, when the machine is still
new, the chain will loosen quite frequently, but this is normal
during the breaking-in period of a new tool.
WARNING! Never leave the chain loose as it may come off
the bar while cutting.
WARNING! If the chain is too tight, it could cause overhea-
ting and damages. It is forbidden to use the machine without
lubricating oil for the chain.
PREPARING THE MIXTURE
WARNING! The chain saw engine works exclusively with
a mix of oil and petrol with 4% oil. If this mixture is not
used irreparable damage will be caused to the engine with
immediate loss of warranty.
WARNING! Risk of fire and explosion. The fuel and its fu-
mes are highly inflammable. Do not pour the fuel onto hot
surfaces. Work in a well ventilated area, do not smoke and
keep away from naked flames and incandescent objects. Use
protective eyewear and anti-acid heavy duty gloves. Do not
swallow, do not inhale the fumes given off by the fuel and
keep it out of the reach of children. Avoid contact with the
skin. In case of contact with the eyes wash with water and
seek medical advice.
WARNING! Do not use the machine in areas with a risk of

15
explosion and/or fire, in indoor areas or in the presence
of inflammable and/or explosive liquids, gases, powders,
vapours, acids or elements. Do not use the machine in the
presence of incendiary sources such as naked flames,
cigarettes, sparks, etc.
How to prepare the petrol-oil mixture with 4% oil (1:25)
For the mixture, use unleaded car petrol (green or eurosuper
petrol) with a minimum of 90 octanes and oil for 2 stroke
engines of API TC quality. Using a petrol-resistant container
and a measuring device, mix 40cc of oil for every 1000cc
(1litre) of petrol. Shake the mixture well before use. It is
advisable only to prepare the quantity of mixture necessary
for the task in hand. Storage of the mixture for long periods
of time brings about rapid deterioration and consequently
malfunctioning of the engine.
FILLING UP THE MACHINE (Fig. A)
IMPORTANT! Risk of fire and explosion. Refuel when the
machine is switched off. Let the machine cool before re-
fuelling. If the fuel has splashed onto the machine or floor,
dry it up before starting the machine.
WARNING! The two-stroke engine of the chian saw must
be fuelled exclusively with a petrol-oil mixture with 4%
lubricating oil. If this mixture is not used as fuel the engine
will suffer irreparable damage with consequent immediate
loss of the warranty.
WARNING! Any refuelling must be carried out with the
engine switched off and the engine ignition switch in the
“stop” position (Fig.A, 25).
Before opening the petrol cap, for refuelling, place the
chain saw on a flat surface with the cap facing upwards.
Open the cap (Fig.A, 14) by unscrewing it and fill up the
tank without allowing it to overflow and make sure the cap
is firmly secured.
REFUELLING LUBRICATING OIL FOR THE CHAIN (Fig. A)
WARNING! Do not use old or recycled oil to fill the tank.
Never use the tool without oil as its functionality and the
safety of the operator would be compromised. The chain
saw is sold with an empty tank.
Before opening the petrol cap, for refuelling, place the chain
saw on a flat surface with the cap facing upwards.
- Unscrew the oil cap (Fig. A nr. 6) and fill the tank with biode-
gradable chain oil available in specialized shops, hardware
stores, agricultural machinery dealers, etc.
- Fill the tank to a maximum of 2 cm below the cap, being
careful not to introduce dirt, sawdust, or dust inside.
- Close the tank cap.
- WARNING! It is very important to clean the chain saw (with
a brush) around the cap before refilling.
- IMPORTANT! The oil level must be checked frequently during
use to prevent the chain remaining without lubricant. Lack of
lubricant causes rapid wear of the chain and the bar. Top up
the oil at least every time refuelling is carried out.
- IMPORTANT! The length of time one oil fill-up lasts may
vary according to the chain tension, the type of wood being
cut, the environmental temperature, the oil density, and the
usage of the chain saw.
STARTING UP THE ENGINE (FIG. A)
PLEASE NOTE! Before starting the engine check that the tank
is suitably full.
The machine has a centrifugal clutch (26) and with the engine
at a minimum (without acceleration) the chain does not turn. In
order to stop the cutting device rotation it is enough to release
the accelerator (4) so that the engine slows to minimum speed.
The accelerator control is equipped with a safety lock-off lever
(5) that aims to block involuntary starting of the chain.
WARNING! During the start-up phase with the engine
cold, the chain could start moving, immediately use the
accelerator control.
Cold engine start-up
1) Shift on/off switch (25) to the “I” position
2) Activate the chain break by pushing the hand guard (8)
towards the bar (10).
3) Shift the air control (24) to the “close” position.
4) Place the chain saw on the floor in a firm position and
carefully check that the chain and the bar are far from any
objects or people.
5) Keep it in position by securely gripping the front hand grip
and blocking the back one with the heel of your right foot
(Fig. D).
6) Pull the start handle (9) a few times to trigger the feeding
pump.
7) Bring the air control lever (24) to the “open” position and pull
the start handle firmly without releasing it with a jerk.
8) A few seconds after the engine starts, fully activate the
accelerator lever (4) to un-block it.
9) With the engine at minimum, deactivate the chain brake by
pulling the hand guard (8) towards the rear hand grip.
Hot engine start-up
1) Shift on/off switch (25) to the “I” position
2) Place the chain saw on the floor in a firm position and
carefully check that the chain and the bar are far from any
objects or people.
3) Keep it in position by firmly gripping the front hand grip
and locking the back one with the heel of your right foot
(Fig. D).
4) Pull the start handle firmly (9), to start the engine, without
releasing it with a jerk.
Please note: With the engine warm, do not close the air.
SWITCHING OFF THE ENGINE (FIG.A)
- Release the accelerator lever (4) so that the engine goes
back to a minimum and the chains stops.
- Shift the engine off switch (25) to “O”.
BREAKING IN
For the first 20 hours of use, do not use the chain saw on full
load or for extended periods.
BREAKING IN THE CHAIN
Before using the chain saw for the first time, lubricate the
chain and its guide on the bar with lubricating oil. Check the
chain tension often.

16
CARBURATION
The carburation has already been correctly adjusted in the
factory and does not need to be set. In case of carburation
faults, clean the air filter or have the chain saw checked at a
customer service centre.
Please note: The carburation can vary according to climatic
conditions and/or altitude.
The basic regulations of the carburettor are the followings:
- Completely screw in screw L for acceleration adjustment
(Fig.A, Pos.1) and unscrew by 1+1/4 (+/-1/8) of a turn.
- Completely screw in screw H for maximum throttle opening
and unscrew by 1+1/4 (+/-1/8) of a turn.
- Screw T, adjustment screw for minimum, at minimum the
chain must absolutely not move.
FUNCTIONING OF THE EMERGENCY CHAIN
BRAKE (FIG.A)
The chain brake is a safety device that is activated by exerting
pressure on the front hand guard (8). In case of kickback, the
operator’s hand hits the hand guard, activating the chain brake.
When the chain brake is activated, the movement of the chain
is stopped within 0.15 seconds.
The purpose of the chain brake is to reduce danger in case
of kickback.
Before using the chain saw, you must test the chain brake
as follows:
- Check that the chain brake is deactivated, pushing the front
hand guard (nr. 8) towards the rear handle.
- Position the chain saw on a solid flat surface that has been
cleared of all objects.
- Switch on the chain saw (see “Starting up the engine ”).
- With the chain saw switched on, activate the chain brake
by turning your left wrist against the hand guard (8) without
releasing the hand grip.
- The chain should stop instantly.
- Release the accelerator control and switch off the engine.
N.B. Release the start lever immediately.
WARNING! If the chain does not stop when the brake is
activated, have the chain saw checked at an authorised
customer service centre. Do not use the chain saw if the
chain brake does not function properly!
INDICATIONS FOR USE (FIG.A)
Starting the chain
For starting the chain it is enough, after switching on the
engine, to press the accelerator lever (4).
Stopping the chain
It is enough to release the accelerator lever (4).
WARNING! When you have finished working or whilst taking
a break, always switch off the engine.
WARNING! In order to prevent kickbacks always grip both of
the hand grips safely and avoid cutting with the tip of the bar
and avoid getting the bar stuck in the trunk being cut.
FELLING TREES AND SAFETY PROCEDURES
The following topics will be discussed below:
1. Felling trees in relation to the saw’s cutting capacity.
2. How to control the fall direction of the tree being cut.
3. Using wedges for felling trees
4. Cutting branches (debranching)
5. Cutting fallen trunks
6. Preparing and using escape routes
7. Limiting access to danger zones
8. Cutting wood on supports
9. Felling trees on slopes
10. Precautions to be taken according to weather conditions
for people in the area and any local regulations.
11. Useful suggestions concerning safety gear
12. Advice for those using the chain saw for the first time
1. Felling trees in relation to the saw’s cutting capacity.
Do not make cuts on diameters greater than the effective cutting
length (see technical specifications).
It is always better not to exagerate with the diameter of the
cut.
2. How to control the fall direction of the tree being cut.
Usually, felling a tree consists of two main cuts, the face cut
(C Fig.1) and the undercut (D. Fig. 1), which is needed to
fell the tree.
- Begin with the face cut (C) on the side of the tree facing the
direction of the fall (E).
- The cut must be as deep as about ¼ of the trunk diameter
(F).
- After this operation, make the under cut (D) on the other side
of the tree at about 3-5 cm above the height of the face cut
(Fig. 1).
- Do not walk in front of the tree on the fall side after you have
made the cut.
- WARNING! Before proceeding with the final cut, check that
there are no people, animals, or objects in the fall area.
- WARNING! When the tree begins to fall, extract the chain saw
from the cut, lay it on the ground, and leave the area quickly
along the escape route.
3. Using wedges for felling trees
- Use wooden or plastic wedges (G Fig.2) to prevent the bar
or the chain from getting lodged in the trunk.
FIG. 1
D
C
F
E
1/4
3/4
3.5cm
G
H
FIG. 2

17
- WARNING! When the tree begins to fall, extract the chain saw
from the cut, lay it on the ground, and leave the area quickly
along the escape route.
4. Cutting branches (debranching)
Introduction:
This operation consists of cutting the branches of felled
trees.
Note: do not cut the branches that support the felled tree before
cutting it into pieces. (Fig. 3)
- IMPORTANT! Never climb onto the trunk to cut it.
5. Cutting fallen trunks
Introduction:
This operation consists of cutting the felled trunk into several pieces.
Methods for cutting the trunk according to its position as follows:
1. Trunk supported along its entire length:
Cut from the top down (Fig.4).
2. Trunk supported only on one end:
First cut from below for 1/3 of the trunk and then from the top
down until the previous cut has been reached. (Fig.5).
3. Trunk supported on both ends.
First cut from above for 1/3 of the trunk and then from the
bottom up until the previous cut has been reached. (Fig.6).
6. Preparing and using escape routes
- WARNING! Before you begin felling a tree, you must decide
the fall direction, identify the escape route and then eliminate
all obstacles along it.
N.B.: The direction of the fall is determined by the cut.
- The escape routes for the operator are outlined in Fig. 7.
a) Fall direction
b) Danger area
c) Escape route
7. Limiting access to danger zones
If the area where you are working allows little visibility of the
fall area, it is advisable to limit access to the area by marking
it off with warning signs.
8. Cutting wood on supports (trestles)
In order to work easily and safely, it is important to maintain
the correct position:
- Distribute your weight on both feet.
- Hold the chain saw to your right while cutting.
- Keep your left arm as straight as possible.
9. Felling trees on slopes
- IMPORTANT! When felling a tree on a slope, the operator
must position himself/herself on the upper side because,
once the tree is cut, it will roll downhill.
10. Precautions to be taken according to weather conditions
for people in the area and any local regulations.
- IMPORTANT! Do not use the chain saw in adverse weather
conditions, for example rain, snow, low visibility, near
cables or electrical networks, or where there may be a risk
of explosions.
11. Useful suggestions concerning protective clothing
For protection from other risks related to the use of this tool,
adequate clothing and gear must be used. In general, the
following devices should be used:
- Heavy-duty padded trousers.
- Coloured jacket to ensure that the operator is easily visi-
ble.
- Heavy-duty leggings and heavy-duty, safety shoes with
non-skid soles and steel toes.
- Heavy-duty gloves and, if possible, insulated to dampen
vibrations.
- Helmet with visor for protection from falling branches and
materials.
- Soundproof headphones to protect hearing.
12. Advice for those using the chain saw for the first time
Those who are using the chain saw for the first time should
receive practical instructions concerning its use and on gear
A
FIG. 3
FI
G
. 4
2
1
FIG. 5
1
2
1
2
FIG. 6
2
1
a
c
c
b
b

18
by an expert. A beginner should first practice by cutting wood
on a trestle or other support.
MAINTENANCE AND CLEANING
WARNING! All operations indicated below must be carried
out with the engine switched off and the spark plug wire
unplugged.
WARNING! If in doubt, contact an authorised assistance
centre.
WARNING! For operations not considered below please seek
advice from an authorised assistance centre.
Take care of your machine and clean it regularly to ensure that
it remains perfectly efficient and has a long lifetime.
Clean the machine with a soft brush or cloth.
Do not spray or wet the machine with water.
Do not use inflammable substances, detergents or solvents
as these may damage the machine beyond repair. The plastic
parts are prone to damage by chemical agents.
Bar and chain
- Tension the chain when necessary
- Bring the chain to a specialised workshop for maintenance
and sharpening as needed.
- Turn the bar 180° following extensive use and when the chain
is replaced in order to create uniform wear along the entire
bar.
- Lubricate or grease the ball bearings on the nose of the bar
regularly.
- Keep the oil channels on the bar clean.
- Replace the chain when, after repeated sharpenings, the
length of the tooth has reached 3-4 mm or when the links
are worn. (Chain type: see technical data)
- Replace the bar if deformed or damaged. (Bar type: see
technical data)
Air filter
Clean it every 15 months or after every 15 hours of use, and
replace it if necessary.
In case of use in dusty areas clean more regularly.
1 Open the cover opening lever (Fig.A, 28) and remove the
cover
2 Take off the filter element (Fig.A, 31).
3 Wash it with soap and water and rinse completely.
4 Leave it to dry.
5 Put the filter back in place and close the cover.
Spark plug (Fig.A, 30)
Check every month or 25 hours of operation, replace if
necessary.
For the spark plug type, check the technical information.
1 Remove the pipette and unscrew the spark plug using the
relative spanner.
2 Examine the spark plug and remove any carbon residue
with a metal brush. Replace the spark plug if the electrode
is excessively worn or the insulation is damaged.
3 Measure the distance between the electrodes: it should be
between 0.6 and 0.7 mm.
4 Screw the spark plug back in by hand.
5 Secure a used spark plug with around ¼ turn of the spanner,
and a new one with around ½ turn of the spanner.
TROUBLESHOOTING
The engine does not start
- - The on/off switch is in the “stop” position. Put it to “I”
- There is no fuel mixture in the tank: fill it up.
- There is dirt or water in the fuel tank: clean it.
- The new spark plug does not spark: it is dirty, worn or
defective, clean or replace it.
- The spark plug does not spark: contact an authorised service
centre.
- Other: contact an authorised service centre.
The engine starts then stops
- Excessive electric load: reduce the load on the cutting
device.
- The spark plug is damaged: replace it.
- A mixture of petrol-oil has not been used and serious damage
has been provoked to the engine: take the machine to an
authorised assistance centre. Warning: damage due to this
kind of negligence is not covered by the warranty.
- Other: contact an authorised service centre.
The chain does not turn.
- Check that the front hand guard has not come down: push
the front hand guard towards the engine.
The chain and bar overheat
- Insufficient oil in the tank: fill
- The chain is too tense: loosen the chain.
- Oil nozzle or channel clogged: clean it.
Chain is dry
- Insufficient oil in the tank: fill with oil
The chain brake does not work
- Defective hand guard mechanism: contact customer service
centre.
The chain saw does not cut well, blocks, or makes banging
noise
- Chain is loose adjust the chain tension
- Chain is worn: sharpen or replace it.
- Defective chain: replace it.
An oil stain forms under the chain saw
- The chain saw was not cleaned and the sawdust releases the
oil accumulated during cutting: clean the saw and remove
the sawdust from the housing.
The bar is loose
- The screws have been fixed badly: make sure that the screws
have been tightened vigourously.
STORAGE
WARNING! Hot surfaces. Some parts of the machine may
stay hot for several hours after it has been switched off. Wait
for it to cool down completely before storing it.
WARNING! Make sure that the storage place is not damp
and dusty.
1. Remove all the fuel from the tank.
2. Pour a few drops of motor oil into the spark plug hole and
put the motor in the compression position.
3. Put the machine back in a firm, safe position, out of the
reach of children.

19
DEMOLITION
In order to protect the environment, proceed according to the
local laws in force.
WARNING! Before demolition totally empty the fuel tank.
Do not throw the packaging away. Take it to a recycling centre
instead.
When the machine is no longer usable or reparable, dismantle
the various parts for differentiated refuse collection.
All the plastic components bear an acronym identifying the
materials they are made of. This can be used when recycling
them in the future.
Do not dispose of used oil with domestic waste, but take it to
the special Collection Centres.
WARRANTY
The product is protected by law against all non-conformities
with respect to the stated characteristics, as long as it has been
used solely in the way described in this user’s manual, it has
not been tampered with in any way, it has not been repaired
by unauthorised personnel and only original spare parts have
been used. Materials subject to normal wear are however
excluded. Take the product to your retailer or an authorised
service centre, exhibiting proof of purchase.
DECLARATION OF CONFORMITY
The firm indicated on the label declares, under its own
responsibility, that the product complies with the essential
health and safety requirements contained in the following
European directives: 98/37/CE, 2004/108/CE, 2005/88/CE
and subsequent modifications.
For directive 2005/88/EC see table, points 17-16.
Bruno Anzolin
TECHNICAL DATA
1. Engine capacity
2. Engine power
3. Minimum recommended rotation speed
4. Maximum recommended rotation speed (with cutting tool
engaged)
5. Fuel tank capacity
6. Chain oil tank capacity
7. Number of sprocket guide teeth
8. Length of bar
9. Effective cutting length
10. Chain pitch
11. Chain guide teeth width
12. Chain type
13. Bar type
14. Vibration at grip level
15. Acoustic pressure level in operator position LpA
(ISO3744)
16. Guaranteed noise level Lw(A)
17. Procedure for evaluating conformity enclosed:
18. Declaration place and date
19. Machine weight
20. Type of start-up spark plug
1 35,2 cm3
2 1,5 kW (8500 min-1)
3 3000 min-1
4 10000 min-1
5 400 cm3
6 220 cm3
76
8 416 mm
9 320 mm
10 9,53 mm (3/8")
11 1,27 mm (0,05")
12 OREGON 91VG052/91VG053
13 TRILINK HH1-50-52P/416 mm
14 12 m/s2
15 104 dB(A)
16 116 dB(A)
17 V
18 Schio 24.08.2006
19 5,1 kg
20 Torch L7RTC, NGK BPMR7A, Champion RCJ7Y

20
f
INSTRUCTIONS
Nous vous remercions d’avoir choisi ce produit, qui sera
également désigné dans ce manuel par “ machine “.
Votre nouvel appareil, fabriqué en adoptant de hauts stan-
dards de qualité, vous garantira efficacité et sécurité dans
le temps.
ATTENTION ! Avant d’utiliser la machine, lisez attentive-
ment les instructions indiquées ci-dessous pour effectuer
correctement la mise en service, la mise en marche, l’utili-
sation, l’arrêt et l’entretien. Avant de commencer le travail,
familiarisez-vous avec les commandes et avec l’utilisation
correcte de la machine et assurez-vous que, en cas d’urgen-
ce, vous êtes en mesure de l’arrêter. L’utilisation incorrecte
de cette machine peut provoquer des blessures graves, la
mort et des dommages aux choses. Travaillez toujours en
pensant à votre sécurité et à celle d’autrui.
Toute utilisation autre que celle indiquée dans ces instruc-
tions peut endommager la machine et entraîner des risques
graves pour les personnes et les choses.
ATTENTION ! Le moteur de la scie à chaîne doit être exclusi-
vement alimenté par un mélange essence-huile composé de
4% d’huile. Si vous n’utilisez pas ce mélange, le moteur sera
irrémédiablement endommagé et vous ne pourrez en aucun
cas bénéficier de la garantie. Conservez soigneusement à
portée de main ce manuel et le feuillet ci-joint de façon à
pouvoir les consulter en cas de besoin.
DESCRIPTION DE LA MACHINE
1. Pot d’échappement
2. Poignée arrière
3. Dispositif arrière de protection de la main
4. Levier de démarrage
5. Bouton de déblocage du levier de démarrage
6. Bouchon du réservoir d’huile
7. Poignée avant
8. Dispositif avant de protection de la main / Levier de frein
chaîne - urgence
9. Poignée du lanceur.
10. Lame
11. Protège-lame (en option)
12. Chaîne
13. Butoir denté
14. Bouchon de réservoir du carburant.
15. Vis de réglage chaîne (en option)
16. Pivot de fixation de la lame
17. Ecrou de fixation de la lame
18. Carter
19. Roue dentée
20. Téton de tension de la chaîne (en option)
21. Rainure de la lame
22. Trou inférieur de la lame
23. Trou d’alimentation huile
24. Levier de commande volet starter.
25. Interrupteur d’arrêt moteur
26. Groupe embrayage frein.
27. Moteur thermique.
28. Levier d’ouverture du couvercle.
29. Cale d’emballage.
30. Bougie d’allumage.
31. Filtre à air.
DESCRIPTION MARQUAGES ET SYMBOLES
1. Données techniques
2. Nom de la machine
3. Marquages
5. Attention
6. Lisez le mode d’emploi avant d’utiliser la machine
7. Munissez-vous de lunettes de protection, d’un casque an-
tibruit et de masques de protection contre la poussière
8. Attention ! Lisez les normes de sécurité relatives aux
dangers liés aux contrecoups
9. Attention surfaces chaudes.
10. Attention ! Risque d’incendie.
11. Attention ! Munissez-vous de gants de protection. Munis-
sez-vous de chaussures de sécurité.
12. Indication du bruit
MATÉRIEL LIVRÉ
L’emballage contient les éléments suivants :
- Une scie à chaîne
- Une lame
- Une chaîne
- Un manuel d’utilisation et d’entretien (ce manuel)
- Un certificat de conformité (joint à ce manuel)
AVERTISSEMENTS
1)RISQUE D’INCENDIE ET D’EXPLOSION
ATTENTION ! Risque d’incendie et d’explosion : arrêtez
toujours le moteur avant d’effectuer les ravitaillements.
Le carburant et ses vapeurs sont facilement inflamma-
bles, veillez à ne pas le verser sur des surfaces chaudes.
Faites cette opération dans un endroit bien ventilé, ne
fumez pas, n’approchez pas de flammes nues ou d’objets
incandescents.
Utilisez des lunettes de protection et des gants anti-acide.
N’ingérez pas et n’inhalez pas les vapeurs dégagées par le
carburant et tenez celui-ci hors de la portée des enfants.
Évitez tout contact avec la peau. En cas de contact avec
les yeux, lavez abondamment avec de l’eau et consultez
un médecin.
ATTENTION ! N’utilisez pas la machine dans des lieux pré-
sentant des risques d’explosion et/ou d’incendie, dans des
locaux fermés, en présence de liquides, gaz, poussières, va-
peurs, acides et substances inflammables et/ou explosives.
N’utilisez pas la machine en présence de sources d’ignition
(flammes nues, cigarettes, étincelles, etc.)
Quand vous utilisez la tronçonneuse, il faut qu’un extincteur
se trouve à proximité de la zone de travail.
2)GAZ D’ÉCHAPPEMENT : RISQUE D’EMPOISONNEMENT
ATTENTION ! Risque d’empoisonnement. Le moteur émet
des gaz toxiques, inodores et incolores contenant du mo-
noxyde de carbone : l’inhalation provoque des nausées,
l’évanouissement et même la mort.
ATTENTION ! Ne faites pas fonctionner la machine dans des
locaux fermés ou peu ventilés. En cas d’inhalation, faites
immédiatement appel à un médecin.
La page charge ...
La page charge ...
La page charge ...
La page charge ...
La page charge ...
La page charge ...
La page charge ...
La page charge ...
La page charge ...
La page charge ...
La page charge ...
La page charge ...
La page charge ...
La page charge ...
La page charge ...
La page charge ...
La page charge ...
La page charge ...
La page charge ...
La page charge ...
La page charge ...
La page charge ...
La page charge ...
La page charge ...
La page charge ...
La page charge ...
La page charge ...
La page charge ...
-
 1
1
-
 2
2
-
 3
3
-
 4
4
-
 5
5
-
 6
6
-
 7
7
-
 8
8
-
 9
9
-
 10
10
-
 11
11
-
 12
12
-
 13
13
-
 14
14
-
 15
15
-
 16
16
-
 17
17
-
 18
18
-
 19
19
-
 20
20
-
 21
21
-
 22
22
-
 23
23
-
 24
24
-
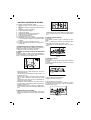 25
25
-
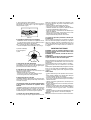 26
26
-
 27
27
-
 28
28
-
 29
29
-
 30
30
-
 31
31
-
 32
32
-
 33
33
-
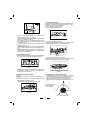 34
34
-
 35
35
-
 36
36
-
 37
37
-
 38
38
-
 39
39
-
 40
40
-
 41
41
-
 42
42
-
 43
43
-
 44
44
-
 45
45
-
 46
46
-
 47
47
-
 48
48


Valex 1493930 Le manuel du propriétaire
- Catégorie
- Tronçonneuses électriques
- Taper
- Le manuel du propriétaire
dans d''autres langues
- italiano: Valex 1493930 Manuale del proprietario
- español: Valex 1493930 El manual del propietario
- slovenčina: Valex 1493930 Návod na obsluhu
Documents connexes


Autres documents
-
Efco GS 630 Le manuel du propriétaire
-
-
 Oleo-Mac GS 720 Le manuel du propriétaire
-
Efco MTH 560 / MTH 5600 Le manuel du propriétaire
-
Shindaiwa 352S Manuel utilisateur
-
-
-
-
 Oleo-Mac GS 44 / GS 440 Le manuel du propriétaire
-
 Oleo-Mac GS44 Manuel utilisateur


