Winco EMP-10 Manuel utilisateur
- Catégorie
- Mélangeurs
- Taper
- Manuel utilisateur

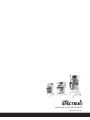
COMMERC IAL
PLANETARY MIXERS
Installation and Operating Instruction Manual
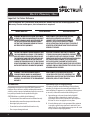
BEFORE OPERATING ANY EQUIPMENT, READ AND FAMILIARIZE YOURSELF WITH THESE USE AND SAFETY INSTRUCTIONS
Congratulations on your purchase of this SPECTRUM commercial equipment. When used as intended, and with
proper care and maintenance, you are sure to experience years of reliable operation from this equipment. To ensure
best results, it is important that you read and follow the instructions in this manual carefully. It is important to
keep these instructions in a safe place for future reference.
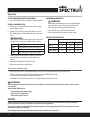
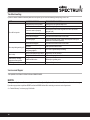
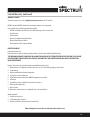
Model Voltage Frequency Power Amperage Plug Ty pe Overall Dimensions
Width x Depth x Height Weight
EMP-10 110V 50/60Hz 750W
1HP 7A NEMA 5-15P 15-1/8" x 18" x 24-1/8"
(383 x 456 x 612mm)
99.2 lbs
45 kgs
EMP-20 110V 50/60Hz 1100W
1.5HP 10A NEMA 5-15P 19-7/8" x 21-11/16" x 29-3/4"
(505 x 550 x 735mm)
233.7 lbs
106 kgs
EMP-30 110V 50/60Hz 1500W
2HP 14A NEMA 5-15P 23-13/16" x 24-1/2" x 44-13/16"
(605 x 620 x 1138mm)
392.4 lbs
178 kgs
Form No. EMP-Series Manual - 07/21
For California Customers
WARNING: Cancer and Reproducve Harm -
www.P65Warnings.ca.gov
EMP-10 EMP-20 EMP-30

2
Electric Planetary Mixer
Important For Future Reference
Introduction
Congratulations on the purchase of your SPECTRUM™ Commercial
Equipment. Please take time to carefully read through this manual to
ensure the machine is operated and maintained properly, to ensure the
best possible performance from the product for many years.
SPECTRUM will not accept liability for the following if:
• The instructions in this manual have not been followed correctly.
• Non-authorized personnel have tampered with the machine.
• Non-original spare parts are used.
• The machine has not been handled and cleaned correctly.
• There is any use damage to the unit.
Immediately Inspect for Shipping Damage
All containers should be examined for damage before and during
unloading. The freight carrier has assumed responsibility for its safe
transit and delivery. If equipment is received damaged, either apparent
or concealed, a claim must be made with the delivering carrier.
A. Apparent damage or loss must be noted on the freight bill
at the time of delivery. It must then be signed by the carrier
representative (Driver). If this is not done, the carrier may refuse
the claim. The carrier can supply the necessary forms.
B. If concealed damage or loss is not apparent until after equipment
is uncrated, a request for inspection must be made to the carrier
within 15 days. The carrier should arrange an inspection. Be certain
to keep all contents and packaging material.
Please complete this information and retain this manual for the life of the equipment. For
Warranty Service and/or parts, this information is required.
Model Number Serial Number Date Purchased
! !
WARNING: IMPROPER INSTALLATION, ADJUSTMENT,
ALTERATION, SERVICE OR MAINTENANCE CAN CAUSE
PROPERTY DAMAGE, INJURY, OR DEATH. READ THE
INSTALLATION, OPERATION, AND MAINTENANCE
INSTRUCTIONS THOROUGHLY BEFORE INSTALLING
OR SERVICING THIS EQUIPMENT.
AVERTISSEMENT: TOUTE INSTALLATION, RÉGLAGE,
MODIFICATION, RÉPARATION OU ENTRETIEN
INCORRECT PEUT OCCASIONNER DES DOMMAGES
MATÉRIELS, DES BLESSURES GRAVES OU LA MORT.
LIRE LES INTRUCTIONS D'INSTALLATION, D'UTILISATION ET
D'ENTRETIEN ATTENTIVEMENT AVANT D'INSTALLER OU DE
RÉPARER CET APPAREIL.
! !
CAUTION: THESE MODELS ARE DESIGNED, BUILT, AND
SOLD FOR COMMERCIAL USE ONLY. IF THESE MODELS
ARE POSITIONED SO THE GENERAL PUBLIC CAN USE
THE EQUIPMENT, MAKE SURE THAT CAUTION SIGNS,
WARNINGS, AND OPERATING INSTRUCTIONS ARE
CLEARLY POSTED NEAR EACH UNIT SO THAT ANYONE
USING THE EQUIPMENT WILL USE IT CORRECTLY AND
NOT INJURE THEMSELVES OR HARM THE EQUIPMENT.
ATTENTION: CES MODÈLES SONT CONÇUS, FABRIQUÉS,
ET VENDUS POUR UN USAGE COMMERCIAL SEULEMENT.
SI CES MODÈLES SONT PLACÉS POUR QUE LE GRAND
PUBLIC PUISSE LES UTILISER, ASSUREZ-VOUS QUE LES CONSIGNES
D’ATTENTION, D'AVERTISSEMENT, ET LES INSTRUCTIONS
D'UTILISATION SOIENT CLAIREMENT AFFICHÉES PRÈS DE
CHAQUE UNITÉ DE SORTE QUE N'IMPORTE QUEL UTILISATEUR DE
L'APPAREIL L'EMPLOIE CORRECTEMENT ET NE SE BLESSE PAS OU
N'ENDOMMAGE PAS L'APPAREIL.
! !
WARNING: A FACTORY AUTHORIZED SERVICE
PROVIDER SHOULD HANDLE ALL MAINTENANCE
AND REPAIR. BEFORE DOING ANY MAINTENANCE
OR REPAIR, FOLLOW SERVICE SET UP ARRANGEMENT
ON PAGE 11.
AVERTISSEMENT: UN TECHNICIEN AUTORISÉ PAR
L'USINE DEVRA EFFECTUER TOUT L'ENTRETIEN ET LES
RÉPARATIONS. AVANT DE FAIRE TOUT ENTRETIEN OU
RÉPARATION, VEUILLEZ CONTACTER WINCO.

3
Electric Planetary Mixer
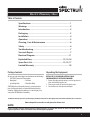
Table of Contents
Specications .............................................................................. 1
Warnings ..................................................................................... 2
Introduction ................................................................................ 2
Packaging .................................................................................... 3
Installation .................................................................................. 4
Operation .................................................................................... 5
Cleaning, Care & Maintenance ................................................. 6
Safety ........................................................................................... 6
Troubleshooting ......................................................................... 7
Service & Repair .......................................................................... 7
Electrical Diagram .....................................................................11
Exploded View ............................................................. 12, 14, 16
Spare Parts List .............................................................. 13, 15, 17
Limited Warranty ..................................................................... 18
Package Contents
All units come with an Operating Instruction Manual and the following:
• SPECTRUM™ Commercial Planetary Mixer
• Mixing Bowl
• Spiral Dough Hook
SPECTRUM prides itself on quality and service, ensuring that at the
time of packing, all products are supplied fully functional and free
of damage. Should you nd any damage as a result of freight, please
contact your SPECTRUM dealer immediately.
Unpacking the Equipment
DISPOSE OF ALL PACKAGING MATERIALS IN AN
ENVIRONMENTALLY RESPONSIBLE MANNER.
1. Remove all packing materials and tape, as well as any protective
plastic and cardboard, from the unit.
2. Clean any glue residue left over from the plastic or tape.
3. Place the unit in the desired position and height.
Please keep this manual in a safe place for future use!
Installation and start-up must be performed by a qualified installer who has thoroughly read, understands and follows these instructions.
NOTE
Please remember that this manual and the warning labels do not replace the need to be alert, to properly train and
supervise operators, and to use common sense when using this equipment.
• Flat Beater
• Whisk (Wire Whip)

4
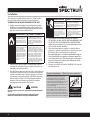
Installation
2. Remove the SPECTRUM™ Commercial Planetary Mixer from the
packaging. Be certain that all protective plastics and residues are
thoroughly cleaned from its surface.
3. Place the Planetary Mixer on a rm level surface. Install rubber feet
or bolt mixer to counter or stand. Local standards and regulations
should be consulted in order to abide by standards set in relation
to positioning, spacing, and ventilation. SPECTRUM recommends
that you allow no less than 4” for a ventilation gap around the
perimeter of this unit. Common sense should be used when
choosing position and operation of this product.
4. The installation of the unit must conform to the NATIONAL
ELECTRIC CODE, ALL LOCAL ELECTRIC CODES AND ORDINANCES, AND
ALL THE LOCAL ELECTRICAL COMPANY RULES AND REGULATIONS.
Additionally, we recommend a 4" spacing surrounding the unit in
order to provide adequate ventilation.
5. Proper connections and power supply are essential for ecient
performance. Supply the appropriate power and connect to source;
the Planetary Mixer is now ready to turn on and operate.
(For power supply please see technical specification on page 1).
Fournir l'alimentation secteur appropriée et brancher l’appareil à la
source d'alimentation ; votre Grille-pain à Convoyeur est maintenant
prête à être allumée et à fonctionner. (Pour l’alimentation, veuillez
voir la che technique, page 1).
6. The units are wired to be used with a 110V, NEMA 5-15R receptacle
on a dedicated circuit.
These instructions should be followed at all times. Failure to follow
these instructions could result in injury to yourself and others.
TO REDUCE RISK OF INJURY OR DAMAGE TO THE UNIT:
1. Read this manual thoroughly before installation and operation.
DO NOT proceed with installation and operation if you have any
questions or do not understand anything in this manual. Contact
your representative or the manufacturer rst.
Fire Hazard.
Correct installation precautions,
procedures and regulations
must be followed. Operation
and safety training is necessary
for all users of this equipment.
Risque d'incendie
La surchaue des vapeurs d'huile ou de
l'huile peut s'enammer et provoquer
un incendie. Surveillez la température,
la qualité et le niveau d’huile. Utilisez et
entretenez le système d'élimination des
vapeurs d'huile.
The equipment must be
installed by qualied personnel
only. Correct installation
precautions, procedures and
regulations must be followed
in order to reduce the risk of
re. Hood and re suppression
systems must be maintained
per manufacturer's guidelines.
Only qualied and trained
personnel are to use this
equipment.
Faire chauer l'huile avec précaution. Si
l'huile fume, réduire le feu. Ne pas laisser
l'appareil sans surveillance. Si le feu se
produit, éteindre l'appareil, couvrir jusqu'à
refroidissement. Ne pas mettre l'eau dans
l'huile chaude ou enammée. Ne faites pas
fonctionner avec de l'huile sous la barre
d'huile. L’huile sale a un point d'éclair
plus bas. Remplacer l'huile sur une base
régulière. Maintenir le niveau d'huile
correct. Utiliser un système d'évacuation
de la vapeur d'huile (capot) pour réduire
l'accumulation de graisse et d'huile sur les
surfaces de paroi ou de plafond.
WARNING AVERTISSEMENT
ATTENTION
Proper Grounding · Mise à la terre correcte
This machine is provided with a three-pronged
grounding plug. The outlet to which this plug
is connected must be properly grounded. If the
receptacle is not the proper grounding type, contact an
electrician. DO NOT, under any circumstances, cut
or remove the third ground prong from the power cord
or use any adapter plug.
Cette machine est équipée d'une che à trois broches.
La prise sur laquelle cette che est branchée doit être
correctement mise à la terre. Si la prise n'est pas le type de
mise à la terre, contactez avec un électricien. NE PAS, en
aucun cas couper ou enlever la troisième broche de terre à
partir du cordon d'alimentation ou utiliser un adaptateur.
USE A GROUNDED OUTLET
DO NOT ADD AN ADAPTOR
TO THE PLUG
UTILISER UNE PRISE AVEC MISE
À LA TERRE NE PAS AJOUTER UN
ADAPTATEUR SUR LA FICHE
Electrical Shock Hazard
Keep water and other liquids
from entering the inside of the
unit. Liquid inside the unit could
cause an electrical shock.
Risque de choc électrique
Conserver l'eau et d'autres liquides
de pénétrer à l'intérieur de l'appareil.
Liquide à l'intérieur de l'appareil pourrait
provoquer un choc électrique.
Do not spray water or cleaning
products. Liquid could contact
the electrical components
and cause a short circuit or an
electrical shock. Do not use unit
if power cord is damaged or has
been modied.
Ne pas pulvériser de l'eau ou des produits
de nettoyage. Le liquide pourrait
contacter avec les composants électriques
et causer un court-circuit ou un choc
électrique. Ne pas utiliser l'appareil si le
cordon d'alimentation est endommagé ou
a été modié.
WARNING AVERTISSEMENT
Do not position or operate near combustible materials/ammable
objects.
Ne pas placer ni faire fonctionner l'appareil près de
matériels combustibles ou d'objets inflammables.
CAUTION

5
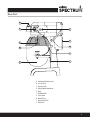
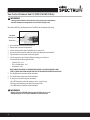
A. Attachment Retaining Screw
B. Speed Control
C. Planetary Shaft
D. Mixing Agitator Attachment
E. Bowl
F. On/O Switches
G. Reset Switch
H. Bowl Lift Lever
I. Bowl Safety Guard
J. Bowl Slides
Mixer Parts
B
A
F
G
H
J
I
C
D
E

6
Operation
INSTALLATION OF MIXER AGITATOR ATTACHMENT:
1. Place the stirring shaft in Mixer and rotate in clockwise direction.
ADDING MIXING INGREDIENTS:
WARNING
Overloading or not following the capacity chart will damage the
mixer and void the warranty. Refer to Capacity Chart section.
1. Add the appropriate mixing ingredients into the bowl.
2. Rotate bowl lift lever up until bowl lock into position.
3. Rotate bowl guard to the right until it locks into position.
ROTATION SPEED PARAMETERS:
STARTING & CHANGING SPEED:
1. Pull the gear speed control handle to position 1 before starting,
push the ON power switch.
2. Changing Speed: To change speed, push the OFF power switch
rst, and then pull the speed control handle to the new position
(2 or 3).
WARNING
Never change speeds while mixer is running. Failure to do so will
damage the gears or other parts and WILL void the warranty.
Gear Speed Product Type
1 (Low) Heavy: mixing pizza, bread, donut doughs, etc.
2 (Medium) Medium: 2nd stage mixing for donut doughs, etc.
3 (High) Light: whipping cream, egg whites, meringue
Model Speed of Stirring Shaft (r/min)
1 (low) 2 (medium) 3 (high)
EMP-10 108 195 355
EMP-20 w/hub 108 195 355
EMP-30 w/hub 91 166 282
3.
Shutting down: When the operation is complete, push the OFF
power switch rst, then pull the gear change hand lever to
position 1.
4. Rotate the bowl lift hand lever to the lowest point
5. Rotate bowl guard to the left until fully open
Accessories and Functions
• Whisk (Wire Whip): Used for stirring of liquid material, such as cream and egg. Recommended speed: mid or high speed.
• Flat Beater: Stirring of paste, powder and fragmental material, such as stung and cake dough.
Recommended speed: start with low speed, end with mid speed.
• Spiral Dough Hook: Stirring of sticky material, such as dough. Recommended speed: low speed.
NOTES
Please remember that this manual and the warning labels do not replace the need to be alert, to properly train and
supervise operators, and to use common sense when using this equipment.
Don’t put your hands into the stirring barrel during operation. Power supply should be disconnected before the mixer
attachment is going to be installed.
Don’t operate the mixer beyond the time limit to prevent reduction of its service life.
WARNING
If the equipment fails to function, please make sure that it is serviced by professional person or please turn to special
service point.
Mixer will NOT START unless:
• Unit is plugged into power supply
• Bowl is secure in up position
• Bowl safety guard is closed

7
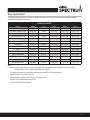
Mixer Capacity Chart
The following maximum capacities are intended as a guideline only. Varying factors such as the type of our, water temperature and other
conditions may require batch to be reduced.
NOTES:
• Mixer capacity depends on the moisture content of the dough. When mixing dough, check the Absorption Ratio percentage (AR%)
Absorption Ratio % (AR%) = Water Weight divided by Flour Weight.
• The capacities listed above are based on our at room temperature and 70°F (21°C) water temperature.
• If high gluten our is used, reduce batch by 10%
• If using chilled our, water below 70°F (21°C) or ice, reduce batch by 10%
• Do not use 2nd speed with mixtures below 50% AR
• Do not use hub attachments while mixing
PLANETARY MIXERS
Product Agitator Speed EMP-10 EMP-20 EMP-30
Pizza Dough - Thin (40% AR) Dough Hook 1st only 5 lbs (2.3 kg) 9 lbs (4.0 kg) 16 lbs (7.3 kg)
Pizza Dough - Medium (50% AR) Dough Hook 1st only 5 lbs (2.3 kg) 10 lbs (4.5 kg) 25 lbs (11.3 kg)
Pizza Dough - Thick (60% AR) Dough Hook 1st only 10 lbs (4.5 kg) 20 lbs (9.0 kg) 40 lbs (18.1 kg)
Heavy Bread Dough (55% AR) Dough Hook 1st only 7.5 lbs (3.4 kg) 15 lbs (6.8 kg) 30 lbs (13.6 kg)
Bread & Roll Dough (60% AR) Dough Hook 1st only 12.5 lbs (5.7 kg) 25 lbs (11.3 kg) 45 lbs (20.4 kg)
Raised Donut Dough (65% AR) Dough Hook 1st and 2nd 4.5 lbs 2.0 kg) 9 lbs (4.0 kg) 15 lbs (6.8 kg)
Pasta - Basic Dough Hook All Speeds 3 lbs (1.3 kg) 5 lbs (2.3 kg) 8 lbs (3.6 kg)
Pie Dough Flat Beater All Speeds 10 lbs (4.5 kg) 18 lbs (8.1 kg) 27 lbs (12.3 kg)
Cake Flat Beater All Speeds 10 lbs (4.5 kg) 20 lbs (9.0 kg) 30 lbs (13.6 kg)
Mashed Potatoes Flat Beater All Speeds 8 lbs (3.6 kg) 16 lbs (7.3 kg) 24 lbs (10.9 kg)
Wae or Pancake Batter Flat Beater All Speeds 5 qts (4.7 lts) 8 qts (7.5 lts) 12 qts (11.4 lts)
Whipped Cream Wire Whip All Speeds 2 qts 1.9 lts) 4 qts (3.8 lts) 6 qts (5.7 lts)
Egg Whites Wire Whip All Speeds 1 pts (.47 lts) 1 qts (.95 lts) 1.5 qts (1.4 lts)
Meringue (Qty of Water) Wire Whip All Speeds .75 pts (.35 lts) 1.5 pts (.75 lts) 1 qts (.95 lts)

8
1. Loosen and remove attachment hub thumbscrew.
2. Remove plastic cover from attachment hub.
3. Lubricate attachment shaft with a food quality grease or mineral oil.
4. Insert attachment shaft into hub making sure to line up the alignment pin with hub hole.
5. Tighten thumbscrew back into hub and securely tighten it.
6. Select the appropriate speed setting by lifting or lowering speed control lever.
How To Use Attachment Hub #12 (EMP-20 & EMP-30 Only)
Recommended speed while using attachments:
• Vegetable Slicer: 1 or 2
• Cheese Shredder/Grater: 1 or 2
• Meat Grinder: 1 only
NOTE: MAKE SURE BOWL IS UP AND BOWL GUARD IS CLOSED. MIXER WILL NOT
START IF BOWL AND BOWL GUARD ARE NOT IN THE PROPER OPERATING POSITION.
• Never put your hand into the feed chute when using a mixer attachment.
• DO NOT attempt to mix ingredients in bowl while using the hub.
Always STOP mixer BEFORE changing speeds! Failure to do so can
damage the gears or other parts and WILL void the warranty!
WARNING
WARNING
7. Press the ON button to start mixer and hub attachment.
8. Press the OFF button to stop mixer and hub attachment
9. To change the speed while using mixer attachments:
a. Press OFF button, then wait for the agitator to come to a complete stop.
b. Change speed by adjusting speed control lever to new position.
c. Press ON button to restart mixer and hub attachment.
Mixer must be OFF before installing attachment. Do NOT use hub attachments while mixing.
Plastic Cover
Attachment
Retaining Screw

9
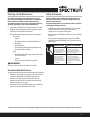
Recommended Maintenance
Cleaning, Care & Maintenance
To maintain the appearance and increase the service
life, clean your unit daily. The SPECTRUM™ Commercial
Planetary Mixer should be cleaned after each day’s
operation; however, the unit may require more frequent
cleaning, depending on the volume of production.
1. Switch power o and disconnect from the outlet before cleaning.
2. Mix/dilute cleaning detergent and sanitizer solution in separate
containers per the manufactures instructions.
3. Hand-wash using mild soap and water; rinse, dry and sanitize:
After each use:
• Agitators
• Bowl (bowl can also be washed in the dishwasher)
• Bowl Guard
• Rear Splash Guard
• Planetary Shaft (add a light coating of mineral oil to
planetary shaft after cleaning)
Daily:
• Bowl Cradle (add a light coating of mineral oil to cradle
slides after cleaning)
• Exterior
• Hub Interior (clean damp cloth, dry, sanitize)
WARNING
Do not use a water hose or pressure washer to clean mixer
1. Bowl Slides - Apply a light coating of mineral oil to the bowl slides
as needed or when bowl becomes dicult to lift and lower.
2. Planetary Shaft - Apply a light coating of mineral oil to the
planetary shaft daily. Do not leave agitator connected to shaft,
remove for cleaning after every use.
3. Gear transmission cavity and shaft bearing are greased at factory.
Inspect every 6 months and lubricated as needed.
Safety Precautions
Before installing and operating this equipment be sure
everyone involved in its operation are fully trained and
aware of all precautions.
Accidents and problems can result from a failure to follow
fundamental safety precautions.
• A WINCO® Approved Recommended Qualied Service Technician
should carry out repairs if necessary. Do not remove any
components or service panels on this product.
• Before cleaning, switch o power and disconnect power cord from
the outlet.
• If the power cord is damaged, it must be replaced by a WINCO®
Approved Recommended Qualied Service Technician in order to
avoid a hazard.
Installation and start-up must be performed by a qualified installer who has thoroughly read, understands and follows these instructions.
Electrical Shock Hazard
Keep water and other liquids
from entering the inside of the
unit. Liquid inside the unit could
cause an electrical shock.
Risque de choc électrique
Conserver l'eau et d'autres liquides
de pénétrer à l'intérieur de l'appareil.
Liquide à l'intérieur de l'appareil pourrait
provoquer un choc électrique.
Do not spray water or cleaning
products. Liquid could contact
the electrical components
and cause a short circuit or an
electrical shock. Do not use unit
if power cord is damaged or has
been modied.
Ne pas pulvériser de l'eau ou des produits
de nettoyage. Le liquide pourrait
contacter avec les composants électriques
et causer un court-circuit ou un choc
électrique. Ne pas utiliser l'appareil si le
cordon d'alimentation est endommagé ou
a été modié.
WARNING AVERTISSEMENT

10
If your SPECTRUM™ Commercial Planetary Mixer does not operate, please check the following before placing a service call:
Troubleshooting
ISSUE MIGHT BE CAUSED BY RECOMMENDED SOLUTION
Mixer will not operate
Bowl guard not in closed position. Rotate guard to the right until fully closed
Bowl not raised. Raise bowl to highest position.
Power not connected properly. Check all power connections. Plug into a live socket. (Do not use
extension cord)
Building circuit breaker is o. Check breaker box.
Internal overload tripped. Reset internal overload breaker on rear of unit
Gear not engaged. Switch gear fully into position. (Mixer will not operate if the speed
control lever is in between positions)
Mixer stops during mixing cycle
Internal overload tripped. Reset internal overload breaker on rear of unit
Overloads Reduce product load and restart
The speed of mixing is too high or
using wrong agitator Select correct agitator and speed setting
Mixer is noisy Mixer is not installed on level surface. Adjust surface or relocate mixer
The agitator or bowl are deformed Replace or change agitator or bowl
Abnormal noise and high
temperature from gearbox Insucient lubrication Add or replace gearbox grease
Oil leaking Seal ring are worn Replace seal rings
Service and Repair
THIS EQUIPMENT MUST ONLY BE SERVICED BY AN AUTHORIZED AGENT.
NOTE
Parts protected by the manufacturer or its agent are not to be adjusted by the installer unless the installer is an authorized service agent.
If you have any questions or problems DO NOT send unit to WINCO® without rst contacting our customer service department.
See "Limited Warranty" section on page 18 for details.

11
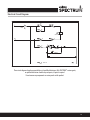
Electrical Circuit Diagram
These circuit diagrams have been provided to assist qualied electricians; Only SPECTRUM™ service agents,
or qualied electricians should carry out repairs, if repair is required.
Do not remove any components or service panels on this product.
RESET
START STOP
FORM C
CONTACTOR
GUARD BOWL
START CAP RUN START CAP
RUN CAP
MOTOR
MOTOR
DROP OUT

12
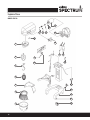
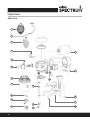
Exploded View
MODEL: EMP-10
2
1
3
8
9
10
21
22
11 12 13
15
14
16
20
4
5
6
17
18 19
725
23
24

13
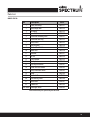
Parts List
MODEL: EMP-10
No. Description Part #
1Planetary Gear Box EMP-P1
2Flat Beater EMP-P2
3Spiral Dough Hook EMP-P3
4Whisk (Wire Whip) EMP-P4
5Back Shield EMP-P5
6Safety Guard EMP-P6
7Mixing Bowl EMP-P7
8Safety Guard Lock Switch EMP-P8
9Green Start Push Button EMP-P9
10 Red Stop Push Button EMP-P10
11 Snap Ring EMP-P11
12 Helical Gear EMP-P12
13 Oil Seal EMP-P13
14 Way Key EMP-P14
15 Motor EMP-P15
16 Fan EMP-P16
17 Gear Shift Handle EMP-P17
18 Start Capacitor EMP-P18
19 Run Capacitor EMP-P19
20 Bowl Locking Switch EMP-P20
21 Overload Reset Switch EMP-P21
22 Power Cord EMP-P22
23 Mixer Stand EMP-P23
24 Rubber Feet EMP-P24
25 Contactor EMP-P25
Not Shown Centrifugal Switch EMP-P26
Please contact factory for special order parts not listed.

14
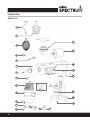
Exploded View
MODEL: EMP-20
1
18
19
20
21
22
2
3
6
5
7
8
4
9
10
11
13
12
14
15 16
17

15
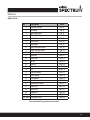
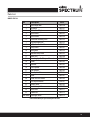
Parts List
MODEL: EMP-20
Please contact factory for special order parts not listed.
No. Description Part #
1Whisk (Wire Whip) EMP-P27
2Spiral Dough Hook EMP-P28
3Flat Beater EMP-P29
4Speed Shifter EMP-P30
5Attachment Retaining Screw EMP-P31
6Attachment Hub Plug EMP-P32
7Safety Guard EMP-P33
8Bowl Assembly EMP-P34
9Overload Reset Switch EMP-P35
10 Power Cord EMP-P36
11 Contactor EMP-P37
12 Oil Seal EMP-P38
13 Start Capacitor EMP-P39
14 Run Capacitor EMP-P40
15 Red Stop Push Button EMP-P41
16 Green Start Push Button EMP-P42
17 Safety Guard Lock Switch EMP-P43
18 Motor EMP-P44
19 Handle-shifter EMP-P45
20 Bowl Locking Switch EMP-P46
21 Mixer Stand EMP-P47
22 Rubber Feet EMP-P48
Not Shown Centrifugal Switch EMP-P49

16
Exploded View
MODEL: EMP-30
1
2
3
4
6
8
5
7
9
19
18
22
24
25
20
21
10
11
12
13
15
16
23
17
14

17
Parts List
MODEL: EMP-30
No. Description Part #
1Spiral Dough Hook EMP-P50
2Flat Beater EMP-P51
3Whisk (Wire Whip) EMP-P52
4Speed Shifter EMP-P53
5Speed Handle EMP-P54
6Attachment Retaining Screw EMP-P55
7Plug Attachment Hub EMP-P32
8Safety Guard Lock Switch EMP-P56
9Safety Guard EMP-P57
10 Mixing Bowl EMP-P58
11 Overload Safety Switch EMP-P59
12 Power Cord EMP-P60
13 Power Supply with Waterproof Connectors EMP-P61
14 Guards EMP-P62
15 Contactor EMP-P63
16 Start Capacitor EMP-P64
17 Run Capacitor EMP-P65
18 Planetary Gear Box EMP-P66
19 Motor EMP-P67
20 Green Start Push Button EMP-P68
21 Red Stop Push Button EMP-P41
22 Handle-Shifter EMP-P69
23 Bowl Locking Switch EMP-P70
24 Mixer Stand EMP-P71
25 Rubber Feet EMP-P72
Not Shown Centrifugal Switch EMP-P73
Please contact factory for special order parts not listed.

18
Limited Warranty
WINCO® warrants to the original purchaser of new equipment that said equipment, when installed in accordance with our instructions within North
America and subjected to normal use, is free from defects in material or workmanship for a period of 1 year. The labor warranty is one year from
original installation or 18 months from actual factory shipment date, whichever date occurs rst.
THIS WARRANTY IS IN LIEU OF ALL OTHER WARRANTIES, WHETHER EXPRESSED OR IMPLIED. WINCO EXPRESSLY DISCLAIMS ANY
IMPLIED WARRANTY OF MERCHANTABILITY OR EXPRESSED OR IMPLIED WARRANTY OF FITNESS FOR A PARTICULAR PURPOSE.
WINCO’S OBLIGATION AND LIABILITY UNDER THIS WARRANTY IS EXPRESSLY LIMITED TO REPAIRING AND REPLACING EQUIPMENT
THAT PROVES TO BE DEFECTIVE IN MATERIAL OR WORKMANSHIP WITHIN THE APPLICABLE WARRANTY PERIOD.
IN NO EVENT SHALL WINCO BE LIABLE FOR INCIDENTAL OR CONSEQUENTIAL DAMAGES TO BUYER OR ANY THIRD PARTY, INCLUDING,
WITHOUT LIMITATION, LOSS OF PROPERTY, PERSONAL INJURY, LOSS OF BUSINESS OR PROFITS OR OTHER ECONOMIC LOSSES, OR
STATUTORY OR EXEMPLARY DAMAGES, WHETHER IN NEGLIGENCE, WARRANTY, STRICT LIABILITY, OR OTHERWISE.
This warranty is given only to the rst purchaser from a retail dealer. No warranty is given to subsequent transferees.
Warranty does not cover product failures caused by: failure to maintain, neglect, abuse, damage due to excess water, re, normal wear, improper set
up and use. Periodic maintenance is not covered.
This warranty is not in force until such time as a properly completed and digitally signed Installation/Warranty Registration has been received by
WINCO within 30 days from the date of installation.

19
Please keep this manual in a safe place for future use!
WARRANTY SERVICE
To initiate warranty service contact: EquipSer[email protected] or call: 973-295-3899
DO NOT send unit to WINCO® without rst contacting our customer service department.
Please provide or have the following information available:
• Model & Serial Number (located on the silver identication tag, on side or rear of unit)
• Date of Purchase
• Purchase Dealer
• Operator / Installation Contact Information
• Business Name & Business Address
• Contact Name & Contact Telephone Number
REGISTER ONLINE AT:
http://www.wincous.com
Proof of purchase is required to extend warranty more than 1 year from date of shipment from the factory.
THE FOREGOING WARRANTY PROVISIONS ARE A COMPLETE AND EXCLUSIVE STATEMENT BETWEEN THE BUYER AND SELLER. WINCO®
NEITHER ASSUMES NOR AUTHORIZES ANY PERSONS TO ASSUME FOR IT ANY OTHER OBLIGATION OR LIABILITY IN CONNECTION
WITH SAID EQUIPMENT.
Examples of items not covered under warranty, but not limited to just these items:
1. Natural disasters (ie: earthquakes, tornadoes, hurricanes, etc.), re, water damage, burglary, accident, theft.
2. Freight damage.
3. Improper installation or alteration of equipment.
4. Use of generic or after-market parts.
5. Repairs made by anyone other than a WINCO® designated service provider.
6. Lubrication.
7. Expendable wear parts, adjustable feet, blown fuses, lamps, etc.
8. Normal product maintenance.
9. Misuse or abuse.
10. Normal wear and tear items such as light bulbs, fuses, and exterior nishes.
Warranty voided if:
1. Product is altered by user
2. Serial number plate is removed
3. Product is installed in a prison or any correctional facility.
Limited Warranty (continued)

Models: EMP-10, EMP-20 and EMP-30
www.wincous.com
-
 1
1
-
 2
2
-
 3
3
-
 4
4
-
 5
5
-
 6
6
-
 7
7
-
 8
8
-
 9
9
-
 10
10
-
 11
11
-
 12
12
-
 13
13
-
 14
14
-
 15
15
-
 16
16
-
 17
17
-
 18
18
-
 19
19
-
 20
20


Winco EMP-10 Manuel utilisateur
- Catégorie
- Mélangeurs
- Taper
- Manuel utilisateur
dans d''autres langues
- English: Winco EMP-10 User manual