GE HPE16BTNLWW Le manuel du propriétaire
- Catégorie
- Frigos
- Taper
- Le manuel du propriétaire

SAFETY INFORMATION .........3
USING THE REFRIGERATOR
Temperature Control ...................5
Sabbath Mode .........................5
Fresh Food Compartment Shelves .......5
Freezer Compartment Shelves ..........6
Storage Drawers .......................6
Automatic Ice Maker ...................7
CARE AND CLEANING ...........8
INSTALLATION INSTRUCTIONS
Preparing to Install the Refrigerator ......9
Water Line Installation ................10
Installing the Door Handle .............13
Reversing the Door Swing .............14
TROUBLESHOOTING
Normal Operating Sounds .............18
LIMITED WARRANTY .............21
CONSUMER SUPPORT ..........22
ENGLISH/FRANÇAIS/
ESPAÑOL
Write the model and serial
numbers here:
Model # _________________
Serial # _________________
Find these numbers on a label
on the left side, near the middle
of the refrigerator compartment.
49-1000394 Rev. 2 09-19 GEA
Models 16, 17, 18, 19, 22
OWNER’S MANUAL &
INSTALLATION
INSTRUCTIONS
REFRIGERATORS
Top-Freezer
GE is a trademark of the General Electric Company. Manufactured under trademark license.

2 49-1000394 Rev. 2
THANK YOU FOR MAKING GE APPLIANCES A PART OF YOUR HOME.
Whether you grew up with GE Appliances, or this is your first, we’re happy to have you in the family.
We take pride in the craftsmanship, innovation and design that goes into every GE Appliances
product, and we think you will too. Among other things, registration of your appliance ensures that we
can deliver important product information and warranty details when you need them.
Register your GE appliance now online. Helpful websites and phone numbers are available in the
Consumer Support section of this Owner’s Manual. You may also mail in the pre-printed registration
card included in the packing material.

49-1000394 Rev. 2 3
CAUTION
To reduce the risk of injury when using your refrigerator, follow these basic safety precautions.
Ŷ 'RQRWFOHDQJODVVVKHOYHVRUFRYHUVZLWKZDUP
water when they are cold. Glass shelves and
covers may break if exposed to sudden temperature
changes or impact, such as bumping or dropping.
Tempered glass is designed to shatter into many
small pieces if it breaks.
Ŷ .HHSILQJHUVRXWRIWKH³SLQFKSRLQW´DUHDV
clearances between the doors and between the
doors and cabinet are necessarily small. Be careful
closing doors when children are in the area.
Ŷ 'RQRWWRXFKWKHFROGVXUIDFHVLQWKHIUHH]HU
compartment when hands are damp or wet, skin
may stick to these extremely cold surfaces.
Ŷ 'RQRWUHIUHH]HIUR]HQIRRGVZKLFKKDYHWKDZHG
completely.
Ŷ ,QUHIULJHUDWRUVZLWKDXWRPDWLFLFHPDNHUVDYRLG
contact with the moving parts of the ejector
mechanism, or with the heating element that
UHOHDVHVWKHFXEHV'RQRWSODFHILQJHUVRUKDQGV
on the automatic ice making mechanism while the
refrigerator is plugged in.
SAFETY INFORMATION
READ AND SAVE THESE INSTRUCTIONS
WARNING
To reduce the risk of fire, explosion, electric shock, or injury when using your refrigerator, follow
these basic safety precautions:
Ŷ 7KLVUHIULJHUDWRUPXVWEHSURSHUO\LQVWDOOHG
DQGORFDWHGLQDFFRUGDQFHZLWKWKH,QVWDOODWLRQ
,QVWUXFWLRQVEHIRUHLWLVXVHG
Ŷ 8QSOXJWKHUHIULJHUDWRUEHIRUHPDNLQJUHSDLUVRU
cleaning.
NOTE: Power to the refrigerator cannot be
disconnected by any setting on the control panel.
NOTE: Repairs must be performed by a qualified
Service Professional.
Ŷ 5HSODFHDOOSDUWVDQGSDQHOVEHIRUHRSHUDWLQJ
Ŷ 'RQRWXVHDQH[WHQVLRQFRUG
Ŷ .HHSIODPPDEOHPDWHULDOVDQGYDSRUVDZD\IURPWKH
refrigerator.
Ŷ 'RQRWVWRUHH[SORVLYHVXEVWDQFHVVXFKDVDHURVRO
cans with a flammable propellant in this appliance.
Ŷ 7RSUHYHQWVXIIRFDWLRQDQGHQWUDSPHQWKD]DUGV
WRFKLOGUHQUHPRYHWKHIUHVKIRRGDQGIUHH]HU
doors from any refrigerator before disposing of it or
discontinuing its use.
Ŷ 7RDYRLGVHULRXVLQMXU\RUGHDWKFKLOGUHQVKRXOGQRW
stand on, or play in or with the appliance.
Ŷ &KLOGUHQDQGSHUVRQVZLWKUHGXFHGSK\VLFDOVHQVRU\
or mental capabilities or lack of experience and
knowledge can use this appliance only if they are
supervised or have been given instructions on safe
XVHDQGXQGHUVWDQGWKHKD]DUGVLQYROYHG
Ŷ 7KLVDSSOLDQFHLVLQWHQGHGWREHXVHGLQKRXVHKROG
and similar applications such as: staff kitchen areas
LQVKRSVRIILFHVDQGRWKHUZRUNLQJHQYLURQPHQWV
IDUPKRXVHVE\FOLHQWVLQKRWHOVPRWHOVEHG
EUHDNIDVWDQGRWKHUUHVLGHQWLDOHQYLURQPHQWV
catering and similar non-retail applications.
Ŷ Connect to potable water supply only. A cold water
supply is required for automatic icemaker operation.
The water pressure must be between 40 and 120 psi
(275-827 kilopascals).
Ŷ'RQRWDSSO\KDUVKFOHDQHUVWRWKHUHIULJHUDWRU
Certain cleaners will damage plastic which may
cause parts such as the door or door handles to
detach unexpectedly. See the Care and Cleaning
section for detailed instructions.
IMPORTANT SAFETY INFORMATION
READ ALL INSTRUCTIONS BEFORE USING THE APPLIANCE
WARNING
FIRE OR EXPLOSION HAZARD Flammable Refrigerant
This appliance contains isobutane refrigerant,
also known as R600a, a natural gas with high
environmental compatibility. However, it is also
combustible. Adhere to the warnings below to
reduce the risk of injury or property damage.
1. When handling, installing and operating the
appliance, care should be taken to avoid damage to
the refrigerant tubing.
2. 6HUYLFHVKDOORQO\EHSHUIRUPHGE\DXWKRUL]HG
VHUYLFHSHUVRQQHO8VHRQO\PDQXIDFWXUHUDXWKRUL]HG
service parts.
3. 'LVSRVHRIUHIULJHUDWRULQDFFRUGDQFHZLWKWKH
Federal and Local Regulations. The flammable
refrigerant and insulation material used in this
product require special disposal procedures. Contact
your local authorities for the environmentally safe
disposal of your refrigerator.
4. .HHSYHQWLODWLRQRSHQLQJVLQWKHDSSOLDQFH
enclosures or in the built-in structure clear of
obstruction.
5. To remove frost, scrape with a plastic or wood
VSDWXODRUVFUDSHU'RQRWXVHDQLFHSLFNRUDPHWDO
or sharp-edged instrument as it may puncture the
IUHH]HUOLQHUDQGWKHQWKHIODPPDEOHUHIULJHUDQW
tubing behind it.
6. 'RQRWXVHHOHFWULFDODSSOLDQFHVLQVLGHWKHIRRG
storage compartment of the appliance.
7. 'RQRWXVHDQ\HOHFWULFDOGHYLFHWRGHIURVW\RXU
IUHH]HU

4 49-1000394 Rev. 2
PROPER DISPOSAL OF YOUR OLD REFRIGERATOR
Do not, under any circumstances, cut or remove the third (ground) prong from the power cord. For
personal safety, this appliance must be properly grounded.
The power cord of this appliance is equipped with a
3-prong (grounding) plug which mates with a standard
SURQJJURXQGLQJZDOORXWOHWWRPLQLPL]HWKH
SRVVLELOLW\RIHOHFWULFVKRFNKD]DUGIURPWKLVDSSOLDQFH
Have the wall outlet and circuit checked by a qualified
electrician to make sure the outlet is properly
grounded.
Where a standard 2-prong wall outlet is encountered, it
is your personal responsibility and obligation to have it
replaced with a properly grounded 3-prong wall outlet.
'RQRWXVHDQDGDSWHU
The refrigerator should always be plugged into its own
individual electrical outlet which has a voltage rating
that matches the rating plate.
$9ROW$&+]RUDPSIXVHGJURXQGHG
electrical supply is required. This provides the best
performance and also prevents overloading house
ZLULQJFLUFXLWVZKLFKFRXOGFDXVHDILUHKD]DUGIURP
overheated wires.
Never unplug your refrigerator by pulling on the power
cord. Always grip plug firmly and pull straight out from
the outlet.
,PPHGLDWHO\GLVFRQWLQXHXVHRIDGDPDJHGVXSSO\
FRUG,IWKHVXSSO\FRUGLVGDPDJHGLWPXVWEH
replaced by a qualified service professional with an
DXWKRUL]HGVHUYLFHSDUWIURPWKHPDQXIDFWXUHU
When moving the refrigerator away from the wall, be
careful not to roll over or damage the power cord.
CONNECTING ELECTRICITY
WARNING
ELECTRICAL SHOCK HAZARD
Plug into a grounded 3-prong outlet
'RQRWUHPRYHWKHJURXQGSURQJ
'RQRWXVHDQDGDSWHU
'RQRWXVHDQH[WHQVLRQFRUG
Failure to follow these instructions can result in death, fire, or electrical shock.
SAFETY INFORMATION
IMPORTANT SAFETY INFORMATION
READ ALL INSTRUCTIONS BEFORE USING THE APPLIANCE
READ AND SAVE THESE INSTRUCTIONS
WARNING
SUFFOCATION AND ENTRAPMENT HAZARD
Failure to follow these disposal instructions can result in death or serious injury
IMPORTANT: Child entrapment and suffocation
are not problems of the past. Junked or abandoned
refrigerators are still dangerous even if they will sit
IRU³MXVWDIHZGD\V´,I\RXDUHJHWWLQJULGRI\RXUROG
refrigerator, please follow the instructions below to help
prevent accidents.
Before You Throw Away Your Old Appliance
Ŷ7DNHRIIWKHIUHVKIRRGDQGIUHH]HUGRRUV
Ŷ Leave the shelves in place so that children may not
easily climb inside.
INSTALLATION
WARNING
FIRE OR EXPLOSION HAZARD
.HHSIODPPDEOHPDWHULDOVDQGYDSRUVDZD\IURPUHIULJHUDWRU)DLOXUHWRGRVRFDQUHVXOWLQILUHH[SORVLRQRUGHDWK
Refrigerant and Foam Disposal:
'LVSRVHRIDSSOLDQFHLQDFFRUGDQFHZLWK)HGHUDODQG/RFDO5HJXODWLRQV)ODPPDEOHUHIULJHUDQWDQGLQVXODWLRQ
material used requires special disposal procedures. Contact your local authorities for the environmentally safe
disposal of your appliance.

49-1000394 Rev. 2 5
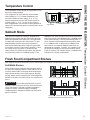
The temperature control adjusts the refrigerator from its
warmest to coldest settings.
Your refrigerator will come with the recommended
IDFWRU\VHWWLQJRQ³´)RUFROGHUWHPSHUDWXUHWXUQ
WKHNQREFORFNZLVHWRHLWKHUVHWWLQJ³´RU³´)RU
warmer temperature, turn the dial counter-clockwise
WRHLWKHUVHWWLQJ³´RU³´7RWXUQRIIWKHFRROLQJLQ
both compartments, turn the knob counter-clockwise to
VHWWLQJ³2II´1RWHWKDWWKLVGRHVQRWVKXWRIISRZHUWRWKH
refrigerator.
This product is capable of entering a Sabbath Mode.
Sabbath mode requires that the control knob and light
switch are operated at the same time. The light switch
is located just to the left of the control knob. To enter
Sabbath Mode, turn the control knob to position 5,
then hold down the light switch. While the light switch
is held down, turn the control knob to position 3. Once
the control knob is in position 3, release the light
switch. When you release the light switch, the light will
turn off and the product is in Sabbath mode. To exit
Sabbath mode, enter the same control knob/ light switch
VHTXHQFHXVHGWRHQWHU6DEEDWKPRGH,I6DEEDWKPRGH
is not exited manually, it will end automatically after 74
KRXUV,ISRZHULVGLVFRQQHFWHGIURPWKHSURGXFWZKLOH
it is in Sabbath mode, it will remain in Sabbath mode
after power is reconnected. Sabbath mode does not
deactivate the icemaker, if present. The icemaker must
be turned off manually by moving the icemaker switch
to the off position. The icemaker switch is located on the
LFHPDNHULQWKHIUHH]HUFRPSDUWPHQW
Temperature Control
Fresh Food Compartment Shelves
Sabbath Mode
USING THE REFRIGERATOR: Temperature Control / Shelves
Shelf supports at various levels allow you to custom-space your shelves. Not all features are on all models.
Full-Width Shelves
Some models have a stationary tempered glass shelf or
two steel wire stationary shelves. These shelves can be
moved to another place in the fresh food compartment.
When placed correctly on the shelf supports, the shelf
will stop before coming completely out of the refrigerator
and will not tilt when you place food on it or remove food
from it.
CAUTION
'RQRWFOHDQJODVVVKHOYHVRUFRYHUV
with warm water when they are cold. Glass shelves and
covers may break if exposed to sudden temperature
changes or impact such as bumping or dropping.
Tempered glass is designed to shatter into many small
pieces if it breaks.
Light Switch
1
33
2
Wire shelf - lift back end and pull forward to remove
Glass shelf - lift the front edge (1), push shelf back (2),
lift shelf up and pull forward (3) to remove.

6 49-1000394 Rev. 2
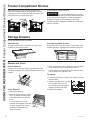
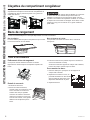
USING THE REFRIGERATOR: )UHH]HU&RPSDUWPHQW6KHOYHV'UDZHUV
Drawer and Cover
Drawer Removal
'UDZHUVFDQEHUHPRYHGHDVLO\E\JUDVSLQJWKHVLGHV
and lifting up slightly while pulling drawers past the stop
location.
Cover Removal
1. Remove the drawers.
2. Reach in, push the back of glass
cover up, and at the same time,
pull it backward as far as it will
come.
Tilt it and take it out. Avoid
cleaning the cold glass cover with
hot water because the extreme
temperature difference may
cause it to break.
3. Remove the drawer frame. (Always remove the glass
cover before you take out the drawer frame.)
Lift the frame off the supports at each side and back,
pull it forward, tilt it and take it out.
To replace:
1. Lower the frame until it rests on the supports at each
side and back.
2. Replace the glass cover, pushing
its front edge firmly into the
front frame channel and gently
lowering the back into place.
3. Replace the drawers.
Storage Drawers
Not all features are on all models.
Snack Drawer
The snack drawer can be moved to the most useful
location for your family’s needs.
Fruit and Vegetable Drawers
Excess water that may accumulate in the bottom of the
drawers should be emptied and the drawers wiped dry.
Freezer Compartment Shelves
When placed correctly on the shelf supports, the
steel wire stationary shelves will stop before coming
FRPSOHWHO\RXWRIWKHIUHH]HUDQGZLOOQRWWLOWZKHQ\RX
place food on it or remove food from it.
Some models have glass shelves.
CAUTION
'RQRWFOHDQJODVVVKHOYHVRUFRYHUV
with warm water when they are cold. Glass shelves and
covers may break if exposed to sudden temperature
changes or impact such as bumping or dropping.
Tempered glass is designed to shatter into many small
pieces if it breaks.

49-1000394 Rev. 2 7
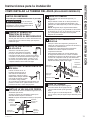
Automatic Icemaker (on some models)
WARNING
Connect to potable water supply only.
A cold water supply is required for automatic icemaker
operation. The water pressure must be between 40 and
120 psi (275-827 kilopascals).
CAUTION
Avoid contact with the moving parts
of the ejector mechanism, or with the heating element
(located on the bottom of the ice maker) that releases
WKHFXEHV'RQRWSODFHILQJHUVRUKDQGVRQWKH
automatic ice making mechanism while the refrigerator is
plugged in.
A newly-installed refrigerator may take 12–24 hours to
begin making ice.
The ice maker will produce approximately 70-100
FXEHVLQDKRXUSHULRGGHSHQGLQJRQWKHIUHH]HU
compartment temperature, room temperature, number of
door openings and other use conditions.
,IWKHUHIULJHUDWRULVRSHUDWHGEHIRUHWKHZDWHUFRQQHFWLRQ
is made to the ice maker, set the switch OFF.
When the refrigerator has been connected to the water
supply, set the switch ON position.
The ice maker will fill with water when it cools to 15°F
(-9°C). A newly-installed refrigerator may take 12 to 24
hours to begin making ice cubes.
Once the ice maker starts to make ice, it may take up
to 48 hours to fill the bin, depending on the temperature
settings and number of door openings.
<RXZLOOKHDUDEX]]LQJVRXQGHDFKWLPHWKHLFHPDNHU
fills with water.
NOTICE: Throw away the first few batches of ice to
allow the water line to clear.
Be sure nothing interferes with the sweep of the feeler
arm.
When the bin fills to the level of the feeler arm, the ice
maker will stop producing ice.
,WLVQRUPDOIRUVHYHUDOFXEHVWREHMRLQHGWRJHWKHU
,ILFHLVQRWXVHGIUHTXHQWO\ROGLFHFXEHVZLOOEHFRPH
cloudy, taste stale, shrink or fuse together.
,FHPDNHUDFFHVVRU\NLW
,I\RXUUHIULJHUDWRUGLGQRWDOUHDG\FRPHHTXLSSHGZLWK
an automatic ice maker, an ice maker accessory kit is
available at extra cost.
This refrigerator will accept accessory icemaker kit
,0'RU,0'8VHLQVWUXFWLRQV;VXSSOLHGLQWKHNLWIRU
assembly.
IMPORTANT: This refrigerator requires a red label
icemaker. See above for the location of the label on the
LFHPDNHU,IWKHLFHPDNHUWKDWFDPHZLWK\RXUNLWGRHV
QRWKDYHDUHGODEHOLWZLOOQRWIXQFWLRQ,QWKLVFDVH
please call 800.GE.CARES (in Canada 800.561.3344)
for the correct icemaker.
USING THE REFRIGERATOR: $XWRPDWLF,FHPDNHU
,FHPDNHU
,FHPDNHU/DEHO
Feeler Arm
Power Switch
Not all features are on all models.

8 49-1000394 Rev. 2
Cleaning the Inside
To help prevent odors, leave an open box of baking soda
LQWKHIUHVKIRRGDQGIUHH]HUFRPSDUWPHQWV
8QSOXJWKHUHIULJHUDWRUEHIRUHFOHDQLQJ,IWKLVLVQRW
practical, wring excess moisture out of sponge or cloth
when cleaning around switches, lights or controls.
8VHZDUPZDWHUDQGEDNLQJVRGDVROXWLRQ²DERXWD
tablespoon (15 ml) of baking soda to a quart (1 liter) of
ZDWHU7KLVERWKFOHDQVDQGQHXWUDOL]HVRGRUV5LQVHDQG
wipe dry.
After cleaning the door gaskets, apply a thin layer of
petroleum jelly to the door gaskets at the hinge side.
This helps keep the gaskets from sticking and bending
out of shape.
CAUTION
'RQRWFOHDQJODVVVKHOYHVRUFRYHUV
with warm water when they are cold. Glass shelves and
covers may break if exposed to sudden temperature
changes or impact such as bumping or dropping.
Tempered glass is designed to shatter into many small
SLHFHVLILWEUHDNV'RQRWZDVKDQ\SODVWLFUHIULJHUDWRU
parts in the dishwasher.
Moving the Refrigerator
Be careful when moving the refrigerator away from
the wall. All types of floor coverings can be damaged,
particularly cushioned coverings and those with
embossed surfaces.
Turn the leveling legs at each front corner of the
refrigerator counterclockwise until the rollers support
the refrigerator. Pull the refrigerator straight out and
return it to position by pushing it straight in. Moving the
refrigerator in a side direction may result in damage to
the floor covering or refrigerator.
When pushing the refrigerator back, make sure you don’t
roll over the power cord or ice maker supply line (on
some models).
After rolling the refrigerator back into place, turn the legs
clockwise until the legs again bear the weight of the
refrigerator.
Replacing the Lights
/('OLJKWLQJLVORFDWHGDWWKHWRSFHQWHURIWKHIUHVKIRRG
compartment.
$QDXWKRUL]HGWHFKQLFLDQZLOOQHHGWRUHSODFHWKH
/('OLJKW
,IWKLVDVVHPEO\QHHGVWREHUHSODFHGFDOO*(
$SSOLDQFHV6HUYLFHDWLQWKH8QLWHG
States or 1.800.561.3344 in Canada.
Preparing for Vacation
For long vacations or absences, remove food and unplug
the refrigerator. Move the temperature control dial to the
OFF position, and clean the interior with a baking soda
solution of one tablespoon (15 ml) of baking soda to one
quart (1 liter) of water. Leave the doors open.
Move the switch to the OFF position on the power switch
model, and shut off the water supply to the refrigerator.
,IWKHWHPSHUDWXUHFDQGURSEHORZIUHH]LQJKDYHD
qualified servicer drain the water supply system (on
some models) to prevent serious property damage due
to flooding.
Preparing to Move
Secure all loose items such as grille, shelves and
drawers by taping them securely in place to prevent
damage. To prevent the doors from opening while
moving, secure them to the case with tape. Be sure the
refrigerator stays in an upright position during moving.
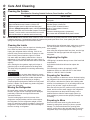
Care And Cleaning
CARE AND CLEANING
Cleaning the Outside
Directions for Cleaning Outside Surfaces, Door Handles, and Trim
DO USE DO NOT USE
Soft, clean cloth or sponge Abrasive cloths, scrubbing sponges, scouring or steel
wool pads
Mild detergent mixed with warm water
$SSURYHGVWDLQOHVVVWHHOFOHDQHUV9LVLWWKH*(
Appliances parts store for approved stainless steel
cleaners: GEAppliancesparts.com or call 877.959.8688
&OHDQHUVZLWKR[DOLFDFLGVXFKDV%DU.HHSHUV)ULHQG6RIW
Cleanser™ can be used to remove surface rust, tarnish
and small blemishes on stainless steel surfaces only.
Abrasive powders or sprays
Window Sprays or Ammonia
Citrus or plant oil-based cleaners
Acidic or vinegar-based cleaners
Oven cleaners
Cleaners containing acetone (propanone)
$Q\FOHDQHUZLWK:$51,1*DERXWSODVWLFFRQWDFW
NOTE: DO NOT allow stainless steel cleaner to come in contact with any plastic parts such as trim pieces, handle
KDUGZDUHDQGOLQHUV,IXQLQWHQWLRQDOFRQWDFWRIFOHDQHUVZLWKSODVWLFSDUWVGRHVRFFXUFOHDQSODVWLFSDUWZLWKD
sponge and mild detergent mixed with warm water.

49-1000394 Rev. 2 9
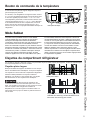
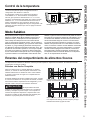
ROLLERS AND LEVELING LEGS
Leveling legs near each front corner of the refrigerator
are adjustable. They firmly position the refrigerator
and prevent it from moving when the doors are
opened. Leveling legs should be set so the front of
the refrigerator is raised just enough that the doors
close easily when opened about halfway.
Turn the leveling legs clockwise to raise the
refrigerator, counterclockwise to lower it.
Rollers next to the leveling legs allow you to move the
refrigerator away from the wall for cleaning.
Turn the legs counterclockwise until the weight of the
refrigerator is transferred from them to the rollers.
After rolling the refrigerator back into place, turn the
legs clockwise until the legs again bear the weight of
the refrigerator.
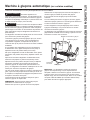
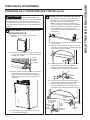
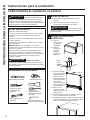
Installation Instructions Models 16, 17, 18, 19, & 22
CLEARANCES
Allow the following clearances for ease of installation,
proper air circulation and plumbing and electrical
connections.
6LGHV´PP
7RS´PP
%DFN´PPRQFXIWPRGHOV
• Back 1" (25 mm) on 16 & 17 cuft models
BEFORE YOU BEGIN
Read these instructions completely and carefully.
•
IMPORTANT – Save these instructions for
local inspector’s use.
• IMPORTANT – Observe all governing codes
and ordinances.
• Note to Installer – Be sure to leave these
instructions with the Consumer.
• Note to Consumer – .HHSWKHVHLQVWUXFWLRQV
for future reference.
• Skill level±,QVWDOODWLRQRIWKLVDSSOLDQFHUHTXLUHV
basic mechanical skills.
• Completion time±5HIULJHUDWRU,QVWDOODWLRQ
15 minutes
5HYHUVLQJWKH'RRU6ZLQJ
15 minutes
• Proper installation is the responsibility of the
installer.
• Product failure due to improper installation is not
covered under the Warranty.
REFRIGERATOR LOCATION
• 'RQRWLQVWDOOWKHUHIULJHUDWRUZKHUHWKHWHPSHUDWXUH
will go below 55°F (12.7°C) because it will not run
often enough to maintain proper temperatures.
• 'RQRWLQVWDOOWKHUHIULJHUDWRUZKHUHWKH
temperature will go above 100°F (37°C) because
it will not perform properly.
• 'RQRWLQVWDOOWKHUHIULJHUDWRULQDORFDWLRQH[SRVHG
to water (rain, etc.) or direct sunlight.
,QVWDOOLWRQDIORRUVWURQJHQRXJKWRVXSSRUWLWIXOO\
loaded.
WATER SUPPLY TO THE ICE
MAKER (on some models)
,IWKHUHIULJHUDWRUKDVDQLFHPDNHULWZLOOKDYHWR
be connected to a cold water line. A water supply
kit (containing copper tubing, shutoff valve, fittings
and instructions) is available at extra cost from your
dealer, by visiting our Website at GEAppliances.
com (in Canada at geappliances.ca) or from Parts
and Accessories, 1.877.959.8688. See instructions
,QVWDOOLQJWKH:DWHU/LQH
If you have questions, call 1.800.GE.CARES or visit our Website at: GEAppliances.com.
In Canada, call 1.800.561.3344 or Visit our Website at: geappliances.ca
INSTALLATION INSTRUCTIONS

10 49-1000394 Rev. 2
Installation Instructions
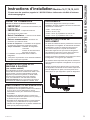
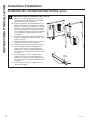
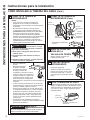
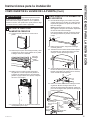
INSTALLING THE WATER LINE (on some models)
BEFORE YOU BEGIN
5HFRPPHQGHGFRSSHUZDWHUVXSSO\NLWVDUH:;;
:;;RU:;;GHSHQGLQJRQWKHDPRXQWRI
tubing you need. Approved plastic water supply
lines are SmartConnect
™
Refrigerator Tubing
:;;:;;DQG:;;
When connecting your refrigerator to a GE
Appliances Reverse Osmosis Water System, the only
DSSURYHGLQVWDOODWLRQLVZLWKD*($SSOLDQFHV59.LW
For other reverse osmosis water systems, follow the
manufacturer’s recommendations.
This water line installation is not warranted by the
refrigerator or ice maker manufacturer. Follow these
LQVWUXFWLRQVFDUHIXOO\WRPLQLPL]HWKHULVNRIH[SHQVLYH
water damage.
Water hammer (water banging in the pipes) in house
plumbing can cause damage to refrigerator parts and
lead to water leakage or flooding. Call a qualified
plumber to correct water hammer before installing the
water supply line to the refrigerator.
To prevent burns and product damage, do not hook
up the water line to the hot water line.
,I\RXXVH\RXUUHIULJHUDWRUEHIRUHFRQQHFWLQJWKH
water line, make sure the ice maker power switch
is in the OFF position (on power switch models) or
operating arm is in OFF position.
'RQRWLQVWDOOWKHLFHPDNHUWXELQJLQDUHDVZKHUH
WHPSHUDWXUHVIDOOEHORZIUHH]LQJ
When using any electrical device (such as a power
drill) during installation, be sure the device is double
insulated or grounded in a manner to prevent the
KD]DUGRIHOHFWULFVKRFNRULVEDWWHU\SRZHUHG
All installations must be in accordance with local
plumbing code requirements.
WARNING
Connect to potable water supply
only.
WHAT YOU WILL NEED
• Copper or SmartConnect™ Refrigerator Tubing kit,
´RXWHUGLDPHWHUWRFRQQHFWWKHUHIULJHUDWRUWRWKH
ZDWHUVXSSO\,IXVLQJFRSSHUEHVXUHERWKHQGVRI
the tubing are cut square.
To determine how much tubing you need: measure
the distance from the water valve on the back of the
refrigerator to the water supply pipe. Then add 6’
(1.8 m). Be sure there is sufficient extra tubing (about
¶>P@FRLOHGLQWRWXUQVRIDERXW´>FP@
diameter) to allow the refrigerator to move out from
the wall after installation.
WHAT YOU WILL NEED (Cont.)
6PDUW&RQQHFW5HIULJHUDWRU7XELQJ.LWVDUHDYDLODEOH
in the following lengths:
¶P±:;;
¶P±:;;
¶P±:;;
Be sure that the kit you select allows at least 6’
(1.8 m) as described above.
NOTE: The only GE Appliances approved plastic
tubing is that supplied in SmartConnect™ Refrigerator
7XELQJNLWV'RQRWXVHDQ\RWKHUSODVWLFZDWHUVXSSO\
line because the line is under pressure at all times.
Certain types of plastic will crack or rupture with age
and cause water damage to your home.
• A GE Appliances water supply kit (containing tubing,
shutoff valve and fittings listed below) is available
at extra cost from your dealer or from Parts and
Accessories, 877.959.8688.
• A cold water supply. The water pressure must be
between 20 and 120 psi (138 – 827 kilopascals) on
models without a water filter and between 40 and
120 psi (275 – 827 kilopascals) on models with a
water filter.
• Power drill.
´RUDGMXVWDEOHZUHQFK
• Straight and Phillips blade
screwdriver.
7ZR´RXWHUGLDPHWHU
compression nuts and 2 ferrules
VOHHYHV²WRFRQQHFWWKHFRSSHU
tubing to the shutoff valve and
the refrigerator water valve.
OR
,I\RXDUHXVLQJD6PDUW&RQQHFW5HIULJHUDWRU
Tubing kit, the necessary fittings are preassembled
to the tubing.
,I\RXUH[LVWLQJFRSSHUZDWHUOLQHKDVDIODUHGILWWLQJ
at the end, you will need an adapter (available at
plumbing supply stores) to connect the water line to
the refrigerator OR you can cut off the flared fitting
with a tube cutter and then use a compression
ILWWLQJ'RQRWFXWIRUPHGHQGIURP6PDUW&RQQHFW
Refrigerator tubing.
• Shutoff valve to connect to the cold water line.
The shutoff valve should have a water inlet with a
PLQLPXPLQVLGHGLDPHWHURI´DWWKHSRLQWRI
FRQQHFWLRQWRWKH&2/':$7(5/,1(6DGGOH
type shutoff valves are included in many water
supply kits. Before purchasing,
make sure a saddle-type valve
complies with your local plumbing
codes.
INSTALLATION INSTRUCTIONS

49-1000394 Rev. 2 11
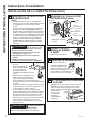
INSTALLATION INSTRUCTIONS
Installation Instructions
INSTALLING THE WATER LINE (Cont.)
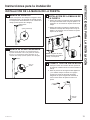
1
SHUT OFF THE MAIN WATER
SUPPLY AND UNPLUG
REFRIGERATOR
Turn on the nearest faucet (counterclockwise)
long enough to clear the line of water.
2
CHOOSE THE VALVE LOCATION
Choose a location for the valve that
LVHDVLO\DFFHVVLEOH,WLVEHVWWR
connect into the side of a vertical
water pipe. When it is necessary
WRFRQQHFWLQWRDKRUL]RQWDOZDWHU
pipe, make the connection to the
top or side, rather than at the
bottom, to avoid drawing off any
sediment from the water pipe.
5
ROUTE THE TUBING
Route the tubing between the cold water line and
the refrigerator.
Route the tubing through a hole drilled in the wall
or floor (behind the refrigerator or adjacent base
cabinet) as close to the wall as possible.
NOTE: Be sure there is sufficient extra tubing
(about 6 feet [1.82 m] coiled into 2 turns of about
´>FP@GLDPHWHUWRDOORZWKHUHIULJHUDWRUWR
move out from the wall after installation.
6
CONNECT THE TUBING TO THE
VALVE
Place the compression nut and ferrule (sleeve)
for copper tubing onto the end of the tubing and
connect it to the shutoff valve.
Make sure the tubing is fully inserted into the
valve. Tighten the compression nut securely.
For plastic tubing from a SmartConnect™
Refrigerator Tubing kit, insert the molded end
of the tubing into the shutoff valve and tighten
compression nut until it is hand tight, then tighten
one additional turn with a wrench. Overtightening
may cause leaks.
NOTE: Commonwealth of Massachusetts Plumbing
Codes 248CMR shall be adhered to. Saddle
valves are illegal and use is not permitted in
Massachusetts. Consult with your licensed plumber.
3
DRILL THE HOLE FOR THE VALVE
'ULOOD´KROHLQWKHZDWHUSLSHHYHQLIXVLQJD
self-piercing valve), using a sharp bit. Remove any
burrs resulting from drilling
the hole in the pipe. Take
care not to allow water to
drain into the drill. Failure to
GULOOD´KROHPD\UHVXOW
in reduced ice production or
smaller cubes.
4
FASTEN THE SHUTOFF VALVE
Fasten the shutoff valve to the cold water pipe
with the pipe clamp.
Tighten the clamp screws until the sealing washer
begins to swell.
NOTE: 'RQRWRYHUWLJKWHQRU\RXPD\FUXVKWKH
tubing.
4
FASTEN THE SHUTOFF VALVE
(Cont.)
NOTE: Commonwealth of Massachusetts Plumbing
Codes 248CMR shall be adhered to. Saddle
valves are illegal and use is not permitted in
Massachusetts. Consult with your licensed plumber.
Washer
,QOHW(QG
Clamp
Screw
Vertical Cold
Water Pipe
Saddle-Type
6KXWRႇ9DOYH
Pipe Clamp
Saddle-Type
6KXWRႇ9DOYH
Compression
Nut
SmartConnect
™
Tubing
Packing Nut
Outlet Valve
Ferrule (sleeve)
7
FLUSH OUT THE TUBING
Turn the main water supply on
(counterclockwise) and flush out the
tubing until the water is clear.
Shut the water off at the water valve
after about one quart (1 liter) of water
has been flushed through the tubing.
BEFORE YOU BEGIN
Read these instructions completely and carefully.
WARNING
To reduce the risk of
electric shock or injury during installation,
you must first unplug the refrigerator
before proceeding.

12 49-1000394 Rev. 2
Installation Instructions
INSTALLING THE WATER LINE (Cont.)
8
CONNECT THE TUBING TO THE
REFRIGERATOR
NOTES:
• Before making the connection to the
refrigerator, be sure the refrigerator power cord
is not plugged into the wall outlet.
• We recommend installing a water filter
*;5/4DYDLODEOHRQJewaterfilters.com
or 877.959.8688) if your water supply has
sand or particles that could clog the screen
RIWKHUHIULJHUDWRU¶VZDWHUYDOYH,QVWDOOLWLQ
WKHZDWHUOLQHQHDUWKHUHIULJHUDWRU,IXVLQJ
SmartConnect™ Refrigerator Tubing kit, you
ZLOOQHHGDQDGGLWLRQDOWXEH:;;
WRFRQQHFWWKHILOWHU'RQRWFXWSODVWLFWXEHWR
install filter.
WARNING
To reduce the risk of death
or electric shock, you must follow these
instructions:
Ŷ Unplug the refrigerator before removing
any panels.
Ŷ Do not damage any wiring while the panel
is removed.
Ŷ Replace all parts and panels before
plugging the refrigerator back in.
• Remove the access
cover.
• Remove the plastic
flexible or screw cap
from the water valve
(refrigerator connection) and
discard.
• Place the compression nut and
ferrule (sleeve) onto the end
of the tubing as shown. On
SmartConnect™ Refrigerator Tubing kit, the
nuts are already assembled to the tubing.
,QVHUWWKHHQGRIWKHWXELQJLQWRWKHZDWHUYDOYH
connection as far as possible. While holding
the tubing, tighten the fitting.
• For plastic tubing from a SmartConnect™
Refrigerator Tubing kit, insert the molded
end of the tubing into the shutoff valve and
tighten compression nut until it is hand tight,
then tighten one additional turn with a wrench.
Overtightening may cause leaks.
• Fasten the tubing into the clamp provided to hold
it in a vertical position. You may need to pry open
the clamp.
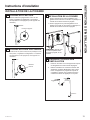
9
TURN THE WATER ON AT THE
SHUTOFF VALVE
Tighten any connections that
leak.
8
CONNECT THE TUBING TO THE
REFRIGERATOR (Cont.)
• Reattach the access
cover.
Tubing
Clamp
´
Compression
Nut
Ferrule
(sleeve)
SmartConnect
™
Tubing
Refrigerator
Connection
´
Copper
Tubing
10
INSTALLING THE
REFRIGERATOR
Plug in the refrigerator.
Arrange the coil of tubing so that it
does not vibrate against the back of
the refrigerator or against the wall.
Push the refrigerator back to the
wall.
11
START THE ICE MAKER
Set the ice maker power switch to the
0N position. The ice maker will not begin
to operate until it reaches its operating
temperature
of 15°F
(–9°C) or
EHORZ,WZLOO
then begin
operation
automatically.
ON
OFF
Power
switch
Power switch model
WARNING
ELECTRIC SHOCK
HAZARD
Attach tubing clamp using existing hole only.
'2127GULOOLQWRWKHUHIULJHUDWRU
INSTALLATION INSTRUCTIONS

49-1000394 Rev. 2 13
INSTALLATION INSTRUCTIONS
Installation Instructions
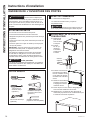
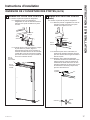
INSTALLING THE DOOR HANDLE
1A
PLASTIC HANDLE
,QVWDOOWKHKDQGOHIDVWHQHULQWRWKHKROHRQWKH
IUHH]HUDQGIUHVKIRRGGRRUV7KHIDVWHQHUV
correspond with the handle side (the side
opposite the hinge).
1B
STAINLESS STEEL HANDLE
Attach plastic bushing to the door with the
screw on both freezer and fresh food doors. The
fasteners correspond with the handle side (the
side opposite the hinge).
2
HANDLE INSTALLATION
$WWDFKKDQGOHWRIUHH]HUGRRUE\VOLGLQJKDQGOH
up onto plastic bushing or fastener with the
screws at the bottom of the handle.
2. Attach handle to fresh food door by sliding
handle down onto plastic bushing or fastener
with the screws at top of handle.
3
BADGE AND PLUG BUTTON
INSTALLATION
1. Place a plug button on the opposite side of the
fresh food door across from the handle.
2. Remove the backing on the GE Appliances
badge and carefully place it in the hole
RSSRVLWHWKHKDQGOHRQWKHIUHH]HUGRRU%H
sure the badge is oriented the correct way
before applying it to the door.
Handle Fastener
NOTE: Be sure to remove
¿OPEHIRUHKDQGOHLQVWDOODWLRQ
if applicable)
Plug
button
Badge
Bushing
with Screw

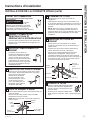
14 49-1000394 Rev. 2
REVERSING THE DOOR SWING
Installation Instructions
1
BEFORE YOU START
8QSOXJWKHUHIULJHUDWRUIURPLWVHOHFWULFDO
outlet.
1.2 Empty all door shelves, including the dairy
compartment.
CAUTION
'RQRWOHWHLWKHUGRRUGURSWRWKH
floor. To do so could damage the door stop.
2
REMOVE THE FREEZER DOOR
2.1 Tape the
door shut with
masking tape.
2.2 Remove the
screws that
hold the top
hinge to the
cabinet.
2.3 Lift the hinge
straight up to free
the hinge pin from
the socket in the top
of the door and set
it aside, along with
its screws.
2.4 Remove the tape.
Lift it off the center
hinge pin.
2.5 Set the door on a non-scratching surface with
the outside up.
2.6 Transfer the 2 screws from the opposite side
of the cabinet to the screw holes vacated by
the top hinge removal.
TOOLS REQUIRED
IMPORTANT NOTES:
When reversing the door swing:
• Read the instructions all the way through before
starting.
• Handle parts carefully to avoid scratching paint.
• Set screws down by their related parts to avoid
losing them.
• Provide a non-scratching work surface for the doors.
IMPORTANT: Once you begin, do not move the
cabinet until door-swing reversal is completed.
These instructions are for changing the hinges from
WKHULJKWVLGHWRWKHOHIWVLGH²LI\RXHYHUZDQWWR
change the hinges back to the right side, follow these
same instructions and reverse all references to left
and right.
CAUTION
Lifting Hazard
7KHIUHVKIRRGDQGIUHH]HUGRRUVDUHKHDY\8VHERWK
hands to secure the doors before lifting.
Phillips screwdriver
Masking tape
´KH[KHDG
socket driver
(optional)
´RSHQHQG
wrench (optional)
Putty knife or
thin-blade screwdriver
(optional)
Allen wrench (Stainless
Steel Handle Models)
Top Hinge
WARNING
Follow all steps when reversing
the door swing. Failure to follow these instructions,
leaving off parts, or overtightening screws, can lead
to the door falling off and result in injury and property
damage.
INSTALLATION INSTRUCTIONS

49-1000394 Rev. 2 15
INSTALLATION INSTRUCTIONS
Installation Instructions
REVERSING THE DOOR SWING (Cont.)
3
REMOVE THE FRESH FOOD
DOOR
3.1 Tape the door shut
with masking tape.
8QVFUHZWKHFHQWHU
hinge pin and remove
it from its socket. Be
careful not to lose
the center hinge and
washer.
3.3 Remove the tape and tilt the door away from
the cabinet. Lift the door from the pin in the
ERWWRPKLQJH,IWKHSODVWLFZDVKHUVWLFNVWR
the door bottom, put it back on the hinge.)
3.4 Set the door outside-up on a non-scratching
surface.
4
REVERSING THE HARDWARE
,QWHUFKDQJHWKHKLQJHDQGVFUHZVDWWRS
ULJKWZLWKVFUHZVDWWRSOHIWRIFDELQHW'RQRW
tighten screws on hinge side.
NOTE: Some hinges have 4 holes. Which
holes you use for installing depends on which
side you install the hinge.
The outer edge of the hinge should be
parallel to the edge of the case for correct
installation.
4.2 Remove the three screws holding the center
hinge to the cabinet.
4.3 Transfer the three screws from the opposite
side of the cabinet to the screw holes vacated
by the center hinge removal.
4.4 Reattach the center hinge with all three
screws on the left side of the cabinet.
NOTE: The center hinge must be turned over
as shown when mounted on the left side.
4.5 Remove the screws holding the bottom hinge
to the cabinet. Move the bottom hinge from
the right to left side of the cabinet. Switch the
hinge pin to the opposite side of the hinge
and reinsert the screws.
Center
Hinge Pin
Washer
Plastic
Washer
Hinge
Pin
Hinge
Pin
Plastic
Washer
Hinge
Bracket
Hinge
Bracket
Switch the
hinge pin to the
opposite side of
the bracket.
WARNING
Follow all steps when reversing
the door swing. Failure to follow these instructions,
leaving off parts, or overtightening screws, can lead
to the door falling off and result in injury and property
damage.

16 49-1000394 Rev. 2
Installation Instructions
REVERSING THE DOOR SWING (Cont.)
5
REVERSING THE DOOR HANDLES
5.1. Remove handle screws from the top of fresh
food door. Remove handle screws from the
ERWWRPRIIUHH]HUGRRU
5.2. Remove door handle on fresh food door by
sliding the handle up off of the fastener (Plastic
Handle) or plastic bushing (Stainless Steel
+DQGOH5HPRYHGRRUKDQGOHRQIUHH]HUGRRU
by sliding the handle down off of the fastener
(Plastic Handle) or plastic bushing (Stainless
Steel Handle).
5.3. Change places between the handle fastener or
plastic bushing and plug button on door front.
5.4. Move the plug buttons on top and front of the
door to fill the now vacant holes.
5.5. Transfer the door stop on the bottom of the
door.
5.6. Attach handle to fresh food door by sliding
handle down onto fastener (Plastic Handle) or
plastic bushing (Stainless Steel handle) and
with screws at top of handle.
$WWDFKKDQGOHWRIUHH]HUGRRUE\VOLGLQJKDQGOH
up onto fastener (Plastic Handle) or plastic
bushing (Stainless Steel handle) and with
screws at bottom of handle.
$WWDFKEDGJHRQIUHH]HUGRRURSSRVLWHWKH
handle.
'RRU
Stop
INSTALLATION INSTRUCTIONS

49-1000394 Rev. 2 17
INSTALLATION INSTRUCTIONS
Installation Instructions
REVERSING THE DOOR SWING (Cont.)
6
RE-HANGING THE DOORS
6.1 Re-hang the fresh food door
6.1.1 Lower the fresh food door onto the
bottom hinge pin. Be sure the washer is
in place on the pin.
6.1.2 Tilt the door towards the cabinet. As
the door is brought into position, align
the socket in the door with the hole
in the center hinge. Place the center
hinge pin into the hole in the center
hinge and tighten. Make sure the
washer is on the top of the hinge pin.
6
RE-HANGING THE DOORS (CO
6.1 Re-hang the fresh food door
/RZHUWKHIUHH]HUGRRURQWRWKHFHQWHU
hinge pin. Be sure the washer is in
place on the pin.
6.2.2 Tilt the door towards the cabinet, lifting
the top hinge so the pin fits into the
socket on the top of the door.
6.2.3 Make sure the door is slightly above
the top of the cabinet and the gap
between the doors is even across the
IURQW7LJKWHQWKHWRSKLQJHVFUHZV'R
not over-tighten these screws. Tighten
them until they are just snug, and then
turn them another one-half turn.
Plastic
Washer
Hinge
Pin
Hinge
Pin with
Washer
Center
Hinge
Hinge
Pin
Plastic
Washer
Top
Hinge
Hinge
Gap

18 49-1000394 Rev. 2
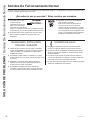
Normal Operating Sounds
Ŷ The new high
efficiency compressor
may run faster and
longer than your old
refrigerator and you may hear a high-pitched hum
or pulsating sound while it is operating.
Ŷ You may hear a whooshing sound when the doors
FORVH7KLVLVGXHWRSUHVVXUHHTXDOL]LQJZLWKLQWKH
refrigerator.
Newer refrigerators sound different from older refrigerators. Modern refrigerators have more features and use newer
technology.
Ŷ You may hear the fans spinning at high
speeds.
This happens when the refrigerator
is first plugged in, when the doors
are opened frequently or when a
large amount of food is added to the
UHIULJHUDWRURUIUHH]HUFRPSDUWPHQWV
The fans are helping to maintain the
correct temperatures.
&/,&.63236
&5$&.6DQG&+,536
Ŷ You may hear cracking or popping sounds when
the refrigerator is first plugged in. This happens as
the refrigerator cools to the correct temperature.
Ŷ The compressor may cause a clicking or chirping
sound when attempting to restart (this could take
up to 5 minutes).
Ŷ Expansion and contraction of cooling coils during
and after defrost can cause a cracking or popping
sound.
Ŷ On models with an ice maker, after an ice making
cycle, you may hear the ice cubes dropping into the
ice bucket.
:$7(56281'6
Ŷ 7KHIORZRIUHIULJHUDQWWKURXJKWKHIUHH]HUFRROLQJFRLOV
may make a gurgling noise like boiling water.
Ŷ Water dropping on the defrost heater can cause a
VL]]OLQJSRSSLQJRUEX]]LQJVRXQGGXULQJWKHGHIURVW
cycle.
Ŷ A water dripping noise may occur during the defrost
cycle as ice melts from the evaporator and flows into
the drain pan.
Ŷ Closing the door may cause a gurgling sound due to
SUHVVXUHHTXDOL]DWLRQ
Do you hear what I hear? These sounds are normal.
HUMMM...
WHOOSH...
TROUBLESHOOTING TIPS: Normal Operating Sounds

49-1000394 Rev. 2 19
TROUBLESHOOTING TIPS
Troubleshooting Tips... Before you call for service
6DYHWLPHDQGPRQH\5HYLHZWKHFKDUWVRQWKHIROORZLQJSDJHVILUVWDQG\RXPD\QRWQHHGWRFDOOIRUVHUYLFH,I
needed, service can be scheduled by visiting us online GEAppliances.com or calling 800.GECARES 800.432.2737.
,Q&DQDGDYLVLWGEAppliances.ca or call 800.561.3344.
Truth or Myth
Truth or Myth? Answer Explanation
The automatic ice maker in
my refrigerator will produce ice
when the refrigerator is plugged
in to a power receptacle.
MYTH The refrigerator must be connected to water, and the ice maker must be turned on. Make
sure the ice maker is turned on, only after the water line is connected and water is turned
on. The ice maker can be turned off by switching it to the OFF position.
7KHIUHH]HUPXVWEHGHJUHHVRUFROGHUEHIRUHWKHLFHPDNHUZLOOSURGXFHLFH3OHDVH
allow at least 24 hours for the refrigerator to pull down and the unit’s temperature to
VWDELOL]H
,ZLOOQHYHUVHHIURVWLQVLGHWKH
IUHH]HUFRPSDUWPHQW
MYTH )URVWLQVLGHWKHIUHH]HUW\SLFDOO\LQGLFDWHVWKDWWKHGRRULVQRWSURSHUO\VHDOHGRUKDV
EHHQOHIWRSHQ,IIURVWLVIRXQGFOHDUWKHIURVWXVLQJDSODVWLFVSDWXODDQGWRZHOWKHQ
FKHFNWRHQVXUHWKDWQRIRRGSDFNDJHVRUFRQWDLQHUVDUHSUHYHQWLQJWKHIUHH]HUGRRU
from closing. To help reduce to the potential for frost please make sure there is proper
FOHDUDQFHWRWKHDLUVXSSO\DQGYHQWVLQWKHIUHH]HUWRLPSURYHFLUFXODWLRQ$OZD\VFRYHU
food before loading into the refrigerator, moisture from open containers can add to the
frost load.
Refrigerator door handles can
be easily tightened.
758( ,IGRRUKDQGOHVDUHORRVHRUKDYHDJDSWKHKDQGOHFDQEHDGMXVWHGZLWKVHWVFUHZV
located on the ends of the handles.
After starting the ice maker
throw away 24 hours of ice
production.
758( To avoid issues with odor and taste the first batch of ice should be discarded
'RRUUHPRYDOLVDOZD\VUHTXLUHG
for installation.
MYTH 'RRUVVKRXOGRQO\EHUHPRYHGZKHQQHFHVVDU\WRSUHYHQWGDPDJHIURPSDVVDJHZD\RU
DFFHVVWRILQDOORFDWLRQ,IGRRUVDUHUHPRYHGSOHDVHUHYLHZ5HYHUVLQJWKH'RRU6ZLQJ
section for re-hang procedure.
There is an adjustment to rear
wheels.
MYTH Front leveling legs are adjustable and should be used to balance the refrigerator.
Leveling legs are used to make initial fresh food door adjustment. There should be
DSSUR[LPDWHO\Dó´IDOOIURPWKHIURQWWREDFNWRHQVXUHWKDWWKHGRRUVDOZD\VFORVH
Any All-Purpose cleaner can be
used to clean my refrigerator.
MYTH All-purpose cleaners are not recommended for use on the refrigerator.
'RQRWXVHZD[SROLVKDPPRQLDEOHDFKRURWKHUSURGXFWVFRQWDLQLQJFKORULQHRQ
IRUDQ\VXUIDFHV&OHDQZLWKDFORWKGDPSHQHGZLWKVRDS\ZDWHU'U\ZLWKDVRIWFORWK
The stainless steel doors can be cleaned with a commercially available stainless steel
FOHDQHU&OHDQHUVZLWKR[DOLFDFLGVXFKDV%DU.HHSHUV)ULHQG6RIW&OHDQVHUZLOO
UHPRYHVXUIDFHUXVWWDUQLVKDQGVPDOOEOHPLVKHV8VHRQO\DOLTXLGFOHDQVHUIUHHRIJULW
DQGUXELQWKHGLUHFWLRQRIWKHEUXVKOLQHVZLWKDGDPSVRIWVSRQJH'RQRWXVHDSSOLDQFH
wax or polish on the stainless steel.
Gaskets will last longer
with regular cleaning and
maintenance.
758( Clean gaskets with warm soapy water. Make sure all folds are clean and dry after
cleaning. Make sure flanges are clear of any grit or grime. After cleaning the door
gaskets, apply paraffin wax or petroleum jelly to the door gaskets and hinges at the hinge
side. This helps keep the gaskets from sticking and bending out of shape.
'RRUVPD\EHVKLSSHGZLWK
SURWHFWLYH¿OPWKDWKDVWREH
removed before use.
758( 6PRRWK¿QLVKHGGRRUV6WDLQOHVV6ODWH*ORVV%ODFNDQG*ORVV:KLWHRU6LOYHU0HWDOOLF
ZLOOKDYHDFOHDUSODVWLF¿OPRQWKHGRRUWKDWPXVWEHUHPRYHGDIWHULQVWDOO
Have more questions? For more information on your refrigerator or other GE appliances please visit geappliances.com/videos

20 49-1000394 Rev. 2
Notes
La page est en cours de chargement...
La page est en cours de chargement...
La page est en cours de chargement...
La page est en cours de chargement...
La page est en cours de chargement...
La page est en cours de chargement...
La page est en cours de chargement...
La page est en cours de chargement...
La page est en cours de chargement...
La page est en cours de chargement...
La page est en cours de chargement...
La page est en cours de chargement...
La page est en cours de chargement...
La page est en cours de chargement...
La page est en cours de chargement...
La page est en cours de chargement...
La page est en cours de chargement...
La page est en cours de chargement...
La page est en cours de chargement...
La page est en cours de chargement...
La page est en cours de chargement...
La page est en cours de chargement...
La page est en cours de chargement...
La page est en cours de chargement...
La page est en cours de chargement...
La page est en cours de chargement...
La page est en cours de chargement...
La page est en cours de chargement...
La page est en cours de chargement...
La page est en cours de chargement...
La page est en cours de chargement...
La page est en cours de chargement...
La page est en cours de chargement...
La page est en cours de chargement...
La page est en cours de chargement...
La page est en cours de chargement...
La page est en cours de chargement...
La page est en cours de chargement...
La page est en cours de chargement...
La page est en cours de chargement...
La page est en cours de chargement...
La page est en cours de chargement...
La page est en cours de chargement...
La page est en cours de chargement...
La page est en cours de chargement...
La page est en cours de chargement...
-
 1
1
-
 2
2
-
 3
3
-
 4
4
-
 5
5
-
 6
6
-
 7
7
-
 8
8
-
 9
9
-
 10
10
-
 11
11
-
 12
12
-
 13
13
-
 14
14
-
 15
15
-
 16
16
-
 17
17
-
 18
18
-
 19
19
-
 20
20
-
 21
21
-
 22
22
-
 23
23
-
 24
24
-
 25
25
-
 26
26
-
 27
27
-
 28
28
-
 29
29
-
 30
30
-
 31
31
-
 32
32
-
 33
33
-
 34
34
-
 35
35
-
 36
36
-
 37
37
-
 38
38
-
 39
39
-
 40
40
-
 41
41
-
 42
42
-
 43
43
-
 44
44
-
 45
45
-
 46
46
-
 47
47
-
 48
48
-
 49
49
-
 50
50
-
 51
51
-
 52
52
-
 53
53
-
 54
54
-
 55
55
-
 56
56
-
 57
57
-
 58
58
-
 59
59
-
 60
60
-
 61
61
-
 62
62
-
 63
63
-
 64
64
-
 65
65
-
 66
66


GE HPE16BTNLWW Le manuel du propriétaire
- Catégorie
- Frigos
- Taper
- Le manuel du propriétaire
dans d''autres langues
- English: GE HPE16BTNLWW Owner's manual
- español: GE HPE16BTNLWW El manual del propietario
Documents connexes
-
Hotpoint HPE16BTNRWW Manuel utilisateur
-
GE GTE22JSNRSS Le manuel du propriétaire
-
GE GTS22KGNRWW Le manuel du propriétaire
-
GE GTS22KGNRWW Guide d'installation
-
-
Hotpoint GTS16GSHSS Le manuel du propriétaire
-
-
GE HPE15BTHHRWW Le manuel du propriétaire
