Hilti WSC 7.25-A36 Mode d'emploi
- Catégorie
- Outils électroportatifs
- Taper
- Mode d'emploi

WSC 7.25-A36
Operating instructions en
Mode d’emploi fr
Manual de instrucciones es
Printed: 12.03.2014 | Doc-Nr: PUB / 5143348 / 000 / 01

5
+[
+}"≠"±"“ +±
+] +Ç
+#
4
6
+±
+{
"[
"Ç
9
+≠
12+“8+|
7 "#
2
3
"]
"|
1
This Product is Certified
Ce produit est certifié
Este producto esta certificado
Este produto está certificado
C US
Printed: 12.03.2014 | Doc-Nr: PUB / 5143348 / 000 / 01

2
3
4
5/ 6
1
2
7
6
4
3
5
1
7
3
3/4
1
4
0-45°(50)
2/4
1
5
2/5
2/5
3/4
3/4
1
6
Printed: 12.03.2014 | Doc-Nr: PUB / 5143348 / 000 / 01

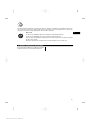
1400/3000 mm
60° 45° 30° 22.5° 0° 22.5° 30° 45°
200 mm
WGS 1400-2
WGS 1400-2
7
Printed: 12.03.2014 | Doc-Nr: PUB / 5143348 / 000 / 01

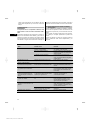
Holz / Wood / Bois Kunststoff / Synthetics /
Plastiques
Andere / Others /
Autre chose
Corian
Variocor
QuickCut
SpecialCut
MultiCut
z54
z48
z42
z42-A
z24-A
z42-A
z18
z18
z14
QualiCut
...optimal geeignet
ideal
tout indiquée
...geeignet
good
indiquée
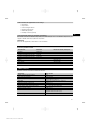
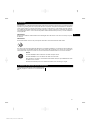
AKKU / BATTERY / ACCU / BATERIAS / BATTERI / AKU / AKUMULATORY / AKKìMìãüíéê
Printed: 12.03.2014 | Doc-Nr: PUB / 5143348 / 000 / 01

ORIGINAL OPERATING INSTRUCTIONS
WSC 7.25‑A36 cordless circular saw
It is essential that the operating instructions
are read before the power tool is operated for
the first time.
Always keep these operating instructions to-
gether with the power tool.
Ensure that the operating instructions are
with the power tool when it is given to other
persons.
Contents Page
1 General information 1
2Description 2
3 Accessories 4
4 Technical data 4
5 Safety instructions 5
6Beforeuse 8
7 Operation 9
8 Care and maintenance 11
9 Troubleshooting 12
10 Disposal 12
11 Manufacturer’s warranty - tools 13
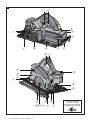
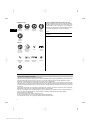
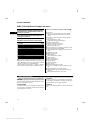
1 These numbers refer to the corresponding illustra-
tions. The illustrations can be found on the fold-out cover
pages. Keep these pages open while studying the oper-
ating instructions.
In these operating instructions, the designation “the
powertool”alwaysreferstotheWSC7.25-A36circu-
lar saw.
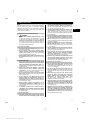
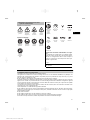
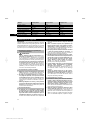
Operating controls and indicators 1
@
Battery
;
Release buttons with additional function (charge
status display activation)
=
Charge status and fault display (Li-ion battery)
%
On / off switch
&
Switch-on interlock
(
Auxiliary grip
)
Drive spindle lockbutton
+
Hexagon socket wrench
§
Cutting angle scale
/
Clamping lever for cutting angle adjustment
:
Clamping screws for the parallel guide
·
Clamping lever for cutting depth adjustment
$
45°cutting line indicator
£
0°cutting line indicator
|
Parallel guide (rip fence)
¡
Pivoting guard
Q
Base plate
W
Guard
E
Drive spindle
R
Mounting flange
T
Clamping flange
Z
Clamping screw
U
Cutting depth scale
I
Pivoting guard operating lever
O
Chip deflector guard
P
Chip deflector guard release
Ü
Angle extender for 50° cuts
1 General information
1.1 Safety notices and their meaning
DANGER
Draws attention to imminent danger that will lead to
seriousbodilyinjuryorfatality.
WARNING
Draws attention to a potentially dangerous situation that
could lead to serious personal injury or fatality.
CAUTION
Draws attention to a potentially dangerous situation that
could lead to slight personal injury or damage to the
equipment or other property.
NOTE
Draws attention to an instruction or other useful informa-
tion.
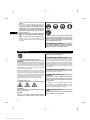
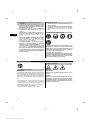
1.2 Explanation of the pictograms and other
information
Warning signs
General
warning
Warning:
electricity
Warning:
caustic
substances
Warning: hot
surface
en
1
Printed: 12.03.2014 | Doc-Nr: PUB / 5143348 / 000 / 01

Obligation signs
Wear eye
protection
Wear a hard
hat
Wear ear
protection
Wear
protective
gloves
Wear
breathing
protection
Symbols
Read the
operating
instructions
before use
Return waste
material for
recycling.
Volts Direct
current
Rated speed
under no
load
Revolutions
per minute
Revolutions
per minute
Diameter
Saw blade
Location of identification data on the power tool
The type designation can be found on the type identifica-
tion plate and the serial number on the side of the motor
housing. Make a note of this data in your operating in-
structions and always refer to it when making an enquiry
to your Hilti representative or service department.
Type:
Serial no.:
2 Description
2.1 Use of the product as directed
The power tool is a hand-held, cordless circular saw.
The power tool is designed for cutting wood or wood-like materials, plastics, gypsum plasterboard, gypsum fiberboard
andcompositeswithathicknessofupto70mm(2⁵/₈")andformakingbevelcuts at angles between 0° and 50°.
Working on materials hazardous to the health (e.g. asbestos) is not permissible.
The power tool is designed for professional use and may be operated, serviced and maintained only by trained,
authorized personnel. This personnel must be informed of any special hazards that may be encountered. The power
tool and its ancillary equipment may present hazards when used incorrectlybyuntrainedpersonnelorwhenusednot
as directed.
The working environment may be as follows: construction site, workshop, renovation, conversion or new construction.
Modification of the power tool or tampering with its parts is not permissible.
The use of saw blades not in compliance with the given specification (e.g. diameter, speed of rotation, thickness) or
the use of cutting and grinding discs or blades made from high-alloy steel (HSS steel) is not permissible.
Sawing metals is not permissible.
Do not use the power tool to cut tree branches or logs.
Do not use the battery as a power source for other unspecified appliances.
To avoid the risk of injury, use only genuine Hilti accessories and insert tools.
en
2
Printed: 12.03.2014 | Doc-Nr: PUB / 5143348 / 000 / 01

Observe the information printed in the operating instructions concerning operation, care and maintenance.
2.2 Switches
On/off switch with switch-on interlock
2.3 Grips
Grip and auxiliary grip
2.4 Protective device
Blade guard and pivoting guard
2.5 Lubrication
Grease lubrication
2.6 Deep discharge protection
To extend the life of the battery and the motor, the electronic control system is designed to audibly reduce blade
drive speed when excessive pressure is applied, up to the point at which the blade stalls completely when pressure is
maintained causing activation of the power cut-out.
CAUTION
So long as the on/off switch remains depressed, the power tool runs up to speed again when the pressure applied to
it is released, just like a mains-powered tool.
2.7 Li‑ion battery charge status
When a Li-ion battery is used, the charge status can be indicated by gently pressing one of the battery release buttons
(press until resistance is felt - do not release the battery). The display on the rear of the battery provides the following
information:
LEDs light constantly LEDs blink
Charge status C
LED1,2,3,4
-
C≧75%
LED1,2,3
-
50 % ≦ C < 75 %
LED 1, 2
-
25 % ≦ C < 50 %
LED 1
-
10 % ≦ C < 25 %
-
LED 1
C<10%
2.8 Items supplied as standard
1 Power tool
1Sawblade
1 Hexagon socket wrench
1 Operating instructions
1 Hilti toolbox (optional)
1 Cardboard box (optional)
2.9 Additional items required for operating the tool
One B 36/2.4 NiCd battery or one B 36/3.3 Li‑Ion battery or one B 36/3.9 Li‑Ion battery for the WSC 7.25‑A36 plus a
C4⁄36‑90 or C4⁄36‑350 or C7/36‑ACS or C4/36‑ACS charger.
NOTE
Depending on the version, these items may be supplied with the power tool.
en
3
Printed: 12.03.2014 | Doc-Nr: PUB / 5143348 / 000 / 01

3 Accessories
Accessories for the WSC 7.25‑A36
Designation
Short designation
Item number, description
Charger C7/36-ACS
Charger for Li-ion batteries C4/36-ACS
Charger for Li-ion batteries C 4/36‑90
Charger for Li-ion batteries C 4/36‑350
Battery B36/2.4 NiCd 228195
Battery B36/3.9 Li‑ion
Parallel guide (rip fence) WPG 370/355
Guide rail WGS 1400‑2B
4 Technical data
Right of technical changes reserved.
Power tool
WSC 7.25‑A36
Rated voltage (DC voltage) 36 V
Weight including battery 5.8 kg (12.8 lbs)
Dimensions (L x W x H) 393 mm (15.47") x 233 mm (9.17") x 307 mm
(15¹⁵/₃₂" X 9¹¹/₆₄" X 12 ³/₃₂")
Base plate 193 mm (7.6") x 320 mm (7¹⁹/₃₂" X 12¹⁹/₃₂")
Maximum saw blade diameter 184 mm (7 ¹/₄")
Minimum saw blade diameter 165 mm (6 ¹/₂")
Saw blade disc thickness 0.5…1.5 mm (0.02" to 0.06")
Saw blade arbor size
15.88 mm (⁵/₈")
Cutting depth
Cutting angle 90°: 67 mm (2⁵/₈")
Cutting angle 50°: 42 mm (1³/₄")
Cutting angle 45°: 48 mm (1⁷/₈")
Speed under no load 4,000/min
Battery
B36/2.4NiCd
B 36/3.3 Li‑Ion B 36/3.9 Li‑Ion
Rated voltage 36 V 36 V 36 V
Capacity 2.4 Ah 3.3 Ah 3.9 Ah
Energy capacity 86.4 Wh 118.8 Wh 140.4 Wh
Temperature monitoring NTC NTC NTC
Weight 2.08 kg (4.58 lbs) 1.65 kg (3.64 lbs) 1.65 kg (3.64 lbs)
Type of cell Nickel-cadmium Li‑ion Li‑ion
No. of cells 30 30 30
en
4
Printed: 12.03.2014 | Doc-Nr: PUB / 5143348 / 000 / 01

5 Safety instructions
NOTE
The safety rules in section 5.1 contain all general safety
rules for power tools which, in accordance with the
applicable standards, must be listed in the operating
instructions. Accordingly, some of the rules listed may
not be relevant to this tool.
5.1 General power tool safety warnings
a)
WARNING
Read all safety warnings and instructions. Failure
to follow the warnings and instructions may result
in electric shock, fire and/or serious injury. Save all
warnings and instructions for future reference.
The term “power tool” in the warnings refers to
your mains-operated (corded) power tool or battery-
operated (cordless) power tool.
5.1.1Workareasafety
a) Keep work area clean and well lit. Cluttered or dark
areas invite accidents.
b) Do not operate power tools in explosive atmo-
spheres, such as in the presence of flammable
liquids, gases or dust. Power tools create sparks
which may ignite the dust or fumes.
c) Keep children and bystanders away while operat-
ing a power tool. Distractions can cause you to lose
control.
5.1.2 Electrical safety
a) Power tool plugs must match the outlet. Never
modify the plug in any way. Do not use any adapter
plugs with earthed (grounded) power tools. Un-
modified plugs and matching outlets will reduce risk
of electric shock.
b) Avoid body contact with earthed or grounded
surfaces such as pipes, radiators, ranges and
refrigerators. There is an increased risk of electric
shock if your body is earthed or grounded.
c) Do not expose power tools to rain or wet condi-
tions. Water entering a power tool will increase the
risk of electric shock.
d) Do not abuse the cord. Never use the cord for
carrying, pulling or unplugging the power tool.
Keep cord away from heat, oil, sharp edges or
moving parts. Damaged or entangled cords increase
theriskofelectricshock.
e) When operating a power tool outdoors, use an
extension cord suitable for outdoor use. Use of
a cord suitable for outdoor use reduces the risk of
electric shock.
f) If operating a power tool in a damp location is
unavoidable, use a residual current device (RCD)
protected supply. Use of an RCD reduces the risk
of electric shock.
5.1.3 Personal safety
a) Stay alert, watch what you are doing and use
common sense when operating a power tool. Do
not use a power tool while you are tired or under
the influence of drugs, alcohol or medication. A
moment of inattention while operating power tools
may result in serious personal injury.
b) Use personal protective equipment. Always wear
eye protection. Protective equipment such as dust
mask, non-skid safety shoes, hard hat, or hearing
protection used for appropriate conditions will reduce
personal injuries.
c) Prevent unintentional starting. Ensure the switch
is in the off‐position before connecting to power
source and/or battery pack, picking up or carrying
the tool. Carrying power tools with your finger on the
switch or energising power tools that have the switch
on invites accidents.
d) Remove any adjusting key or wrench before turn-
ing the power tool on. A wrench or a key left at-
tached to a rotating part of the power tool may result
in personal injury.
e) Do not overreach. Keep proper footing and bal-
ance at all times. This enables better control of the
power tool in unexpected situations.
f) Dress properly. Do not wear loose clothing or
jewellery. Keep your hair, clothing and gloves
away from moving parts. Loose clothes, jewellery
or long hair can be caught in moving parts.
g) If devices are provided for the connection of dust
extraction and collection facilities, ensure these
are connected and properly used. Use of dust
collection can reduce dust-related hazards.
5.1.4 Power tool use and care
a) Do not force the power tool. Use the correct
power tool for your application. The correct power
tool will do the job better and safer at the rate for
which it was designed.
b) Do not use the power tool if the switch does not
turn it on and off. Any power tool that cannot be
controlled with the switch is dangerous and must be
repaired.
c) Disconnect the plug from the power source
and/or the battery pack from the power tool
before making any adjustments, changing
accessories, or storing power tools. Such
preventive safety measures reduce the risk of
starting the power tool accidentally.
d) Store idle power tools out of the reach of chil-
dren and do not allow persons unfamiliar with the
power tool or these instructions to operate the
power tool. Power tools are dangerous in the hands
of untrained users.
e) Maintain power tools. Check for misalignment or
binding of moving parts, breakage of parts and
any other condition that may affect the power
tool’s operation. If damaged, have the power tool
repaired before use. Many accidents are caused by
poorly maintained power tools.
en
5
Printed: 12.03.2014 | Doc-Nr: PUB / 5143348 / 000 / 01

f) Keep cutting tools sharp and clean. Properly main-
tained cutting tools with sharp cutting edges are less
likely to bind and are easier to control.
g) Use the power tool, accessories and tool bits etc.
in accordance with these instructions, taking into
account the working conditions and the work to
be performed. Use of the power tool for opera-
tions different from those intended could result in a
hazardous situation.
5.1.5 Battery tool use and care
a) Recharge only with the charger specified by the
manufacturer. A charger that is suitable for one type
of battery pack may create a risk of fire when used
with another battery pack.
b) Use power tools only with specifically designated
battery packs. Use of any other battery packs may
create a risk of injury and fire.
c) When battery pack is not in use, keep it away
from other metal objects, like paper clips, coins,
keys, nails, screws or other small metal objects,
that can make a connection from one terminal to
another. Shorting the battery terminals together may
cause burns or a fire.
d) Under abusive conditions, liquid may be ejected
from the battery, avoid contact. If contact acci-
dentally occurs, flush with water. If liquid contacts
eyes, additionally seek medical help. Liquid ejected
from the battery may cause irritation or burns.
5.1.6 Service
a) Have your power tool serviced by a qualified repair
person using only identical replacement parts.
This will ensure that the safety of the power tool is
maintained.
5.2 Cutting procedures
a)
DANGER
Keep hands away from cutting area and the blade.
Keep your second hand on auxiliary handle, or
motor housing. If both hands are holding the saw,
they cannot be cut by the blade.
b) Do not reach underneath the workpiece. The guard
cannot protect you from the blade below the work-
piece.
c) Adjust the cutting depth to the thickness of the
workpiece. Less than a full tooth of the blade teeth
should be visible below the workpiece.
d) Never hold piece being cut in your hands or across
your leg. Secure the workpiece to a stable plat-
form. It is important to support the work properly to
minimize body exposure, blade binding, or loss of
control.
e) Hold power tool by insulated gripping surfaces
only, when performing an operation where the
cutting tool may contact hidden wiring. Contact
with a “live” wire will also make exposed metal parts
of the power tool “live” and shock the operator.
f) When ripping, always use a rip fence or straight
edge guide. This improves the accuracy of cut and
reduces the chance of blade binding.
g) Always use blades with correct size and shape
(diamond versus round) of arbour holes. Blades
that do not match the mounting hardware of the saw
will run eccentrically, causing loss of control.
h) Never use damaged or incorrect blade washers
or bolt. The blade washers and bolt were specially
designed for your saw, for optimum performance and
safety of operation.
5.3 Further safety instructions for all saws
Kickback causes and related warnings
kickback is a sudden reaction to a pinched, bound or
misaligned saw blade, causing an uncontrolled saw to lift
up and out of the workpiece toward the operator;
when the blade is pinched or bound tightly by the kerf
closing down, the blade stalls and the motor reaction
drives the unit rapidly back toward the operator;
if the blade becomes twisted or misaligned in the cut, the
teeth at the back edge of the blade can dig into the top
surface of the wood causing the blade to climb out of the
kerf and jump back toward the operator.
Kickback is the result of saw misuse and/or incorrect
operating procedures or conditions and can be avoided
by taking proper precautions as given below.
a) Maintain a firm grip with both hands on the saw
and position your arms to resist kickback forces.
Position your body to either side of the blade, but
not in line with the blade. Kickback could cause the
saw to jump backwards, but kickback forces can be
controlled by the operator, if proper precautions are
taken.
b) When blade is binding, or when interrupting a
cut for any reason, release the trigger and hold
the saw motionless in the material until the blade
comes to a complete stop. Never attempt to re-
move the saw from the work or pull the saw back-
ward while the blade is in motion or kickback
may occur. Investigate and take corrective actions
to eliminate the cause of blade binding.
c) When restarting a saw in the workpiece, centre
the saw blade in the kerf and check that saw
teeth are not engaged into the material. If saw
blade is binding, it may walk up or kickback from the
workpiece as the saw is restarted.
d) Support large panels to minimise the risk of blade
pinching and kickback. Large panels tend to sag
under their own weight. Supports must be placed
under the panel on both sides, near the line of cut
and near the edge of the panel.
e) Do not use dull or damaged blades. Unsharpened
or improperly set blades produce narrow kerf causing
excessive friction, blade binding and kickback.
f) Blade depth and bevel adjusting locking levers
must be tight and secure before making cut. If
blade adjustment shifts while cutting, it may cause
binding and kickback.
g) Use extra caution when sawing into existing walls
or other blind areas. The protruding blade may cut
objects that can cause kickback.
en
6
Printed: 12.03.2014 | Doc-Nr: PUB / 5143348 / 000 / 01

5.4 Safety instructions for circular saws with outer
pendulum guard
Lower guard function
a) Check lower guard for proper closing before each
use. Do not operate the saw if lower guard does
not move freely and close instantly. Never clamp
or tie the lower guard into the open position. If saw
is accidentally dropped, lower guard may be bent.
Raise the lower guard with the retracting handle and
make sure it moves freely and does not touch the
blade or any other part, in all angles and depths of
cut.
b) Check the operation of the lower guard spring.
If the guard and the spring are not operating
properly, they must be serviced before use. Lower
guard may operate sluggishly due to damaged parts,
gummy deposits, or a build-up of debris.
c) Lower guard should be retracted manually only
for special cuts such as “plunge cuts” and “com-
pound cuts.” Raise lower guard by retracting han-
dle and as soon as blade enters the material, the
lower guard must be released. For all other sawing,
the lower guard should operate automatically.
d) Always observe that the lower guard is covering
the blade before placing saw down on bench or
floor. An unprotected, coasting blade will cause the
saw to walk backwards, cutting whatever is in its
path.Beawareofthetimeittakesforthebladeto
stop after switch is released.
5.5 Additional safety instructions
5.5.1 Personal safety
a) Wear ear protectors. Exposure to noise can cause
hearing loss.
b) Always hold the power tool securely with both
hands on the grips provided. Keep the grips dry,
clean and free from oil and grease.
c) Breathing protection must be worn if the power
tool is used without a dust removal system for
work that creates dust.
d) Do not operate the power tool without the protec-
tive devices that belong to it.
e) Operate the power tool only as intended and when
it is in faultless condition.
f) Improve the blood circulation in your fingers by
relaxing your hands and exercising your fingers
during breaks between working.
g) Switch the power tool on only after bringing it into
position at the workpiece.
h) Remove the battery before storing or transporting
the power tool.
i) Always guide the power tool away from your body
when working with it.
j) Do not work with the power tool overhead.
k) Do not attempt to brake the speed of the saw
bladebypressingittotheside.
l) Do not touch the clamping flange or the clamping
screw while the power tool is running.
m) The kerf must be free of obstructions. Do not saw
into screws and nails etc.
n) Never press the drive spindle lockbutton while the
saw blade is rotating.
o) Never direct the power tool toward persons.
p) Adjust the pressure applied to the saw blade and
the material being cut so that the blade doesn’t
stall, possibly causing the power tool to kick back.
q) Avoid overheating the tips of the saw blade teeth.
r) When cutting plastics, melting of the plastic
should be avoided.
s) Before beginning the work, check the hazard clas-
sification of the dust that will be produced. Use
an industrial vacuum cleaner with an officially
approved protection classification in compliance
with locally applicable dust protection regula-
tions.
t) Children must be instructed not to play with the
power tool.
u) The power tool is not intended for use by children,
by debilitated persons or those who have received
no instruction or training.
v) WARNING: Some dust created by grinding, sand-
ing, cutting and drilling contains chemicals known
to cause cancer, birth defects, infertility or other
reproductive harm; or serious and permanent res-
piratory or other injury. Some examples of these
chemicals are: lead from lead-based paints, crys-
talline silica from bricks, concrete and other masonry
products and natural stone, arsenic and chromium
from chemically-treated lumber. Your risk from these
exposures varies, depending on how often you do
this type of work. To reduce exposure to these
chemicals, the operator and bystanders should
work in a well-ventilated area, work with ap-
proved safety equipment, such as respiratory pro-
tection appropriate for the type of dust generated,
and designed to filter out microscopic particles
and direct dust away from the face and body.
Avoid prolonged contact with dust. Wear protec-
tive clothing and wash exposed areas with soap
and water. Allowing dust to get into your mouth,
eyes, or to remain on your skin may promote absorp-
tion of harmful chemicals.
5.5.2 Power tool use and care
a) Secure the workpiece. Use clamps or a vice to
secure the workpiece. The workpiece is thus held
more securely than by hand and both hands remain
free to operate the power tool.
b) Check that the insert tools used are compatible
with the chuck system and that they are secured
in the chuck correctly.
5.5.3 Electrical safety
Before beginning work, check the working area (e.g.
using a metal detector) to ensure that no concealed
electric cables or gas and water pipes are present.
External metal parts of the power tool may become
en
7
Printed: 12.03.2014 | Doc-Nr: PUB / 5143348 / 000 / 01

live, for example, when an electric cable is damaged
accidentally. This presents a serious risk of electric shock.
5.5.4 Battery use and care
a) Observe the special instructions applicable to the
transport, storage and use of Li-ion batteries.
b) Do not expose batteries to high temperatures or
fire. This presents a risk of explosion.
c) Do not disassemble, squash or incinerate batter-
ies and do not subject them to temperatures over
80°C. This presents a risk of fire, explosion or injury
through contact with caustic substances.
d) Use only batteries that are approved for use with
the applicable tool or appliance. Use of unap-
proved batteries or use of the batteries for areas of
application for which they are not approved presents
a risk of fire and explosion.
e) Do not charge or continue to use damaged bat-
teries (e.g. batteries with cracks, broken parts,
bent or pushed-in and/or pulled-out contacts).
f) If the battery gets too hot to touch, this may indicate
that it is faulty. Place the tool in a location where
it can be kept under observation, well away from
flammable materials, and allow it to cool down.
Contact Hilti Service after the battery has been
allowed to cool.
5.5.5 Work area
a) Ensure that the workplace is well lit.
b) Ensure that the workplace is well ventilated. Ex-
posure to dust at a poorly ventilated workplace may
result in damage to the health.
5.5.6 Personal protective equipment
The user and any other persons in the vicinity must
wear suitable eye protection, a hard hat, ear protec-
tion, protective gloves and breathing protection while
the tool is in use.
5.5.7 Safety precautions
Do not switch the power tool on if the saw blade,
the blade guard or the pivoting guard are not fitted
correctly.
6Beforeuse
6.1 Battery use and care
NOTE
Battery performance drops at low temperatures. Never
use the battery until the cells become fully discharged.
Change to the second battery as soon as a drop in per-
formance is noticed. Recharge the battery immediately
so that it is ready for reuse.
Store the battery in a cool, dry place. Never store the
battery where it is exposed to the heat of the sun, on a
radiator or behind glass, e.g. at a window. Batteries that
have reached the end of their life must be disposed of
safely and correctly to avoid environmental pollution.
Insert the battery in the corresponding charger.
6.2 Charging the battery
CAUTION
Use only the Hilti chargers listed under “Accessories”.
DANGER
Ensure that the outer surfaces of the battery are
clean and dry before inserting it in the correspond-
ing charger. Read the operating instructions for the
charger for further information about the charging
procedure.
6.2.1 Charging a new battery for the first time
A new battery must be charged correctly for the first time
before use. This will ensure that the cells form correctly.
Incorrect initial charging may have a permanent, negative
effect on battery capacity. Please refer to the applicable
battery charger’s operating instructions for information
about initial charging.
6.2.2 Recharging NiCd batteries
NiCd batteries should be allowed to reach full charge
each time they are charged.
6.2.3 Recharging Li-ion batteries
CAUTION
Make sure that the outer surfaces of the battery are
clean and dry before inserting it in the charger. Ob-
serve the operating instructions for the charger.
Li-ion batteries are ready for use at any time, even when
only partly charged. Charging progress is indicated by
the LED display (see charger operating instructions).
en
8
Printed: 12.03.2014 | Doc-Nr: PUB / 5143348 / 000 / 01

6.3 Fitting the battery
DANGER
Use only the Hilti batteries and Hilti chargers listed
under “Accessories”.
CAUTION
Check that the power tool is switched off and the
switch interlock activated before fitting the battery.
Use only the Hilti batteries approved for use with this
power tool.
1. Push the battery into the power tool from the rear as
far as it will go and until it is heard to engage with a
double click.
2. CAUTION A falling battery may present a risk of
injury to yourself and others.
Check that the battery is seated securely in the
power tool.
6.4 Removing the battery
1. Press one or both release buttons.
2. Pull the battery out of the power tool toward the
rear.
6.5 Transport and storage of batteries
Pull the battery out of the locked position (working posi-
tion) and move it into the first click-stop position (trans-
port position).
If you disconnect a battery from the power tool for trans-
port or storage, make sure that the battery contacts are
not short-circuited. Remove loose metal parts such as
screws, nails, clamps, loose screwdriving bits, wires or
metal swarf from the case, toolbox or transport container,
or prevent these parts from coming into contact with the
battery.
Observe national and international transport regulations
when shipping batteries (transportation by road, rail, sea
or air).
7Operation
NOTE
If the blade is stalled for a long time, the tool will not
restart by itself when the pressure applied to it is released.
The switch-on interlock and the on/off switch must be
pressed again.
CAUTION
Wear protective gloves. The cutting edges of the saw
blade teeth are sharp. The cutting edges may present a
risk of injury.
CAUTION
Wear protective glasses and a dust mask. The sawing
operation swirls up dust and wood chips into the air. The
dust and wood chips may be harmful to the eyes and
respiratory system.
CAUTION
Wear ear protectors. The power tool and the sawing
operation generate noise. Exposure to noise can cause
loss of hearing.
7.1 Changing the saw blade
CAUTION
Wear protective gloves when changing insert tools.
The blade, the clamping flange and the clamping screw
get hot.
CAUTION
Check that the blade to be fitted complies with the
technical requirements and that it is well sharpened. A
sharp saw blade is an essential requirement for a perfect
cut.
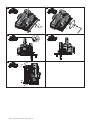
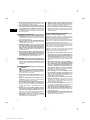
7.1.1 Removing the saw blade 2
1. Pull the battery out of the power tool.
2. Press the drive spindle lockbutton.
3. Turnthesawbladeclampingscrewwiththehex.
socket wrench until the locking pin engages fully.
4. Use the hex. socket wrench to release the clamping
screw by turning it counterclockwise.
5. Remove the clamping screw from the outer clamping
flange.
6. Open the pivoting guard by swinging it to the side
and then remove the saw blade.
7.1.2 Fitting the saw blade 3
1. Pull the battery out of the power tool.
2. Clean the mounting flange and the clamping flange.
3. Fit the mounting flange.
4. Open the pivoting guard.
5. CAUTION Observe the direction-of-rotation ar-
rowonthesawblade.
Fit the new saw blade.
6. Fit the outer clamping flange.
7. Secure the clamping flange by tightening the clamp-
ing screw in a clockwise direction. When doing so,
pressthespindlelockbuttonasbefore(see“Re-
moving the blade”).
8. Before using the power tool, check that the saw
blade is securely attached.
en
9
Printed: 12.03.2014 | Doc-Nr: PUB / 5143348 / 000 / 01

7.2 Adjusting the cutting depth 4
NOTE
The cutting depth set should always be approx. 5 to 10
mm (³/₁₆" to ³/₈") greater than the thickness of the material
to be cut.
The cutting depth can be adjusted stepplessly between
0 and 70 mm (2⁵/₈").
1. Pull the battery out of the power tool.
2. Place the power tool on a supporting surface.
3. Release the cutting depth adjustment clamping lever
The depth set can be read from the scale at the
arrow on the guide.
4. Lift the power tool in a scissor movement and set
the desired cutting depth by closing the clamping
lever.
7.3 Adjusting the cutting angle 5
The power tool can be set to any angle between 0 and
45º for bevel cuts. Angles of up to 50° can be set after
lifting the angle extender.
1. Pull the battery out of the power tool.
2. Release the cutting angle adjustment clamping
lever.
3. Pivot the power tool into the desired position or,
respectively, lift the angle extender to allow angles
up to 50° to be set.
4. Tighten the cutting angle adjustment clamping lever.
7.4 Sawing along a line
There is a cutting line indicator for straight cuts or bevel
cuts (0° and 45°) at the front section of the base plate of
the power tool. This permits precise cuts to be made at
the selected cutting angle. The edge of the line indicator
corresponds to the inside of the saw blade. The viewing
window provides a better view of the cutting line and thus
ensures a better cut. Additional cutting line indicators are
located at the front opening for the saw blade and at the
end of the base plate.
1. Secure the workpiece so that it cannot move.
2. Position the workpiece so that the saw blade is free
to move under the workpiece.
3. Check to ensure that the switch on the power tool
is in the off-position.
4. Fit the battery into the power tool.
5. Place the power tool with the base plate on the
workpiece in such a way that the blade still has no
contact with the workpiece.
6. Switch the power tool on by pressing the switch-on
interlock and then pressing the on/off switch while
the switch-on interlock is depressed.
7. Guide the power tool along the cutting line on the
workpiece at a suitable speed.
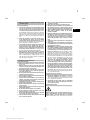
7.5 Sawing using the parallel guide (accessory)
Use of the two-arm parallel guide allows precise cuts to
be made along the edge of the workpiece or, respectively,
strips of even width to be cut.
The parallel guide can be fitted on either side of the base
plate.
7.6 Fitting / adjusting the parallel guide 6
1. Pull the battery out of the power tool.
2. Slacken the clamping screw on the base plate.
3. Slide both arms of the parallel guide under the
clamping screw.
4. Set the desired cutting width.
5. Tighten the clamping screws.
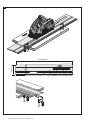
7.7 Using the saw on the guide rail 7
7.7.1 Longitudinal cuts at 0 °
Place the saw on the guide rail so that the rib fits into the
grooveinthebaseplate.
7.7.2 Longitudinal cuts at up to 50 °
Guide the saw so that the outer edge of the base plate
runs along the rib on the guide rail. The saw blade will
otherwise come into contact with the guide rail.
7.7.3 Cuts at an angle across the surface of the
workpiece
NOTE
The cutting angle indicated is the angle of deviation from
a straight, right-angled cut.
1. Position the guide rail with the zero mark at the edge
of the workpiece and then pivot the rail until the
desired angle shown on the angle scale is opposite
the zero mark.
2. Use the two screw clamps to secure the guide rail.
7.8 Trimming to size
1. Secure the guide rail from below with two screw
clamps.
NOTE The saw must be placed on the guide rail
behind the workpiece.
2. CAUTIONTakecaretoensurethatthesawblade
is not in contact with the workpiece.
Position the saw on the guide rail a short distance
from the starting point of the cut.
3. Switch the power tool on.
4. Push the saw steadily across the workpiece.
The pendulum guard opens as it contacts the ac-
tuating edge at the side of the guide rail and sub-
sequently closes at the end of the rail as the cut is
completed.
en
10
Printed: 12.03.2014 | Doc-Nr: PUB / 5143348 / 000 / 01

8 Care and maintenance
CAUTION
Before beginning cleaning, remove the battery from
the power tool in order to prevent unintentional start-
ing.
8.1Careofinserttools
Clean off dirt and dust deposits adhering to the insert
tools and protect them from corrosion by wiping the
insert tools from time to time with an oil-soaked rag.
8.2 Care of the power tool
CAUTION
Keep the power tool, especially its grip surfaces,
clean and free from oil and grease. Do not use clean-
ing agents which contain silicone.
The outer casing of the power tool is made from impact-
resistant plastic. Sections of the grip are made from a
synthetic rubber material.
Never operate the power tool when the ventilation slots
are blocked. Clean the ventilation slots carefully using
a dry brush. Do not permit foreign objects to enter the
interior of the power tool. Clean the outside of the power
tool at regular intervals with a slightly damp cloth. Do
not use a spray, steam pressure cleaning equipment or
running water for cleaning. This may negatively affect the
electrical safety of the power tool.
8.3 Cleaning the safety devices
1. Remove the saw blade before cleaning the safety
devices.
2. Clean the safety devices carefully with a dry brush.
3. Use a suitable tool to remove deposits or wood
chips from the inside surfaces of the safety devices.
4. Fit the saw blade.
8.4 Care of the NiCd battery
Avoid entrance of moisture.
Keep the electrical contacts free from dust, oil and
grease. If necessary, use a clean cloth to clean the con-
tact surfaces. The battery must be recharged as soon as
the power tool’s performance drops noticeably or when
the deep discharge prevention system becomes active.
NOTE
Please refer to the operating instructions for the charger
for further information about charging the battery.
8.5 Care of the Li-ion battery
Avoid ingress of moisture.
Charge the battery fully before using it for the first time.
In order to achieve maximum battery life, stop discharg-
ing the battery as soon as a significant drop in battery
performance is noticed.
NOTE
If use continues, further battery discharge will be stopped
automatically before the battery cells suffer damage.
Charge the battery using an approved charger from Hilti
designed for use with Li-ion batteries.
NOTE
- A conditioning charge (as is required with NiCd or
NiMH batteries) is not necessary.
- Interruption of the charging procedure has no negative
effect on battery life.
- Charging can be started at any time with no negative
effect on battery life. There is no memory effect (as
with NiCd or NiMH batteries).
- For best results, batteries should be stored fully
charged in a cool dry place. Storing the battery in
places subject to high ambient temperatures (e.g. at
a window) has an adverse effect on battery life and
increases the rate of self-discharge.
- If the battery no longer reaches full charge, it may
have lost capacity due to aging or overstressing. It
is still possible to work with this battery. You should,
however, soon replace the battery with a new one.
8.6 Maintenance
WARNING
Repairs to the electrical section of the power tool may
be carried out only by trained electrical specialists.
Check all external parts of the power tool for damage
at regular intervals and check that all controls operate
faultlessly. Do not operate the power tool if parts are
damaged or when the controls do not function faultlessly.
Have the power tool repaired by Hilti Service.
8.7 Checking the power tool after care and
maintenance
After carrying out care and maintenance work on the
power tool, check that all protective and safety devices
are fitted and that they function faultlessly.
To check the pivoting guard, open the guard fully by
moving the guard operating lever.
The pivoting guard must close quickly and completely
when the guard operating lever is released.
en
11
Printed: 12.03.2014 | Doc-Nr: PUB / 5143348 / 000 / 01

9 Troubleshooting
Fault Possible cause Remedy
The power tool doesn’t run. The battery is discharged or fitted
incorrectly.
The battery must be heard to engage
with a double click or, respectively,
needs to be charged.
Electrical fault. Remove the battery from the power
tool and contact Hilti Service.
The battery is discharged/hot. Deep discharge prevention / the elec-
tronics switch off. Insert the battery in
the charger or allow it to cool down.
Theon/offswitchcan’tbe
pressed, i.e. the switch is
locked.
Not a fault (safety function). Press the switch-on interlock.
Running speed suddenly drops
considerably.
The battery is discharged or the feed
pressure applied to the power tool is
too high.
Change the battery and recharge the
discharged battery. Reduce the feed
pressure applied to the power tool.
The battery runs down more
quickly than usual.
Battery condition is not optimal. Only NiCd batteries should be given
a conditioning charge. (Please refer
to the operating instructions for the
charger.)
The power tool doesn’t restart
by itself after the saw blade has
stalled.
The deep discharge prevention sys-
tem has switched off after the blade
has stalled a second time.
Press the switch-on interlock and the
on/off switch again.
The battery doesn’t engage with
an audible double click.
The retaining lugs on the battery are
dirty.
Clean the retaining lugs and check
that the battery engages securely.
Contact Hilti Service if the problem
persists.
The tool or the battery become
very warm.
Electrical fault. Switch the power tool off immedi-
ately, remove the battery and contact
Hilti Service.
The power tool has been overloaded
(application limits exceeded).
Use the right power tool for the job
(don’t use a low-powered tool for
heavy work).
No / reduced suction power. Chip ejector channel blocked. Clean out the chip ejector channel.
10 Disposal
CAUTION
Improper disposal of the equipment may have serious consequences: The burning of plastic components generates
toxic fumes which may present a health hazard. Batteries may explode if damaged or exposed to very high
temperatures, causing poisoning, burns, acid burns or environmental pollution. Careless disposal may permit
unauthorized and improper use of the equipment. This may result in serious personal injury, injury to third parties and
pollution of the environment.
CAUTION
Dispose of defective batteries without delay. Keep them out of reach of children. Do not attempt to open or dismantle
batteries and do not dispose of them by incineration.
CAUTION
Dispose of the batteries in accordance with national regulations or return them to Hilti.
en
12
Printed: 12.03.2014 | Doc-Nr: PUB / 5143348 / 000 / 01

RBRC
R
E
C
Y
C
L
E
1
.
8
0
0
.
8
2
2
.
8
8
3
7
Most of the materials from which Hilti power tools or appliances are manufactured can be recycled. The materials
must be correctly separated before they can be recycled. In many countries, Hilti has already made arrangements for
taking back your old power tools or appliances for recycling. Please ask your Hilti customer service department or
Hilti representative for further information.
Batteries
The Hilti B36/2.4 NiCd battery contains nickel-cadmium cells.
The Hilti B36/3.3 Li-ion battery contains lithium-ion cells.
Both you and Hilti bear responsibility for the recycling of worn-out batteries in keeping with
environmental protection requirements.
Do not throw worn-out batteries into household waste, a fire or water.
11 Manufacturer’s warranty - tools
Please contact your local Hilti representative if you have
questions about the warranty conditions.
en
13
Printed: 12.03.2014 | Doc-Nr: PUB / 5143348 / 000 / 01

NOTICE ORIGINALE
WSC 7.25‑A36 Scie circulaire sur accu
Avantdemettrel'appareilenmarche,lireim-
pérativement son mode d'emploi et bien res-
pecter les consignes.
Le présent mode d'emploi doit toujours ac-
compagner l'appareil.
Ne pas prêter ou céder l'appareil à un autre
utilisateur sans lui fournir le mode d'emploi.
Sommaire Page
1 Consignes générales 14
2Description 15
3 Accessoires 17
4 Caractéristiques techniques 17
5 Consignes de sécurité 18
6 Mise en service 22
7Utilisation 23
8 Nettoyage et entretien 25
9 Guide de dépannage 26
10 Recyclage 26
11 Garantie constructeur des appareils 27
1 Les chiffres renvoient aux illustrations respectives. Les
illustrations qui se rapportent au texte se trouvent sur les
pages rabattables. Pour lire le mode d'emploi, rabattre
ces pages de manière à voir les illustrations.
Dans le présent mode d'emploi, « l'appareil » désigne
toujours la scie circulaire à bloc-accu WSC 7.25‑A36.
Organesdecommandeetélémentsd'affichage1
@
Bloc-accu
;
Boutons de déverrouillage avec fonction supplé-
mentaire d'activation de l'indicateur de l'état de
charge
=
Indicateur de l'état de charge et de défauts (bloc-
accu Li-Ion)
%
Interrupteur Marche / Arrêt
&
Dispositif de blocage de l'interrupteur
(
Poignée supplémentaire
)
Boutondeblocagedelabroche
+
Clépourvisàtête6panscreux
§
Échelle d'angle de coupe
/
Levier de blocage pour réglage de l'angle de coupe
:
Vis de blocage pour butée parallèle
·
Levier de blocage pour réglage de la profondeur de
coupe
$
Repère de coupe 45°
£
Repère de coupe 0°
|
Butée parallèle
¡
Capot de protection oscillant
Q
Plaque de base
W
Carter de protection
E
Broche d'entraînement
R
Flasque support
T
Flasquedeserrage
Z
Vis de serrage
U
Échelledeprofondeurdecoupe
I
Levier de commande du capot de protection oscil-
lant
O
Capot d'aspiration du canal de copeaux
P
Déverrouillage du capot d'aspiration du canal de
copeaux
Ü
Étrier supplémentaire pour coupe à 50°
1 Consignes générales
1.1 Termes signalant un danger et leur signification
DANGER
Pour un danger imminent qui peut entraîner de graves
blessures corporelles ou la mort.
AVERTISSEMENT
Pour attirer l'attention sur une situation pouvant présen-
ter des dangers susceptibles d'entraîner des blessures
corporelles graves ou la mort.
ATTENTION
Pour attirer l'attention sur une situation pouvant présen-
ter des dangers susceptibles d'entraîner des blessures
corporelles légères ou des dégâts matériels.
REMARQUE
Pour des conseils d'utilisation et autres informations
utiles.
fr
14
Printed: 12.03.2014 | Doc-Nr: PUB / 5143348 / 000 / 01

1.2 Explication des pictogrammes et autres
symboles d'avertissement
Symboles d'avertissement
Avertisse-
ment danger
général
Avertisse-
ment tension
électrique
dangereuse
Avertisse-
ment
matières
corrosives
Avertisse-
ment
surfaces
chaudes
Symboles d'obligation
Porter des
lunettes de
protection
Porter un
casque de
protection
Porter un
casque
antibruit
Porter des
gants de
protection
Porter un
masque
respiratoire
léger
Symboles
Lire le mode
d'emploi
avant
d'utiliser
l'appareil
Recycler les
déchets
Volt Courant
continu
Vitesse
nominale à
vide
Tours par
minute
Tours par
minute
Diamètre
Lame de scie
Emplacement des détails d'identification sur l'appa-
reil
La désignation du modèle figure sur la plaque signalé-
tiqueetlenumérodesériesurlecôtéducartermoteur.
Inscrire ces renseignements dans le mode d'emploi et
toujours s'y référer pour communiquer avec notre repré-
sentant ou agence Hilti.
Type :
N° de série :
2 Description
2.1 Utilisation conforme à l'usage prévu
L'appareil est une scie circulaire sur accu à guidage manuel.
Les appareils sont destinés aux travaux de sciage dans le bois ou des matières semblables, les plastiques, les
panneaux-plan, le placoplâtre et les matériaux composites jusqu'à une profondeur de coupe de 70 mm (2 ⁵/₈") ainsi
que des coupes en onglets de 0° à 50°.
Ne pas travailler sur des matériaux susceptibles de nuire à la santé (par ex.amiante).
L’appareil est destiné aux utilisateurs professionnels et ne doit être utilisé, entretenu et réparé que par un personnel
agréé, formé à cet effet. Ce personnel doit être au courant des dangers inhérents à l'utilisation de l'appareil. L'appareil
et ses accessoires peuvent s'avérer dangereux s'ils sont utilisés de manière incorrecte par un personnel non qualifié
ou de manière non conforme à l'usage prévu.
L'environnement de travail peut être : chantiers, ateliers, sites de rénovation, sites de constructions nouvelles ou de
constructions en cours de réaménagement.
Toute manipulation ou modification de l'appareil est interdite.
Ne pas utiliser les lames de scie dont les caractéristiques techniques indiquées (par ex. diamètre, vitesse de rotation,
épaisseur) ne correspondent pas, ni lesdisquesàtronçonner/àébarberetles lames de scie en acier à coupe rapide
fortement allié (acier HSS).
Ne pas scier les métaux.
Ne pas utiliser l'appareil pour scier des branches ni des troncs d'arbres.
Ne pas utiliser les blocs-accus comme source d'énergie pour d'autres appareils non spécifiés.
Pour éviter tout risque de blessure, utiliser uniquement les accessoires et outils Hilti d'origine.
fr
15
Printed: 12.03.2014 | Doc-Nr: PUB / 5143348 / 000 / 01
La page est en cours de chargement...
La page est en cours de chargement...
La page est en cours de chargement...
La page est en cours de chargement...
La page est en cours de chargement...
La page est en cours de chargement...
La page est en cours de chargement...
La page est en cours de chargement...
La page est en cours de chargement...
La page est en cours de chargement...
La page est en cours de chargement...
La page est en cours de chargement...
La page est en cours de chargement...
La page est en cours de chargement...
La page est en cours de chargement...
La page est en cours de chargement...
La page est en cours de chargement...
La page est en cours de chargement...
La page est en cours de chargement...
La page est en cours de chargement...
La page est en cours de chargement...
La page est en cours de chargement...
La page est en cours de chargement...
La page est en cours de chargement...
La page est en cours de chargement...
La page est en cours de chargement...
La page est en cours de chargement...
-
 1
1
-
 2
2
-
 3
3
-
 4
4
-
 5
5
-
 6
6
-
 7
7
-
 8
8
-
 9
9
-
 10
10
-
 11
11
-
 12
12
-
 13
13
-
 14
14
-
 15
15
-
 16
16
-
 17
17
-
 18
18
-
 19
19
-
 20
20
-
 21
21
-
 22
22
-
 23
23
-
 24
24
-
 25
25
-
 26
26
-
 27
27
-
 28
28
-
 29
29
-
 30
30
-
 31
31
-
 32
32
-
 33
33
-
 34
34
-
 35
35
-
 36
36
-
 37
37
-
 38
38
-
 39
39
-
 40
40
-
 41
41
-
 42
42
-
 43
43
-
 44
44
-
 45
45
-
 46
46
-
 47
47


Hilti WSC 7.25-A36 Mode d'emploi
- Catégorie
- Outils électroportatifs
- Taper
- Mode d'emploi
dans d''autres langues
Documents connexes
-
Hilti WSC 7.25-A36 Mode d'emploi
-
Hilti SC 60W-A36 Mode d'emploi
-
-
-
-
-
-
Hilti WSC 7.25-S Mode d'emploi
-
Hilti QTG WSC 85 Mode d'emploi
-