Krups EC322050 Manuel utilisateur
- Catégorie
- Cafetières
- Taper
- Manuel utilisateur

ENFRES
EC322
www.krups.com
x*
t*
u*
w
k
n
o
v
l
s
m
r
p
q
NC00142207-01 - Réalisation : Espace Graphique
www.krups.com
EN.............................................................................. p. 7
FR .............................................................................. p. 16
ES .............................................................................. p. 26
This product may differ from the photo
Photo non contractuelle
El producto puede ser diferente al de la imagen
*depending on the model - *selon modèle - *según el modelo
KR_CAFETIERE_EC322_M1_NAFTA_NC00142207_01_Mise en page 1 24/11/2017 13:35 PageC1

1 2 3
4 5
14
6
7 8 9a
9b
12 13 14
15 16 17
18
19
27 28*
1110
17 fl.
OZ
(0.5 L)
20b20a
21b21a
29*
24 25 26
2322*
KR_CAFETIERE_EC322_M1_NAFTA_NC00142207_01_Mise en page 1 24/11/2017 10:59 PageC4

30* 31*
KR_CAFETIERE_EC322_M1_NAFTA_NC00142207_01_Mise en page 1 24/11/2017 10:59 Page5

PAGE
1. IMPORTANT SAFEGUARDS
. . . . . . . . . . . . . . . . . . . . . . . . . . . . . . . . . . . . . . . . . . . . . . . . . . . . . . . . . . . . . 7
2. DESCRIPTION
. . . . . . . . . . . . . . . . . . . . . . . . . . . . . . . . . . . . . . . . . . . . . . . . . . . . . . . . . . . . . . . . . . . . . . . . . . . . . . . 9
3. SETTING THE CLOCK
. . . . . . . . . . . . . . . . . . . . . . . . . . . . . . . . . . . . . . . . . . . . . . . . . . . . . . . . . . . . . . . . . . . . . 9
4. BEFORE FIRST USE
. . . . . . . . . . . . . . . . . . . . . . . . . . . . . . . . . . . . . . . . . . . . . . . . . . . . . . . . . . . . . . . . . . . . . . . 9
5. MAKING COFFEE
. . . . . . . . . . . . . . . . . . . . . . . . . . . . . . . . . . . . . . . . . . . . . . . . . . . . . . . . . . . . . . . . . . . . . . . . . . 9
6. OTHER FEATURES
. . . . . . . . . . . . . . . . . . . . . . . . . . . . . . . . . . . . . . . . . . . . . . . . . . . . . . . . . . . . . . . . . . . . . . . 10
6A AUTO START FUNCTION
6B REGULAR OR BOLD
6C 1-4 CUPS
6D KEEP WARM
7. CLEANING
. . . . . . . . . . . . . . . . . . . . . . . . . . . . . . . . . . . . . . . . . . . . . . . . . . . . . . . . . . . . . . . . . . . . . . . . . . . . . . . . . . 11
8. DESCALING
. . . . . . . . . . . . . . . . . . . . . . . . . . . . . . . . . . . . . . . . . . . . . . . . . . . . . . . . . . . . . . . . . . . . . . . . . . . . . . . . 11
9. TROUBLESHOOTING
. . . . . . . . . . . . . . . . . . . . . . . . . . . . . . . . . . . . . . . . . . . . . . . . . . . . . . . . . . . . . . . . . . . . 13
10. KRUPS INTERNATIONAL LIMITED WARRANTY
. . . . . . . . . . . . . . . . . . . . . . . . . . . . . . . . . . . . 14
TABLE OF CONTENTS
6
KR_CAFETIERE_EC322_M1_NAFTA_NC00142207_01_Mise en page 1 24/11/2017 11:00 Page6

7
EN
1. IMPORTANT SAFEGUARDS
When using electrical appliances, basic safety precautions should always be
followed to reduce the risk of fire, electric shock, and/or injury to persons
including the following:
■ Read all instructions.
■ Do not touch hot surfaces. Use handles or knobs.
■ To protect against fire, electric shock and injury to persons, do not immerse cord,
plugs or machine in water or other liquid. Close supervision is necessary when any
appliance is used by or near children.
■ Unplug from outlet when not in use and before cleaning. Allow to cool before putting
on or taking off parts, and before cleaning the appliance.
■ Do not operate any appliance with a damaged cord or plug or after the appliance
malfunctions, or has been damaged in any manner. Return appliance to the nearest
authorized service facility for examination, repair or adjustment.
■ The use of accessory attachments not recommended by the appliance manufacturer
may result in fire, electric shock or injury to persons.
■ Do not use outdoors.
■ Do not let cord hang over edge of table or counter, or touch hot surfaces.
■ Do not place on or near a hot gas or electric burner, or in a heated oven.
■ Always attach plug to appliance first, then plug cord into the wall outlet. To
disconnect, turn any control to the “off” position, then remove plug from wall outlet.
■ Do not use appliance for other than intended use.
■ The carafe is designed for use with this appliance. It must never be used on a range
top.
■ Do not place a hot carafe on a wet or cold surface.
■ Do not use a cracked carafe or a carafe having a loose or weakened handle.
■ Do not clean carafe with cleansers, steel wool pads, or other abrasive material.
■ Scalding may occur if the lid is removed during the brewing cycles.
SAVE THESE INSTRUCTIONS
CAUTION
This machine is intended for household use only. Any servicing other than cleaning and
user maintenance should be performed by the nearest authorized KRUPS Service
Center. Visit our website at www.krupsusa.com in the USA or www.krups.ca in Canada
or contact your respective country’s Consumer Service department for the service
center nearest you, or contact your respective country’s Consumer Service department.
To reduce the risk of fire or electric shock, do not attempt to disassemble the machine.
Repair should be done by an authorized KRUPS Service Center only.
SHORT CORD INSTRUCTIONS
A. A short power cord or a detachable power cord is provided to reduce the risks of
becoming entangled in or tripping over a longer cord accidentally.
B. Longer detachable power cords or extension cords are available and may be used
if care is exercised in their use.
KR_CAFETIERE_EC322_M1_NAFTA_NC00142207_01_Mise en page 1 24/11/2017 11:00 Page7

8
C. If a long detachable power cord or an extension cord is used:
1) the marked electrical rating of the detachable power cord or extension cord
should be at least as great as the electrical rating of the appliance.
2) If the appliance is of the grounded type, the extension cord should be a
grounding type 3-wire cord.
3) the longer cord should be arranged so that it will not drape over the counter
where it can be pulled on by children or tripped over accidentally. The
appliance may have a polarized plug (one blade is wider than the other). To
reduce the risk of electric shock, this plug is intended to fit into a polarized
outlet only one way. If the plug does not fit fully into the outlet, reverse the plug.
If it still does not fit, contact a qualified electrician. Do not attempt to modify
the plug in anyway.
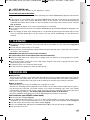
ADDITIONAL SAFETY INSTRUCTIONS
■ Your appliance is designed for domestic use only.
■ It is not intended to be used in the following applications, and the guarantee will not
apply for: staff kitchen areas in shops, offices and other working environments; farm
houses; by clients in hotels, motels and other residential type environments; bed
and breakfast type environments.
■ This appliance is not designed to be used by children or people without knowledge
or experience with the product, unless they are supervised or given prior instructions
concerning the use of the appliance by someone responsible for their safety.
■ Burns can occur from touching hot plate, hot water or steam. Exercise caution.
■ All machines are subject to stringent quality control. Practical tests using machines
taken at random are conducted and this may explain any slight marks or coffee
residue showing prior to use.
■ Do not pour liquids other than water and descaling solutions specified in this manual
into the water tank.
■ Protect the machine against humidity and freezing.
■ Do not pour water into the appliance if it is still hot.
■ Always place your coffee maker on a flat, stable, heat resistant work surface away
from water splashes and any external sources of heat.
■ Never place your carafe or your insulated pot in a microwave oven, in a dishwasher
or on a stove top.
■ Never put your hand inside the insulated pot.
■ Do not use the carafe or the insulated pot without the lid.
■ Do not use the thermal carafe if the glass inner part inside is broken. If the glass
inner part of the carafe is broken, pieces of glass can transfer to your cup.
■ In the interest of improving products, KRUPS reserves the right to change
specifications without prior notice.
■ A short power supply cord is provided to reduce the hazards resulting from
becoming entangled in or tripping over a long cord.
■ This appliance is not intended for use by persons (including children) with reduced
physical, sensory or mental capabilities, or lack of experience and knowledge, unless
they have been given supervision or instruction concerning use of the appliance by
a person responsible for their safety.
Children should be supervised to ensure that they do not play with the appliance.
KR_CAFETIERE_EC322_M1_NAFTA_NC00142207_01_Mise en page 1 24/11/2017 11:00 Page8

9
EN
■ Place the coffee maker on a hard flat surface.
■ Connect the power cord to a 120V wall socket.
1 - When you plug in the coffee maker for the first time, "1:00 pm" will start flashing on the display. Fig. 1.
Set the time by pressing the HR button
(r) to set the hour and the MIN button (s) to set the minutes.
The time will be displayed. It will be automatically set after about five seconds or if the BREW button
(k) is
pressed.
2 - You can also change or reset the time whenever you wish by pressing the CLOCK button (l) then adjusting
the time by pressing HR (r) for the hours and MIN (s) for the minutes. The time will be displayed. Fig. 2
and 3.
It will be automatically set after about five seconds or if the BREW button is pressed.
Note: Your clock is now programmed and will continue to display the time even when your appliance is on
standby.
If the appliance is disconnected or there is a power failure, the clock will default to 1:00 PM. Repeat the steps
above to program clock again.
■ Remove stickers from your coffee maker.
■ Before first use, run your coffee maker without coffee to flush the circuit. Fill the water tank up to the maximum
level and begin a cycle by pressing the BREW button (k).
IMPORTANT : Your appliance was designed to operate only with cold or room temperature water.
■ Open the lid of the coffee maker (b). Fig. 4.
■ Fill the carafe (g) with cold or room temperature water. Pour the water in the water tank (c) Fig. 5. The
water level indicator displays the number of cups. Do not exceed 14 cups. Fig. 6.
■ Place the carafe (g) with its lid on the warming plate (h) making sure that it is properly placed to trigger
the mechanism that will allow the coffee to flow. Fig. 7.
■ Make sure the filter holder (i) is inserted. Fig. 8. Place the permanent filter (j) in the filter holder (i) Fig. 9a
or a paper filter Fig. 9b. If you use a paper filter, be sure it is fully open and properly positioned in the filter
holder.
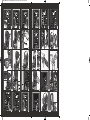
2. DESCRIPTION
a
Body of the appliance
b
Lid
c
Water tank
d
Water level indicator
e
Carafe lid
f
Carafe handle
g
Carafe
h
Warming plate
i
Filter holder
j
Permanent gold tone filter
k
BREW button
l
CLOCK button
m
BOLD button
n
1-4 CUPS button
o
CLEAN button
p
AUTO button
q
ON OFF button
r
HR button
s
MIN button
t
Filter cartridge holder*
u
Filter cartridge*
v
KEEP WARM button
w
Spoon
x
Replacement indicator of the filter cartridge*
3. SETTING THE CLOCK
4. BEFORE FIRST USE
5. MAKING COFFEE
*depending on the model
KR_CAFETIERE_EC322_M1_NAFTA_NC00142207_01_Mise en page 1 24/11/2017 11:00 Page9

10
■ Add 1 KRUPS (w) spoonful of ground coffee per cup. Do not exceed 14 spoons (2.5 ounces). Fig. 10.
■ If ground coffee has accidentally been poured into the water tank, please do not run the cycle; instead
clean the water tank. The ground coffee could plug the water circuit.
■ Close the lid (b).
■ Press the ON OFF button (Fig. 11) to turn on the coffee maker and then press BREW
(k) to start the
cycle. When the coffee maker begins the brew cycle, the BREW button will light, and the machine will beep
once. Fig. 12.
■ When the brew cycle ends, the coffee maker beeps 3 times, the 'keep warm' cycle automatically begins,
and the screen will display the time remaining before the 'keep warm' cycle ends. The BREW button (k)
flashes slowly.
■ After the default keep warm time of 4 hours your coffee maker beeps 3 times and the BREW button (k)
switches off.
■ At any time during the brew cycle, you may turn off the coffee maker by pressing the BREW button (k) or
ON OFF button. The light on the BREW button will also go out. It beeps 3 times prior to turning off.
Even if the brew cycle has ended, there is still hot liquid in the filter. Wait a few minutes for the rest of the
liquid to flow into the carafe before removing the filter.
Note :
- The amount of coffee in the carafe at the end of the cycle is less than the amount of water poured into the
water tank, since the ground coffee and the filter absorb about 10% of it.
- The water tank is equipped with an overflow outlet at the rear of the appliance. If you add too much water,
excess water will leak from this opening.
- Clean the permanent filter in between each use, or use a paper filter.
CAUTION:
- To avoid overflowing, the carafe should be properly placed on the warming plate of the coffee
maker, otherwise the hot water or hot coffee may overflow.
- The coffee maker becomes very hot during the brew cycle. Handle it carefully.
6A – AUTO START FUNCTION (AUTO)
Programming the auto-start settings.
■ Your appliance is equipped with one auto-start program.
■ Check whether the clock is set to the right time. If not, follow the instructions in the SETTING THE CLOCK
section.
■ Press the AUTO button
(p). An AUTO icon displays on screen. Fig. 13.
■ Set the time by pressing the HR button
(r) to set the hours and the MIN button (s) to set the minutes. The
time will be displayed. It will be automatically set after about five seconds. The time is displayed. Fig. 14 and
15.
Activate a delayed start-up when the time is already pre-set.
■ Select AUTO by pressing the AUTO button (p).
■ To cancel the AUTO setting, press the AUTO button (p) ONE time.
6B – REGULAR OR BOLD
■ This feature allows you to adjust the coffee intensity.
■ The BOLD feature increases the brew time of the cycle for a stronger coffee.
■ Press the BOLD button to select the intensity of your coffee. Fig. 16.
■ The REG or BOLD icon appears on screen.
■ The feature is stored in the memory for subsequent cycles.
6C – 1- 4 CUPS
■ To activate this feature, press the 1-4 button (n) before starting the cycle. Fig. 17.
■ The 1-4 icon will appear on the display.
■ This feature is especially designed for making small amounts of coffee, with optimal aroma and flavor.
6. OTHER FEATURES
KR_CAFETIERE_EC322_M1_NAFTA_NC00142207_01_Mise en page 1 24/11/2017 11:00 Page10

11
EN
6D – KEEP WARM TIME
■ The default keep warm duration on your appliance is 4 hours.
To set the keep warm duration:
■ If the keep warm function has already been activated, press KEEP WARM button (v) once to desactivate
it.
■ If the function is not activated, press the KEEP WARM button (v) and set the time by pressing the HR
button
(r) to set the hours and the MIN button (s) to set the minutes. The time will be automatically
confirmed after about three seconds so that the duration of the keep warm function can be selected.
Fig. 18 and 19.
■ KEEP WARM will appear on the screen and the duration is confirmed.
■ To cancel the keep warm function, press KEEP WARM button (v) and KEEP WARM will disappear from
the screen.
■ You can change the keep warm duration while it is in operation by pressing the HR button
(r) to set the
hours and the MIN button
(s) to set the minutes. The time will be automatically set after about three
seconds.
■ To dispose of used ground coffee, remove the filter and the filter holder from the coffee maker. Fig. 20a-b
and 21a-b.
■ Do not clean the coffee maker if it is still hot.
■ Wash the carafe, the removable filter holder and the permanent filter with warm, soapy water. You may place
the carafe in the dishwasher.
CAUTION: Do not place the carafe in the microwave.
Do not put other parts of the coffee maker into the dishwasher.
■ Clean the coffee maker with a damp cloth or sponge. Never use abrasive or strong products on any part
of the coffee maker.
■ To clean the stainless steel parts of your coffee maker, dampen a soft cloth or sponge with warm water.
Wipe carefully with a dry cloth.
■ For difficult stains, use a cloth with white vinegar.
■ Do not immerse the appliance in water or under the tap.
■ Why descale
- Limestone forms naturally in your coffee maker. Descaling preserves the coffee maker and ensures it will last
longer and provide quality coffee over time. Limestone can permanently affect the machine's performance.
Malfunctions associated with scaling will not be covered by the warranty if the product is returned.
■ When to descale
- When descaling is necessary, the CLEAN icon will appear on screen.
- However, the descaling frequency depends on the hardness of the water and the number of brew cycles. It
may be necessary to descale your coffee machine if you notice the following signs, even if the CLEAN
message does not appear on the screen : longer cycle time, excessive steaming, more noise at the end of
the cycle, stopping mid-cycle ; this means that your machine needs to be descaled.
- Descaling should be done about once a month, depending on the hardness of the water.
How to descale your KRUPS coffee maker
■ Remove the filter cartridge. Fig. 22*.
■ Use the KRUPS descaling solution
®
or 5 fl. oz of white vinegar diluted in 17 fl.oz of cold or water at room
temperature (or 1.5 oz of citric acid diluted in 17 fl. oz) until the crystals have completely dissolved. Fig. 23.
■ Pour the solution into the water tank (without coffee). Fig. 24.
■ Press the CLEAN button (o) and then the BREW button (k) to start the descaling cycle. Fig. 25.
■ The cycle lasts for 30 min.
7. CLEANING
8. DESCALING
KR_CAFETIERE_EC322_M1_NAFTA_NC00142207_01_Mise en page 1 24/11/2017 11:00 Page11

12
■ Please wait until the end of the cycle.
■ If the water tank is not empty, please launch another descaling cycle by pressing CLEAN button (o).
■ To rinse the machine, run 2 full 12 cups cycles with water but without coffee. Fig. 26.
■ Repeat the operation if needed.
■ Replace the filter cartridge. Fig. 30* and 31*.
■ The warranty does not cover coffee makers that do not work, or do so poorly, due to lack of
descaling.
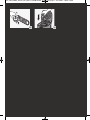
DUO FILTER CARTRIDGE*
■ Your coffee maker filters water using a DuoFilter: a double action filter – reduces chlorine and scaling –
formulated with active plant ingredients. This Duo Filter allows you to enjoy the most delicate aromas of
your coffee and reduces the need to descale.
■ In its upper part, the filter cartridge support is equipped with an indicator for replacement of the cartridge.
■ Select the number of the month when you replaced the filter. It will display the month when you should
change your filter according to water hardness. Fig. 29*.
■ To change the filter, remove the DuoFilter from the tank. Fig. 28*.
■ Open it by unlatching and opening the lower part and replacing it. Fig. 30*.
IMPORTANT :
The DuoFilter filter must only be used with water.
Your coffee maker operates even if the water filter is not installed.
If you have not used your coffee machine for over a month, rinse the DuoFilter filter under
running water.
It is recommended not to leave the DuoFilter water filter in place for over 5 months.
The DuoFilter may need to be replaced if water flow is slow, machine releases excessive steam,
or machine makes loud noises when brewing.
*depending on the model
KR_CAFETIERE_EC322_M1_NAFTA_NC00142207_01_Mise en page 1 24/11/2017 11:00 Page12

13
EN
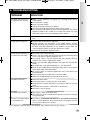
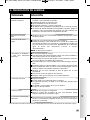
If your appliance does not always work properly, call customer service in your country.
PROBLEM SOLUTION
The coffee does not brew or
the appliance does not turn
on.
■ Make sure the appliance is plugged into a working outlet and the
screen flashes.
■ The water tank is empty.
■ There is a power outage.
■ Unplug the machine, then plug it back in.
■ The clock should be reprogrammed after a power outage.
■ The automatic stop feature has turned off the appliance. Turn off the
appliance and then turn it back on to make more coffee. For more
information, please consult the "Making Coffee" section.
The appliance seems to leak.
■ Make sure the water tank has not been filled beyond the maximum
limit.
Brewing takes a long time.
■ It may be time to descale the appliance.
■ Several minerals can accumulate in the coffee maker's circuitry.
Regular descaling of the machine is recommended. This may need to
be done more often depending on the hardness of your water. For
more information, please consult the "Descaling" section.
CAUTION: do not take the appliance apart.
The filter basket overflows or
the coffee flows too slowly.
■ The coffee maker needs cleaning.
■ There is too much coffee. We recommend using one measuring spoon
or one soup spoon of ground coffee per cup.
■ The ground coffee is too fine (Please note that: ground coffee for
espresso won't work in a drip coffee maker).
■ There is ground coffee lodged between the paper filter and the filter
holder.
■ The paper filter is not opened properly or is not well placed.
■ Rinse the filter holder before inserting the paper filter so it will adhere
to the damp walls of the filter basket.
■ Be sure you have not inserted a paper filter at the same time as the
permanent filter.
■ There is more than one paper filter in the filter holder.
■ Make sure the filter basket is pushed down all the way.
The coffee tastes bad.
■ Clean the coffee maker.
■ The ground coffee is not right for your coffee maker.
■ The proportion of coffee and water is not sufficient. Adjust to suit your
taste.
■ The quality and freshness of the coffee is not the best.
■ The water is of poor quality.
The coffee does not flow.
■ See if there is water in the water tank.
■ The coffee flow system may be obstructed. You may clean it simply by
rinsing with water.
The time is not correct (there
is a time difference).
■ The timer is synchronized and depends on your electrical network. If
there is a time difference, we recommend that you program the time
once a week to be sure it is correct.
9. TROUBLESHOOTING
KR_CAFETIERE_EC322_M1_NAFTA_NC00142207_01_Mise en page 1 24/11/2017 11:00 Page13

14
: www.krups.com
This product is repairable by KRUPS during and after the warranty period.
Accessories, consumables and end-user replaceable parts can be purchased, if locally
available, as described on the KRUPS internet site www.krups.com.
The Warranty
This product is guaranteed by KRUPS (company address and details included in the country
list of the KRUPS International Warranty) against any manufacturing defect in materials or
workmanship for a period of 2 years starting from the initial date of purchase.
The international manufacturer's warranty by KRUPS is an extra benefit which does not affect
consumer's Statutory Rights.
The international manufacturer’s warranty covers all costs related to restoring the proven
defective product so that it conforms to its original specifications, through the repair or
replacement of any defective part and the necessary labor. At KRUPS’s choice, a replacement
product may be provided instead of repairing a defective product. KRUPS’s sole obligation
and your exclusive resolution under this warranty are limited to such repair or replacement.
Conditions & Exclusions
The international KRUPS warranty only applies within the warranty period and for those
countries listed in the Country List attached and is valid only on presentation of a proof of
purchase. The product can be taken directly in person to an authorized service center or must
be adequately packaged and returned, by recorded delivery (or equivalent method of
postage), to a KRUPS authorized service center. Full address details for each country’s
authorized service centers are listed on KRUPS website (www.krups.com) or by calling the
appropriate telephone number as set out in the Country List to request the appropriate postal
address.
KRUPS shall not be obliged to repair or replace any product which is not accompanied by a
valid proof of purchase.
This warranty will not cover any damage which could occur as a result of misuse, negligence,
failure to follow KRUPS instructions, use on current or voltage other than as stamped on the
product, or a modification or unauthorized repair of the product. It also does not cover normal
wear and tear, maintenance or replacement of consumable parts, or the following:
- using the wrong type of water or consumable
- ingress of water, dust or insects into the product
- scaling (any de-scaling must be carried out according to the instructions for use)
- mechanical damages, overloading
- damages or bad results due to wrong voltage or frequency
- accidents including fire, flood, thunderbolt, etc
- professional or commercial use
- damage to any glass or porcelain ware in the product
KRUPS INTERNATIONAL LIMITED WARRANTY
KR_CAFETIERE_EC322_M1_NAFTA_NC00142207_01_Mise en page 1 24/11/2017 11:00 Page14

15
EN
This warranty does not apply to any product that has been tampered with, or to damages
incurred through improper use and care, faulty packaging by the owner or mishandling by
any carrier.
The international KRUPS warranty applies only for products purchased in one of the countries
listed, and
used for domestic purposes only in one of the countries listed on the Country List.
Where a product purchased in one listed country and
then used in another listed country:
a) The international KRUPS warranty does not apply in case of non conformity of the
purchased product with the local standards, such as voltage, frequency, power plugs,
or other local technical specifications.
b) The repair process for products purchased outside the country of use may require a
longer time if the product is not locally sold by KRUPS.
c) In cases where the product is not repairable in the new country, the international KRUPS
warranty is limited to a replacement by a similar product or an alternative product at
similar cost, where possible.
Consumer Statutory Rights
This international KRUPS warranty does not affect the statutory rights a consumer may have
or those rights that cannot be excluded or limited, nor rights against the retailer from which
the consumer purchased the product. This warranty gives a consumer specific legal rights,
and the consumer may also have other legal rights which vary from State to State or Country
to Country. The consumer may assert any such rights at his sole discretion.
KR_CAFETIERE_EC322_M1_NAFTA_NC00142207_01_Mise en page 1 24/11/2017 11:00 Page15

16
PAGE
1. CONSIGNES IMPORTANTES DE SÉCURITÉ
. . . . . . . . . . . . . . . . . . . . . . . . . . . . . . . . . . . . . . . . 17
2. DESCRIPTION
. . . . . . . . . . . . . . . . . . . . . . . . . . . . . . . . . . . . . . . . . . . . . . . . . . . . . . . . . . . . . . . . . . . . . . . . . . . . . 19
3. PROGRAMMATION DE L’HORLOGE
. . . . . . . . . . . . . . . . . . . . . . . . . . . . . . . . . . . . . . . . . . . . . . . . . . 19
4. AVANT LA PREMIÈRE UTILISATION
. . . . . . . . . . . . . . . . . . . . . . . . . . . . . . . . . . . . . . . . . . . . . . . . . . 19
5. PRÉPARATION DU CAFÉ
. . . . . . . . . . . . . . . . . . . . . . . . . . . . . . . . . . . . . . . . . . . . . . . . . . . . . . . . . . . . . . . 20
6. AUTRES FONCTIONS
. . . . . . . . . . . . . . . . . . . . . . . . . . . . . . . . . . . . . . . . . . . . . . . . . . . . . . . . . . . . . . . . . . . 20
6A DÉPART DIFFÉRÉ
6B REGULAR OU BOLD
6C 1-4 TASSES
6D MAINTIEN AU CHAUD
7. NETTOYAGE
. . . . . . . . . . . . . . . . . . . . . . . . . . . . . . . . . . . . . . . . . . . . . . . . . . . . . . . . . . . . . . . . . . . . . . . . . . . . . . . 21
8. DÉTARTRAGE
. . . . . . . . . . . . . . . . . . . . . . . . . . . . . . . . . . . . . . . . . . . . . . . . . . . . . . . . . . . . . . . . . . . . . . . . . . . . . 22
9. DÉPANNAGE
. . . . . . . . . . . . . . . . . . . . . . . . . . . . . . . . . . . . . . . . . . . . . . . . . . . . . . . . . . . . . . . . . . . . . . . . . . . . . . . 23
10. GARANTIE DU FABRICANT
. . . . . . . . . . . . . . . . . . . . . . . . . . . . . . . . . . . . . . . . . . . . . . . . . . . . . . . . . . . . . 24
TABLE DES MATIÈRES
KR_CAFETIERE_EC322_M1_NAFTA_NC00142207_01_Mise en page 1 24/11/2017 11:00 Page16

17
FR
1. CONSIGNES IMPORTANTES
DE SÉCURITÉ
Lorsque vous utilisez un appareil électrique, des consignes de sécurité
élémentaires doivent toujours être observées pour réduire les risques de feu, de
décharge électrique et de blessures, y compris les suivantes :
■ Lire le mode d’emploi entier.
■ Ne pas toucher les surfaces chaudes; utiliser les poignées ou les boutons.
■ Pour se protéger des incendies, des décharges électriques et des blessures, ne pas
immerger la machine dans l’eau ni dans tout autre liquide.
■ Il convient de surveiller les enfants étroitement lorsque l’appareil est utilisé par des
enfants ou à proximité d’eux.
■ Débrancher l’appareil de la prise murale lorsqu’il n’est pas utilisé ou pour le nettoyer.
Laisser l’appareil refroidir avant d’ajouter ou d’enlever des pièces.
■ Ne pas utiliser un appareil électrique ayant un cordon d’alimentation ou une prise
endommagé, quand l’appareil fonctionne mal, ou s’il a été endommagé de quelque
manière que ce soit. Retourner tout appareil défectueux au centre de service agréé
le plus près afin qu’il soit examiné, réglé ou réparé.
■ L’utilisation d’accessoires non recommandés ni vendus par le fabricant peut causer
des feux, des décharges électriques ou des blessures.
■ Ne pas utiliser à l’extérieur.
■ Le cordon ne doit pas pendre de la table ou du comptoir, ni toucher à des surfaces
chaudes.
■ Ne pas placer l’appareil sur ou près d’un brûleur au gaz ou électrique, ni dans un
four chaud.
■ Toujours brancher le cordon à l’appareil en premier, puis sur la prise murale.
Pour débrancher, tourner le bouton de commande à la position « OFF » puis retirer
la fiche de la prise murale.
■ Ne pas utiliser l’appareil pour une autre fonction que celle pour laquelle il a été conçu.
■ La verseuse est conçue pour être utilisée avec cet appareil; ne jamais l’utiliser sur
une cuisinière.
■ Ne pas déposer une verseuse chaude sur une surface froide ou humide.
■ Ne pas utiliser un récipient fêlé ou qui présente une faiblesse à la poignée.
■ Ne pas nettoyer la verseuse avec des nettoyants, des éponges métalliques ni avec
tout autre produit abrasif.
■ Le retrait du couvercle pendant les cycles d’infusion peut causer des blessures.
CONSERVER CES INSTRUCTIONS
ATTENTION
Cet appareil est conçu pour une utilisation domestique seulement. Tout entretien autre
que le nettoyage et l’entretien normal de l’appareil par son propriétaire doit être effectué
par un centre de service agréé de Krups uniquement. Visitez notre site Web
www.krups.ca
au Canada ou communiquez avec le service à la clientèle pour connaître
le centre de service le plus près de chez vous. Afin de réduire les risques de feu et de
décharge électrique, ne pas démonter la base de l’appareil. Toute réparation doit être
effectuée par un centre de service agréé de Krups uniquement.
KR_CAFETIERE_EC322_M1_NAFTA_NC00142207_01_Mise en page 1 24/11/2017 11:00 Page17

18
INSTRUCTIONS POUR LE CORDON COURT
A. Un cordon d’alimentation court ou amovible est fourni avec l’appareil pour éviter
qu’il ne s’emmêle ou ne fasse trébucher quelqu’un.
B. Des rallonges et des cordons plus longs peuvent être utilisés, mais l’utilisateur doit
prendre les précautions nécessaires.
C. Si vous utilisez une rallonge ou un cordon d’alimentation plus long :
1) Le calibre spécifié sur le cordon ou la rallonge doit être égal ou supérieur à
celui indiqué sur l’appareil.
2) Si l’appareil est mis à la terre, le cordon ou la rallonge doit être du type mis à
la terre (à 3 fils).
3) Le cordon d’alimentation doit être placé de façon qu’il ne pende pas du plan
de travail ou du haut de la table, car un enfant pourrait tirer dessus ou trébucher
accidentellement. L’appareil peut être équipé d’une prise polarisée (une lame
est plus large que l’autre). Pour réduire les risques de décharges électriques,
cette fiche ne peut se brancher que dans un sens. Si la fiche ne rentre pas
correctement dans la prise murale, mettez-la dans l’autre sens. Si elle ne rentre
toujours pas, contactez un électricien. N’essayez en aucune façon de modifier
la prise.
CONSIGNES DE SÉCURITÉ
SUPPLÉMENTAIRES
■ Votre machine a été conçue pour un usage domestique seulement.
■ Il n’a pas été conçu pour être utilisé dans les cas suivants qui ne sont pas couverts
par la garantie: dans des coins de cuisines réservés au personnel dans des
magasins, bureaux et autres environnements professionnels; dans des fermes; Par
les clients des hôtels, motels et autres environnements à caractère résidentiel; dans
des environnements de type chambres d’hôtes.
■ Cet appareil n’est pas conçu pour être utilisé par des enfants et des personnes ne
possédant pas de connaissances ou d’expérience quant au produit, à moins qu’une
personne responsable de leur sécurité ne les supervise ou ne leur donne des
instructions préalables.
■ Tout contact avec la base, de l’eau chaude ou de la vapeur peut provoquer des
brûlures. Faites preuve de prudence.
■ Tout appareil est soumis à un contrôle de qualité très strict qui comprend des tests
d’utilisation réelle sur des appareils sélectionnés au hasard, ce qui expliquerait toute
trace légère d’usage ou résidus de café avant l’utilisation.
■ Ne pas verser de liquides dans le réservoir d’eau autres que de l’eau ou les solutions
de détartrage spécifiées dans ce guide.
■ Protéger l’appareil contre l’humidité et la congélation.
■ Ne pas verser de l’eau dans l’appareil s’il est encore chaud.
■ Toujours installer votre cafetière sur un plan de travail plat, stable et résistant à la
chaleur, loin des éclaboussements d’eau et de toute source externe de chaleur.
■ Ne jamais mettre votre verseuse ou votre cafetière isolée dans un four à micro-
ondes, au lave-vaisselle ou sur une cuisinière.
■ Ne jamais mettre votre main à l’intérieur de la cafetière isolée.
■ Ne pas utiliser la verseuse ou la cafetière isolée sans le couvercle.
KR_CAFETIERE_EC322_M1_NAFTA_NC00142207_01_Mise en page 1 24/11/2017 11:00 Page18

19
FR
■ Posez la cafetière sur une surface dure et plane.
■ Branchez le cordon d’alimentation sur la prise murale de 120V.
1- Lorsque vous branchez la cafetière pour la première fois, « 1:00 pm » paraît et clignote à l’écran. Fig. 1.
Programmez l’heure en appuyant sur la touche HR (r) pour les heures et MIN (s) pour les minutes.
L’heure paraît. Elle est validée automatiquement au bout d'environ 5 secondes ou en appuyant sur la touche
BREW (k).
2- Vous pouvez aussi modifier ou programmer à nouveau l'heure lorsque vous le souhaitez en appuyant sur la
touche CLOCK (l) puis réglez l’heure en appuyant sur la touche HR (r) pour les heures et MIN (s) pour
les minutes. L’heure paraît. Fig. 2 et 3.
Elle est validée automatiquement au bout d'environ 5 secondes ou en appuyant sur la touche BREW.
Note : Votre horloge est maintenant programmée et continuera d’afficher l’heure courante même lorsque
votre appareil est en veille.
Si l’appareil est débranché ou en cas de panne de courant, l’horloge reviendra à 1:00 PM. Il faut répéter les
instructions ci-dessus pour programmer de nouveau l’horloge.
■ Retirez les autocollants de la machine.
■ Avant la première utilisation, faites fonctionner votre cafetière sans café pour rincer le circuit. Remplissez le
réservoir d’eau jusqu’au niveau max et lancez un cycle en appuyant sur le bouton BREW (k).
IMPORTANT : Votre appareil a été conçu pour fonctionner seulement avec de l’eau froide ou tempérée.
2. DESCRIPTION
a
Corps de l’appareil
b
Couvercle
c
Réservoir d’eau
d
Indicateur de niveau d’eau
e
Couvercle de la carafe
f
Poignée de la carafe
g
Carafe
h
Plaque chauffante
i
Porte-filtre
j
Filtre permanent (éviter de prendre des filtres
papier)
k
Touche BREW
l
Touche CLOCK
m
Touche BOLD
n
Touche 1-4 tasses
o
Touche CLEAN
p
Touche AUTO
q
Touche ON OFF
r
Touche HR
s
Touche MIN
t
Support cartouche filtrante*
u
Cartouche filtrante*
v
Touche KEEP WARM
w
Cuillère
x
Indicateur de remplacement de la cartouche
filtrante*
3. PROGRAMMATION DE L’HORLOGE
4. AVANT LA PREMIÈRE UTILISATION
■ Ne pas utiliser la verseuse isotherme si la partie intérieure en verre est cassée, car
des morceaux de verre pourraient être transférés dans votre tasse.
■ Dans l’intérêt d’améliorer ses produits, Krups se réserve le droit de modifier les
caractéristiques sans avis préalable.
■ Un cordon électrique court est fourni afin de réduire les risques d’emmêlement et
de trébuchement accidentel liés à l’utilisation d’un plus long cordon.
■ Cet appareil n’est pas prévu pour être utilisé par des personnes (y compris les
enfants) dont les capacités physiques, sensorielles ou mentales sont réduites ou
des personnes dénuées d’expérience ou de connaissance, sauf si elles ont pu
bénéficier, par l’intermédiaire d’une personne responsable de leur sécurité, d’une
surveillance ou d’instructions préalables concernant l’utilisation de l’appareil.
Il convient de surveiller les enfants pour s’assurer qu’ils ne jouent pas avec l’appareil.
* selon modèle
KR_CAFETIERE_EC322_M1_NAFTA_NC00142207_01_Mise en page 1 24/11/2017 11:00 Page19

20
■ Soulevez le couvercle de la cafetière (b). Fig. 4.
■ Remplissez la carafe (g) d'eau froide ou tempérée. Versez l’eau dans le réservoir d’eau (c) Fig. 5.
L’indicateur de niveau d’eau affiche le nombre de tasses. Ne dépassez pas 14 tasses. Fig. 6.
■ Mettez la carafe (g) avec son couvercle sur la plaque chauffante (h) en vous assurant qu’elle est bien
placée pour activer le mécanisme permettant au café de s’écouler. Fig. 7.
■ Il est préférable de retirer le porte-filtre avec le filtre avant d’y ajouter la mouture. Si de la mouture devait
être versée par mégarde dans le réservoir, veuillez ne pas lancer le cycle et nettoyez le réservoir.
La mouture risque en effet de boucher le circuit d’eau.
■ Ajoutez 1 cuillerée KRUPS (w) de mouture par tasse. Ne pas dépasser 14 cuillerées (2.5 onces). Fig. 10.
■ Assurez-vous que le porte-filtre (i) est inséré. Fig. 8. Mettez le filtre permanent (j) dans le porte-filtre (i) ou
un filtre papier. Si vous utilisez un filtre papier, assurez vous qu’il est bien ouvert et bien en place dans le
porte-filtre. Fig. 9a et 9b.
■ Fermez le couvercle (b).
■ Appuyez sur la touche ON OFF Fig. 11 pour mettre la cafetière en marche puis BREW (k) pour lancer le
cycle. La touche s’illumine pour indiquer que la cafetière a démarré le cycle d’infusion. Elle émet un bip.
Fig. 12.
■ Lorsque le cycle d’infusion est terminé, la cafetière émet 3 bips et la fonction maintien au chaud se met en
marche automatiquement (le décompte du temps de maintien au chaud s'affiche à l'écran). La touche
BREW (k) clignote lentement.
■ À la fin, votre appareil émet 3 bips et la touche BREW (k) s’éteint.
■ À tout moment pendant le cycle d’infusion, vous pouvez éteindre la cafetière en appuyant simplement sur
la touche BREW (k) ou ON OFF . La lumière du bouton BREW s’éteindra également. Elle émet 3 bips.
Même si le cycle d’infusion est terminé, il reste du liquide chaud dans le filtre. Attendez quelques minutes
pour que le reste du liquide s’écoule dans la carafe avant de retirer le filtre.
Note :
- La quantité de café dans la carafe à la fin du cycle est inférieure à la quantité d’eau versée dans le réservoir
puisque la mouture et le filtre en absorbent environ 10 %.
- Le réservoir est muni d’un orifice de trop-plein à l’arrière de l’appareil. Si vous ajoutez trop d’eau, elle fuira
par cet orifice.
- Nettoyez le filtre permanent entre chaque utilisation ou utilisez un nouveau filtre papier.
ATTENTION :
- Pour éviter tout débordement, la carafe doit être bien placée sur la plaque chauffante de la
cafetière, sinon il pourrait y avoir un débordement d’eau chaude ou de café chaud.
- La cafetière devient très chaude pendant le cycle d’infusion. Veuillez la manipuler avec
précaution.
6A – DÉPART DIFFÉRÉ (AUTO)
Réglage de l’heure du départ différé.
■ Votre appareil compte un programme de départ différé.
■ Assurez-vous que l’horloge est à la bonne heure. Si ce n’est pas le cas, suivez les instructions à la section
PROGRAMMATION DE L’HORLOGE.
■ Appuyez sur la touche AUTO (p). Une icône AUTO paraît à l’écran. Fig. 13.
■ Programmez l’heure en appuyant sur la touche HR (r) pour les heures et MIN (s) pour les minutes. L’heure
paraît. Elle est validée automatiquement au bout de environ 5 secondes. L’heure paraît. Fig. 14 et 15.
Mettez en marche un départ différé dont l’heure est déjà réglée.
■ Sélectionnez AUTO en appuyant sur le bouton AUTO (p).
■ Pour annuler la programmation AUTO, appuyez sur la touche AUTO
(p).
6. AUTRES FONCTIONS
5. PRÉPARATION DU CAFÉ
KR_CAFETIERE_EC322_M1_NAFTA_NC00142207_01_Mise en page 1 24/11/2017 11:00 Page20

21
FR
6B – REGULAR OU BOLD
■ Cette fonction vous permet de préparer un café plus ou moins corsé.
■ La fonction BOLD augmente le temps du cycle pour rendre un café plus intense.
■ Appuyez sur la touche BOLD pour sélectionner l’intensité de votre café. Fig. 16.
■ L’icône REG ou BOLD apparaît à l’écran.
■ La fonction est gardée en mémoire pour les cycles suivants.
6C – 1- 4 TASSES
■ Pour activer cette fonction, appuyez sur la touche 1-4 (n) avant de démarrer le cycle. Fig. 17.
■ L’icône 1-4 apparaît à l’écran.
■ Cette fonction est spécialement conçue pour la préparation de petites quantités de café, de 2 à 4 tasses.
Elle améliore l’extraction d’arômes.
6D – MAINTIEN AU CHAUD
DURÉE
■ Par défaut, le maintien au chaud de votre appareil est réglé à 4 heures.
Pour programmer le temps de maintien au chaud :
■ Si la fonction maintien au chaud est déjà activée, appuyez une première fois sur la touche KEEP WARM
(v) pour désactiver cette fonction.
■ Si la fonction n’est pas activée, appuyez sur la touche KEEP WARM (v) et Programmez l’heure en
appuyant sur la touche HR (r) pour les heures et MIN (s) pour les minutes. Elle est validée
automatiquement au bout d'environ 3 secondes pour sélectionner la durée de maintien au chaud. Fig. 18
et 19.
■ KEEP WARM paraît à l’écran et le réglage est pris en compte.
■ Pour annuler le maintien au chaud, appuyez à nouveau sur la touche KEEP WARM (v) et cette mention
disparaîtra de l’écran.
■ Vous pouvez changez la durée de maintien au chaud pendant qu’il est en marche en appuyant sur la touche
HR (r) pour les heures et MIN (s) pour les minutes. Elle est validée automatiquement au bout de environ
3 secondes.
■ Pour enlever la mouture usagée, retirez le filtre et le porte-filtre de la cafetière. Fig 20a-b et 21a-b.
■ Ne nettoyez pas l’appareil s’il est encore chaud.
■ Lavez la carafe, le porte-filtre amovible et le filtre permanent à l’eau chaude savonneuse. Vous pouvez
mettre la carafe dans le lave-vaisselle.
ATTENTION : Ne mettez pas la carafe au micro-ondes.
Ne mettez pas les autres pièces de la cafetière au lave-vaisselle.
■ Nettoyez la cafetière à l’aide d’un chiffon doux ou d’une éponge humide. N’utilisez jamais de produits
abrasifs ou puissants sur n’importe quelle pièce de votre cafetière.
■ Pour nettoyer les pièces en acier inoxydable de votre cafetière, humidifiez un chiffon doux ou une éponge
à l’eau chaude. Essuyez-les bien à l’aide d’un chiffon sec.
■ Pour les taches difficiles, utilisez un chiffon avec du vinaigre blanc.
■ N’immergez pas l’appareil dans l’eau ou sous le robinet.
■ Pourquoi détartrer
- Le calcaire se dépose naturellement dans votre cafetière. Le détartrage préserve la cafetière et en assure
une plus longue durée de vie et assure une qualité de café constante dans le temps. Le calcaire risque
d'altérer de façon définitive le rendement de l'appareil. Les défauts de fonctionnement liés à l’entartrage ne
seront pas pris sous garantie en cas de retour du produit.
7. NETTOYAGE
8. DÉTARTRAGE
KR_CAFETIERE_EC322_M1_NAFTA_NC00142207_01_Mise en page 1 24/11/2017 11:00 Page21

22
■ Quand détartrer
- Lorsque le détartrage est nécessaire, votre machine vous l’indique et l’icône CLEAN apparait à l’écran.
- Cependant la fréquence du détartrage dépend de la dureté de l’eau et du nombre de cycles d'infusion. Il
peut-être nécessaire de détartrer sa cafetière lorsque l’on rencontre les signes suivants même si le message
CLEAN n’apparaît pas à l’écran : temps de cycle rallongé, beaucoup de vapeur, niveau de bruit élevé en fin
de cycle, arrêt en cours de cycle, cela signifie que votre machine est entartrée.
- Le détartrage de la cafetière doit être fait environ une fois par mois selon la dureté de l'eau.
Comment détartrer votre cafetière KRUPS
■ Retirez la cartouche filtrante. Fig. 22*.
■ Utilisez la solution de détartrage KRUPS
®
ou 150 ml de vinaigre blanc dilué dans un demi-litre d'eau froide
ou tempérée ou bien 40 g d'acide citrique dilué dans un demi-litre d'eau jusqu'à dissolution complète des
cristaux. Fig. 23.
■ Versez la solution dans le réservoir d’eau (sans café). Fig. 24.
■ Appuyez sur la touche CLEAN (o) puis sur le bouton BREW (k) pour lancer le cycle de détartrage. Fig. 25.
■ Ce cycle dure 30 min.
■ Veuillez patienter jusqu’à la fin du cycle.
■ Si le réservoir d'eau n'est pas vidé à la fin du cycle de détartrage, relancez un autre cycle en appuyant sur
le bouton CLEAN (o).
■ Afin de rincer la machine, lancez 2 cycles complets de 12 tasses avec l'eau, mais sans café. Fig. 26.
■ Répétez l'opération au besoin.
■ Remettez la cartouche filtrante en place. Fig. 30* et 31*.
■ La garantie exclut les cafetières ne fonctionnant pas ou mal en raison d'un manque de
détartrage.
CARTOUCHE DUO FILTER*
■ Votre appareil vous permet de filtrer l’eau avec les filtres DuoFilter : filtre double action – réduction du
chlore et du tartre – à base de végétaux actifs. La cartouche Duo Filter vous permet de profiter des arômes
les plus délicats de votre café et réduit la fréquence des détartrages.
■ Dans sa partie supérieure, le support cartouche filtrante est muni d’un indicateur de remplacement de la
cartouche.
■ Sélectionnez le numéro du mois lorsque vous remplacez le filtre. Il indiquera le mois auquel vous devez
changer votre filtre selon la dureté de l’eau. Fig. 29*.
■ Pour changer le filtre, retirez le DuoFilter du réservoir. Fig. 28*.
■ Ouvrez-le en déverrouillant et en ouvrant la partie inférieure, puis remplacez-le. Fig. 30*.
IMPORTANT :
Le filtre DuoFilter ne doit être utilisé qu’avec de l’eau.
Votre cafetière fonctionne même si le filtre à eau n’est pas installé.
Si vous n'avez pas utilisé votre cafetière pendant plus d’un mois, rincez le filtre DuoFilter à l’eau
courante.
Il est recommandé de ne pas laisser votre filtre DuoFilter sans le remplacer pendant plus de 5 mois.
* selon modèle
KR_CAFETIERE_EC322_M1_NAFTA_NC00142207_01_Mise en page 1 24/11/2017 11:00 Page22
La page est en cours de chargement...
La page est en cours de chargement...
La page est en cours de chargement...
La page est en cours de chargement...
La page est en cours de chargement...
La page est en cours de chargement...
La page est en cours de chargement...
La page est en cours de chargement...
La page est en cours de chargement...
La page est en cours de chargement...
La page est en cours de chargement...
La page est en cours de chargement...
La page est en cours de chargement...
-
 1
1
-
 2
2
-
 3
3
-
 4
4
-
 5
5
-
 6
6
-
 7
7
-
 8
8
-
 9
9
-
 10
10
-
 11
11
-
 12
12
-
 13
13
-
 14
14
-
 15
15
-
 16
16
-
 17
17
-
 18
18
-
 19
19
-
 20
20
-
 21
21
-
 22
22
-
 23
23
-
 24
24
-
 25
25
-
 26
26
-
 27
27
-
 28
28
-
 29
29
-
 30
30
-
 31
31
-
 32
32
-
 33
33


Krups EC322050 Manuel utilisateur
- Catégorie
- Cafetières
- Taper
- Manuel utilisateur
dans d''autres langues
- English: Krups EC322050 User manual
- español: Krups EC322050 Manual de usuario
Documents connexes
-
Krups EC415050 Manuel utilisateur
-
-
-
-
-
-
-
Krups 7211002500 Manuel utilisateur
-
-