
3-047-938-21 (1)
IC Recorder
Operating Instructions
Mode d’emploi
2000 Sony Corporation
ICD-37/57/67
GB
FR

2
GB

3
GB
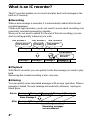
Table of Contents
What is an IC recorder? ................................................................................ 4
Features .......................................................................................................... 5
Getting Started
Step 1: Installing the Battery ........................................................................ 6
Step 2: Setting the Clock............................................................................... 8
Basic Operations
Recording Messages ................................................................................... 10
Playing Back Messages............................................................................... 13
Erasing Messages ........................................................................................ 16
Advanced Operations
Moving Messages to a Different File — Move Function ....................... 18
Adjusting the Playback Speed .................................................................. 19
Adding a Recording to a Previously Recorded Message ...................... 20
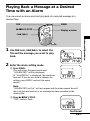
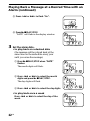
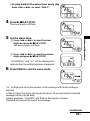
Playing Back a Message at a Desired Time with an Alarm................... 21
Preventing Accidental Operation — HOLD function ........................... 25
Menu Settings
Turning off the Beep Sound ....................................................................... 26
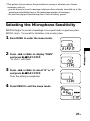
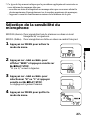
Selecting the Microphone Sensitivity....................................................... 27
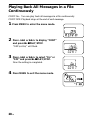
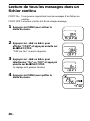
Playing Back All Messages in a File Continuously ................................ 28
Additional Information
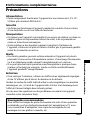
Precautions................................................................................................... 29
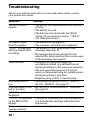
Troubleshooting .......................................................................................... 30
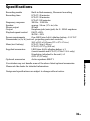
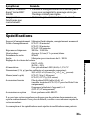
Specifications ............................................................................................... 31
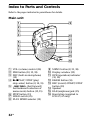
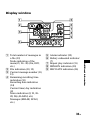
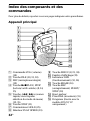
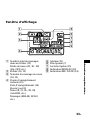
Index to Parts and Controls ....................................................................... 32
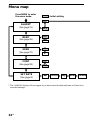
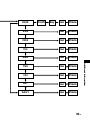
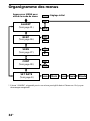
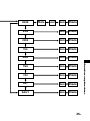
Menu map .................................................................................................... 34
Index ............................................................................................................. 36
Notes
• The illustrations in this manual are those of ICD-57.
• The display in the display window may be different from the illustrations in
the manual depending on the models or operating conditions.
GB

4
GB
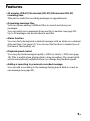
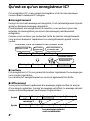
What is an IC recorder?
This IC recorder enables you to record and play back oral messages in the
built-in IC memory.
z Recording
When a new message is recorded, it is automatically added after the last
recorded messages.
Unlike with tape recorders, you do not need to worry about recording over
previously recorded messages by mistake.
Since you do not need to search for the end of the last recording, you can
start recording quickly whenever you wish.
z Playback
With this IC recorder, you can quickly locate the message you want to play
back.
Reviewing the current recording is also very easy.
z Erasing
You can quickly erase unwanted messages with an easy operation. When a
message is erased, the next message automatically advances, leaving no
blank space.
Meet Mr. Brown at
2 p.m. tomorrow.
11:30, November 1
12:00, November 1
10:00, November 2
Don’t forget
to call Mary
Make remittance
at ABC bank
9:00, November 4
Send a card to
Miss Smith
Message 1 Message 2 Message 3
Message 1 Message 2 Message 3
Message 4
Remaining messages
are renumbered.
Message 1 Message 2 Message 5
Message 4Message 1 Message 2 Message 3
Message 3
Message 4
After
Before
Erase Message 3

5
GB
Features
•45 minutes (ICD-37)/90 minutes (ICD-57)/180 minutes (ICD-67)
recording time
This unit is useful for recording messages or appointments.
•Organizing message files
You can choose among 3 different files to record and store your
messages.
You can easily move messages from one file to another (see page 18).
Up to 99 messages can be recorded in each file.
•Alarm function
You can start playing back a desired message with an alarm on a desired
date and time (see page 21). You can use this function to remind you of
the time of the meeting, etc.
•Playback speed control
You can play back messages rapidly (+50%) or slowly (–25%) (see page
19). This is useful when playing back a long recording. The sound pitch
will be automatically adjusted when you change the playback speed.
•Adding a recording to previously recorded message
You can add a recording to the message being played back to count as
one message (see page 20).

6
GB
1
2
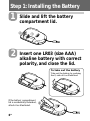
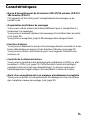
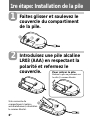
Slide and lift the battery
compartment lid.
Insert one LR03 (size AAA)
alkaline battery with correct
polarity, and close the lid.
If the battery compartment
lid is accidentally detached,
attach it as illustrated.
Step 1: Installing the Battery
1
2
1
2
To take out the battery
Take out the battery by pushing
the # side of it as illustrated.

7
GB
Getting Started
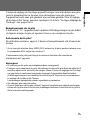
Clock setting display appears when you insert battery for the first time, or
when you insert battery after the unit has been without battery for a
certain period of time. Please refer to Steps 2 to 4 in “Step 2: Setting the
Clock” on pages 8 and 9 to set the date and time.
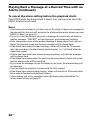
Replacing the battery
“E“ appears on the display when the battery becomes weak and it flashes
when the battery is exhausted. Replace the battery with a new one.
Battery life*
With continuous use, approx. 5 hours recording/4.5 hours playback
* Using Sony alkaline battery LR03 (SG), playing back through the internal
speaker with VOL control at around 3
The battery life may shorten depending on the operation of the unit.
Notes
• Do not use manganese batteries for this unit.
• When you replace the battery, insert the new one within 3 minutes after you
removed the exhausted one. Otherwise, the display may show the clock
setting display or incorrect date and time when you reinsert the battery. In this
case, set the date and time again.
The recorded messages, however, will remain.
• Do not charge a dry battery.
• When you are not going to use the unit for a long time, remove the battery to
prevent damage from battery leakage and corrosion.

8
GB
Clock setting display appears when you insert battery for the first time, or
when you insert battery after the unit has been without battery for a
certain period of time. In this case, proceed from Step 2.
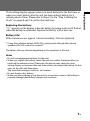
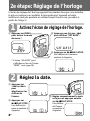
Display the clock setting display.
Set the date.
Step 2: Setting the Clock
1 Press MENU to enter
the menu mode.*
2 Press –. once to display
“SET DATE”.
3 Press NxPLAY/STOP.
The year digits will flash.
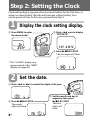
2 Press NxPLAY/STOP.
The month
digits will flash.
3 Set the month and day in
sequence, then press
NxPLAY/STOP.
The hour
digits will
flash.
1 Press –. or >+ to select the digits of the year.
1
2
* The “ALARM” display may
appear instead of the “BEEP”
display (see page 34).

9
GB
Getting Started
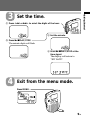
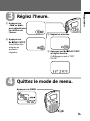
Set the time.
Exit from the menu mode.
Press MENU.
3
2 Press NxPLAY/STOP.
The minute digits will flash.
3 Set the minute.
4 Press NxPLAY/STOP at the
time signal.
The display will return to
“SET DATE”.
4
1 Press –. or >+ to select the digits of the hour.

10
GB
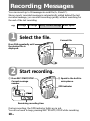
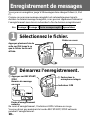
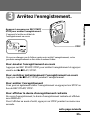
Recording Messages
You can record up to 99 messages in each file (A, B and C).
Since a newly recorded message is automatically added behind the last
recorded message, you can start recording quickly without searching for
the end of the last recording.
Select the file.
Start recording.
During recording, the OPR indicator lights up in red.
You do not need to keep pressing REC START/STOP while recording.
1
Press FILE repeatedly until
the desired file is
displayed.
Current file
1 Press REC START/STOP.
Current message
number
Remaining recording time
2 Speak to the built-in
microphone.
2
OPR indicator
Message 1 Message 2 Blank space
Newly recorded message
e.g.

11
GB
Basic Operations
Stop recording.
If you do not change the file after you stop recording, the next time you record
you will record in the same file.
To listen to the current recording
Press REC START/STOP to stop recording, then press NxPLAY/STOP.
To review the current recording instantly
Press NxPLAY/STOP during recording.
To stop recording
You can also stop recording by pressing STOP instead of REC START/
STOP.
To display the remaining recording time
During recording, the remaining recording time is displayed under
REMAIN.
To display it during stop, press STOP for more than one second.
3
STOP
Press REC START/STOP again.
The unit stops at the beginning
of the current recording.
Continued

12
GB
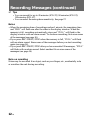
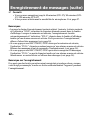
Recording Messages (continued)
1 Tips
• You can record for up to 45 minutes (ICD-37)/90 minutes (ICD-57)/
180 minutes (ICD-67).
• You can select the microphone sensitivity. See page 27.
Notes
• When the remaining time of recording reaches 1 minute, the remaining time
and “END” will flash one after the other in the display window. When the
memory is full, recording automatically stops and “FULL” will flash in the
display window with an alarm sound. To continue recording, first erase some
of the messages (see page 16).
• If you press REC START/STOP when the memory is full, “FULL” will flash
with an alarm sound. Erase some of the messages before you start recording
again (see page 16).
• If you press REC START/STOP after you have recorded 99 messages, “FULL”
will flash with an alarm sound. Select another file or erase some of the
messages (see page 16).
Note on recording
Noise may be recorded if an object, such as your finger, etc., accidentally rubs
or scratches the unit during recording.

13
GB
Basic Operations
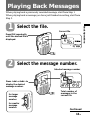
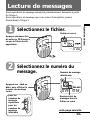
Playing Back Messages
When playing back a previously recorded message, start from Step 1.
When playing back a message you have just finished recording, start from
Step 3.
Select the file.
Select the message number.
1
2
Press –. or >+ to
display the desired
message number.
Continued
Press FILE repeatedly
until the desired file is
displayed.
Current file
Selected message number
Total number of
messages in the
current file
for smaller
message
number
for larger
message
number

14
GB
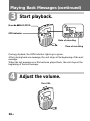
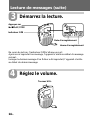
Start playback.
During playback, the OPR indicator lights up in green.
After playing back one message, the unit stops at the beginning of the next
message.
When the last message on a file has been played back, the unit stops at the
beginning of the last message.
Adjust the volume.
Playing Back Messages (continued)
3
4
OPR indicator
Time of recording
Date of recording
Turn VOL.
Press NxPLAY/STOP.

15
GB
Basic Operations
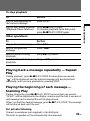
Playing back a message repeatedly — Repeat
Play
During playback, press NxPLAY/STOP for more than one second.
“ “ will be displayed and the selected message will be played back
repeatedly until you stop playback by pressing STOP.
Playing the beginning of each message —
Scanning Play
During stop mode, press NxPLAY/STOP for more than one second.
“SCAN” will be displayed in the display window and the first 5 seconds of
each message in the selected file will be played back.
When you find the desired message, press NxPLAY/STOP. The message
will be played back until the end.
For private listening
Connect an earphone (not supplied) to the EAR jack.
The built-in speaker will be automatically disconnected.
To stop playback
To Do this
stop at the beginning of Press STOP.
the current message
stop at the current position Press NxPLAY/STOP.
(Playback Pause function) To resume playback from that point,
press NxPLAY/STOP again.
Other operations
To Do this
skip to the next message Press >+.
skip to the previous Press –..
message
search forward during Keep >+ pressed.
playback
search backward during Keep –. pressed.
playback

16
GB
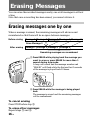
Erasing Messages
You can erase the recorded messages one by one or all messages in a file at
a time.
Note that once a recording has been erased, you cannot retrieve it.
Erasing messages one by one
When a message is erased, the remaining messages will advance and
renumbered so that there will be no space between messages.
To cancel erasing
Press STOP before step 2.
To erase other messages
Repeat steps 1 and 2.
1 Press ERASE while playing back the message you
want to erase or press ERASE for more than 1
second during stop mode.
A beep will sound and the message number and
“ERASE” will flash while the first and last 5 seconds
of the message is played back 10 times.
2 Press ERASE while the message is being played
back.
The message is erased and the remaining messages
will be renumbered.
Erase Message 3
Message 1 Message 2 Message 3 Message 4
Before erasing
After erasing
Remaining messages are renumbered.
Message 1 Message 3 Message 4 Message 5Message 2

17
GB
Basic Operations
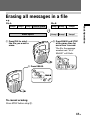
Erasing all messages in a file
e.g.
File A
File B
1 Press FILE to select
the file you want to
erase.
To cancel erasing
Press STOP before step 3.
3 Press ERASE.
Message 1
Message 2 Message 3
Blank space
Blank space
Message 1 Message 2 Message 3
Message 1 Message 2 Message 3
2 Press ERASE and STOP
at the same time for
more than 1 second.
The file, the message
number and “ALL
ERASE” will flash.

18
GB
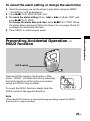
BAdvanced Operations
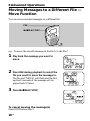
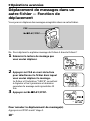
Moving Messages to a Different File —
Move Function
You can move recorded messages to a different file.
e.g. To move the seventh message in the file A to the file C
1 Play back the message you want to
move.
2 Press FILE during playback to select the
file you want to move the message to.
The file and “MOVE” will flash and the first
and last 5 seconds of the message will be
played back 10 times.
3 Press NxPLAY/STOP.
To cancel moving the message(s)
Press STOP before Step 3.
FILE
NxPLAY/STOP

19
GB
Advanced Operations
NORMAL FASTSLOW
PLAY SPEED
PLAY SPEED selector
Notes
• The move function does not duplicate a message in another file. When you
move a message to another file, the one in the previous file will be deleted.
• If you do not press NxPLAY/STOP while the first and last 5 seconds of the
message are played back, the display will return to the REMAIN display. In
this case, start the procedure from the beginning.
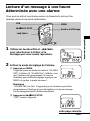
Adjusting the Playback Speed
You can adjust the speed of the playback with the use of the PLAY SPEED
selector on the bottom.
To play back rapidly
Set PLAY SPEED to FAST.
“FAST” will flash three times in the display
window and the playback speed will
increase about 50%.
To play back slowly
Set PLAY SPEED to SLOW.
“SLOW” will flash three times in the display
window and the playback speed will
decrease about 25%.
To play messages with normal speed
Set PLAY SPEED to NORMAL.

20
GB
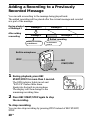
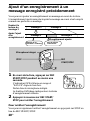
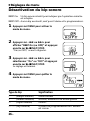
Adding a Recording to a Previously
Recorded Message
You can add a recording to the message being played back.
The added recording will be placed after the current message and counted
as a part of the message.
1 During playback, press REC
START/STOP for more than 1 second.
The OPR indicator lights in red and
“R-PLUS” flashes three times.
Speak into the built-in microphone.
The display will then change to the
remaining recording time.
2 Press REC START/STOP again to stop
the recording.
To stop recording
You can also stop recording by pressing STOP instead of REC START/
STOP.
STOP
REC
START/STOP
Built-in microphone
During playback
of Message 3
After adding
a recording
Message 3 Message 4
Message 3 Message 4
Meeting at 2 o’clock
on December 1.
at Conference
room A
Added recording
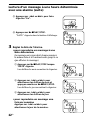
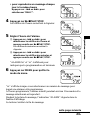
La page est en cours de chargement...
La page est en cours de chargement...
La page est en cours de chargement...
La page est en cours de chargement...
La page est en cours de chargement...
La page est en cours de chargement...
La page est en cours de chargement...
La page est en cours de chargement...
La page est en cours de chargement...
La page est en cours de chargement...
La page est en cours de chargement...
La page est en cours de chargement...
La page est en cours de chargement...
La page est en cours de chargement...
La page est en cours de chargement...
La page est en cours de chargement...
La page est en cours de chargement...
La page est en cours de chargement...
La page est en cours de chargement...
La page est en cours de chargement...
La page est en cours de chargement...
La page est en cours de chargement...
La page est en cours de chargement...
La page est en cours de chargement...
La page est en cours de chargement...
La page est en cours de chargement...
La page est en cours de chargement...
La page est en cours de chargement...
La page est en cours de chargement...
La page est en cours de chargement...
La page est en cours de chargement...
La page est en cours de chargement...
La page est en cours de chargement...
La page est en cours de chargement...
La page est en cours de chargement...
La page est en cours de chargement...
La page est en cours de chargement...
La page est en cours de chargement...
La page est en cours de chargement...
La page est en cours de chargement...
La page est en cours de chargement...
La page est en cours de chargement...
La page est en cours de chargement...
La page est en cours de chargement...
La page est en cours de chargement...
La page est en cours de chargement...
La page est en cours de chargement...
La page est en cours de chargement...
La page est en cours de chargement...
La page est en cours de chargement...
La page est en cours de chargement...
La page est en cours de chargement...
-
 1
1
-
 2
2
-
 3
3
-
 4
4
-
 5
5
-
 6
6
-
 7
7
-
 8
8
-
 9
9
-
 10
10
-
 11
11
-
 12
12
-
 13
13
-
 14
14
-
 15
15
-
 16
16
-
 17
17
-
 18
18
-
 19
19
-
 20
20
-
 21
21
-
 22
22
-
 23
23
-
 24
24
-
 25
25
-
 26
26
-
 27
27
-
 28
28
-
 29
29
-
 30
30
-
 31
31
-
 32
32
-
 33
33
-
 34
34
-
 35
35
-
 36
36
-
 37
37
-
 38
38
-
 39
39
-
 40
40
-
 41
41
-
 42
42
-
 43
43
-
 44
44
-
 45
45
-
 46
46
-
 47
47
-
 48
48
-
 49
49
-
 50
50
-
 51
51
-
 52
52
-
 53
53
-
 54
54
-
 55
55
-
 56
56
-
 57
57
-
 58
58
-
 59
59
-
 60
60
-
 61
61
-
 62
62
-
 63
63
-
 64
64
-
 65
65
-
 66
66
-
 67
67
-
 68
68
-
 69
69
-
 70
70
-
 71
71
-
 72
72


