Indesit WAX 80 (EX) Mode d'emploi
- Catégorie
- Machines à laver
- Taper
- Mode d'emploi

M
Washing machine
Instructions for installation and use
Machine à laver
Instruction pour l'installation et l'emploi
Lavadora
Instrucciones para la instalación y uso
ÐëõíôÞñéï ñïý÷ùí
Ïäçãßåò åãêáôÜóôáóçò êáé ÷ñÞóçò
WAX 80

Washing machine 1
Instructions for installation and use
Machine à laver 13
Instruction pour l'installation et l'emploi
Lavadora 25
Instrucciones para la instalación y uso
ÐëõíôÞñéï ñïý÷ùí 37
Ïäçãßåò åãêáôÜóôáóçò êáé ÷ñÞóçò
GB
F
E
49
GR


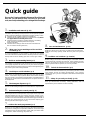
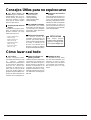
Here are the 11 topics explained in this manual. Read, learn and
have fun: you will discover many secret ways to get a better
wash, more easily and making your washing machine last longer.
Quick guide
1.
Installation and removal (p. 10)
Installation, after delivery or transport, is the most important operation
for the correct functioning of your washing machine. Always check:
1. That the electric system conforms to regulations;
2. That the inlet and draining pipes are connected correctly. Never
use pipes that have already been used.
3. That the washing machine is levelled properly; something
worth checking to aid the performance of your
washing machine;
4. That the drum's fixing screws have been removed from
the back of the washing machine;
2. What goes in your washing machine and how
to start it (p. 2)
A correct distribution of your laundry is vital to the successful
outcome of the wash and the life of the washing machine. Learn all
the tips and secrets to dividing your linen: colour, type of fabric.
3.
Guide to understanding labels (p. 5)
The symbols on the labels of your garments are easy to understand
and equally important for the success of your wash. The guide
includes simple instructions to help you choose the right tempera-
ture, wash cycles and ironing methods.
4.
Useful tips to avoid mistakes (p. 6)
Years back, our grandmothers were the ones who gave us good
advice - and in those days synthetic fibres did not exist: washing
was easy. Today, your washing machine offers you helpful advice
allowing you to wash wool even better than an expert laundress
would by hand.
5.
The detergent dispenser (p. 7)
How to use the detergent dispenser and the bleach compartment.
6.
Understanding the control panel (p. 3)
Washing machine’s control panel is very simple. It has only a few
essential buttons to help you choose any type of wash cycle,
ranging from the most energetic, capable of cleaning a mechanic’s
overalls, to the most delicate for wool. Familiarising yourself with it
will help you get the best out of your wash while helping your
washing machine last longer. It’s easy.
7. Guide to the wash programmes (p. 4)
Herein is an easy table to help you choose the right programme,
temperature, detergents and possible additives. Choose the right
programme and you will get better results with your wash while
saving time, water and energy, day after day.
8. Care and maintenance (p. 11)
With just a bit of care, it will repay you with loyalty and devotion.
With the necessary upkeep, it will wash for years and years to
come.
9.
Problems and solutions (p. 8 and 9)
Before calling a technician, read these pages: immediate solutions
may be found for a number of problems. If the problem persists,
call your local Indesit customer services who will be pleased to
help. Any failure will be repaired, as soon as possible.
10.
Technical characteristics (p. 9)
Herein are the technical features of your washing machine: model
type number, electric and water specifications, size, capacity,
speed of the spin cycle and compliance with Italian and European
regulations.
11. Safety for you and your family (p. 12)
Here you will find the necessary safety guidelines, and it is
important for you to read this section carefully.
1
Instructions for installation and use

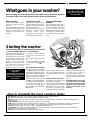
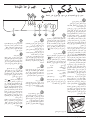
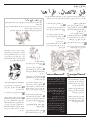
What goes in your washer?
Before washing, you can do a great deal to ensure better results. Divide your garments
according to fabric and colour. Read the labels, follow their guidelines.
Before washing.
Divide your washing according
to the type of fabric and colour
fastness.
Empty all pockets (coins, paper,
money and small obejects) and
ensure all loose buttons are
repaired or removed prior to
loading.
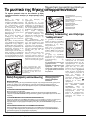
How to eliminate the most common stains
Ink and biro Dab with a wad of cotton soaked in methyl alcohol or alcohol at 90°.
Tar Dab with fresh butter, rub in turpentine then wash immediately.
Wax Scrape away, then run a hot iron between two sheets of absorbent paper. Then rub in cotton with turpentine or
methyl alcohol.
Chewing gum Rub in nail polish remover and wipe with a clean rag.
Mold Cotton and white linen should be placed in a solution of 5 parts water, one bleach and a spoon of vinegar, then
washed immediately. For other white fabrics, use hydrogen peroxide at 10 volumes and wash immediately.
Lipstick Dab with ether on wool or cotton. Use tricloroetilene for silk.
Nail polish Place a sheet of absorbent paper on the side of the stain, wet it with nail polish remover, shifting the
garment as the sheet gradually changes colour.
Grass Dab with a wad of cotton soaked in methyl alcohol.
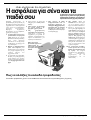
Starting the washer
Starting your washing machine
in the right way is important for
the quality of your wash, to help
prevent future problems and
enhance life expectancy of your
appliance. Once you have
loaded your washing machine
and added the detergent
together with any fabric
conditioner, always check that:
1. The door is closed correctly.
2. The plug is secured in the
socket.
3. The water supply is turned
on.
4. Selector knob A is positioned
on one of the symbols
(Stop/
Reset).
Choose the desired programme
The programme is selected
according to the type of garments
that need to be washed. To choose
a programme, refer to the table on
page 4. Turn knob A until the
selected programme is aligned
with the mark on the knob, turn
knob B to the desired temperatu-
re settings, check that knob C is
in the desired position, if
necessary use buttons E, F and
G, and lastly, press on/off button
H (I position).
After installing your new washing machine, start a wash
cycle by setting programme "1" at 90 degrees.
For more delicate
garments:
protect underwear, tights
and stockings and delicate
items by placing them in a
canvas pouch
Dividing your garments
according to fabric and
colour, is very important
for good results
Remember that, if you want to
use it, the "programmed start"
should be set before the wash
cycle.
At the end of the wash cycle...
The L lamp to extinguish: it will
take about three minutes.
Then turn the washing machine
off by pressing on-off button H
(O position). You can now open
the washing machine door
safely. After having removed the
freshly cleaned washing, leave
the door open to allow air
circulation inside the drum.
Always disconnect electricity at
the socket and turn off the water
supply.
Remember that, in the event
of a power failure, or should
the washing machine switch
itself off, the programme
chosen will remain in its
memory.
The labels say it all.
Always look at the labels: they
tell you everything about your
garment and how to wash it in
the best possible way.
The table on page 5 shows all
meanings behind these
symbols. Their recom-
mendations are important to
achieve better wash results.
Instructions for installation and use
2
M
Big and small happily
together.
This washing machine has a
special electronic control device
for even distribution: before the
spin cycle starts, this device
allows the garments to positions
themselves, to minimise noise
and vibrations during the spin
cycle.

I
L
A
B
C
H
D
F
GE
The washing machine is
equipped with an extra
compartment 4 (provided as an
accessory) for the bleach, to be
inserted in compartment 1.
Extra Economy
Reduces water consumption
during the rinse cycles. We
recommend that you use this
function only with small laundry
loads, dosing the detergent
proportionally.
Rapid wash
This button reduces the length
of the wash programme by
about 30%. It cannot be used
with special programmes (see
page 4) or those for wool and
silk.
Stain removal (see page 7)
Thanks to this command, the
washing machine will carry out
a more intensive wash that
optimises the effectiveness of the
liquid additives, thus allowing
more resistant stains to be
removed. When you press the
stain removal button, you cannot
activate the pre-wash.
On-off
When button H is pressed, the
washing machine is switched
on, when it is not the machine
is switched off.
Turning the appliance off
does not cancel the selected
programme.
Here I’m in command
Understanding the control panel
Making the right choice is important. And it’s easy.
Programme selector knob
and programmed start
Use this knob to select the wash
programme.
Turn this knob clockwise only.
To select a programme, you
should turn the knob so that the
symbol/number of the desired
programme is in line with the
pointer on the knob.
Now press on/off button H
(position I), pilot lamp I will start
flashing.
After 5", the setting will be
accepted, pilot lamp I will stop
flashing (staying lit) and the wash
cycle will begin.
Should you wish to interrupt the
programme in progress or set a
new one, select one of the
symbols
(Stop/Reset) and wait
5" : when the cancellation has
been accepted, pilot lamp I
flashes, and you can then turn the
appliance off.
You can use this knob to delay
the appliance's operation.
Select one of the four delay time
positions, press the on/off button
H (position I) and wait 5". The
setting has now been accepted
(pilot lamp I stays lit) and you can
select the programme you desire.
Pilot lamp I has a particular
flashing motion (2" on and 4" off)
to indicate that a delayed start
has been set.
During this phase, you can open
the appliance door and change
the washing load, should you
wish to do so.
After the wash cycle has been set
and accepted by the washing
machine, turning the knob will
have no effect (except for when
it is on position
Stop/Reset).
Temperature control knob
It is used to set the wash tempe-
rature in the recommended
programme table on pag. 4. It also
allows you to reduce the tempe-
rature recommended for the
selected programme, and even to
set a cold wash cycle (
).
Spin exclusion knob
It is used to exclude the spin
cycle (by choosing symbol
)
or to reduce the spin speed of
the selected programme. The
maximum speed for the four
types of fabric are:
Fabric Speed
Cotton 800 rpm
Synthetics 800 rpm
Wool 600 rpm
Silk no
Note: distribution phase will be
carried out at low speed.
Detergent dispenser
It is divided into three
compartments:
1.Detergent for pre-wash;
2.Detergent for the main cycle
wash;
3. Fabric conditioner.
The detergent dispenser with the
additional bleach compartment
is here.
3
Instructions for installation and use
1
2
3
4
The on-off lamp
Lamp I flashes when the
appliance is switched on and
awaiting a programme to be set.
A steady light means the
appliance has accepted the
selected programme.
The door block lamp
The safety lamp indicates that the
washing machine door is locked
to prevent it from being opened
accidentally. To avoid any
damages to lock mechanism,
you must wait for the lamp to
extinguish, before attempting to
open the door which takes around
three minutes.
Anti-crease
This function (represented by the
symbol
) interrupts the wash
programme, keeping the washing
soaking in water before draining.
It is only enabled in programmes
for synthetic fabrics, silk and
curtains. It is very useful,
because it prevents delicate and
synthetic fabrics from creasing
(for example, when you cannot
take the washing out at the end
of the wash cycle but only a few
hours later). The programme can
be completed by turning knob A
one notch. In the case of
synthetic fabrics, should you
prefer draining rather than a spin
cycle, turn knob A until you have
selected the symbol
(Drain).

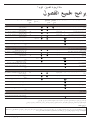
Type of fabric and degree of soil Programme
knob
Temperature
knob
Detergent
for wash
Fabric
softener
Stain rem.
button/
Bleach
Length of
the cycle
(minutes)
Description of wash cycle
COTTON
Exceptionally soiled whites
(sheets, tablecloths, etc.)
1 90°C
◆◆
165
Prewash cycle, wash cycle at 90°C, rinse
cycles, intermediate and final spin cycles
Exceptionally soiled whites
(sheets, tablecloths, etc.)
2 90°C
◆◆
Del./Trad.
145
Wash cycle at 90°C, rinse cycles,
intermediate and final spin cycles
Heavily soiled whites and fast colours
3 60°C
◆◆
Del./Trad.
130
Wash cycle at 60°C, rinse cycles,
intermediate and final spin cycles
Slightly soiled whites and delicate
colours (shirts, jumpers, etc.)
4 40°C
◆◆
Del./Trad.
95
Wash cycle at 40°C, rinse cycles,
intermediate and final spin cycles
Rinse cycles/Bleach
◆
Del./Trad.
Rinse cycles, intermediate and final spin cycles
Spin cycle Draining and final spin cycle
Stop/Reset
Interrupts/Cancels the selected programme
SYNTHETICS
Heavily soiled fast colour synthetics
(baby linen, etc.)
5 60°C
◆◆
Delicate
100
Wash cycle at 60°C, rinse cycles, anti-
crease or delicate spin cycle
Delicate colour synthetics
(all types of slightly soiled garments)
6 40°C
◆◆
Delicate
70
Wash cycle at 40°C, rinse cycles, anti-
crease or delicate spin cycle
Delicate colour synthetics
(all types of slightly soiled garments)
7 30°C
◆◆
30
Wash cycle at 30°C, rinse cycles and
delicate spin cycle
Rinse cycles/Bleach
◆
Delicate
Rinse cycles, anti-crease or delicate spin
cycle
Fabric softener
◆
Rinse cycles with automatic introduction of
softener, anti-crease or delicate spin cycle
Spin cycle Draining and delicate spin cycle
Stop/Reset
Interrupts/Cancels the selected programme
DELICATES
Hand wash
8 40°C
◆◆
60
Wash cycle at 40°C, rinse cycles and
delicate spin cycle
Particularly delicate garments and
fabrics (curtains, silk, viscose, etc.)
9 30°C
◆◆
50
Wash cycle at 30°C, rinse cycles, anti-
crease or draining
Rinse cycles
◆
Rinse cycles, anti-crease or draining
Spin cycle Draining and delicate spin cycle
Draining Draining
Stop/Reset
Interrupts/Cancels the selected programme
PROGRAMMED START
12 - 9 - 3 - 1 hour delay Start is delayed by 12 - 9 - 3 - 1 hours
Stop/Reset
Interrupts/Cancels the selected programme
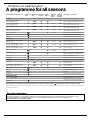
A programme for all seasons
What are you washing today?
Instructions for installation and use
4
Daily wash Your washer has a programme available for the washing of lightly soiled garments in a short amount of time.
By setting programme 7 at a temperature of 30°C, you can wash different types of fabrics together (except for wool and silk), with a
maximum load of 3 kg. This programmes allows you to save on both time and energy as it only lasts around 30 minutes.
We recommend the use of liquid detergent.
Important: to cancel the wash programme you have just set, select one of the symbols (Stop/Reset) and wait for at least 5 seconds.
Special programme
The data found in the table is purely indicative, and can vary according to the quantity and type of washing, the water system temperature and
the room temperature.

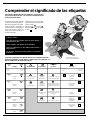
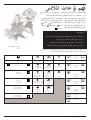
Wash Bleaching Ironing Dry cleaning Drying
Strong
action
Delicate
action
High
Temp.
Low
Temperat.
Wash at
95°C
Bleaching only in
cold water
Hot iron at max
200°C
Dry clean with any
solvent Machine dryable
Wash at
60°C Do not bleach
Medium hot
ironing at
max 150°C
Dry clean only with
perchloride, benzine
av., pure alcohol,
R111 and R113
Do not machine
dry
Wash at
40°C
Iron at max
110°C
Dry clean with av.
benzine, pure alcohol
and R113 Spread to dry
Wash at
30°C Not ironable Do not dry clean
Hang to dry
without spin
drying
Hand wash
Dry on clothes
hanger
Not
washable in
water
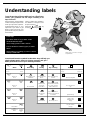
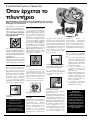
Understanding labels
Learn the meaning of these symbols and you will get better
results, your garments will last longer resulting in an
improved wash.
All over Europe, garment labels
contain messages expressed in
small yet important symbols.
Understanding them is very
important if you want to get
better results and treat your
garments the way they deserve
to be treated.
These symbols are divided in
five different categories and
shapes: washing
,
bleaching
, ironing , dry
cleaning
and drying .
Consult and learn the symbols in this table: they will help you
obtain a better wash, treat your clothes properly, and get a
better performance out of your washing machine.
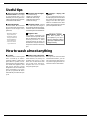
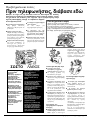
Useful tips
Turn shirts inside out to get better results
and make them last longer.
Always empty pockets of their contents.
Look at the label: it will always give you useful
advice.
When loading your washing, try to have a mixture
of large to small items.
Make sure you select the right
temperature!
5
Instructions for installation and use
l
c
A
P
F

Useful tips
Never use your washing
machine to wash... torn, fraying
or non-hemmed linen. If it is
absolutely neccessary, place it in
a bag for protection. Do not wash
coloured linen with whites.
Watch the weight!
For best results, do not exceed
the weight limits stated below
(figures show weight of dry
garments):
- Resistant fabrics:
6 kg maximum
- Synthetic fabrics:
2.5 kg maximum
- Delicate fabrics:
2 kg maximum
- Pure new wool:
1 kg maximum
How to wash almost anything
Curtains.
Curtains tend to crease a great
deal. A useful tip to reduce
creasing: fold the curtains and
place them in a pillow case or
mesh bag. Do not load anything
else inside the appliance, this
will ensure that the overall
weight does not exceed the half
load. Remember to use the
specific programme 9 which
automatically excludes the spin
cycle.
Trainers.
Once you have removed mud
and dirt from trainers, you can
even wash them with jeans or
any other tough garments. Do
not wash trainers with whites.
Quilted coats and anorak.
You can wash quilted coats and
wind-cheaters, too, if they are
padded with goose or duck
down. Do not load more than
2-3 kg and never load 6 kg.
Repeat rinse once or twice
using the gentle spin.
How much does it weigh?
1 sheet 400-500 gr.
1 pillow case 150-200 gr.
1 tablecloth 400-500 gr.
1 bathrobe 900-1,200 gr.
1 towel 150-250 gr.
Coloured T-shirts, printed
ones and shirts last longer if
turned inside out before washing.
Printed T-shirts and sweatshirts
should always be ironed inside out.
Dungaree alert.
Very popular “salopette” type
overalls have straps with hooks
that can damage the drum of your
washing machine or other
garments during the wash. To
minimise the risk, place hooks in
the pocket and fasten with safety
pins.
Holidays: unplug the
appliance.
It is recommended that you
should unplug the machine from
the socket and turn off the water
supply. Leave the door ajar to
allow air circulation to the draw
and the door gasket area. This will
prevent unpleasant odours.
Instructions for installation and use
6
For best results, we
recommend you use a
specific detergent, taking
care not to wash more than
1 kg of laundry.
WOOL CYCLE

You must follow the dosage
recommendations provided by
the manufacturers when adding
detergent or fabric conditioner.
Doses will vary according to the
wash load, the water hardness
and how soiled the washing is.
Experience will help you select
the right dosage almost
automatically: it will become your
secret.
Before adding detergent for pre-
washing in compartment 1,
make sure that the extra
compartment for bleach 4 has
not been inserted.
Ensure no overfilling when
adding fabric conditioner in
compartment 3.
The washing machine automa-
tically adds the softener to the
wash in each programme.
Liquid detergent is poured into
compartment 2 just a few
seconds before starting the
wash cycle.
In compartment 1:
Detergent for pre-washing (powder)
In compartment 2:
Detergent for washing
(powder or liquid)
In compartment 3:
Additives (softeners, perfumes, etc.)
In compartment 4:
Bleach and delicate bleach.
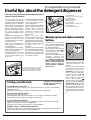
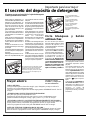
Useful tips about the detergent dispenser
It’s important for a good wash
The first secret is the easiest: the detergent dispenser is
opened by pull it outwards.
Remember that liquid detergent
is only designed for wash
cycles of up to 60 degrees on
non pre-wash items.
Special containers are sold with
liquid or powder detergents for
placing inside the washing
machine drum, these are
positioned according to the
instructions found in the
detergent box
Never use hand wash
detergent, because it may form
too much foam, which could
damage the washing machine.
Detergents that are specifically
formulated for both hand and
machine wash are an
exception.
One last secret: when washing
with cold water, always reduce
the amount of detergent you use:
it dissolves less easily in cold
water than in hot water, so part
of it would be wasted.
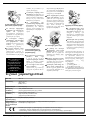
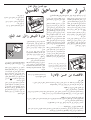
Cutting costs efficiently
A guide to environmentally
friendly and economic use
of your appliance.
MAXIMISE THE LOAD SIZE
Achieve the best use of energy, water, detergent and time by using the recommended
maximum load size.
SAVE up to 50% energy by washing a full load instead of 2 half loads.
DO YOU NEED TO PRE-WASH?
For heavily soiled laundry only!
SAVE detergent, time, water and between 5 to 15% energy consumption by NOT
selecting Prewash for slight to normally soiled laundry.
IS A HOT WASH REQUIRED?
Pretreat stains with stain remover or soak dried in stains in water before washing to
reduce the necessity of a hot wash programme.
SAVE up to 50% energy by using a 60°C wash programme.
BEFORE USING A DRYING PROGRAMME ...
SAVE energy and time by selecting the highest suitable spin speed to reduce the water
content in laundry before using a drying programme.
The detergent dispenser can be
removed and cleaned: pull it outwards,
as indicated in the figure. Then leave it
under running water for a few minutes.
7
Instructions for installation and use
1
2
3
4
Bleach cycle and stain removal
button
If bleaching is necessary, the
extra case 4 (provided) must be
inserted into compartment 1 of
the detergent dispenser.
When pouring in the bleach, be
careful not to exceed the "max"
level indicated on the central
pivot (see illustration).
The use of the additional bleach
container excludes the
possibility of using the pre-wash
cycle. Traditional bleach can
only be used on sturdy white
fabrics, whereas delicate
bleach can be used for
coloured fabrics, synthetics
and for wool.
You cannot bleach with the
“Silk” programme and with the
“special programmes” (see
page 4).
Use the stain removal button
every time you want to bleach.
Should you want to do it
separately you must pour the
bleach into the additional
container 4, press button G
(stain removal), start the
washing machine, then select
one of the symbols
according to the type of fabric.
When you bleach during a
normal wash cycle, pour the
detergent and any additives in
the special compartments,
press button G (stain removal),
set the programme you desire
and turn the washing machine
on.

The washing machine
fails to fill with water.
Is the hose correctly
connected to the tap?
Is there a water shortage ?
There could be work in
progress in your building or
street.
Is there sufficient water
pressure? The autoclave
may be malfunctioning.
Is the tap filter clean? If the
water is very calcareous, or
if work has recently been
carried out on the water
piping, the tap filter could be
clogged with particles and
debris.
Is the rubber hose kinked?
The tract of the rubber hose
bringing water to washing
machine must be as straight
as possible. Make sure it is
not squashed or kinked.
The programme selector
knob keeps turning?
Wait a few minutes for the
drain pump to empty the
tub, switch the washer off,
select one of the symbols
stop/reset
, then switch it
back on. If the knob continues
to turn, call for assistance
because it is showing an
anomaly.
The washing machine
continuously fills and
drains water.
Is the drain hose positioned
too low? It must be installed
at a height ranging from 60 to
100 cm.
Is the end of the hose
immersed in water?
Does the wall drainage
system have a breather
pipe? If the problem persists
even after these checks, turn
the water supply off the
machine and call for
assistance.
If you live on an upper floor of
your building, there may be a
problem with your drain trap.
To solve this problem, a
special valve must be
installed.
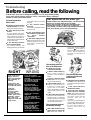
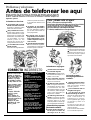
Before calling, read the following
Troubleshooting
In most cases, when your washing machine fails to work, the problems arising
can be easily solved without having to call for a technician. Before calling for
assistance, always check these points.
The washing machine
fails to start.
Is the plug correctly inserted
into the socket? It could have
been moved whilst cleaning.
Is there electricity in the
house?
A circuit breaker may have
switched off as a result of too
many electrical appliances
working at the same time. Or
maybe due to a general failure
in your entire area.
Is the washing machine
door closed properly?
For safety reasons, the
washing machine cannot work
if the door is open or not shut
properly.
Is the On/Off button
pressed?
If it is, then a programmed start
has been set.
Is the programmed start
knob, in the correct position
for those models
concerned?
Is the water supply turned
on? For safety reasons, if the
washing machine does not
load water, it cannot start a
wash cycle.
RIGHT WRONG
Turn off the water
supply after use.
This will eliminate
the possibility of
leakage.
Always leave the
appliance door ajar
to avoid bad odours.
Clean the
appliance’s
exteriors gently.
To clean the
exteriors and the
rubber parts of the
appliance, always
use a soft cloth
dipped in warm and
soapy water.
Leave the washing
machine plugged in while
cleaning.
Even during maintenance,
the appliance should
always be unplugged.
Use solvents and
aggressive abrasives.
Never use solvents or
abrasives to clean the
external and rubber parts
of the washing machine.
Neglect the detergent
dispenser.
It is removable and can
easily be cleaned by
leaving it under running
water.
Go on holiday without
thinking about her.
Before leaving, always
make sure that the
washing machine is
unplugged and that the
water supply is turned off.
Instructions for installation and us
e
8
Simple: with the new Indesit technology, you need less than
half of it, to get good results on twice as much!
This is why you cannot see the water through the door:
because there is little, very little of it, to respect the
environment yet without renouncing maximum cleanliness.
And, on top of that, you are also saving electricity.
But where did all the water go?

Too much foam.
Is the detergent appropriate
for machine washing?
Check whether the definition
on its label reads “for machine
wash” or “hand and machine
wash”, or any other similar
wording.
Is the correct amount being
used? An excessive amount
of detergent, besides
producing too much foam,
does not guarantee a more
effective wash, and causes
scaling in the internal parts of
the appliance.
If, despite all checks, the
washing machine fails to
function and the problem
persists, call your nearest
authorised Customer Service
Centre, providing the following
information:
- the nature of malfunction
- the model type no. (Mod. ....)
- the serial number (S/N ....)
This information can be found on
the data plate situated at the
back of the washing machine.
Is there space between the
machine and adjacent
units? If it is not a built-in
model, the washing machine
will oscillate a bit during the
spin cycle. A few cm of space
should therefore be left
around it.
The washing machine
leaks.
Is the metal ring of the inlet
hose properly attached?
Turn off the water supply,
unplug the appliance and try
tightening its attachment
without forcing it.
Is the detergent dispenser
obstructed? Remove and
wash it under tap water.
Is the drain hose well
attached? Turn off the water
supply, unplug the appliance
and try tightening its
attachment.
Is the drain hose kinked?
The tract of the drain hose
must be as straight as
possible. Make sure the drain
hose is not squashed or
kinked.
Is the washing machine’s
drain duct clogged? Is there
an extension of the drain
hose? If so, is it positioned
incorrectly, blocking the
water flow?
Excessive vibration
during the spin cycle.
Have all transit screws been
removed durind instal-
lation? See the following
page on installation
procedures.
Has the washing machine
been levelled correctly? The
levelling of the appliance
should be checked
periodically. Adjust the feet
and check them with a level.
The washing machine
does not drain or spin.
Does the selected
programme incorporates
water draining? Some
programmes stop at the end
of the wash cycles and
draining will have to be
selected manually.
Is the “Anti-crease"
function -where provided -
enabled? This function
requires manual selection for
draining.
Is the drain pump clogged?
To check it, turn off the water
supply, unplug the washing
machine and follow the
instructions on page 11, or
call for technical assistance.
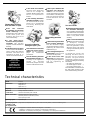
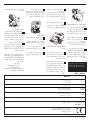
Technical characteristics
Always get
assistance from
authorised
technicians and
always insist on
original spare parts.
9
Instructions for installation and use
Model
WAX 80
Dimensions
width 59,5 cm
height 85 cm
depth 53,5 cm
Capacity
from 1 to 6 kg
Electrical
connections
voltage 220/230 Volt 50 Hz
maximum absorbed power 2300 W
Water connections
maximum pressure 1 MPa (10 bar)
minimum pressure 0,05 MPa (0,5 bar)
drum capacity 52 litre
Spinning speed
up to 800 rpm
Control programs in
compliance with
IEC regulation 456
programme 3; temperature 60°C; press extra economy button; carried out with 6 kg load.
This appliance conforms with the following E.E.C. directives:
- 73/23/EEC of 19/02/73 (Low Voltage) and subsequent modifications
- 89/336/EEC of 03/05/89 (Electromagnetic Compatibility) and subsequent modifications

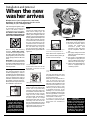
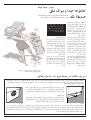
When the new
washer arrives
Installation and removal
Whether new or just transported to a new house,
installation is extremely important for the correct
functioning of your washing machine.
The hook to be used in case the drain
hose ends at a height below 60 cm.
If the drains hose empties into a
tub or sink then fit the plastic gui-
de and secure it to the tap.
The guide for draining into tubs and
sinks.
The end of the drain hose must
be positioned so that it cannot
become submerged.
Extensions are unadvisable. In
case of absolute need, the
extension must have the same
diameter as the original hose and
must not exceed 150 cm. In case
of wall draining pipes, their
efficiency must be checked by
a qualified technician. If the
dwelling is on one of the upper
floors of a building, there may be
drain trap problems causing the
washing machine to load and
unload water continuously.
In order to avoid such an
inconvenience, special anti-drain
trap valves are available in
shops.
After removing the appliance from
its packaging, check that it is
intact. If in doubt, contact a
qualified technician immediately.
The inside of the machine is
supported, for transportation, by
four screws on the back panel.
Before using the washing
machine, remove the screws,
remove the spacers together with
the rubber tubes attached to them
(keeping all the parts) and use the
plastic plugs provided to fill in the
holes.
Important: Use the cap (provided)
to close the 3 holes which housed
the stop pin, situated in the right-hand
part of the lower back of the
washing machine.
Levelling
The washing machine must be
levelled appropriatey in order to
guarantee its correct functioning. To
level the appliance, the front feet
must be adjusted; the angle of
inclination, measured according to
the worktop, must not exceed 2°.
When placed on carpet, make sure
the ventilation is not reduced.
The front feet are adjustable.
Connection to the water
mains
Connect the supply pipe to the
water mains using a gas 3/4
attachment, fitting the filter and
rubber gasket supplied with the
appliance and ensuring that they
are fimly tightened to the taps. The
water supply marked C must be
connected to the cold water tap;
the pipe marked H must be
connected to the hot water tap.
Both pipes may be connected to
the cold water tap using the
special Y connection with multi-
ple attachments, supplied with the
appliance.
The rubber gasket .
Connect the inlet hose to the
threaded connector on the
machine rear.
Water pipe inlet at the top right.
Connecting the drain hose
There are two hooks (right or left)
on the rear of your washing
machine to which the drain hose
is to be fixed. Insert the other end
in a stand pipe or place it on the
edge of a sink or tub avoiding
excessive kinks and bending. It
should be placed at a height
ranging from 60 to 100 cm. If it is
necessary to fix the end of the
hose at a height below 60 cm from
the ground, it must be fixed in the
appropriate hook placed on the
upper part of the back panel.
Warning!
The company denies all
liability if and when these
norms are not respected.
Plastic bags, expanded
styrofoam, nails and other
packaging parts are not
children’s toys, and are
potentially dangerous.
Retain the transit screws,
spacers and washers.
Should you move house
then these should be
replaced to support the
inside of the machine to
prevent damage when
transporting the machine.
Instructions for installation and use
10
Electric connection
Before connecting the appliance
to the electric socket, be sure that:
1) the electric socket is able to
sustain the appliance’s
maximum power load
indicated on the data plate
and in compliance with the
law;
2) the supply voltage is included
within the values indicated on
the data plate;
3) the socket is compatible with
the appliance’s plug. If not, do
not use adapters, but replace
either the socket or the plug;
4) electric household appliances
must be equipped with an
“earthing” system.

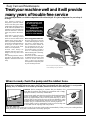
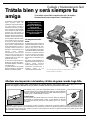
Treat your machine well and it will provide
many years of trouble free service
Easy Care and Maintenance
Your washing machine is a reliable companion in life and on the job. It is just as important for you to keep it
in shape.
Your washing machine is
designed to provide reliable
service over many years. A few
simple steps will help to prolong
its life and avoid problems. It is
advisable, to turn off water taps
when the machine is not to be
used, this protects the hoses,
etc.
If the water in your area is too
hard, use a deliming product
(water is hard if it often leaves
whitish stains around taps or
drains, especially of bath tubs.
For more accurate information as
to the type of water in your
system, call the local water
works or a local plumber).
Pockets must always be
emptied removing even pins,
badges and any other hard
object.
The washing machine exterior
should be cleaned with a rag
dipped in lukewarm water and
soap.
Never exaggerate with doses.
Normal detergents already
contain deliming agents. Only if
the water is particularly hard,
that is, rich in lime content, do
we recommend the use of a
specific product at every wash.
A periodical wash cycle with a
dose of a deliming product,
without detergents or washing,
may prove useful.
Never use too much detergent
or additives because this could
cause an excess amount of
foam, scaling and possible
damage to the component parts
of your washing machine.
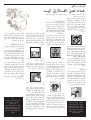
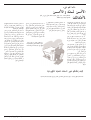
When in need, check the pump and the rubber hose.
The washer comes equipped with a self-cleaning pump that does not require any cleaning or maintenance. Small
objects may accidentally fall into the pump: coins, hair clips, loose buttons and other small items. To avoid possible
damage, they are withheld in an accessible pre-chamber, situated at the lower end of the pump.
It is important to wash
the detergent dispenser
regularly.
To prevent dried washing
powder from
accumulating, place the
dispenser under running
water for a few minutes.
Do not forget to empty all pockets: small objects can
cause damage to your washer.
Attention: Before attempting to examine this pre-chamber, first
ensure that the machine has finished its programme and is empty.
Unplug the machine, as with any maintenance.
To gain access gently ease down the top of the plinth panel situated at
the base of the machine, with a screwdriver etc, to release it. Then
ease the top edge forward to allow it to be lifted clear (Fig. 1). Place
a shallow dish or tray below the cover of the pre-chamber to catch
the small amount of water present. Release the cover by turning anti-
clockwise (Fig. 2). Ensure that the cover is securely replaced.
Re-fit the plinth cover by inserting the hooks on its lower edge into
the slots and ease the top edge back into position.
The water inlet hose
Check the rubber hose at least once a year. If you see any cracks, replace it immediately. When you use your washing machine,
water pressure is very strong and a cracked tube could easily split open.
Fig. 1
Fig. 2
11
Instructions for installation and use

Instructions for installation and use
12
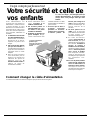
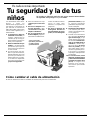
Your safety and that of
your family
Important for the safe use of your washing machine
Your washer has been built in compliance with
the strictest international safety regulations. To
protect you and all your family.
Read these instructions and all
the information in this manual
carefully: they are an important
source, not only of numerous
useful tips, but also of vital
information on safety, use and
maintenance.
1. the machine should not be
installed in an outdoor
environment, not even
when a roof shelters the
area, because it may be very
dangerous to leave it
exposed to rain and
thunderstorms.
2. It must only be used by
adults and exclusively for
washing clothes following
the instructions provided in
this manual.
3. Should it have to be moved,
proceed with the help of two
or three people and handle
it with the utmost care.
Never try to do this alone,
because the appliance is
very heavy.
4. Before loading the washing
machine, make sure the
drum is empty.
5. Never touch the washing
machine when barefoot or
with wet or damp hands
or feet.
6. Never use extensions or
multiple plugs, which are
particularly dangerous in
humid environments. The
power supply cable must
never be bent or
dangerously compressed.
7. Never open the detergent
dispenser while the
appliance is functioning;
do not use hand wash
detergent because the
abundance of foam could
damage its internal parts.
8. Never pull on the supply
cable or the washing
machine to disconnect it
from the wall socket: it is
extremely dangerous.
9. While the appliance is
functioning, do not touch
the drain water as it could
reach very high
temperatures. The
appliance door, during
wash cycles, tends to
become hot; ensure that
children do no touch it.
Never force the washing
machine door because
this could damage the
safety lock which prevents
accidental opening when the
nachine is working. Allow a
few minutes at the end of the
program for the lock to
release.
10. In case of malfunctio-ning,
first close the water tap
and unplug the appliance
from the wall socket; do
not under any
circumstances touch
internal parts in order to
attempt repairs.
I only want an authorised
specialised technician with
original Indesit spare parts!
How to change the power supply cable
The power supply cable must only be replaced by one of our authorised Service Engineers.

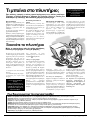
Découvrez ci-dessous les 11 sujets qui seront développés
dans les pages de ce manuel. Lisez, apprenez, amusez-
vous: vous découvrirez un tas de petits secrets pour laver
mieux, avec moins d’efforts tout en augmentant la
longévité de votre lave-linge. Et surtout, en toute sécurité.
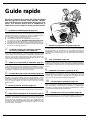
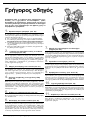
Guide rapide
1.
Installation et déménagement (page 22)
Pour un bon fonctionnement de la machine à laver, l’opération la
plus importante après sa livraison ou après un déménagement,
est sans aucun doute son installation. Vérifiez toujours:
1. si l’installation électrique est conforme;
2. si les tuyaux d’arrivée et de vidange de l’eau sont bien
raccordés correctement. Ne jamais utiliser des tuyaux usés.
3. si le lave-linge est bien de niveau. C’est important: pour la
longévité de votre lave-linge et pour la qualité de votre lavage.
4. que toutes les vis de fixation du tambour, situées à l'arrière du
lave-linge, ont bien été enlevées.
2.
Comment charger votre lave-linge et mettre
en service la machine à laver (page 14)
Triez correctement votre linge: c’est une opération importante dont
la réussite de votre lessive dépend entièrement. Apprenez tous
les trucs et tous les secrets pour bien trier votre lessive: les
couleurs, les textiles, la tendance à produire des peluches, voilà
quels sont les critères les plus importants.
3.
Guide pour comprendre les étiquettes (page 17)
Les symboles reportés sur les étiquettes des vêtements sont très
faciles à comprendre et importants quant à la réussite du lavage.
Ce guide vous aidera à vous y retrouver parmi les températures
conseillées, les types de lavage et de repassage.
4.
Conseils utiles pour ne pas vous tromper (page 18)
Autrefois, on suivait les bons conseils de grand-mère - et les
matières synthétiques n’existaient pas: il était donc facile de laver.
Aujourd’hui, la votre machine à laver vous donne de bons conseils
et vous permet même de laver laine aussi bien qu’une
blanchisseuse.
5.
Le tiroir à produits lessiviels (page 19)
Comment utiliser le tiroir à produits lessiviels et le bac à eau de Javel.
6.
Bien maîtriser le bandeau de commandes (page 15)
Le bandeau de commandes de la machine à laver est très simple.
Quelques commandes essentielles pour choisir les types de
lavage, du plus énergique, pour laver une combinaison de
mécanicien, jusqu’au plus délicat pour la laine. Apprenez à vous
en servir, vous laverez mieux et prolongerez la durée de vie de
votre lave-linge. C’est facile.
7.
Guide des programmes de lavage (page 16)
Un tableau facile à consulter pour cerner d’un seul coup d’oeil tous
les programmes, les températures, les produits lessiviels et
additionnels. Utilisez le bon et vous obtiendrez de meilleurs
résultats en économisant du temps, de l’eau et de l’électricité, jour
après jour.
8.
Soin et entretien (page 23)
La votre machine à laver est une amie: quelques petites attentions
suffisent pour qu’elle vous rende la pareille en fidélité et dévotion.
Chouchoutez-la, elle lavera pour vous pendant des années et des
années.
9.
Problèmes et solutions (pages 20 et 21)
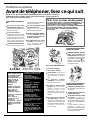
Avant d’appeler un technicien, lisez ces pages: de nombreux
problèmes peuvent trouver une solution immédiate. Si vous
n’arrivez pas à les résoudre, appelez alors le numéro de votre
SAV et en un rien de temps la panne sera réparée.
10.
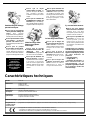
Caractéristiques techniques (page 21)
Vous y trouverez les caractéristiques techniques de votre lave-linge:
sigle du modèle, spécifications électriques et hydrauliques,
dimensions, capacité, vitesse d’essorage et conformité aux normes
et aux directives italiennes et européennes.
11.
Sécurité pour vous et vos enfants (page 24)
Vous y trouverez tous les conseils indispensables à votre sécurité
et à celle de votre famille. C’est ce qu’il y a de plus important.
13
Mode dinstallation et demploi

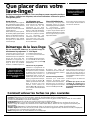
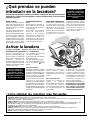
Que placer dans votre
lave-linge?
Quelques astuces pour mieux laver. Triez votre linge en tenant compte des textiles et
des couleurs. Attention aux étiquettes, suivez leurs indications. Alternez les petites
et les grandes pièces.
Avant de laver.
Triez votre linge selon le type de
tissu et la résistance des couleurs:
les tissus plus résistants doivent
être séparés des délicats.
Séparez les couleurs claires des
couleurs foncées.
Videz toutes les poches (pièces
de monnaie, papier, argent et petits
objets) et contrôlez les boutons.
Recousez tout de suite les
boutons ballants, vous éviterez
ainsi qu’ils ne se détachent en
cours de lavage.
Comment enlever les taches les plus courantes
Encre et stylo à bille Tamponnez avec du coton imbibé d’alccol méthylique ou d’alcool à 90°.
Goudron Tamponnez avec du beurre frais, passez de la térébenthine puis lavez immédiatement.
Cire Raclez puis repassez avec un fer bien chaud entre deux feuilles de papier buvard. Passez ensuite du coton imbibé
d’essence de térébenthine ou d’alcool méthylique.
Chewing-gum Passez du solvant pour vernis à ongles puis un chiffon propre.
Moisissure Plongez le coton et le lin blanc dans une solution formée de 5 parties d’eau, une d’eau de javel et une
cuillère à soupe de vinaigre, lavez aussitôt. Pour les autres tissus blancs, utilisez de l’eau oxygénée à 10 volumes puis
lavez aussitôt.
Rouge à lèvres Tamponnez à l’éther les tissus de laine ou de coton. Pour la soie, utilisez du trichloréthylène.
Vernis à ongles Posez le tissu du côté de la tache contre une feuille de papier buvard, mouillez de solvant, en déplaçant
le vêtement au fur et à mesure que la feuille se colore.
Herbe Tamponnez avec du coton imbibé d’alcool méthylique.
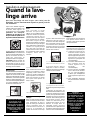
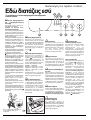
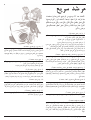
Démarrage de la lave-linge
Une bonne mise en service de
la votre machine à laver est pri-
mordiale tant pour la qualité du
lavage que pour éviter des
problèmes et augmenter sa
longévité. Après avoir chargé le
linge et dosé les produits
lessiviels, contrôlez toujours si:
1. Le hublot est bien fermé.
2. La fiche est bien branchée
dans la prise.
3. Le robinet de l’eau est ouvert.
4. Le bouton A est bien placé
en face de l’un des symboles
(Stop/Reset).
Choisissez un programme
Choisissez ce programme en
fonction du type de linge à laver.
Pour opérer ce choix, consultez
le tableau page 16. Tournez le
bouton A pour amener le
programme choisi en face du
repère situé dans le haut de la
bouton, programmez la tempé-
rature à l'aide du bouton B,
vérifiez que le bouton C est bien
dans la position que vous
désirez, sinon utilisez les
touches E, F et G, puis appuyez
sur le bouton marche/arrêt H
(position I).
Dès son installation, démarrez un cycle de lavage en
sélectionnant le programme "1" à 90 degrés.
Chouchoutez votre linge:
placez vos pièces de
lingerie, vos bas et vos
vêtements délicats dans
un sachet en toile pour les
protéger
Triez votre linge par type
de tissu et couleur: vous
obtiendrez de meilleurs
résultats
N’oubliez pas enfin de
sélectionner, si vous le désirez,
le "départ programmé" avant le
cycle de lavage.
Une fois le lavage terminé...
Attendez que l’indicateur
lumineux L s’éteigne: il faut
compter environ trois minutes.
Eteignez alors la machine à
laver en appuyant sur la touche
marche-arrêt H (position O).
Vous pouvez alors ouvrir le
hublot en toute sécurité. Après
avoir sorti le linge, laissez le
hublot ouvert ou entrouvert pour
que l’humidité à l’intérieur puisse
s’évaporer.
Fermez toujours le robinet de
l’eau.
N’oubliez pas qu’en cas de
coupure de courant ou si
vous éteignez le lave-linge, le
programme sélectionné reste
mémorisé.
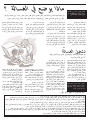
Les étiquettes vous
disent tout ce qu’il faut.
Lisez toujours les étiquettes:
vous saurez tout sur vos
vêtements et sur leurs
meilleures conditions de lavage.
Page 17, nous vous dévoilerons
tous les secrets qui se cachent
derrière les symboles reportés
sur les étiquettes des
vêtements. Leurs indications
sont précieuses, elles vous
aideront à conserver la beauté
de vos vêtements.
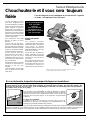
Dispositif antibalourds.
Ce lave-linge est équipé d’un
dispositif spécial à contrôle
électronique pour bien équilibrer
le chargement: avant
l’essorage, ce dispositif veille à
ce que le linge soit bien réparti
à l’intérieur du tambour, compte
tenu du type de linge et de sa
disposition initiale.
Ainsi le lave-linge ne vibre pas
et ne fait pas de bruit même à
une vitesse maximum.
Mode dinstallation et demploi
14
M

Voyant hublot bloqué
L’allumage du voyant indique
que le hublot est bloqué pour
empêcher toute ouverture
accidentelle. Attendez que le
voyant s’éteigne avant d’ouvrir
le hublot . L'attente est d’environ
trois minutes.
Arrêt cuve pleine
Cette fonction (repérée par le
symbole
) interrompt le
programme de lavage en laissant
le linge tremper dans l'eau avant la
vidange. Elle n'est présente que
pour les programmes spéciaux
textiles synthétiques, soie et
rideaux. Elle est des plus précieuse
car elle évite que les tissus délicats
et les synthétiques ne se froissent
(par exemple, quand vous ne
pouvez pas sortir le linge dès la fin
du lavage mais seulement au bout
de quelques heures). Pour
compléter le programme, tournez
le bouton A d'un cran.
Pour vos tissus synthétiques, si
vous désirez effectuer une
vidange plutôt qu'un essorage,
tournez le bouton A jusqu'au
symbole
(Vidange).
Extra economy
Cette touche réduit la
consommation d’eau lors des
rinçages. Nous vous conseillons
de ne l’utiliser qu’en cas de
chargement incomplet et de réduire
la quantité de produit lessiviel.
Peu sale
Cette touche réduit la durée du
programme de lavage d’environ
30%. A ne pas utiliser avec les
programmes spéciaux (voir
page 16) et les programmes
laine et soie.
Anti-taches (voir page 19)
Grâce à cette commande la
lave-linge effectue un lavage
plus intense qui optimise l’effet
des addittifs liquides permettant
ainsi d’éliminer les taches les
plus difficiles. Quand la touche
anti-taches est activée, pas de
prélavage possible.
Marche-arrêt
Appuyez sur la touche H pour
allumer votre lave-linge,
relachez-la pour l’éteindre.
L'arrêt de la machine n'annule
pas le programme sélectionné.
Voyant marche-arrêt
Le voyant I clignote pour
signaler que la machine est
allumée et attend d’être
programmée. Sa lumière fixe
indique que le programme
sélectionné est accepté.
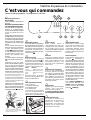
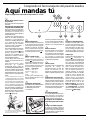
C’est vous qui commandez
Maîtrise du panneau de commandes
Choisir les bons programmes: c’est important et c’est facile.
Bouton programmes et
départ différé
Il sert à sélectionner le programme
de lavage.
Ne tournez ce bouton que dans le
sens des aiguilles d'une montre.
Pour sélectionner les programmes,
amenez le symbole/numéro
correspondant au programme désiré
en face du repère situé sur le
bouton.
Appuyez alors sur la touche marche
/ arrêt H (position I), la lampe-témoin
I commence à clignoter. Au bout de
5", la sélection est acceptée, la lampe-
témoin I cesse de clignoter (mais
reste allumée) et le cycle de lavage
débute.
Si vous désirez interrompre le
lavage en cours ou en programmer
un autre, sélectionnez l'un des
symboles
(Stop/Reset) et attendre
5" : quand l'annulation est acceptée,
la lampe-témoin I clignote, vous
pouvez alors éteindre votre
machine.
Vous pouvez utiliser ce bouton pour
différer le fonctionnement du lave-
linge.
Sélectionnez une des quatre
positions de départ différé, appuyez
sur la touche marche/arrêt H
(position I) et attendre 5". La sélection
est alors acceptée (la lampe-témoin
I reste allumée) et vous pouvez
sélectionner le programme souhaité.
L'indicateur lumineux I clignote de
façon particulière (2" allumé et 4"
éteint) pour signaler qu'il y a
programmation d'un départ différé.
Pendant cette phase, vous pouvez
ouvrir le hublot pour compléter votre
chargement de linge.
Une fois que le cycle de lavage a été
sélectionné et accepté par le lave-
linge, un changement de position du
bouton n’aura aucune conséquence
(sauf dans la position
Stop/Reset).
Bouton température
Il sert à sélectionner la température
de lavage indiquée dans le tableau
des programmes (voir page 16). Il
vous permet aussi de réduire la
température conseillée pour le
programme sélectionné, jusqu’au
lavage à froid (
).
Bouton essorage
Il sert à supprimer l’essorage
(sélectionnez le symbole
) et
à réduire la vitesse d’essorage
du programme sélectionné. Les
vitesses maximum prévues
pour les 4 types de tissu sont:
Tissu Vitesse
Coton 800 tours minute
Synthétiques 800 tours minute
Laine 600 tours minute
Soie non
De toute manière, la machine
procède à une répartition de la
charge à faible vitesse.
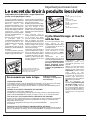
Tiroir à produits lessiviels
Il est à trois bacs:
1.Produit de prélavage;
2.Produit de lavage;
3. Assouplissants.
Le lave-linge est aussi équipé
d’un bac supplémentaire 4
(fourni) pour l’eau de Javel, à
insérer dans le compartiment 1.
Le tiroir à produits lessiviels
avec son bac à eau de javel
supplémentaire est ici.
15
Mode dinstallation et demploi
1
2
3
4
I
L
A
B
C
H
D
F
GE

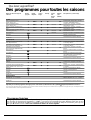
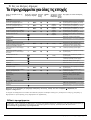
Nature des tissus et degré de
salissure
Bouton
program.
Bouton
températ.
Lessive
lavage
Assoupl. Touche
anti-
taches/
Javel
Durée du
cycle
(minutes)
Description du cycle de lavage
COTON
Blancs extrêmement sales
(draps, nappes, etc.)
1 90°C
◆◆
165
Prélavage tiède, lavage à 90°C, rinçages,
essorages intermédiaires et final
Blancs extrêmement sales
(draps, nappes, etc.)
2 90°C
◆◆
Dél./Trad.
145
Lavage à 90°C, rinçages, essorages
intermédiaires et final
Blancs et couleurs résistantes très
sales
3 60°C
◆◆
Dél./Trad.
130
Lavage à 60°C, rinçages, essorages
intermédiaires et final
Blancs peu sales et couleurs délicates
(chemises, pulls, etc.)
4 40°C
◆◆
Dél./Trad.
95
Lavage à 40°C, rinçages, essorages
intermédiaires et final
Rinçages/Javel
◆
Dél./Trad.
Rinçages, essorages intermédiaires et final
Essorage Vidange et essorage final
Stop/Reset
Interrompt/Annule le programme sélectionné
SYNTHETIQUES
Synthétiques couleurs résistantes très
sales (linge de bébé, etc.)
5 60°C
◆◆
Délicate
100
Lavage à 60°C, rinçages, anti-froissement
ou essorage délicat
Synthétiques couleurs délicates
(linge en tout genre légèrement sale)
6 40°C
◆◆
Délicate
70
Lavage à 40°C, rinçages, anti-froissement
ou essorage délicat
Synthétiques couleurs délicates
(linge en tout genre légèrement sale)
7 30°C
◆◆
30
Lavage à 30°C, rinçages et essorage
délicat
Rinçages/Javel
◆
Délicate
Rinçages, anti-froissement ou essorage
délicat
Assouplissant
◆
Rinçages avec prélèvement de l'assouplis-
sant, antifroissement ou essorage délicat
Essorage Vidange et essorage délicat
Stop/Reset
Interrompt/Annule le programme sélectionné
DELICATS
Lainage
8 40°C
◆◆
60
Lavage à 40°C, rinçages et essorage
délicat
Vêtements et tissus particulière-ment
délicats (rideaux, soie, viscose, etc.)
9 30°C
◆◆
50
Lavage à 30°C, rinçages, anti-froissement
ou vidange
Rinçages
◆
Rinçages, anti-froissement ou vidange
Essorage Vidange et essorage délicat
Vidange Vidange
Stop/Reset
Interrompt/Annule le programme sélectionné
DÉPART DIFFÉRÉ
Retard de 12 - 9 - 3 - 1 heures Diffère le départ de 12 - 9 - 3 - 1 heures
Stop/Reset
Interrompt/Annule le programme sélectionné
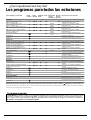
Des programmes pour toutes les saisons
Que laver, aujourd’hui?
Mode dinstallation et demploi
16
Lavage express Votre machine à laver dispose d’un programme spécial permettant de laver des vêtements peu sales en un
rien de temps. En choisissant le programme 7 à 30°C, vous pouvez laver ensemble des tissus différents (sauf laine et soie),
avec une capacité maximum de 3 kg. Ce programme permet de faire des économies de temps et d’électricité, parce qu’il ne
dure que 30 minutes environ. Nous vous conseillons d’utiliser des lessives liquides.
Important: pour annuler le programme de lavage que vous venez de lancer, sélectionnez l’un des symboles (Stop/Reset) et attendez au moins 5”.
Programme Spéciaux
Les données reportées dans le tableau sont fournies à titre indicatif, elles peuvent varier selon la quantité et le type de linge, la température de
l'eau d'alimentation et la température ambiante.

Lavage Blanchissage Repassage Nettoyage à sec Séchage
Action
forte
Action
délicate
Temp.
élevée
Temperat.
modérée
Lavage à 95°
On peut blanchir
dans l'eau froide
Repassage fort
max200°C
Nettoyage à sec avec
tous les solvants
Sécher en
machine
Lavage à 60° Ne pas blanchir
Repassage
moyen
max 150°C
Nettoyage à sec avec
perchlorure, benzine,
alcool pur, R111 et
R113
Ne pas sécher
en machine
Lavage à 40°
Repassage
max 110°C
Nettoyage à sec avec
benzine, alcool pur et
R113 Sécher à plat
Lavage à 30°
Ne pas
repasser Ne pas nettoyer à sec
Sécher étendue
une pièce pas
essorée
Lavage
délicat
à la main
Sécher sur
cintre
Ne pas laver
dans l'eau
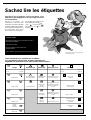
Sachez lire les étiquettes
Apprenez à lire ces symboles, vous laverez mieux, votre
linge durera plus longtemps et votre lave-linge ne vous en
servira que mieux.
Partout en Europe, les
étiquettes contiennent des
messages sous forme de petits
mais très importants symboles.
Il est primordial d’apprendre à
les comprendre pour mieux
laver et traiter vos vêtements.
On compte cinq catégories de
sigles différents: lavage
,
Javel
, repassage ,
nettoyage à sec
et enfin
séchage
.
Lisez et mémorisez les symboles de ce tableau:
vous apprendrez à mieux laver et traiter votre linge et à
augmenter les performances de votre machine à laver Indesit.
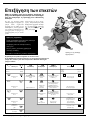
Conseils Utiles
Retournez les chemises, elles seront mieux lavées et
dureront plus longtemps.
Videz bien les poches.
Lisez les étiquettes: leurs conseils sont
précieux et utiles.
Dans le tambour, alternez grandes et petites pièces de linge.
Attention à ne pas vous tromper
de température....
17
Mode dinstallation et demploi
l
c
A
P
F
La page est en cours de chargement...
La page est en cours de chargement...
La page est en cours de chargement...
La page est en cours de chargement...
La page est en cours de chargement...
La page est en cours de chargement...
La page est en cours de chargement...
La page est en cours de chargement...
La page est en cours de chargement...
La page est en cours de chargement...
La page est en cours de chargement...
La page est en cours de chargement...
La page est en cours de chargement...
La page est en cours de chargement...
La page est en cours de chargement...
La page est en cours de chargement...
La page est en cours de chargement...
La page est en cours de chargement...
La page est en cours de chargement...
La page est en cours de chargement...
La page est en cours de chargement...
La page est en cours de chargement...
La page est en cours de chargement...
La page est en cours de chargement...
La page est en cours de chargement...
La page est en cours de chargement...
La page est en cours de chargement...
La page est en cours de chargement...
La page est en cours de chargement...
La page est en cours de chargement...
La page est en cours de chargement...
La page est en cours de chargement...
La page est en cours de chargement...
La page est en cours de chargement...
La page est en cours de chargement...
La page est en cours de chargement...
La page est en cours de chargement...
La page est en cours de chargement...
La page est en cours de chargement...
La page est en cours de chargement...
La page est en cours de chargement...
La page est en cours de chargement...
La page est en cours de chargement...
La page est en cours de chargement...
-
 1
1
-
 2
2
-
 3
3
-
 4
4
-
 5
5
-
 6
6
-
 7
7
-
 8
8
-
 9
9
-
 10
10
-
 11
11
-
 12
12
-
 13
13
-
 14
14
-
 15
15
-
 16
16
-
 17
17
-
 18
18
-
 19
19
-
 20
20
-
 21
21
-
 22
22
-
 23
23
-
 24
24
-
 25
25
-
 26
26
-
 27
27
-
 28
28
-
 29
29
-
 30
30
-
 31
31
-
 32
32
-
 33
33
-
 34
34
-
 35
35
-
 36
36
-
 37
37
-
 38
38
-
 39
39
-
 40
40
-
 41
41
-
 42
42
-
 43
43
-
 44
44
-
 45
45
-
 46
46
-
 47
47
-
 48
48
-
 49
49
-
 50
50
-
 51
51
-
 52
52
-
 53
53
-
 54
54
-
 55
55
-
 56
56
-
 57
57
-
 58
58
-
 59
59
-
 60
60
-
 61
61
-
 62
62
-
 63
63
-
 64
64


Indesit WAX 80 (EX) Mode d'emploi
- Catégorie
- Machines à laver
- Taper
- Mode d'emploi
dans d''autres langues
- English: Indesit WAX 80 (EX) User guide
- español: Indesit WAX 80 (EX) Guía del usuario
- português: Indesit WAX 80 (EX) Guia de usuario
- slovenčina: Indesit WAX 80 (EX) Užívateľská príručka
