
100187637: 1 of 6; Rev A; Rev Date 17-FEB-2016
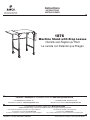
1876
For questions or concerns, please call 1-800-664-0042
available Monday-Friday 7:30 AM to 5:00 PM (Central Time) (English-speaking operators)
Si vous avez des questions pour poser ou les préoccupations
pour exprimer, connecter au 1-800-664-0042
de 7H30 à 17H00 (Heure centrale) (Opérateurs de langue anglaise)
Si usted tiene preguntas o preocupaciones,
por favor llame 1-800-664-0042
de 7:30 AM a 5:00 PM (Hora Central) (Operadores que hablan inglés)
Instructions
PRODUCT WARRANTY is available online at: www.safcoproducts.com
INSTRUCTIONS
INSTRUCCIONES
• LA GARANTÍA DEL PRODUCTO está
disponible en la Internet: www.safcoproducts.com
• LA GARANTIE DU PRODUIT est
disponible sur l’Internet : www.safcoproducts.com
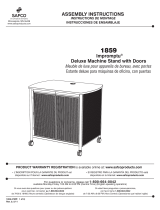
Machine Stand with Drop Leaves
Charrette avec Étagères qui Plient
La carreta con Estanter que Pliegan
Minneapolis, MN 55428
www.safcoproducts.com
an LDI Spaces Company
Safco Products Company, New Hope, MN 55428

HARDWARE PACK / PAQUET MATÉRIEL
/ PAQUETE MATERIAL
100187649
HARDWARE PACK / PAQUET MATÉRIEL / PAQUETE MATERIAL
100187669
Safco Products Company, New Hope, MN 55428
100187637: 2 of 6; Rev A; Rev Date 17-FEB-2016
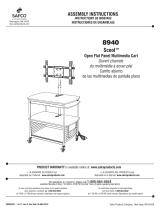
TOOLS REQUIRED: Phillips Screwdriver.
OUTILS REQUIS : Tournevis À Pointe Cruciforme.
HERRAMIENTAS REQUERIDAS: Destornillador Phillips.
Top / L’Étagère Supérieure / El Estante Superior 1 100187653
Side Shelf / L’Étagère Latérale / El Estante Lateral 2 100187654
Leg Bracket / Le Support De La Jambe / El Apoyo De La Pierna 4 100187655
Left Shelf Support / Le Support De l’Étagère Gauche / El Apoyo Del Estante Izquierdo 2 100187656
Right Shelf Support / Le Support De L’Étagère Droit / El Apoyo Del Estante Derecho 2 100187657
Modesty Panel / Le Panneau De La Modestie / El Panel De Modestia 1 100187651
Leg Frame / La Structure De La Jambe / La Estructura De La Pierna 2 100187652
A
B
C
D
E
F
G
CODE /
CODIGO
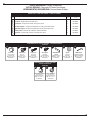
PARTS LIST / LISTE DES PIÈCES / LISTA DE PIEZAS
DESCRIPTION / DESCRIPTION /DESCRIPCIÓN
QTY. /
QUANTITÉ/
CANTIDAD
PART NO. /
N
O
DE PIECE / NO.
DE PIEZA
H
Acorn Nut
L’Écrou Du Gland
La Tuerca Ciega
Qty. / Qte. / Cant.: 8
#100187671
I
Short Screw
Vis Courte
Tornillo Corto
Qty. / Qte. / Cant.: 4
#100187672
J
Long Screw
Vis Longue
Tornillo Largo
Qty. / Qte. / Cant.: 8
#100187673
L
10MM Wrench
10MM Clé
10MM Llave Inglesa
Qty. / Qte. / Cant.: 1
#100187675
O
Caster Without Brake
Roue Sans Frein
La Rueda Sin El Freno
Qty. / Qte. / Cant.: 2
#100187675
P
K
Wood Screw
Vis À Bois
Tornillo De Madera
Qty. / Qte. / Cant.: 24
#100187674
Caster With Brake
Roue Avec Frein
La Rueda Con El Freno
Qty. / Qte. / Cant.: 2
#100187676
M
Spacer
Entretoise
Espaciador
Qty. / Qte. / Cant.: 8
#100187677
N
4MM Hex Key
4MM Clé Hexagonale
4MM Llave Hexagonal
Qty. / Qte. / Cant.: 1
#920000005
La page est en cours de chargement...

Safco Products Company, New Hope, MN 55428
990000009: 4 of 6; Rev A; Rev Date 17-FEB-2016
1
2
I
(4)
K
(24)
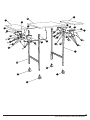
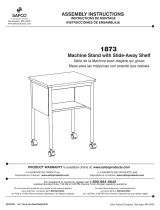
Lay the A Top and B Side Shelves face down (holes up) on a clean flat surface. Attach the C Leg Brackets to the Top (open end toward the center)
, using four D Small Screws per Bracket. Attach a E Left Shelf Support and a F Right Shelf Support to each Side Shelf, again using Small Screws.
IMPORTANT: Flanges on these Shelf Supports must face each other!
Mettez l’Étagère Supérieure A et Étagères Latérales B visage à bas (trous en haut) sur une surface plate propre. Attachez les Supports de la Jambe
C à l’Étagère Supérieure (fin ouverte vers le centre). Attachez avec quatre Petits Vis D pour chaque Support de la Jambe. Attachez un Support de
l’Étagère Gauche E et un Support de l’Étagère Droit F à chaque Étagère Latérale, utiliser encore de Petits Vis. IMPORTANT: Bourrelets sur ceux-ci
les Supports de l’Étagère doivent faire face à l’un l’autre!
Ponga el Estante Superior A y los Estantes Laterales B boca abajo (agujerea arriba) en una superficie llana limpia. Ate los Apoyos de la Pierna C al
Estante Superior (el extremo abierto hacia el centro). Ate con cuatro Tornillos Pequeños D para cada Apoyo de la Pierna. Ate un Apoyo del Estante
Izquierdo E y un Apoyo del Estante Derecho F a cada Estante Lateral, usando los Tornillos Pequeños de nuevo. IMPORTANTE: ¡Los rebordes en
éstos los Apoyos del Estante deben enfrentarnos!
B
K
D
E
(2)
K
(2)
B
D
E
K
K
(2)
(2)
C
A
C
C
C
K
K
K
K
(4)
(4)
(4)
(4)
Note: Open Ends To Center!
Noter: Fins Ouvertes Vers Le Centre!
Note: ¡Los Extremos Abiertos Hacia El Centro!
Note: Flanges Must Face Each
Other!
Noter: Les Bourrelets Doivent Faire
Face À L’un L’autre!
Note: ¡Los Rebordes Deben
Enfrentarnos!
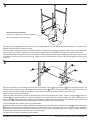
Attach the F Modesty Panel to the two G Leg Frames using I Large Screws. The notches in the Modesty Panel must face the top of the Leg Frames,
and its flanges fit between the Frames.
Attachez le Panneau de la Modestie F aux deux Structures de la Jambe G utiliser de Grands Vis I . Les encoches dans le Panneau de la Modestie
doivent faire face à la fin supérieure des Structures de la Jambe, et ses bourrelets doivent aller parfaitement entre les Structures de la Jambe.
Ate el Panel de Modestia F a las dos Estructuras de la Pierna G usando los Tornillos Grandes I . Las muescas en el Panel de Modestia deben
enfrentar el extremo superior de las Estructuras de la Pierna, y sus rebordes deben encajar entre las Estructuras de la Pierna.
I
I
(2) (2)
F
G
G
Flange
La Bride
La Brida
Notche
Les Encoche
Las Muesca
Notche
Les Encoche
Las Muesca

Safco Products Company, New Hope, MN 55428
990000009: 5 of 6; Rev A; Rev Date 17-FEB-2016
3
4
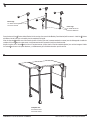
Carefully lift the leg assembly (upside down) over the Top (also upside down) and insert the ends of the legs into the Brackets. Be certain that the
Modesty Panel slides INSIDE the Bracket (see inset).
Avec soin soulevez l’assemblée de la jambe (sens dessus dessous) sur l’Étagère Supérieure (aussi sens dessus dessous) et insère les fins des jambes
dans les Supports de la Jambe. Soyez certain que le Panneau de la Modestie glisse À L’INTÉRIEUR DE le Support de la Jambe (voyez l’encart).
Cuidadosamente levante el conjunto de la pata (con el lado superior abajo) a encima del Estante Superior (también con el lado superior abajo) e inserta
los extremos de las piernas en los Apoyos de la Pierna. Haga cierto que el Panel de Modestia se desliza al INTERIOR del Apoyo de la Pierna (vea la
ilustración)
Modesty Panel Inside Bracket!
Panneau De La Modestie À L’intérieur De Support!
¡El Panel De Modestia Dentro Del Apoyo!
Align the slots and holes in the Shelf Supports with the holes in the Brackets. Insert a J Long Bolt through a K Spacer, then through the slot in the
Shelf Support and on through the rest of the leg and Bracket, and fasten with an L Acorn Nut. The Spacer must fit within the edges of the slot! Insert
another Long Bolt and Spacer through the other Bracket hole (the Spacer must fit within the notch) and fasten with an Acorn Nut.
Repeat this step with the remaining three legs.
Alignez les fentes et trous dans les Supports de l’Étagère avec les trous dans les Supports de la Jambe. Insérez un Long Verrou J à travers une
Entretoise K , alors à travers la fente dans le Support de l’Étagère et sur à travers le reste de la Jambe et Support de la Jambe, et attache avec un
Écrou du Gland L . L’Entretoise doit aller parfaitement dans les bords de la fente! Insérez un autre Long Verrou et Entretoise à travers l’autre trou du
Support de la Jambe (l’Entretoise doit aller parfaitement dans l’encoche) et attache avec un Écrou du Gland.
S’il vous plaît répétez cette instruction pour les trois restant jambes.
Encuadre las ranuras y agujeros en los Apoyos del Estante con los agujeros en los Apoyos de la Pierna. ¡Inserte un Perno Largo J a través de un Espaciador
K , entonces a través de la ranura en el Apoyo del Estante y en a través del resto de la Pierna y Apoyo de la Pierna, y ata con una tuerca ciega L . El
Espaciador debe encajar dentro de los bordes de la ranura! Inserte otro Perno Largo y Espaciador a través del otro agujero de Apoyo de Pierna (el
Espaciador debe encajar dentro de la muesca) y ata con una tuerca ciega.
Por favor repita esta instrucción para las tres piernas restantes
H
(2)
M
(2)
J
(2)
M
(2)
J
(2)

Safco Products Company, New Hope, MN 55428
990000009: 6 of 6; Rev A; Rev Date 17-FEB-2016
5
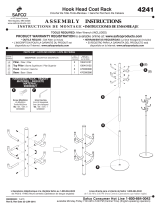
Screw the stems of the O Casters without Brakes into the rear legs (the ones with the Modesty Panel attached) with hex wrench. Install the P Casters
with Brakes into the front legs, and carefully turn the completed unit upright.
Visser les tiges des O roulettes sans freins dans les jambes à l’arrière (ceux avec le panneau modestie en annexe) avec la clé hexagonale. Installez les
roulettes avec freins P dans les pattes avant, et soigneusement mettre l’appareil en position verticale terminée.
Atornille los tallos de los Casters O sin los freno en las patas traseras (los que tienen el Panel de modestia adjuntas) con una llave hexagonal. Instale
los Casters P con frenos en las patas delanteras, y cuidadosamente gire la unidad terminada en posición vertical.
O
O
P
P
Back Legs
Les Jambes Arrières
Las Piernas Traseras
Front Legs
Les Jambes De Devant
Las Piernas Delanteras
Complete Unit
Les Jambes Arrières
Las Piernas Traseras
-
 1
1
-
 2
2
-
 3
3
-
 4
4
-
 5
5
-
 6
6


dans d''autres langues
- English: Safco 1876BL Installation guide
Documents connexes
-
Safco 5221 Guide d'installation
-
-
-
-
-
-
-
-
-
Autres documents
-
 Safco Products 1873BL Guide d'installation
-
 Safco Products 8940BL Le manuel du propriétaire
-
 Safco Products 4241BL Le manuel du propriétaire
-
Kimex 091-3141K7 Guide d'installation
-
-
 Safco Products Safco Adjustable Wood Projection Cart Le manuel du propriétaire
-
 Safco Products 1859GR Guide d'installation
-


