Haier HI1MK Installation Instructions Manual
- Catégorie
- Frigos
- Taper
- Installation Instructions Manual

Haier
What The World Comes Home To _
Automatic I_ceMaker
Fabricader de Hie_esAutematice
Instaltation InstructiOnSo
Model#
#nstructionsd'insta##atiOno
Modele#
#nstruccionesdeinsta#aci6no
Modelo#

l_portan_ Safety _nstru¢_ions
Warning!
1) To avoid electric shock, which can cause death or severe personal injury,
disconnect the refrigerator from the electrical power before connecting a
water supply line to the refrigerator.
2) Do not place fingers or hand on the automatic ice making mechanism
while the refrigerator is plugged in. This will help protect you from
possible injury. It will also prevent interference with moving parts of the
ejector mechanism and the heating element that releases the cubes.
To avoid property damage:
• Copper tubing is recommended for the water supply line. Water
supply tubing should be 1/4". Plastic is not recommended since it
greatly increases the potential for water leaks.
• Do not install water supply tubing in areas where the temperature
falls below freezing.
• Connect the ice maker to a drinkable water source that is not tied
into a water softening system. Chemicals from the softener may
damage the ice maker, causing it to malfunction.
SuppMies Required for installation
The following items are required to install the ice maker.
a) 1/4 inch copper supply line with shut off valve.
b) 1/4 inch brass compression nut and ferrule (sleeve).
• The copper tubing and shut off valve should be available at your local
hardware or plumbing supply store. Coil enough tubing in the back of the
unit to allow movement for cleaning.
TooMs Required for Installation
Plastic putty knife
Phillips screwdriver
1/4-inch socket wrench or nut driver
Adj usta ble wrench
Needle nose pliers
Power drill with Phillips bit #2
1

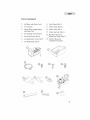
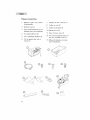
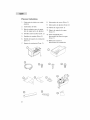
Parts }nc}uded
1. Ice Maker with Power Cord
2. Ice Container
3. Plastic Water Supply Tubing
with Plastic Nut
4. Self-Tapping Screws (Qty-2)
5. Pan Head Screws (Qty-2)
6. Leveling Bracket Screw (Qty-1)
7. Leveling Bracket (Qty-1)
8. Steel Clamp (Qty-1)
9. Plastic Clamp (Qty-2)
10. Water Valve (Qty-1)
11. Water Inlet Tube (Qty-1)
12. Hex-Head Screw for
Water Line Clamp (Qty-1)
13. Owner's Manual &
Installation Instructions
G
©
©
©
®

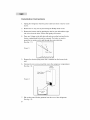
_nstaHation Instruotions
1. Unplug the refrigerator from the power outlet and move it out for easier
access.
2. Remove the ice tray rack by unscrewing the Phillips head screws.
3. Remove the freezer shelf by pushing the shelf to your left until the right
side is free from the holes. Lift the shelf gently and remove.
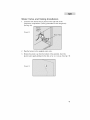
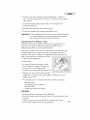
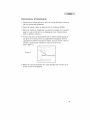
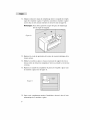
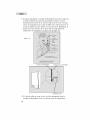
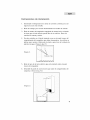
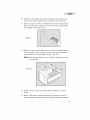
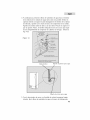
4. There are 2 plugs on the left side wall and one on the back wall in the
freezer compartment that must be removed. The holes are used to
mount the ice maker and to pull through the water inlet tube.
(See fig. # 1 )
(Figure 1)
5.
6.
7.
3
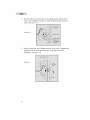
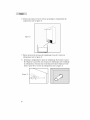
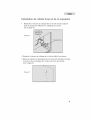
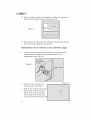
Remove the electrical plug cover that is mounted on the freezer back
wall.
Unscrew the rear access panel that covers the compressor compartment.
(See fig. # 2) nterior
Condenser
Water Filling
Tube Gromme[
(Figure 2)
I Rear Acc:ssPane :
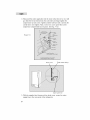
Pull out the water fill tube grommet from the rear of the refrigerator.
(See fig. # 2)

iiiiiiiiiiiiiiiiiiiiiiiiiiiiiiiiiiiiiiiiiiiiiiiiiiiiiiii !i !i !i !i !i !i !i !i !i !i !i !i !i !i !i !i !i !i !i !i !i !i i i i ! !!
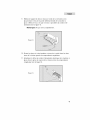
8,
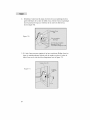
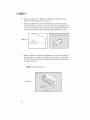
Insert the supplied fill tube completely into the grommet. Reinstall the
grommet with the filling tube through the refrigerator body. (Rotate
while inserting the tube) Firmly reinstall the grommet in the rear of the
refrigerator. (See fig # 3)
(Figure 3)
g,
Install the supplied leveling bracket with the supplied leveling bracket
screw to the screw hole on the bottom of the icemaker. Use the screw
hole that is near the power cord. (See fig. # 4)
Note: Do not tighten all the way
(Figure 4)
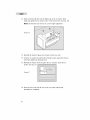
10. Take the 2 pan head screws and screw them half way into the 2 holes
on the left wall of the freezer compartment.
11. Insert the electrical power cord plug of the icemaker into the power
socket on the rear wall of the freezer compartment. (Seefig. # 5)
(Figure 5)
i

12. Align and fit the fill tube into the filling cup on the ice maker. Now
hang and tighten the ice maker on the 2 side wall screws. (See fig. #6)
Note: The fill tube may need to be cut for length adjustment.
(Figure 6)
13. Reinstall the electrical plug cover located on the rear wall.
14. Level the ice maker by pushing the leveling bracket against the freezer
wall. Now tighten the leveling screw.
15. Reinstall the freezer shelf and place the ice container under the ice
maker. (See fig. #7)
(Figure 7)
16. Raise the wire auto shut off arm on the ice maker until the full
installation is completed.

Water Valve and Tubing _nstaHation
1. Locate the wire harness that is placed on the right side of the
compressor compartment, (Factory preinstalled on the refrigerator)
(See fig. #8)
(Figure 8)
2. Plug the harness to the supplied water valve.
3. Remove the plastic cap from the bottom of the grommet. Insert the
plastic water supply tubing into the inlet as far as it can go. (See fig # 9)
(Figure 9)

4. Insert the other end of the plastic water tubing into the bottom of the
water valve. Tighten the plastic nut, while pushing the tube inside the
valve. (See fig # 10)
(Figure 1O)
5. Using a power drill with a Phillips-head bit, drive in the 2 supplied self
tapping screws to attach the water valve to the right side of the
refrigerator. (See fig. # 11)
(Figure 11)

Water SuppMy Connection
This water supply installation is not warranted by the refrigerator
or icemaker manufacturer, Follow these instructions carefully to
minimize the risk of expensive water damage.
Supplies Required for Installation:
• Access to a household cold water line with water pressure between
20psi. and 120psi.
• A water supply line made of 1/4-inch OD, copper tubing. To determine
the length of the copper tubing needed, you will need to measure the
distance from the ice maker inlet valve at the back of the refrigerator to
your cold water pipe. Then add approximately 7 feet, so the refrigerator
can be moved out for service.
• A shutoff valve to connect the water supply line to your household
water system.
Note: Do Not use a self-piercing type shutoff valve.
• A compression nut and ferrule (sleeve) for connecting the water supply
line to the ice maker inlet valve.
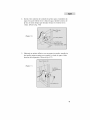
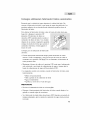
1. Turn off the water supply at the shut off valve.
2. Remove the plastic cap from the water valve inlet.
3. Insert the brass compression nut and the ferrule (sleeve) onto the end of
the copper water line as shown in the picture.

4.Nowpushthe water supply line into the water valve inlet as far as it will
go. Slide the ferrule (sleeve) into the valve inlet and finger tighten the
compression nut onto valve. Tighten another half-turn with a wrench. Be
careful not to over tighten. Now, screw rear access panel that covers
compressor com )artment back in place. (See fig. # 12)
(Figure 12) ..........
Power cord Plastic water tubing
ii_;!i!i!i!
Coper water line
5. With the supplied steel clamp and hex head screw, secure the water
supply line to the rear panel of the refrigerator.
9

6.Coiltheexcesswatersupplylinebehindrefrigerator,asshownin
fig.# 12andarrangethecoilssotheydonotvibrateorwearagainst
othersurfaces.
7.TurnONthewatersupplyattheshutoffvalveandtightenany
connectionsthatleak.
8.Reconnectthe refrigerator to the power supply.
9. To turn the icemaker ON, lower the auto shut-off arm.
Important: It takes approximately 24 hours for the ice maker to produce
ice. New plumbing may cause ice discoloration and poor
flavor. Discard ice made in the first 24 hours.
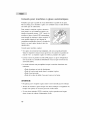
Automatic Maker Tips
Remember that the water quality determines your ice quality. Do not
connect the ice maker to water that is softened. Chemicals from a
malfunctioning softener can damage the icemaker.
To stop the ice maker, lift the wire arm until it clicks and locks in the OFF
(raised) position. The ice maker turns OFF automatically when the ice
container is full. If your model has an adjustable freezer shelf, place the
shelf so that when the ice container is full, the
ice will hit the wire signal arm.
Ice Maker Tips:
• Ice stored too long may develop an odd
flavor. Empty the container and make sure
the wire arm is in its ON (lowered)
position. The ice maker will then produce ice.
• Keep the wire arm in OFF position until the
refrigerator is connected to the water supply or whenever the water
supply is turned OFF.
• The following sounds are normal when the ice maker is operating.
• Running motor
• Ice dropping into ice container
• Running water
• Water valve opening or closing
CAUTION:
• Do Not wash the ice container in your dishwasher.
• Stop the ice maker when cleaning the freezer or when leaving for short
vacations.
• If the ice maker has to be turned OFF for a long period of time,
turn the water supply valve to the closed position. 10

In-Home Service
What is covered and for how
long?
This warranty covers all defects in
workmanship or materials of the
automatic ice maker for a period of:
12 months labor
12 months parts
The warranty commences on the date
the item was purchased and the original
purchase receipt must be presented to
the authorized service center before
warranty repairs are rendered.
What is covered.
1. The mechanical and electrical parts,
which serve as a functional, purpose
of this kit for a period of 12 months.
What will be done?
1, We will repair or replace, at our dis-
cretion any mechanical or electrical
part which proves to be defective in
normal usage during the warranty
period so specified.
2. There will be no charge to the
purchaser for parts and labor on any
covered items during the initial 12
month period.
3. Contact your nearest authorized
service center. For the name of the
nearest service center please call
1-877-337-3639
THIS WARRANTY COVERS
WITHIN THE CONTINENTAL UNIT-
ED STATES, PUERTO RICO AND
CANADA. IT DOES NOT COVER
THE FOLLOWING:
Damages from improper installation.
Damages in shipping.
Defects other than manufacturing.
Damage from misuse, abuse, accident,
alteration, lack of proper care and
maintenance or incorrect current or
voltage.
Damage from other than household use.
11
Damage from service by other than an
authorized dealer or service center.
Transportation and shipping.
• Improper installation
If you have an installation problem,
contact your dealer or installer.
You are responsible for providing ade-
quate electrical, plumbing and other
connecting facilities, including the water
line to the ice maker and the water line
installation.
• Replacement of house fuses or resetting
of circuit breakers.
• Failure of the product if it is used for
other than its intended purpose or used
commercially.
• Damage to product caused by
accident, fire, floods or Acts of God,
WARRANTOR IS NOT RESPONSIBLE
FOR CONSEOUENTIAL DAMAGES.
THIS LIMITED WARRANTY IS GIVEN IN
LIEU OF ALL OTHER WARRANTIES,
EXPRESSED OR, INCLUDING THE
WARRANTIES OF MERCHANTABILITY
AND FITNESS FOR A PARTICULAR
PURPOSE.
The remedy provided in this warranty is
exclusive and is granted in lieu of all
other remedies,
This warranty does not cover incidental
or consequential damages, so the above
limitations may not apply to you. Some
States do not allow limitations on how
long an implied warranty lasts, so the
above limitations may not apply to you,
This warranty gives you specific legal
rights, and you may have other rights,
which vary, from state to state.
Haler America
New York, NY 10018

Consignes de seourite importantes
Avertissement!
1) Pour eviter tout risque d'electrocution pouvant entrainer des blessures
graves voir la mort, debranchez le cordon d'alirnentation du refrigerateur
de la source de courant avant de raccorder la conduite d'alirnentation
d'eau au refrigerateur.
2) Ne placez pas les doigts ou les mains sur le rnecanisrne de la machine
glace autornatique pendant que le refrigerateur est branche. Vous eviterez
ainsi de vous blesser accidentellernent. Cela evitera egalernent toute inter-
ference avec les pieces mobiles du rnecanisrne d'ejection et de I'elernent
chauffant qui libere les gla(i:ons.
Pour eviter des deg_ts materiels:
• II est recornrnande d'utiliser une conduite en cuivre pour la tuyau-
terie d'alirnentation d'eau. La conduite doit rnesurer 1/4 po. (6
rnrn) de diarnetre. II est deconseille d'utiliser un tuyau en plastique
car cela augrnentera les risques de fuites potentielles.
• N'installez pas la conduite d'alirnentation d'eau dans les endroits
ore3il risque de geler.
• Raccordez la machine a glace a une source d'eau potable qui
n'est pas raccordee a un adoucisseur d'eau. Les produits chirn-
iques presents dans un adoucisseur d'eau risquent d'endornrnager
la machine a glace et elle risque de tornber en panne.

Accessoires requis pour I instaIIation
Les amides suivants sont necessaires afin d'instaIIerla machine a glace.
a) Une conduite d'alimentation en cuivre de 1/4 po. (6 ram) de diametre
avec un robinet d'arret.
b) Un ecrou de compression en laiton de 1/4 po. (6 mm) de diametre et un
raccord de branchement (manchon).
• Vous pouvez vous procurer la conduite en cuivre et le robinet de d'arret
aupres de votre quincaillier ou d'un magasin de materiel de plomberie.
Enroulez suffisamment de tuyau a I'arriere de la machine afin de pouvoir y
acceder pour le nettoyage.
OutHs r÷quis pour _'instaHation
Couteau a mastic en plastique
Tournevis Phillips (cruciforme)
Cle a tube d'1/4 po.( 6 mm) ou tourne-ecrou
Cle reglable
Pinces a becs fins
Perceuse electrique avec foret Phillips #2

Pie¢÷s foumies
1. Machine a glace avec cordon
d'alimentation
2. Recipient a glace
3. Tuyau d'alimentation d'eau en
plastique avec ecrou plastique
4, Vis autotaraudeuses (2)
5. Visa cylindrique bombee (2)
6. Vis de support pour raise
niveau (1)
7. Support de mise a niveau (1)
8. Collier en acier (1)
9. Collier en plastique (2)
10, Robinet d'eau (1)
11. Tube d'arrivee d'eau (1)
12. Visa tete hexagonale pour col-
lier de la conduite d'eau (1)
13. Manuel d'utilisation et instruc-
tions d'installation
©
©
©
®
®

iiiiiiiiiiiiiiiiiiiiiiiiiiiiiiiiiiiiiiiiiiiiiiiiii i ii ii ii ii ii ii ii ii ii ii ii ii ii ii ii ii ii ii ii ii ii i
_nstru¢_ions d_instaHation
1. Debranchez le rdrigerateur de la prise de courant electrique et sortez-le
afin d'y acceder plus facilement.
2. Retirez la clayette a glace en devissant les vis cruciformes Phillips.
3. Retirez la clayette du congelateur en poussant la clayette vers la gauche
jusqu'a ce que le c6te droit se soit degage des trous. Soulevez douce-
ment la clayette et retirez-la.
4. II existe deux prises de branchement dans la cloison laterale gauche et
une prise sur la cloison arriere du compartiment congelateur dont les
capuchons de protection devront etre retires. Les trous servent a fixer la
machine a glace et pour introduire le tuyau d'arrivee d'eau
(voir la figure 1).
(Figure 1)
5. Retirez le cache de protection de la prise electrique qui se trouve sur la
cloison arriere du congelateur.

6.Devissezlepanneaud'accesarrierequiprotegelecompartimentdu
compresseur(voirlafigure2).
(Figure 2)
7. Retirez le passe-fils du tuyau de remplissage d'eau de I'arriere du
refrigerateur (voir la figure 2).
8.
Introduisez completement le tuyau de remplissage fourni dans le passe-
fils. Replacez le passe-fils avec le tuyau de remplissage dans I'habillage
du refrigerateur. (Tournez tout en introduisant le tube). Replacez ferme-
ment le passe-fils a I'arriere du refrigerateur (voir la figure 3).
(Figure 3)

g,
Montez le support de mise a niveau a I'aide de la vis fournie en la
pla_;:ant dans le trou de la partie inferieure (fond) de la machine
glace. Utilisez le trou a vis qui se trouve a proximite du cordon d'ali-
mentation (voir la figure 4).
Remarque: Ne pas serrez completement.
(Figure 4)
10. Prenez les deux visa tete bombees et vissez-les a moitie dans les deux
trous de la cloison gauche du compartiment congelateur.
11. Introduisez la fiche du cordon d'alimentation electrique de la machine
glace dans la prise de courant de la cloison arriere du compartiment
congelateur (voir la figure 5).
(Figure 5)

12. Alignez et placez le tuyau de remplissage dans la coupelle de remplis-
sage de la machine a glace. A present, accrochez la machine a glace
sur les deux vis des cloisons laterales et serrez-les (voir la figure 6).
Remarque: Vous devrez peut-etre couper le tuyau de remplissage
afin de regler la Iongueur.
(Figure 6)
13. Replacez le cache de protection de la prise de courant electrique de la
cloison arriere.
14. Mettez la machine a glace a niveau en pressant le support de mise
niveau contre la cloison du congelateur. Serrez a present la vis de mise
niveau.
15. Replacez la clayette du congelateur et placez le recipient a glace sous
la machine a glace (voir la figure 7).
(Figure 7)
16. Apres avoir completement termine I'installation, relevez le bras d'arret
automatique de la machine a glace.

_nstaHation du robin÷_ d_eau ÷t de _a tuyauterie
1. Recherchez le faisceau de cablage situe sur le cote droit du comparti-
ment du compresseur. (Monte sur le refrigerateur en usine).
(voir la figure 8)
(Figure 8)
2. Branchez la faisceau de cablage sur la valve de debit d'eau fournie.
3. Retirez le capuchon en plastique du bas du passe-ills. Introduisez le tuyau
d'arrivee d'eau en plastique dans I'entree aussi loin que possible
(voir la figure 9).
(Figure 9)
La page est en cours de chargement...
La page est en cours de chargement...
La page est en cours de chargement...
La page est en cours de chargement...
La page est en cours de chargement...
La page est en cours de chargement...
La page est en cours de chargement...
La page est en cours de chargement...
La page est en cours de chargement...
La page est en cours de chargement...
La page est en cours de chargement...
La page est en cours de chargement...
La page est en cours de chargement...
La page est en cours de chargement...
La page est en cours de chargement...
La page est en cours de chargement...
La page est en cours de chargement...
La page est en cours de chargement...
La page est en cours de chargement...
La page est en cours de chargement...
-
 1
1
-
 2
2
-
 3
3
-
 4
4
-
 5
5
-
 6
6
-
 7
7
-
 8
8
-
 9
9
-
 10
10
-
 11
11
-
 12
12
-
 13
13
-
 14
14
-
 15
15
-
 16
16
-
 17
17
-
 18
18
-
 19
19
-
 20
20
-
 21
21
-
 22
22
-
 23
23
-
 24
24
-
 25
25
-
 26
26
-
 27
27
-
 28
28
-
 29
29
-
 30
30
-
 31
31
-
 32
32
-
 33
33
-
 34
34
-
 35
35
-
 36
36
-
 37
37
-
 38
38
-
 39
39
-
 40
40


Haier HI1MK Installation Instructions Manual
- Catégorie
- Frigos
- Taper
- Installation Instructions Manual
dans d''autres langues
- English: Haier HI1MK
- español: Haier HI1MK
Autres documents
-
Inglis IHS226303 Le manuel du propriétaire
-
Roper RT14ZKXKQ04 Le manuel du propriétaire
-
KitchenAid KSRS22FGBT04 Le manuel du propriétaire
-
Crosley CT14NKXJW00 Le manuel du propriétaire
-
-
Whirlpool ED20TKXFW02 Le manuel du propriétaire
-
-
LG LSC27950SB Le manuel du propriétaire
-
-
Maytag MFT2673BEM10 Le manuel du propriétaire