
4015-2 Yanokuchi, Inagi-city, Tokyo 206-0812 Japan
C
2004 KORG INC.
Thank you for purchasing the Korg MICRO TUNER AW-1.
Merci d’avoir fait l’acquisition du MICRO TUNER AW-1 Korg.
Herzlichen Dank für den Kauf des Korg MICRO TUNER AW-1.
OWNER’S MANUAL
MANUEL D’UTILISATION
BEDIENUNGSANLEITUNG
Precautions
Location
Using the unit in the following locations can result in a malfunction.
• In direct sunlight
• Locations of extreme temperature or humidity
• Excessively dusty or dirty locations
• Locations of excessive vibration
• Close to magnetic fields
Power supply
Be sure to turn the power switch to OFF when the unit is not in use. Remove the battery in order to
prevent it from leaking when the unit is not in use for extended periods.
Interference with other electrical devices
Radios and televisions placed nearby may experience reception interference. Operate this unit at a
suitable distance from radios and televisions.
Handling
To avoid breakage, do not apply excessive force to the switches or controls.
Care
If the exterior becomes dirty, wipe it with a clean, dry cloth. Do not use liquid cleaners such as
benzene or thinner, or cleaning compounds or flammable polishes.
Keep this manual
After reading this manual, please keep it for later reference.
Keeping foreign matter out of your equipment
Never set any container with liquid in it near this equipment. If liquid gets into the equipment, it could
cause a breakdown, fire, or electrical shock. Be careful not to let metal objects get into the equip-
ment.
CE mark for European Harmonized Standards
CE mark which is attached to our company’s products of AC mains operated apparatus until December 31,
1996 means it conforms to EMC Directive (89/336/EEC) and CE mark Directive (93/68/EEC).
And, CE mark which is attached after January 1, 1997 means it conforms to EMC Directive (89/336/EEC),
CE mark Directive (93/68/EEC) and Low Voltage Directive (73/23/EEC).
Also, CE mark which is attached to our company’s products of Battery operated apparatus means it con-
forms to EMC Directive (89/336/EEC) and CE mark Directive (93/68/EEC).
THE FCC REGULATION WARNING (for U.S.A.)
This equipment has been tested and found to comply with the limits for a Class B digital device, pursuant to
Part 15 of the FCC Rules. These limits are designed to provide reasonable protection against harmful
interference in a residential installation. This equipment generates, uses, and can radiate radio frequency
energy and, if not installed and used in accordance with the instructions, may cause harmful interference to
radio communications. However, there is no guarantee that interference will not occur in a particular instal-
lation. If this equipment does cause harmful interference to radio or television reception, which can be
determined by turning the equipment off and on, the user is encouraged to try to correct the interference by
one or more of the following measures:
• Reorient or relocate the receiving antenna.
• Increase the separation between the equipment and receiver.
• Connect the equipment into an outlet on a circuit different from that to which the receiver is connected.
• Consult the dealer or an experienced radio/TV technician for help.
Unauthorized changes or modification to this system can void the user’s authority to operate this equip-
ment.
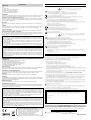
Anbringen des mitgelieferten Clips
Attaching the included clip
Mise en place de la pince fournie
Meter surface
Attach / Mise en place
Anbringen
Remove / Retrait
Abnehmen
Surface de l'accordeur
Messgerätoberfläche
OK
NG
Firmly push the clip all the way into the attachment slot, making sure that it's ori-
ented correctly. To remove the clip, grasp the AW-1 and pull the clip in the opposite
direction.
Do not attempt to insert anything other than the included clip. Doing so may damage the con-
nector or other parts.
The large clip can rotate a maximum of +/-90 degrees. It will break if you attempt to rotate it far-
ther than this.
Poussez fermement la pince dans la fente de fixation jusqu'au bout, en veillant à ce qu'elle
soit dans le bon sens. Pour enlever la pince, Saisissez le AW-1 et tirez sur la pince dans la
direction opposée.
N'essayez pas d'insérer autre chose que la pince fournie. Vous risqueriez d'endommager le con-
necteur ou d'autres pièces.
La grande pince peut pivoter sur un angle maximal de +/- 90 degrés. Elle se brisera si vous es-
sayez de la faire tourner plus.
Drücken Sie den Clip ganz in den Anbringungsschacht, und stellen Sie sicher, dass er
richtig ausgerichtet ist. Zum Abnehmen des Clips greifen Sie den AW-1 und ziehen den
Clip in entgegengesetzter Richtung.
Versuchen Sie nicht, einen anderen Gegenstand als den mitgelieferten Clip einzusetzen. Dadurch
können die Steckverbindung oder andere Teile beschädigt werden.
Der große Clip kann maximal um +/-90 Grad drehen. Wenn Sie versuchen, ihn weiter zu dre-
hen, bricht er ab.
IMPORTANT NOTICE TO CONSUMERS
This product has been manufactured according to strict specifications and voltage requirements that are
applicable in the country in which it is intended that this product should be used. If you have purchased this
product via the internet, through mail order, and/or via a telephone sale, you must verify that this product is
intended to be used in the country in which you reside.
WARNING: Use of this product in any country other than that for which it is intended could be dangerous
and could invalidate the manufacturer's or distributor's warranty.
Please also retain your receipt as proof of purchase otherwise your product may be disqualified from the
manufacturer's or distributor's warranty.

Précautions
Emplacement
L'utilisation de cet instrument dans les endroits suivants peut en entraîner le mauvais fonctionne-
ment.
• En plein soleil
• Endroits très chauds ou très humides
• Endroits sales ou fort poussiéreux
• Endroits soumis à de fortes vibrations
• A proximité de champs magnétiques
Alimentation
Lorsque vous n’utilisez pas l’appareil, n’oubliez pas de le mettre hors tension. Retirez les piles pour
éviter toute fuite lorsque l’appareil ne sera pas utilisé pendant de longues périodes de temps.
Interférences avec d'autres appareils électriques
Les postes de radio et de télévision situés à proximité peuvent par conséquent souffrir d'interféren-
ces à la réception. Veuillez dès lors faire fonctionner cet appareil à une distance raisonnable de
postes de radio et de télévision.
Maniement
Pour éviter de les endommager, manipulez les commandes et les boutons de cet instrument avec
soin.
Entretien
Lorsque l'instrument se salit, nettoyez-le avec un chiffon propre et sec. Ne vous servez pas d'agents
de nettoyage liquides tels que du benzène ou du diluant, voire des produits inflammables.
Conservez ce manuel
Après avoir lu ce manuel, veuillez le conserver soigneusement pour toute référence ultérieure.
Evitez toute intrusion d'objets ou de liquide
Ne placez jamais de récipient contenant du liquide près de l'instrument. Si le liquide se renverse ou
coule, il risque de provoquer des dommages, un court-circuit ou une électrocution.Veillez à ne pas
laisser tomber des objets métalliques dans le boîtier (trombones, par ex.).
Marque CE pour les normes européennes harmonisées
La marque CE apposée sur tous les produits de notre firme fonctionnant sur secteur jusqu'au 31 décembre
1996 signifie que ces appareils répondent à la Directive EMC (89/336/CEE) et à la Directive concernant la
marque CE (93/68/CEE).
La marque CE apposée après le 1 janvier 1997 signifie que ces appareils sont conformes à la Directive
EMC (89/336/CEE), à la Directive concernant la marque CE (93/68/CEE) ainsi qu'à la Directive Basse
Tension (73/23/CEE).
La marque CE apposée sur tous les produits de notre firme fonctionnant sur piles signifie que ces appa-
reils répondent à la Directive EMC (89/336/CEE) et à la Directive concernant la marque CE (93/68/CEE).
REMARQUE IMPORTANTE POUR LES CLIENTS
Ce produit a été fabriqué suivant des spécifications sévères et des besoins en tension applicables dans le
pays où ce produit doit être utilisé. Si vous avez acheté ce produit via l’internet, par vente par correspon-
dance ou/et vente par téléphone, vous devez vérifier que ce produit est bien utilisable dans le pays où vous
résidez.
ATTENTION: L’utilisation de ce produit dans un pays autre que celui pour lequel il a été conçu peut être
dangereuse et annulera la garantie du fabricant ou du distributeur. Conservez bien votre récépissé qui est
la preuve de votre achat, faute de quoi votre produit ne risque de ne plus être couvert par la garantie du
fabricant ou du distributeur.
Vorsichtsmaßnahmen
Aufstellungsort
Vermeiden Sie das Aufstellen des Geräts an Orten, an denen
• es direkter Sonneneinstrahlung ausgesetzt ist;
• hohe Feuchtigkeit oder Extremtemperaturen auftreten können;
• Staub oder Schmutz in großen Mengen vorhanden sind;
• das Gerät Erschütterungen ausgesetzt sein kann.
• in der Nähe eines Magnetfeldes.
Stromversorgung
Stellen Sie den Netzschalter auf OFF, wenn das Gerät nicht benutzt wird. Wenn Sie das Gerät über einen
längeren Zeitraum nicht benutzen, nehmen Sie die Batterien heraus, damit sie nicht auslaufen.
Störeinflüsse auf andere Elektrogeräte
Dieser kann bei in der Nähe aufgestellten Rund-funkempfängern oder Fernsehgeräten Empfangsstörungen
hervorrufen. Betreiben Sie solche Geräte nur in einem geeigneten Abstand von diesem Erzeugnis.
Bedienung
Vermeiden Sie bei der Bedienung von Schaltern und Reglern unangemessenen Kraftaufwand.
Reinigung
Bei auftretender Verschmutzung können Sie das Gehäuse mit einem trockenen, sauberen Tuch abwischen.
Verwenden Sie keinerlei Flüssigreiniger wie beispielsweise Reinigungsbenzin, Verdünnungs- oder Spülmittel.
Verwenden Sie niemals brennbare Reiniger.
Bedienungsanleitung
Bewahren Sie diese Bedienungsanleitung gut auf, falls Sie sie später noch einmal benötigen.
Flüssigkeiten und Fremdkörper
Stellen Sie niemals Behältnisse mit Flüssigkeiten in der Nähe des Geräts auf. Wenn Flüssigkeit in das Gerät
gelangt, können Beschädigung des Geräts, Feuer oder ein elek-trischer Schlag die Folge sein. Beachten Sie,
daß keinerlei Fremdkörper in das Gerät gelangen.
Das CE-Zeichen für die Europäische Gemeinschaft
Vor dem 31.12.1996 vergebene CE-Zeichen auf unseren netzgespeisten Geräten zeigen an, daß diese
Geräte gemäß der EMC-Richtlinie (89/336/EWG) und der CE-Richtlinie (93/68/EWG) der EU arbeiten.
Nach dem 01.01.1997 vergebene CE-Zeichen auf unseren netzgespeisten Geräten zeigen an, daß diese
Geräte gemäß der EMC-Richtlinie (89/336/EWG), der CE-Richtlinie (93/68/EWG) und der Niederspannungs-
stromrichtlinie (73/23/EWG) der EU arbeiten.
Die CE-Zeichen auf unseren batteriegespeisten Geräten zeigen an, daß diese Geräte gemäß der EMC-
Richtlinie (89/336/EWG) und der CE-Richtlinie (93/68/EWG) der EU arbeiten.
WICHTIGER HINWEIS FÜR KUNDEN
Dieses Produkt wurde unter strenger Beachtung von Spezifikationen und Spannungsanforderungen her-
gestellt, die im Bestimmungsland gelten. Wenn Sie dieses Produkt über das Internet, per Postversand und/
oder mit telefonischer Bestellung gekauft haben, müssen Sie bestätigen, dass dieses Produkt für Ihr Wohn-
gebiet ausgelegt ist.
WARNUNG: Verwendung dieses Produkts in einem anderen Land als dem, für das es bestimmt ist, ver-
wendet wird, kann gefährlich sein und die Garantie des Herstellers oder Importeurs hinfällig lassen wer-
den. Bitte bewahren Sie diese Quittung als Kaufbeleg auf, da andernfalls das Produkt von der Garantie des
Herstellers oder Importeurs ausgeschlossen werden kann.
This device complies with Part 15 of the FCC Rules.
Operation is subject to the following two conditions: (1) This
device may not cause harmful interference, and (2) this
device must accept any interference received, including
interference that may cause undesired operation.
Complies with Canadian ICES-003 Class B.
Conforme au Reglement Canadian NMB-003 classe B.

After you've read this manual, please keep it for future reference.
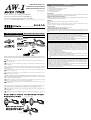
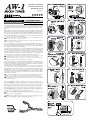
Parts of the AW-1 and what they do
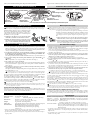
Installing the battery
Turn the power switch off before you replace the battery. The battery included with the AW-1 is
for the purpose of verifying that the unit operates correctly, and may not have a very long life.
When the battery begins to run low, the liquid crystal
display (in particularly the meter movement) will be-
come fainter. The AW-1 will continue to operate for a
while longer, but tuning will be less accurate. Replace
the battery as soon as possible.
1. Lightly press the battery cover located on the back
of the AW-1, and slide it in the direction shown.
2. Making sure that the battery is facing the correct
way (if you're looking at the back surface of the AW-
1, the “+” side of the battery should be toward your-
self), insert the battery and replace the cover.
Tuning procedure
1.
Press the power button. The power will turn on/off each time you press this button.
When you turn the power on, the reference pitch is set to the value you selected last
time (default: A=440 Hz). If the power is left on for approximately 20 minutes with-
out any sound being input, it will turn off automatically.
2. Use the input select button to specify whether the sound of your instrument will
be picked up from the internal mic (MIC) or the included clip mic (PIEZO). (Re-
fer to “Attaching the included clip,” over.)
The setting will alternate between MIC and PIEZO each time you press the button.(*)
3. If you want to change the reference pitch (calibration), press the CALIB [ ] or
[
] button.
You can adjust this over a range of 410 Hz...480 Hz in 1 Hz steps.(*)
4. Play a single note on your instrument.
The display will show the name of the note closest to the pitch detected by the mic.
Tune your instrument to approximately the correct pitch so that the desired note
name appears.
5. Once again play a single note on your instrument, and adjust the tuning so that the
center segment of the meter is lit.
The right (+) indicator will light if the pitch is too high, and the left (-) indicator will
light if the pitch is too low.
You have the option of reversing the direction of the AW-1’s meter between left and right, but
in our explanation here we will assume that the High (+) indicator is located at the right side.
If you want to tune a pure major third or pure minor third above a certain note, adjust
the pitch to the [
] (-13.7 cents) or [ ] (+15.6 cents) marks in the meter.
For example if you want to tune to a pure major third above A (0 cents), make the note
name indicator read C
, and tune so that the meter indicates [
] (-13.7 cents). Alterna-
tively, if you want to tune to a pure minor third above A (0 cents), make the note name
indicator read C, and tune so that the meter indicates [
] (+15.6 cents).
Avoid letting the mic pick up any extraneous sound while tuning.
Even if the pitch is within the range of detection, it may not be possible to detect the pitch of an
instrumental sound that contains large numbers of overtones or that has a rapid decay (e.g., very
low or very high notes on a piano).
Reverse the meter display (Reverse function)
Each time you press the display reverse button, the High (+) indicator will move al-
ternately between the left and right sides. Select the position that feels most natural
for the instrument to which you've attached the AW-1.(*)
Specifications
Scale: 12-note equal temperament
Range(sine wave): A0 (27.50 Hz)–C8 (4186 Hz)
Precision: +/-1 cent Reference pitch: 410...480 Hz (1 Hz steps)
Dimensions: 25 mm (D) x 55 mm (W) x 9 mm (H)
0.98’’(D) x 2.17’’ (W) x 0.35’’ (H) (AW-1 only)
Weight: 10 g/0.022 lbs (including battery)
Battery life:
approximately 20 hours (tuner continuously operating, A4 input)
Included items: CR1220 lithium battery (3V) for checking operation
large instrument clip (with internal piezo pickup),
small instrument clip (with internal piezo pickup),
carrying case
*
Settings are remembered even when the power is off. However, settings will be initialized
when you replace the battery (default: CALIB=440 Hz, PIEZO, right side High).
• Specifications and appearance are subject to change without notice for the sake of improv-
ing the product.
Après avoir lu ce manuel, veuillez le conserver pour vous y référer ultérieurement.
Parties du AW-1 et leurs fonctions
Mise en place de la pile
Mettez l'appareil hors tension à l'aide de l'interrupteur d'alimentation avant de remplacer la pile.
La pile fournie avec le AW-1 est destinée à la vérification du bon fonctionnement de l'appareil et
il est possible que son autonomie soit plus courte que celle des autres piles.
Lorsque la pile commence à être épuisée, l'affichage à cristaux
liquides (en particulier l'affichage du compteur) s'affaiblit. Le AW-
1 continuera à fonctionner pendant un certain moment, mais
l'accordage sera moins précis. remplacez la pile dès que possi-
ble.
1.Appuyez légèrement sur le couvercle du logement de pile situé à
l'arrière du AW-1, et faites-le glisser dans la direction indiquée.
2.Veillez à respecter la polarité de la pile (quand vous regardez la
surface arrière du AW-1, la face “+” de la pile doit être tournée
vers vous), insérez la pile et refermez le couvercle.
Procédure d'accordage
1. Appuyez sur l'interrupteur d'alimentation. L'appareil se mettra sous/hors tension
à chaque pression sur l'interrupteur.
Lorsque vous mettez l'appareil sous tension, la hauteur du son de référence est réglée
sur la valeur sélectionnée précédemment (par défaut : A = 440 Hz).
Si vous laissez l'appareil allumé pendant environ 20 minutes sans capter aucun son, il
s'éteindra automatiquement.
2. Utilisez la touche de sélection de la source pour spécifier si le son de votre instru-
ment sera capté par le micro incorporé (MIC) ou par le micro pince (PIEZO) fourni.
(Reportez-vous à “Mise en place de la pince fournie”.)
Le réglage alternera entre MIC et PIEZO à chaque pression sur la touche. (*)
3. Si vous souhaitez changer la note de référence (calibrage), appuyez sur la touche
CALIB ( ) ou ( ).
Vous pouvez effectuer ce calibrage sur une plage de 410 Hz à 480 Hz par paliers de 1 Hz. (*)
4. Jouez une seule note sur votre instrument.
Le nom de la note la plus proche de la hauteur du son détecté par le micro sera affi-
ché. Accordez votre instrument approximativement à la hauteur du son correcte de
telle façon que le nom de la note souhaitée apparaisse.
5. Jouez une fois de plus la note sur votre instrument et accordez précisément votre
instrument de telle façon que le segment central du compteur s'allume.
(+) s'allumera à droite si la note est trop haute et (-) à gauche si elle trop basse.
Vous pouvez aussi si vous le souhaitez inverser l'affichage du AW-1 gauche-droite, mais dans
nos explications, nous considérerons que High (+) est situé à droite.
Si vous souhaitez accorder une tierce majeure pure ou une tierce mineure pure au-des-
sus d'une certaine note, réglez la hauteur du son sur les repères [
] (-13.7 cents) or [ ]
(+15.6 cents) du compteur.
Par exemple, si vous souhaitez effectuer l'accordage sur une tierce majeure au-dessus
de A (0 cents), affichez C
comme nom de la note et accordez de telle façon que le
compteur indique [
] (-13.7 cents). Si vous souhaitez effectuer l'accordage sur une
tierce mineure au-dessus de A (0 cents), affichez C comme nom de la note et accordez
de telle façon que le compteur affiche [
] (+15.6 cents).
Faites attention à ne pas laisser le micro capter d'autre son pendant l'accordage.
Même si la note se trouve à l’intérieur de la plage de détection, elle peut ne pas être détectée si le
son de l’instrument de musique contient un grand nombre d’harmoniques ou un temps de des-
cente rapide (par exemple, des notes très basses ou très hautes sur un piano).
Inversez l’affichage du compteur (fonction d’inversion)
A chaque pression sur la touche d'inversion du compteur, l'indicateur High (+) se dépla-
cera alternativement du côté gauche au côté droit et vice versa. Sélectionnez la position
qui vous semble la plus naturelle pour l'instrument auquel vous avec attaché le AW-1. (*)
Spécifications
Gamme :
12 notes tempérament égal
Note de référence :
410 à 480 Hz (paliers de 1 Hz)
Précision :
+/-1 centième
Plage de détection (onde sinus) :
A0 (27,50 Hz) à C8 (4186 Hz)
Poids :
10 g (pile comprise)
Dimensions:
25 mm (L) x 55 mm (P) x 9 mm (H) (uniqeument AW-1)
Autonomie de la pile : Environ 20 heures
(utilisation continue de l'accordeur, entrée de la note A4)
Accessoires fournis :
Pile au lithium CR1220 (3 V) pour vérification du fonctionnement
Pince pour grand instrument de musique (avec micro PIEZO incorporé)
Pince pour petit instrument de musique (avec micro PIEZO incorporé)
Étui de transport
* Les réglages sont conservés même quand l'appareil est mis hors tension. Néanmoins, les
réglages seront réinitialisés si vous remplacez la pile (par défaut : CALIB = 440 Hz, PIEZO,
High à droite).
• Les spécifications et l'aspect extérieur sont sujets à modifications sans préavis à des fins
d'amélioration du produit.
Input select button
Touche de sélection de la source
Clip attachment slot
Fente de fixation de la pince
Internal mic
Micro incorporé
Micro incorporé
Display reverse button
Touche d'inversion du
compteur
CALIB buttons
Boutons CALIB
Note name indicator
Indicateur du nom
de la note
Reference
pitch indicator
High(+) indicator
Indicateur High (+)
Pure major third, Pure minor third / Tierce majeure pure, Tierce mineure pure
Meter
Cadran de type compteur
Input indicator
Indicateur de la source
Power button
Interrupteur d'alimentation
Indicateur de la
note de référence
La page est en cours de chargement...

B3
A8
A3
A1
a
a
C1
A2
B1
A9
A6
A5
A4
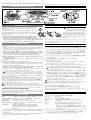
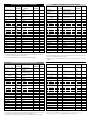
You can use this tuner to tune woodwind, brass, and string instruments, but the
recommended location for attaching the tuner to your instrument when using the
mic (PIEZO) of the included clip will depend on the type of instrument you are
using.
Refer to the table on the other side of this sheet and to the illustrations at the right,
and attach the tuner in the recommended location. Depending on the conditions
of use, you may also be able to tune with the tuner attached in a different location.
You can also switch the input to the internal mic (MIC) and attach the tuner to a
music stand rather than to your instrument. If you've selected the internal mic,
you can also use the tuner without the clip.
The tuner may not respond correctly if the rubber pad (area "a" in the diagram below) of the
clip is not in close contact with your instrument.
Please carefully attach the AW-1 to your instrument. Leaving the AW-1 attached for a long
time may hurt the instrument surface.
Vous pouvez utiliser cet accordeur pour accorder des instruments à vent, bois ou
cuivres et des instruments à cordes, mais l’emplacement exact pour la mise en
place de l’accordeur sur l’instrument lorsque vous utilisez le micro-pince (PIEZO)
fourni dépend du type d’instrument utilisé.
Reportez-vous au tableau au verso ainsi qu’aux illustrations à droite, et mettez
l’accordeur en place aux endroits conseillés. Suivant les conditions d’utilisation,
vous pourrez éventuellement accorder l’instrument avec l’accordeur installé
ailleurs. Vous pouvez aussi choisir le micro incorporé (MIC) comme source et
attacher l’accordeur à un pupitre au lieu de l’instrument. Si vous avez sélectionné
le micro incorporé, vous pourrez aussi utiliser l’accordeur sans la pince.
L’accordeur peut ne pas répondre correctement si le tampon en caoutchouc (zone “a” de l’il-
lustration ci-dessous) de la pince n’est pas au contact étroit de votre instrument.
S'il vous plait, attachez soigneusement l'AW-1 à votre instrument. Le laisser attach pen-
dant un long moment, peut rayer la surface de votre instrument.
Sie können diesen Tuner verwenden, um Holzblasinstrumente und Blechblasinstru-
mente Saiteninstrumente zu stimmen, aber die empfohlene Lage zum Anbringen
des Tuners an das Instrument bei Verwendung des Mikrofons (PIEZO) des enthalte-
nen Clips hängt vom betreffenden Instrument ab.
Siehe Tabelle an der anderen Seite dieses Blatts und Anweisungen rechts, und brin-
gen Sie den Tuner an der empfohlenen Stelle an. Je nach den Verwendungs-
bedingungen können Sie auch in der Lage sein, mit dem Tuner einer anderen Stelle
abzustimmen. Sie können auch den Eingang auf das interne Mikrofon (MIC)
umscalten und den Tuner an einem Notenständern anstelle des Instruments anbrin-
gen. Wenn Sie das interne Mikrofon gewählt haben, können Sie auch den Tuner
ohne den Clip verwenden.
Der Tuner kann möglicherweise nicht ansprechen, wenn das Gummipolster des Clips (Be-
reich "a" in der Abbildung unten) nicht in engem Kontakt mit Ihrem Instrument ist.
Bitte befestigen sie das AW-1 vorsichtig an ihrem Instrument. Wenn sie das AW-1 für längere
Zeit an ihrem Instrument befestigt lassen, kann dies zu Veränderungen an der Oberfläche
des Instruments führen.
A7
B2
Where to attach the clip
Anbringungsort des Clips
Où installer la pince
4015-2 Yanokuchi, Inagi-city, Tokyo 206-0812 Japan
C
2004 KORG INC.
Attatchment position
Position d’attachment
Zubenhörpossition

Recommended locations for attachment Positions conseillées pour la mise en place
Empfohlene Platzierungen für Ansätze
*1 Drücken Sie die Display-Umkehrtaste, um das Umkehrmerkmal zu verwenden.
*2 Anstelle den AW-1 am Instrument anzubringen, platzieren Sie den AW-1 an einer
gut sichtbaren Stelle und verwenden Sie das interne Mikrofon.
*3 Drücken Sie die Eingangswahltaste, um das interne Mikrofon (MIC) zu wählen.
Instrumentenname Clip Ansatz-Platzierung Abbildung Bemer -
Groß Klein
(andere Seite)
kungen
Trompete / Kornett
Schallstück (oben)
Haupttubus A1
Posaune
Schallstück (oben rechts) A2 *1
Mundstück-Empfänger
Horn einzeln
Erster Tubus A3
doppel F-Schieber
Tenorbaßhorn Tuning-Schieber A4
Tuba Mundröhre A5
E
Klarinette Schallstück
B
Klarinette Schallstück A6
Bassklarinette Blastubus *1
Sopransaxophon
Schallstück
Oberer Hals
Altsaxophon Hals A7 *1
Tenorsaxophon Hals *1
Barytonsaxophon Hals *1
Oboe Schallbecher A8
Fagott Flügelverbindung-Bereich A9 *1
Whiffler — — *2 *3
Violine Kopf B1
Viola Kopf
Violoncello Endstück B2 *1
Kontrabass Endstück *1
Gitarre Kopf B3
Mandoline Kopf
Shamisen (Sangen) Kopf
Notenständer — — Nach Wunsch C1 *3
*1 Press the display reversal button to use the Reverse feature.
*2 Instead of attaching the AW-1 to the instrument, place the AW-1 in a location for
convenient viewing and use the internal mic.
*3 Press the input select button to switch to the internal mic (MIC).
Instrument name Clip Attachment Illustration Remarks
Large Small
location (other side)
Trumpet / Cornet
Bell (top)
Main tube A1
Trombone
Bell (top right) A2 *1
Mouthpiece receiver
Horn Single
First tube A3
Duble F slide
Euphonium Tuning slide A4
Tube Mouth pipe A5
E
Clarinet Bell joint area
B
Clarinet Bell A6
Bass clarinet (B
) Blowing tube *1
Soprano saxophone
Bell
Upper neck
Alto saxophone Neck A7 *1
Tenor saxophone Neck *1
Baritone saxophone Neck *1
Oboe Bell body A8
Bassoon Wing joint area A9 *1
Flute — — *2 *3
Viorin Head B1
Viola Head
Cello Tailpiece B2 *1
Contrabass Tailpiece *1
Guitar Head B3
Mandolin Head
Shamisen (Sangen) Head
Music Stand — — As desired C1 *3
*1 Appuyez sur la touche d’inversion du compteur pour utiliser la fonction d’inver-
sion.
*2 Au lieu d’attacher l’AW-1 à l’instrument, installez-le dans un endroit où il est
facile à voir et utilisez le micro incorporé.
*3 Appuyez sur la touche de sélection de la source pour passer au micro incorporé
(MIC).
Nom de l'instrument Pince Position Illustration
Remarques
gr.
petite
(au verso)
Trompette /
Pavillon (en haut)
Cornet à bouquin Tu yau principale A1
Trombone
Pavillon (en haut à droite) A2 *1
Récepteur d’embouchure
Cor simple
Premier tube A3
double Coulisse de Fa
Basse Coulisse d’accord A4
Tuba Branche d'embouchure A5
Clarinette E
Corps du pavillon
Clarinette B
Pavillon A6
Clarinette basse Bec *1
Saxohone soprano
Pavillon
Bocal supérieur
Saxohone alto Bocal A7 *1
Saxohone ténor Bocal *1
Saxohone baryton Bocal *1
Hautbois Corps du pavillon A8
Basson Petite branche A9 *1
Flûte – – *2 *3
Violon Chevillier B1
Alto Chevillier
Violoncelle Pointe B2 *1
Contrebasse Pointe *1
Guitare Chevillier B3
Mandoline Chevillier
Shamisen (Sangen) Chevillier
Pupitre – – Au choix C1 *3
-
 1
1
-
 2
2
-
 3
3
-
 4
4
-
 5
5
-
 6
6


dans d''autres langues
- English: Korg AW-1 Owner's manual
- Deutsch: Korg AW-1 Bedienungsanleitung
- 日本語: Korg AW-1 取扱説明書
Documents connexes
-
Korg CA40 Le manuel du propriétaire
-
-
Korg CA-2 Le manuel du propriétaire
-
-
-
-
Korg AW-LT100T Le manuel du propriétaire
-
-
-