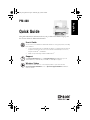
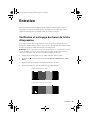
Epson PictureMate PM 400 Guide de démarrage rapide
- Catégorie
- Imprimer
- Taper
- Guide de démarrage rapide

PM-400
Quick Guide
This guide includes basic information about your product and troubleshooting tips. See
the resources below for additional information.
User’s Guide
See the online User’s Guide for detailed information on using your product, including
these features:
• Connect wirelessly from your smartphone, tablet, or computer. Print documents
and photos from across the room or around the world with Epson Connect
TM
,
Google Cloud Print
TM
, and AirPrint.
• Easily set up networking—Wi-Fi and Wi-Fi Direct
®
.
Support
Visit epson.com/support (U.S.) or epson.ca/support (Canada) where you can
download drivers, view manuals, see FAQs, or e-mail Epson support.
Wireless Videos
View easy-to-follow videos on connecting the printer to your network. Visit
epson.com/support/wireless (U.S.) or epson.ca/support/wireless (Canada) to
view the videos.
English
pm_400_quick_guide.book Page 1 Wednesday, July 8, 2015 3:44 PM

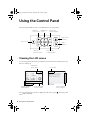
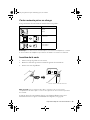
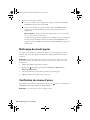
2 Using the Control Panel
Using the Control Panel
The control panel makes it easy to use all the features of your product.
Viewing the LCD screen
To save energy, the LCD screen goes dark after several minutes of inactivity. Press any
button to wake it up.
For more information on the icons displayed on the screen, press if necessary, then
select
Help > Icon List.
Turn on or off
Navigate the
screen
Return to
home screen
Return to
previous screen
Start
printing
Stop current
operation
Decrease the
number of prints
Increase the
number of prints
Displays the
printer status
Scroll up or down
for more options
Screen name
Displays available
button options
Scroll left or right
for more options
pm_400_quick_guide.book Page 2 Wednesday, July 8, 2015 3:44 PM

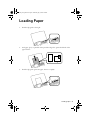
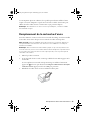
Loading Paper 3
Loading Paper
1. Slide the edge guide to the right.
2. Load paper, glossy or printable side up and short edge first, against the left side of the
paper feed slot.
3. Slide the edge guide against the paper, but not too tightly.
pm_400_quick_guide.book Page 3 Wednesday, July 8, 2015 3:44 PM

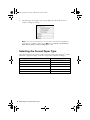
4 Selecting the Correct Paper Type
4. Check the paper size and paper type settings displayed on the LCD screen and
confirm or change the settings.
Note: If you don’t see the above screen, this option may have been disabled on
the product. To enable this option, press and select Setup > Printer Setup >
Paper Source Setting > Paper Configuration > On.
Selecting the Correct Paper Type
Select the correct paper type setting on the control panel. This tells your Epson
®
product
what kind of paper you’re using, so the ink coverage can be adjusted accordingly.
For this paper Select this setting
Plain paper Plain Paper
Epson Ultra Premium Photo Paper Glossy Ultra Glossy
Epson Premium Photo Paper Glossy Prem. Glossy
Epson Photo Paper Glossy Glossy
Epson Premium Photo Paper Semi-gloss Prem. Semi-Gloss
Envelopes Envelope
pm_400_quick_guide.book Page 4 Wednesday, July 8, 2015 3:44 PM

Printing 5
Printing
This section describes basic steps to print with your product. For detailed instructions on
any of these printing options, see the online User’s Guide.
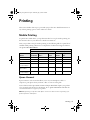
Mobile Printing
To print from a mobile device, your product must first be set up for wireless printing. See
the Start Here sheet or your online User’s Guide for instructions.
Once your product is setup for wireless printing, see the following table for a partial list of
available mobile printing solutions. For a complete list of solutions and supported devices,
visit epson.com/solutionsfinder.
Epson Connect
Epson Connect is a free service that allows you to use your smartphone, tablet, or
computer to print photos from your home, office, or even across the globe.
Some solutions such as Epson Remote Print and Epson Email Print require your product
to be registered and connected to the Internet. Go to epson.com/connect and follow the
on-screen instructions to register your product.
Note: Registering your product with Epson Connect is different from registering your
product purchase with Epson.
Available solutions
Epson Connect 3rd party
Device
Epson
Email Print
Epson Remote
Print™
Epson
iPrint™
AirPrint
Google Cloud
Print
Android™ X X X
Chromebook X X
iOS X X X
Mac
computer/laptop
XX XX
Windows
®
phone/tablet
X
Windows
computer/laptop
XX X
pm_400_quick_guide.book Page 5 Wednesday, July 8, 2015 3:44 PM

6 Printing From a Memory Card
The following Epson Connect solutions are available for your product:
■ Epson Remote Print: When Epson Remote Print is installed on your computer, you
can select your product through the
File > Print command from anywhere in the
world. (An Internet connection is required for both your product and computer.)
■ Epson Email Print: Send your photos to your printer as attachments wherever you
have access to email.
■ Epson iPrint: Print from an Android or iOS device using the Epson iPrint
application.
For more information, including instructions on obtaining and installing any of the above
solutions, see your online User’s Guide or epson.com/connect (U.S) or epson.ca/connect
(Canada).
Printing From a Memory Card
Your product lets you print photos directly from your digital camera’s memory card; just
insert it into the memory card slot and you’re ready to print.
You can also print in various layouts to include several photos on one sheet of paper or
print from a USB flash drive. See the online User’s Guide for instructions.
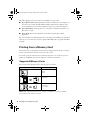
Supported Memory Cards
You can insert the following memory card types in your product:
Note: Cards marked with an asterisk (*) require an adapter; consult your adapter
documentation for details on using it.
Illustration Memory card type
SD
SDHC
SDXC
miniSD*
miniSDHC*
microSD*
microSDHC*
microSDXC*
pm_400_quick_guide.book Page 6 Wednesday, July 8, 2015 3:44 PM

Printing From a Memory Card 7
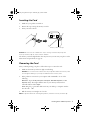
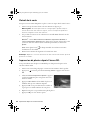
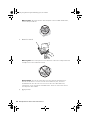
Inserting the Card
1. Make sure your product is turned on.
2. Remove the cap covering the memory card slot.
3. Insert your card as shown.
Caution: Do not force the card into the slot; it won’t go in all the way. Keep the
memory card slot cap out of the reach of children.
The memory card access light flashes, then stays lit. Now you can view your photos on the
LCD screen and print them (see page 8).
Removing the Card
After you finish printing your photos, follow these steps to remove the card:
1. Make sure the memory card access light is not flashing.
Caution: Do not remove the card or turn off your product while the memory card
access light is flashing or you may lose data from the memory card.
2. If the product is connected to your computer with a USB cable, do one of the
following:
Windows
®
: Open the My Computer, Computer, Windows Explorer, or File
Explorer
utility. Then right-click the name of your memory card (listed as a
removable disk) and select
Eject.
OS X: Drag the removable disk icon from your desktop or computer window
into the trash.
3. Pull the memory card straight out of its slot.
Note: To prevent dust from entering the product, insert the memory card slot cap.
Memory card access light
pm_400_quick_guide.book Page 7 Wednesday, July 8, 2015 3:44 PM

8 Printing From a Memory Card
Printing Photos From the LCD Screen
You can select individual photos for printing as you view them on the LCD screen.
1. Make sure you loaded paper and inserted a memory card in the product.
2. Press
if necessary, then select Print Photos and press the OK button.
3. Select
View and Print Photos and press the OK
button. A photo on your memory card is displayed.
4. Press l or r to scroll through your photos and display
one that you want to print.
5. Press
+ or – to select the number of copies you want
of that photo.
6. Repeat steps 4 and 5 to select more photos.
7. Press d to view additional options.
8. Select the option you want to change, then press the
OK button and change the
settings as necessary. You can select from the following options:
■ Browse to select photos by date
■ Select Photos to select all photos
■ Display Options to change the display setting for the LCD screen
■ Print Settings to change the print settings (e.g., paper size, paper type, and
borders)
■ Photo Adjustment to change the appearance of your printed photos (e.g.,
sharpness and fixing red-eye)
■ Filter to apply a sepia tone or black-and-white filter
■ Crop/Zoom to zoom your photo and crop the printed image
For more information on these features, see your online User’s Guide.
9. When you’re ready to print, press the
x button.
To cancel printing, press the
y button.
pm_400_quick_guide.book Page 8 Wednesday, July 8, 2015 3:44 PM

Printing Photos From a Digital Camera 9
Printing Photos From a Digital Camera
If you have a digital camera that supports PictBridge printing, you can print your photos
directly from the camera using a USB cable. Check your camera manual to see if it is
compatible. If you want to print from a digital camera wirelessly, see your online
User’s Guide for instructions.
1. Make sure you loaded paper in the product.
2. Remove any memory cards from the product.
3. Press
if necessary, then select Setup and press the OK button.
4. Select
External Device Setup and press the OK button.
5. Select
Print Settings or Photo Adjustments, then press OK button and change
settings as necessary.
6. Connect the USB cable that came with your camera
to the USB port on the side of your product.
7. Turn on your camera.
8. Follow the instructions that came with your camera to
select and print your photos.
When you finish printing, turn off your camera and
disconnect it from the product.
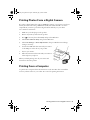
Printing From a Computer
To print from a computer, follow the instructions on the Start Here sheet to install the
necessary software. Then see your online User’s Guide for printing instructions.
pm_400_quick_guide.book Page 9 Wednesday, July 8, 2015 3:44 PM

10 Maintenance
Maintenance
Follow the instructions in this chapter to check and clean the print head nozzles, clean the
paper path, and replace the ink cartridge. To align the print head, see your online
User’s Guide.
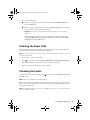
Checking and Cleaning the Print Head
Nozzles
If your printouts are faint or have gaps in them, some of the nozzles in the print head may
be clogged or ink may be running low in the ink cartridge. Follow the steps below to check
the print head nozzles.
Note: You cannot clean the print head if the ink cartridge is expended, and may not be
able to clean it when the cartridge is low. You must replace the cartridge first.
1. Load 4 x 6-inch (102 × 152 mm) paper in the product.
2. Press
if necessary, then select Setup > Maintenance > Nozzle Check.
3. Press
x to print the nozzle check pattern.
4. Check the pattern that prints to see if there are gaps in the lines.
Print head is clean
Print head needs cleaning
pm_400_quick_guide.book Page 10 Wednesday, July 8, 2015 3:44 PM

Cleaning the Paper Path 11
5. Do one of the following:
■ If there are no gaps, the print head is clean. Select Finish Nozzle Check and
press the
OK button.
■ If there are gaps or the pattern is faint, select Head Cleaning and press the OK
button. Then press
x to clean the print head.
Caution: Never turn off the product during a cleaning cycle or you may
damage it.
After cleaning the print head, you can print another nozzle check pattern by
selecting
Nozzle Check and pressing the OK button. Otherwise, select Finish
Cleaning
and press the OK button.
Cleaning the Paper Path
If your printouts are smeared or scuffed, or your paper does not feed correctly, clean the
paper path inside the printer by following the steps below.
Note: Do not use tissues to clean the inside of the product; lint from tissues may clog
the print head nozzles.
1. Load a sheet of paper in the product.
2. Press
if necessary, then select Setup > Maintenance > Paper Guide Cleaning.
3. Follow the instructions on the LCD screen to clean the paper path.
4. Repeat as necessary until the paper comes out clean.
Checking Ink Levels
To check the ink level in the cartridge, press if necessary, and select Setup > Ink Level.
Press
OK to exit.
Note: The ink level displayed is an approximate.
If are you printing from a computer, a window may also appear on your computer screen
when you try to print when ink is low. This window can optionally display ink offers and
other updates from Epson.
Note: To disable checking for ink offers or updates from Epson, see the instructions in
your online User’s Guide.
pm_400_quick_guide.book Page 11 Wednesday, July 8, 2015 3:44 PM

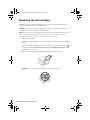
12 Replacing the Ink Cartridge
Replacing the Ink Cartridge
Make sure you have a new ink cartridge before you begin. You must install the new
cartridge immediately after removing the old one.
Caution: Do not open the ink cartridge package until you are ready to install the ink.
Cartridges are vacuum packed to maintain reliability.
Note: Leave the expended cartridge installed until you have obtained a replacement, or
the ink remaining in the print head nozzles may dry out. If you remove a low or
expended ink cartridge, you cannot reinstall and use the cartridge.
1. Turn on your product.
2. If an ink cartridge is expended, you see a message on the LCD screen. Press the
OK
button.
If you’re replacing a cartridge before you see a message on the LCD screen, press
if
necessary, then select
Setup > Maintenance > Ink Cartridge Replacement. Press
the
OK button to proceed.
3. Unpack the ink cartridge and completely remove the yellow tape only.
Caution: Do not remove any other labels or seals, or ink may leak.
pm_400_quick_guide.book Page 12 Wednesday, July 8, 2015 3:44 PM

Replacing the Ink Cartridge 13
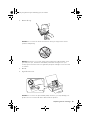
4. Remove the cap.
Caution: Do not touch the areas shown below. Doing so may prevent normal
operation and printing.
Warning: If ink gets on your skin, wash it thoroughly with soap and water. If ink
gets into your eyes, flush them immediately with water. If ink gets into your
mouth, spit it out and see a doctor right away. Keep ink cartridges out of the reach
of children.
5. Press x.
6. Open the inner cover.
Caution: Do not move the print head by hand; otherwise, you may damage your
product. Do not touch the flat white cable inside the product.
pm_400_quick_guide.book Page 13 Wednesday, July 8, 2015 3:44 PM

14 Replacing the Ink Cartridge
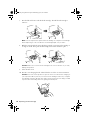
7. Press the blue tab down to unlock the ink cartridge. Then lift the ink cartridge to
remove it.
Note: Use the cap from the replacement ink cartridge to recap the used cartridge
before disposing of it. Do not take the used cartridge apart or try to refill it.
8. Hold the cartridge with the green chip facing towards you and insert the cartridge at
an angle as shown. Then press the ink cartridge down until it clicks into place.
Caution: Make sure to insert the ink cartridge in the correct direction or you may
damage the product.
9. Close the inner cover
10. Press x to start charging the ink. Then follow the rest of the on-screen instructions.
Caution: Don’t turn off the product or open the inner cover while ink is charging or
you may not be able to print. If you remove an ink cartridge for later use, recap the
ink cartridge using the cap that came with it to prevent the ink from drying out and
to protect the surrounding area from getting smeared by ink.
pm_400_quick_guide.book Page 14 Wednesday, July 8, 2015 3:44 PM

Purchasing Epson Ink Cartridges and Paper 15
Purchasing Epson Ink Cartridges and Paper
You can purchase genuine Epson ink and paper at epson.com/ink3 (U.S. sales) or
epson.ca (Canadian sales). You can also purchase supplies from an Epson authorized
reseller. To find the nearest one, call 800-GO-EPSON (800-463-7766).
Use the following list when you order or purchase new ink cartridges:
Note: This product uses only genuine Epson-brand cartridges. Other brands of ink
cartridges and ink supplies are not compatible and, even if described as compatible,
may not function properly.
The cartridge included with the printer is designed for printer setup and not for resale.
After some ink is used for charging, the rest is available for printing. Yields vary
considerably based on images printed, print settings, paper type, frequency of use, and
temperature. For print quality, a variable amount of ink remains in the cartridge after the
“replace cartridge” indicator comes on.
For best printing results, use up a cartridge within six months of opening the package,
and before the expiration date on the cartridge box.
Store ink cartridges in a cool, dark place. If cartridges have been exposed to cold
temperatures, allow them to warm up to room temperature for at least 3 hours before
using them.
Part number Description
320 Color Ink Cartridge
320P Print Pack — Color Ink Cartridge and Glossy Photo Paper
pm_400_quick_guide.book Page 15 Wednesday, July 8, 2015 3:44 PM

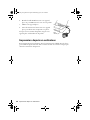
16 Transporting Your Product
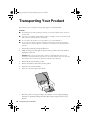
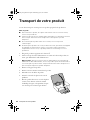
Transporting Your Product
If you need to store or transport your product, prepare it as described here.
Caution:
■ Avoid tilting the product, placing it vertically, or turning it upside down; otherwise
ink may leak.
■ Leave the ink cartridge installed. Removing the cartridge can dry out the print head
and may prevent the product from printing.
■ Do not subject the product to strong impacts or you may damage it.
■ Do not leave the product in direct sunlight, near heaters, inside cars, and other
areas subject to high temperatures. Otherwise, the product may get damaged or
leak ink.
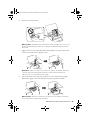
1. Turn off the product by pressing the P button.
2. Make sure the green power light on the front of the product is turned off and then
unplug the power cord.
Caution: Make sure the power light is off before unplugging the power cord;
otherwise, the print head may not return to the home position. This can cause the
print head to dry out which may prevent the product from printing.
3. Remove all the paper from the product.
4. Remove any memory cards inserted in the product.
5. Disconnect any connected cables.
6. Close the cover and output tray as shown.
7. Place the product in a bag if traveling a short distance or in its original packaging
materials (or equivalent packing materials) when transporting the product a long
distance.
pm_400_quick_guide.book Page 16 Wednesday, July 8, 2015 3:44 PM

Solving Problems 17
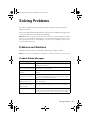
Solving Problems
If you have a problem with your product, check the messages on the control panel to
diagnose the cause.
You can also check “Problems and Solutions” below for basic troubleshooting suggestions,
or see your online User’s Guide for more detailed help.
Note: Breakdown or repair of this product may cause loss of network data and settings.
Epson is not responsible for backing up or recovering data and settings during or after
the warranty period. We recommend that you make your own backup or print out your
network data and settings.
Problems and Solutions
Check the solutions below if you’re having trouble using your Epson product.
Note: If the LCD screen is dark, press any button to wake the printer from sleep mode.
Product Status Messages
Error Messages Solutions
Printer error Turn the product off and then back on again. If the error is still
displayed, contact Epson.
Operation canceled. An
error occurred while saving.
Make sure the memory card is inserted correctly and meets the
specifications for your product.
Paper Configuration is
disabled
The Paper Configuration setting must be turned on to use
AirPrint.
A printer's ink pad is nearing
the end of its service life
The ink pads are near the end of their service life and the
message will be displayed until the ink pad is replaced. Contact
Epson. (To resume printing, press
x.)
A printer's ink pad is at the
end of its service life
The ink pad is at the end of its service life. Turn off the product
and contact Epson.
Combination of the IP
address and the subnet
mask is invalid.
There is a problem with the network connection to your product.
Check the solutions in this guide or your online User’s Guide.
Recovery Mode An error has occurred during firmware updating. Connect your
product using a USB cable and try updating the firmware again. If
you still receive this error message, contact Epson for support.
pm_400_quick_guide.book Page 17 Wednesday, July 8, 2015 3:44 PM

18 Problems and Solutions
Network Problems
■ Try connecting to the router or access point with your computer or another device to
confirm that it is working correctly.
■ The product can only connect to a network that supports 2.4 GHz. If you are using a
5 GHz wireless router, set the router to operate in dual band (2.4 GHz and 5 GHz)
mode.
■ Try resetting the router (turn it off and then on), then try to connect to it again.
■ View the network status (see the next section) to check the signal strength. If it is
poor, try moving the product closer to your router or access point. Avoid placing it
next to a microwave oven, 2.4 GHz cordless phone, or large metal object such as a
filing cabinet.
■ If your wireless router doesn’t broadcast its network name (SSID), manually enter
your wireless network name.
■ If your wireless router has security enabled, make sure you entered the WEP key or
WPA passphrase correctly.
■ When using TCP/IP, make sure your network’s DHCP option is enabled (your router
manufacturer will be able to assist you with this setting).
■ Remove and reinstall your product software.
■ Disable the firewall temporarily to see if that may be causing the problem. Contact
your firewall manufacturer for assistance.
■ You may need to disable any anti-virus software on your wireless router or access
point.
Check Network Status
1. Press if necessary, then select Setup and press the OK button.
2. Select
Network Settings and press the OK button.
3. Select
Network Status and press the OK button.
4. Press d or u to scroll through your network information, or press l or r to view
additional options.
Printing Problems
■ Make sure your paper is loaded short edge first and is positioned against the left side
with the edge guide against its right side. Don’t load paper above the arrow mark
inside the edge guide.
■ Make sure the paper size and paper type settings are correct for the paper you loaded.
pm_400_quick_guide.book Page 18 Wednesday, July 8, 2015 3:44 PM

Problems and Solutions 19
■ Run a nozzle check to see if any of the print head nozzles are clogged. Then clean the
print head, if necessary.
■ You may need to align the print head.
Paper Feeding Problems
■ If paper doesn’t feed, remove it from the paper feed slot. Flip through the stack to
separate the sheets a little. Then reload the paper against the left side, and slide the
right edge guide against the paper (but not too tightly).
■ Do not load too many sheets at once. See your online User’s Guide for more
information.
■ Make sure the paper size and paper type settings are correct for the paper you loaded.
Print Quality Problems
If you have any problems with the copy or print quality, try these solutions:
■ Load the paper printable side up (usually the whiter, brighter, or glossy side).
■ Make sure the paper size and paper type settings are correct for the paper you loaded.
■ Make sure your paper isn’t damp or curled.
■ Use a support sheet with special paper or load your paper one sheet at a time. Remove
sheets from the output tray so not too many collect at a time.
■ For best results, use genuine Epson ink and paper (see page 15).
■ If you notice light or dark bands across your printouts or they are too faint, you may
need to clean the print head (see page 10). Run a nozzle check to see if any of the
print head nozzles are clogged. Then clean the print head, if necessary.
■ If you notice jagged vertical lines, you may need to align the print head. See your
online User’s Guide for instructions.
■ The ink cartridge may be low on ink. Check your cartridge status (see page 11) and
replace the cartridge, if necessary (see page 12).
pm_400_quick_guide.book Page 19 Wednesday, July 8, 2015 3:44 PM

20 Where to Get Help
Where to Get Help
Internet Support
Visit Epson’s support website at epson.com/support (U.S.) or epson.ca/support (Canada)
and select your product for solutions to common problems. You can download drivers and
documentation, get FAQs, or e-mail Epson.
Speak to a Support Representative
Before you call Epson for support, please have the following information ready:
■ Product name (PM-400)
■ Product serial number (located on the back of the product)
■ Proof of purchase (such as a store receipt) and date of purchase
■ Description of the problem
Then call:
(562) 276-7282 (U.S.) or (905) 709-2567 (Canada), 6
AM to 8 PM, Pacific Time, Monday
through Friday and 7
AM to 4 PM Saturday.
Days and hours of support are subject to change without notice. Toll or long distance
charges may apply.
Purchase Supplies and Accessories
You can purchase genuine Epson ink and paper at epson.com/ink3 (U.S. sales) or
epson.ca (Canadian sales). You can also purchase supplies from an Epson authorized
reseller. To find the nearest one, call 800-GO-EPSON (800-463-7766).
pm_400_quick_guide.book Page 20 Wednesday, July 8, 2015 3:44 PM
La page est en cours de chargement...
La page est en cours de chargement...
La page est en cours de chargement...
La page est en cours de chargement...
La page est en cours de chargement...
La page est en cours de chargement...
La page est en cours de chargement...
La page est en cours de chargement...
La page est en cours de chargement...
La page est en cours de chargement...
La page est en cours de chargement...
La page est en cours de chargement...
La page est en cours de chargement...
La page est en cours de chargement...
La page est en cours de chargement...
La page est en cours de chargement...
La page est en cours de chargement...
La page est en cours de chargement...
La page est en cours de chargement...
La page est en cours de chargement...
La page est en cours de chargement...
La page est en cours de chargement...
La page est en cours de chargement...
La page est en cours de chargement...
La page est en cours de chargement...
La page est en cours de chargement...
La page est en cours de chargement...
La page est en cours de chargement...
La page est en cours de chargement...
La page est en cours de chargement...
La page est en cours de chargement...
La page est en cours de chargement...
-
 1
1
-
 2
2
-
 3
3
-
 4
4
-
 5
5
-
 6
6
-
 7
7
-
 8
8
-
 9
9
-
 10
10
-
 11
11
-
 12
12
-
 13
13
-
 14
14
-
 15
15
-
 16
16
-
 17
17
-
 18
18
-
 19
19
-
 20
20
-
 21
21
-
 22
22
-
 23
23
-
 24
24
-
 25
25
-
 26
26
-
 27
27
-
 28
28
-
 29
29
-
 30
30
-
 31
31
-
 32
32
-
 33
33
-
 34
34
-
 35
35
-
 36
36
-
 37
37
-
 38
38
-
 39
39
-
 40
40
-
 41
41
-
 42
42
-
 43
43
-
 44
44
-
 45
45
-
 46
46
-
 47
47
-
 48
48
-
 49
49
-
 50
50
-
 51
51
-
 52
52


Epson PictureMate PM 400 Guide de démarrage rapide
- Catégorie
- Imprimer
- Taper
- Guide de démarrage rapide
dans d''autres langues
Documents connexes
-
Epson WorkForce WF-100 Guide de démarrage rapide
-
Epson WorkForce WF-7620 Guide de démarrage rapide
-
Epson WF-100 Quick Guide and Warranty
-
-
Epson WP-4020 Une information important
-
-
Epson ET-2550 Guide de démarrage rapide
-
-
-
Epson 435 Manuel utilisateur