Bresser 40-640x Microscope Le manuel du propriétaire
- Catégorie
- Microscopes
- Taper
- Le manuel du propriétaire
Ce manuel convient également à

Art.No. 9119501
Bedienungsanleitung
Operating instructions
Mode d’emploi
Instrucciones de uso
Handleiding (download)
Istruzioni per l’uso (download)
Руководство по эксплуатации (download)
DE
EN
FR
ES
NL
IT
RU
MIKROSKOP
MICROSCOPE
40X-640X

2
(DE) Besuchen Sie unsere Website über den folgenden QR
Code oder Weblink um weitere Informationen zu diesem
Produkt oder die verfügbaren Übersetzungen dieser
Anleitung zu nden.
(EN) Visit our website via the following QR Code or web
link to nd further information on this product or the
available translations of these instructions.
(NL) Bezoek onze internetpagina via de volgende QR-
code of weblink, voor meer informatie over dit product of
de beschikbare vertalingen van deze gebruiksaanwijzing.
(IT) Desidera ricevere informazioni esaustive su questo
prodotto in una lingua specica? Venga a visitare il
nostro sito Web al seguente link (codice QR Code) per
conoscere le versioni disponibili.
(RU) Вам требуется подробная инструкция на это
изделие на определенном языке? Проверьте наличие
соответствующей версии инструкции, посетив наш сайт
по этой ссылке (QR-код).
www.bresser.de/9119501
MANUAL DOWNLOAD:
Bedienungsanleitung ...........................................4
Operating instructions ....................................... 11
Mode d’emploi .................................................. 18
Instrucciones de uso ......................................... 25
Handleiding ........................................ DOWNLOAD
Istruzioni per l’uso ............................... DOWNLOAD
Руководство по эксплуатации ............. DOWNLOAD
DE
EN
FR
ES
NL
IT
RU
ACHTUNG!
Nicht für Kinder unter 3 Jahren geeignet. ERSTICKUNGSGEFAHR - kleine
Teile. VERLETZUNGSGEFAHR - Funktionsbedingte scharfe Kanten oder Spitzen. Anleitung und
Verpackung aufbewahren, da Sie wichtige Informationen enthalten.
WARNINGS!
Not suitable for children under three years. Choking harzard - small parts.
RISK OF INJURY - functional sharp points or sharp edges. Keep instructions and packaging as they
contain important information.
AVERTISSEMENT !
Ne convient pas aux enfants de moins de trois ans. Risque
d'étouffement- petites pièces. DANGER DE COUPURE - pointes ou arêtes vives fonctionnelles.
Conservez les instructions et l'emballage car ils contiennent des informations importantes.
¡ATENCIÓN!
No es adecuado para niños menores de 3 años. PELIGRO DE ASFIXIA – Piezas
pequeñas. PELIGRO DE LESIONES – Puntas o cantos afilados necesarios para el funcionamiento del
producto. Guarde las instrucciones y el embalaje ya que contienen información importante.
AVVERTENZE!
Non adatto a bambini di età inferiore a tre anni. Pericolo di soffocamento
- Contiene piccole parti. RISCHIO D‘INFORTUNIO - Contiene spigoli vivi e punte! Conservare le
istruzioni e l‘imballaggio in quanto contengono informazioni importanti.

D
E
C
F
H
1
B
I
F
G
J
1!
1
1
1
1%
1
3
1@
1#
1$
!
!

4
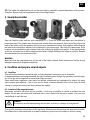
Allgemeine Warnhinweise
• ERSTICKUNGSGEFAHR! Dieses Produkt beinhaltet Kleinteile, die von Kindern verschluckt werden können!
Es besteht ERSTICKUNGSGEFAHR!
• GEFAHR eines STROMSCHLAGS! Dieses Gerät beinhaltet Elektronikteile, die über eine Stromquelle
(Batterien) betrieben werden. Lassen Sie Kinder beim Umgang mit dem Gerät nie unbeaufsichtigt!
Die Nutzung darf nur, wie in der Anleitung beschrieben, erfolgen, andernfalls besteht GEFAHR eines
STROMSCHLAGS!
• BRAND-/EXPLOSIONSGEFAHR! Setzen Sie das Gerät keinen hohen Temperaturen aus. Benutzen Sie
nur die empfohlenen Batterien. Gerät und Batterien nicht kurzschließen oder ins Feuer werfen! Durch
übermäßige Hitze und unsachgemäße Handhabung können Kurzschlüsse, Brände und sogar Explosionen
ausgelöst werden!
• VERÄTZUNGSGEFAHR! Batterien gehören nicht in Kinderhände! Achten Sie beim Einlegen der Batterie
auf die richtige Polung. Ausgelaufene oder beschädigte Batterien verursachen Verätzungen, wenn Sie
mit der Haut in Berührung kommen. Benutzen Sie gegebenenfalls geeignete Schutzhandschuhe.
• Bauen Sie das Gerät nicht auseinander! Wenden Sie sich im Falle eines Defekts an Ihren Fachhändler. Er
nimmt mit dem Service-Center Kontakt auf und kann das Gerät ggf. zwecks Reparatur einschicken.
• Für die Arbeit mit diesem Gerät werden häug scharfkantige und spitze Hilfsmittel eingesetzt. Bewahren
Sie deshalb dieses Gerät sowie alle Zubehörteile und Hilfsmittel an einem für Kinder unzugänglichen Ort
auf. Es besteht VERLETZUNGSGEFAHR!
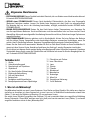
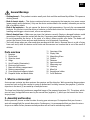
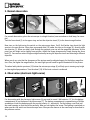
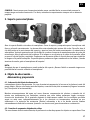
Teileübersicht
1. Okular
2. Scharfeinstellungsrad
3. Revolverkopf mit Objektiven
4. Objekttisch
5. Ein-/Aus-Schalter (Beleuchtung)
6. Elektrische Beleuchtung
7. Fuß mit Batteriefach
8. Batteriefach
9. Deckgläser und Klebeetiketten
10. Dauerpräparate und leere Objektträger
11. Fläschchen mit Proben
12 leere Fläschchen
13. Lupe
14. Pipette
15. Pinzette
16. Blendenrad
17. Messbecher
18. Brutanlage
19. MicroCut
20. Smartphone-Halterung
21. 2x AA Batterien
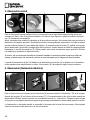
1. Was ist ein Mikroskop?
Das Mikroskop besteht aus zwei Linsen-Systemen: Dem Okular und dem Objektiv. Wir stellen uns, damit es
einfacher zu verstehen ist, diese Systeme als je eine Linse vor. In Wirklichkeit bestehen aber sowohl das
Okular (1) als auch die Objektive im Revolver (3) aus mehreren Linsen.
Die untere Linse (Objektiv) vergrößert das Präparat (10) und es entsteht dabei eine vergrößerte Abbildung
dieses Präparates. Dieses Bild, welches man nicht sieht, wird von der zweiten Linse (Okular, 1) nochmals
vergrößert und dann siehst du das „Mikroskop-Bild“.

5
DE
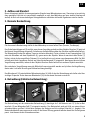
2. Aufbau und Standort
Bevor du beginnst, wählst du einen geeigneten Standort zum Mikroskopieren aus. Zum einen ist es wichtig,
dass genügend Licht da ist, zum anderen empehlt es sich, das Mikroskop auf eine stabile Unterlage zu
stellen, da sich auf einem wackeligen Untergrund keine zufrieden stellenden Ergebnisse erzielen lassen.
3. Normale Beobachtung
Für die normale Beobachtung stellst du das Mikroskop an einen hellen Platz (Fenster, Tischlampe).
Das Scharfeinstellungsrad (2) wird bis zum oberen Anschlag gedreht und der Objektiv-Revolver (3) wird auf
die kleinste Vergrößerung eingestellt. Schalte nun die Beleuchtung über den Schalter am Mikroskopfuß ein.
Zur Beleuchtung ndest du weitere Tipps im nächsten Abschnitt. Jetzt schiebst du ein Dauerpräparat (10)
unter die Klemmen auf dem Objekttisch (4), genau unter das Objektiv. Wenn du nun durch das Okular (1)
blickst, siehst du das vergrößerte Präparat. Es ist vielleicht ein noch etwas verschwommenes Bild. Die Bild-
schärfe wird durch langsames Drehen am Scharfeinstellungsrad (2) eingestellt. Nun kannst du eine höhere
Vergrößerung auswählen, indem du den Objektiv-Revolver drehst und auf ein anderes Objektiv einstellst.
Bei veränderter Vergrößerung muss die Bildschärfe neu eingestellt werden und je höher die Vergrößerung,
desto mehr Licht wird für eine gute Bildausleuchtung benötigt.
Das Blendenrad (16) unterhalb des Mikroskoptisches (4) hilft dir bei der Betrachtung sehr heller oder klar-
sichtiger Präparate. Drehe dazu am Blendenrad (16) bis der beste Kontrast erreicht ist.
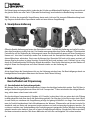
4. Betrachtung (Elektrische Beleuchtung)
Zur Beobachtung mit der elektrischen Beleuchtung (6) benötigst du 2 AA Batterien mit 1,5 V, die im Bat-
teriefach (8) am Mikroskop-Fuß (7) eingesetzt werden. Das Batteriefach wird mit Hilfe von einem Kreuz-
schraubenzieher geöffnet. Achte beim einlegen der Batterien auf die richtige Polarität (+/- Angabe). Der
Batteriefachdeckel muss nun zuerst rechts in die kleine Öffnung gesteckt werden damit der Deckel genau
passt. Jetzt kannst du die Schraube anziehen.

6
Die Beleuchtung wird eingeschaltet, indem du den Schalter am Mikroskopfuß betätigst. Jetzt kannst du auf
die gleiche Weise wie unter Punkt 3 (Normale Beobachtung) beschrieben eine Beobachtung vornehmen.
TIPP: Je höher die eingestellte Vergrößerung, desto mehr Licht wird für eine gute Bildausleuchtung benö-
tigt. Beginne deshalb deine Experimente immer mit einer kleinen Vergrößerung.
5. Smartphone-Halterung
Öffne die exible Halterung und setze dein Smartphone hinein. Schließe die Halterung und stelle Sie sicher,
dass dein Smartphone richtig fest sitzt. Die Kamera muss genau über dem Okular auiegen. Öffne dazu den
Feststellclip auf der Rückseite der Halterung und passe den Okulareinblick genau auf deine Smartphone-
Kamera ein. Jetzt den Feststellclip wieder fest anziehen und die Smartphone-Halterung auf das Okular
deines Mikroskops aufstecken. Starte nun die Kamera-App. Wenn das Bild noch nicht genau zentriert auf
deinem Display zu sehen ist, dann löse den Feststellclip leicht und justieren nach. Eventuell ist es nötig,
durch die Zoomfunktion das Bild Display füllend darzustellen. Eine leichte Abschattung an den Rändern ist
möglich. Nimm das Smartphone nach dem Gebrauch wieder von der Halterung ab!
HINWEIS:
Achte darauf, dass das Smartphone nicht von der Halterung rutschen kann. Bei Beschädigungen durch ein
herabgefallenes Smartphone übernimmt die Bresser GmbH keine Haftung!
6. Beobachtungsobjekt –
Beschaffenheit und Präparierung
6.1. Beschaffenheit des Beobachtungsobjekts
Mit diesem Gerät, einem Durchlichtmikroskop, können durchsichtige beobachtet werden. Das Bild des je-
weiligen Beobachtungsobjektes wird über das Licht “transportiert”. Daher entscheidet die richtige Beleuch-
tung, ob du etwas sehen kannst oder nicht!
Bei durchsichtigen (transparenten) Objekten (z.B. Einzeller) scheint das Licht von unten durch die Öffnung
im Mikroskoptisch und dann durch das Beobachtungsobjekt. Der Weg des Lichts führt weiter durch Objek-
tiv und Okular, wo wiederum die Vergrößerung erfolgt und gelangt schließlich ins Auge. Dies bezeichnet
man als Durchlichtmikroskopie.Viele Kleinlebewesen des Wassers, Panzenteile und feinste tierische Be-
standteile sind von Natur aus transparent, andere müssen erst noch entsprechend präpariert werden. Sei
es, dass sie mittels einer Vorbehandlung oder Durchdringung mit geeigneten Stoffen (Medien) durchsichtig
gemacht werden oder dadurch, dass sie in feinste Scheibchen geschnitten (Handschnitt, Microcutschnitt)
und dann untersuchen werden. Mit diesen Methoden soll dich der nachfolgende Teil vertraut machen.

7
DE
6.2. Herstellen dünner Präparatschnitte
Wie bereits vorher ausgeführt, sind von einem Objekt möglichst dünne Scheiben herzustellen. Um zu bes-
ten Ergebnissen zu kommen, benötigst du etwas Wachs oder Parafn. Nehme z.B. eine Kerze. Das Wachs
wird in einen Topf gegeben und über der Kerze erwärmt.
GEFAHR!
Sei äußerst vorsichtig im Umgang mit heißem Wachs, es besteht Verbrennungsgefahr!
Das Objekt wird nun mehrere Male in das üssige Wachs getaucht. Lass das Wachs am Objekt hart wer-
den. Mit einem MicroCut oder Messer/Skalpell werden jetzt feinste Schnitte von dem mit Wachs umhüllten
Objekt abgeschnitten.
GEFAHR!
Sei äußerst vorsichtig im Umgang mit Messern/Skalpellen oder dem MicroCut! Durch ihre
scharfkantigen Oberflächen besteht ein erhöhtes Verletzungsrisiko!
Diese Schnitte werden auf einen Glasobjektträger gelegt und mit einem Deckglas abgedeckt.
6.3. Herstellen eines eigenen Präparats
Lege das zu beobachtende Objekt auf einen Glasobjektträger und gib mit einer Pipette (14) einen Tropfen
destilliertes Wasser auf das Objekt.
Setze ein Deckglas senkrecht am Rand des Wassertropfens an, so dass das Wasser entlang der Deckglas-
kante verläuft. Lege das Deckglas nun langsam über dem Wassertropfen ab.
7. Experimente
Wenn du dich bereits mit dem Mikroskop vertraut gemacht hast, kannst du die nachfolgenden Experimente
durchführen und die Ergebnisse unter deinem Mikroskop beobachten.
7.1. Wie züchtet man Salzwassergarnelen?
Zubehör (aus deinem Mikrokop-Set):
1. Garneleneier,
2. See-Salz,
3. Bruttank,
4. Hefe.
Der Lebenskreislauf der Salzwasser-Garnele
Die Salzwasser-Garnele oder „Artemia salina“, wie sie von den Wissenschaftlern genannt wird, durchläuft
einen ungewöhnlichen und interessanten Lebenskreislauf. Die von den Weibchen produzierten Eier werden
ausgebrütet, ohne jemals von einer männlichen Garnele befruchtet worden zu sein. Die Garnelen, die aus
diesen Eiern ausgebrütet werden, sind alle Weibchen.
Unter ungewöhnlichen Umständen, z. B. wenn der Sumpf austrocknet, können den Eiern männliche Garne-
len entschlüpfen. Diese Männchen befruchten die Eier der Weibchen und aus der Paarung entstehen beson-
dere Eier. Diese Eier, sogenannte „Winter-Eier“, haben eine dicke Schale, die das Ei schützt. Die Winter-Eier

8
sind sehr widerstandsfähig und bleiben sogar lebensfähig, wenn der Sumpf oder der See austrocknet und
dadurch der Tod der ganzen Garnelen-Bevölkerung verursacht wird. Sie können 5-10 Jahre in einem „schla-
fenden“ Zustand verharren. Die Eier brüten aus, wenn die richtigen Umweltbedingungen wieder hergestellt
sind. Solche Eier ndest Du in Deinem Mikroskop-Set.
Das Ausbrüten der Salzwasser-Garnele
Um die Garnele auszubrüten, ist es zuerst notwendig, eine Salz-Lösung herzustellen, die den Lebensbe-
dingungen der Garnele entspricht. Fülle dazu einen halben Liter Regen- oder Leitungswasser in ein Gefäß.
Dieses Wasser lässt Du ca. 30 Stunden stehen. Da das Wasser im Laufe der Zeit verdunstet, ist es ratsam,
ein zweites Gefäß ebenfalls mit Wasser zu füllen und 36 Stunden stehen zu lassen. Nachdem das Wasser
diese Zeit „abgestanden“ hat, schüttest Du die Hälfte des beigefügten See-Salzes in das Gefäß und rührst
so lange, bis sich das Salz ganz aufgelöst hat. Nun gibst Du einige Eier in das Gefäß und deckst es mit
einer Platte ab. Stelle das Glas an einen hellen Platz, aber vermeide es, den Behälter direktem Sonnenlicht
auszusetzen. Da Dir ein Bruttank zur Verfügung steht, kannst Du auch die Salzlösung mit einigen Eiern in
jede der vier Zellen des Tanks geben. Die Temperatur sollte ca. 25° C betragen.
Bei dieser Temperatur schlüpft die Garnele nach ungefähr 2-3 Tagen aus. Falls während dieser Zeit das
Wasser in dem Gefäß verdunstet, füllst Du Wasser aus dem zweiten Gefäß nach.
Die Salzwasser-Garnele unter dem Mikroskop
Das Tier, das aus dem Ei schlüpft, ist bekannt unter dem Namen „Nauplius-Larve“. Mit Hilfe der Pipette
kannst Du einige dieser Larven auf einen Glas-Objektträger legen und beobachten.
Die Larve wird sich durch das Salzwasser mit Hilfe ihrer haarähnlichen Auswüchse bewegen. Entnehme
jeden Tag einige Larven aus dem Gefäß und beobachte sie unter dem Mikroskop. Falls Du die Larven in
einem Bruttank gezogen hast, nimm einfach die obere Kappe des Tanks ab und setze den Tank auf den
Objekttisch.
Abhängig von der Raumtemperatur wird die Larve innerhalb von 6-10 Wochen ausgereift sein. Bald wirst Du
eine ganze Generation von Salzwasser-Garnelen gezüchtet haben, die sich immer wieder vermehrt.
Das Füttern Deiner Salzwasser-Garnelen
Um die Salzwasser-Garnelen am Leben zu erhalten, müssen sie natürlich von Zeit zu Zeit gefüttert wer-
den. Dies muss sorgfältig geschehen, da eine Überfütterung bewirkt, dass das Wasser fault und unsere
Garnelen-Bevölkerung vergiftet wird. Die Fütterung erfolgt am besten mit trockener Hefe in Pulverform. Ein
wenig von dieser Hefe jeden zweiten Tag genügt. Wenn das Wasser in den Kästchen des Bruttanks oder in
Deinem Behälter dunkel wird, ist das ein Zeichen, dass es fault. Nimm die Garnelen dann sofort aus dem
Wasser und setze sie in eine frische Salz-Lösung.
Achtung!
Die Garneleneier und die Garnelen sind nicht zum Verzehr geeignet!

9
DE
7.2. Textilfasern
Objekte und Zubehör:
1. Fäden von verschiedenen Textilien: Baumwolle, Leine, Wolle, Seide, Kunstseide, Nylon usw.
2. zwei Nadeln
Jeder Faden wird auf einen Glasobjektträger gelegt und mit Hilfe zweier Nadeln aufgefasert. Die Fäden wer-
den angefeuchtet und mit einem Deckglas abgedeckt. Das Mikroskop wird auf eine niedrige Vergrößerung
eingestellt. Baumwollfasern sind panzlichen Ursprungs und sehen unter dem Mikroskop wie ein aches,
gedrehtes Band aus. Die Fasern sind an den Kanten dicker und runder als in der Mitte. Baumwollfasern sind
im Grunde lange, zusammengefallene Röhrchen. Leinenfasern sind auch panzlichen Ursprungs, sie sind
rund und verlaufen in gerader Richtung. Die Fasern glänzen wie Seide und weisen zahllose Schwellungen
am Faserrohr auf. Seide ist tierischen Ursprungs und besteht im Gegensatz zu hohlen panzlichen Fasern
aus massiven Fasern von kleinerem Durchmesser. Jede Faser ist glatt und ebenmäßig und hat das Ausse-
hen eines kleinen Glasstabes. Wollfasern sind auch tierischen Ursprungs, die Oberäche besteht aus sich
überlappenden Hülsen, die gebrochen und wellig erscheinen. Wenn es möglich ist, vergleiche Wollfasern
von verschiedenen Webereien. Beachte dabei das unterschiedliche Aussehen der Fasern. Experten können
daraus das Ursprungsland der Wolle bestimmen. Kunstseide ist, wie bereits der Name sagt, durch einen
langen chemischen Prozess künstlich hergestellt worden. Alle Fasern zeigen harte, dunkle Linien auf der
glatten, glänzendenen Oberäche. Die Fasern kräuseln sich nach dem Trocknen im gleichen Zustand. Be-
obachte die Gemeinsamkeiten und Unterschiede.
Hinweise zur Reinigung
• Trennen Sie das Gerät vor der Reinigung von der Stromquelle (Netzstecker ziehen oder Batterien
entfernen)!
• Reinigen Sie das Gerät nur äußerlich mit einem trockenen Tuch. Benutzen Sie keine
Reinigungsüssigkeit, um Schäden an der Elektronik zu vermeiden.
• Schützen Sie das Gerät vor Staub und Feuchtigkeit!
• Entfernen Sie Batterien aus dem Gerät, wenn es längere Zeit nicht benutzt wird!
EG-Konformitätserklärung
Eine „Konformitätserklärung“ in Übereinstimmung mit den anwendbaren Richtlinien und entspre-
chenden Normen ist von der Bresser GmbH erstellt worden. Diese kann auf Anfrage jederzeit
eingesehen werden.
Entsorgung
Entsorgen Sie die Verpackungsmaterialien sortenrein. Beachten Sie bitte bei der Entsorgung des Ge-
räts die aktuellen gesetzlichen Bestimmungen. Informationen zur fachgerechten Entsorgung erhalten
Sie bei den kommunalen Entsorgungsdienstleistern oder dem Umweltamt.
Werfen Sie Elektrogeräte nicht in den Hausmüll!
Gemäß der Europäischen Richtlinie 2002/96/EG über Elektro- und Elektronik-Altgeräte und deren Um-
setzung in nationales Recht müssen verbrauchte Elektrogeräte getrennt gesammelt und einer umwelt-
gerechten Wiederverwertung zugeführt werden. Entladene Altbatterien und Akkus müssen vom Verbrau-
cher in Batteriesammelgefäßen entsorgt werden. Informationen zur Entsorgung alter Geräte oder Batterien,
die nach dem 01.06.2006 produziert wurden, erfahren Sie beim kommunalen Entsorgungsdienstleister oder
Umweltamt.

10
Batterien und Akkus dürfen nicht im Hausmüll entsorgt werden, sondern Sie sind zur Rückgabe ge-
brauchter Batterien und Akkus gesetzlich verpflichtet. Sie können die Batterien nach Gebrauch entwe-
der in unserer Verkaufsstelle oder in unmittelbarer Nähe (z.B. im Handel oder in kommunalen Sammelstel-
len) unentgeltlich zurückgeben.
Batterien und Akkus sind mit einer durchgekreuzten Mülltonne sowie dem chemischen Symbol des Schad-
stoffes bezeichnet.
Cd¹ Hg² Pb³
1
Batterie enthält Cadmium
2
Batterie enthält Quecksilber
3
Batterie enthält Blei
Garantie und Garantiezeitverlängerung
Die reguläre Garantiezeit beträgt 5 Jahre und beginnt am Tag des Kaufs. Die vollständigen Garantiebe-
dingungen sowie Informationen zu Garantiezeitverlängerung und Serviceleistungen können Sie unter
www.bresser.de/garantiebedingungen einsehen.

11
EN
General Warnings
• Choking hazard — This product contains small parts that could be swallowed by children. This poses a
choking hazard.
• Risk of electric shock — This device contains electronic components that operate via a power source
(power supply and/or batteries). Only use the device as described in the manual, otherwise you run the
risk of an electric shock.
• Risk of re/explosion — Do not expose the device to high temperatures. Use only the recommended
batteries. Do not short-circuit the device or batteries, or throw them into a re. Excessive heat or improper
handling could trigger a short-circuit, a re or an explosion.
• Risk of chemical burn — Make sure you insert the batteries correctly. Empty or damaged batteries could
cause burns if they come into contact with the skin. If necessary, wear adequate gloves for protection.
• Do not disassemble the device. In the event of a defect, please contact your dealer. The dealer will
contact the Service Centre and can send the device in to be repaired, if necessary.
• Tools with sharp edges are often used when working with this device. Because there is a risk of injury
from such tools, store this device and all tools and accessories in a location that is out of the reach of
children.
Parts overview
1. Eyepiece
2. Focus knob
3. Objective turret
4. Stage
5. On/off switch ( illumination)
6. Electronic light source
7. Base with battery compartment
8. Battery compartment
9. Cover plates and adhesive labels
10. Prepared slides and blank slides
11. Specimen Vials
12. Empty Vials
13. Magnifying Glass
14. Pipette
15. Tweezers
16. Aperture wheel
17. Measuring cup
18. Hatchery
19. MicroCut
20. Smartphone holder
21. 2x AA Batteries
1. What is a microscope?
A microscope contains two lens systems: the eyepiece and the objective. We’re presenting these systems
as one lens each so that the concept is easier to understand. In reality, however, the eyepiece (1) and the
objective in the turret (3) are made up of multiple lenses.
The lower lens (objective) produces a magnified image of the prepared specimen (10). The picture, which
you can’t see, is magnified once more by the second lens (eyepiece, 1), which you can see as the 'micro-
scope picture'.
2. Assembly and location
Before you start, choose an ideal location for using your microscope. It’s important that you choose a
spot with enough light for normal observation. Furthermore, it is recommended that you place the micro-
scope on a stable surface, because a shaky surface will not lead to satisfactory results.

12
3. Normal observation
For normal observation, place the microscope in a bright location (near a window or desk lamp, for exam-
ple).
Turn the focus knob (2) to the upper stop, and set the objective turret (3) to the lowest magnification.
Now, turn on the light using the switch on the microscope base. You’ll find further tips about the light
source in the next section. Now, place a prepared slide (10) under the clips on the stage (4), directly under
the objective (1). When you take a look through the eyepiece, you can see the magnified specimen. At this
point, you still might see a slightly fuzzy picture. Adjust the image sharpness by slowly turning the focus
knob (2). You can now select a higher magnification by turning the objective turret and selecting a different
objective.
When you do so, note that the sharpness of the picture must be adjusted again for the higher magnifica-
tion. Also, the higher the magnification, the more light you will need for good illumination of the picture.
The wheel with pinhole apertures (16) below the microscope stage (4) will help you in viewing very bright
or clear-sighted preparations. Turn the wheel (16) till the best contrast is achieved.
4. Observation (electronic light source)
For observation with the electronic light source (6) you need to insert 2 AA batteries 1.5 V, in the battery
compartment (8) on the base of the microscope (7). The battery compartment is opened using a Phillips
screwdriver. Insert the batteries with the correct polarity (+/- indication). Put the battery cover rst into
the small opening so that the lid ts perfectly. Now you can tighten the screw. The lighting is switched on
when you turn the switch on the microscope base. Now you can observe in the same way as described in
the previous section.

13
EN
TIP: The higher the magnification you use the more light is required for a good illumination of the picture.
Therefore, always start your experiments with a low magnification.
5. Smartphone holder
Open the exible holder and put your smartphone in it. Close the holder and make sure your phone is
properly secured. The camera must be positioned exactly above the eyepiece. Open the locking clip on the
back of the holder and t the eyepiece exactly onto your smartphone camera. Now retighten the locking clip
and attach the smartphone adaptor to the eyepiece of your microscope. Now start the camera app. If the
image is not yet centered on your display, loosen the locking clip slightly and readjust. It may be necessary
to use the zoom function to ll the image on the display. A slight shading at the edges is possible. Remove
the smartphone from the holder after use!
WARNING:
Make sure that the smartphone can not slip out of the holder. Bresser GmbH assumes no liability for any
damages caused by a dropped smartphone.
6. Condition and prepare viewed objects
6.1. Condition
This microscope features transmitted light, so that transparent specimens can be examined.
If opaque specimens are being examined, the light from below goes through the specimen, lens and eyepi-
ece to the eye and is magnied en route (direct light principle).
Some small water organisms, plant parts and animal components are transparent by nature, but many
others require pretreatment — that is, you need to make a thinnest possible slice of the object by hand
cutting or using a microtome, and then examine this sample.
6.2. Creation of thin preparation cuts
Specimens should be sliced as thin as possible. A little wax or parafn is needed to achieve the best
results. Put the wax into a heat-safe bowl and heat it over a ame until the wax is melted. You can use a
candle ame to melt the wax.
DANGER!
Be exremely carfeful when dealing with hot wax, as there is a danger of being burned.
Then, dip the specimen several times in the liquid wax. Allow the wax that encases the specimen to harden.
Use a MicroCut or other small knife or scalpel to make very thin slices of the object in its wax casing.

14
DANGER!
Be extremely careful when using the MicroCut, knife or scalpel. These instruments are very
sharp and pose a risk of injury.
Place the slices on a glass slide and cover them with another slide before attempting to view them with
the microscope.
6.3. Creation of your own preparation
Put the object to be observed on a glass slide and cover the object with a drop of distilled water using the
pipette (14).
Set a cover glass (available at a well-stocked hobby shop) perpendicular to the edge of the water drop, so
that the water runs along the edge of the cover glass. Now lower now the cover glass slowly over the water
drop.
7. Experiments
Now that you're familiar with your microscope's functions and how to prepare slides, you can complete the
following experiments and observe the results under your microscope.
7.1. How do You Raise Brine Shrimp?
Accessories (from your microscope set):
1. Shrimp eggs
2. Sea salt,
3. Hatchery,
4. Yeast.
The Life Cycle of Brine Shrimp
Brine shrimp, or “Artemia salina,” as they are called by scientists, have an unusual and interesting life cycle. The
eggs produced by the female are hatched without ever being fertilized by a male shrimp. The shrimp that hatch
from these eggs are all females. In unusual circumstances, e.g. when the marsh dries up, the male shrimp can
hatch. These males fertilize the eggs of the females and from this mating, special eggs come about. These
eggs, so-called “winter eggs,” have a thick shell, which protects them. The winter eggs are very resistant and
capable of survival if the marsh or lake dries out, killing off the entire shrimp population. They can persist for
5-10 years in a “sleep” status. The eggs hatch when the proper environmental conditions are reproduced. These
are the type of eggs you have in your microscope set.
The Incubation of the Brine Shrimp
In order to incubate the shrimp, you rst need to create a salt solution that corresponds to the living conditions
of the shrimp. For this, put a half liter of rain or tap water in a container. Let the water sit for approx. 30 hours.
Since the water evaporates over time, it is advisable to ll a second container with water and let it sit for 36
hours. After the water has sat stagnant for this period of time, add half of the included sea salt to the container
and stir it until all of the salt is dissolved. Now, put a few eggs in the container and cover it with a dish. Place the

15
EN
glass container in a bright location, but don’t put it in direct sunlight. Since you have a hatchery, you cal also add
the salt solution along with a few eggs to each of the four compartments of the tank. The temperature should
be around 25º. At this temperature, the shrimps will hatch in about 2-3 days. If the water in the glass evaporates,
add some water from the second container.
The Brine Shrimp under the Microscope
The animal that hatches from the egg is known by the name “nauplius larva.” With the help of a pipette,
you can place a few of these larvae on a glass slide and observe them. The larvae will move around in the
salt water by using their hair-like appendages. Take a few larvae from the container each day and observe
them under the microscope. In case you’ve hatched the larvae in a hatchery, simply take off the cover of
the tank and place the tank on the stage. Depending on the room temperature, the larvae will be mature in
6-10 weeks. Soon, you will have had raised a whole generation of brine shrimp, which will constantly grow
in numbers.
Feeding your Brine Shrimp
In order to keep the brine shrimp alive, they must be fed from time to time, of course. This must be done
carefully, since overfeeding can make the water become foul and poison our shrimp population. The feed-
ing is done with dry yeast in powdered form. A little bit of this yeast every second day is enough. If the water
in the compartments of the hatchery or your container turns dark, that is a sign that it is gone bad. Take the
shrimp out of the water right away and place them in a fresh salt solution.
Warning!
The shrimp eggs and the shrimp are not meant to be eaten!
7.2. Textile bres
Objects and accessories:
1. Threads of different textiles: Cotton, linen, wool, silk, Celanese, nylon and any others you can nd.
2. Two needles:
Put each thread on a glass slide and fray each with the help of the two needles. Put a drop of water over
each thread with the pipette and cover each with a cover glass. Adjust the microscope to a low magnica-
tion. Cotton bres are of plant origin and look, under the microscope, like a at, twisted band. The bres are
thicker and rounder at the edges than in the centre. Cotton bres consist primarily of long, collapsed tubes.
Linen bres are also of plant origin; they are round and run in straight lines. The bres shine like silk and
exhibit numerous swellings along the shaft of the bre. Silk is of animal origin and consists of solid bres
of smaller diameter than the hollow vegetable bres. Each silk bre is smooth and even and has the appear-
ance of a small glass rod. Wool bres are also of animal origin; the surface consists of overlapping scales,
which appear broken and wavy. If possible, compare wool bres from different weaving mills, and note the
differences in the appearance of the bres. Experts can determine the country of origin of wool based on
its appearance under a microscope. Celanese is articially manufactured by a long chemical process. All
Celanese bres show hard, dark lines on a smooth, shining surface. The bres crinkle in the same way after
drying. Observe the similarities and differences between the different bres.

16
Notes on Cleaning
• Before cleaning the device, disconnect it from the power supply by removing the plug or batteries.
• Only use a dry cloth to clean the exterior of the device. To avoid damaging the electronics, do not use any
cleaning uid.
• Protect the device from dust and moisture.
• The batteries should be removed from the unit if it has not been used for a long time.
EC Declaration of Conformity
Bresser GmbH has issued a ‘Declaration of Conformity’ in accordance with applicable guidelines
and corresponding standards. This can be viewed any time upon request.
Disposal
Dispose of the packaging materials properly, according to their type, such as paper or cardboard.
Contact your local waste-disposal service or environmental authority for information on the proper
disposal.
Do not dispose of electronic devices in the household garbage!
As per Directive 2002/96/EC of the European Parliament on waste electrical and electronic equip-
ment and its adaptation into German law, used electronic devices must be collected separately and
recycled in an environmentally friendly manner.
Empty, old batteries must be disposed of at battery collection points by the consumer. You can find out
more information about the disposal of devices or batteries produced after 6 January 2006 from your local
waste-disposal service or environmental authority.
In accordance with the regulations concerning batteries and rechargeable batteries, disposing of
them in the normal household waste is explicitly forbidden. Please make sure to dispose of your used
batteries as required by law — at a local collection point or in the retail market. Disposal in domestic waste
violates the Battery Directive.
Batteries that contain toxins are marked with a sign and a chemical symbol.
Cd¹ Hg² Pb³
1
battery contains cadmium
2
battery contains mercury
3
battery contains lead

17
EN
Warranty and warranty term extension
The regular guarantee period is 5 years and begins on the day of purchase. You can consult the full guar-
antee terms as well as information on extending the guarantee period and details of our services at:
www.bresser.de/warranty_terms.

18
Consignes générales de sécurité
• RISQUE D’ETOUFFEMENT! Ce produit contient des petites pièces, qui pourraient être avalées par des
enfants. Il y a un RISQUE D’ETOUFFEMENT.
•
RISQUE D’ELECTROCUTION ! Cet appareil contient des pièces électroniques raccordées à une source
d’alimentation électrique (par bloc d’alimentation et/ou batteries). L’utilisation de l’appareil doit se faire
exclusivement comme décrit dans ce manuel, faute de quoi un RISQUE d’ELECTROCUTION peut exister !
• RISQUE D’EXPLOSION / D’INCENDIE ! Ne pas exposer l’appareil à des températures trop élevées.
N’utilisez que les batteries conseillées. L’appareil et les batteries ne doivent pas être court-circuitées
ou jeter dans le feu ! Toute surchauffe ou manipulation inappropriée peut déclencher courts-circuits,
incendies voire conduire à des explosions !
• RISQUE DE BLESSURE ! En équipant l’appareil des batteries, il convient de veiller à ce que la polarité des
batteries soit correcte. Les batteries endommagées ou ayant coulées causent des brûlures par acide,
lorsque les acides qu’elles contiennent entrent en contact direct avec la peau. Le cas échéant, il convient
d’utiliser des gants de protection adaptés.
• Ne pas démonter l’appareil ! En cas de défaut, veuillez vous adresser à votre revendeur spécialisé. Celui-
ci prendra contact avec le service client pour, éventuellement, envoyer l’appareil en réparation.
• L’utilisation de cet appareil exige souvent l’utilisation d’accessoires tranchants et/ou pointus. Ainsi, il
convient de conserver l’appareil et ses accessoires et produits à un endroit se trouvant hors de la portée
des enfants. RISQUES DE BLESSURES !
Vue d'ensemble des pièces
1. Oculaire
2. Molette de mise au point
3. Tourelle porte-objectifs
4. Platine avec pinces
5. Interrupteur marche/arrêt (Eclairage)
6. Eclairage électrique
7. Base avec compartiment de la batterie
8. Compartiment à piles
9. Lamelles et étiquettes adhésives
10. Lames porte-objet et des diapositives vides
11. Flacons avec échantillons
12. Bouteilles vides
13. Loupe
14. Pipette
15. Pince à épiler
16. Roue avec des ouvertures sténopés
17. Tasses de mesure
18. Installation d‘accouvage
19. MicroCut
20. Adaptateur pour Smartphone
21. 2x piles AA
1. Qu’est ce qu’un microscope ?
Le microscope est composé de deux lots de lentilles : l’oculaire et l’objectif. Pour simplier, nous allons
considérer que chaque lot n’a qu’une seule lentille. En vérité, l’oculaire (1), tout comme les objectifs sur
la tourelle (3), sont des groupes de lentilles. La lentille inférieure (objectif) grossit l’objet (10) et permet
d’obtenir une reproduction agrandie de celui-ci. Cette image, qui n’est pas encore visible, est à nouveau
grossie par la seconde lentille (oculaire 1) et apparaît alors comme «image microscopique».
2. Montage et mise en place
Avant de commencer, cherche une place adaptée pour ton microscope. D’une part, il est important que cet
endroit soit bien éclairé. De plus, je te conseille de poser le microscope sur un emplacement stable étant
donné qu’il est impossible d’obtenir un bon résultat sur une base qui bouge.

19
FR
3. Observation normale
Pour une observation normale, tu dois poser ton microscope sur un emplacement bien éclairé (près d’une
fenêtre ou d’une lampe). La molette de mise au point (2) doit être vissée jusqu’à sa butée supérieure et le
porte-objectifs réglé sur le plus petit grossissement.
Maintenant, allumer la lumière en utilisant l'interrupteur sur la base du microscope. En ce qui concerne la
lampe, tu trouveras d’autres conseils dans le chapitre suivant. Glisse maintenant une lamelle porte-objet
(10) sous la pince sur la platine (4) exactement au-dessous de l’objectif. Lorsque tu regardes à travers
l’oculaire (1), tu vois ton échantillon grossi. L’image est éventuellement encore oue. Le réglage de la
netteté se fait en tournant doucement la molette de mise au point (2). Maintenant, tu peux choisir un gros-
sissement plus important en tournant le porte-objectifs et en choisissant ainsi un autre objectif.
Après le changement du grossissement, tu dois à nouveau faire une mise au point et, plus le grossissement
est important, plus le besoin en lumière est important pour obtenir un bon éclairage de l’échantillon.
La roue avec des ouvertures sténopé (16) en dessous de la platine du microscope (4) vous aidera à visua-
liser préparations très vives ou clairvoyants. Tournez la roue (16) jusqu'à ce que le meilleur contraste soit
obtenu.
4. Observation (Eclairage électrique)
Pour l'observation de la source de lumière électronique (6), vous devez insérer deux piles AA 1.5V, dans
le compartiment de la batterie (8) sur la base du microscope (7). Le compartiment des piles est ouvert à
l'aide d'un tournevis cruciforme. Insérez les piles avec la polarité (+/- d'indication). Mettez le couvercle de
la batterie en premier dans la petite ouverture pour que le couvercle s’adapte parfaitement. Maintenant,
vous pouvez serrer la vis.

20
L'éclairage s’allume lorsque vous allumez l'interrupteur sur la base du microscope. Maintenant, vous pou-
vez observer dans la même manière que décrit dans la section précédente.
Conseil : plus le grossissement est important, plus le besoin en lumière est important pour obtenir un bon
éclairage de l’échantillon. Commence donc toujours tes expériences avec le plus petit grossissement.
5. Support de smartphone
Ouvrez le support coulissant et placez votre smartphone dedans. Fermez le support et assurez-vous que
votre téléphone est correctement sécurisé. Le smartphone doit être positionnée exactement au-dessus
de l'oculaire. Ouvrez le clip de verrouillage situé à l'arrière du support et placez l'oculaire exactement sur
l'objectif de votre smartphone. Resserrez maintenant le clip de verrouillage et xez l'adaptateur de smart-
phone à l'oculaire de votre microscope. Maintenant, démarrez l'application appareil photo. Si l'image n'est
pas encore centrée sur votre écran, desserrez légèrement le clip de verrouillage et procédez à un nouveau
réglage. Il peut être nécessaire d’utiliser la fonction de zoom de votre smartphone pour obtenir la totalité de
l’image sur l’écran. Une légère ombrage sur les bords est possible. Retirez le smartphone de son support
après utilisation!
ATTENTION :
Assurez-vous que le smartphone ne peut pas glisser du support. Bresser GmbH n'assume aucune respon-
sabilité pour les dommages causés par la chute d'un smartphone.
6. Objet de l‘observation – Qualité et préparation
6.1. Qualité de l‘objet de l‘observation
Avec ce microscope, un dit microscrope à éclairage par transmission, vous pouvez observer des objets
transparents. Pour les objets transparents la lumière arrive par le bas sur l‘objet sur la platine porte-échan-
tillon, est agrandie par les lentilles de l‘objectif et de l‘oculaire et atteint ensuite notre oeil (principe de la
lumière transmise).
l Beaucoup de microorganismes de l‘eau, des parties de plantes et des composants animales les plus ns
ont naturellement une structure transparente, d‘autres doivent être préparés à cette n. Soit nous les prépa-
rons à la transparence à travers un prétraitement ou la pénétration avec des matériaux adéquats (mediums)
soit en découpant des tranches les plus nes d‘elles (sectionnement manuel, microcut) et que nous les
examinons ensuite. Avec de telles méthodes nous nous préparons à la partie suivante.
La page est en cours de chargement...
La page est en cours de chargement...
La page est en cours de chargement...
La page est en cours de chargement...
La page est en cours de chargement...
La page est en cours de chargement...
La page est en cours de chargement...
La page est en cours de chargement...
La page est en cours de chargement...
La page est en cours de chargement...
La page est en cours de chargement...
La page est en cours de chargement...
-
 1
1
-
 2
2
-
 3
3
-
 4
4
-
 5
5
-
 6
6
-
 7
7
-
 8
8
-
 9
9
-
 10
10
-
 11
11
-
 12
12
-
 13
13
-
 14
14
-
 15
15
-
 16
16
-
 17
17
-
 18
18
-
 19
19
-
 20
20
-
 21
21
-
 22
22
-
 23
23
-
 24
24
-
 25
25
-
 26
26
-
 27
27
-
 28
28
-
 29
29
-
 30
30
-
 31
31
-
 32
32


Bresser 40-640x Microscope Le manuel du propriétaire
- Catégorie
- Microscopes
- Taper
- Le manuel du propriétaire
- Ce manuel convient également à
dans d''autres langues
Documents connexes
-
Bresser Biotar 300x-1200x Set Microscope (without case) Le manuel du propriétaire
-
-
Bresser 9119501 Le manuel du propriétaire
-
-
-
-
-
Autres documents
-
Bresser Junior 8856000 Le manuel du propriétaire
-
National Geographic 9118300 Le manuel du propriétaire
-
Discovery Adventures 4400800 Le manuel du propriétaire
-
-
-
-
-
-
-