Sony CDP-CE535 Manuel utilisateur
- Catégorie
- Lecteur CD
- Taper
- Manuel utilisateur

3-866-304-21 (1)
1999 by Sony Corporation
CDP-CE535
Operating Instructions
Mode d’emploi
Manual de instrucciones
BruksanvisningFRFR
GB
FR
ES
SE

2
GB
WARNING
To prevent fire or shock
hazard, do not expose
the unit to rain or
moisture.
To avoid electrical shock,
do not open the cabinet.
Refer servicing to
qualified personnel only.
Welcome!
Thank you for purchasing the Sony
Compact Disc Player. Before operating
the unit, please read this manual
thoroughly and retain it for future
reference.
About This Manual
The instructions in this manual are for
model CDP-CE535.
Conventions
• Instructions in this manual describe
the controls on the player.
You can also use the controls on the
remote if they have the same or
similar names as those on the player.
• The following icons are used in this
manual:
Indicates that you can do the
task using the remote.
Indicates hints and tips for
making the task easier.
This appliance is classified as a CLASS 1
LASER product.
The CLASS 1 LASER PRODUCT
MARKING is located on the rear
exterior.
CAUTION
TO PREVENT ELECTRIC SHOCK,
DO NOT USE THIS POLARIZED AC
PLUG WITH AN EXTENSION
CORD, RECEPTACLE OR OTHER
OUTLET UNLESS THE BLADES
CAN BE FULLY INSERTED TO
PREVENT BLADE EXPOSURE.
For the customers in Canada

Getting Started
3
GB
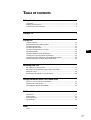
TABLE OF CONTENTS
GB
Getting Started
Unpacking............................................................................................................................. 4
Hooking Up the System...................................................................................................... 4
Connecting Another CD Player ......................................................................................... 6
Playing a CD............................................................................................................................. 8
Playing CDs
Using the Display .............................................................................................................. 10
Replacing Discs While Playing a Disc ............................................................................ 12
Locating a Specific Disc .................................................................................................... 13
Locating a Specific Track .................................................................................................. 14
Locating a Particular Point in a Track ............................................................................ 14
Playing Repeatedly............................................................................................................ 14
Playing in Random Order (Shuffle Play) ....................................................................... 15
Creating Your Own Program (Program Play)............................................................... 16
Controlling Another CD Player (Advanced Mega Control) ....................................... 18
Playing Alternately (No-Delay Play/X-Fade Play) ...................................................... 20
Recording From CDs
Recording Your Own Program........................................................................................ 21
Recording a CD by Specifying Tape Length (Time Edit)............................................. 21
Fading In or Out................................................................................................................. 22
Adjusting the Recording Level (Peak Search) ............................................................... 23
Storing Information About CDs (Custom Files)
What You Can Do With the Custom Files ..................................................................... 24
Labeling Discs (Disc Memo)............................................................................................. 24
Storing Specific Tracks (Delete Bank) ............................................................................. 26
Additional Information
Precautions ......................................................................................................................... 27
Notes on CDs...................................................................................................................... 27
Troubleshooting ................................................................................................................. 28
Specifications ...................................................................................................................... 28
Index
Index .................................................................................................................................... 29

Getting Started
4
GB
Unpacking
Check that you received the following items:
• Audio cord (1)
• Monaural (2P) mini-plug cord (1) (Connecting cord
for CONTROL A1
) (supplied for Canadian models
only)
• Remote commander (remote) (1)
• R6 (size AA) batteries (2)
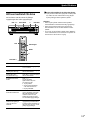
Inserting batteries into the remote
You can control the player using the supplied remote.
Insert two size AA (R6) batteries by matching the +
and – on the batteries. When using the remote, point it
at the remote sensor g on the player.
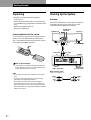
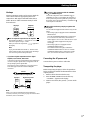
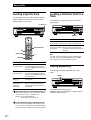
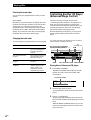
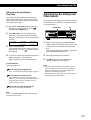
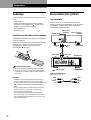
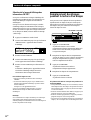
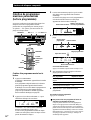
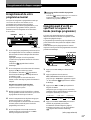
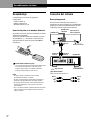
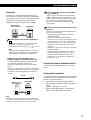
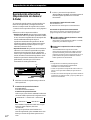
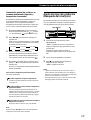
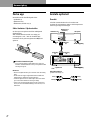
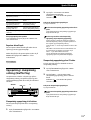
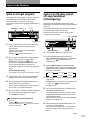
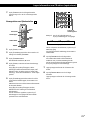
Hooking Up the System
Overview
This section describes how to hook up the CD player to
an amplifier. Be sure to turn off the power of each
component before making the connections.
CD player
: Signal flow
White
(L)
Red
(R)
White
(L)
Red
(R)
What cords will I need?
Audio cord (supplied) (1)
To an AC outlet
When to replace batteries
With normal use, the batteries should last for about six
months. When the remote no longer operates the player,
replace all the batteries with new ones.
Notes
• Do not leave the remote near an extremely hot or humid
place.
• Do not drop any foreign object into the remote casing,
particularly when replacing the batteries.
• Do not expose the remote sensor to direct sunlight or
lighting apparatuses. Doing so may cause a malfunction.
• If you don’t use the remote for an extended period of time,
remove the batteries to avoid possible damage from battery
leakage and corrosion.
Getting Started
LINE OUT
(L)
LINE OUT
(R)
Audio input
(L)
Audio input
(R)
Amplifier
To an AC outlet
DIGITAL OUT
(OPTICAL)
CONTROL A1

Getting StartedGetting Started
5
GB
Hookups
When connecting an audio cord, be sure to match the
color-coded cord to the appropriate jacks on the
components: Red (right) to Red and White (left) to
White. Be sure to make connections firmly to avoid
hum and noise.
You can adjust the output level to the amplifier
Press LINE OUT LEVEL +/– on the remote. You can
reduce the output level up to –20 dB.
When you reduce the output level, “
FADE
” appears in
the display.
Note
If you press the LINE OUT LEVEL +/– buttons on the
remote while recording, the recording level will change
even when it is preset on the tape deck, etc.
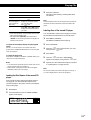
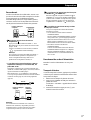
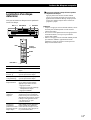
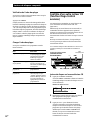
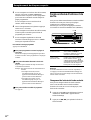
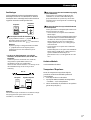
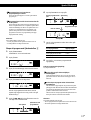
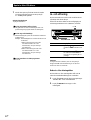
• If you have a digital component such as a digital
amplifier, D/A converter, DAT or MD
Connect the component via the DIGITAL OUT (OPTICAL)
connector using the optical cable (not supplied). Take off
the cap and plug in the optical cable.
Note that you cannot use fading in or out (page 22) and
Time Fade (page 23) functions when making this
connection.
If you have a Sony component with the CONTROL
A1 (or CONTROL A1) jack
Connect the component via the CONTROL A1 (or
CONTROL A1) jack. You can simplify the operation of
audio systems composed of separate Sony components.
For details, refer to the supplementary “CONTROL-A1
Control System” instructions.
When using another Sony CD player together with
this player
You can make the supplied remote effective only for this
player.
• When using a player equipped with the COMMAND
MODE selector:
Leave the COMMAND MODE selector of this player
to CD 1 which is set at the factory and set that of
another player to CD 2 or CD 3. Then set the CD 1/2/3
switch on the remote supplied for each player
accordingly.
• When using a player not equipped with the
COMMAND MODE selector:
The command mode of the player without the
COMMAND MODE selector is set to CD 1. Set the
COMMAND MODE selector of this player and the
CD 1/2/3 switch on the remote to CD 2 or CD 3.
Connecting the AC power cord
Connect the AC power cord to a wall outlet.
Transporting the player
Before transporting the player, follow the procedure
below to return the internal mechanisms back to their
original position.
1 Remove all the discs from the disc tray.
2 Press § OPEN/CLOSE to close the disc tray.
“–NO DISC–” appears in the display.
3 Wait for 10 seconds, then press 1/u to turn off the
player.
AmplifierCD player
POC-15
Optical cable (not supplied)
Note
When you connect via the DIGITAL OUT (OPTICAL)
connector, noise may occur when you play CD software other
than music, such as a CD-ROM.
CD player Digital component
LINE
IN OUT
L
R
INPUT
CD
L
R
2ND
CD
DIGITAL
INPUT
OPTICAL
DIGITAL
OUT
OPTICAL

Getting Started
6
GB
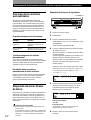
What cords will I need?
• Audio cord (1) (Use the cord supplied with the player to be
connected.)
• Monaural (2P) mini-plug cord (1) (supplied for Canadian
models only)
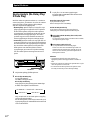
1 Connect the players with an audio cord (see also
“Hookups” on page 5).
2 Connect the players with a monaural (2P) mini-
plug cord.
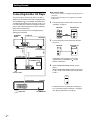
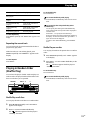
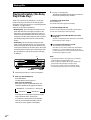
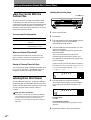
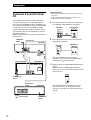
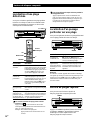
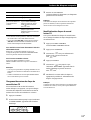
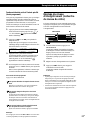
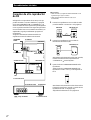
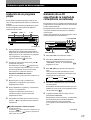
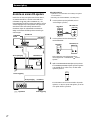
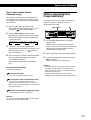
Connecting Another CD Player
If you have a Sony CD player in which 5, 50, 200, or
300 discs can be inserted and which is equipped with
the CONTROL A1
(or CONTROL A1) jack and the
command mode of that player can be set to CD 3, you
can control that player as the second player with this
player. After connecting this player and an amplifier,
follow the procedure below.
Be sure to turn off the power of each player before
making this connection.
CDP-CX300, etc.
CDP-CE535
To 2ND CD IN
CDP-CX300, etc.
To an AC outlet
To an AC outlet: Signal flow
To audio input
To audio output
To LINE OUT
Amplifier
CDP-CE535
CDP-CX300, etc.CDP-CE535
For details on this connection, refer to the
supplementary “CONTROL-A1
Control
System” instructions.
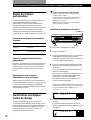
3 Set the COMMAND MODE selector of each
player.
Set the COMMAND MODE selector of this player
to CD 1 or CD 2, and set that of the second player
to CD 3.
To an AC outlet
For details on how to operate the second player,
see “Controlling Another CD Player” on page 18
and “Playing Alternately” on page 20.
COMMAND
MODE
To CONTROL A1
COMMAND
MODE
CD
132
To CONTROL A1
LINE
IN OUT
L
R
LINE OUT
L
R
2ND
CD
CONTROL A1
CONTROL A1

Getting StartedGetting Started
7
GB
4 Connect the AC power cord of both players to AC
outlets.
Notes
• Do not connect a player other than that you use as the
second player to the 2ND CD IN jacks of this player.
• When connecting a second CD player, do not connect the
DIGITAL OUT (OPTICAL) connector of this player to the
amplifier.

Basic Operations
8
GB
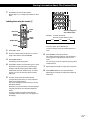
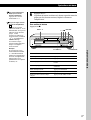
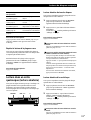
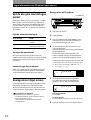
1
2
3
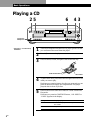
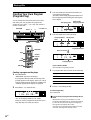
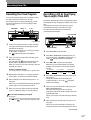
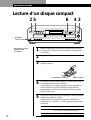
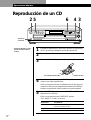
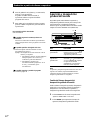
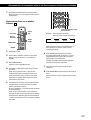
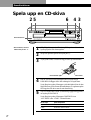
Playing a CD
25
With the label side up
Disc number
4
5
• See pages 4 – 5 for the hookup
information.
Turn on the amplifier and select the CD player position so that
you can listen to the sound from this player.
Press 1/u to turn on the player.
Press § OPEN/CLOSE, and place a disc on the disc tray.
To place other discs, press DISC SKIP and place the discs in the
order you want to play.
Each time you press the button, the disc tray turns and you can
place the discs in the empty disc compartments. The player
plays the disc in front of you first.
Press CONTINUE to select ALL DISCS or 1 DISC Continuous
Play mode.
Each time you press the CONTINUE button, “ALL DISCS” or
“1 DISC” appears in the display.
When you select
ALL DISCS
1 DISC
The player plays
All discs in the player consecutively in the order of
disc number
Only the disc you’ve selected
634
Connect the
headphones.
I / u
REPEAT
DISC 1 DISC 2 DISC 3 DISC 4 DISC 5
OPEN/CLOSE
DISC
SKIP
EX-
CHANGE
AMS
INPUT
FADER
TIME FADE
EDIT/
SEARCH
PEAK
X
-
FADENO DELAYCLEARCHECK
DISC CHECK
PUSH ENTER
MEGA
CONTROL
CONTINUE SHUFFLE PROGRAM
(
-
AMS
+
)
(DISC)
PHONES
TEXT
TIME/

Basic Operations
Basic Operations
9
GB
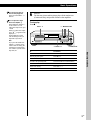
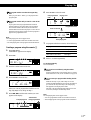
6
Press ·.
The disc tray closes and the player plays all the tracks once
(Continuous Play). Adjust the volume on the amplifier.
You can select the disc you
want to start playing first
Press one of the DISC 1 – 5
buttons.
You can adjust the output
level to the amplifier Z
Press LINE OUT LEVEL +/–
on the remote. You can
reduce the output level up to
–20 dB.
When you reduce the output
level, “
FADE
” appears in the
display.
The headphones volume
will also change when you
adjust the output level.
Note
If you press the LINE OUT
LEVEL +/– buttons on the
remote while recording, the
recording level will change
even when it is preset on the
tape deck, etc.
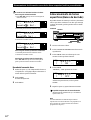
To stop play
Press p.
To
Pause
Resume play after pause
Go to the next track
Go back to the preceding track
Go to the next disc
Select a disc directly
Stop play and remove the CD
You need to
Press P
Press P or ·
Turn ≠ AMS ± clockwise
Turn ≠ AMS ± counterclockwise
Press DISC SKIP
Press DISC 1 – 5
Press § OPEN/CLOSE
§ OPEN/CLOSE
·pP
DISC SKIP
≠ AMS ±
DISC 1 – 5
I / u
CONTINUE SHUFFLE PROGRAM REPEAT
DISC 1 DISC 2 DISC 3 DISC 4 DISC 5
OPEN/CLOSE
DISC
SKIP
EX-
CHANGE
INPUT
FADER
TIME FADE
EDIT/
SEARCH
PEAK
X
-
FADENO DELAYCLEARCHECK
DISC CHECK
PUSH ENTER
MEGA
CONTROL
AMS
(DISC)
PHONES
TEXT
TIME/
(
-
AMS
+
)

Playing CDs
10
GB
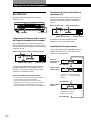
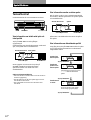
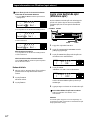
Using the Display
You can check information about the disc using the
display.
Playing CDs
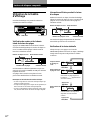
Checking the total number and playing
time of the tracks
Press TIME/TEXT before you start playing.
The display shows the current disc number, the total
number of tracks, total playing time and music
calendar.
Total playing timeCurrent disc number
The information also appears when you press the
§ OPEN/CLOSE button to close the disc tray.
The tracks numbered over 20 cannot be displayed in
the music calendar.
Notes on the disc number indications
• The red circle around a disc number indicates the disc is
ready to be played.
• When all the tracks on a disc have been played, the semi-
circle around the disc number disappears.
• When a disc compartment is recognized as empty, the semi-
circled disc number disappears.
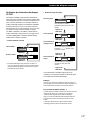
Display information while playing a disc
While playing a disc, the display shows the current
disc number, current track number, playing time of the
track and the music calendar.
Current disc number Playing time
INPUT
Total number of tracks Music calendar
Music calendarCurrent track number
The track numbers in the music calendar disappear
after they are played.
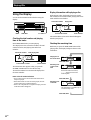
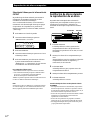
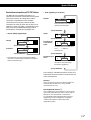
Checking the remaining time
Each time you press the TIME/TEXT button while
playing a disc, the display changes as shown in the
chart below.
Playing time of
the current track
Press TIME/TEXT.
Remaining time
on the current
track
If the track number exceeds 24,
“– – – –” appears instead of the
remaining time.
Press TIME/TEXT.
Remaining time
on the disc
This information is available only in
Continuous Play mode.
Press TIME/TEXT.
12345
678910
1 2 3 4 5
DISCSALL
DISC TRACK
MIN SEC
CD1
1 1 1.56
12345
678910
1 2 3 4 5
DISCSALL
DISC TRACK
MIN SEC
CD1
1 1 1.56
12345
678910
1 2 3 4 5
DISCSALL
DISC TRACK
MIN SEC
CD1
1 1 -1.57
12345
678910
1 2 3 4 5
DISCSALL
DISC TRACK
MIN SEC
CD1
1 -43.32
12345
678910
1 2 3 4 5
DISCSALL
DISC TRACK
MIN SEC
CD1
1 1O 45.28
TIME/TEXT ≠ AMS ±

Playing CDsPlaying CDs
11
GB
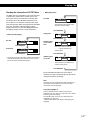
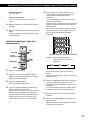
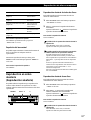
Checking the information of CD TEXT discs
CD TEXT discs have information, such as the disc titles
or artist names, memorized in a blank space on the
discs where there is no information on normal discs.
The display shows the CD TEXT information of the
disc so that you can check the current disc title, artist
name and track title. When the player detects CD TEXT
discs, the “CD-TEXT” indication lights up in the
display. Each time you press the TIME/TEXT button,
the display changes as shown in the charts below.
• Before you start playing
Press TIME/TEXT.
Artist name
Press TIME/TEXT.*
Disc title
• While playing a disc
Press TIME/TEXT.
Playing time
Track title
Remaining time
on the current
track
Remaining time
on the disc
This information is available only in
Continuous Play mode.
If the track number exceeds 24,
“– – – –” appears instead of the
remaining time.
If each CD TEXT information has more than 12
characters, the first 12 characters light up after all the
characters scrolled in the display.
Note
This player can only display the disc titles, track titles and
artist names from CD TEXT discs. The other CD TEXT
information cannot be displayed.
To play disc highlights Z
Some CD TEXT discs have a feature to play only the
highlights of the discs. When you select such a disc, “HIGH
LIGHT” appears in the display.
Press HIGH-LIGHT on the remote to start playing disc
highlights in the stop mode.
“HIGH LIGHT” flashes in the display while playing disc
highlights.
This information also appears when
the player locates the track.
Press TIME/TEXT.
Press TIME/TEXT.
Press TIME/TEXT.
* The display shows the current disc number, total number of
tracks and total playing time of the disc for a few seconds
before returning to the disc title indication.
12345
678910
1 2 3 4 5
DISCSALL
DISC
CD-TEXT
CD1
SONYHITS
12345
678910
1 2 3 4 5
DISCSALL
CD-TEXT
CD1
Sony Band
ART.
12345
678910
1 2 3 4 5
DISCSALL
TRACK
CD-TEXT
CD1
HitechBlues
12345
678910
1 2 3 4 5
DISCSALL
DISC TRACK
MIN SEC
CD-TEXT
CD1
2 1 1.56
12345
678910
1 2 3 4 5
DISCSALL
DISC TRACK
MIN SEC
CD-TEXT
CD1
2 1 -1.57
12345
678910
1 2 3 4 5
DISCSALL
DISC TRACK
MIN SEC
CD-TEXT
CD1
2 -58.5‚

Playing CDs
12
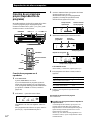
GB
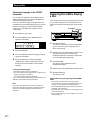
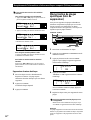
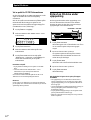
Replacing Discs While Playing
a Disc
You can open the disc tray while playing a disc so that
you can check what discs are to be played next and
replace discs without interrupting play of the current
disc.
EX-CHANGE
1 Press EX-CHANGE.
The disc tray opens and two disc compartments
appear. Even if the player is playing a disc, it
doesn’t stop playing.
2 Replace discs in the compartments with new ones.
The player plays the disc on the left side
compartment after the current disc, and then the
one on the right side compartment.
3 Press DISC SKIP.
The disc tray turns and other two disc
compartments appear.
4 Replace discs in the compartments with new ones.
5 Press EX-CHANGE.
The disc tray closes.
While the disc tray is open by pressing the EX-CHANGE
button
• If the play of the current disc ends, the player stops
playing. If the disc is played in 1 DISC Repeat Play mode
(see page 15), the current disc starts playing again.
• In ALL DISCS Shuffle Play mode (see page 15), tracks are
reshuffled on the current disc.
• In Program Play mode (see page 16), only the tracks on the
current disc are played.
• Do not push the disc tray to close it in Step 5, as you may
damage the player.
DISC SKIP
Selecting the language of the CD TEXT
information
You can select the language used to display the CD
TEXT information when you select a CD TEXT disc
with multi-language information.
Once you select the language, the display shows the
information in the selected language until you turn off
the player. If the player cannot read the language
memorized in a CD TEXT disc, the player shows
“(other lang).”
1 Press INPUT in stop mode.
2 Turn ≠ AMS ± until “SELECT LANG.”
appears in the display.
3 Push ≠ AMS ±.
4 Turn ≠ AMS ± until the language you want
appears in the display.
5 Push ≠ AMS ± to select the language.
“Reading Text” appears momentarily, then the
display shows the information in the selected
language.
To check the current language
1 Press INPUT while playing a CD TEXT disc.
2 Turn ≠ AMS ± until “SHOW LANG.” appears in the
display, then push ≠ AMS ±.
The current language appears momentarily.
You can also check the current language while selecting a CD
TEXT disc without multi-language information.
Note
If you select a CD TEXT disc which does not contain the
information of the selected language, the display shows the
information in another language according to the disc‘s
preference.
12345
678910
1 2 3 4 5
DISCSALL
DISC
CD-TEXT
CD1
SELECT LANG.

Playing CDsPlaying CDs
13
GB
You can extend the playing time during scanning the
discs
Press DISC CHECK repeatedly until the playing time
you want (10, 20 or 30) appears in the display. Each time
you press the button, the playing time changes cyclically.
Notes
• When you press the DISC CHECK button, the play mode
automatically changes to ALL DISCS Continuous Play
mode.
• When you’ve opened the disc tray by pressing the
EX-CHANGE button, you cannot use the DISC CHECK
function.
• Even if you press the DISC CHECK button while
“REPEAT” appears in the display (see page 14), the player
stops after scanning all the discs once.
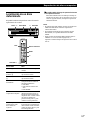
Locating a Specific Disc
You can locate any disc before or while playing a disc.
DISC 1 – 5 DISC CHECK · DISC SKIP
DISC SKIP +/–
Number
buttons
DISC
ENTER
·
To locate
The next disc
The next or succeeding
discs Z
The current or preceding
discs Z
A specific disc directly
A disc while checking the
labels
A disc by scanning the first
track of each disc for 10
seconds
Press
DISC SKIP while playing a disc
DISC SKIP + repeatedly until
you find the disc
DISC SKIP – repeatedly until
you find the disc
DISC 1 – 5.
When using the remote, follow
the procedure below.
1 Press DISC.
2 Press the number button of
the disc.
3 Press ENTER.
DISC CHECK while the disc
tray is open. The disc tray turns
to show you each disc label.
When the disc you want comes
in front of you, press · to
continue playing.
DISC CHECK before you start
playing while the disc tray is
closed. When you find the disc
you want, press · to continue
playing.

Playing CDs
14
GB
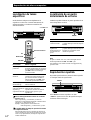
Locating a Particular Point in a
Track
You can also locate a specific point in a track while
playing a disc.
To locate
A point while
monitoring the sound
A point quickly by
observing the display
during pause
Press
) (forward) or 0 (backward) and
hold down until you find the point
) (forward) or 0 (backward) and
hold down until you find the point.
You will not hear the sound during the
operation.
Note
If “OVER” appears in the display, the disc has reached the
end while you were pressing the ) button. Press 0 or
turn ≠ AMS ± counterclockwise to go back.
Playing Repeatedly
You can play discs/tracks repeatedly in any play
mode.
0/)
Press REPEAT while playing a disc.
“REPEAT” appears in the display. The player repeats
the discs/tracks as follows:
REPEAT
When you directly locate a track numbered over 10 Z
Press >10 first, then the corresponding number buttons
on the remote. To enter “0,” use button 10/0.
Example: To play track number 30
Press >10 first, then 3 and 10/0.
You can extend the playing time during Music Scan
Press MUSIC SCAN repeatedly until the playing time
you want (10, 20 or 30) appears in the display. Each time
you press the button, the playing time changes cyclically.
Locating a Specific Track
You can quickly locate any track while playing a disc
using the AMS (Automatic Music Sensor) control or
number buttons on the remote.
≠ AMS ±
Number buttons
>10
=/+
·
MUSIC SCAN
To locate
The next or
succeeding tracks
The current or
preceding tracks
A specific track
directly Z
A track by scanning
each track for 10
seconds Z
(Music Scan)
You need to
Turn ≠ AMS ± clockwise until
you find the track. When using the
remote, press + repeatedly until you
find the track.
Turn ≠ AMS ± counterclockwise
until you find the track. When using
the remote, press =repeatedly until
you find the track.
Press the number button of the track
on the remote
Press MUSIC SCAN on the remote
before you start playing. When you
find the track you want, press · to
start playing.

Playing CDsPlaying CDs
15
GB
When the disc is played in
ALL DISCS Continuous
Play (page 8)
1 DISC Continuous Play
(page 8)
ALL DISCS Shuffle Play
(page 15)
1 DISC Shuffle Play
(page 15)
Program Play (page 16)
To cancel Repeat Play
Press REPEAT repeatedly until “REPEAT OFF” appears in the
display.
Repeating the current track
You can repeat only the current track while the disc is
played in any play mode.
While the track you want is being played, press
REPEAT repeatedly until “REPEAT 1” appears in the
display.
To cancel Repeat 1
Press REPEAT.
Playing in Random Order
(Shuffle Play)
You can have the player “shuffle” tracks and play in a
random order. The player shuffles all the tracks on all
discs or on the disc you’ve specified.
SHUFFLE
Shuffle Play on all discs
You can play all tracks on all discs in a random order.
1 Press SHUFFLE repeatedly until “ALL DISCS”
appears in the display.
2 Press · to start ALL DISCS Shuffle Play.
The
indication appears while the player is
“shuffling” the tracks.
DISC 1 – 5 ·
The player repeats
All the tracks on all discs
All the tracks on the current
disc
All the tracks on all discs in
random orders
All the tracks on the current
disc in random orders
The same program
To cancel Shuffle Play
Press CONTINUE.
You can start Shuffle Play while playing
Press SHUFFLE, and Shuffle Play starts from the current
track.
You can specify discs during Shuffle Play (Select
Shuffle Play)
You can specify discs during ALL DISCS Shuffle Play
mode, and the tracks on the specified discs are played in
a random order.
Press DISC 1 – 5 to specify the discs after Step 1.
Semi-circles appear around the specified disc numbers in
the display. To cancel the selected discs, press DISC 1 – 5
again. The semi-circles disappear.
To return to ALL DISCS Shuffle Play, press SHUFFLE
twice.
Shuffle Play on one disc
You can play all tracks on the specific disc in a random
order.
1 Press SHUFFLE repeatedly until “1 DISC” appears
in the display.
2 Press DISC 1 – 5 to start 1 DISC Shuffle Play on the
selected disc.
The indication appears while the player is
“shuffling” the tracks.
To cancel Shuffle Play
Press CONTINUE.
You can start Shuffle Play while playing
Press SHUFFLE, and Shuffle Play starts from the current
track.

Playing CDs
16
GB
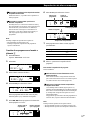
3 Turn ≠ AMS ± until the track number you
want appears in the display.
The track number being programmed flashes and
the total playing time including the track appears
in the display.
4 Push ≠ AMS ± to select the track.
If you’ve made a mistake
Press CLEAR, then repeat Steps 3 and 4.
5 To program other discs or tracks, do the following:
To program
All tracks on other discs
Other tracks on the same disc
Other tracks on other discs
6 Press · to start Program Play.
To cancel Program Play
Press CONTINUE.
You can create your program while checking the disc
labels
While the disc tray is open, follow Steps 1 to 6 with
pressing the DISC SKIP button to check the disc labels. If
you close the disc tray before Step 6, the total playing
time appears in the display after a while.
Note that, if the programmed track number isn’t found
on the disc, that step is automatically erased.
Total playing time
Track number
being programmed
Last programmed
track
Playing order
After one second
Total playing time
Programmed tracks
Repeat Step(s)
2
3 and 4
2 through 4
A
25
8
1 2 3 4 5
DISC TRACK
MIN SEC
CD1
1 5 13.18
PROGRAM
A
25
8
1 2 3 4 5
DISC TRACK STEP
CD1
1 5 3
PROGRAM
A
25
8
1 2 3 4 5
DISC TRACK
MIN SEC
CD1
1 5 13.18
PROGRAM
Creating Your Own Program
(Program Play)
You can arrange the order of the tracks on the discs
and create your own program. The program can
contain up to 32 “steps” — one “step” may contain a
track or a whole disc.
Creating a program on the player
1 Press PROGRAM.
“PROGRAM” appears in the display.
If a program is already stored, the last step of the
program appears in the display. When you want to
erase the whole program, hold down CLEAR until
“CLEAR” appears in the display (see page 18).
2 Press DISC 1 – 5 to select the disc.
PROGRAM
“AL” in the display stands for “all” tracks.
When you want to program the whole disc as one
step, skip Steps 3 to 4, and go to Step 5.
A
12345
678910
1 2 3 4 5
DISC TRACK
MIN SEC
CD1
1 AL 45.28
PROGRAM
·
DISC 1 – 5
CLEAR
CHECK
PROGRAM
CLEAR
CHECK
=/+
·
≠ AMS ±
DISC
Number
buttons
>10
ENTER

Playing CDsPlaying CDs
17
GB
The program remains even after the Program Play
ends
When you press the · button, you can play the same
program again.
The program remains until you erase it or turn off the
player
If you replace discs, the programmed disc and track
numbers remain. So, the player plays only the existing
disc and track numbers. However, the disc and track
numbers that aren’t found in the player or on the disc are
deleted from the program, and the rest of the program is
played in the programmed order.
Note
The total playing time doesn’t appear when:
—You have programmed a track whose number exceeds 20.
—The total playing time of the program exceeds 200 minutes.
Creating a program using the remote Z
1 Press PROGRAM.
“PROGRAM” appears in the display.
2 Press DISC.
3 Press the number button of the disc.
4 Press ENTER to select the disc.
When you want to program the whole disc as one
step, skip Steps 5 to 6, and go to Step 7.
5 Press =/+ until the track number you want
appears in the display.
6 Press ENTER to select the track.
7 To program other discs or tracks, do the following:
To program
All tracks on other discs
Other tracks on the same disc
Other tracks on other discs
8 Press · to start Program Play.
To cancel Program Play
Press CONTINUE.
You can select a track directly using the number
buttons
Press the number button of the track in Step 5. To select a
track numbered over 10, use the >10 button (see page 14).
You can create your program while checking the disc
labels
While the disc tray is open, follow Steps 1 to 8 with
pressing the DISC SKIP button to check the disc labels. If
you close the disc tray before Step 8, the total playing
time appears in the display after a while.
Note that, if the programmed track number isn’t found
on the disc, that step is automatically erased.
Note
The total playing time doesn’t appear when:
—You have programmed a track whose number exceeds 20.
—The total playing time of the program exceeds 200 minutes.
Last programmed
track
Playing order
After one second
Total playing time
Programmed tracks
Repeat Steps
2 through 4
5 and 6
2 through 6
Total playing time
Track number
being programmed
A
2
8
1 2 3 4 5
CD1
DISC-[_]
PROGRAM
A
2
8
1 2 3 4 5
CD1
DISC-[1]
PROGRAM
A
12345
678910
1 2 3 4 5
DISC TRACK
MIN SEC
CD1
1 AL 45.28
PROGRAM
A
25
8
1 2 3 4 5
DISC TRACK
MIN SEC
CD1
1 5 13.18
PROGRAM
A
25
8
1 2 3 4 5
DISC TRACK STEP
CD1
1 5 3
PROGRAM
A
25
8
1 2 3 4 5
DISC TRACK
MIN SEC
CD1
1 5 13.18
PROGRAM

Playing CDs
18
GB
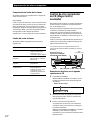
Playing discs of the second CD player
1 Press MEGA CONTROL.
The MEGA CONTROL button lights up and the
display shows the current disc number of the
second player.
2 Select the play mode you want.
To program tracks, use the controls on the second
player.
3 Press · to start playing.
The play starts and the display shows the current
disc and track numbers and the playing time of the
track.
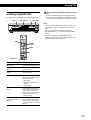
While the MEGA CONTROL button is lit, you can
control the second player with the controls on this
player as follows:
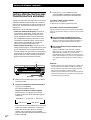
MEGA CONTROL0 (–AMS+) )
pP·
Current disc number
Play mode buttons (CONTINUE/
SHUFFLE/PROGRAM/REPEAT)
Controlling Another CD Player
(Advanced Mega Control)
This unit can control a second CD player (see
“Connecting Another CD Player” on pages 6 and 7).
Even when a second CD player is connected, the
controls on both of the units will function. When you
press the play button on either unit, the operating
player stops and the resting player starts.
Note that depending on the player, you may not be
able to operate all the functions of the second CD
player.
The controls indicated in the illustration below are effective
while the MEGA CONTROL button is lit.
DISCSALL
DISC
CD1
*DISC-1*
≠
AMS
(DISC)
±
INPUT CLEAR
Checking the track order
You can check your program before or after you start
playing.
Press CHECK.
Each time you press this button, the display shows the
track (the disc and track numbers) or the disc (the disc
number and “AL” indication) of each step in the
programmed order. After the last step in the program,
the display shows “END” and returns to the original
display. If you check the order after you start playing,
the display shows only the remaining steps.
Changing the track order
You can change your program before you start playing.
To
Erase a track
Erase the last track in the
program
Add tracks to the end of the
program
Erase the whole program
completely
You need to
Press CHECK until the track
you don’t want appears in
the display, then press
CLEAR
Press CLEAR. Each time you
press the button, the last
track will be cleared.
Follow the programming
procedure
Hold down CLEAR until
“CLEAR” appears in the
display. Create a new
program following the
programming procedure.

Playing CDsPlaying CDs
19
GB
To
Pause
Stop play
Locate a disc while
the second player is
set to Continuous
Play mode
Locate a track
You need to
Press P
Press p
Turn ≠
AMS
(DISC)
± until the
display shows the disc number
you want, then push
≠
AMS
(DISC)
±
Press 0 (–AMS+) ) until the
display shows the track number
you want
• To do other operations, use the controls on the second
player or the supplied remote.
• The AMS buttons (=/+) and search buttons
(0/)) on the remote operate the second player as
indicated on the remote.
To control the second player directly using the supplied
remote
Set CD 1/2/3 on the remote to CD 3 which is the same
position as the COMMAND MODE selector on the rear panel
of the second player.
To control this player again
Press MEGA CONTROL. The MEGA CONTROL button goes
off and you can control this player.
Notes
• You cannot locate a particular point in a track of the second
player using the controls on this player.
• Some controls on this player work on the second player
differently from they do to this player.
Loading the Disc Memos of the second CD
player
If the second CD player has the Disc Memo function
(see page 24), you can load the Disc Memos of the
second CD player to this player’s memory and display
them on this player.
1 Press INPUT.
2 Turn ≠ AMS ± until “LOADING MEMO”
appears in the display.
3 Push ≠ AMS ±.
This player starts loading. (Loading takes about
one minute.)
Note
If each Disc Memo of the second CD player has more than 12
characters, the first 12 characters of each are loaded to this
player.
Labeling discs of the second CD player
You can label discs of the second CD player or change
the Disc Memos loaded from the second CD player.
1 Press MEGA CONTROL.
The MEGA CONTROL button lights up.
2 Press CONTINUE.
3 Turn ≠
AMS
(DISC)
± to select the disc you want,
then push ≠
AMS
(DISC)
±.
4 Press INPUT.
5 Turn ≠
AMS
(DISC)
± until “ DISC MEMO”
appears in the display, then push ≠
AMS
(DISC)
±.
6 Input the new Disc Memo following the procedure
in “Labeling Discs” on pages 24 to 26.
Note
The new Disc Memos are stored on this player’s memory, so
you cannot display them on the second CD player.
12345
678910
1 2 3 4 5
DISCSALL
DISC TRACK
MIN SEC
CD1
LOADING MEMO

Playing CDs
20
GB
3 Press · to start playing.
The MEGA CONTROL button lights up while the
track in the second player is selected.
To check the X-Fade mode status
Press X-FADE once.
The X-Fade mode status appears momentarily.
To cancel No-Delay/X-Fade Play
Press the corresponding button repeatedly until the button
goes off. The current player continues playing.
You can change the method (No-Delay or X-Fade)
during play
Press the corresponding button (NO DELAY or X-FADE)
following the procedure in Step 2.
You can start X-Fade whenever you like
Press FADER during X-Fade Play.
Even after you have set the X-Fade mode and started X-
Fade Play, you can start X-Fade manually at the point
you like. Note that you cannot do this operation while the
sound from both players is mixed.
Notes
• The play starts from the second player if you start play
while the MEGA CONTROL button is lit.
• When one player has played all the discs/tracks in the
player ahead of the other player, the play stops.
• Do not use the controls on the second player during
No-Delay/X-Fade Play. They may not work correctly.
·
X-FADE
NO DELAY
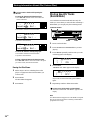
Playing Alternately (No-Delay
Play/X-Fade Play)
When you connect the second player, you can play
tracks in this player and those in the second player
alternately in any play mode (see “Connecting Another
CD Player” on pages 6 and 7).
Select one of the following methods:
• No-Delay Play: The current player changes at each
track. Each time the current player changes to the
other player, the other player starts play without a
break in sound immediately after the current player
ends play. The other player skips the lead-in portion
and starts playing from where the sound actually
begins.
• X-Fade Play: The current player changes at each
track or at the specified interval. You can select the
interval among 30, 60 and 90 seconds. Each time the
current player changes to the other player, the sound
from both players is mixed. The current player ends
play by fading out, and the other player starts play
by fading in.
1 Select the play mode you want on each player.
2 When you select No-Delay Play
Press NO DELAY.
The NO DELAY button lights up.
When you select X-Fade Play
Each time you press the X-FADE button, the
indication (X-Fade mode) appears as follows:
To change the current player each time a whole
track is finished, select “at track end.”
To change the current player at the specified
interval, press X-FADE repeatedly until the
interval you want appears in the display.
nX-FADE off n at track end n after 30 sec
after 90 sec N after 60 sec N
La page est en cours de chargement...
La page est en cours de chargement...
La page est en cours de chargement...
La page est en cours de chargement...
La page est en cours de chargement...
La page est en cours de chargement...
La page est en cours de chargement...
La page est en cours de chargement...
La page est en cours de chargement...
La page est en cours de chargement...
La page est en cours de chargement...
La page est en cours de chargement...
La page est en cours de chargement...
La page est en cours de chargement...
La page est en cours de chargement...
La page est en cours de chargement...
La page est en cours de chargement...
La page est en cours de chargement...
La page est en cours de chargement...
La page est en cours de chargement...
La page est en cours de chargement...
La page est en cours de chargement...
La page est en cours de chargement...
La page est en cours de chargement...
La page est en cours de chargement...
La page est en cours de chargement...
La page est en cours de chargement...
La page est en cours de chargement...
La page est en cours de chargement...
La page est en cours de chargement...
La page est en cours de chargement...
La page est en cours de chargement...
La page est en cours de chargement...
La page est en cours de chargement...
La page est en cours de chargement...
La page est en cours de chargement...
La page est en cours de chargement...
La page est en cours de chargement...
La page est en cours de chargement...
La page est en cours de chargement...
La page est en cours de chargement...
La page est en cours de chargement...
La page est en cours de chargement...
La page est en cours de chargement...
La page est en cours de chargement...
La page est en cours de chargement...
La page est en cours de chargement...
La page est en cours de chargement...
La page est en cours de chargement...
La page est en cours de chargement...
La page est en cours de chargement...
La page est en cours de chargement...
La page est en cours de chargement...
La page est en cours de chargement...
La page est en cours de chargement...
La page est en cours de chargement...
La page est en cours de chargement...
La page est en cours de chargement...
La page est en cours de chargement...
La page est en cours de chargement...
La page est en cours de chargement...
La page est en cours de chargement...
La page est en cours de chargement...
La page est en cours de chargement...
La page est en cours de chargement...
La page est en cours de chargement...
La page est en cours de chargement...
La page est en cours de chargement...
La page est en cours de chargement...
La page est en cours de chargement...
La page est en cours de chargement...
La page est en cours de chargement...
La page est en cours de chargement...
La page est en cours de chargement...
La page est en cours de chargement...
La page est en cours de chargement...
La page est en cours de chargement...
La page est en cours de chargement...
La page est en cours de chargement...
La page est en cours de chargement...
La page est en cours de chargement...
La page est en cours de chargement...
La page est en cours de chargement...
La page est en cours de chargement...
La page est en cours de chargement...
La page est en cours de chargement...
La page est en cours de chargement...
La page est en cours de chargement...
La page est en cours de chargement...
La page est en cours de chargement...
La page est en cours de chargement...
La page est en cours de chargement...
La page est en cours de chargement...
La page est en cours de chargement...
La page est en cours de chargement...
La page est en cours de chargement...
-
 1
1
-
 2
2
-
 3
3
-
 4
4
-
 5
5
-
 6
6
-
 7
7
-
 8
8
-
 9
9
-
 10
10
-
 11
11
-
 12
12
-
 13
13
-
 14
14
-
 15
15
-
 16
16
-
 17
17
-
 18
18
-
 19
19
-
 20
20
-
 21
21
-
 22
22
-
 23
23
-
 24
24
-
 25
25
-
 26
26
-
 27
27
-
 28
28
-
 29
29
-
 30
30
-
 31
31
-
 32
32
-
 33
33
-
 34
34
-
 35
35
-
 36
36
-
 37
37
-
 38
38
-
 39
39
-
 40
40
-
 41
41
-
 42
42
-
 43
43
-
 44
44
-
 45
45
-
 46
46
-
 47
47
-
 48
48
-
 49
49
-
 50
50
-
 51
51
-
 52
52
-
 53
53
-
 54
54
-
 55
55
-
 56
56
-
 57
57
-
 58
58
-
 59
59
-
 60
60
-
 61
61
-
 62
62
-
 63
63
-
 64
64
-
 65
65
-
 66
66
-
 67
67
-
 68
68
-
 69
69
-
 70
70
-
 71
71
-
 72
72
-
 73
73
-
 74
74
-
 75
75
-
 76
76
-
 77
77
-
 78
78
-
 79
79
-
 80
80
-
 81
81
-
 82
82
-
 83
83
-
 84
84
-
 85
85
-
 86
86
-
 87
87
-
 88
88
-
 89
89
-
 90
90
-
 91
91
-
 92
92
-
 93
93
-
 94
94
-
 95
95
-
 96
96
-
 97
97
-
 98
98
-
 99
99
-
 100
100
-
 101
101
-
 102
102
-
 103
103
-
 104
104
-
 105
105
-
 106
106
-
 107
107
-
 108
108
-
 109
109
-
 110
110
-
 111
111
-
 112
112
-
 113
113
-
 114
114
-
 115
115
-
 116
116


Sony CDP-CE535 Manuel utilisateur
- Catégorie
- Lecteur CD
- Taper
- Manuel utilisateur
dans d''autres langues
- English: Sony CDP-CE535 User manual
- español: Sony CDP-CE535 Manual de usuario
- svenska: Sony CDP-CE535 Användarmanual
Documents connexes
-
Sony CDP-CA80ES Le manuel du propriétaire
-
-
-
-
Sony CDP-CX355 Le manuel du propriétaire
-
-
-
Sony CDP-CE575 Manuel utilisateur
-
-