Bestway 56217E Le manuel du propriétaire
- Catégorie
- Accessoires de piscine hors terre
- Taper
- Le manuel du propriétaire

1
Item
56217E
Aged
Over 2 years
MY FIRST FRAME POOL
OWNER’S MANUAL
Read and Follow All Safety Information and
Instructions.
Keep for future reference.
Failure to follow these warnings and instructions
can result in serious injury or death to users,
especially children.
Prevent Young Children From Drowning:
Install fencing or approved barrier around all sides of pool.
State or local laws or codes may require fencing or other approved barriers.
Check state or local laws and codes before setting up pool.
Drowning occurs silently and quickly. Assign an adult to supervise pool and
wear provided water watcher tag.
Keep children in your direct sight when they are in or near pool and when you
are filling and emptying pool.
When searching for a missing child, check pool first, even if you think your
child is in the house.
Pool presents a drowning hazard even during filling and draining of the pool.
Maintain constant supervision of children and do not remove any safety
barriers until the pool is completely empty and stowed away.
Refer to the list of barrier recommendations and guidelines as described in
CPSC Publication No.362.
Assign an adult to be responsible for watching children in the pool. Give this
person a “water watcher” tag and ask that they wear it the entire time they are
in charge of supervising children in the pool. If they need to leave for any
reason, ask this person to pass the “water watcher” tag and the supervision
responsibility to another adult.
Prevent Young Children From Gaining Access to Pool:
Remove pool ladders before leaving pool. Toddlers can climb ladder and get
into pool.
Position furniture away from pool so that children cannot climb and gain
access to pool.
When leaving pool, remove floats and toys from pool that might attract a child.
Be Prepared to Respond to an Emergency:
Keep a working phone and list of emergency numbers near pool.
Become certified in cardiopulmonary resuscitation (CPR) so you can respond
to an emergency.
Diving Risk:
Do not dive into the pool. Diving into shallow water can result in a broken
neck, paralysis, or death.
Electrocution Risk:
Keep all electrical lines, radios, speakers and other electrical appliances away
from the pool.
Do not place pool near or under overhead electrical lines.
Safety Barrier Guidelines for Residential Swimming Pool
Section I: Outdoor swimming pool
An outdoor swimming pool, including an inground, aboveground, or onground
pool, hot tub, or spa, should be provided with a barrier which complies with
the following:
1. The top of the barrier should be at least 48 inches above grade measured
on the side of the barrier which faces away from the swimming pool. The
maximum vertical clearance between grade and the bottom of the barrier
should be 4 inches measured on the side of the barrier which faces away
from the swimming pool. Where the top of the pool structure is above
grade, such as an aboveground pool, the barrier may be at ground level,
such as the pool structure, or mounted on top of the pool structure. Where
the barrier is mounted on top of the pool structure, the maximum vertical
clearance between the top of the pool structure and the bottom of the
barrier should be 4 inches.
2. Openings in the barrier should not allow passage of a 4-inch diameter
sphere.
3. Solid barriers, which do not have openings, such as a masonry or stone
wall, should not contain indentations or protrusions except for normal
construction tolerances and tooled masonry joints.
4. Where the barrier is composed of horizontal and vertical members and the
distance between the tops of the horizontal members is less than
45 inches, the horizontal members should be located on the swimming
pool side of the fence. Spacing between vertical members should not
exceed 1-3/4 inches in width. Where there are decorative cutouts, spacing
within the cutouts should not exceed 1-3/4 inches in width.
5. Where the barrier is composed of horizontal and vertical members and
the distance between the tops of the horizontal members is 45 inches or
more, spacing between vertical members should not exceed 4 inches.
Where there are decorative cutouts, spacing within the cutouts should not
exceed 1-3/4 inches in width.
6. Maximum mesh size for chain link fences should not exceed 1-3/4 inch
square unless the fence is provided with slats fastened at the top or the
bottom which reduce the openings to no more than 1-3/4 inches.
7. Where the barrier is composed of diagonal members, such as a lattice
fence, the maximum opening formed by the diagonal members should be
no more than 1-3/4 inches.
8. Access gates to the pool should comply with Section I, Paragraphs 1
through 7,and should be equipped to accommodate alocking device.
Pedestrian access gates should open outward, away from the pool, and
should be self-closing and have a self-latching device. Gates other than
pedestrian access gates should have a self-latching device. Where the
release mechanism of the self-latching device is located less than
54 inches from the bottom of the gate, (a) the release mechanism should
be located on the pool side of the gate at least 3 inches below the top of
the gate and (b) the gate and barrier should have no opening greater than
1/2 inch within18 inches of the release mechanism.
9. Where a wall of a dwelling serves aspart of the barrier, one of the
following should apply:
(a) All doors with direct access to the pool through that wall should be
equipped with an alarm which produces an audible warning when the
door and its screen, if present, are opened. The alarm should sound
continuously for a minimum of 30 seconds within 7 seconds after the
door is opened. Alarms should meet the requirements of UL2017
General-Purpose Signaling Devices and Systems, Section 77. The
alarm should have a minimum sound pressure rating of 85 dBA at 10
feet and the sound of the alarm should be distinctive from other
household sounds, such as smoke alarms, telephones, and door bells.
The alarm should automatically reset under all conditions. The alarm
should be equipped with manual means, such as touchpads or
switches, to temporarily deactivate the alarm for a single opening of
the door from either direction. Such deactivation should last for
nomore than 15 seconds. The deactivation touchpads or switches
should be located at least 54 inches above the threshold of the door.
(b) The pool should be equipped with a power safety cover which
complies with ASTM F1346-91 listed below.
(c) Other means of protection, such as self-closing doors with self-latching
devices, are acceptable so long as the degree of protection afforded is
not less than the protection afforded by (a) or (b) described above.
10. Where an aboveground pool structure is used as a barrier or where the
barrier is mounted on top of the pool structure, and the means of access is
a ladder or steps, then (a) the ladder to the pool or steps should be
capable of being secured, locked or removed to prevent access, or (b) the
ladder or steps should be surrounded by a barrier which meets Section I,
Paragraphs 1 through 9. When the ladder or steps are secured, locked, or
removed, any opening created should not allow the passage of a 4-inch
diameter sphere.
Section II: Barrier Locations
Barriers should be located so as to prohibit permanent structures, equipment
or similar objects from being used to climb the barriers.
Refer to the item name or number stated on the packaging.
Packaging must be read carefully and kept for future reference.
Prevent Drowning
WARNING
Children under 5,
especially toddlers are at
highest risk of drowning.
Closely watch children
who are in or near this
pool. Empty pool or
prevent access when not
in use.
WARNING
You can break your
neck and be
paralyzed!
No Diving
Keep all electrical lines,
radios, speakers, and
other electrical devices
away from pool.
Do not place pool near
or under overhead
electrical lines.
Electrocution Risk
WARNING
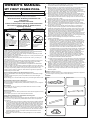
PARTS
B
D
C
A
Repair Patch
Liner
E

2
PREPARATION
Installation of small swimming pool usually takes only 10 minutes with 1
people.
Recommendations regarding placement of the pool:
Do not install the pool on a slope or inclined surfaces, on soft or loose soil
conditions (such as sand or mud), or on an elevated surface such as a deck,
platform or balcony, which may collapse under the weight of the filled pool.
• It is essential the pool is set up on solid, level ground. If the pool is set up on
uneven ground it can cause collapse of the pool and flooding, causing
serious personal injury and/or damage to personal property.
• Do not set up on driveways, decks, platforms, gravel or asphalt. Ground
should be firm enough to withstand the pressure of the water; mud, sand,
soft / loose soil or tar are not suitable.
• The ground must be cleared of all objects and debris including stones and
twigs.
• Check with your local city council for by-laws relating to fencing, barriers,
lighting and safety requirements and ensure you comply with all laws.
Drawings may not reflect actual product, not scaled to size.
Ref
A
B
C
D
E
4
4
4
4
4
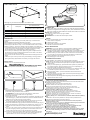
Top Rail A
Top Rail B
Vertical Pool Leg
Corner
Footing
Description
Pool Size & Quantity
48 in. x 48 in. x 12 in.
(1.22 m x 1.22 m x 30.5 cm)
STRUCTURE PHOTO:
AB
Fig. 1 Fig. 2
A
D
B
Fig. 3
C
D
Fig. 4
C
E
DISMANTLING
1.
Open water valve on the bottom of the pool, water will drain automatically.
(Check local regulations for drainage by-laws). Then dismantle the frame of
the pool to release the water. Make sure release all the water in 20 minutes.
NOTE: Drain by adult only!
2. Open the air valve on the top ring to deflate.
3. Air dry pool.
ATTENTION: Do not leave the drained pool outside.
REPAIR
If your pool is damaged, use the provided repair patch.
1. Clean area to be repaired.
2. Carefully peel patch.
3. Press patch over area to be repaired.
4. Wait 30 minutes before inflation.
POOL MAINTENANCE
WARNING: If you do not adhere to the maintenance guidelines covered
herein, your health might be at risk, especially that of your children.
1. Change the water of pools frequently (particularly in hot weather) or when
noticeably contaminated, unclean water is harmful to the user’s health.
2. Please contact your local retailer to obtain chemicals to treat the water in
your pool. Be sure to follow the chemical manufacturer’s instructions.
3. Proper maintenance can maximize the life of your pool.
4. See packaging for water capacity.
CLEANING AND STORAGE
1. After deflation, use a damp cloth to gently clean all surfaces.
NOTE: Never use solvents or other chemicals that may damage the product.
2. Remove all the accessories and spare parts of the pool and store them
clean and dry.
3. Once pool is completely dry, sprinkle with talcum powder to prevent pool
from sticking together, fold pool carefully. If pool is not completely dry,
mould may result and will damage the pool liner.
4. Store liner and accessories in a cool, dry place out of children’s reach, with
a moderate temperature between 5°C / 41°F and 38°C / 100°F.
5. During the rainy season, pool and accessories should be stored as
instructed above.
6. Unproper draining of the pool might cause serious personal injury and/or
damage to personal property.
7. Check the product for damage at the beginning of each season and at
regular intervals when in use.
INSTALLATION
Assembly can be completed without tools.
WARNING: Assembly by an adult.
NOTE: It is important to assemble pool in the order shown below.
B
B
D
C
E
A
B
A
A
A
B
303021277986
©2021 Bestway Inflatables & Material Corp.
All rights reserved/Tous droits réservés/Todos los derechos reservados/Alle Rechte
vorbehalten/Tutti i diritti riservati
Trademarks used in some countries under license from/
Marques utilisées dans certains pays sous la licence de/
Marcas comerciales utilizadas en algunos países bajo la licencia de/
Die Warenzeichen werden in einigen Ländern verwendet unter Lizenz der/
Marchi utilizzati in alcuni paesi concessi in licenza a
Bestway Inflatables & Material Corp., Shanghai, China
Manufactured, distributed and represented in the European Union by/
Fabriqués, distribués et représentés dans l’Union Européenne par/Fabricado,
distribuido y representado en la Unión Europea por/
Hergestellt, vertrieben und in der Europäischen Union vertreten von/Prodotto,
distribuito e rappresentato nell'Unione Europea da
Bestway (Europe) S.r.l., Via Resistenza, 5, 20098 San Giuliano Milanese (Milano),
Italy
Distributed in Latin America by/Distribué en Amérique latine par/Distribuido en
Latinoamérica por/Distribuído na América Latina por
Bestway Central & South America Ltda, Salar Ascotan 1282, Parque Enea,
Pudahuel, Santiago, Chile
Distributed in Australia & New Zealand by Bestway Australia Pty Ltd, Unit 2/98-104
Carnarvon St Silverwater, NSW 2128, Australia
Tel: Australia: (+61) 29 0371 388; New Zealand: 0800 142 101
Distributed in United Kingdom by Bestway Corp UK Ltd. 8 Wentworth Road,
Heathfield Industrial Estate, Newton Abbot, Devon, TQ12 6TL
Exported by/Exporté par/Exportado por/Exportiert von/Esportato da
Bestway (Hong Kong) International Ltd./Bestway Enterprise Company Limited
Suite 713, 7/Floor, East Wing, Tsim Sha Tsui Centre, 66 Mody Road, Kowloon,
Hong Kong
Tel: +86 21 69135588 (For U.S. and Canada)
www.bestwaycorp.com
1. Find solid, level ground and clear it of debris.
ATTENTION: Do not set up the pool under cables or under trees.
2. Spread out the pool and make sure it is right side up.
3. Cover the water valve.
4. Assemble the top rails. Connect Top Rail A to Top Rail B, and slide into the
pole sleeve (Fig.1). Please see the structure photo for detailed directions.
Make sure the top rails’ ends are in right position.
5. At the corners, insert the Top Rails (A & B) into the Corners (D). Ensure
the spring-loaded pins snap into the pre-drilled holes. (Fig. 2)
6.
Insert the Vertical Pool Legs (C) into the bottom of the Corners (D). (Fig. 3)
7. Attach all Footings (E) to the bottom of the Vertical Pool Legs (C). (Fig. 4)
8. Test the Frame to ensure all connections are secure before filling wit
water.
9. Put 1in. to 2in. (2.5cm to 5cm) of water in the pool to cover the floor. Once
pool floor is slightly covered, gently smooth out all wrinkles. Start in the
center of the pool and work your way clockwise to the outside.
10. Continue to fill the pool until the water reaches the welding line located
1.2in.-3.1in. (3cm-8cm) from the top of the pool. Please kindly pay the
upmost attention to not over fill the pool for security reasons.
1.2in.-3.1in.
(3cm-8cm)
-
 1
1
-
 2
2


Bestway 56217E Le manuel du propriétaire
- Catégorie
- Accessoires de piscine hors terre
- Taper
- Le manuel du propriétaire
dans d''autres langues
- English: Bestway 56217E Owner's manual
Documents connexes
-
Bestway 57392E Le manuel du propriétaire
-
Bestway Steel Pro 13’1″ x 6’11” x 32″ Above Ground Pool Le manuel du propriétaire
-
Bestway STEEL PRO Manuel utilisateur
-
-
Bestway 303021293210-C Manuel utilisateur
-
Bestway 56543-BW Mode d'emploi
-
Bestway 56620 Le manuel du propriétaire
-
-
Bestway Steel Oval Power Pool Set Shape Frame Oval Pool Equipped Le manuel du propriétaire
-