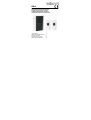
Velleman DB4 Manuel utilisateur
- Catégorie
- Stroboscopes
- Taper
- Manuel utilisateur

DB4
PORTABLE WIRELESS DOOR CHIME
DRAAGBARE DRAADLOZE DEURBEL
SONNETTE PORTATIVE SANS FIL
TIMBRE INALÁMBRICO PORTÁTIL
TRAGBARE DRAHTLOSE TÜRGLOCKE
USER MANUAL 3
GEBRUIKERSHANDLEIDING 7
NOTICE D’EMPLOI 11
MANUAL DEL USUARIO 15
BEDIENUNGSANLEITUNG 19

DB4
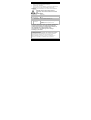
24/02/2009 2 Velleman®
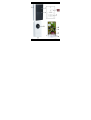
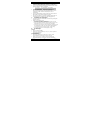
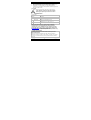
Figure 1

DB4
24/02/2009 3 Velleman®
USER MANUAL
1. Introduction
To all residents of the European Union
Important environmental information about this product
This symbol on the device or the package indicates that
disposal of the device after its lifecycle could harm the
environment. Do not dispose of the unit (or batteries) as
unsorted municipal waste; it should be taken to a
specialized company for recycling. This device should be
returned to your distributor or to a local recycling service.
Respect the local environmental rules.
If in doubt, contact your local waste disposal authorities.
Thank you for choosing Velleman! Please read the manual thoroughly
before bringing this device into service. If the device was damaged in
transit, don't install or use it and contact your dealer.
2. Safety Instructions
Keep the device away from children and unauthorised users.
Keep this device away from rain, moisture, splashing and
dripping liquids
• Damage caused by disregard of certain guidelines in this manual is
not covered by the warranty and the dealer will not accept
responsibility for any ensuing defects or problems.
• Note that damage caused by user modifications to the device is not
covered by the warranty.
3. General Guidelines
Refer to the Velleman® Service and Quality Warranty on the last
pages of this manual.
• Protect this device from shocks and abuse. Avoid brute force when
operating the device.
• Protect the device against extreme heat and dust.
• Familiarise yourself with the functions of the device before using it.
• All modifications of the device are forbidden for safety reasons.
• Only use the device for its intended purpose. Using the device in an
unauthorised way will void the warranty.

DB4
24/02/2009 4 Velleman®
4. Features
• encoded signal prevents false alarm
• easy installation without cables
• 3 different chimes: ding, ding-dong, Westminster
• 2 doorbell push buttons: a different doorbell melody can be set
for each push button
• 16 codes
• comes with:
o 1x doorbell
o 2x doorbell push button
o 2x 12Vdc battery, type A23 (for push buttons)
5. Overview
Refer to the illustrations on page 2 of this manual.
doorbell 3 status LED
1 4.5VDC input jack 4 DIP switch + cover
2 speaker 5 battery compartment
doorbell push button (2x) C select melody jumpers
A push button D DIP switch
B activate chime button (= A) E battery compartment
6. Operation
• Insert batteries (not incl.) into the doorbell (see §8) or connect a
4.5VDC adaptor (not incl.) to the 4.5VDC input jack [1].
Polarity for the adaptor:
• Open the DIP switch cover [4] of the doorbell. Releasing the
screw and remove the cover.
• Open the doorbell push buttons by pushing gently with a small
screwdriver in the gap at the bottom of the casing (see arrow)
and removing the back cover.
• Insert the batteries into the doorbell push buttons (see §8).
• Verify that the settings of the DIP switches of the doorbell [4]
and doorbell push buttons [D] are the same. These DIP-switches
set the encoding of the transmitted signal. When interference
with similar devices in the neighbourhood is noticed, change the

DB4
24/02/2009 5 Velleman®
DIP-switch setting, but make sure that the same setting is
selected on doorbell and doorbell push-buttons.
• Both doorbell push buttons can have their own melody setting. Set
the melody jumper [C] to the desired melody:
1
für Elise 2 Westminster 3 ding-dong
• Close the DIP switch cover [4] of the doorbell. Secure the screw.
• Mount or place the doorbell push buttons in the desired locations
and close the doorbell push buttons. Protect them from harsh
weather conditions to prolong their life time. Make sure push
buttons are not surrounded by metal or near a strong magnetic
field.
• Mount or place the doorbell itself in the desired location (indoors
only). Make sure the doorbell is not surrounded by metal or near
a strong magnetic field.
• A push on the doorbell button will produce the chosen melody for
that button through the speaker [2] of the doorbell, while the
status LED [3] is lit.
7. Troubleshooting
• When sound becomes weak, replace the batteries of the doorbell
(see §8).
• When pushing a push button does not produce a chime:
• verify whether the DIP switch settings on doorbell and doorbell
push buttons are identical. Set the same setting on doorbell and
doorbell push buttons.
• verify whether the push button is located within the specified
range (max. 60m). If not, bring it closer to the doorbell.
• verify whether doorbell and doorbell push buttons are not
surrounded by metal or near a strong magnetic field. In these
cases, move the push button or doorbell to a suitable
location.
• replace the push button battery (see §8)
8. Batteries
doorbell
• Open the battery compartment [5].
• Insert 3 new 1.5V batteries type AA (LR6C) with polarity as
indicated inside the battery casing.
• Close the battery compartment.

DB4
24/02/2009 6 Velleman®
doorbell push button
• Open the doorbell push buttons by pushing gently with a small
screwdriver on the bottom of the casing (see arrow) and
removing the back cover.
• Insert a new 12V battery type GP23A with polarity as indicated
on the illustration (see page 2 of this manual).
general
• Do not attempt to recharge non-rechargeable batteries and do
not throw batteries in fire as they might explode.
WARNING: handle batteries with care, observe
warnings on battery casing. Dispose of batteries in
accordance with local regulations.
Keep batteries away from children.
9. Technical Specification
transmission
frequency 433.92MHz
range max. 60m
power supply 3.5mm
each doorbell
push button 1 x 12V battery GP23GAC (incl.)
doorbell
3 x AA battery 1.5V (LR6C, not incl.)
or
power adaptor 4.5VDC/5W (PSS0530, not incl.)
Use this device with original accessories only. Velleman nv
cannot be held responsible in the event of damage or injury
resulted from (incorrect) use of this device.
For more info concerning this product, please visit our
website www.velleman.eu.
The information in this manual is subject to change without
prior notice.
© COPYRIGHT NOTICE
This manual is copyrighted. The copyright to this manual is owned by Velleman
Components nv. All worldwide rights reserved. No part of this manual may be
copied, reproduced, translated or reduced to any electronic medium or otherwise
without the prior written consent of the copyright holder.

DB4
24/02/2009 7 Velleman®
GEBRUIKERSHANDLEIDING
1. Inleiding
Aan alle ingezetenen van de Europese Unie
Belangrijke milieu-informatie betreffende dit product
Dit symbool op het toestel of de verpakking geeft aan dat,
als het na zijn levenscyclus wordt weggeworpen, dit toestel
schade kan toebrengen aan het milieu. Gooi dit toestel (en
eventuele batterijen) niet bij het gewone huishoudelijke
afval; het moet bij een gespecialiseerd bedrijf terechtkomen voor
recyclage. U moet dit toestel naar uw verdeler of naar een lokaal
recyclagepunt brengen. Respecteer de plaatselijke milieuwetgeving.
Hebt u vragen, contacteer dan de plaatselijke autoriteiten
betreffende de verwijdering.
Dank u voor uw aankoop! Lees deze handleiding grondig voor u het
toestel in gebruik neemt. Werd het toestel beschadigd tijdens het
transport, installeer het dan niet en raadpleeg uw dealer.
2. Veiligheidsinstructies
Houd buiten het bereik van kinderen en onbevoegden.
Bescherm tegen regen, vochtigheid en opspattende
vloeistoffen.
• De garantie geldt niet voor schade door het negeren van
bepaalde richtlijnen in deze handleiding en uw dealer zal de
verantwoordelijkheid afwijzen voor defecten of problemen die
hier rechtstreeks verband mee houden.
• Schade door wijzigingen die de gebruiker heeft aangebracht valt
niet onder de garantie.
3. Algemene richtlijnen
Raadpleeg de Velleman® service- en kwaliteitsgarantie
achteraan de handleiding.
• Bescherm dit toestel tegen schokken. Vermijd brute kracht
tijdens de bediening.
• Bescherm tegen extreme temperaturen, stof en vochtigheid.

DB4
24/02/2009 8 Velleman®
• Leer eerst de functies van het toestel kennen voor u het gaat
gebruiken.
• Om veiligheidsredenen mag u geen wijzigingen aanbrengen.
• Gebruik het toestel enkel waarvoor het gemaakt is. Bij
onoordeelkundig gebruik vervalt de garantie.
4. Eigenschappen
• het gecodeerde signaal voorkomt vals alarm
• eenvoudige installatie zonder bedrading
• 3 verschillende beltonen: ding, dingdong, Westminster
• 2 deurbeldrukknoppen: aan elke drukknop kan een afzonderlijke
melodie toegekend worden
• 16 codes
• inhoud:
o 1x deurbel
o 2x deurbeldrukknoppen
o 2x 12VDC-batterij type A23 (voor drukknoppen)
5. Omschrijving
Raadpleeg de figuren op pagina 2 van deze handleiding.
deurbel 3 statusled
1 4,5 VDC-ingang 4 DIP-schakelaars + deksel
2 luidspreker 5 batterijvak
deurbeldrukknop (2x) C selectiejumpers voor melodie
A drukknop D DIP-schakelaars
B drukknop inschakeling (= A) E batterijvak
6. Gebruik
• Plaats de batterijen (niet meegelev.) in de deurbel (zie §8) of sluit
een 4,5 VDC voedingsadapter (niet meegelev.) aan de 4,5 VDC-
ingang [1]. Polariteit van de adapter: .
• Open het dekseltje van de DIP-schakelaars [4] op de deurbel.
• Open de drukknop door het lipje met een kleine, platte
schroevendraaier voorzichtig in te duwen (zie pijl).
• Plaats de batterijen in de drukknop (zie §8).

DB4
24/02/2009 9 Velleman®
• Zorg ervoor dat de DIP-schakelaars op zowel de deurbel [4] als
op de drukknoppen [D] identiek ingesteld zijn. Probeer bij
interferentie door gelijksoortige toestellen een andere instelling.
• U kunt op elke deurbel een afzonderlijke melodie instellen. Stel de
gewenste melodie in met de jumper [C]:
1
Für Elise 2 Westminster 3 dingdong
• Sluit het dekseltje [4] en bevestig met de schroef.
• Kies een installatieplaats waar elk van de drukknoppen
beschermd is tegen strenge weersomstandigheden en sterke
magnetische velden. Installeer de plaatjes en sluit de
drukknoppen.
• Kies een installatieplaats (enkel binnenshuis) waar de deurbel
beschermd is tegen sterke magnetische velden.
• Druk op een drukknop: u hoort de ingestelde melodie door de
luidspreker [2] van de deurbel. De statusled [3] licht op.
7. Problemen en oplossingen
• Vervang de batterijen in de deurbel van zodra het geluidsignaal
verzwakt (zie §8).
• Indien u geen melodie hoort:
• Controleer of de DIP-schakelaars op de deurbel en op de
drukknop(pen) identiek ingesteld zijn.
• Zorg ervoor dat de deurbel en de drukknop(pen) binnen het
maximale bereik van 60 m van elkaar zijn verwijderd.
• Controleer of de deurbel en de drukknop(pen) onderhevig zijn
aan magnetische velden. Kies een andere installatieplaats
voor de deurbel en/of de drukknop(pen) indien nodig.
• Vervang de batterij in de drukknop(pen) (zie §8).
8. De batterijen
deurbel
• Open het batterijvak [5].
• Plaats drie nieuwe AA-batterijen van 1,5 V (LR6C) volgens de
polariteitaanduidingen.
• Sluit het batterijvak.
deurbeldrukknop
• Open de drukknop door het lipje met een kleine, platte
schroevendraaier voorzichtig in te duwen (zie pijl).
• Plaats een nieuwe 12 V-batterij type GP23A volgens de
polariteitaanduidingen (zie pagina 2 van deze handleiding).

DB4
24/02/2009 10 Velleman®
algemeen
• Herlaad geen alkalinebatterijen en gooi batterijen nooit in het
vuur.
LET OP: Leef de veiligheidsinstructies op de
verpakking van de batterijen zorgvuldig na. Houd
batterijen uit de buurt van kinderen.
9. Technische specificaties
zendfrequentie 433,92 MHz
bereik max. 60 m
voeding 3,5 mm
drukknoppen 2 x 12 V-batterij GP23GAC (incl.)
deurbel
3 x 1,5 V AA-batterij (LR6C, niet meegelev.)
of
4,5V DC/5 W voedingstrafo (PSS0530, niet
meegelev.)
Gebruik dit toestel enkel met originele accessoires. Velleman
Components nv is niet aansprakelijk voor schade of
kwetsuren bij (verkeerd) gebruik van dit toestel. Voor meer
informatie over dit product, zie www.velleman.eu. De
informatie in deze handleiding kan te allen tijde worden
gewijzigd zonder voorafgaande kennisgeving.
© AUTEURSRECHT
Velleman Components nv heeft het auteursrecht voor deze
handleiding.
Alle wereldwijde rechten voorbehouden. Het is niet toegestaan om
deze handleiding of gedeelten ervan over te nemen, te kopiëren, te
vertalen, te bewerken en op te slaan op een elektronisch medium
zonder voorafgaande schriftelijke toestemming van de
rechthebbende.

DB4
24/02/2009 11 Velleman®
NOTICE D’EMPLOI
1. Introduction
Aux résidents de l'Union européenne
Des informations environnementales importantes concernant
ce produit
Ce symbole sur l'appareil ou l'emballage indique que l’élimination
d’un appareil en fin de vie peut polluer l'environnement. Ne
pas jeter un appareil électrique ou électronique (et des
piles éventuelles) parmi les déchets municipaux non sujets
au tri sélectif ; une déchèterie traitera l’appareil en
question. Renvoyer les équipements usagés à votre fournisseur ou à
un service de recyclage local. Il convient de respecter la
réglementation locale relative à la protection de l’environnement.
En cas de questions, contacter les autorités locales pour
élimination.
Nous vous remercions de votre achat ! Lire la présente notice
attentivement avant la mise en service de l’appareil. Si l’appareil a
été endommagé pendant le transport, ne pas l’installer et consulter
votre revendeur.
2. Consignes de sécurité
Garder hors de la portée des enfants et des personnes non
autorisées.
Protéger contre la pluie, l’humidité et les projections d’eau.
• La garantie ne s’applique pas aux dommages survenus en
négligeant certaines directives de cette notice et votre revendeur
déclinera toute responsabilité pour les problèmes et les défauts
qui en résultent.
• Les dommages occasionnés par des modifications par le client ne
tombent pas sous la garantie.
3. Directives générales
Se référer à la Garantie de service et de qualité Velleman® en
fon de notice.
• Protéger contre les chocs et le traiter avec circonspection pendant
l’opération.

DB4
24/02/2009 12 Velleman®
• Tenir à l’écart de la poussière, l’humidité et des températures
extrêmes.
• Se familiariser avec le fonctionnement avant l’emploi.
• Toute modification est interdite pour des raisons de sécurité.
• N’utiliser qu’à sa fonction prévue. Un usage impropre annule
d'office la garantie.
4. Caractéristiques
• le signal encodé prévient les fausses alertes
• installation facile sans câblage
• 3 tonalités différentes : ding, ding-dong, Westminster
• 2 boutons de sonnette : attribution d’une tonalité à chaque
bouton de sonnette
• 16 codes
• contenu :
o 1x sonnette
o 2x boutons de sonnette
o 2x pile 12 V type A23 (pour boutons-poussoirs)
5. Description
Se référer aux illustrations à la page 2 de cette notice.
sonnette 3 DEL d’état
1 prise 4,5 VCC 4 interrupteurs DIP + couvercle
2 haut-parleur 5 compartiment de la pile
boutons de sonnette (2x) C sélection tonalité
A bouton D interrupteurs DIP
B activation sonnette (= A) E compartiment des piles
6. Emploi
• Insérer les piles (non incluses) dans la sonnette (voir §8) ou
connecter une alimentation 4,5 VCC (non incluse) à la prise 4,5 VCC
[1]. Polarité de l’alimentation : .
• Desserrer la vis et ouvrir le couvercle des interrupteurs DIP [4] sur
la sonnette.
• Ouvrir le boîtier du bouton-poussoir en enfonçant légèrement la
languette avec un petit tournevis à lame plate (voir la flèche).
• Insérer la pile dans chaque bouton-poussoir (voir §8).

DB4
24/02/2009 13 Velleman®
• S’assurer que les interrupteurs DIP sur la sonnette [4] et ceux
sur les boutons-poussoirs [D] soient identiquement configurés.
Reconfigurer ces interrupteurs en cas d’interférence causée par
des appareils similaires.
• Choisir une tonalité sur chaque bouton-poussoir à l’aide du cavalier
de sélection [C] :
1 La Lettre à Élise 2 Westminster 3 ding-dong
• Refermer le couvercle des interrupteurs [4] et resserrer la vis.
• Installer les boutons-poussoirs dans un endroit protégé contre les
intempéries et contre les champs magnétiques intenses. Installer
d’abord la plaquette et refermer ensuite chaque bouton-poussoir.
• Installer la sonnette à l’intérieur dans un endroit protégé contre
les champs magnétiques intenses.
• Actionner un bouton-poussoir pour activer la tonalité
sélectionnée. Cette tonalité sera audible grâce au haut-parleur
[2] de la sonnette La DEL d’état [3] s’allume.
7. Problèmes et solutions
• Remplacer les piles dans la sonnette dès que la tonalité s’affaiblit
(voir §8).
• L’actionnement d’un bouton-poussoir ne produit aucune tonalité :
• S’assurer que la configuration des interrupteurs DIP sur la
sonnette et celle sur les deux boutons-poussoirs soient
identiques.
• Vérifier la distance entre la sonnette et les boutons-
poussoirs : elle ne peut pas dépasser la portée maximale de
60 m.
• S’assurer que la sonnette et les deux boutons-poussoirs
soient protégés contre des champs magnétiques et qu’ils ne
soient pas installés à proximité d’objets métalliques.
• Remplacer les piles dans les butons-poussoirs (voir §8).
8. Les piles
sonnette
• Ouvrir le compartiment des piles [5].
• Insérer trois nouvelles piles de 1,5 V type R6 (LR6C) selon les
indications de polarité.
• Refermer le compartiment des piles.

DB4
24/02/2009 14 Velleman®
boutons-poussoirs
• Ouvrir le boîtier du bouton en enfonçant légèrement la languette
avec un petit tournevis à lame plate (voir la flèche).
• Insérer une nouvelle pile de 12 V type GP23A selon les
indications de polarité dans chaque bouton-poussoir (voir la page
2 de cette notice).
en général
• Ne pas recharger des piles alcalines et ne jamais jeter des piles
au feu.
ATTENTION : Respecter les consignes de sécurité
mentionnées sur l’emballage des piles. Tenir la pile
à l’écart des enfants.
9. Spécifications techniques
fréquence de transm. 433,92 MHz
portée max. 60 m
alimentation 3,5 mm
boutons de
sonnette 2 piles 12 V type GP23GAC (incl.)
sonnette 3 piles 1,5 V type R6 (LR6C, non incl.) ou
alimentation 4,5 VCC/5 W (PSS0530, non incl.)
N’employer cet appareil qu’avec des accessoires d’origine. SA
Velleman Components ne sera aucunement responsable de
dommages ou lésions survenus à un usage (incorrect) de cet
appareil. Pour plus d’information concernant cet article,
visitez notre site web www.velleman.eu. Toutes les
informations présentées dans cette notice peuvent être
modifiées sans notification préalable.
© DROITS D’AUTEUR
SA Velleman Components est l’ayant droit des droits d’auteur
pour cette notice.
Tous droits mondiaux réservés. Toute reproduction, traduction, copie
ou diffusion, intégrale ou partielle, du contenu de cette notice par
quelque procédé ou sur tout support électronique que se soit est
interdite sans l’accord préalable écrit de l’ayant droit.

DB4
24/02/2009 15 Velleman®
MANUAL DEL USUARIO
1. Introducción
A los ciudadanos de la Unión Europea
Importantes informaciones sobre el medio ambiente
concerniente a este producto
Este símbolo en este aparato o el embalaje indica que, si
tira las muestras inservibles, podrían dañar el medio
ambiente. No tire este aparato (ni las pilas, si las hubiera)
en la basura doméstica; debe ir a una empresa
especializada en reciclaje. Devuelva este aparato a su
distribuidor o a la unidad de reciclaje local. Respete las leyes locales
en relación con el medio ambiente.
Si tiene dudas, contacte con las autoridades locales para
residuos.
¡Gracias por haber comprado el DB4! Lea atentamente las
instrucciones del manual antes de usarlo. Si el aparato ha sufrido
algún daño en el transporte no lo instale y póngase en contacto con
su distribuidor.
2. Instrucciones de seguridad
Mantenga el aparato lejos del alcance de personas no
capacitadas y niños.
No exponga este equipo a lluvia, humedad, temperaturas
extremas, polvo ni a ningún tipo de salpicadura o goteo.
• Los daños causados por descuido de las instrucciones de
seguridad de este manual invalidarán su garantía y su
distribuidor no será responsable de ningún daño u otros
problemas resultantes.
• Los daños causados por modificaciones no autorizadas, no están
cubiertos por la garantía.
3. Normas generales
Véase la Garantía de servicio y calidad Velleman® al final de este
manual del usuario.
• No agite el aparato. Evite usar excesiva fuerza durante el manejo
y la instalación.
• No exponga este aparato a polvo, humedad y temperaturas
extremas.

DB4
24/02/2009 16 Velleman®
• Familiarícese con el funcionamiento del aparato antes de
utilizarlo.
• Por razones de seguridad, las modificaciones no autorizadas del
aparato están prohibidas.
• Utilice sólo el aparato para las aplicaciones descritas en este
manual. Su uso incorrecto anula la garantía completamente.
4. Características
• una señal codificada evita las falsas alarmas
• fácil instalación sin cableado
• 3 diferentes tonos: ding, ding-dong, Westminster
• 2 botones de timbre: es posible atribuir una melodía a cada botón
de timbre
• 16 códigos
• incluye:
o 1x timbre
o 2x botones de timbre
o 2x pila de 12 V, tipo A23 (para pulsadores)
5. Descripción
Véase las figuras en la página 2 de este manual del usuario.
timbre 3 LED de estado
1 entrada 4,5 VCC 4 interruptores DIP + tapa
2 altavoz 5 compartimiento de pilas
botones de timbre (2x) C puentes para seleccionar la
melodía
A botón D interruptores DIP
B activación timbre (= A) E compartimiento de pilas
6. Uso
• Introduzca las pilas (no incl.) en el timbre (véase §8) o conecte una
alimentación de 4,5 VCC (non incluse) a la entrada 4,5 VCC [1].
Polaridad de la alimentación: .
• Desatornille el tornillo y abra la tapa de los interruptores DIP [4]
del timbre.
• Abra la caja del pulsador al apretar ligeramente la lengüeta con
un pequeño destornillador con punta plana (véase la flecha).

DB4
24/02/2009 17 Velleman®
• Introduzca la pila en cada pulsador (véase §8).
• Asegúrese de que los interruptores DIP del timbre [4] y los de
los pulsadores [D] estén configuradas de manera idéntica.
Vuelva a configurar estos interruptores en caso de interferencias
causadas por aparatos similares.
• Elija una melodía para cada pulsador con el puente de selección
[C] :
1 Für Élise (para Elise) 2 Westminster 3 ding-dong
• Vuelva a cerrar la tapa de los interruptores [4] y vuelva a atornillar
el tornillo.
• Instale los pulsadores en un lugar protegido contra a intemperie
y contra los campos magnéticos intensos. Primero, instale la
placa y luego, vuelva a cerrar cada pulsador.
• Instale el timbre en el interior en un lugar protegido contra los
campos magnéticos intensos.
• Pulse un pulsador para activar la melodía seleccionada. Oíra esta
melodía gracias al altavoz [2] del timbre El LED de estado [3] se
ilumina.
7. Solución de problemas
• Reemplace las pilas del timbre en cuanto la intensidad sonora
disminuya (véase §8).
• Al pulsar un pulsador no se produce ningún tono:
• Asegúrese de que la configuración de los interruptores DIP del
timbre y la de los dos pulsadores coincidan.
• Controle la distancia entre el timbre y los pulsadores: no
puede sobrepasar el alcance máx. de 60m.
• Asegúrese de que el timbre y los dos pulsadores estén
protegidos contra los campos magnéticos y no estén
instalados cerca de objetos metálicos.
• Reemplace las pilas de los pulsadores (véase §8).
8. Las pilas
timbre
• Abra el compartimiento de pilas [5].
• Introduzca tres nuevas pilas AA de 1,5 V (LR6C). ¡Controle la
polaridad!
• Vuelva a cerrar el compartimiento de pilas.

DB4
24/02/2009 18 Velleman®
pulsadores
• Abra la caja del botón al apretar ligeramente la lengüeta con un
pequeño destornillador con punta plana (véase la flecha).
• Introduzca una nueva pila de 12 V, tipo GP23A según las
indicaciones de polaridad en cada pulsador (véase la página 2 de
este manual del usuario).
en general
• Nunca recargue pilas alcalinas. No eche las pilas al fuego.
¡OJO!: Respete las advertencias del embalaje.
Mantenga las pilas lejos del alcance de niños.
9. Especificaciones
frecuencia de
transmisión 433,92 MHz
alcance máx. 60 m
alimentación 3,5 mm
botones de
timbre 2 pilas 12 V tipo GP23GAC (incl.)
timbre 3 pilas AA de 1,5 V (LR6C, no incl.) o
alimentación 4,5 VCC/5 W (PSS0530, no incl.)
Utilice este aparato sólo con los accesorios originales.
Velleman NV no será responsable de daños ni lesiones
causados por un uso (indebido) de este aparato. Para más
información sobre este producto, visite nuestra página web
www.velleman.eu. Se pueden modificar las especificaciones y
el contenido de este manual sin previo aviso.
© DERECHOS DE AUTOR
Velleman NV dispone de los derechos de autor para este
manual del usuario.
Todos los derechos mundiales reservados. Está estrictamente
prohibido reproducir, traducir, copiar, editar y guardar este manual
del usuario o partes de ello sin previo permiso escrito del derecho
habiente.

DB4
24/02/2009 19 Velleman®
BEDIENUNGSANLEITUNG
1. Einführung
An alle Einwohner der Europäischen Union
Wichtige Umweltinformationen über dieses Produkt
Dieses Symbol auf dem Produkt oder der Verpackung zeigt
an, dass die Entsorgung dieses Produktes nach seinem
Lebenszyklus der Umwelt Schaden zufügen kann.
Entsorgen Sie die Einheit (oder verwendeten Batterien)
nicht als unsortiertes Hausmüll; die Einheit oder
verwendeten Batterien müssen von einer spezialisierten Firma
zwecks Recycling entsorgt werden. Diese Einheit muss an den
Händler oder ein örtliches Recycling-Unternehmen retourniert
werden. Respektieren Sie die örtlichen Umweltvorschriften.
Falls Zweifel bestehen, wenden Sie sich für
Entsorgungsrichtlinien an Ihre örtliche Behörde.
Wir bedanken uns für den Kauf des DB4! Lesen Sie diese
Bedienungsanleitung vor Inbetriebnahme sorgfältig durch. Überprüfen
Sie, ob Transportschäden vorliegen. Sollte dies der Fall sein, verwenden
Sie das Gerät nicht und wenden Sie sich an Ihren Händler.
2. Sicherheitshinweise
Halten Sie Kinder und Unbefugte vom Gerät fern.
Schützen Sie das Gerät vor Regen und Feuchte, Staub und
extremen Temperaturen. Setzen Sie das Gerät keiner
Flüssigkeit wie z.B. Tropf- oder Spritzwasser, aus.
• Bei Schäden, die durch Nichtbeachtung der Bedienungsanleitung
verursacht werden, erlischt der Garantieanspruch. Für daraus
resultierende Folgeschäden übernimmt der Hersteller keine Haftung.
• Bei Schäden verursacht durch eigenmächtige Änderungen erlischt
der Garantieanspruch.
3. Allgemeine Richtlinien
Siehe Velleman® Service- und Qualitätsgarantie am Ende dieser
Bedienungsanleitung.
• Vermeiden Sie Erschütterungen. Vermeiden Sie rohe Gewalt
während der Installation und Bedienung des Gerätes.
• Schützen Sie das Gerät vor extreme Temperaturen, Staub und
Feuchte.

DB4
24/02/2009 20 Velleman®
• Nehmen Sie das Gerät erst in Betrieb, nachdem Sie sich mit
seinen Funktionen vertraut gemacht haben.
• Eigenmächtige Veränderungen sind aus Sicherheitsgründen
verboten.
• Verwenden Sie das Gerät nur für Anwendungen beschrieben in
dieser Bedienungsanleitung sonst kann dies zu Schäden am
Produkt führen und erlischt der Garantieanspruch.
4. Eigenschaften
• das codierte Signal sorgt dafür, dass die Klingel nicht von externen
Signalen aktiviert wird
• einfach zu installieren ohne Verkabelung
• 3 verschiedene Klingeltöne: ding, dingdong, Westminster
• 2 Türklingelknöpfe: jedem Druckknopf kann eine andere Melodie
zugewiesen werden
• 16 Codes
• Lieferumfang:
o 1x Türklingel
o 2x Klingelknöpfe
o 2x 12VDC-BatterieTyp A23 (voor Druckknöpfe)
5. Umschreibung
Siehe Abbildungen, Seite 2 dieser Bedienungsanleitung.
Türklin
g
el 3 Status-LED
1 4,5 VDC-Ein
g
an
g
4 DIP-Schalter + Deckel
2 Lauts
p
recher 5 Batteriefach
Türklin
g
elDruckknopf (2x) C Steckbrücken zum Auswahl
der Melodie
A Druckkno
p
f D DIP-Schalte
r
B Druckkno
p
f Einschaltun
g
(
=
A
)
E Batteriefach
6. Anwendung
• Legen Sie die Batterien (nicht mitgeliefert) in die Türklingel (siehe
§8) oder schließen Sie ein 4,5 VDC Netzteil (nicht mitgeliefert) an
den 4,5VDC-Eingang [1] an. Polarität des Netzteils: .
• Öffnen Sie den Deckel der DIP-Schalter [4] der Türklingel.
• Öffnen Sie den Druckknopf indem Sie die Lasche mit einem kleinen,
flachen Schraubendreher vorsichtig hineindrücken (siehe Pfeil).
La page est en cours de chargement...
La page est en cours de chargement...
La page est en cours de chargement...
La page est en cours de chargement...
La page est en cours de chargement...
La page est en cours de chargement...
La page est en cours de chargement...
La page est en cours de chargement...
La page est en cours de chargement...
-
 1
1
-
 2
2
-
 3
3
-
 4
4
-
 5
5
-
 6
6
-
 7
7
-
 8
8
-
 9
9
-
 10
10
-
 11
11
-
 12
12
-
 13
13
-
 14
14
-
 15
15
-
 16
16
-
 17
17
-
 18
18
-
 19
19
-
 20
20
-
 21
21
-
 22
22
-
 23
23
-
 24
24
-
 25
25
-
 26
26
-
 27
27
-
 28
28
-
 29
29


Velleman DB4 Manuel utilisateur
- Catégorie
- Stroboscopes
- Taper
- Manuel utilisateur
dans d''autres langues
- English: Velleman DB4 User manual
- español: Velleman DB4 Manual de usuario
- Deutsch: Velleman DB4 Benutzerhandbuch
- Nederlands: Velleman DB4 Handleiding