Fluance Ai61 Mode d'emploi
- Catégorie
- Équipement musical supplémentaire
- Taper
- Mode d'emploi

Ai61 – Powered 6.5” Bookshelf Speakers
Quick Start Guide v1.1

Fluance Ai61 Quick Start Guide
Important Safety Instructions
1. Read these instructions.
2. Keep these instructions.
3. Heed all warnings.
4. Follow all instructions.
5. Do not use this apparatus near water.
6. Clean only with dry cloth.
7. Do not block any ventilation openings. Install in accordance with the manufacturer’s instructions.
8. Do not install near any heat sources such as radiators, heat registers, stoves, or other apparatus (including ampliers) that produce heat.
9. Do not defeat the safety purpose of the polarized or grounding-type plug. A polarized plug has two blades with one wider than the other. A grounding type
plug has two blades and a third grounding prong. The wide blade or the third prong are provided for your safety. if the provided plug does not t into your
outlet, consult an electrician for replacement of the obsolete outlet.
10. Protect the power cord from being walked on or pinched particularly at plugs,
convenience receptacles, and the point where they exit form the apparatus.
11. Only use attachments/accessories specied by the manufacturer.
12. Use only with the cart, stand, tripod, bracket, or table specied by the
manufacturer, or sold with the apparatus. When a cart is used, use caution
when moving the cart/ apparatus combination to avoid injury from tip-over.
13. Unplug this apparatus during lightning storms or when unused for long periods of time.
14. Refer all servicing to qualied service personnel. Servicing is required when the
apparatus has been damaged in anyway, such as power supply cord or plug is damaged, liquid has been spilled or objects have fallen into the apparatus, the
apparatus has been exposed to rain or moisture, does not operate normally, or has been dropped.
15. The use of apparatus in moderate climates.
CAUTION
• Minimum 5cm around the apparatus for sufcient ventilation.
• The ventilation should not be impeded by covering the ventilation openings with items, such as newspapers, table-cloths, curtains, etc.
• No naked ame sources, such as lighted candles, should be placed on the apparatus.
• Should be drawn to the environmental aspects of the battery disposal.
• To reduce the risk of re or electric shock, do not expose this apparatus to rain or
moisture.
• Battery shall not be exposed to excessive heat such as sunshine, re or the like.
• The mains plug or an appliance coupler is used as the disconnect device, the disconnect device shall remain readily operable.
Précautions De Sécurité Importantes a Lire En Premier
1. Lisez ces instructions.
2. Conservez ces instructions.
3. Tenez compte de tous les avertissements.
4. Suivez toutes les instructions.
5. N’utilisez pas cet appareil près de l’eau.
6. Nettoyer uniquement avec un chiffon sec.
7. Ne bloquez aucune ouverture de ventilation. Installez conformément aux instructions du
fabricant.
8. Ne pas installer à proximité de sources de chaleur telles que des radiateurs, des registres de chaleur, des poêles ou d’autres appareils (y compris des amplica-
teurs) qui produisent de la chaleur.
9. Ne détournez pas le but de sécurité de la prise polarisée ou de mise à la terre. Une che polarisée comporte deux pales dont une plus large que l’autre. Une
che de type à la terre a deux lames et une troisième broche de mise à la terre. La lame large ou la troisième broche sont fournies pour votre sécurité. Si la che
fournie ne rentre pas dans votre prise, consultez un électricien pour le remplacement de la sortie obsolète.
10. Protégez le cordon d’alimentation avant d’être piétiné ou pincé en particulier sur les bouchons, les prises de courant et le point où ils sortent de l’appareil.
11. N’utilisez que des acces soires / accessoires spéciés par le fabricant.
12. Utilisez uniquement avec le chariot, le support, le trépied, le support
ou la table spéciés par le fabricant ou vendus avec l’appareil. Lorsqu’un
chariot est utilisé, soyez prudent lorsque vous déplacez la combinaison
panier / appareil pour éviter les blessures causées par le renversement.
13. Débranchez cet appareil pendant les orages ou lorsqu’il n’est pas utilisé pendant de longues périodes.
14. Référer tous les services à un personnel qualié. Un entretien est nécessaire lorsque l’appareil a été endommagé de toute façon, comme le cordon d’alimen-
tation ou la che est endommagé, le liquide a été renversé ou les objets sont tombés dans l’appareil, l’appareil a été exposé à la pluie ou à l’humidité, s’il ne
fonctionne pas normalement ou s’il est tombé.
15. L’utilisation d’appareils dans les climats modérés.
ATTENTION
• 5cm minimale autour de l’appareil pour une aération sufsante.
• il convient que l’aeration ne soit pas gênée par l’obstruction des ouvertures d’aération par des objets tels que journaux, nappes, rideaux, etc...
• il convent de ne pas placer sur l’appareil de sources de ammes nues, telles que des bougies allumées.
• il convent d’attirer l’attention sur les problèmes d’environnement dus à la mise au déchet des piles.
• le mode d’emploi doit stipuler que l’appareil ne doit pas être exposé à des égouttements d’eau ou des éclaboussures et de plus qu’aucun objet rempli de
liquide tel que des vases ne doit être placé sur l’appareil.
• Un avertissement selon lequel les batteries (bloc de batteries ou batteries installées) ne doivent pas être exposées à une chaleur excessive telle que celle du
soleil, d’un feu ou d’origine similaire.
• lorsque la prise du RESEAU D’ALIMENTATION ou une prise placée sur l’appareil est utilisée comme appareil de déconnecxion, cet appareil doit demeurer
aisément accessible.

Fluance Ai61 Quick Start Guide
Introduction
Thank you for your purchase of your Fluance product. We hope you enjoy your experience. If
you have any questions please visit us at www.Fluance.com/support.
Fluance believes everyone should experience audio in its truest form, recreating the
performance the way the artist intended. Utilizing only superior components and expert
audio engineering, their products are a testament to the performance that can be achieved
when a passion for music takes center stage. The perfect complement to any audiophile’s
lifestyle, you’ll be enjoying live performances in your home for years to come.
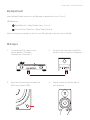
Break-in Period
Our speakers have a Butyl rubber ring surrounding the cone. The break-in period allows
the rubber to loosen and stretch, allowing the cone a larger range of movement, resulting
in better sound reproduction. We recommend 10-12 hours of play at moderate volume to
achieve this.
For additional product information, please consult the manual at: Fluance.com/resources
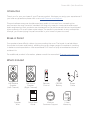
What’s Included
Quick Start
Guide
Speaker
Wire
LIFETIME
Customer Support
Lifetime
Customer Support
2 Year
Warranty
Ai61 Passive
Speaker
(Left Channel)
Ai61 Active
Speaker
(Right Channel)
VOL +
++
VOL -
TREBLE BASS
Remote
Control
CR2032
Battery
Power
Cable

Fluance Ai61 Quick Start Guide
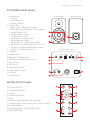
Front & Back Panel Layout
1. Control Knob
• Volume
• Input Selection
• Power ON/OFF
2. Source LED
• Blue (Solid) - Bluetooth® Paired
• Blue (Flashing) - Bluetooth® Pairing Mode
• Green (Solid) - RCA
• White (Solid) - Optical
• Purple (Solid) - USB
• Red (Solid) - Standby Mode
• Red (Flashing) - Mute
• Red (Flash x2) - Volume Set to Max
• Red (Flash x2) - Bass/Treb Set to -5 or +5
• Source Color: Blue/Green/White/Purple
(Flash x2) - Bass/Treb Set to 0
3. IR Sensor
4. Speaker Input
5. Bluetooth® Reset Pairing
6. USB Input (Audio Playback Only)
7. Optical Input
8. RCA Input
9. Subwoofer Output
10. Left Speaker Output
11. AC Input
12. Power Switch
Remote Control Layout
13. Power ON/OFF
14. Volume UP/DOWN
15. Source
16. Treble UP/DOWN
17. Mute
18. Play/Pause & Bluetooth® Pairing Reset*
*To enable Bluetooth® Pairing Reset, press + hold for 3 seconds.
19. Forward/Back
20. LED Brightness - (100% > 25% > OFF)
21. Bass UP/DOWN
1
24
VOL +
++
VOL -
TREBLE BASS
13 17
15 20
14
16 21
18
19
Passive SpeakerActive Speaker
3
Active Speaker (Back)
12
5
6
7
8
9
10
11

Fluance Ai61 Quick Start Guide
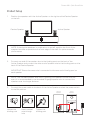
Product Setup
1. Position the speakers with the Active Speaker on the right and the Passive Speaker
on the left.
Passive Speaker Active Speaker
NOTE: If placing the speakers in a cabinet or on a shelf, position the front of the
speakers as close as possible to the front edge of the shelf for optimum audio
performance.
NOTE: The included speaker wire is 8ft. If placing your speakers further than 8ft
apart it is recommended to use standard 18 gauge speaker wire to connect the
speakers over the longer distance.
2. Connect one end of the speaker wire to the binding posts on the back of the
Active Speaker and connect the other end of speaker wire to the binding posts on the
back of the Passive Speaker.
IMPORTANT: Ensure the same wire is connected to the same color binding post on
each speaker.
Loosen the
binding post
Insert speaker
wire through
hole
Tighten the
binding post
3. Connect the power cable to the back of the Active Speaker and set the power switch
to the ON position.
Passive
Speaker
Active
Speaker

Fluance Ai61 Quick Start Guide
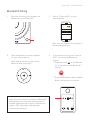
EQ Adjustment
Use the Bass/Treble buttons on the Remote to adjust each from -5 to +5.
LED Behavior:
Red (Flash 2x) - Bass/Treble Set to -5 or +5
Source Color (Flash 2x) - Bass/Treble Set to 0
Note: If using a source device, with it’s own EQ settings, ensure it is set to at(0).
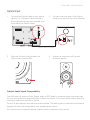
RCA Input
1. Connect the RCA cable to your
source device (Turntable,
Smartphone, Computer…).
2. Connect the other end of the RCA
cable to back of the Active Speaker.
4. Adjust volume on Ai61 as well as
source device.
3. Press the Control Knob to select the
RCA input (Green LED).
*RCA to RCA cable not included

Fluance Ai61 Quick Start Guide
Bluetooth® Pairing
1. Press the Control Knob to select the
Bluetooth® input (Blue LED).
3. Use the Remote to control playback
on your source device.
2. Pair to “Fluance Ai61” on your
source device.
4. If your device cannot nd “Fluance
Ai61”, you can reset Bluetooth®
pairing.
Note: Unit will attempt to auto-pair to
the last paired device.
Bluetooth
MY DEVICES
Settings
Fluance Ai61
• Press and hold on the Remote
for 3 seconds to reset Bluetooth®
pairing.
• Press the Bluetooth® Pairing Reset
Button on the back of the unit.
Note: How you access your device’s Bluetooth®
settings may vary from one manufacturer to
another. Maximum line of sight for Bluetooth®
range is 33ft. Obstacles may decrease
transmission distance.
VOL +
++
VOL -
TREBLE BASS
OR
Note: Adjust Volume on the source
device as well as the Ai61.

Fluance Ai61 Quick Start Guide
Optical Input
1. Connect the Optical cable to your source
device (TV, Computer, Game Console...).
Ensure protective caps are removed from
the ends of the Optical cable.
2. Connect the other end of the Optical
cable to the back of the Active Speaker.
4. Adjust the volume on Ai61 as well
as source device.
3. Press the Control Knob to select the
Optical Input (White LED).
Optical Audio Signal Compatibility
The Ai61 does not support Dolby Digital Audio or DTS Audio. Locate the audio output settings
on your source device and ensure Dolby Digital is turned off. The correct audio output setting is
commonly referred to as PCM or Stereo.
Some TVs also require that audio output be enabled. This setting may be referred to as External
Speakers. Ensure this is selected as your speaker/audio output.
For instructions on a specic device, please consult the device’s user manual.
*Optical cable not included

Fluance Ai61 Quick Start Guide
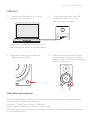
USB Input
1. Connect the USB cable to your source
device (Laptop, Desktop...).
2. Connect the other end of the USB
cable to the USB C port on the
back of the Active Speaker.
4. Adjust the volume on Ai61 as well as
source device. You may also need to
adjust volume in the different programs
on the source device.
3. Press the Control Knob to select the
USB Input (Purple LED).
USB Audio Output Settings
You may need to enable USB audio output on your source device. Here are the directions for
most Windows® and Apple® Computers.
Windows®: Control Panel > Sound > USB Audio
Apple®: System Preferences > Sound > Output > USB
It is also important to check that any sound enhancements, effects, or EQ settings are disabled
on your source device.
IMPORTANT: The USB input on the Ai61 is for
USB audio playback and not for USB charging.
*USB cable not included

Fluance Ai61 Quick Start Guide
Frequently Asked Questions
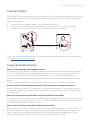
What is “auto-pairing” and how does it work?
Auto-pairing is a convenient connection feature included in all Fluance Bluetooth® Speakers.
If the connected Bluetooth®-enabled device leaves the connection range of the Ai61 and
returns at a later time, the device will automatically connect. If the device’s Bluetooth®
function is disabled and then enabled at a later time, the device will automatically connect
as well.
*Note: The Fluance Ai61 will only auto-pair to the last device that it was connected to.
Another device is connected to my Fluance Ai61 and I want to connect my device.
You can reset any Bluetooth® connection by pressing the Bluetooth® Pairing Reset button
on the back of the Active Speaker. You can also press and hold “Play/Pause” on the Remote
for 3 seconds.
How can I increase the volume when using the Ai61 with a turntable?
If turntable audio is too quiet you may need to add a preamplier. Some turntables have built
in preamps which can be turned on or off. The Fluance PA10 preamplier is a great match for
Fluance powered speakers and turntables.
Why is the volume from each input dierent on the Ai61?
Ensure that any volume and EQ settings on your source devices are set to similar levels. The
different signal types used by each input means they are processed differently by the Ai61.
The Optical Input uses a digital signal while the RCA Input uses an analog signal. These
differences can result in slight variances in the output volume of the Ai61.
Subwoofer Output
IMPORTANT: When a subwoofer cable is connected, the Ai61 will automatically cut frequencies
below 80Hz to optimize performance. The subwoofer cable must be removed to resume full
frequency playback.
1. Connect the Subwoofer cable to your powered subwoofer.
2. Connect the other end of the Subwoofer cable to the back of the Active Speaker.
3. Adjust the volume on the Subwoofer for the best listening experience.
Fluance offers matching subwoofers for the ultimate audio experience. For more information
visit: www.Fluance.com/subwoofer.
DB10
*Subwoofer cable not included

Fluance Ai61 Quick Start Guide
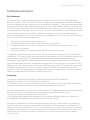
Certification Information
FCC Statement
This equipment has been tested and found to comply with the limits for a Class B digital
device, pursuant to Part 15 of the FCC Rules. These limits are designed to provide reasonable
protection against harmful interference in a residential installation. This equipment generates
uses and can radiate radio frequency energy and, if not installed and used in accordance with
the instructions, may cause harmful interference to radio communications. However, there is
no guarantee that interference will not occur in a particular installation. If this equipment does
cause harmful interference to radio or television reception, which can be determined by
turning the equipment off and on, the user is encouraged to try to correct the interference by
one or more of the following measures:
• Reorient or relocate the receiving antenna.
• Increase the separation between the equipment and receiver.
• Connect the equipment into an outlet on a circuit different from that to which the
receiver is connected.
• Consult the dealer or an experienced radio/TV technician for help.
This device complies with part 15 of the FCC Rules. Operation is subject to the following two
conditions:(1) This device may not cause harmful interference, and (2) this device must accept
any interference received, including interference that may cause undesired operation.
Changes or modications not expressly approved by the party responsible for compliance
could void the user’s authority to operate the equipment. This equipment complies with FCC
radiation exposure limits set forth for an uncontrolled environment. This equipment should be
installed and operated with minimum distance 20cm between the radiator & your body.
The device has been evaluated to meet general RF exposure requirement. The device can be
used in portable exposure condition without restriction.
IC Warning
This device complies with Industry Canada license-exempt RSS standard(s).
Operation is subject to the following two conditions:
(1) This device may not cause interference, and (2) This device must accept any interference,
including interference that may cause undesired operation of the device.
Le présent appareil est conforme aux CNR d’Industrie Canada applicables aux appareils radio
exempts de licence. L’exploitation est autorisée aux deux conditions suivantes:
(1) l’appareil ne doit pas produire de brouillage, et
(2) l’utilisateur de l’appareil doit accepter tout brouillage radioélectrique subi, même si le
brouillage est susceptible d’en compromettre le fonctionnement.
Changes or modications not expressly approved by the party responsible for compliance
could void the user’s authority to operate the equipment. This equipment complies with IC
radiation exposure limits set forth for an uncontrolled environment. This equipment should be
installed and operated with minimum distance 20cm between the radiator & your body. This
transmitter must not be co-located or operating in conjunction with any other antenna
or transmitter.

Warranty Information
Thank you for choosing Fluance! We guarantee your investment in our products is a solid one. High performance components
combined with quality craftsmanship allow us to maintain the highest possible production standards.
All items are guaranteed against defects in materials and craftsmanship. Fluance has outstanding quality control; if something
should go wrong with any of our products, we will repair it free of charge within the warranty period. If the product cannot be
repaired, we will replace the product. If the product has been discontinued, we will replace the product with either the newest
version of said product or current equivalent. In the event that Fluance replaces a product under warranty, the replacement would
only carry the original warranty from the original date of purchase.
Warranty Period
The Fluance products below are warrantied for parts and labor for the stated period from date of original purchase, and are
subject to the terms and conditions of the warranty. Any refurbished products that are discontinued hold a 90 day warranty from
the date of original purchase. Fluance warranties are valid for the original owner and are non-transferable.
Home Audio Passive Speakers: Lifetime Warranty
Active/Powered Speakers: Two Year Warranty
HiFi Turntables: Two Year Warranty
Batteries (For Powered Speakers): One Year Warranty
Warranty Exclusions
• Products purchased from a dealer not authorized by Fluance.
• Products with the serial number defaced, altered, or missing.
• Defects resulting from disaster, accident, abuse, misuse, lightning, power surges, neglect, unauthorized modification or water
damage.
• Defect or damage as a result of repairs performed by a person or party not authorized by Fluance.
• Defects of damage occurring during shipping (claims should be made with the shipping company).
• Defect or damage as a result of connecting a product to an outlet with the incorrect voltage. Voltage converters must be
used where applicable.
• Consumable parts including, but not limited to, batteries, styli, and rubber belts.
To Obtain Warranty Service
Should your product require warranty service, please contact us at www.fluance.com/contact or call us at 1-888-617-6863 to set
up a Return Authorization. Products returned without a valid Return Authorization number will be refused.
Fluance products must be returned in their original packaging. Our products are packaged specially to protect them from any
damage during shipping, and without this packaging the return shipment could get damaged.
This warranty does not cover the shipping cost, insurance, or any other incidental charges. Products shipped for warranty service
must be pre-paid by the customer, and Fluance will cover the cost to ship the repaired or replaced product back to the customer.
Thank you for your purchase of this Fluance® product.
We hope you enjoy your experience.
Questions?
Give us a chance to help, we’re just a click away.
Don’t forget to register your product with us!
Fluance.com/registration
Fluance.com/videos
Fluance.com/resources Fluance.com/support Fluance.com/contact
-
 1
1
-
 2
2
-
 3
3
-
 4
4
-
 5
5
-
 6
6
-
 7
7
-
 8
8
-
 9
9
-
 10
10
-
 11
11
-
 12
12


Fluance Ai61 Mode d'emploi
- Catégorie
- Équipement musical supplémentaire
- Taper
- Mode d'emploi
dans d''autres langues
- English: Fluance Ai61 User guide
Documents connexes
Autres documents
-
 Vanatoo TRANSPARENT ZERO Le manuel du propriétaire
-
Electrohome EB30 Mode d'emploi
-
Hisense AX5100G Dolby Atmos 5.1 Soundbar Manuel utilisateur
-
Yamaha RX V3900 - AV Network Receiver Manuel utilisateur
-
 TRIANGLE HIFI BOREA BT Wireless Bluetooth Bookshelf Speaker Le manuel du propriétaire
-
Dynaudio Xeo 10 Le manuel du propriétaire
-
Samsung HW-R47M Manuel utilisateur
-
Yamaha RX-Z7 Le manuel du propriétaire
-

