LIVARNO 388901 Le manuel du propriétaire
- Taper
- Le manuel du propriétaire

PARTYZELT XL
XL PARTY GAZEBO
TENTE DE RÉCEPTION XL
12.27.2021 / AM 11:35
Klappen Sie vor dem Lesen die Seite mit den Abbildungen aus und machen Sie sich anschließend mit allen Funktionen des Artikels vertraut.
Before reading, fold out the illustration page and get to know all of the functions of your unit.
Dépliez la page avec les illustrations avant la lecture et informez-vous ensuite au sujet des fonctions de l‘appareil.
Klap voor het lezen de pagina met de afbeeldingen open en maak u vervolgens vertrouwd met alle functies van het apparaat.
Przed przeczytaniem należy rozłożyć bok z ilustracjami a następnie zapoznać się ze wszystkimi funkcjami urządzenia.
Před čtením si nejdříve vyklopte stránku s obrázky a seznamte se se všemi funkcemi přístroje.
Skôr než začnete návod čítať, si ho otvorte na strane s obrázkami a oboznámte sa so všetkými funkciami prístroja.
Antes de leer, abra la página con las ilustraciones y familiarícese seguidamente con todas las funciones del aparato.
Klap siden med illustrationerne op inden du læser dem og gør dig efterfølgende fortrolig med alle apparatets funktioner.
DE/AT/CH Aufbau- und Sicherheitshinweise Seite 10
GB/IE Assembly and safety information Page 13
FR/BE Consignes de montage et de sécurité Page 15
NL/BE Montage- en veiligheidstips Pagina 18
PL Wskazówki dot. montażu i bezpieczeństwa Strona 21
CZ Pokyny k sestavení a bezpečnosti Stránky 24
SK Pokyny pre montáž a bezpečnosť Stranu 26
ES Instrucciones de montaje y seguridad Página 28
DK Monterings- og sikkerhedsanvisninger Side 31
PARTYZELT XL
Aufbauanleitung
TENTE DE RÉCEPTION XL
Notice de montage
NAMIOT IMPREZOWY XL
Instrukcja montażu
PARTY STAN XL
Návod k sestavení
PÁRTY STAN XL
Montážny návod
XL PARTY GAZEBO
Assembly instructions
PARTYTENT XL
Montagehandleiding
PARTYTELT XL
Monteringsvejledning
CARPA PARA FIESTAS XL
Instrucciones de montaje
IAN 388901_2107IAN 388901_2107
DELTA-SPORT HANDELSKONTOR GMBH
Wragekamp 6 • DE-22397 Hamburg
GERMANY
12/2021
Delta-Sport-Nr.: PZ-10198

8x 1 4x 2 12x 3 6x 4 6x 5 6x 6 1x 7 2x 8 4x 9 2x 10
2x 11
6x 13 6x 14
1x 15
2x 16
4x 17
12x 18
1x 12
A
click
5
9
3
3
1
B
click
5
3
3
1
11
C
1
4x
1
2x
3
8x
3
4x
5
4x
5
2x
9
4x
11
2x

5
4 4
D
4
4
E
1 1 2
2
2
2
8
8
712 1010
click
F
4
4x
4
2x
1
2x
2
4x
7
1x
8
2x
10
2x
12
1x

6
G
15
H
15
1x

7
6
666
6
6
13
I
14
18
18
J
18
12x
13
6x
14
6x
6
6x

8
1616
17
K
17
4x
16
2x

9
WICHTIG, FÜR SPÄTERE BEZUGNAHME AUFBEWAHREN:
SORGFÄLTIG LESEN!
IMPORTANT, RETAIN FOR FUTURE REFERENCE:
READ CAREFULLY!
IMPORTANT, À CONSERVER POUR CONSULTATION ULTÉRIEURE :
À LIRE ATTENTIVEMENT !
BELANGRIJK, BEWAREN VOOR LATERE RAADPLEGING:
ZORGVULDIG LEZEN!
WAŻNE, ZACHOWAĆ DO PÓŹNIEJSZEGO UŻYTKU:
UWAŻNIE PRZECZYTAĆ!
DŮLEŽITÉ, UCHOVEJTE PRO POZDĚJŠÍ POUŽITÍ:
PEČLIVĚ SI PŘEČTĚTE!
DÔLEŽITÉ, USCHOVAJTE PRE PRÍPAD POUŽITIA V BUDÚCNOSTI:
DÔKLADNE SI PREČÍTAJTE POKYNY!
IMPORTANTE: CONSERVAR PARA CONSULTAS POSTERIORES:
LEER ATENTAMENTE.
VIGTIGT, SKAL OPBEVARES TIL SENERE BRUG:
SKAL LÆSES OMHYGGELIGT!

10
Herzlichen Glückwunsch!
Mit Ihrem Kauf haben Sie sich für
einen hochwertigen Artikel ent-
schieden. Machen Sie sich vor der
ersten Verwendung mit dem Artikel
vertraut.
Lesen Sie hierzu aufmerk-
sam die nachfolgende
Aufbauanleitung und die
Sicherheitshinweise.
Benutzen Sie den Artikel nur wie be-
schrieben und für die angegebenen
Einsatzbereiche. Bewahren Sie diese
Aufbauanleitung gut auf. Händigen
Sie alle Unterlagen bei Weitergabe
des Artikels an Dritte ebenfalls mit
aus.
Lesen Sie alle Sicherheits-
hinweise und Anweisungen.
Versäumnisse bei der Einhal-
tung können schwere Verlet-
zungen verursachen.
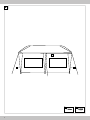
Lieferumfang (Abb. A)
1 x Pavillon, zerlegt (1 - 13)
6 x Spannseil (14)
1 x Pavillon-Dach (15)
2 x Seitenwand klein (16)
4 x Seitenwand groß (17)
12 x Erdnagel (18)
1 x Aufbauanleitung
Technische Daten
Maße:
ca. 6 x 3 x 2,5 m (B x T x H)
Herstellungsdatum
(Monat/Jahr): 12/2021
Bestimmungsgemäße
Verwendung
Der Artikel ist als Sonnenschutz im
Außenbereich konzipiert.
Er ist nicht für eine Dauernutzung
im Außenbereich vorgesehen, da er
nur bedingt wetterbeständig ist.
Der Artikel ist nicht für den gewerbli-
chen Gebrauch bestimmt.
Sicherheitshinweise
Lebensgefahr!
• Lassen Sie Kinder niemals unbe-
aufsichtigt mit dem Verpackungs-
material. Es besteht Erstickungsge-
fahr.
Verletzungsgefahr!
• Der Artikel darf nicht bei widrigen
Wetterbedingungen, wie starkem
Wind, Regen oder Schnee, ver-
wendet werden.
• Abbau des Pavillons bei zu er-
warteten Windgeschwindigkeiten
größer 40 km/h (frischer Wind,
größere Zweige und Bäume be-
wegen sich und Wind ist deutlich
hörbar).
• Stellen Sie den Artikel auf einen
ebenerdigen Untergrund.
• Der Artikel darf nur unter Aufsicht
von Erwachsenen und nicht als
Spielzeug verwendet werden.
• Prüfen Sie den Artikel vor jedem
Gebrauch auf Beschädigungen
oder Abnutzungen. Der Artikel
darf nur in einwandfreiem Zustand
verwendet werden!
• Prüfen Sie vor jedem Gebrauch,
dass alle Teile sachgerecht mon-
tiert wurden. Eine nicht korrekt
durchgeführte Montage kann die
Sicherheit und Funktion beeinträch-
tigen.
• Kein offenes Feuer, Grills, Heizpil-
ze in oder in der Nähe des Pavil-
lons! Sollte ein Pavillon trotzdessen
Feuer fangen, verlassen Sie ihn
sofort! Löschen Sie den Brand mit
einem Feuerlöscher oder Wasser.
Alarmieren Sie bei Bedarf umge-
hend die Feuerwehr.
• Einzelne Pavillons dürfen nicht
verbunden oder miteinander be-
festigt werden. Zwischen einzelnen
Pavillons muss ein Mindestabstand
von 3 m eingehalten werden.
• Entstehende Wassersäcke sind zu
leeren!
Standortauswahl
• Der Artikel hat eine Abmessung
von 6x3 m.
• Platzieren Sie den Artikel mög-
lichst an einer windgeschützten
Stelle.
• Der Boden sollte eben sein und
den Erdnägeln genügend Festig-
keit geben.
Aufbau
Teilebezeichnung (Abb. A)
1 – Dachstange
2 – Eckdachstange
3 – Stange für Eckverbindung
4 – Verbindungsstange
5 – Bein, oben
6 – Bein, unten
7 – Dachstange, mitte
8 – Dachstange
9 – Eckverbindung
10 – Y-Dachverbindung
11 – Querverbindung
12 – Giebelverbindung
13 – Fuß
Hinweis! Zum Aufbau des Ar-
tikels werden mindestens
4 Personen benötigt.
Wir empfehlen, den Aufbau
mit 6 Personen durchzufüh-
ren.
Achten Sie auf das hörbare
Einrasten der Arretierpins.
Schritt 1
Stecken Sie die Stangen (1), (3) und
(5), wie in Abbildung B gezeigt, in
die Eckverbindung (9).
Schritt 2
Stecken Sie die Stangen (1), (3) und
(5), wie in Abbildung C gezeigt, in
die Querverbindung (11).
Schritt 3
Verbinden Sie die Eckkonstruktionen
mithilfe der Verbindungsstange (4)
mit den beiden Querkonstruktionen
(Abb. D).
Schritt 4
Verbinden Sie die beiden Seitenkon-
struktionen mithilfe der Verbindungs-
stange (4) miteinander (Abb. E).
DE/AT/CH

11DE/AT/CH
Schritt 5
Führen Sie die Dachstange (7)
durch die Giebelverbindung (12).
Stecken Sie für den Giebel die
Stangen (1), (2) und (7), wie in
Abbildung F gezeig,t in die Y-Dach-
verbindung (10).
Schritt 6
Setzen Sie die Giebelkonstruktion
auf das Grundgerüst (Abb. G).
Schritt 7
Ziehen Sie das Pavillon-Dach (15)
über das montierte Dachgestell
(Abb. H). Nutzen Sie die Laschen
am Pavillon-Dach zur Befestigung
am Dachgestell.
Schritt 8
Stecken Sie die Beine (6) und
Füße (13) unter das Dachgestell
(Abb. I).
Schritt 9
Sichern Sie den Artikel mit den
Erdnägeln (18) und den Spannsei-
len (14) (Abb. K).
Achtung! Prüfen Sie den fes-
ten Sitz der Erdnägel.
Hinweis: Sollte der feste Sitz
der Erdnägel aufgrund von
lockeren Bodenverhältnissen
nicht ausreichen, muss eine
zusätzliche Sicherung der Erd-
nägel oder eine Beschwerung
der Beine erfolgen.
Auf festem Untergrund, ohne
Möglichkeit Erdnägel zu
nutzen, muss der Artikel ver-
ankert werden. Erkundigen
Sie sich im Fachhandel nach
geeignetem Montagematerial
(nicht im Lieferumfang enthal-
ten) für Ihren Untergrund.
Schritt 10
Montieren Sie die Seitenwände (16
und 17) (Abb. K).
Abbau
Schritt 1
Entfernen Sie die Seitenwände (16
und 17) (Abb. K).
Schritt 2
Ziehen Sie die Erdnägel aus dem
Boden.
Schritt 3
Entfernen Sie die unteren Beinstan-
gen (6).
Schritt 4
Lösen Sie die Laschen und ziehen
Sie das Pavillon-Dach ab.
Schritt 5
Lösen Sie die Arretierpins von den
Stangen und den Verbindungsstü-
cken.
Vorsicht! Klemmgefahr!
Schritt 6
Verstauen Sie den Artikel getrocknet
und gereinigt und lagern Sie ihn bei
Raumtemperatur.
Lagerung, Reinigung,
Pflege
Lagerung
Lagern Sie den Artikel bei Nichtbe-
nutzung immer trocken und sauber
bei Raumtemperatur.
Reinigung
Reinigen Sie den Artikel mit einem
feuchten Tuch und mit einem milden
Reinigungsmittel.
Verwenden Sie kein Benzin, Lösemit-
tel oder starke Reinigungsmittel.
WICHTIG! Nie mit scharfen Reini-
gungsmitteln reinigen.
Pflegehinweis
Das Pavillon-Dach kann mit Impräg-
nierspray behandelt werden.
Hinweise zur
Entsorgung
Entsorgen Sie den Artikel und die
Verpackungsmaterialien entspre-
chend aktueller örtlicher Vorschrif-
ten. Verpackungsmaterialien, wie
z. B. Folienbeutel, gehören nicht in
Kinderhände. Bewahren Sie das
Verpackungsmaterial für Kinder
unerreichbar auf.
Entsorgen Sie den Artikel und
die Verpackung umweltscho-
nend.
Der Recycling-Code dient der
Kennzeichnung verschiedener
Materialien zur Rückführung in
den Wiederverwertungskreislauf
(Recycling). Der Code besteht aus
dem Recyclingsymbol – das den
Verwertungskreislauf widerspiegeln
soll – und einer Nummer, die das
Material kennzeichnet.
Hinweise zur Garantie
und Serviceabwicklung
Der Artikel wurde mit großer Sorg-
falt und unter ständiger Kontrolle
produziert. DELTA-SPORT HAN-
DELSKONTOR GmbH räumt priva-
ten Endkunden auf diesen Artikel
drei Jahre Garantie ab Kaufdatum
(Garantiefrist) nach Maßgabe der
folgenden Bestimmungen ein. Die
Garantie gilt nur für Material- und
Verarbeitungsfehler. Die Garantie
erstreckt sich nicht auf Teile, die der
normalen Abnutzung unterliegen
und deshalb als Verschleißteile an-
zusehen sind (z. B. Batterien) sowie
nicht auf zerbrechliche Teile, z. B.
Schalter, Akkus oder Teile, die aus
Glas gefertigt sind.
Ansprüche aus dieser Garantie sind
ausgeschlossen, wenn der Artikel
unsachgemäß oder missbräuchlich
oder nicht im Rahmen der vorgese-
henen Bestimmung oder des vorge-
sehenen Nutzungsumfangs verwen-
det wurde oder Vorgaben in der
Anleitung/Anweisung nicht beachtet
wurden, es sei denn, der Endkunde
weist nach, dass ein Material- oder
Verarbeitungsfehler vorliegt, der
nicht auf einem der vorgenannten
Umstände beruht.
Ansprüche aus der Garantie können
nur innerhalb der Garantiefrist unter
Vorlage des Originalkassenbelegs
geltend gemacht werden. Bitte
bewahren Sie deshalb den Original-
kassenbeleg auf. Die Garantiefrist
wird durch etwaige Reparaturen
aufgrund der Garantie, gesetzlicher
Gewährleistung oder Kulanz nicht
verlängert. Dies gilt auch für ersetzte
und reparierte Teile.

12
Bitte wenden Sie sich bei Beanstan-
dungen zunächst an die untenste-
hende Service-Hotline oder setzen
Sie sich per E-Mail mit uns in Verbin-
dung. Liegt ein Garantiefall vor, wird
der Artikel von uns – nach unserer
Wahl – für Sie kostenlos repariert,
ersetzt oder der Kaufpreis erstattet.
Weitere Rechte aus der Garantie
bestehen nicht.
Ihre gesetzlichen Rechte, insbeson-
dere Gewährleistungsansprüche ge-
genüber dem jeweiligen Verkäufer,
werden durch diese Garantie nicht
eingeschränkt.
IAN: 388901_2107
Service Deutschland
Tel.: 0800-5435111
E-Mail: deltaspor[email protected]
Service Österreich
Tel.: 0820 201 222
(0,15 EUR/Min.)
E-Mail: deltaspor[email protected]
Service Schweiz
Tel.: 0842 665566
(0,08 CHF/Min.,
Mobilfunk max.
0,40 CHF/Min.)
E-Mail: deltaspor[email protected]h
DE/AT/CH

13GB/IE
Congratulations!
You have chosen to purchase a
high-quality product. Familiarise
yourself with the product before
using it for the first time.
Read the following as-
sembly instructions and
the safety information
carefully.
Use the product only as described
and only for the given areas of
application. Store these assembly
instructions carefully. When pass-
ing the product on to third parties,
please also hand over all accompa-
nying documents.
Read all safety instruc-
tions and directions. Failure
to comply can cause serious
injury.
Scope of delivery
(fig. A)
1 x pavilion, unassembled (1-13)
6 x tension rope (14)
1 x pavilion roof (15)
2 x side wall - small (16)
4 x side wall - large (17)
12 x ground spike (18)
1 x assembly instructions
Technical data
Dimensions:
approx. 6 x 3 x 2.5m (w x d x h)
Date of manufacture
(month/year): 12/2021
Intended use
The product is designed for outdoor
use as protection against the sun.
It is not intended for long-term use
outdoors since it is weatherproof
only to a limited extent.
The product is not intended for com-
mercial use.
Safety instructions
Danger to life!
• Never leave children unsupervised
with the packaging material. Risk
of suffocation.
Risk of injury!
• The product may not be used
under adverse weather conditions
such as strong wind, rain, or snow.
• Dismantle the pavilion when wind
speeds greater than 40 km/h
are anticipated (brisk wind, large
branches and trees are moving,
and the wind is plainly audible.)
• Stand the product on a level
surface.
• The product may only be used
under adult supervision and not as
a toy.
• Check the product for damage
or wear before each use. The
product may be used only when in
good working order and condi-
tion!
• Check that all parts have been
assembled properly before each
use. Incorrectly performed assem-
bly may compromise safety and
function.
• No open fire, grills, or patio heat-
ers are permitted in or close to the
pavilion. Should a pavilion catch
fire despite these precautions, get
out immediately! Use a fire extin-
guisher or water to put out the fire.
Call the fire brigade immediately if
necessary.
• Individual pavilions may not be
connected or attached to each
other. A minimum distance of 3m
must be kept between individual
pavilions.
• Any pockets of water that form
must be emptied.
Selecting the location
• The dimensions of the product are
6 x 3m.
• Place the product in a location as
protected from the wind as possi-
ble.
• The ground should be flat and
the ground spikes should provide
adequate stability.
Assembly
Parts list (fig. A)
1 – Roof pole
2 – Roof corner pole
3 – Pole for corner connection
4 – Connecting pole
5 – Leg, top
6 – Leg, bottom
7 – Roof pole, centre
8 – Roof pole
9 – Corner connection
10 – Y connection, roof
11 – Cross connection
12 – Gable connection
13 – Base
Note! At least 4 people are
needed to assemble the prod-
uct.
We recommend performing
the assembly with 6 people.
Make sure that the locking
pin clicks in audibly.
Step 1
Insert the poles (1), (3), and (5) into
the corner connection (9) as shown
in fig. B.
Step 2
Insert the poles (1), (3), and (5) into
the cross connection (11) as shown
in fig. C.
Step 3
Connect the corner structures to the
two cross structures (fig. D) using the
connecting pole (4).
Step 4
Connect the two side structures to
each other (fig. E) using the connect-
ing pole (4).
Step 5
Guide the roof pole (7) through
the gable connection (12). Insert
the poles (1), (2), and (7) for the
gable into the Y connection for the
roof (10) as shown in fig. F.
Step 6
Place the gable structure onto the
base frame (fig. G).

14
Step 7
Pull the pavilion roof (15) over the
assembled frame of the roof (fig. H).
Use the tabs on the pavilion roof for
attachment to the roof frame.
Step 8
Insert the legs (6) and bases (13)
under the roof frame (fig. I).
Step 9
Secure the product with the ground
spikes (18) and the tension ropes
(14) (fig. K).
Warning! Make sure that the
ground spikes hold securely.
Note: If the ground spikes
do not hold firmly enough
because of soft ground con-
ditions, the spikes must be
made more secure or the legs
must be weighted down.
On firm ground where
ground spikes cannot be used
the product must be anchored
down. Ask your specialist
retailer about assembly mate-
rials (not included in delivery)
suitable for the ground sur-
face you have.
Step 10
Assemble the side walls (16 and 17)
(fig. K).
Disassembly
Step 1
Remove the side walls (16 and 17)
(fig. K).
Step 2
Pull the spikes out of the ground.
Step 3
Remove the lower leg poles (6).
Step 4
Undo the tabs and pull off the pavil-
ion roof.
Step 5
Loosen the locking pins from the
poles and the connecting pieces.
Caution: Mind your fingers!
Step 6
After it has been cleaned and dried,
keep the product in storage at room
temperature.
Storage, cleaning,
Storage
When not in use, always store the
product clean and dry at room
temperature.
Cleaning
Clean the product with a damp cloth
and a mild detergent.
Do not use petrol, solvent, or harsh
detergents.
IMPORTANT! Never clean the prod-
uct with harsh cleaning agents.
Care instructions
The pavilion roof can be treated
with protector spray.
Disposal
Dispose of the article and the pack-
aging materials in accordance with
current local regulations. Packaging
materials such as foil bags are not
suitable to be given to children.
Keep the packaging materials out of
the reach of children.
Dispose of the products and
the packaging in an environ-
mentally friendly manner.
The recycling code is used to
identify various materials for
recycling.
The code consists of the recycling
symbol – which is meant to reflect
the recycling cycle – and a number
which identifies the material.
Notes on the guarantee
and service handling
The product was produced with
great care and under continuous
quality control. DELTA-SPORT
HANDELSKONTOR GmbH gives
private end customers a three-year
guarantee on this product from the
date of purchase (guarantee period)
in accordance with the following
provisions.
The guarantee is only valid for
material and manufacturing defects.
The guarantee does not cover parts
subject to normal wear and tear that
are thus considered wear parts (e.g.
batteries) or fragile parts such as
switches, rechargeable batteries, or
parts made of glass.
Claims under this guarantee are ex-
cluded if the product has been used
incorrectly, improperly, or contrary
to the intended purpose, or if the
provisions in the Assembly instruc-
tions were not observed, unless the
end customer proves that a material
or manufacturing defect exists that
was not caused by one of the afore-
mentioned circumstances.
Claims under the guarantee can
only be made within the guarantee
period by presenting the original
sales receipt. Please therefore keep
the original sales receipt. The guar-
antee period is not extended by any
repairs carried out under the guar-
antee, under statutory guarantees,
or as a gesture of goodwill. This also
applies to replaced and repaired
parts.
If you wish to make a claim please
first contact the service hotline
mentioned below or contact us by
e-mail. If there is a guarantee case,
then the product will be repaired or
replaced free of charge to you or
the purchase price will be refunded,
depending on our choice.
Your legal rights, in particular guar-
antee claims against the respective
seller, are not limited by this guaran-
tee.
IAN: 388901_2107
Service Great Britain
Tel.: 0800 404 7657
Service Ireland
Tel.: 1890 930 034
(0,08 EUR/Min.,
(peak))
(0,06 EUR/Min.,
(off peak))
E-Mail: deltasport@lidl.ie
GB/IE

15FR/BE
Félicitations !
Vous venez d’acquérir un article de
grande qualité. Avant la première
utilisation, familiarisez-vous avec
l’article.
Pour cela, veuillez lire
attentivement la notice de
montage suivante et les
consignes de sécurité.
Utilisez l’article uniquement comme
indiqué et pour les domaines
d’utilisation mentionnés. Conservez
cette notice de montage. Si vous
cédez l’article à un tiers, veillez à lui
remettre l’ensemble de la documen-
tation.
Lisez toutes les notices
et consignes de sécurité. Le
non-respect de cette recom-
mandation peut entraîner des
blessures graves.
Contenu de la livraison
(fig. A)
1 pavillon, démonté (1 - 13)
6 câble de tension (14)
1 toit de pavillon (15)
2 paroi latérale, petite (16)
4 paroi latérale, grande (17)
12 piquet (18)
1 notice de montage
Données techniques
Dimensions :
env. 6 x 3 x 2,5 m (l x P x H)
Date de fabrication
(mois/année) : 12/2021
Utilisation conforme
L’article est conçu pour protéger
du soleil et pour une utilisation en
extérieur.
Il n’est pas destiné à une utilisation
permanente à l’extérieur, car il ne
résiste aux intempéries que sous
certaines conditions.
L’article n’est pas destiné à un usage
commercial.
Consignes de sécurité
Danger de mort !
• Ne laissez jamais des enfants ma-
nipuler le matériau d’emballage
sans surveillance. Danger d’étouf-
fement.
Risque de blessure !
• L’article ne doit pas être utilisé
dans des conditions météorolo-
giques défavorables telles que par
vent fort, pluie ou neige.
• Démontez le pavillon si des
vitesses de vent supérieures à
40 km/h sont attendues (vent
frais, les plus grosses branches et
les arbres bougent et le vent est
clairement audible).
• Placez l’article sur une surface
plane.
• L’article ne doit être utilisé que
sous la surveillance d’un adulte et
non comme un jouet.
• Avant chaque utilisation, vérifiez
que l’article ne montre aucun
signe de dégradation ou d’usure.
L’article ne doit être utilisé qu’en
parfait état !
• Avant chaque utilisation, vérifiez
que toutes les pièces ont été
correctement assemblées. Un
montage mal réalisé peut nuire
à la sécurité et aux fonctions de
l’article.
• Il ne doit y avoir aucune flamme
nue, grill, chauffage à gaz dans
ou à proximité du pavillon ! Si
malgré tout le pavillon prend feu,
sortez-en immédiatement ! Étei-
gnez le feu avec un extincteur ou
de l’eau. Si nécessaire, alertez
immédiatement les pompiers.
• Les pavillons individuels ne doivent
pas être reliés ni fixés ensemble.
Une distance minimale de 3 m doit
être respectée entre les pavillons
individuels.
• Si des poches d’eau se forment,
elles doivent être vidées !
Choix de l’endroit
• L’article a une dimension de
6 x 3 m.
• Placez l’article si possible dans un
endroit protégé du vent.
• Le sol doit être plat et fournir une
stabilité suffisante aux piquets.
Montage
Liste des composants
(fig. A)
1 – Barre du toit
2 – Barre d’angle du toit
3 – Barre pour le raccord d’angle
4 – Barre de raccord
5 – Pied, supérieur
6 – Pied, inférieur
7 – Barre du toit, milieu
8 – Barre du toit
9 – Raccord d’angle
10 – Raccord en Y du toit
11 – Connexion transversale
12 – Raccordement pignon
13 – Socle
Remarque : Pour le montage,
4 personnes au minimum
sont requises.
Nous recommandons de réa-
liser le montage avec 6 per-
sonnes.
Assurez-vous que les gou-
pilles de verrouillage s’en-
clenchent de manière audible.
Étape 1
Insérez les barres (1), (3) et (5)
dans le raccord d’angle (9) tel
qu’indiqué sur la figure B.
Étape 2
Insérez les tiges (1), (3) et (5) dans
la connexion transversale (11) tel
qu’indiqué sur la figure C.
Étape 3
Reliez les éléments d’angle aux
deux éléments transversaux à l’aide
de la barre de raccord (4) (fig. D).
Étape 4
Reliez les deux éléments latéraux
l’un à l’autre à l’aide de la barre de
raccord (4) (fig. E).

16
Étape 5
Introduisez la barre du toit (7) à
travers le raccordement pignon (12).
Pour le pignon, insérez les
barres (1), (2) et (7) dans le raccord
du toit en Y (10) tel qu’indiqué sur la
figure F.
Étape 6
Placez l’élément du pignon sur la
structure de base (fig. G).
Étape 7
Tirez le toit du pavillon (15) sur la
structure du toit assemblé (fig. H).
Utilisez les languettes du toit du pa-
villon pour fixer celui-ci à la structure
du toit.
Étape 8
Insérez les pieds (6) et les
socles (13) sous la structure du toit
(fig. I).
Étape 9
Fixer l’article à l’aide des pi-
quets (18) et des câbles de ten-
sion (14) (fig. K).
Attention ! Vérifiez la stabilité
des piquets.
Remarque : Si la stabilité des
piquets n’est pas suffisante
en raison d’un sol meuble, il
convient de fixer plus solide-
ment les piquets ou de lester
les pieds.
Sur un sol ferme ne permet-
tant pas d’utiliser des piquets,
l’article doit être arrimé.
Demandez à votre revendeur
spécialisé quel est le matériel
de montage adapté à votre
sol (non compris dans la li-
vraison).
Étape 10
Montez les parois latérales (16 et
17) (fig. K).
Démontage
Étape 1
Retirez les parois latérales (16 et
17) (fig. K).
Étape 2
Retirez les piquets du sol.
Étape 3
Retirez les barres des pieds infé-
rieurs (6).
Étape 4
Détachez les languettes et retirez le
toit du pavillon.
Étape 5
Libérez les goupilles de verrouil-
lage des barres et des éléments de
raccord.
Prudence ! Risque de pince-
ment !
Étape 6
Rangez l’article séché et nettoyé
et conservez-le à une température
ambiante.
Stockage, nettoyage,
entretien
Stockage
Lorsque vous n’utilisez pas l’article,
rangez-le toujours dans un endroit
sec et propre à une température
ambiante.
Nettoyage
Nettoyez l’article avec un chiffon
humide et un produit de nettoyage
doux.
N’utilisez pas d’essence, de solvants
ou de produits de nettoyage forts.
IMPORTANT ! Ne jamais laver avec
des produits de nettoyage agressifs.
Conseils d’entretien
Le toit du pavillon peut être traité
avec un spray imperméabilisant.
Mise au rebut
Éliminez l‘article et le matériel
d‘emballage conformément aux
directives locales en vigueur. Le
matériel d‘emballage tel que les
sachets en plastique par exemple ne
doivent pas arriver dans les mains
des enfants. Conservez le matériel
d‘emballage hors de portée des
enfants.
Ce produit est recyclable. Il est
soumis à la responsabilité
élargie du fabricant et est
collecté séparément.
Éliminez les produits et les
emballages dans le respect de
l‘environnement.
Le code de recyclage est
utilisé pour identifier les
différents matériaux pour le
retour dans le circuit de recyclage.
Le code se compose du symbole de
recyclage, qui doit correspondre au
circuit de recyclage, et d‘un numéro
identifiant le matériau.
Indications concernant
la garantie et le service
après-vente
L’article a été produit avec grand
soin et sous un contrôle constant.
DELTA-SPORT HANDELSKONTOR
GmbH accorde au client final privé
une garantie de trois ans sur cet
article à compter de la date d’achat
(période de garantie) conformément
aux dispositions suivantes. La ga-
rantie ne vaut que pour les défauts
de matériaux et de fabrication. La
garantie ne couvre pas les pièces
soumises à une usure normale,
lesquelles doivent donc être consi-
dérées comme des pièces d’usure
(comme par ex. les piles), de même
qu’elle ne couvre pas les pièces fra-
giles, telles que les interrupteurs, les
batteries ou les pièces fabriquées en
verre.
Les réclamations au titre de cette
garantie sont exclues si l’article a
été utilisé de manière abusive ou
inappropriée, hors du cadre de son
usage ou du champ d’application
prévu ou si les instructions de la
Notice de montage n’ont pas été
respectées, à moins que le client
final ne prouve que l´article présen-
tait un défaut de matériau ou de fa-
brication n´étant pas dû à l’une des
conditions mentionnées ci-dessus.
Les réclamations au titre de la
garantie ne peuvent être adressées
pendant la période de garantie
qu’en présentant le ticket de caisse
original. Veuillez pour cela conser-
ver le ticket de caisse original.
FR/BE

17FR/BE
Ceci s’applique également aux
pièces remplacées et réparées.
Si vous avez des plaintes à formuler,
veuillez d’abord contacter le service
d’assistance téléphonique ci-dessous
ou nous contacter par courrier élec-
tronique. Si le cas est couvert par la
garantie, nous nous engageons - à
notre appréciation - à réparer ou
à remplacer l’article gratuitement
pour vous ou à vous rembourser le
prix d’achat. Aucun autre droit ne
découle de la garantie.
Vos droits légaux, en particulier les
droits de garantie contre le vendeur
concerné, ne sont pas limités par
cette garantie.
Article L217-16 du Code de la
consommation
Lorsque l‘acheteur demande au
vendeur, pendant le cours de la
garantie commerciale qui lui a été
consentie lors de l‘acquisition ou
de la réparation d‘un bien meuble,
une remise en état couverte par la
garantie, toute période d‘immobi-
lisation d‘au moins sept jours vient
s‘ajouter à la durée de la garantie
qui restait à courir.
Cette période court à compter de la
demande d‘intervention de l‘ache-
teur ou de la mise à disposition pour
réparation du bien en cause, si cette
mise à disposition est postérieure à
la demande d‘intervention.
Indépendamment de la garantie
commerciale souscrite, le vendeur
reste tenu des défauts de conformité
du bien et des vices rédhibitoires
dans les conditions prévues aux
articles L217-4 à L217-13 du Code
de la consommation et aux articles
1641 à 1648 et 2232 du Code
Civil.
Article L217-4 du Code de la
consommation
Le vendeur livre un bien conforme
au contrat et répond des défauts de
conformité existant lors de la déli-
vrance.
Il répond également des défauts de
conformité résultant de l‘emballage,
des instructions de montage ou de
l‘installation lorsque celle-ci a été
mise à sa charge par le contrat ou a
été réalisée sous sa responsabilité.
Article L217-5 du Code de la
consommation
Le bien est conforme au contrat :
1° S´il est propre à l‘usage habi-
tuellement attendu d‘un bien sem-
blable et, le cas échéant :
• s‘il correspond à la description
donnée par le vendeur et pos-
séder les qualités que celui-ci a
présentées à l‘acheteur sous forme
d‘échantillon ou de modèle ;
• s‘il présente les qualités qu‘un
acheteur peut légitimement at-
tendre eu égard aux déclarations
publiques faites par le vendeur,
par le producteur ou par son
représentant, notamment dans la
publicité ou l‘étiquetage ;
2° Ou s‘il présente les caractéris-
tiques définies d‘un commun accord
par les parties ou être propre à tout
usage spécial recherché par l‘ache-
teur, porté à la connaissance du
vendeur et que ce dernier a accep-
té.
Article L217-12 du Code de la
consommation
L‘action résultant du défaut de
conformité se prescrit par deux ans
à compter de la délivrance du bien.
Article 1641 du Code civil
Le vendeur est tenu de la garantie
à raison des défauts cachés de la
chose vendue qui la rendent im-
propre à l‘usage auquel on la des-
tine, ou qui diminuent tellement cet
usage que l‘acheteur ne l‘aurait pas
acquise, ou n‘en aurait donné qu‘un
moindre prix, s‘il les avait connus.
Article 1648 1er alinéa du
Code civil
L‘action résultant des vices rédhibi-
toires doit être intentée par l‘acqué-
reur dans un délai de deux ans à
compter de la découverte du vice.
Les pièces détachées indispensables
à l’utilisation du produit sont dis-
ponibles pendant la durée de la
garantie du produit.
IAN : 388901_2107
Service France
Tel. : 0800 919270
E-Mail : deltaspor[email protected]
Service Belgique
Tel. : 070 270 171
(0,15 EUR/Min.)
E-Mail : deltaspor[email protected]

18 NL/BE
Gefeliciteerd!
Met uw aankoop hebt u voor een
hoogwaardig artikel gekozen. Zorg
ervoor dat u voor het eerste gebruik
met het artikel vertrouwd raakt.
Lees hiervoor de volgen-
de montagehandleiding
en de veiligheidstips
zorgvuldig door.
Gebruik het artikel alleen zoals om-
schreven en voor het aangegeven
doel. Bewaar deze montagehand-
leiding goed. Geef alle documenten
mee als u het artikel aan iemand
anders geeft.
Lees alle veiligheidsin-
structies en aanwijzingen.
Verzuim bij de naleving kan
ernstige blessures veroorza-
ken.
In het leveringspakket
inbegrepen (afb. A)
1 x paviljoen, gedemonteerd (1 - 13)
6 x spankabel (14)
1 x paviljoendak (15)
2 x zijwand klein (16)
4 x zijwand groot (17)
12 x grondpen (18)
1 x montagehandleiding
Technische gegevens
Afmetingen:
ca. 6 x 3 x 2,5 m (b x d x h)
Productiedatum
(maand/jaar): 12/2021
Voorgeschreven
gebruik
Het artikel werd ontwikkeld als zon-
wering voor buitenshuis.
Het is niet voorzien voor langdurig
gebruik buitenshuis, omdat het slechts
voorwaardelijk weerbestendig is.
Het artikel is niet bestemd voor com-
mercieel gebruik.
Veiligheidsinstructies
Levensgevaar!
• Laat kinderen nooit zonder toe-
zicht met het verpakkingsmateri-
aal. Er bestaat verstikkingsgevaar.
Gevaar voor blessures!
• Het artikel mag niet in ongunstige
weersomstandigheden, zoals felle
wind, regen of sneeuw, gebruikt
worden.
• Demontage van het paviljoen bij
te verwachten windsnelheden van
meer dan 40 km/h (frisse wind,
grotere takken en bomen zijn in
beweging en wind is duidelijk
hoorbaar).
• Zet het artikel op een vlakke on-
dergrond.
• Het artikel mag alleen onder toe-
zicht van volwassenen en niet als
speelgoed gebruikt worden.
• Controleer het artikel telkens vóór
gebruik op beschadigingen of
slijtageverschijnselen. Het artikel
mag uitsluitend in een perfecte
staat gebruikt worden!
• Controleer telkens vóór het ge-
bruik, of alle onderdelen vakkun-
dig gemonteerd werden. Een niet
correct uitgevoerde montage kan
de veiligheid en functie nadelig
beïnvloeden.
• Geen open vuur, barbecues,
terrasverwarmers in of in de buurt
van het paviljoen! Als een pavil-
joen desondanks vuur vat, verlaat
u het onmiddellijk! Blus de brand
met een brandblusapparaat of
water. Alarmeer, al naar behoefte,
onmiddellijk de brandweer.
• Afzonderlijke paviljoenen mogen
niet met elkaar verbonden of aan
elkaar bevestigd worden. Tussen
afzonderlijke paviljoenen moet er
een minimumafstand van 3 m in
acht genomen worden.
• Tot stand komende waterzakken
dienen geledigd te worden!
Keuze van de locatie
• Het artikel heeft een afmeting van
6x3 m.
• Plaats het artikel zo mogelijk op
een tegen de wind beschutte
plaats.
• De grond dient vlak te zijn en de
grondpennen voldoende stevig-
heid te bieden.
Montage
Benaming van de
onderdelen (afb. A)
1 – Dakstang
2 – Hoekdakstang
3 – Stang voor hoekverbinding
4 – Verbindingsstang
5 – Poot, boven
6 – Poot, beneden
7 – Dakstang, midden
8 – Dakstang
9 – Hoekverbinding
10 – Y-dakverbinding
11 – Dwarsverbinding
12 – Gevelverbinding
13 – Voetstuk
Opmerking! Voor de mon-
tage van het artikel zijn er
minstens
4 personen nodig.
Wij adviseren, de montage
door 6 personen te laten uit-
voeren.
Let op het hoorbaar vastklik-
ken van de vergrendelpinnen.
Stap 1
Steek de stangen (1), (3) en (5),
zoals in afbeelding B getoond, in de
hoekverbinding (9).
Stap 2
Steek de stangen (1), (3) en (5),
zoals in afbeelding C getoond, in
de dwarsverbinding (11).
Stap 3
Verbind de hoekconstructies met
behulp van de verbindingsstang (4)
met de beide dwarsconstructies
(afb. D).
Stap 4
Verbind de beide zijconstructies met
behulp van de verbindingsstang (4)
met elkaar (afb. E).
Stap 5
Leid de dakstang (7) door de
gevelverbinding (12). Steek voor
de gevel de stangen (1), (2) en (7),
zoals in afbeelding F getoond, in de
Y-dakverbinding (10).

19NL/BE
Stap 6
Zet de gevelconstructie op de basis-
constructie (afb. G).
Stap 7
Trek het paviljoendak (15) over het
gemonteerde dakonderstel (afb. H).
Gebruik de verbindingsstukken aan
het paviljoendak voor de bevesti-
ging aan het dakonderstel.
Stap 8
Steek de poten (6) en voetstuk-
ken (13) onder het dakonderstel
(afb. I).
Stap 9
Beveilig het artikel met de grond-
pennen (18) en de spankabels (14)
(afb. K).
Waarschuwing! Controleer
de vaste zitting van de grond-
pennen.
Opmerking: Indien de vaste
zitting van de grondpennen
op grond van een te losse bo-
demgesteldheid niet volstaat,
moeten de grondpennen
extra beveiligd of de poten
verzwaard worden.
Op een vaste ondergrond,
zonder mogelijkheid om
grondpennen te gebruiken,
moet het artikel verankerd
worden. Informeer in de
vakhandel naar (niet in het
leveringspakket inbegrepen)
geschikt montagemateriaal
voor uw ondergrond.
Stap 10
Monteer de zijwanden (16 en 17)
(afb. K).
Demontage
Stap 1
Verwijder de zijwanden (16 en 17)
(afb. K).
Stap 2
Trek de grondpennen uit de grond.
Stap 3
Verwijder de onderste pootstan-
gen (6).
Stap 4
Los de verbindingsstukken en trek
het paviljoendak af.
Stap 5
Los de vergrendelpinnen van de
stangen en de verbindingstukken.
Opgepast! Klemgevaar!
Stap 6
Berg het artikel in een droge toe-
stand en gereinigd bij kamertempe-
ratuur op.
Opslag, reiniging,
onderhoud
Opslag
Bewaar het artikel wanneer u dit
niet gebruikt altijd droog en schoon
op kamertemperatuur.
Reiniging
Reinig het artikel met een vochtige
doek en een mild reinigingsmiddel.
Gebruik geen benzine, oplosmidde-
len of sterke reinigingsmiddelen.
BELANGRIJK! Reinig nooit met
agressieve reinigingsmiddelen.
Onderhoudsinstructie
Het paviljoendak kan met impreg-
neerspray behandeld worden.
Afvalverwerking
Voer het artikel en verpakkingsma-
terialen in overeenstemming met
actuele lokale voorschriften af. Ver-
pakkingsmaterialen, zoals bv. folie-
zakjes, horen niet thuis in kinderhan-
den. Berg het verpakkingsmateriaal
buiten het bereik van kinderen op.
Voer de producten en verpak-
kingen op milieuvriendelijke
wijze af.
De recyclingcode dient om
verschillende materialen te
kenmerken ten behoeve van
hergebruik via het recyclingproces.
De code bestaat uit het recy-
clingsymbool, dat het recyclingpro-
ces weerspiegelt, en een getal dat
het materiaal identificeert.
Opmerkingen over
garantie en
serviceafhandeling
Het artikel werd met de grootste
zorgvuldigheid en onder permanent
toezicht geproduceerd. De firma
DELTA-SPORT HANDELSKONT-
OR GmbH verleent particuliere
eindklanten op dit artikel drie jaar
garantie, te rekenen vanaf de datum
van aankoop (garantietermijn) en dit
op grond van de volgende bepalin-
gen. De garantie geldt alleen voor
materiaal- en verwerkingsfouten. De
garantie is niet van toepassing op
onderdelen die aan een normale
slijtage onderhevig zijn en daar-
om als niet-slijtvaste onderdelen te
beschouwen zijn (bv. batterijen) en
evenmin op breekbare onderdelen,
bv. schakelaars, accu’s of onderde-
len die van glas gemaakt zijn.
Uit de garantie voortvloeiende
claims zijn uitgesloten als het artikel
onvakkundig, verkeerd of niet in het
kader van de voorziene bepaling
of in het kader van het voorziene
gebruiksdoeleinde gebruikt werd
of indien richtlijnen in de Montage-
handleiding niet in acht genomen
werden, tenzij de eindklant aantoont
dat er sprake is van een materiaal-
of verwerkingsfout die niet op één
van de hoger vermelde omstandig-
heden gebaseerd is.
Uit de garantie voortvloeiende
claims kunnen alleen tijdens de ga-
rantieperiode op vertoon van de ori-
ginele kassabon ingediend worden.
Gelieve daarom de originele kassa-
bon te bewaren. De garantieperio-
de wordt door eventuele reparaties
op grond van de garantie, wettelijke
waarborg of coulance niet verlengd.
Dit geldt ook voor vervangen en
gerepareerde onderdelen.
Gelieve u bij klachten in eerste
instantie tot de hieronder vermelde
servicehotline te richten of met ons
per e-mail contact op te nemen.

20 NL/BE
Is er sprake van een garantiegeval,
dan wordt het artikel door ons –
naar onze keuze – voor u gratis
gerepareerd, wordt het vervangen
of wordt de aankoopsom terugbe-
taald. Verdere rechten op grond van
de garantie bestaan niet.
Uw wettelijke rechten, in het bijzon-
der rechten op garantie tegenover
de betreffende verkoper, worden
door deze garantie niet beperkt.
IAN: 388901_2107
Service België
Tel.: 070 270 171
(0,15 EUR/Min.)
E-Mail: deltaspor[email protected]
Service Nederland
Tel.: 0900 0400223
(0,10 EUR/Min.)
E-Mail: deltaspor[email protected]

21PL
Gratulujemy!
Decydując się na ten produkt,
otrzymują Państwo towar wyso-
kiej jakości. Należy zapoznać się
z produktem przed jego pierwszym
użyciem.
Należy uważnie przeczy-
tać następującą instrukcję
montażu i wskazówki
bezpieczeństwa.
Produkt ten należy użytkować
wyłącznie w opisany sposób
oraz zgodnie ze wskazanym prze-
znaczeniem. Niniejszą instrukcję
montażu należy przechowywać
w bezpiecznym miejscu. Przeka-
zując produkt innej osobie, należy
upewnić się, że otrzyma ona także
całą dokumentację dotyczącą
produktu.
Należy przeczytać
wszystkie wskazówki bez-
pieczeństwa i zalecenia.
Nieprzestrzeganie ich może
spowodować poważne obra-
żenia ciała.
Zakres dostawy
(rys. A)
1 x pawilon, zdemontowany (1-13)
6 x lina napinająca (14)
1 x dach pawilonu (15)
2 x ścianka boczna mała (16)
4 x ściana boczna duża (17)
12 x śledź (18)
1 x instrukcja montażu
Dane techniczne
Wymiary:
ok. 6 x 3 x 2,5 m (szer. x gł. x wys.)
Data produkcji
(miesiąc/rok): 12/2021
Zastosowanie zgodne
z przeznaczeniem
Artykuł przeznaczony jest do korzy-
stania na zewnątrz jako ochrona
przeciwsłoneczna.
Nie jest przeznaczony do stałego
użytkowania na zewnątrz, ponie-
waż jest tylko częściowo odporny
na warunki atmosferyczne.
Artykuł nie jest przeznaczony do
użytku komercyjnego.
Wskazówki
bezpieczeństwa
Zagrożenie dla życia!
• Nigdy nie pozostawiać dzieci z
materiałem opakowaniowym bez
nadzoru. Istnieje niebezpieczeń-
stwo uduszenia.
Ryzyko obrażeń!
• Nie należy korzystać z artykułu w
trakcie niekorzystnych warunków
atmosferycznych, takich jak silny
wiatr, deszcz lub śnieg.
• Zdemontować pawilon przy
spodziewanej prędkości wiatru
powyżej 40 km/h (chłodny wiatr,
poruszające się większe gałęzie
i drzewa i wyraźnie słyszalny
wiatr).
• Artykuł należy postawić na pła-
skiej powierzchni.
• Z artykułu można korzystać tylko
pod nadzorem dorosłych i nie
można go używać jako zabawki.
• Przed każdym użyciem należy
sprawdzić, czy artykuł nie po-
siada uszkodzeń bądź śladów
zużycia. Z artykułu można korzy-
stać tylko wtedy, gdy znajduje się
w nienagannym stanie!
• Przed każdym użyciem należy
sprawdzić, czy wszystkie części
zostały prawidłowo zmontowane.
Nieprawidłowy montaż może
negatywnie wpłynąć na bezpie-
czeństwo i funkcjonowanie.
• W pawilonie lub w jego pobliżu
nie mogą znajdować się źródła
otwartego ognia, grille ani ogrze-
wacze ogrodowe! Jeśli mimo to
pawilon zapali się, należy natych-
miast go opuścić! Ogień należy
gasić gaśnicą lub wodą. W razie
potrzeby natychmiast zadzwonić
po straż pożarną.
• Nie należy łączyć ze sobą ani
montować razem kilku pawilonów.
Między poszczególnymi pawilo-
nami należy zachować minimalny
odstęp 3 metrów.
• Należy opróżniać tworzące się
na dachu kałuże wody!
Wybór miejsca
ustawienia
• Artykuł ma wymiary 6 x 3 metry.
• Jeśli to możliwe, należy postawić
artykuł w miejscu chronionym
przed wiatrem.
• Podłoże powinno być równe, a
śledzie powinny być wbite wystar-
czająco mocno.
Montaż
Opis części (rys. A)
1 – belka dachowa
2 – narożna belka dachowa
3 – belka do połączenia narożnego
4 – belka łącząca
5 – noga, góra
6 – noga, dół
7 – belka dachowa, środkowa
8 – belka dachowa
9 – połączenie narożne
10 – połączenie dachowe Y
11 – połączenie krzyżowe
12 – połączenie szczytowe
13 – stopka
Wskazówka! W celu realizacji
montażu artykułu wymaga-
na jest współpraca co naj-
mniej 4 osób.
Zalecamy, aby montaż wyko-
nywało 6 osób.
Upewnić się, że słychać za-
trzaśnięcie bolców blokują-
cych.
Krok 1
Włożyć belki (1), (3) i (5) do po-
łączenia narożnego (9) w sposób
przedstawiony na rysunku B.
Krok 2
Włożyć belki (1), (3) i (5) do połą-
czenia krzyżowego (11) w sposób
przedstawiony na rysunku C.

22 PL
Krok 3
Połączyć konstrukcje narożne z
dwiema konstrukcjami krzyżowy-
mi za pomocą belki łączącej (4)
(rys. D).
Krok 4
Połączyć obie konstrukcje bocz-
ne za pomocą belki łączącej (4)
(rys. E).
Krok 5
Poprowadzić belkę dachową (7)
przez połączenie szczytowe (12).
Aby utworzyć dach szczytowy,
należy włożyć belki (1), (2) i (7) do
połączenia dachowego Y (10) w
sposób przedstawiony na rysunku F.
Krok 6
Umieścić konstrukcję szczytową na
ramie podstawy (rys. G).
Krok 7
Przeciągnąć dach pawilonu (15)
przez zmontowany stelaż dachu
(rys. H). Przymocować dach pawi-
lonu do stelaża dachu za pomocą
zaczepów.
Krok 8
Włożyć nogi (6) i stopki (13) pod
stelaż dachu (rys. I).
Krok 9
Zabezpieczyć artykuł, wbijając
śledzie (18) w ziemię i mocując liny
napinające (14) (rys. K).
Ostrzeżenie! Sprawdzić pew-
ne osadzenie śledzi.
Wskazówka: Jeśli mocne osa-
dzenie śledzi nie jest wystar-
czające ze względu na luźne
warunki glebowe, należy
dodatkowo zabezpieczyć śle-
dzie lub obciążyć nogi.
W przypadku stałych pod-
łoży, na których nie ma
możliwości wbicia śledzi,
artykuł należy zakotwić. O
odpowiedni materiał monta-
żowy (nieobjęty zakresem
dostawy) dla danego podło-
ża należy zapytać w specjali-
stycznym sklepie.
Krok 10
Zmontować ściany boczne (16 i 17)
(rys. K).
Demontaż
Krok 1
Zdjąć ściany boczne (16 i 17)
(rys. K).
Krok 2
Wyciągnąć śledzie z podłoża.
Krok 3
Zdjąć dolne belki nóg (6).
Krok 4
Poluzować zaczepy i zdjąć dach
pawilonu.
Krok 5
Zwolnić bolce blokujące z belek i
łączników.
Ostrożnie! Niebezpieczeń-
stwo zakleszczenia!
Krok 6
Wysuszony i oczyszczony artykuł
należy przechowywać w temperatu-
rze pokojowej.
Przechowywanie,
czyszczenie,
konserwacja
Przechowywanie
Podczas nieużywania należy
zawsze przechowywać produkt w
suchym i czystym miejscu, w tempe-
raturze pokojowej.
Czyszczenie
Artykuł należy czyścić wilgotną
ściereczką i łagodnym środkiem
czyszczącym.
Nie stosować benzyny, rozpuszczal-
ników ani silnych środków czyszczą-
cych.
WAŻNE! Nie czyścić przy użyciu
ostrych środków czyszczących.
Wskazówka dotycząca
pielęgnacji
Do dachu pawilonu można zastoso-
wać sprej impregnacyjny.
Uwagi odnośnie
recyklingu
Artykuł oraz materiały opakowanio-
we należy usunąć zgodnie z aktu-
alnymi przepisami obowiązującymi
w danym miejscu. Materiały opa-
kowaniowe, jak np. worki foliowe
nie powinny znaleźć się w rękach
dzieci. Materiał opakowaniowy
należy przechowywać w miejscu
niedostępnym dla dzieci.
Zutylizować produkt i opako-
wanie w sposób przyjazny
dla środowiska.
Kod materiału do recyklingu
służy do oznaczenia różnych
materiałów przeznaczonych do
zwrotu do przetwórstwa wtórnego
(recyklingu).
Kod składa się z symbolu, który
powinien odzwierciedlać cykl od-
zysku, oraz numeru oznaczającego
materiał.
Wskazówki dotyczące
gwarancji i obsługi
serwisowej
Artykuł został wyprodukowany z
najwyższą starannością i pod stałą
kontrolą. DELTA-SPORT HANDEL-
SKONTOR GmbH przyznaje klien-
towi końcowemu na niniejszy artykuł
trzy lata gwarancji od daty zakupu
(okres gwarancyjny) z zastrzeże-
niem poniższych postanowień.
Gwarancja dotyczy wyłącznie
wad materiałowych i wad wyko-
nania. Gwarancja nie obejmuje
części, które podlegają normalnemu
zużyciu i z tego względu należy je
traktować jako części zużywalne
(np. baterie) i nie obejmuje części
kruchych, np. przełączników, akumu-
latorów ani części wykonanych ze
szkła.
La page est en cours de chargement...
La page est en cours de chargement...
La page est en cours de chargement...
La page est en cours de chargement...
La page est en cours de chargement...
La page est en cours de chargement...
La page est en cours de chargement...
La page est en cours de chargement...
La page est en cours de chargement...
La page est en cours de chargement...
-
 1
1
-
 2
2
-
 3
3
-
 4
4
-
 5
5
-
 6
6
-
 7
7
-
 8
8
-
 9
9
-
 10
10
-
 11
11
-
 12
12
-
 13
13
-
 14
14
-
 15
15
-
 16
16
-
 17
17
-
 18
18
-
 19
19
-
 20
20
-
 21
21
-
 22
22
-
 23
23
-
 24
24
-
 25
25
-
 26
26
-
 27
27
-
 28
28
-
 29
29
-
 30
30


LIVARNO 388901 Le manuel du propriétaire
- Taper
- Le manuel du propriétaire
dans d''autres langues
- español: LIVARNO 388901 El manual del propietario
- Deutsch: LIVARNO 388901 Bedienungsanleitung
- Nederlands: LIVARNO 388901 de handleiding
- slovenčina: LIVARNO 388901 Návod na obsluhu
- dansk: LIVARNO 388901 Brugervejledning
- polski: LIVARNO 388901 Instrukcja obsługi
Documents connexes
-
LIVARNO 384177 Le manuel du propriétaire
-
-
-
-
-
-
-
-
-
Autres documents
-
Crivit 290255 Instructions For Use Manual
-
-
 KONIFERA Attractive Double Roof Pavillon Manuel utilisateur
-
Amazon B076N6P6T4 Welcome Manual
-
-
Perel GZB8 Manuel utilisateur
-
 Jack Wolfskin Atmosphere Dome II Le manuel du propriétaire
-
-

