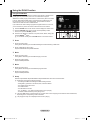
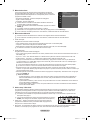
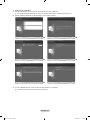
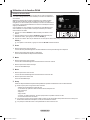
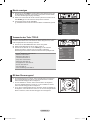
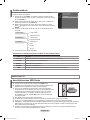
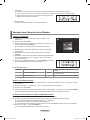
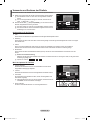
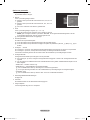
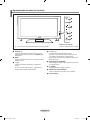
Samsung LE40A756R1M Manuel utilisateur
- Catégorie
- Téléviseurs LCD
- Taper
- Manuel utilisateur

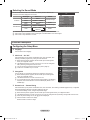
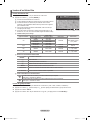
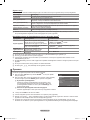
Contact SAMSUNG WORLDWIDE
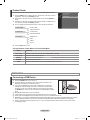
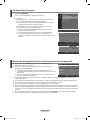
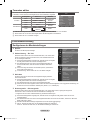
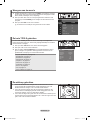
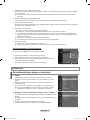
If you have any questions or comments relating to Samsung products, please contact the SAMSUNG customer care centre.
Country
Customer Care Centre
Web Site
AUSTRIA 0800-SAMSUNG (726-7864) www.samsung.com/at
BELGIUM 02 201 2418 www.samsung.com/be
CZECH REPUBLIC
800-726-786 (800 - SAMSUNG) www.samsung.com/cz
Distributor pro Českou republiku:
Samsung Zrt., česká organizační složka, Oasis Florenc, Sokolovská394/17, 180 00, Praha 8
DENMARK 70 70 19 70 www.samsung.com/dk
EIRE 0818 717 100 www.samsung.com/ie
FINLAND 030-6227 515 www.samsung.com/
FRANCE
3260 SAMSUNG (€ 0,15/Min)
08 25 08 65 65 (€ 0,15/Min)
www.samsung.com/fr
GERMANY 01805 - SAMSUNG (726-7864) (€ 0,14/Min) www.samsung.de
HUNGARY 06-80-SAMSUNG (726-7864) www.samsung.com/hu
ITALIA 800-SAMSUNG (726-7864) www.samsung.com/it
LUXEMBURG 02 261 03 710 www.samsung.com/lu
NETHERLANDS 0900-SAMSUNG (726-7864) (€ 0,10/Min) www.samsung.com/nl
NORWAY 815-56 480 www.samsung.com/no
POLAND
0 801 801 881
022-607-93-33
www.samsung.com/pl
PORTUGAL 80820-SAMSUNG (726-7864) www.samsung.com/pt
SLOVAKIA 0800-SAMSUNG (726-7864) www.samsung.com/sk
SPAIN 902-1-SAMSU(72678) www.samsung.com/es
SWEDEN 0771-400 200 www.samsung.com/se
SWITZERLAND 0800-SAMSUNG (726-7864) www.samsung.com/ch
U.K 0845 SAMSUNG (7267864) www.samsung.com/uk
TURKEY 444 77 11 www.samsung.com/tr
ESTONIA 800-7267 www.samsung.ee
LATVIA 8000-7267 www.samsung.com/lv
LITHUANIA 8-800-77777 www.samsung.lt
KAZAHSTAN 8-10-800-500-55-500 www.samsung.com/kz_ru
KYRGYZSTAN 00-800-500-55-500 -
RUSSIA 8-800-555-55-55 www.samsung.ru
TADJIKISTAN 8-10-800-500-55-500 -
UKRAINE 8-800-502-0000 www.samsung.ua
UZBEKISTAN 8-10-800-500-55-500 www.samsung.com/kz_ru
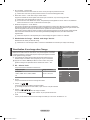
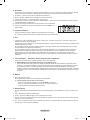
LCD TV
user manual
imagine the possibilities
Thank you for purchasing this Samsung product.
To receive more complete service, please register
your product at
www.samsung.com/global/register
Model Serial No.
BN68-01700M-00
BN68-01700M-ENG.indb 1 2008-08-19 �� 5:01:05
La page est en cours de chargement...
La page est en cours de chargement...
La page est en cours de chargement...
La page est en cours de chargement...
La page est en cours de chargement...
La page est en cours de chargement...
La page est en cours de chargement...

English - 7
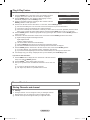
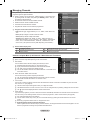
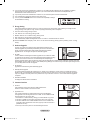
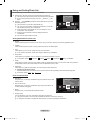
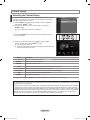
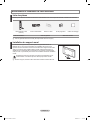
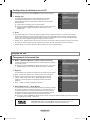
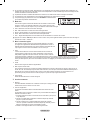
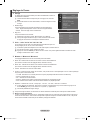
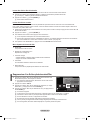
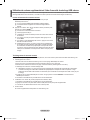
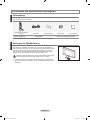
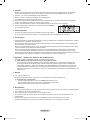
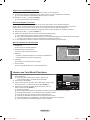
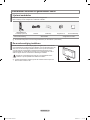
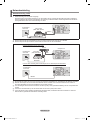
Installing Batteries in the Remote Control
1. Lift the cover at the back of the remote control upward as shown in the gure.
2. Install two AAA size batteries.
Make sure to match the ‘+’ and ‘–’ ends of the batteries with the diagram
inside the compartment.
3. Replace the cover.
Remove the batteries and store them in a cool, dry place if you won’t be
using the remote control for a long time.
Using the remote control with the ON / OFF @ light button set to on will
reduce the battery usage time.
If the remote control doesn’t work, check the following:
1. Is the TV power on?
2. Are the plus and minus ends of the batteries reversed?
3. Are the batteries drained?
4. Is there a power outage or is the power cord unplugged?
5. Is there a special uorescent light or neon sign nearby?
N
Switching On and Off
The mains lead is attached to the rear of your set.
1. Plug the mains lead into an appropriate socket.
The standby indicator lights up on your set.
2. Press the
P
button on your set.
You also can press the POWER
P
button or the TV button on the remote control to turn the TV on.
The programme that you were watching last is reselected automatically.
3. Press the numeric button (0~9) or channel up / down (< / >) button on the remote control or >C/P.
P
< button on your
set.
When you switch the set on for the very rst time, you will be asked to choose language in which the menus are to be
displayed.
4. To switch your set off, press the POWER
P
button again.
Placing Your Television in Standby Mode
Your set can be placed in standby mode in order to reduce the power consumption. The standby mode can be useful when you
wish to interrupt viewing temporarily (during a meal, for example).
1. Press the POWER
P
button on the remote control.
The screen is turned off and a red standby indicator appears on your set.
2. To switch your set back on, simply press the POWER
P
, numeric buttons (0~9), TV button or channel up / down (< / >)
button again.
Do not leave your set in standby mode for long periods of time (when you are away on holiday, for example). It is best to
unplug the set from the mains and aerial.
N
N
N
N
N
N
N
N
N
BN68-01700M-ENG.indb 7 2008-08-19 �� 5:01:07

English - 8
Using the Wheel button
To increase the channel number, turn the wheel clockwise when the
Channel Display is displayed. To decrease the channel number, turn the
wheel counterclockwise.
To turn the volume up, turn the wheel clockwise when the Volume
Control window is displayed. To turn the volume down, turn the wheel
counterclockwise.
To move to a lower menu, turn the wheel clockwise when the menu Display
is displayed. To move to a higher menu, turn the wheel counterclockwise.
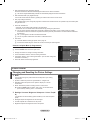
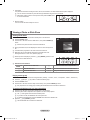
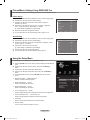
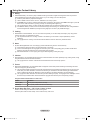
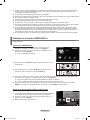
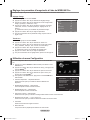
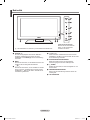
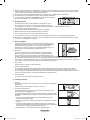
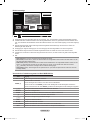
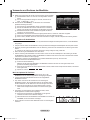
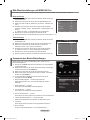
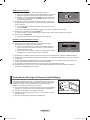
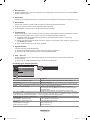
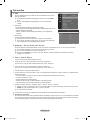
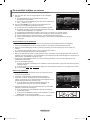
Viewing the Menus
1. With the power on, press the MENU button. The main menu appears on the
screen. The menu’s left side has icons: Picture, Sound, Channel, Setup, Input,
Application.
2. Press the ▲ or ▼ button to select one of the icons. Then press the ENTER
E
button to access the icon’s sub-menu.
3. Press the EXIT button to exit.
The on-screen menus disappear from the screen after about one minute.
Using the TOOLS Button
You can use the TOOLS button to select your frequently used functions quickly and
easily. The “Tools” menu changes depending on which external input mode you are
viewing.
1. Press the TOOLS button. The “Tools” menu will appear.
2. Press the ▲ or ▼ button to select a menu.
3. Press the ▲ / ▼ / ◄ / ► / ENTER
E
buttons to display, change, or use the
selected items. For a more detailed description of each function, refer to the
corresponding page.
Anynet
+
(HDMI-CEC): see page 50
Picture Size: see page 15
Picture Mode: see page 13
Sound Mode: see page 18
Sleep Timer: see page 23
SRS TS XT: see page 18
Energy Saving: see page 22
Dual l ll: see page 20
PIP: see page 16
Auto Adjustment: see page 18
•
•
•
•
•
•
•
•
•
•
N
Mode
:
Standard
Backlight : 7
Contrast : 95
Brightness : 45
Sharpness : 50
Colour : 50
Tint (G / R) : G50 / R50
Detailed Settings
Picture
Tools
Anynet+ (HDMI-CEC)
Picture Size : Auto Wide
Picture Mode : Standard
Sound Mode : Custom
Sleep Timer : Off
SRS TS XT : Off
Energy Saving : Off
Dual l ll : Mono
U
Move
E
Enter
e
Exit
BN68-01700M-ENG.indb 8 2008-08-19 �� 5:01:08
La page est en cours de chargement...
La page est en cours de chargement...
La page est en cours de chargement...
La page est en cours de chargement...
La page est en cours de chargement...
La page est en cours de chargement...
La page est en cours de chargement...
La page est en cours de chargement...

English - 17
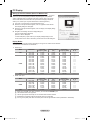
PC Display
Setting Up Your PC Software (Based on Windows XP)
The Windows display-settings for a typical computer are shown below. The actual
screens on your PC will probably be different, depending upon your particular
version of Windows and your particular video card. However, even if your actual
screens look different, the same basic set-up information will apply in almost all
cases. (If not, contact your computer manufacturer or Samsung Dealer.)
1. First, click on ‘Control Panel’ on the Windows start menu.
2. When the control panel window appears, click on ‘Appearance and Themes’
and a display dialog-box will appear
.
3. When the control panel window appears, click on ‘Display’ and a display dialog-
box will appear.
4. Navigate to the ‘Settings’ tab on the display dialog-box.
The correct size setting (resolution)
Optimum: 1920 X 1080 pixels
If a vertical-frequency option exists on your display settings dialog box, the
correct value is ‘60’ or ‘60 Hz’. Otherwise, just click ‘OK’ and exit the dialog box.
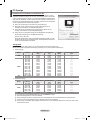
Display Modes
Both screen position and size will vary depending on the type of PC monitor and its resolution.
The resolutions in the table are recommended.
D-Sub Input
Mode Resolution
Horizontal
Frequency (kHz)
Vertical Frequency
(Hz)
Pixel Clock
Frequency (MHz)
Sync Polarity
(H / V)
IBM
640 x 350
720 x 400
31.469
31.469
70.086
70.087
25.175
28.322
+ / -
- / +
VESA
640 x 480
640 x 480
640 x 480
800 x 600
800 x 600
800 x 600
1024 x 768
1024 x 768
1024 x 768
1280 x 1024
1280 x 1024
1360 x 768
1600 x 1200
31.469
37.861
37.500
37.879
48.077
46.875
48.363
56.476
60.023
63.981
79.976
47.712
75.000
59.940
72.809
75.000
60.317
72.188
75.000
60.004
70.069
75.029
60.020
75.025
60.015
60.000
25.175
31.500
31.500
40.000
50.000
49.500
65.000
75.000
78.750
108.000
135.000
85.500
162.000
- / -
- / -
- / -
+ / +
+ / +
+ / +
- / -
- / -
+ / +
+ / +
+ / +
+ / +
+ / +
CVT 1920 x 1080RB 66.587 59.934 138.500 + / -
HDMI / DVI Input
Mode Resolution
Horizontal
Frequency (kHz)
Vertical Frequency
(Hz)
Pixel Clock
Frequency (MHz)
Sync Polarity
(H / V)
VESA
640 x 480
800 x 600
1024 x 768
1280 x 1024
1360 x 768
1600 x 1200
31.469
37.879
48.363
63.981
47.712
75.000
59.940
60.317
60.004
60.020
60.015
60.000
25.175
40.000
65.000
108.000
85.500
162.000
- / -
+ / +
- / -
+ / +
+ / +
+ / +
CEA 1920 x 1080p 67.500 60.000 148.500 + / +
When using an HDMI / DVI cable connection, you must use the HDMI IN 2 jack.
The interlace mode is not supported.
The set might operate abnormally if a non-standard video format is selected.
Separate and Composite modes are supported. SOG is not supported.
Too long or low quality VGA cable can cause picture noise at high resolution modes (1920x1080 or 1600x1200).
N
N
N
N
N
BN68-01700M-ENG.indb 17 2008-08-19 �� 5:01:09
La page est en cours de chargement...
La page est en cours de chargement...

English - 20
Selecting the Sound Mode
You can set the sound mode in the “Tools” menu. When you set to “Dual l ll”, the
current sound mode is displayed on the screen.
Audio Type Dual 1 / 2 Default
A2 Stereo
Mono MONO
Automatic change
Stereo STEREO ↔ MONO
Dual DUAL 1 ↔ DUAL 2 DUAL 1
NICAM Stereo
Mono MONO
Automatic change
Stereo MONO ↔ STEREO
Dual
MONO ↔ DUAL 1
DUAL 2
DUAL 1
If the stereo signal is weak and an automatic switching occurs, then switch to the mono.
This function is only activated in stereo sound signal. It is deactivated in mono sound signal.
This function is only available in TV mode.
N
N
N
ConguringtheSetupMenu
Language
You can set the menu language.
ChildLock→On/Off
This feature allows you to prevent unauthorized users, such as children, from
watching unsuitable programme by muting out video and audio.
Before the setup screen appears, the PIN number input screen appears.
Enter your 4 digit PIN number.
The default PIN number of a new TV set is “0-0-0-0”. You can change the
PIN by selecting “Change PIN” from the menu.
You can lock some channels in Channel List. (refer to page 12)
“Child Lock” is available only in TV mode.
Change PIN
You can change your personal ID number that is required to set up the TV.
Before the setup screen appears, the PIN number input screen appears.
Enter your 4 digit PIN number.
The default PIN number of a new TV set is “0-0-0-0”.
If you forget the PIN code, press the remote control buttons in the following
sequence, which resets the PIN to 0-0-0-0: POWER (Off), MUTE, 8, 2, 4,
POWER (On).
ParentalLock→ParentalRating
This feature allows you to prevent unauthorized users, such as children, from watching unsuitable programme by a 4-digit PIN
(Personal Identication Number) code that is dened by the user.
In the ‘Parental Rating’ screen, congure the parental ratings.
Before the setup screen appears, the PIN number input screen appears. Enter your 4 digit PIN number.
The default PIN number of a new TV set is “0-0-0-0”. You can change the PIN by selecting “Change PIN” from the menu.
When the parental ratings are set, the “
\
” symbol is displayed.
Allow All: Press to unlock all TV ratings.
Block All: Press to lock all TV ratings.
❑
❑
N
N
N
N
❑
N
N
N
❑
-
N
N
N
N
Function Description
Tools
Anynet+ (HDMI-CEC)
Picture Size : Auto Wide
Picture Mode : Standard
Sound Mode : Custom
Sleep Timer : Off
SRS TS XT : Off
Energy Saving : Off
Dual l ll ◄ Mono ►
U
Move
L
Adjust
e
Exit
Setup
Teletext Language : ----
Preference
DigitalText :Enable ►
Wall-Mount Adjustment
Melody : Off
Entertainment : Off
Energy Saving : Off
PIP
Software Upgrade
Common Interface
Setup
Plug & Play
Language : English
Time ►
Network Selection : Cable
Wireless Network Setup
Cable Network Setup
Child
Lock
: On
Change PIN
Parental Lock
Subtitle
BN68-01700M-ENG.indb 20 2008-08-19 �� 5:01:10
La page est en cours de chargement...
La page est en cours de chargement...
La page est en cours de chargement...
La page est en cours de chargement...
La page est en cours de chargement...
La page est en cours de chargement...
La page est en cours de chargement...
La page est en cours de chargement...
La page est en cours de chargement...
La page est en cours de chargement...
La page est en cours de chargement...
La page est en cours de chargement...
La page est en cours de chargement...
La page est en cours de chargement...
La page est en cours de chargement...

English - 36
Using and Sorting the Movie List
You can sort movies in the Movie List by a particular standard.
1. Press the ▲ or ▼ button to select a sorting standard in the Movie list.
The movie les are sorted according to the newly selected sorting
standard.
To move to the previous/next group, press the
π
(REW) or
µ
(FF)
button.
2. Press the
∂
(Play)/ENTER
E
button to play the movie in the order
selected by the user.
The movies are sorted according to the newly selected sorting standard.
Movie information is automatically set. You can change the “Favourites”.
Sorting Standard for the Movie List
Title
It sorts and displays the Movie titles in symbol/Number/alphabet/special order.
Timeline
It sorts and shows movies by date. It sorts by year and month from the earliest movie.
Folder
If there are many folders in USB, the movies les are shown in order in each folder. The movie le in the Root folder is shown
rst and the others are shown in alphabetical order by name.
Preference
It sorts movies by preference. (Favourites) You can change the movie preferences.
Changing the Favourites setting
Select the desired movie le in the movie list, then press the Green button repeatedly until the desired setting appears.
“Favourites” options:
★ ★ ★
,
★ ★ ★
,
★ ★ ★
,
★ ★ ★
Movie List Option Menu
Play Current Group
Using this menu, you can only play movie les in the currently selected
sorting group.
Delete
Using this menu, you can delete the selected movie les.
Information
The movie le information including the name, the size, the date modied
and the path is displayed.
Alternatively, select a movie le from the movie list and press the INFO
button to view the information.
Remove Safely
You can remove the device safely from the TV.
N
N
N
N
N
N
N
Movie
SUM
Device
Favourites Setting
Select
Jump
Option
movie_1.jpg
Date : Jan.01.2008
Folder : movie-folder
Favourites :
★ ★ ★
Preference
Title
Timeline
A M
SYMBOL
▲
□
ENG
Movie
SUM
Device
Favourites Setting
Select
Jump
Option
movie_1.jpg
Date : Jan.01.2008
Folder : movie-folder
Favourites :
★ ★ ★
Preference
Title
Timeline
A M
SYMBOL
▲
□
ENG
Play Current Group
Delete
Information
Remove Safely
BN68-01700M-ENG.indb 36 2008-08-19 �� 5:01:19

English - 37
Playing a Movie File
Playingamoviele
1. Pressing the ◄ or ► button to select a movie to be played,
2. Press the
∂
(Play)/ENTER
E
button.
The selected le is played.
The selected le is displayed at the top with its playing time.
The playing duration of a movie le may be displayed as ‘00:00:00’ if its
playing time information is not found at the start of the le.
You can watch exciting gaming multimedia les, but the gaming function
is not supported.
Movie doesn’t support subtitles. (for example, not support smi, srt and
sub les, etc and not support subtitles included in movie les)
Supported Video Formats
Container Type
Video Codec
Audio codec
Video Codec Type Resolution (Max) Frame Rate
avi
XviD 720 x 576
24/25/30
AC3, MPEG1 (Layer
1, 2, 3), PCM
MPEG2 720 x 576
H.264 HP 1920 x 1088
MPEG-4 ASP 720 x 576
mp4
H.264 HP 1920 x 1088 24/25/30
ADPCM (MS, IMA),
AAC LC
MPEG-4 ASP 720 x 576 24/25/30
PS MPEG2 1920 x 1088 24/25/30
AC3, MPEG1 (Layer
1, 2, 3), LPCM
TS MPEG2 1920 x 1088 24/25/30
AC3, MPEG1 (Layer
1, 2, 3), LPCM
Video Play Control Buttons
ENTER
E
Play/Pause the movie le
∂
Play the movie le
∑
Pause the movie le
∫
Exit play mode and return to the movie list.
TOOLS Run various functions from the movie menus.
◄/►/Wheel Skip forwards or backwards through the movie le in 20 second intervals.
▲/▼/Wheel Play the next le or the previous le.
Movie function information icon
When all movie les in the folder (or the selected le) are repeated.
“Repeat Mode” is “On”.
When all movie les in the folder (or the selected le) are played once.
“Repeat Mode” is “Off”.
Playing the movie group
1. Press the ▲ or ▼ button to select a sorting standard. (“Title”, “Timeline”, “Folder”, “Preference”)
2. Press the π (REW) or µ (FF) button to select the desired group.
3. Press the TOOLS button.
4. Press the ▲ or ▼ button to select “Play Current Group”, then press the ENTER
E
button.
N
N
N
N
N
N
N
N
SUM
E
Pause
-20sec
+20sec
Option
Return
1/5 00:00:48 00:23:05
ABC.avi
BN68-01700M-ENG.indb 37 2008-08-19 �� 5:01:19
La page est en cours de chargement...

English - 39
Picture/Music Settings Using WISELINK Pro
While a slideshow, music or movie is being played, you can set the picture and sound.
Picture Setting
1. Press the TOOLS button while a slideshow, music or movie is being played.
2. Press the ▲ or ▼ button to select “Picture Setting”.
3. Press the ◄ or ► button to select the “Picture Mode” (“Dynamic”,
“Standard”, or “Movie”).
4. Press the ▲ or ▼ button to move to an item. (“Contrast”, “Brightness”,
“Color”, “Dynamic Contrast”, “Black Adjust”, or “Reset”)
Select “Reset” to initialize the picture settings.
5. Press the ◄ or ► button to adjust the settings.
For more information on the picture settings, refer to pages 13~16.
Sound Setting
1. Press the TOOLS button while a slideshow, music or movie is being played.
2. Press the ▲ or ▼ button to select “Sound Setting”.
3. Press the ◄ or ► button to select the “Sound Mode”. (“Standard”, “Music”,
“Movie”, “Speech”, or “Custom”)
4. Press the ▲ or ▼ button to move to an item.
Select “Reset” to initialize the sound settings.
5. Press the ◄ or ► button to adjust the settings.
For more information on the sound settings, refer to page 18.
Using the Setup Menu
Setup displays the user settings of the WISELINK Pro menu.
1. Press the W.LINK button on the remote control to display the WISELINK Pro
menu.
2. Press the ◄ or ► button to select “Setup”, then press the ENTER
E
button.
3. Press the ▲ or ▼ button to select the desired option.
4.
Press the ◄ or ► button to select the option, then press the ENTER
E
button.
To exit WISELINK Pro mode, press the W.LINK button on the remote
control.
Slide Show Speed → Fast/Slow/Normal
Select to control the slide show speed.
Music Repeat Mode → On/Off
Select to repeatedly play music les.
Movie Repeat Mode → On/Off
Select to repeatedly play movie les.
Cont. movie play help → On/Off
Select to display the help pop-up message for continuous movie playback.
Screen Saver Run Time → 1 min/3 min/5 min
Select to set the waiting time before the screen saver appears.
Information
Select to viewing the information of the connected device.
Remove Safely
You can remove the device safely from the TV.
N
N
N
N
N
Setup
SUM
Device
Move Adjust
Return
Slide Show Speed ◄ Normal ►
Music Repeat Mode : On
Movie Repeat Mode : On
Cont. movie play help : On
Screen Saver Run Time : 3 min
Information
Remove Safely
WISELINK Pro
Photo
SUM
Device
e
Exit
Music Setup
SETUP
SUM
851.98MB/995.00MB Free
Movie
Picture Setting
Picture Mode ◄ Standard ►
Contrast : 95
Brightness : 40
Color : 50
Dynamic Contrast : Low
Black Adjust : Low
Reset
U
Move
L
Adjust
E
Enter
R
Return
Sound Setting
Sound Mode ◄ Custom ►
Balance : L50 R50
100Hz : 0
300Hz : 0
1KHz : 0
3KHz : 0
10KHz : 0
Reset
U
Move
L
Adjust
E
Enter
R
Return
BN68-01700M-ENG.indb 39 2008-08-19 �� 5:01:20
La page est en cours de chargement...
La page est en cours de chargement...
La page est en cours de chargement...
La page est en cours de chargement...

English - 44
Setting the Access Permission
To enable the TV to nd your PC, the TV must be set to “Set Device Policy” in the Access Permission Settings window. In
addition, the PC server and the TV must be on the same subnet.
Method: Select the “Share” menu and select “Set Device Policy”. Rejected items are represented in gray.
You can change
the access permissions by using the Allow “Accept” / “Deny” button. To delete an item, select the item and select “Delete
Item”.
Server
Server
You can run or stop using your PC as a server.
Run DLNA Digital Media Server when Windows Starts
You can determine whether to start the PC server automatically when Windows starts.
Change server name
You can rename the PC server. Enter a new name and click “OK”. The new name will appear at the top right of the window
and will appear on the TV.
Name Modied
Name Modied
Name
Help
Version
The programme version information message box appears.
Name Modied
-
❑
❑
BN68-01700M-ENG.indb 44 2008-08-19 �� 5:01:22
La page est en cours de chargement...
La page est en cours de chargement...
La page est en cours de chargement...
La page est en cours de chargement...
La page est en cours de chargement...
La page est en cours de chargement...
La page est en cours de chargement...
La page est en cours de chargement...
La page est en cours de chargement...
La page est en cours de chargement...
La page est en cours de chargement...
La page est en cours de chargement...
La page est en cours de chargement...

English - 58
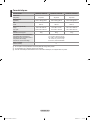
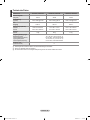
Specications
Model Name LE40A756, LE40A759 LE46A756, LE46A759 LE52A756, LE52A759
Screen Size
(Diagonal) 40 inches 46 inches 52 inches
PC Resolution
(Optimum) 1920 x 1080 @ 60 Hz 1920 x 1080 @ 60 Hz 1920 x 1080 @ 60 Hz
Sound
Output 10W x 2 10W x 2 10W x 2
Dimensions (WxDxH)
Body
With stand
1040 x 85 x 638 mm
1040 x 272 x 686 mm
1172 x 98 x 712 mm
1172 x 300 x 766 mm
1321 x 107 x 805 mm
1321 x 338 x 861 mm
Weight
With Stand 19 kg 29 kg 37 kg
Environmental
Considerations
Operating Temperature
Operating Humidity
Storage Temperature
Storage Humidity
10°C to 40°C (50°F to 104°F)
10% to 80%, non-condensing
-20°C to 45°C (-4°F to 113°F)
5% to 95%, non-condensing
Stand Swivel
(Left / Right) 0˚
Design and specications are subject to change without prior notice.
This device is a Class B digital apparatus.
For the power supply and Power Consumption, refer to the label attached to the product.
N
N
N
BN68-01700M-ENG.indb 58 2008-08-19 �� 5:01:26

This page is intentionally left
blank.
BN68-01700M-ENG.indb 59 2008-08-19 �� 5:01:26

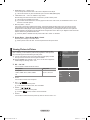
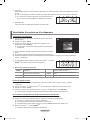
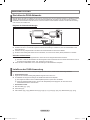
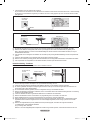
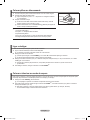
Avertissement concernant les téléviseurs numériques (DVB-T)
1. LES FONCTIONS RELATIVES À LA TÉLÉVISION NUMÉRIQUE (DVB) NE SONT DISPONIBLES QUE DANS LES PAYS
OU RÉGIONS OÙ DES SIGNAUX TERRESTRES NUMÉRIQUES DE TYPE DVB-T (MPEG2 er MPEG4 AVC) SONT
DIFFUSÉS. DVB-T est le standard du consortium européen pour la diffusion de signaux terrestres de télévision numérique.
Consultez votre distributeur local pour savoir si des services DVB-T sont disponibles dans votre région.
2. Bien que ce téléviseur soit conforme à la norme DVB-T (août 2008), il n’est pas garanti qu’il soit compatible avec les futures
émissions terrestres numériques DVB-T.
3. Il se peut que certaines fonctions de TV numérique ne soient pas disponibles ou ne fonctionnent pas correctement dans
certains pays ou certaines régions.
4. Pour plus d’informations, contactez votre service client de SAMSUNG.
© 2008 Samsung Electronics Co., Ltd. All rights reserved.
Comment contacter Samsung dans le monde
Si vous avez des suggestions ou des questions concernant les produits Samsung, veuillez contacter le Service Consommateurs
Samsung. (Voir la quatrième de couverture pour plus d’informations.)
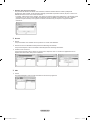
Précautions à prendre lors de l’afchage d’une image xe
Une image xe peut causer des dommages irrémédiables à l’écran du téléviseur.
N’afchez pas une image xe sur l’écran LCD plus de 2 heures. Cela pourrait provoquer une rémanence de l’image à l’écran. Cette
rémanence de l’image est également appelée “brûlure de l’écran”. Pour éviter une telle rémanence de l’image à l’écran, réduisez la
luminosité et le contraste de l’écran lorsque vous laissez une image xe afchée.
Regarder l’écran LCD du téléviseur en format 4:3 pendant une longue période peut laisser des traces de bordures à
gauche, à droite et au centre de l’écran, à cause de la différence d’émission de lumière sur l’écran. La lecture d’un
DVD ou l’utilisation d’une console de jeu peut avoir un effet similaire sur l’écran. Les dommages provoqués par les
effets qui précèdent ne sont pas couverts par la garantie.
L’afchage d’images xes de jeux vidéo et d’ordinateurs pendant plus longtemps qu’une période spécique peut provoquer des
rémanences. Pour éviter cela, réduisez la “luminosité” et le “contraste” lors de l’afchage d’images xes.
BN68-01700M-Fre.indb 1 2008-08-19 �� 5:05:44
La page est en cours de chargement...

Français - 2
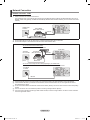
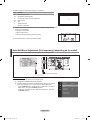
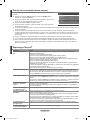
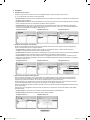
Liste des pièces
Vériez que les éléments suivants sont inclus avec votre téléviseur LCD. S’il manque des éléments, contactez votre revendeur.
Télécommande / Piles
(AAA x 2)
Cordon d’alimentation Bouchon - Base CD du programme Chiffon de nettoyage
Manuel d’utilisation
•
Carte de garantie
•
Manuel de sécurité
•
Carte de garantie/ Manuel de sécurité (Non disponibles dans tous les pays)
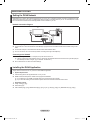
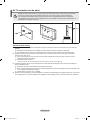
Installation du support mural
Les élements du support mural (vendus séparément) permettent de xer le
téléviseur au mur. Pour plus d’informations sur l’installation du support mural,
reportez-vous aux instructions fournies avec les élements du support mural. Faites
appel à un technicien pour installer la xation murale. Samsung Electronics ne
saurait être tenu responsable de tout dommage sur le produit ni de toute blessure
subie par vous ou par d’autres personnes si vous choisissez d’effectuer l’installation
murale.
N’installez pas votre kit de montage mural lorsque votre téléviseur est en
fonctionnement. Une blessure par choc électrique pourrait en résulter.
Enlevez le support, bouchez l’orice de la base et fermez à l’aide de deux vis.
N
N
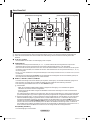
Branchement et installation de votre televiseur
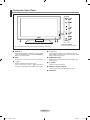
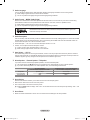
BN68-01700M-Fre.indb 2 2008-08-19 �� 5:05:45

Français - 3
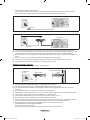
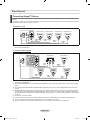
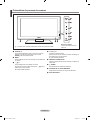
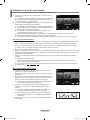
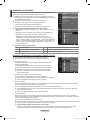
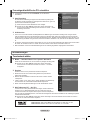
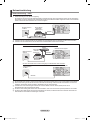
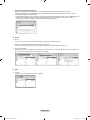
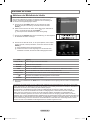
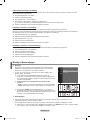
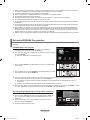
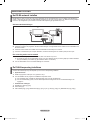
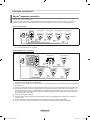
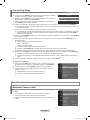
1
SOURCE
E
La liste Source apparaît à l’écran. ans le menu à l’écran,
untilisez ce bouton de la même façon que le bouton
ENTER
E
de votre télécommande.
2
MENU
Permet d’afcher le menu des fonctions de votre téléviseur
sur l’écran.
3
–
=
+
Permet d’augmenter ou de baisser le volume.
Dans le menu à l’écran, utiliser les boutons –
=
+ de la
même façon que les boutons
◄ et ► de la télécommande.
4
>
C/P.
P
<
Permet de changer de canal.
Dans le menu à l’écran, utiliser les boutons
>
C/P.
P
<
de la même façon que les boutons
▼ et ▲ de la télécommande.
5
TÉMOIN D’ALIMENTATION
Clignote et s’éteint lorsqu’il est sous tension et s’allume en
mode Veille.
6
P
POWER
Permet d’allumer et d’éteindre le téléviseur.
7
CAPTEUR DE LA TÉLÉCOMMANDE
Dirigez la télécommande vers ce point du téléviseur.
8
HAUT-PARLEURS
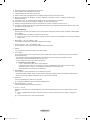
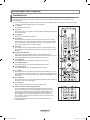
Présentation du panneau de comman
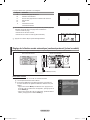
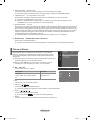
La couleur et la forme du produit peuvent varier en fonction du modèle.
N
Boutons en façade
Touchez les boutons pour les
actionner.
88
4
1
2
3
6
5
7
BN68-01700M-Fre.indb 3 2008-08-19 �� 5:05:46

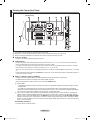
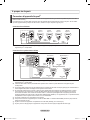
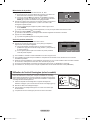
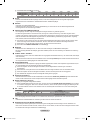
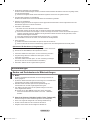
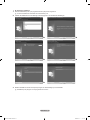
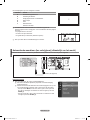
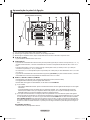
Français - 4
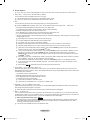
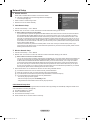
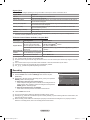
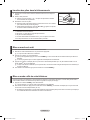
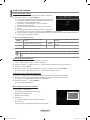
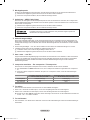
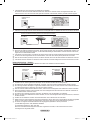
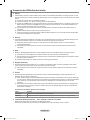
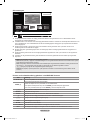
Entrée de
l’alimentation
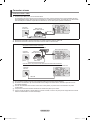
Présentation du panneau de branchement
[Prises du panneau latéral]
[Panneau arrière du téléviseur]
La couleur et la forme du produit peuvent varier en fonction du modèle.
Lorsque vous branchez un périphérique externe à votre téléviseur, assurez-vous que celui-ci est éteint.
Lorsque vous branchez un périphérique externe, faites correspondre les couleurs de la borne de connexion et du câble.
1
PC IN [PC] / [AUDIO]
Pour raccorder la prise de sortie vidéo et audio de votre PC.
2
COMPONENT IN
Branchez les câbles composants vidéo (en option) au connecteur de composant (‘PR’, ‘PB’, ‘Y’) à l’arrière de votre téléviseur
et les autres extrémités aux connecteurs de sortie vidéo du composant correspondants sur le téléviseur numérique ou le
lecteur DVD.
Si vous souhaitez brancher à la fois le boîtier décodeur et le téléviseur numérique (ou lecteur DVD), vous devez brancher
le boîtier décodeur au téléviseur numérique (ou lecteur DVD) et le téléviseur numérique (ou lecteur DVD) au connecteur de
composant (‘P
R’, ‘PB’, ‘Y’) de votre téléviseur.
Les connecteurs P
R, PB ou Y et de vos appareils composants (téléviseur numérique ou lecteur DVD) sont parfois désignés
par les lettres Y, B-Y et R-Y ou Y, Cb et Cr.
Branchez les câbles audio RCA (en option) sur la prise [R-AUDIO-L] située à l’arrière du téléviseur et leurs autres extrémités
sur les prises de sortie audio correspondantes du téléviseur numérique ou du lecteur DVD.
3
HDMI IN 1, HDMI IN 2, HDMI IN 3, HDMI IN 4
Prend en charge les connexions entre des périphériques audio/vidéo compatibles HDMI (boîtiers décodeurs, lecteurs DVD).
Aucune connexion audio supplémentaire n’est nécessaire pour une connexion HDMI - HDMI.
Lorsque vous utilisez une connexion avec câble HDMI/DVI, vous devez utiliser la borne HDMI IN 2.
Qu’est-ce que HDMI ?
‘Elevé Denition Multimedia interface’ permet la transmission de données vidéo numériques haute dénition et plusieurs
canaux de son numérique.
Le terminal HDMI/DVI prend en charge la connexion DVI vers un périphérique raccordé avec le câble adéquat (non
fourni). La différence entre HDMI et DVI est que le périphérique HDMI est plus petit, est équipé de la fonction de codage
HDCP (Elevé Bandwidth Digital Copy Protection), et gère le son numérique multicanal.
Le téléviseur peut n’émettre aucun son et les images peuvent s’afcher avec une couleur anormale lorsque des lecteurs
DVD/décodeurs/récepteurs satellite avec des versions du mode HDMI antérieures à HDMI 1.3 sont branchés. Lorsque
vous branchez un câble HDMI doté d’une version antérieure et qu’aucun son n’est émis, branchez le câble HDMI à la
prise HDMI IN 2 et les câbles audio aux prises DVI IN (HDMI2) [R-AUDIO-L] situées à l’arrière du téléviseur. Dans ce
cas, contactez la société qui fournit le lecteur DVD/décodeur câble/récepteur satellite an de conrmer votre version
HDMI, puis demandez une mise à jour du micrologiciel. Les câbles HDMI d’une version autre que 1.3 peuvent provoquer
des nuisances à l’écran ou une absence d’image.
DVI IN(HDMI2) [R-AUDIO-L]
Sorties audio DVI pour périphériques externes.
N
N
N
-
-
-
-
-
-
-
-
N
-
-
N
-
2 3 4 5
6
7
3
8
9
$
1
0!@#
BN68-01700M-Fre.indb 4 2008-08-19 �� 5:05:46

Français - 5
Modes pris en charge pour HDMI/DVI et Composant
480i 480p 576i 576p 720p 1080i 1080p
HDMI / DVI 50Hz X X X O O O O
HDMI / DVI 60Hz X O X X O O O
Composant O O O O O O O
4
ANT IN
An de retransmettre correctement les canaux de télévision, le téléviseur doit recevoir un signal depuis l’une des sources
suivantes : une antenne extérieure / un réseau de télévision câblée / un réseau par satellite.
5
SERVICE
Prise pour MAINTENANCE uniquement.
Connectez-le à la prise du support de montage mural en option. Cette fonction vous permet d’ajuster l’angle de visualisation
du téléviseur à l’aide de la télécommande.
6
EMPLACEMENT POUR COMMON INTERFACE
Si vous n’insérez pas la carte d’interface commune dans certains canaux, ‘Signal brouillé’ s’afche sur l’écran.
Les informations de pairage contenant un numéro de téléphone, l’ID de la CI CARD, l’ID de l’hôte et d’autres informations
s’afcheront dans 2 ou 3 minutes. Si un message d’erreur s’afche, contactez votre prestataire de service.
Lorsque la conguration des informations sur les canaux est terminée, le message ‘Mise à jour terminée’ s’afche, indiquant
que la liste des chaînes est dorénavant mise à jour.
Vous devez obtenir une CI CARD provenant d’un fournisseur local de diffusion par câble. Retirez la CI CARD en la tirant
délicatement avec vos mains. Sa chute pourrait l’endommager.
Insérez la carte d’interface commune (CI-Card) dans le sens indiqué sur celle-ci.
L’emplacement du logement pour COMMON INTERFACE peut varier en fonction du modèle.
7
WISELINK
Collegare un dispositivo di memorizzazione di massa USB per visualizzare lmati e foto e ascoltare le musicali.
Vous pouvez vous connecter au réseau Samsung sans l en utilisant l’adaptateur ‘Samsung Wireless LAN Adapter’ (vendu
séparément).
8
S-VIDEO / VIDEO / R-AUDIO-L
Branchez un câble RCA ou S-VIDEO à un périphérique audio/vidéo externe approprié tel qu’un magnétoscope, un lecteur
DVD ou un Caméscope.
Branchez les câbles audio RCA sur la prise [R-AUDIO-L] du téléviseur et leurs autres extrémités sur les prises de sortie
audio correspondantes du périphérique audio/vidéo.
9
PRISE CASQUE
Vous pouvez brancher un casque à la prise casque du téléviseur. Lorsque le casque est branché, les haut-parleurs intégrés
n’émettent plus de son.
L’utilisation de la fonction Son est limitée lorsqu’un casque est connecté au téléviseur.
L’utilisation prolongée d’un casque à un niveau sonore élevé peut endommager l’ouïe.
Aucun son n’est émis depuis les enceintes lorsque vous connectez le casque au téléviseur.
Le volume du casque et celui du téléviseur sont réglés séparément.
0
AUDIO OUT [R-AUDIO-L]
Branchez les câbles audio RCA au connecteur AUDIO OUT [R-AUDIO-L]] situé à l’arrière de votre poste et aux connecteurs
d’entrée audio correspondants sur l’amplicateur ou le système Home Cinéma.
!
DIGITAL AUDIO OUT (OPTICAL)
A connecter à un composant audio numérique.
Lorsque les prises HDMI IN sont branchées, la prise DIGITAL AUDIO OUT (OPTICAL) du téléviseur alimente
uniquement un périphérique audio 2 canaux. Pour écouter des chaînes audio 5.1, branchez la prise optique du lecteur
DVD ou du décodeur câble/récepteur satellite directement sur un amplicateur ou sur un système home cinéma, et non
sur le téléviseur.
@
EXT 1, EXT 2
Connecteur
Entrée Sortie
Vidéo Audio (L / R) RGB Vidéo + Audio (L/R)
EXT 1 O O O Seule la sortie TV ou DTV est disponible.
EXT 2 O O Sortie que vous pouvez sélectionner.
Entrées ou sorties pour périphériques tels que des magnétoscopes, des lecteurs DVD, des consoles de jeux vidéo ou des
lecteurs de vidéodisques.
#
LAN
Connectez un câble réseau à ce port pour connecter le téléviseur au réseau.
$
VERROUILLAGE KENSINGTON (EN FONCTION DU MODèLE)
Le verrouillage Kensington (en option) est un dispositif utilisé pour xer physiquement le système dans le cas d’une
utilisation dans un endroit public.
Si vous désirez utiliser un dispositif de verrouillage, contactez le revendeur où vous avez acheté le téléviseur.
L’emplacement du verrou Kensington peut varier en fonction du modèle.
N
-
-
-
-
-
-
N
N
N
-
-
-
-
-
N
N
N
N
-
-
N
-
-
-
-
-
BN68-01700M-Fre.indb 5 2008-08-19 �� 5:05:46

Français - 6
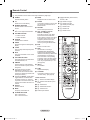
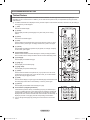
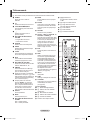
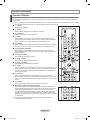
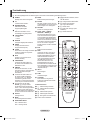
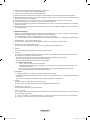
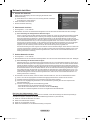
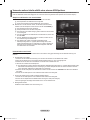
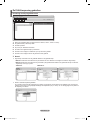
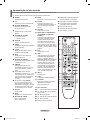
Télécommande
Vous pouvez utiliser la télécommande à une distance maximale du téléviseur d’environ 7 m.
Une lumière intense peut affecter le bon fonctionnement de la télécommande.
1
POWER
Bouton de mise en veille du
téléviseur.
2
TV
Sélectionne directement le mode TV.
3
TOUCHES NUMÉRIQUES
Pavé numérique pour l’accès direct
aux canaux
4
−
Sélection de chaînes à un ou
plusieurs
chiffres
5
BOUTONS DE RÉGLAGE DU
VOLUME
+ : Augmentation du volume
– : Diminution du volume
6
SOURCE
Sélection de la source disponible
7
GUIDE
Afchage EPG (Guide électronique
des programmes)
8
TOOLS
Permet de sélectionner rapidement
les fonctions fréquemment utilisées.
9
INFO
Permet d’afcher les informations
relatives au programme en cours
0
BOUTONS DE COULEUR
Utilisez ces boutons dans la liste des
chaînes, WISELINK Pro, etc.
@
E.MODE
Permet de sélectionner l’afchage
et les modes son en option pour le
sport, le cinéma et les jeux.
#
Utilisez ces boutons en mode DMA,
WISELINK Pro et Anynet
+
. (∏: cette
télécommande peut être utilisée pour
contrôler les enregistreurs Samsung
avec la fonction Anynet
+
.)
$
Chaque pression sur le bouton
lumineux ON/OFF @ permet de
basculer entre les positions ON et
OFF. Lorsque la télécommande est
activée et qu’une de ses touches
est actionnée, les touches de la
télécommande s’allument brièvement.
%
PRE-CH
Chaîne précédente
^
MUTE
Arrêt temporaire du son
&
BOUTONS DE SÉLECTION DE
CHAÎNE
P < : Chaîne suivante
P > : Chaîne précédente
*
MENU
Permet d’afcher le menu principal
à l’écran
(
W.LINK
Cette fonction permet de visualiser
des photos et d’écouter des chiers
musicaux à partir d’un périphérique
externe.
)
RETURN
Revient au menu précédent
a
HAUT ▲ / BAS ▼ / GAUCHE ◄ /
DROITE ► / ENTER
E
Appuyez sur les sections Haut / Bas /
Gauche / Droite du cercle de boutons
et sur Entrer pour sélectionner les
options de menu à l’écran et en
changer les valeurs. En faisant
tourner le cercle, vous pouvez vous
déplacer dans les menus, changer de
chaîne et régler le volume.
b
EXIT
Permet de quitter le menu afché à
l’écran
c
DMA
Utilisez ce paramètre lorsque vous
connectez un appareil SAMSUNG
DMA (Digital Media Adapter) via
une interface HDMI et basculez en
mode DMA. (Le bouton DMA est en
option.) Pour plus d’informations sur
les procédures de fonctionnement,
reportez-vous au manuel d’utilisation
de l’appareil DMA. Ce bouton
est disponible si la fonction
“Anynet
+
(HDMI-CEC)” est réglée sur
“Marche” (voir page 50).
d
INFO.L
Indisponible
e
SUBT.
Afchage numérique des sous-titres
f
CONTENT
Cette fonction vous permet d’afcher
la “bibliothèque de contenu”.
(voir page 46)
Fonctions télétexte
2
:: Quitter l’afchage télétexte
6
0: Sélection du mode Télétexte
(LIST/FLOF)
7
8: Mémorisation du télétexte
8
4: Sélection de la taille du télétexte
9
5: Activation du télétexte
0
Sélection des rubriques Fastext
!
/: Sélectionner
successivement Teletext, Double
ou Mix.
%
1: Page secondaire télétexte
&
2: Page télétexte suivante
3: Page télétexte précédente
*
6: Index télétexte
)
9: Pause télétexte
b
7: Annulation du télétexte
N
BN68-01700M-Fre.indb 6 2008-08-19 �� 5:05:46

Français - 7
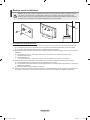
Insertion des piles dans la télécommande
1. Soulevez le couvercle situé à l’arrière de la télécommande comme indiqué sur
la gure.
2. Placez-y deux piles AAA.
Assurez-vous que les pôles ‘+’ et ‘–’ des piles correspondent au schéma
situé à l’intérieur du compartiment.
3. Remettez le couvercle en place.
Retirez les piles et stockez-les dans un endroit frais et sec si vous n’utilisez
pas la télécommande pendant longtemps.
Utiliser la télécommande avec le bouton ON / OFF @ réglé sur On permet
de réduire la durée d’utilisation de la pile.
Si la télécommande ne fonctionne pas :
1. Le téléviseur est-il sous tension ?
2. Les bornes + et - des piles ne sont-elles pas inversées ?
3. Les piles sont-elles déchargées ?
4. Le cordon d’alimentation est-il débranché ou y a-t-il une panne de courant ?
5. Une lampe uorescente ou néon est-elle allumée à proximité ?
N
Mise en marche et arrêt
Le câble relié au secteur est xé à l’arrière du téléviseur/moniteur.
1. Branchez le cordon d’alimentation sur une prise secteur appropriée.
Le voyant de veille s’allume sur le téléviseur.
2. Appuyez sur le bouton
P
de votre téléviseur.
Vous pouvez également appuyer sur le bouton POWER
P
ou sur le bouton TV de votre télécommande pour allumer le
téléviseur.
Le dernier programme que vous avez regardé est automatiquement re-sélectionné.
3. Appuyez sur le bouton numérique (de 0 à 9) ou le bouton canal suivant/précédent (< / >) de la télécommande ou sur le
bouton >C/P.
P
< de votre téléviseur.
Lorsque vous allumez le téléviseur pour la première fois, vous devrez choisir la langue dans laquelle vous souhaitez que
les menus s’afchent.
4. Pour éteindre votre téléviseur, appuyez de nouveau sur le bouton POWER
P
.
Mise en mode veille de votre téléviseur
Vous pouvez mettre votre téléviseur en mode Veille an de réduire la consommation électrique. Le mode veille peut être utile si
vous souhaitez éteindre votre téléviseur temporairement (pendant un repas par exemple).
1. Appuyez sur le bouton POWER
P
de la télécommande.
L’écran s’éteint et un voyant de veille rouge apparaît sur votre téléviseur.
2. Pour rallumer le téléviseur, appuyez de nouveau sur le bouton POWER
P
, les boutons numériques (de 0 à 9), le bouton TV
ou les boutons canal suivant/précédent (< / >).
Ne laissez pas le téléviseur en mode Veille pendant de longues périodes (lorsque vous êtes en vacances par exemple). Il
est conseillé de débrancher le téléviseur du secteur et de l’antenne.
N
N
N
N
N
N
N
N
N
BN68-01700M-Fre.indb 7 2008-08-19 �� 5:05:46

Français - 8
Afchage des menus
1. Une fois l’appareil allumé, appuyez sur le bouton MENU.
Le menu principal apparaît à l’écran. Plusieurs icônes s’afchent sur le côté
gauche du menu: Image, Son, Can., Conguration, Entrée, Application.
numérique.
2. Appuyez sur le bouton ▲ ou ▼ pour sélectionner l’une des icônes. Appuyez
ensuite sur le bouton ENTER
E
pour accéder au sous-menu de l’icône.
3. Appuyez sur le bouton EXIT pour quitter le menu.
Les menus disparaissent de l’écran après environ une minute.
Utilisation du bouton TOOLS
Vous pouvez utiliser le bouton TOOLS pour sélectionner simplement et rapidement
les fonctions que vous utilisez le plus souvent. Le menu “Outils” change en fonction
du mode d’entrée externe afché.
1. Utilisation du bouton TOOLS. Le menu “Outils” s’afche.
2. Appuyez sur le bouton ▲ ou ▼ pour sélectionner un menu.
3. Appuyez sur les boutons ▲/▼/◄/►/ENTER
E
pour afcher, changer ou
utiliser les éléments sélectionnés. Pour une description plus détaillée de chaque
fonction, reportez-vous à la page correspondante.
Anynet
+
(HDMI-CEC): Reportez-vous aux pages 50
Format de l’image: Reportez-vous aux pages 15
Mode Image: Reportez-vous aux pages 13
Mode Son: Reportez-vous aux pages 18
Veille: Reportez-vous aux pages 23
SRS TS XT: Reportez-vous aux pages 18
Mode éco.: Reportez-vous aux pages 22
Dual l ll: Reportez-vous aux pages 20
PIP: Reportez-vous aux pages 16
Réglage auto: Reportez-vous aux pages 18
•
•
•
•
•
•
•
•
•
•
N
Utilizzo della rotella
Per scorrere i canali verso numeri alti, ruotare in senso orario quando è
visualizzata la schermata Channel Display. Per scorrere i canali verso
numeri bassi, ruotare in senso antiorario.
Per aumentare il volume, ruotare in senso orario quando è visualizzata
la schermata Volume Control. Per diminuire il volume, ruotare in senso
antiorario.
Per raggiungere un menu inferiore, ruotare in senso orario quando
è visualizzata la schermata Menu Display. Per raggiungere un menu
superiore, ruotare in senso antiorario.
Mode
:
Standard
Rétroéclairage : 7
Contraste : 95
Luminosité : 45
Netteté : 50
Couleur : 50
Teinte (V/R) : V50 / R50
Réglages des détails
Image
Outils
Anynet+ (HDMI-CEC)
Format de l’image : 16/9 auto
Mode Image : Standard
Mode Son : Personnel
Veille : Arrêt
SRS TS XT : Arrêt
Mode éco. : Arrêt
Dual l ll : Mono
U
Déplacer
E
Entrer
e
Quitter
BN68-01700M-Fre.indb 8 2008-08-19 �� 5:05:47

Français - 9
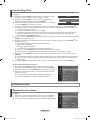
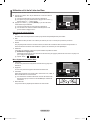
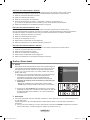
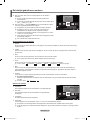
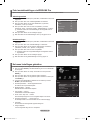
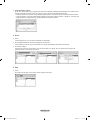
Fonction Plug & Play
Lorsque vous allumez le téléviseur pour la première fois, des réglages de base s’effectuent l’un après l’autre de manière
automatique.
1. Appuyez sur le bouton POWER de la télécommande. Le message “The Menu
Language, Store Demo, Channels, and Time will be set.” s’afche.
2. Appuyez sur le bouton ENTER
E
. Le menu “Select the OSD Language.”
s’afche automatiquement. Appuyez sur le bouton ENTER
E
.
3. Sélectionnez la langue appropriée en appuyant sur le bouton ▲ ou ▼. Appuyez
sur le bouton ENTER
E
pour conrmer votre choix.
4. Appuyez sur le bouton ◄ ou ► pour sélectionner “Enr. démo” ou “Util. domicile”, puis appuyez sur le bouton ENTER
E
.
Nous recommandons de régler la télévision sur le mode “Util. domicile” pour une meilleure qualité d’image dans votre
environnement personnel. Le mode
“Enr. démo” n’est prévu que pour un usage en magasin.
Si l’unité est accidentellement réglée sur le mode “Enr. démo” et que vous souhaitez revenir au mode “Util. domicile”
(Standard) : Appuyez sur le bouton Volume du téléviseur. Lorsque l’OSD du volume s’afche, appuyez pendant
5
secondes sur le bouton MENU du téléviseur.
5. Appuyez sur le bouton ENTER
E
. Sélectionnez le pays approprié en appuyant sur le bouton ▲ ou ▼. Appuyez sur le bouton
ENTER
E
pour conrmer votre choix.
6. Appuyez sur le bouton ▲ ou ▼ pour sélectionner la source de chaîne à mémoriser.
Appuyez sur le bouton ENTER
E
pour
sélectionner “Démarrer”.
Numérique et Analogique : Chaînes numériques et analogiques.
Digital : Chaînes numériques.
Analogique : Chaînes analogiques.
La recherche de canaux démarrera et se terminera automatiquement.
Appuyez sur le bouton ENTER
E
à tout moment pour interrompre la mémorisation.
Une fois que tous les canaux disponibles sont mémorisés, le message “Dénit le mode Horloge.” s’afche.
7. Appuyez sur le bouton ENTER
E
. Appuyez sur le bouton ▲ ou ▼ pour sélectionner “Auto.”, puis appuyez sur le bouton
ENTER
E
.
Si vous sélectionnez “Manuel”, le message “Dénit la date et l’heure en cours.” s’afche. (Reportez-vous à la page 23)
Si vous avez reçu un signal numérique, l’heure sera automatiquement réglée. Sinon, reportez-vous à la page 23 pour
régler l’horloge.
8. Le message “Protez de votre visionnage” s’afche. Lorsque vous avez terminé, appuyez sur le bouton ENTER
E
.
Si vous souhaitez réinitialiser cette fonction...
1. Appuyez sur le bouton MENU pour afcher le menu. Appuyez sur le bouton
▲ ou ▼ pour sélectionner “Conguration”, puis appuyez sur le bouton ENTER
E
.
2. Appuyez de nouveau sur le bouton ENTER
E
pour sélectionner “Plug & Play”.
3. Entrez votre code PIN à quatre chiffres. Le code PIN par défaut d’un nouveau
téléviseur est ‘0-0-0-0’.
Si vous souhaitez changer ce code PIN, reportez-vous à la page 20.
La fonction “Plug & Play” est uniquement disponible en mode TV.
N
N
N
N
N
N
N
N
N
N
N
Gestion des canaux
Mémorisation des chaînes
Pays
Chaîne anal. : Permet de changer de pays pour les chaînes analogiques.
Canal num. : Permet de changer de pays pour les chaînes numériques.
L’écran de saisie du code PIN apparaît. Entrez votre code PIN à quatre chiffres.
❑
N
Conguration
Plug & Play
►
Langue : Franςais
Horloge
Sélection du
réseau : Câble
Config. rés. sans fil
Configuration du réseau câblé
Verr
Parental : Marche
Modifier PIN
Can.
Pays
►
Mémorisation Auto
Mémorisation Manuelle
Guide comp.
Mini Guide
Par
défaut
: Mini Guide
Liste des chaînes
Mode Canal :
Chaînes ajoutées
Plug & Play
The Menu Langue, Store Demo, Channels, and Horloge
will be set.
OK
E
Enter
BN68-01700M-Fre.indb 9 2008-08-19 �� 5:05:47
La page est en cours de chargement...
La page est en cours de chargement...
La page est en cours de chargement...
La page est en cours de chargement...
La page est en cours de chargement...
La page est en cours de chargement...
La page est en cours de chargement...
La page est en cours de chargement...
La page est en cours de chargement...
La page est en cours de chargement...
La page est en cours de chargement...
La page est en cours de chargement...
La page est en cours de chargement...
La page est en cours de chargement...
La page est en cours de chargement...
La page est en cours de chargement...
La page est en cours de chargement...
La page est en cours de chargement...
La page est en cours de chargement...
La page est en cours de chargement...
La page est en cours de chargement...
La page est en cours de chargement...
La page est en cours de chargement...
La page est en cours de chargement...
La page est en cours de chargement...
La page est en cours de chargement...
La page est en cours de chargement...
La page est en cours de chargement...
La page est en cours de chargement...
La page est en cours de chargement...
La page est en cours de chargement...
La page est en cours de chargement...
La page est en cours de chargement...
La page est en cours de chargement...
La page est en cours de chargement...
La page est en cours de chargement...
La page est en cours de chargement...
La page est en cours de chargement...
La page est en cours de chargement...
La page est en cours de chargement...
La page est en cours de chargement...
La page est en cours de chargement...
La page est en cours de chargement...
La page est en cours de chargement...
La page est en cours de chargement...
La page est en cours de chargement...
La page est en cours de chargement...
La page est en cours de chargement...
La page est en cours de chargement...
La page est en cours de chargement...
La page est en cours de chargement...
La page est en cours de chargement...
La page est en cours de chargement...
La page est en cours de chargement...
La page est en cours de chargement...
La page est en cours de chargement...
La page est en cours de chargement...
La page est en cours de chargement...
La page est en cours de chargement...
La page est en cours de chargement...
La page est en cours de chargement...
La page est en cours de chargement...
La page est en cours de chargement...
La page est en cours de chargement...
La page est en cours de chargement...
La page est en cours de chargement...
La page est en cours de chargement...
La page est en cours de chargement...
La page est en cours de chargement...
La page est en cours de chargement...
La page est en cours de chargement...
La page est en cours de chargement...
La page est en cours de chargement...
La page est en cours de chargement...
La page est en cours de chargement...
La page est en cours de chargement...
La page est en cours de chargement...
La page est en cours de chargement...
La page est en cours de chargement...
La page est en cours de chargement...
La page est en cours de chargement...
La page est en cours de chargement...
La page est en cours de chargement...
La page est en cours de chargement...
La page est en cours de chargement...
La page est en cours de chargement...
La page est en cours de chargement...
La page est en cours de chargement...
La page est en cours de chargement...
La page est en cours de chargement...
La page est en cours de chargement...
La page est en cours de chargement...
La page est en cours de chargement...
La page est en cours de chargement...
La page est en cours de chargement...
La page est en cours de chargement...
La page est en cours de chargement...
La page est en cours de chargement...
La page est en cours de chargement...
La page est en cours de chargement...
La page est en cours de chargement...
La page est en cours de chargement...
La page est en cours de chargement...
La page est en cours de chargement...
La page est en cours de chargement...
La page est en cours de chargement...
La page est en cours de chargement...
La page est en cours de chargement...
La page est en cours de chargement...
La page est en cours de chargement...
La page est en cours de chargement...
La page est en cours de chargement...
La page est en cours de chargement...
La page est en cours de chargement...
La page est en cours de chargement...
La page est en cours de chargement...
La page est en cours de chargement...
La page est en cours de chargement...
La page est en cours de chargement...
La page est en cours de chargement...
La page est en cours de chargement...
La page est en cours de chargement...
La page est en cours de chargement...
La page est en cours de chargement...
La page est en cours de chargement...
La page est en cours de chargement...
La page est en cours de chargement...
La page est en cours de chargement...
La page est en cours de chargement...
La page est en cours de chargement...
La page est en cours de chargement...
La page est en cours de chargement...
La page est en cours de chargement...
La page est en cours de chargement...
La page est en cours de chargement...
La page est en cours de chargement...
La page est en cours de chargement...
La page est en cours de chargement...
La page est en cours de chargement...
La page est en cours de chargement...
La page est en cours de chargement...
La page est en cours de chargement...
La page est en cours de chargement...
La page est en cours de chargement...
La page est en cours de chargement...
La page est en cours de chargement...
La page est en cours de chargement...
La page est en cours de chargement...
La page est en cours de chargement...
La page est en cours de chargement...
La page est en cours de chargement...
La page est en cours de chargement...
La page est en cours de chargement...
La page est en cours de chargement...
La page est en cours de chargement...
La page est en cours de chargement...
La page est en cours de chargement...
La page est en cours de chargement...
La page est en cours de chargement...
La page est en cours de chargement...
La page est en cours de chargement...
La page est en cours de chargement...
La page est en cours de chargement...
La page est en cours de chargement...
La page est en cours de chargement...
La page est en cours de chargement...
La page est en cours de chargement...
La page est en cours de chargement...
La page est en cours de chargement...
La page est en cours de chargement...
La page est en cours de chargement...
La page est en cours de chargement...
La page est en cours de chargement...
La page est en cours de chargement...
La page est en cours de chargement...
La page est en cours de chargement...
La page est en cours de chargement...
La page est en cours de chargement...
La page est en cours de chargement...
La page est en cours de chargement...
La page est en cours de chargement...
La page est en cours de chargement...
La page est en cours de chargement...
La page est en cours de chargement...
La page est en cours de chargement...
La page est en cours de chargement...
La page est en cours de chargement...
La page est en cours de chargement...
La page est en cours de chargement...
La page est en cours de chargement...
La page est en cours de chargement...
La page est en cours de chargement...
La page est en cours de chargement...
La page est en cours de chargement...
La page est en cours de chargement...
La page est en cours de chargement...
La page est en cours de chargement...
La page est en cours de chargement...
La page est en cours de chargement...
La page est en cours de chargement...
La page est en cours de chargement...
La page est en cours de chargement...
La page est en cours de chargement...
La page est en cours de chargement...
La page est en cours de chargement...
La page est en cours de chargement...
La page est en cours de chargement...
La page est en cours de chargement...
La page est en cours de chargement...
La page est en cours de chargement...
La page est en cours de chargement...
La page est en cours de chargement...
La page est en cours de chargement...
La page est en cours de chargement...
La page est en cours de chargement...
La page est en cours de chargement...
La page est en cours de chargement...
La page est en cours de chargement...
La page est en cours de chargement...
La page est en cours de chargement...
La page est en cours de chargement...
La page est en cours de chargement...
La page est en cours de chargement...
La page est en cours de chargement...
La page est en cours de chargement...
La page est en cours de chargement...
La page est en cours de chargement...
La page est en cours de chargement...
La page est en cours de chargement...
La page est en cours de chargement...
La page est en cours de chargement...
La page est en cours de chargement...
La page est en cours de chargement...
La page est en cours de chargement...
La page est en cours de chargement...
La page est en cours de chargement...
La page est en cours de chargement...
La page est en cours de chargement...
La page est en cours de chargement...
La page est en cours de chargement...
La page est en cours de chargement...
La page est en cours de chargement...
La page est en cours de chargement...
La page est en cours de chargement...
La page est en cours de chargement...
La page est en cours de chargement...
La page est en cours de chargement...
La page est en cours de chargement...
La page est en cours de chargement...
La page est en cours de chargement...
La page est en cours de chargement...
La page est en cours de chargement...
La page est en cours de chargement...
La page est en cours de chargement...
La page est en cours de chargement...
La page est en cours de chargement...
La page est en cours de chargement...
La page est en cours de chargement...
La page est en cours de chargement...
La page est en cours de chargement...
La page est en cours de chargement...
La page est en cours de chargement...
La page est en cours de chargement...
La page est en cours de chargement...
La page est en cours de chargement...
La page est en cours de chargement...
La page est en cours de chargement...
La page est en cours de chargement...
La page est en cours de chargement...
La page est en cours de chargement...
La page est en cours de chargement...
La page est en cours de chargement...
La page est en cours de chargement...
La page est en cours de chargement...
La page est en cours de chargement...
La page est en cours de chargement...
La page est en cours de chargement...
La page est en cours de chargement...
La page est en cours de chargement...
La page est en cours de chargement...
La page est en cours de chargement...
La page est en cours de chargement...
La page est en cours de chargement...
La page est en cours de chargement...
La page est en cours de chargement...
La page est en cours de chargement...
La page est en cours de chargement...
La page est en cours de chargement...
La page est en cours de chargement...
La page est en cours de chargement...
La page est en cours de chargement...
La page est en cours de chargement...
La page est en cours de chargement...
La page est en cours de chargement...
La page est en cours de chargement...
La page est en cours de chargement...
La page est en cours de chargement...
La page est en cours de chargement...
La page est en cours de chargement...
La page est en cours de chargement...
La page est en cours de chargement...
La page est en cours de chargement...
La page est en cours de chargement...
La page est en cours de chargement...
La page est en cours de chargement...
La page est en cours de chargement...
La page est en cours de chargement...
La page est en cours de chargement...
La page est en cours de chargement...
La page est en cours de chargement...
La page est en cours de chargement...
La page est en cours de chargement...
La page est en cours de chargement...
La page est en cours de chargement...
La page est en cours de chargement...
La page est en cours de chargement...
La page est en cours de chargement...
La page est en cours de chargement...
La page est en cours de chargement...
La page est en cours de chargement...
La page est en cours de chargement...
La page est en cours de chargement...
La page est en cours de chargement...
La page est en cours de chargement...
La page est en cours de chargement...
La page est en cours de chargement...
La page est en cours de chargement...
La page est en cours de chargement...
La page est en cours de chargement...
La page est en cours de chargement...
La page est en cours de chargement...
La page est en cours de chargement...
La page est en cours de chargement...
La page est en cours de chargement...
La page est en cours de chargement...
La page est en cours de chargement...
La page est en cours de chargement...
La page est en cours de chargement...
La page est en cours de chargement...
La page est en cours de chargement...
La page est en cours de chargement...
La page est en cours de chargement...
La page est en cours de chargement...
La page est en cours de chargement...
La page est en cours de chargement...
La page est en cours de chargement...
La page est en cours de chargement...
La page est en cours de chargement...
La page est en cours de chargement...
La page est en cours de chargement...
La page est en cours de chargement...
-
 1
1
-
 2
2
-
 3
3
-
 4
4
-
 5
5
-
 6
6
-
 7
7
-
 8
8
-
 9
9
-
 10
10
-
 11
11
-
 12
12
-
 13
13
-
 14
14
-
 15
15
-
 16
16
-
 17
17
-
 18
18
-
 19
19
-
 20
20
-
 21
21
-
 22
22
-
 23
23
-
 24
24
-
 25
25
-
 26
26
-
 27
27
-
 28
28
-
 29
29
-
 30
30
-
 31
31
-
 32
32
-
 33
33
-
 34
34
-
 35
35
-
 36
36
-
 37
37
-
 38
38
-
 39
39
-
 40
40
-
 41
41
-
 42
42
-
 43
43
-
 44
44
-
 45
45
-
 46
46
-
 47
47
-
 48
48
-
 49
49
-
 50
50
-
 51
51
-
 52
52
-
 53
53
-
 54
54
-
 55
55
-
 56
56
-
 57
57
-
 58
58
-
 59
59
-
 60
60
-
 61
61
-
 62
62
-
 63
63
-
 64
64
-
 65
65
-
 66
66
-
 67
67
-
 68
68
-
 69
69
-
 70
70
-
 71
71
-
 72
72
-
 73
73
-
 74
74
-
 75
75
-
 76
76
-
 77
77
-
 78
78
-
 79
79
-
 80
80
-
 81
81
-
 82
82
-
 83
83
-
 84
84
-
 85
85
-
 86
86
-
 87
87
-
 88
88
-
 89
89
-
 90
90
-
 91
91
-
 92
92
-
 93
93
-
 94
94
-
 95
95
-
 96
96
-
 97
97
-
 98
98
-
 99
99
-
 100
100
-
 101
101
-
 102
102
-
 103
103
-
 104
104
-
 105
105
-
 106
106
-
 107
107
-
 108
108
-
 109
109
-
 110
110
-
 111
111
-
 112
112
-
 113
113
-
 114
114
-
 115
115
-
 116
116
-
 117
117
-
 118
118
-
 119
119
-
 120
120
-
 121
121
-
 122
122
-
 123
123
-
 124
124
-
 125
125
-
 126
126
-
 127
127
-
 128
128
-
 129
129
-
 130
130
-
 131
131
-
 132
132
-
 133
133
-
 134
134
-
 135
135
-
 136
136
-
 137
137
-
 138
138
-
 139
139
-
 140
140
-
 141
141
-
 142
142
-
 143
143
-
 144
144
-
 145
145
-
 146
146
-
 147
147
-
 148
148
-
 149
149
-
 150
150
-
 151
151
-
 152
152
-
 153
153
-
 154
154
-
 155
155
-
 156
156
-
 157
157
-
 158
158
-
 159
159
-
 160
160
-
 161
161
-
 162
162
-
 163
163
-
 164
164
-
 165
165
-
 166
166
-
 167
167
-
 168
168
-
 169
169
-
 170
170
-
 171
171
-
 172
172
-
 173
173
-
 174
174
-
 175
175
-
 176
176
-
 177
177
-
 178
178
-
 179
179
-
 180
180
-
 181
181
-
 182
182
-
 183
183
-
 184
184
-
 185
185
-
 186
186
-
 187
187
-
 188
188
-
 189
189
-
 190
190
-
 191
191
-
 192
192
-
 193
193
-
 194
194
-
 195
195
-
 196
196
-
 197
197
-
 198
198
-
 199
199
-
 200
200
-
 201
201
-
 202
202
-
 203
203
-
 204
204
-
 205
205
-
 206
206
-
 207
207
-
 208
208
-
 209
209
-
 210
210
-
 211
211
-
 212
212
-
 213
213
-
 214
214
-
 215
215
-
 216
216
-
 217
217
-
 218
218
-
 219
219
-
 220
220
-
 221
221
-
 222
222
-
 223
223
-
 224
224
-
 225
225
-
 226
226
-
 227
227
-
 228
228
-
 229
229
-
 230
230
-
 231
231
-
 232
232
-
 233
233
-
 234
234
-
 235
235
-
 236
236
-
 237
237
-
 238
238
-
 239
239
-
 240
240
-
 241
241
-
 242
242
-
 243
243
-
 244
244
-
 245
245
-
 246
246
-
 247
247
-
 248
248
-
 249
249
-
 250
250
-
 251
251
-
 252
252
-
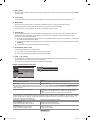 253
253
-
 254
254
-
 255
255
-
 256
256
-
 257
257
-
 258
258
-
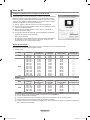 259
259
-
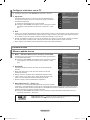 260
260
-
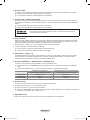 261
261
-
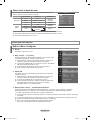 262
262
-
 263
263
-
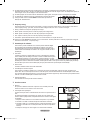 264
264
-
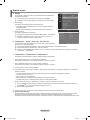 265
265
-
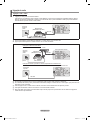 266
266
-
 267
267
-
 268
268
-
 269
269
-
 270
270
-
 271
271
-
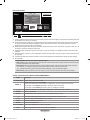 272
272
-
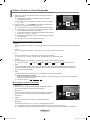 273
273
-
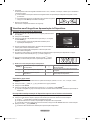 274
274
-
 275
275
-
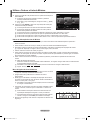 276
276
-
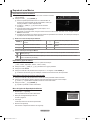 277
277
-
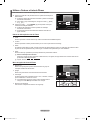 278
278
-
 279
279
-
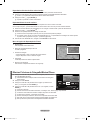 280
280
-
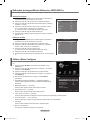 281
281
-
 282
282
-
 283
283
-
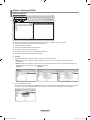 284
284
-
 285
285
-
 286
286
-
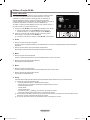 287
287
-
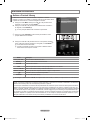 288
288
-
 289
289
-
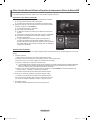 290
290
-
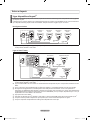 291
291
-
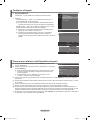 292
292
-
 293
293
-
 294
294
-
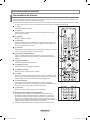 295
295
-
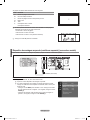 296
296
-
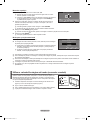 297
297
-
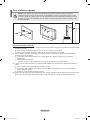 298
298
-
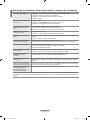 299
299
-
 300
300
-
 301
301
-
 302
302
-
 303
303
-
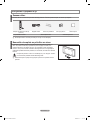 304
304
-
 305
305
-
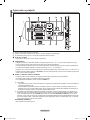 306
306
-
 307
307
-
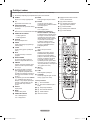 308
308
-
 309
309
-
 310
310
-
 311
311
-
 312
312
-
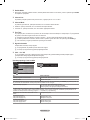 313
313
-
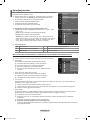 314
314
-
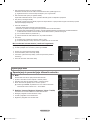 315
315
-
 316
316
-
 317
317
-
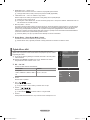 318
318
-
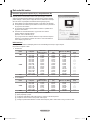 319
319
-
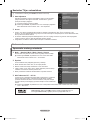 320
320
-
 321
321
-
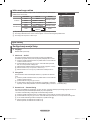 322
322
-
 323
323
-
 324
324
-
 325
325
-
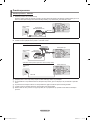 326
326
-
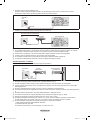 327
327
-
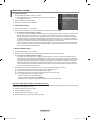 328
328
-
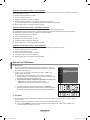 329
329
-
 330
330
-
 331
331
-
 332
332
-
 333
333
-
 334
334
-
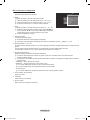 335
335
-
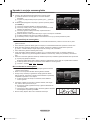 336
336
-
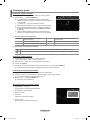 337
337
-
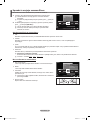 338
338
-
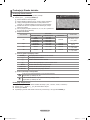 339
339
-
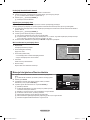 340
340
-
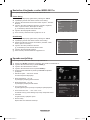 341
341
-
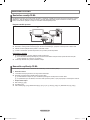 342
342
-
 343
343
-
 344
344
-
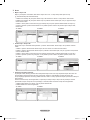 345
345
-
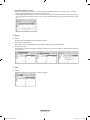 346
346
-
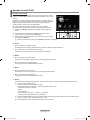 347
347
-
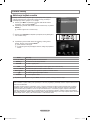 348
348
-
 349
349
-
 350
350
-
 351
351
-
 352
352
-
 353
353
-
 354
354
-
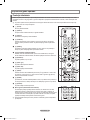 355
355
-
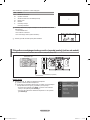 356
356
-
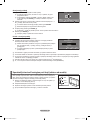 357
357
-
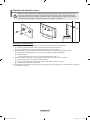 358
358
-
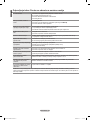 359
359
-
 360
360
-
 361
361
-
 362
362
-
 363
363
-
 364
364
-
 365
365
-
 366
366
-
 367
367
-
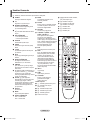 368
368
-
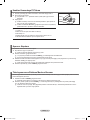 369
369
-
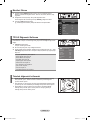 370
370
-
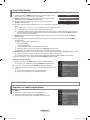 371
371
-
 372
372
-
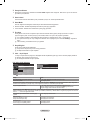 373
373
-
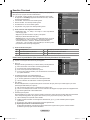 374
374
-
 375
375
-
 376
376
-
 377
377
-
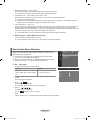 378
378
-
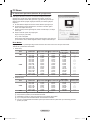 379
379
-
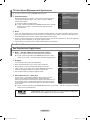 380
380
-
 381
381
-
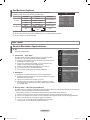 382
382
-
 383
383
-
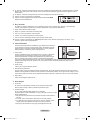 384
384
-
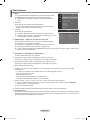 385
385
-
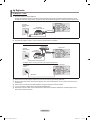 386
386
-
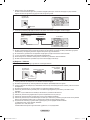 387
387
-
 388
388
-
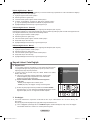 389
389
-
 390
390
-
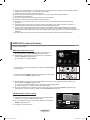 391
391
-
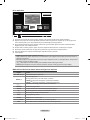 392
392
-
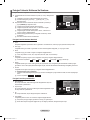 393
393
-
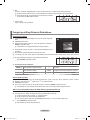 394
394
-
 395
395
-
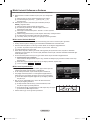 396
396
-
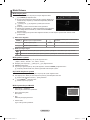 397
397
-
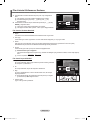 398
398
-
 399
399
-
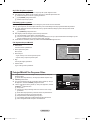 400
400
-
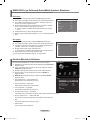 401
401
-
 402
402
-
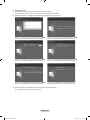 403
403
-
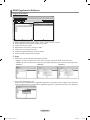 404
404
-
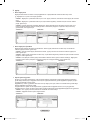 405
405
-
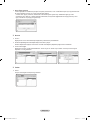 406
406
-
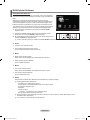 407
407
-
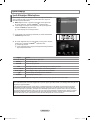 408
408
-
 409
409
-
 410
410
-
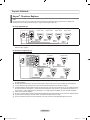 411
411
-
 412
412
-
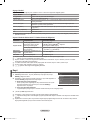 413
413
-
 414
414
-
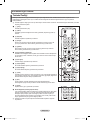 415
415
-
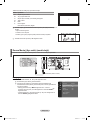 416
416
-
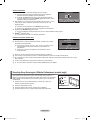 417
417
-
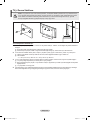 418
418
-
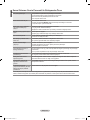 419
419
-
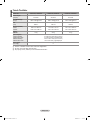 420
420
-
 421
421
-
 422
422


Samsung LE40A756R1M Manuel utilisateur
- Catégorie
- Téléviseurs LCD
- Taper
- Manuel utilisateur
dans d''autres langues
- English: Samsung LE40A756R1M User manual
- Deutsch: Samsung LE40A756R1M Benutzerhandbuch
- Nederlands: Samsung LE40A756R1M Handleiding
- português: Samsung LE40A756R1M Manual do usuário
- Türkçe: Samsung LE40A756R1M Kullanım kılavuzu
Documents connexes
-
Samsung PS50A556S2F Manuel utilisateur
-
Samsung LE40A796 Manuel utilisateur
-
Samsung PS50B530S2W Manuel utilisateur
-
Samsung LE46A756R1M Guide de démarrage rapide
-
-
Samsung PS50B450B1W Manuel utilisateur
-
Samsung UE32C4000PW Manuel utilisateur
-
Samsung LE46A956D1M Manuel utilisateur
-
Samsung LE46A676 Manuel utilisateur
-
Samsung UE55C7000WW Manuel utilisateur