
®
ENGLISH
QUARTZ ANALOG
INSTRUCTIONS
TWO-HAND / THREE-HAND MODELS
1.SecondHand
1
TO SET THE TIME:
1.PullcrownouttorstclickpositionB.
2.Turncrowntosettime.
3.PushcrownbacktopositionA.
TWO-HAND / THREE-HAND DATE
MODELS
1.DateIndicator
TO SET THE TIME:
1.PullcrownouttosecondclickpositionC.
2.Turncrowntosettime.
3.PushcrownbacktopositionA.
TO SET THE DATE:
1.PullcrownouttorstclickpositionB.
2.Turncrowncounter-clockwisetoset
date.
3.PushcrownbacktopositionA.
NOTE:Donotsetthedatebetween9:00
P.M.and1:00A.M.Otherwise,thedate
maynotchangeproperlyonthefollowing
day.Ifitisnecessarytosetthedatedur-
ingthattimeperiod,rstchangethetime
toanytimeoutsideit,thensetthedate
andthenresettothecorrecttime.
THREE-HAND DAY-DATE MODELS
1.Day(oftheweek)Indicator
2.DateIndicator
TO SET THE TIME:
1.PullcrownouttosecondclickpositionC.
2.Turncrowntosettime.
3.PushcrownbacktopositionA.
TO SET THE DAY (OF THE WEEK):
1.PullcrownouttorstclickpositionB.
2.Turncrownclockwisetosetday.
3.PushcrownbacktopositionA.
NOTE:Donotsetthedaybetween9:00
P.M.and1:00A.M.Otherwise,thedaymay
notchangeproperlyonthefollowingday.
Ifitisnecessarytosetthedayduringthat
timeperiod,rstchangethetimetoany
timeoutsideit,thensetthedayandthen
resettothecorrecttime.
TO SET THE DATE:
1.PullcrownouttorstclickpositionB.
2.Turncrowncounter-clockwisetoset
date.
3.PushcrownbacktopositionA.
NOTE:Donotsetthedatebetween9:00
P.M.and1:00A.M.Otherwise,thedate
maynotchangeproperlyonthefollowing
day.Ifitisnecessarytosetthedatedur-
ingthattimeperiod,rstchangethetime
toanytimeoutsideit,thensetthedate
andthenresettothecorrecttime.
TWO-EYE MULTI-FUNCTION MODELS
1.SecondHand
2.DayHand
3.DateHand
TO SET THE DAY (OF THE WEEK):
1.PullcrownouttosecondclickpositionC.
2.Turncrownclockwisetosetday.
3.PushcrownbacktopositionA.
NOTE:TheDayHandwillmovetogether
withtheHourHandandMinuteHand.
Keepturningthecrownuntilthedesired
dayhasbeenreached.
TO SET THE TIME:
1.PullcrownouttosecondclickpositionC.
2.Turncrowntosettime.
3.PushcrownbacktopositionA.
TO SET THE DATE:
1.PullcrownouttorstclickpositionB.
2.Turncrowncounter-clockwisetosetdate.
3.PushcrownbacktopositionA.
NOTE:Donotsetthedatebetween9:00
P.M.and1:00A.M.Otherwise,thedate
maynotchangeproperlyonthefollowing
day.Ifitisnecessarytosetthedatedur-
ingthattimeperiod,rstchangethetime
toanytimeoutsideit,thensetthedate
andthenresettothecorrecttime.
1.SecondHand
2.DateHand
3.24HourHand
TO SET THE TIME:
1.PullcrownouttosecondclickpositionC.
2.Turncrowntosettime.
3.PushcrownbacktopositionA.
NOTE:The24HourHandwillalsobeset
duringtimesetting.
TO SET THE DATE:
1.PullcrownouttorstclickpositionB.
2.Turncrowncounter-clockwisetoset
date.
3.PushcrownbacktopositionA.
NOTE:Donotsetthedatebetween9:00
P.M.and1:00A.M.Otherwise,thedate
maynotchangeproperlyonthefollowing
day.Ifitisnecessarytosetthedatedur-
ingthattimeperiod,rstchangethetime
toanytimeoutsideit,thensetthedate
andthenresettothecorrecttime.
THREE-EYE MULTI-FUNCTION MODELS
1.HourHand
2.MinuteHand
3.SecondHand
4.DateHand
5.DayHand
6.24HourHand
TO SET THE DAY (OF THE WEEK):
1.PullcrownouttosecondclickpositionC.
2.Turncrownclockwisetosetday.
3.PushcrownbacktopositionA.
NOTE:TheDayHandwillmovetogether
withtheHourHandandMinuteHand.
Keepturningthecrownuntilthedesired
dayhasbeenreached.
TO SET THE TIME:
1.PullcrownouttosecondclickpositionC.
2.Turncrowntosettime.
3.PushcrownbacktopositionA.
NOTE:The24HourHandwillalsobeset
duringtimesetting.
TO SET THE DATE:
1.PullcrownouttorstclickpositionB.
2.Turncrowneitherclockwiseor
counter-clockwisetosetdate.
3.PushcrownbacktopositionA.
NOTE:Thedirectionofcrownturning
fordatesettingvariesondifferentwatch
models.
NOTE:Donotsetthedatebetween9:00
P.M.and1:00A.M.Otherwise,thedate
maynotchangeproperlyonthefollowing
day.Ifitisnecessarytosetthedatedur-
ingthattimeperiod,rstchangethetime
toanytimeoutsideit,thensetthedate
andthenresettothecorrecttime.
THREE-EYE CHRONOGRAPH MODELS
1.HourHand
2.MinuteHand
3.SecondHand
4.24HourHand
5.ChronographMinuteHand
6.ChronographSecondHand
7.DateIndicator
S1–Chronographstart/stopbutton
S2–Chronographresetbutton
TO ADJUST THE CHRONOGRAPH HANDS
POSITION:
Beforesettingthetime,checkifthe
ChronographSecondHandandChrono-
graphMinuteHandareatthe12o’clock
position.
Ifthechronographisinuse,pressthe
buttoninthefollowingordertoresetit,
andthencheckifthechronographhands
havereturnedto12o’clockposition.
Ifthechronographiscounting:S1 S2
Ifthechronographisstopped:S2
Incaseoneorseveralchronographhands
arenotatthezeropositionduetocertain
reasons(e.g.followingabatterychange),
thatneedstobeadjusted.
1.PullcrownouttosecondclickpositionC.
2.PressS1buttontosettheChronograph
SecondHand.Holdingdownthebutton
willallowquickadvance.
3.PushcrownbacktopositionA.
TO SET THE TIME:
1.PullcrownouttosecondclickpositionC.
2.Turncrowntosettime.
3.PushcrownbacktopositionA.
NOTE:The24HourHandwillalsobeset
duringtimesetting.
TO SET THE DATE:
1.PullcrownouttorstclickpositionB.
2.Turncrowncounter-clockwisetoset
date.
3.PushcrownbacktopositionA.
NOTE:Donotsetthedatebetween9:00
P.M.and1:00A.M.Otherwise,thedate
maynotchangeproperlyonthefollowing
A BA B
A B C A B C
A B C
A B C
A B C
A B C
A B C
2013 Freestyle-QA-AG9613-INST-R00.indd 2 1/7/13 2:47:08 PM

®
Toreducecarbonfootprint,these
Freestyleinstructionsareprintedwith
soyinksonrecycledpaper.
ENGLISH
day.Ifitisnecessarytosetthedatedur-
ingthattimeperiod,rstchangethetime
toanytimeoutsideit,thensetthedate
andthenresettothecorrecttime.
TO USE THE CHRONOGRAPH (STOP-
WATCH):
1.PressS1buttontostartcounting.
2.Tostopcounting,pressS1buttononce.
PressS1buttonagaintoresumefrom
whereitleftoff.
3.Toresettozero,pressS1buttonto
stopcountingandthenpressS2button.
1.HourHand
2.MinuteHand
3.SecondHand
4.24HourHand
5.ChronographMinuteHand
6.ChronographSecondHand
7.Calendar
S1–Chronographstart/stopbutton
S2–Chronographsplit/splitrelease/
resetbutton
TO ADJUST THE CHRONOGRAPH HANDS
POSITION:
Beforesettingthetime,checkifthe
ChronographSecondHandandChrono-
graphMinuteHandareatthe12o’clock
position.
Ifthechronographisinuse,pressthe
buttoninthefollowingordertoresetit,
andthencheckifthechronographhands
havereturnedto12o’clockposition.
Ifthechronographiscounting:S1 S2
Ifthechronographisstopped:S2
Ifthesplittimeisdisplayed: S2
S1 S2
Incaseoneorseveralchronographhands
arenotatthe12o’clockpositiondueto
certainreasons(e.g.followingabattery
change),thatneedstobeadjusted.
1. Pullcrownouttosecondclickposition
C.
2. PressS1orS2buttontosetthe
ChronographSecondHandand
ChronographMinuteHand(mechani-
callycoupled).BypressingS1orS2
button,thehandswillmovecounter-
clockwiseorclockwiserespectively.
3. PushcrownbacktopositionA.
TO SET THE TIME:
1.Pullcrownouttosecondclickposition
C.
2.Turncrowntosettime.
3.PushcrownbacktopositionA.
NOTE:The24HourHandwillalsobeset
duringtimesetting.
TO SET THE DATE:
1.PullcrownouttorstclickpositionB.
2.Turncrownclockwisetosetdate.
3.PushcrownbacktopositionA.
NOTE:Donotsetthedatebetween9:00
P.M.and1:00A.M.Otherwise,thedate
maynotchangeproperlyonthefollowing
day.Ifitisnecessarytosetthedatedur-
ingthattimeperiod,rstchangethetime
toanytimeoutsideit,thensetthedate
andthenresettothecorrecttime.
TO USE THE CHRONOGRAPH (STOP-
WATCH):
Forthemeasurementofelapsedtime,
1.PressS1buttontostartcounting.
2.Tostopcounting,pressS1buttononce.
PressS1buttonagaintoresumefrom
whereitleftoff.
3.Toresettozero,pressS1buttontostop
countingandthenpressS2button.
Forthemeasurementofsplittime,
1.PressS1buttontostartcounting.
2.Whilethechronographisrunning,
pressS2buttononcetoregisteralap.
Thechronographisstillrunninginthe
background.
Todisplaythecurrentlyaccumulated
time,pressS2buttonagain.Thechro-
nographhandswillquicklyadvanceto
theongoingmeasuredtime.
3.Repeatthelaststepuntilallthelaps
havebeenregistered.
4.Toresettozero,pressS1buttontostop
countingandthenpressS2button.
NOTE:Thechronographisabletomea-
sureupto60minutes.
JS50
A B
1.HourHand
2.MinuteHand
3.SecondHand
4.24hourHand
5.ChronographSecondHand
6.ChronographMinuteHand
S1–Chronographstart/stopbutton
S2–Chronographresetbutton
TO ADJUST THE CHRONOGRAPH HANDS
POSITION:
Beforesettingthetime,checkiftheChro-
nographSecondHandandChronograph
MinuteHandareatthezeroposition.
Ifthechronographisinuse,pressthe
buttoninthefollowingordertoresetit,
andthencheckifthechronographhands
havereturnedtozeroposition.
Ifthechronographiscounting:S1 S2
Ifthechronographisstopped:S2
Incaseoneorseveralchronographhands
arenotatthezeropositionduetocertain
reasons(e.g.followingabatterychange),
thatneedstobeadjusted.
1.PullcrownouttorstclickpositionB.
2.PressS1buttontosettheChronograph
SecondHandandChronographMinute
Hand(mechanicallycoupled).Hold-
ingdownthebuttonwillallowquick
advance.
3.PushcrownbacktopositionA.
TO SET THE TIME:
1.PullcrownouttorstclickpositionB.
2.Turncrowntosettime.
3.PushcrownbacktopositionA.
NOTE:The24HourHandwillalsobeset
duringtimesetting.
TO USE THE CHRONOGRAPH (STOP-
WATCH):
Forthemeasurementofelapsedtime.
1.PressS1buttontostartcounting.
2.Tostopcounting,pressS1buttononce.
PressS1buttonagaintoresumefrom
whereitleftoff.
3.Toresettozero,pressS1buttontostop
countingandthenpressS2button.
NOTE:Thechronographisableto
measureanddisplaytimein1secondunit
uptomaximumof29minutes59seconds.
Thechronographwillstopautomatically
afterrunningcontinuouslyfor30minutes.
TO USE THE BACKLIGHT:
Somewatchmodelsareequippedwithan
electroluminescence(EL)backlight.To
turnonthebacklight,pressthebacklight
button.
Ifthereisnoseparatebacklightbutton,
pressthecrowntoactivatethebacklight.
SCREW-DOWN CROWN
Somewatchmodelsareequippedwith
ascrew-downcrown.Makesuretoun-
screwthecrownbeforepullingoutthe
crownforsetting,thenscrewthecrown
backintightlyaftersettingtoavoidany
waterentry.
TO USE THE COMPASS
E
S
N
W
Theredpointerofthecompassrepre-
sentsthedirectionofmagneticNorth(N).
Withreferencetotheredpointer,youcan
thenlocatethedirectionsofEast,South
andWest.
DISCLAIMER-Thecompassshouldnot
bereliedupontodeterminepreciseloca-
tion,proximity,distanceordirection.In
addition,someareashavemoremagnetic
interferencethanothers.Thisinterfer-
encemayresultinfurtherdistortionof
thecompassreading.Thiscompassis
designedtopointtomagneticnorth,not
truenorth.Pleasetakeintoconsideration
thelevelofdeclinationbasedonyour
globalposition.
A B C
2013Freestyle_QA_AG9613-R00
2013 Freestyle-QA-AG9613-INST-R00.indd 3 1/7/13 2:47:09 PM

®
ESPAÑOL
INSTRUCCIONES DEL
RELOJ ANALÓGICO DE
CUARZO
MODELOS DE DOS O TRES MANECILLAS
1.Segundero
1
CÓMO AJUSTAR LA HORA:
1.Saquelacoronaunpunto(posiciónB).
2.Girelacoronaparaajustarlahora.
3.VuelvaameterlacoronaalaposiciónA.
MODELOS DE DOS O TRES MANECILLAS
CON FECHA
1.Indicadordelafecha
CÓMO AJUSTAR LA HORA:
1.Saquelacoronadospuntos(posiciónC).
2.Girelacoronaparaajustarlahora.
3.VuelvaameterlacoronaalaposiciónA.
CÓMO AJUSTAR LA FECHA:
1.Saquelacoronaunpunto(posiciónB).
2.Girelacoronaendireccióncontrariaalas
manecillasdelrelojparaajustarlafecha.
3.VuelvaameterlacoronaalaposiciónA.
NOTA:Noajustelafechaentrelas09:00pm
yla01:00am.Silohace,lafechapodríano
cambiarseadecuadamentealdíasiguiente.
Situvieraqueajustarlafechaduranteeste
periododetiempo,primerocambielahora
fueradeesteperiodo,despuésajustelafecha
ydespuésvuelvaaponerlahoraadecuada.
MODELOS DE TRES MANECILLAS CON DÍA
Y FECHA
1.Indicadordeldíadelasemana
2.Indicadordelafecha
CÓMO AJUSTAR LA HORA:
1.Saquelacoronadospuntos(posiciónC).
2.Girelacoronaparaajustarlahora.
3.VuelvaameterlacoronaalaposiciónA.
CÓMO AJUSTAR EL DÍA DE LA SEMANA:
1.Saquelacoronaunpunto(posiciónB).
2.Girelacoronaendireccióndelasmanecillas
delrelojparaajustarlafecha.
3.VuelvaameterlacoronaalaposiciónA.
NOTA:Noajustelafechaentrelas09:00pm
yla01:00am.Silohace,lafechapodríano
cambiarseadecuadamentealdíasiguiente.
Situvieraqueajustarlafechaduranteeste
periododetiempo,primerocambielahora
fueradeesteperiodo,despuésajustelafecha
ydespuésvuelvaaponerlahoraadecuada.
CÓMO AJUSTAR LA FECHA:
1.Saquelacoronaunpunto(posiciónB).
2.Girelacoronaendireccióncontrariaalas
manecillasdelrelojparaajustarlafecha.
3.VuelvaameterlacoronaalaposiciónA.
NOTA:Noajustelafechaentrelas09:00pm
yla01:00am.Silohace,lafechapodríano
cambiarseadecuadamentealdíasiguiente.
Situvieraqueajustarlafechaduranteeste
periododetiempo,primerocambielahora
fueradeesteperiodo,despuésajustelafechay
despuésvuelvaaponerlahoraadecuada.
MODELOS MULTIFUNCIÓN CON DOS ESFERAS
1.Segundero
2.Manecillaparaeldíadelasemana
3.Manecillaparalafecha
CÓMO AJUSTAR EL DÍA DE LA SEMANA:
1.Saquelacoronadospuntos(posiciónC).
2.Girelacoronaendireccióndelasmanecillas
delrelojparaajustareldíadelasemana.
3.VuelvaameterlacoronaalaposiciónA.
NOTA:Lamanecilladeldíadelasemanase
moverájuntoconlamanecilladelahorayel
minutero.Sigagirandolacoronahastallegar
aldíadeseado.
CÓMO AJUSTAR LA HORA:
1.Saquelacoronadospuntos(posiciónC).
2.Girelacoronaparaajustarlahora.
3.VuelvaameterlacoronaalaposiciónA.
CÓMO AJUSTAR LA FECHA:
1.Saquelacoronaunpunto(posiciónB).
2.Girelacoronaendireccióncontrariaalas
manecillasdelrelojparaajustarlafecha.
3.VuelvaameterlacoronaalaposiciónA.
NOTA:Noajustelafechaentrelas09:00pm
yla01:00am.Silohace,lafechapodríano
cambiarseadecuadamentealdíasiguiente.
Situvieraqueajustarlafechaduranteeste
periododetiempo,primerocambielahora
fueradeesteperiodo,despuésajustelafechay
despuésvuelvaaponerlahoraadecuada.
1.Segundero
2.Manecillaparalafecha
3.Manecilla24horas
CÓMO AJUSTAR LA HORA:
1.Saquelacoronadospuntos(posiciónC).
2.Girelacoronaparaajustarlahora.
3.VuelvaameterlacoronaalaposiciónA.
NOTA:Lamanecilladelas24horastambiénse
ajustaráalajustarlahora.
CÓMO AJUSTAR LA FECHA:
1.Saquelacoronaunpunto(posiciónB).
2.Girelacoronaendireccióncontrariaalas
manecillasdelrelojparaajustarlafecha.
3.VuelvaameterlacoronaalaposiciónA.
NOTA:Noajustelafechaentrelas09:00pm
yla01:00am.Silohace,lafechapodríano
cambiarseadecuadamentealdíasiguiente.
Situvieraqueajustarlafechaduranteeste
periododetiempo,primerocambielahora
fueradeesteperiodo,despuésajustelafechay
despuésvuelvaaponerlahoraadecuada.
MODELOS MULTIFUNCIÓN CON TRES
ESFERAS
1.Manecilladelashoras
2.Minutero
3.Segunderopequeño
4.Manecillaparalafecha
5.Manecillaparaeldíadelasemana
6.Manecilla24horas
CÓMO AJUSTAR EL DÍA DE LA SEMANA:
1.Saquelacoronadospuntos(posiciónC).
2.Girelacoronaendireccióndelasmanecil-
lasdelrelojparaajustareldíadela
semana.
3.VuelvaameterlacoronaalaposiciónA.
NOTA:Lamanecilladeldíadelasemanase
moverájuntoconlamanecilladelahorayel
minutero.Sigagirandolacoronahastallegar
aldíadeseado.
CÓMO AJUSTAR LA HORA:
1.Saquelacoronadospuntos(posiciónC).
2.Girelacoronaparaajustarlahora.
3.VuelvaameterlacoronaalaposiciónA.
NOTA:Lamanecilladelas24horas
tambiénseajustaráalajustarlahora.
CÓMO AJUSTAR LA FECHA:
1.Saquelacoronaunpunto(posiciónB).
2.Girelacoronaenladirecciónnecesariapara
ajustarlafecha.
3.VuelvaameterlacoronaalaposiciónA.
NOTA:Ladirecciónenquegiralacoronapara
ajustarlafechavaríasegúnelmodelodereloj.
NOTA:Noajustelafechaentrelas09:00pm
yla01:00am.Silohace,lafechapodríano
cambiarseadecuadamentealdíasiguiente.
Situvieraqueajustarlafechaduranteeste
periododetiempo,primerocambielahora
fueradeesteperiodo,despuésajustelafecha
ydespuésvuelvaaponerlahoraadecuada.
MODELOS CON CRONÓMETRO Y TRES
ESFERAS
1.Manecilladelashoras
2.Minutero
3.Segundero
4.Manecilla24horas
5.Minuteroparaelcronómetro
6.Segunderoparaelcronómetro
7.Indicadordelafecha
S1–Botónparainiciar/pararelcronómetro
S2–Botónparaponerelcronómetroacero
CÓMO AJUSTAR LA POSICIÓN DE LAS MAN-
ECILLAS DEL CRONÓMETRO:
Antesdeajustarlahora,compruebesiel
segunderoyelminuteroparaelcronómetro
estánenposiciónenpunto.
Siseestáusandoelcronómetro,pulseel
botónenelsiguienteordenpararesetearlo,
ydespuéscompruebesilasmanecillasdel
cronómetrohanvueltoalaposicióndelas
12enpunto.
Sielcronómetroestáenmarcha:S1 S2
Sielcronómetroestáparado:S2
Siunaomásmanecillasdelcronómetrono
estánenposiciónceroporalgunarazón(ej.:
trasuncambiodepila),tendráqueajustarlo.
1.Saquelacoronadospuntos(posiciónC).
2.PulseelbotónS1paraajustarelsegundero
paraelcronómetro.Mantengapulsadoel
botónparaavanzarmásrápido.
3.VuelvaameterlacoronaalaposiciónA.
CÓMO AJUSTAR LA HORA:
1.Saquelacoronadospuntos(posiciónC).
2.Girelacoronaparaajustarlahora.
3.VuelvaameterlacoronaalaposiciónA.
NOTA:Lamanecilladelas24horastambiénse
ajustaráalajustarlahora.
CÓMO AJUSTAR LA FECHA:
1.Saquelacoronaunpunto(posiciónB).
2.Girelacoronaendireccióncontrariaalas
manecillasdelrelojparaajustarlafecha.
A B A B
A B CA B C
A B C
A B C
A B C
A B C
A B C
2013 Freestyle-QA-AG9613-INST-R00.indd 4 1/7/13 2:47:09 PM

®
retomarlacuentaahídondesequedó.
3. PulseelbotónS1parainterrumpirla
cuentaydespuéspulseelbotónS2para
volveracero.
Paramedireltiempodividido,
1. PulseelbotónS1paraempezaracontar.
2. Mientraselcronómetroestáenmarcha,
pulseelbotónS2unvezpararegistraruna
vuelta.Elcronómetroseguirácontandopor
detrás.Paramostrareltiempoacumulado
hastaelmomento,pulseS2otravez.Las
manecillasdelcronómetroavanzarán
rápidamentehastaeltiempomedidoactual.
3. Repitaelúltimopasohastaquesehayan
guardadotodaslasvueltas.
4. PulseelbotónS1parainterrumpirla
cuentaydespuéspulseelbotónS2para
volveracero.
NOTA:Elcronómetromideeltiempohastaun
máximode60minutos.
JS50
A B
1.Manecilladelashoras
2.Minutero
3.Segundero
4.Manecilla24horas
5.Segunderoparaelcronómetro
6.Minuteroparaelcronómetro
S1–Botónparainiciar/pararelcronómetro
S2–Botónparaponerelcronómetroacero
CÓMO AJUSTAR LA POSICIÓN DE LAS MAN-
ECILLAS DEL CRONÓMETRO:
Antesdeajustarlahora,compruebesiel
segunderoyelminuteroparaelcronómetro
estánenposicióncero.
Siseestáusandoelcronómetro,pulseelbotón
enelsiguienteordenparaponerloacero,
ydespuéscompruebesilasmanecillasdel
cronómetrohanvueltoalaposicióncero.
Sielcronómetroestáenmarcha:S1 S2
Sielcronómetroestáparado:S2
Siunaomásmanecillasdelcronómetrono
estánenposiciónceroporalgunarazón(ej.:
trasuncambiodepila),tendráqueajustarlo.
1.Saquelacoronaunpunto(posiciónB).
2.PulseelbotónS1paracongurarel
segunderodelcronómetroyelminuterodel
cronómetro(acopladosmecánicamente).
Mantengapulsadoelbotónparaavanzar
másrápido.
3.VuelvaameterlacoronaalaposiciónA.
CÓMO AJUSTAR LA HORA:
1.Saquelacoronaunpunto(posiciónB).
2.Girelacoronaparaajustarlahora.
3.VuelvaameterlacoronaalaposiciónA.
NOTA:Lamanecilladelas24horastambiénse
ajustaráalajustarlahora.
CÓMO USAR EL CRONÓMETRO:
Paramedireltiempotranscurrido,
1.PulseelbotónS1paraempezaracontar.
2.PulseelbotónS1unavezparainterrumpir
lacuenta.PulseelbotónS1otravezpara
retomarlacuentaahídondesequedó.
3.PulseelbotónS1parainterrumpirlacuenta
ydespuéspulseelbotónS2paravolver
acero.
NOTA:Elcronómetromideymuestraeltiempo
enunidadesde1segundohastaunmáximo
de29minutosy59segundos.Elcronómetro
separaráautomáticamentealcabode30
minutos.
Parareducirlahuelladelcarbono,
lasinstruccionesdeFreestylesehan
imprimidocontintadesojaenpapel
reciclado.
ESPAÑOL
3.VuelvaameterlacoronaalaposiciónA.
NOTA:Noajustelafechaentrelas09:00pm
yla01:00am.Silohace,lafechapodríano
cambiarseadecuadamentealdíasiguiente.
Situvieraqueajustarlafechaduranteeste
periododetiempo,primerocambielahora
fueradeesteperiodo,despuésajustelafecha
ydespuésvuelvaaponerlahoraadecuada.
CÓMO USAR EL CRONÓMETRO:
1.PulseelbotónS1paraempezaracontar.
2.PulseelbotónS1unavezparainterrumpir
lacuenta.PulseelbotónS1otravezpara
retomarlacuentaahídondesequedó.
3.PulseelbotónS1parainterrumpirla
cuentaydespuéspulseelbotónS2para
volveracero.
1.Manecilladelashoras
2.Minutero
3.Segundero
4.Manecilla24horas
5.Minuteroparaelcronómetro
6.Segunderoparaelcronómetro
7.Calendario
S1–Botónparainiciar/pararelcronómetro
S2–Botónpararesetear/interrumpir/
dividirelcronómetro
CÓMO AJUSTAR LA POSICIÓN DE LAS MAN-
ECILLAS DEL CRONÓMETRO:
Antesdeajustarlahora,compruebesiel
segunderoyelminuteroparaelcronómetro
estánenposiciónenpunto.
Siseestáusandoelcronómetro,pulseel
botónenelsiguienteordenpararesetearlo,
ydespuéscompruebesilasmanecillasdel
cronómetrohanvueltoalaposicióndelas
12enpunto.
Sielcronómetroestáenmarcha:S1 S2
Sielcronómetroestáparado: S2
Sisemuestralahoradividida: S2 S1 S2
Siunaomásmanecillasdelcronómetronoes-
tánenposiciónenpuntoporalgunarazón(ej.:
trasuncambiodepila),tendráqueajustarlo.
1. Saquelacoronadospuntos(posiciónC).
2. PulselosbotonesS1óS2paracongurar
elsegunderodelcronómetroyelminutero
delcronómetro(emparejadosmecánica
mente).AlpulsarlosbotonesS1óS2,
lasmanecillassemoveránalrevésoal
derechorespectivamente.
3. VuelvaameterlacoronaalaposiciónA.
CÓMO AJUSTAR LA HORA:
1.Saquelacoronadospuntos(posiciónC).
2.Girelacoronaparaajustarlahora.
3.VuelvaameterlacoronaalaposiciónA.
NOTA:Lamanecilladelas24horastambiénse
ajustaráalajustarlahora.
CÓMO AJUSTAR LA FECHA:
1. Saquelacoronaunpunto(posiciónB).
2. Girelacoronaendireccióndelasmanecil-
lasdelrelojparaajustarlafecha.
3. VuelvaameterlacoronaalaposiciónA.
NOTA:Noajustelafechaentrelas09:00pm
yla01:00am.Silohace,lafechapodríano
cambiarseadecuadamentealdíasiguiente.
Situvieraqueajustarlafechaduranteeste
periododetiempo,primerocambielahora
fueradeesteperiodo,despuésajustelafecha
ydespuésvuelvaaponerlahoraadecuada.
CÓMO USAR EL CRONÓMETRO:
Paramedireltiempotranscurrido,
1.PulseelbotónS1paraempezaracontar.
2. PulseelbotónS1unavezparainterrumpir
lacuenta.PulseelbotónS1otravezpara
CÓMO USAR LA LUZ DE FONDO:
Algunosmodelosderelojestánequipadoscon
luzdefondoelectroluminiscente(EL).Para
encenderlaluzdefondo,pulseelbotónde
luzdefondo.
Sinohaybotóndeluzdefondoespecíco,
pulselacoronaparaactivarlaluzdefondo.
CORONA GIRATORIA
Algunosmodelosderelojestánequipados
concoronagiratoria.Asegúresedegirarhacia
fueralacoronaantesdesacarlaparahacer
losajustes,ydespuésvuelvaagirarlahacia
adentroapriételaparaquenoentreagua.
FUNCIONAMIENTO DE LA BRúJULA
E
S
N
W
Laagujarojadelabrújularepresentaladirec-
cióndelNortemagnético(N).
Tomandocomoreferencialaagujarojapodrá
localizarenquédirecciónestánelEste,elSur
yelOeste.
EXENCIÓNDERESPONSABILIDAD.Nose
baseenlabrújulaparadeterminaruna
localización,proximidad,distanciaodirección
exactas.Además,algunaszonaspresentan
mayorinterferenciamagnéticaqueotras.
Estasinterferenciaspuedenprovocarmayores
distorsionesenlalecturadelabrújula.La
brújulahasidodiseñadaparaseñalarelnorte
magnético,noelnorteverdadero.Tengaen
cuentaelniveldedeclinaciónapartirdesu
ubicaciónenelglobo.
A B C
2013Freestyle_QA_AG9613-R00
2013 Freestyle-QA-AG9613-INST-R00.indd 5 1/7/13 2:47:10 PM

®
DEUTSCH
ANWEISUNGEN ZUR
ANALOGEN
QUARTZUHR
ZWEI- ODER DREI-ZEIGER MODELLE
1.Sekundenzeiger
1
ZEIT EINSTELLEN:
1.ZiehenSiedieKronebiszumerstenKlick
heraus,Position„B“.
2.DrehenSiedieKronebisdiekorrekteZeit
angezeigtwird.
3.DrückenSiedieKronewiederauf
Position„A“ein.
MODELLE MIT ZWEI ODER DREI
DATUMSZEIGERN
1.Datumsanzeige
ZEIT EINSTELLEN:
1.ZiehenSiedieKronebiszumzweiten
Klickenheraus,Position„C“.
2.DrehenSiedieKronebisdiekorrekteZeit
angezeigtwird.
3.DrückenSiedieKronewiederaufPosition
„A“ein.
DATUM EINSTELLEN:
1.ZiehenSiedieKronebiszumerstenKlick
heraus,Position„B“.
2.DrehenSiedieKronegegendem
UhrzeigersinnumdasDatumeinzustellen.
3.DrückenSiedieKronewiederaufPosition
„A“ein.
HINWEIS:StellenSiedasDatumnichtzwis-
chen21:00Uhrund1:00Uhrein,ansonsten
wirddasDatumamfolgendenTagnichtrichtig
angezeigt.FallsdasDatumzwischen21:00Uhr
und1:00Uhreingestelltwerdenmuss,stellen
SiebitteersteineneueUhrzeitein(nicht
zwischen21:00und1:00Uhr),stellenSiedann
dasDatumeinundstellenSieabschliessend
wiederdiekorrekteUhrzeitein.
DREI-ZEIGER MODELLE MIT
TAGES- UND DATUMSZEIGER
1.Wochentag-Anzeige2.Datumsanzeige
ZEIT EINSTELLEN:
1.ZiehenSiedieKronebiszumzweiten
Klickenheraus,Position„C“.
2.DrehenSiedieKronebisdiekorrekteZeit
angezeigtwird.
3.DrückenSiedieKronewiederaufPosition
„A“ein.
WOCHENTAG EINSTELLEN:
1.ZiehenSiedieKronebiszumerstenKlick
heraus,Position„B“.
2.DrehenSiedieKroneimUhrzeigersinnum
dasDatumeinzustellen.
3.DrückenSiedieKronewiederaufPosition
„A“ein.
HINWEIS:StellenSiedasDatumnichtzwis-
chen21:00Uhrund1:00Uhrein,ansonsten
wirddasDatumamfolgendenTagnichtrichtig
angezeigt.FallsdasDatumzwischen21:00Uhr
und1:00Uhreingestelltwerdenmuss,stellen
SiebitteersteineneueUhrzeitein(nicht
zwischen21:00und1:00Uhr),stellenSiedann
dasDatumeinundstellenSieabschliessend
wiederdiekorrekteUhrzeitein.
DATUM EINSTELLEN:
1.ZiehenSiedieKronebiszumerstenKlick
heraus,Position„B“.
2.DrehenSiedieKronegegendem
UhrzeigersinnumdasDatumeinzustellen.
3.DrückenSiedieKronewiederaufPosition
„A“ein.
HINWEIS:StellenSiedasDatumnichtzwis-
chen21:00Uhrund1:00Uhrein,ansonsten
wirddasDatumamfolgendenTagnichtrichtig
angezeigt.FallsdasDatumzwischen21:00Uhr
und1:00Uhreingestelltwerdenmuss,stellen
SiebitteersteineneueUhrzeitein(nicht
zwischen21:00und1:00Uhr),stellen
MULTIFUNKTIONSMODELLE MIT ZWEI
ZEIGERFENSTERN
1.Sekundenzeiger
2.Tageszeiger
3.Datumszeiger
WOCHENTAG EINSTELLEN:
1.ZiehenSiedieKronebiszumzweiten
Klickenheraus,Position„C“.
2.DrehenSiedieKroneimUhrzeigersinnum
dasDatumeinzustellen.
3.DrückenSiedieKronewiederaufPosition
„A“ein.
HINWEIS:DerTageszeigerwirdsich
gemeinsammitdemStunden-undMinuten-
zeigerbewegen.DrehenSiedieKronebisder
gewünschteTagangezeigtwird.
ZEIT EINSTELLEN:
1.ZiehenSiedieKronebiszumzweiten
Klickenheraus,Position„C“.
2.DrehenSiedieKronebisdiekorrekteZeit
angezeigtwird.
3.DrückenSiedieKronewiederaufPosition
„A“ein.
DATUM EINSTELLEN:
1.ZiehenSiedieKronebiszumerstenKlick
heraus,Position„B“.
2.DrehenSiedieKronegegendem
UhrzeigersinnumdasDatumeinzustellen.
3.DrückenSiedieKronewiederaufPosition
„A“ein.
HINWEIS:StellenSiedasDatumnichtzwis-
chen21:00Uhrund1:00Uhrein,ansonsten
wirddasDatumamfolgendenTagnichtrichtig
angezeigt.FallsdasDatumzwischen21:00Uhr
und1:00Uhreingestelltwerdenmuss,stellen
SiebitteersteineneueUhrzeitein(nicht
zwischen21:00und1:00Uhr),stellenSiedann
dasDatumeinundstellenSieabschliessend
wiederdiekorrekteUhrzeitein.
1.Sekundenzeiger
2.Datumszeiger
3.24-Stundenzeiger
ZEIT EINSTELLEN:
1.ZiehenSiedieKronebiszumzweiten
Klickenheraus,Position„C“.
2.DrehenSiedieKronebisdiekorrekteZeit
angezeigtwird.
3.DrückenSiedieKronewiederaufPosition
„A“ein.
HINWEIS:Der24-Stundenzeigerwirdgle-
ichzeitigmiteingestellt.
DATUM EINSTELLEN:
1.ZiehenSiedieKronebiszumerstenKlick
heraus,Position„B“.
2.DrehenSiedieKronegegendem
UhrzeigersinnumdasDatumeinzustellen.
3.DrückenSiedieKronewiederaufPosition
„A“ein.
HINWEIS:StellenSiedasDatumnichtzwis-
chen21:00Uhrund1:00Uhrein,ansonsten
wirddasDatumamfolgendenTagnichtrichtig
angezeigt.FallsdasDatumzwischen21:00Uhr
und1:00Uhreingestelltwerdenmuss,stellen
SiebitteersteineneueUhrzeitein(nicht
zwischen21:00und1:00Uhr),stellenSiedann
dasDatumeinundstellenSieabschliessend
wiederdiekorrekteUhrzeitein.
MULTIFUNKTIONSMODELLE MIT DREI
ZEIGERFENSTERN
1.Stundenzeiger
2.Minutenzeiger
3.KleinerSekundenzeiger
4.Datumszeiger
5.Tageszeiger
6.24-Stundenzeiger
WOCHENTAG EINSTELLEN:
1.ZiehenSiedieKronebiszumzweiten
Klickenheraus,Position„C“.
2.DrehenSiedieKroneimUhrzeigersinnum
dasDatumeinzustellen.
3.DrückenSiedieKronewiederaufPosition
„A“ein.
HINWEIS:DerTageszeigerwirdsich
gemeinsammitdemStunden-undMinuten-
zeigerbewegen.DrehenSiedieKronebisder
gewünschteTagangezeigtwird.
ZEIT EINSTELLEN:
1.ZiehenSiedieKronebiszumzweiten
Klickenheraus,Position„C“.
2.DrehenSiedieKronebisdiekorrekteZeit
angezeigtwird.
3.DrückenSiedieKronewiederaufPosition
„A“ein.
HINWEIS:Der24-Stundenzeigerwirdgle-
ichzeitigmiteingestellt.
DATUM EINSTELLEN:
1.ZiehenSiedieKronebiszumerstenKlick
heraus,Position„B“.
2.DrehenSiedieKroneimodergegenden
UhrzeigersinnumdasDatumeinzustellen.
3.DrückenSiedieKronewiederaufPosition
„A“ein.
HINWEIS:ObdieKroneinUhrzeigerrichtung
odergegenUhrzeigerrichtunggedrehtwerden
musshängtvomUhrenmodellab.
HINWEIS:StellenSiedasDatumnichtzwis-
chen21:00Uhrund1:00Uhrein,ansonsten
wirddasDatumamfolgendenTagnichtrichtig
angezeigt.FallsdasDatumzwischen21:00Uhr
und1:00Uhreingestelltwerdenmuss,stellen
SiebitteersteineneueUhrzeitein(nicht
zwischen21:00und1:00Uhr),stellenSiedann
dasDatumeinundstellenSieabschliessend
wiederdiekorrekteUhrzeitein.
CHRONOGRAPH-MODELLE MIT DREI ZEIGER-
FENSTERN
1.Stundenzeiger
2.Minutenzeiger
3.Sekundenzeiger
4.24-Stundenzeiger
5.Chronograph-Minutenzeiger
6.Chronograph-Sekundenzeiger
7.Datumsanzeige
S1–ChronographStart/Stop-Taste
S2–ChronographReset-Taste(Zurücksetzen)
POSITION DER CHRONOGRAPHENZEIGER
EINSTELLEN:
BevorSiedieZeiteinstellen,überprüfenSieob
dieChronograph-Sekunden-undMinuten-
zeigeraufder12-Uhr-Positionsind.
WennderChronographnichtbenutztwird,
drückenSiedieTastenwiefolgtumden
Chronographzurückzusetzen.Anschließend
überprüfenSieobdieZeigerinder12-Uhr-
Positionsind.
WährendderChronographmisst:S1 S2
WennderChronographgestopptist:S2
FallseineodermehrereChronographen-
zeigerausverschiedenenGründennichtauf
der„Null”-Positionstehen(z.B.nacheinem
Batteriewechsel),müssendieZeigerwieder
abgestimmtwerden.
A B A B
A B CA B C
A B C
A B C
A B C
A B C
A B C
2013 Freestyle-QA-AG9613-INST-R00.indd 6 1/7/13 2:47:11 PM

®
DieseFreestyle-Gebrauchsanweisung
wurdemitTinteaufSojabasisauf
Recycling-Papiergedrucktumden
Kohleausstoßzureduzieren.
DEUTSCH
1.ZiehenSiedieKronebiszumzweiten
Klickenheraus,Position„C“.
2.DrückenSieTasteS1umdenChronogra-
phen-Sekundenzeigereinzustellen.Der
Zeigerwirdsichschnellerbewegenwenn
SiedieTastegedrückthalten.
3.DrückenSiedieKronewiederaufPosition
„A“ein.
ZEIT EINSTELLEN:
1.ZiehenSiedieKronebiszumzweiten
Klickenheraus,Position„C“.
2.DrehenSiedieKronebisdiekorrekteZeit
angezeigtwird.
3.DrückenSiedieKronewiederaufPosition
„A“ein.
HINWEIS:Der24-Stundenzeigerwirdgle-
ichzeitigmiteingestellt.
DATUM EINSTELLEN:
1.ZiehenSiedieKronebiszumerstenKlick
heraus,Position„B“.
2.DrehenSiedieKronegegendem
UhrzeigersinnumdasDatumeinzustellen.
3.DrückenSiedieKronewiederaufPosition
„A“ein.
HINWEIS:StellenSiedasDatumnichtzwis-
chen21:00Uhrund1:00Uhrein,ansonsten
wirddasDatumamfolgendenTagnichtrichtig
angezeigt.FallsdasDatumzwischen21:00Uhr
und1:00Uhreingestelltwerdenmuss,stellen
SiebitteersteineneueUhrzeitein(nicht
zwischen21:00und1:00Uhr),stellenSiedann
dasDatumeinundstellenSieabschliessend
wiederdiekorrekteUhrzeitein.
ZEITMESSUNG MIT DEM
CHRONOGRAPHEN (STOPPUHR):
1.DrückenSieTasteS1umdieZeitmessung
zustarten.
2.DrückenSieS1nocheinmalumdieZeit-
messungzustoppen.DrückenSieS1noch
einmalumabderletztenMessungweiter
zumessen.
3.UmdenChronographenzurückzusetzen,
drückenSieTasteS1umdieZeitmessungzu
stoppenunddrückenanschliessendS2.
1.Stundenzeiger
2.Minutenzeiger
3.Sekundenzeiger
4.24-Stundenzeiger
5.ChronographMinutenzeiger
6.ChronographSekundenzeiger
7.Kalender
S1–ChronographStart-/Stopp-Taste
S2–ChronographSplit/SplitRelease/Reset
Taste(Zwischenzeit,Weiter,Rücksetzen)
POSITION DER CHRONOGRAPHENZEIGER
EINSTELLEN:
BevorSiedieZeiteinstellen,überprüfenSieob
dieChronograph-Sekunden-undMinuten-
zeigeraufder12-Uhr-Positionsind.
WennderChronographnichtbenutztwird,
drückenSiedieTastenwiefolgtumden
Chronographzurückzusetzen.Anschließend
überprüfenSieobdieZeigerinder12-Uhr-
Positionsind.
FallsderChronographzählt:S1 S2
FallsderChronograph
gestopptist: S2
WenndieZwischenzeit
angezeigtwird: S2 S1 S2
FallseineodermehrereChronographenzeiger
ausverschiedenenGründen(z.B.nacheinem
Batteriewechsel)nichtinder12-Uhr-Position
sind,müssendieseeingestelltwerden.
1.ZiehenSiedieKronebiszurzweiten
Position„C“.
2.DrückenSieTasteS1oderS2umden
Chronograph-Sekunden-undMinutenzeiger
(mechanischgekoppelt)einzustellen.
DrückenSieTasteS1oderS2umdieZeiger
gegendenbzw.imUhrzeigersinnzudrehen.
3.DrückenSiedieKronezurückinPosition
„A“.
ZEIT EINSTELLEN:
1.ZiehenSiedieKronebiszurzweitenPosition
„C“.
2.DrehenSiedieKroneumdieZeit
einzustellen.
3.DrückenSiedieKronezurückinPosition„A“.
HINWEIS:Der24-Stundenzeigerwirdsich
gleichzeitigverstellen.
DATUM EINSTELLEN:
1.ZiehenSiedieKronebiszurerstenPosition
„B“.
2.DrehenSiedieKroneumdasDatum
einzustellen.
3.DrückenSiedieKronezurückinPosition„A“.
HINWEIS:StellenSiedasDatumnichtzwis-
chen21:00Uhrund1:00Uhrein,ansonsten
wirddasDatumamfolgendenTagnichtrichtig
angezeigt.FallsdasDatumindieserZeit
eingestelltwerdenmuss,stellenSiebitteerst
eineneueUhrzeitein,stellenSiedanndas
DatumeinundstellenSieabschließendwieder
diekorrekteUhrzeitein
ZEITMESSUNG MIT DEM CHRONOGRAPHEN
(STOPPUHR):
UmdieabgelaufeneZeitzumessen:
1.DrückenSieTasteS1umdieZeitmessung
zustarten.
2.DrückenSieS1nocheinmalumdie
Zeitmessungzustoppen.DrückenSieS1
nocheinmalumabderletztenMessung
weiterzumessen.
3.UmdenChronographenzurückzusetzen,
drückenSieTasteS1umdieZeitmessungzu
stoppenunddrückenanschließendS2.
MessungderZwischenzeit(SplitTime):
1.DrückenSieTasteS1umdieZeitmes
sungzustarten.
2.WährendderChronographzählt,drücken
SieTasteS2einmalumdieRundenzeitauf-
zunehmen.DerChronographläuftimHinter-
grundweiter.DrückenSienochmalsTasteS2
umdieaktuelle,kumulativeRundenzeit
anzuzeigen.DieChronographenzeiger
werdensichschnellzuraktuellgemessenen
Zeitbewegen.
3.WiederholenSiedenletztenSchrittbisalle
Rundengemessenwurden.
4.UmdenChronographenzurückzusetzen,
drückenSieTasteS1umdieZeitmessungzu
stoppenunddrückenanschließendS2.
HINWEIS:DerChronographkannbiszu60
Minutenmessen.
JS50
A B
1.Stundenzeiger2.Minutenzeiger
3.Sekundenzeiger4.24-Stundenzeiger
5.ChronographSekundenzeiger
6.ChronographMinutenzeiger
S1Start/Stopp-TasteChronograph
S2Reset-Taste(Rücksetzen)Chronograph
POSITION DER CHRONOGRAPHENZEIGER
EINSTELLEN:
ÜberprüfenSieobderChronographen-Sekun-
denzeigerund–MinutenzeigeraufPosition
„null“istbevorSiedieZeiteinstellen.
FallsSiedenChronographenbenutzen,
drückenSiedieTasteninfolgenderReihen-
folgeumdenChronographenzurückzusetzen
undüberprüfenSiedannobdieChronogra-
phenzeigerinPosition„null“stehen.
WährendderChronographmisst:S1 S2
WennderChronographgestopptist:S2
FallseineodermehrereChronographen-
zeigerausverschiedenenGründennichtauf
der„Null”-Positionstehen(z.B.nacheinem
Batteriewechsel),müssendieZeigerwieder
abgestimmtwerden.
1.ZiehenSiedieKronebiszumerstenKlick
heraus,Position„B“.
2.DrückenSieTasteS1umdenChronogra-
phen-Sekunden-undMinutenzeiger
(mechanischgekoppelt)einzustellen.Der
ZeigerwirdsichschnellerbewegenwennSie
dieTastegedrückthalten.
3.DrückenSiedieKronewiederaufPosition
„A“ein.
ZEIT EINSTELLEN:
1.ZiehenSiedieKronebiszumerstenKlick
heraus,Position„B“.
2.DrehenSiedieKroneumdieZeit
einzustellen.
3.DrückenSiedieKronewiederaufPosition
„A“ein.
HINWEIS:Der24-Stundenzeigerwird
gleichzeitigmiteingestellt.
ZEITMESSUNG MIT DEM CHRONOGRAPHEN
(STOPPUHR):
UmdieabgelaufeneZeitzumessen:
1.DrückenSieTasteS1umdieZeitmessung
zustarten.
2.DrückenSieS1nochmalsumdieZeitmes-
sungzustoppen.DrückenSieS1noch
einmalumabderletztenMessungweiter
zumessen.
3.UmdieStoppuhrzurückzusetzen,drücken
SieTasteS1umdieZeitmessungzustop-
penundanschließendS2.
HINWEIS:DerChronographkanndieZeit
inEinheitenvon1Sekundeanzeigen,bis
zumaximal29Minuten59Sekunden.Der
ChronographstopptnacheinerDauervon30
Minutenautomatisch.
ZUR BENUTZUNG DER
HINTERGRUNDBELEUCHTUNG :
EinigeUhrenmodellesindmiteiner
Elektrolumineszenz-Hintergrundbeleuchtung
ausgestattet.ZumAnschaltenderHinter-
grundbeleuchtungdrückenSieaufden
Hintergrundbeleuchtungsknopf.
WenneskeinenseparatenHintergrund-
beleuchtungsknopfgibt,drückenSieauf
dieKronezurAktivierungderHintergrund-
beleuchtung.
SCHRAUBENKRONE
EinigeUhrenmodellesindmiteiner
Schraubenkroneausgestattet.Versichern
Siesich,dieKroneloszuschrauben,bevor
SiesiezurEinstellungherauszuziehen,dann
schraubenSiedieKronenachderEinstellung
festzurück,umjeglichenWassereintrittindie
Uhrzuvermeiden.
GEBRAUCH DES KOMPASSES
E
S
N
W
DerroteZeigerdesKompassesstelltdie
magnetischeNordrichtungdar(N).
DurchBezugnahmeaufdenrotenZeigerkön-
nenSienunOsten,Süden,undWestennden.
HAFTUNGSAUSSCHLUSS:DerKompass
solltenichtalsverlässlicheAnzeigefür
dieErmittlungdesgenauenStandorts,der
genauenLage,EntfernungoderRichtung
benutztwerden.Außerdemgibtesineinigen
GebietenstärkeremagnetischeStörungenals
inanderen.DieseStörungenkönnenzueiner
VerzerrungderKompassangabenführen.
DieserKompasswurdeentwickelt,umdie
magentischeNordrichtunganzuzeigen,nicht
geographischenNorden.BittebeachtenSie
dieDeklinationentsprechendIhrerglobalen
Position.
A B C
2013Freestyle_QA_AG9613-R00
2013 Freestyle-QA-AG9613-INST-R00.indd 7 1/7/13 2:47:12 PM

®
FRANÇAIS
INSTRUCTIONS DE LA
MONTRE ANALOGIQUE
A QUARTZ
MODELES A DEUX AIGUILLES / A TROIS
AIGUILLES
1.Trotteuse
1
Réglage de l’HEURE:
1.Tirezsurlacouronnejusqu’aupremier
déclicpourlamettreenpositionB.
2.Tournezlacouronnepourréglerl’heure.
3.Enfoncezlacouronnepourlaremettreen
positionApourconrmer.
MODELES A DEUX AIGUILLES / A TROIS
AIGUILLES
1.Calendrier
Réglage de l’HEURE:
1.Tirezsurlacouronnejusqu’audeuxième
déclicpourlamettreenpositionC.
2.Tournezlacouronnepourréglerl’heure.
3.Enfoncezlacouronnepourlaremettreen
positionApourconrmer.
Réglage de la DATE:
1.Tirezsurlacouronnejusqu’aupremier
déclicpourlamettreenpositionB.
2.Tournezlacouronnedanslesenscontraire
desaiguillesd’unemontrepourréglerla
date.
3.Enfoncezlacouronnepourlaremettreen
positionApourconrmer.
REMARQUE:Neréglezpasladatelorsqu’ilest
entre21:00et1:00.
Autrement,ladatepourranepassechanger
correctementlejoursuivant.S’ilestnéces-
sairedechangerladatedurantcettetranche
horaire,changeztoutd’abordl’heureàune
heureautrequedanscettetranchehoraire,
puisréglezladateetréglezdenouveaul’heure
correcte.
MODELES A TROIS AIGUILLES
JOUR-DATE
1.Indicateurdujour(delasemaine)
2.Indicateurdeladate
REGLAGE DE L’HEURE :
1.Tirezsurlacouronnejusqu’audeuxième
déclicpourlamettreenpositionC.
2.Tournezlacouronnepourréglerl’heure.
3.Enfoncezlacouronnepourlaremettreen
positionApourconrmer.
REGLAGE DU JOUR (DE LA SEMAINE):
1.Tirezsurlacouronnejusqu’aupremier
déclicpourlamettreenpositionB.
2.Tournezlacouronnedanslesensdes
aiguillesd’unemontrepourréglerladate.
3.Enfoncezlacouronnepourlaremettreen
positionApourconrmer.
REMARQUE:Neréglezpasladatelorsqu’ilest
entre21:00et1:00.
Autrement,ladatepourranepassechanger
correctementlejoursuivant.S’ilestnéces-
sairedechangerladatedurantcettetranche
horaire,changeztoutd’abordl’heureàune
heureautrequedanscettetranchehoraire,
puisréglezladateetréglezdenouveaul’heure
correcte.
REGLAGE DE LA DATE:
1.Tirezsurlacouronnejusqu’aupremier
déclicpourlamettreenpositionB.
2.Tournezlacouronnedanslesenscontraire
desaiguillesd’unemontrepourrégler
ladate.
3.Enfoncezlacouronnepourlaremettreen
positionApourconrmer.
REMARQUE:Neréglezpasladatelorsqu’ilest
entre21:00et1:00.
Autrement,ladatepourranepassechanger
correctementlejoursuivant.S’ilestnéces-
sairedechangerladatedurantcettetranche
horaire,changeztoutd’abordl’heureàune
heureautrequedanscettetranchehoraire,
puisréglezladateetréglezdenouveaul’heure
correcte.
MODELES MULTI-FONCTIONS A DEUX
FENETRES
1.Trotteuse2.Aiguilledujour
3.Aiguilledeladate
REGLAGE DU JOUR (DE LA SEMAINE):
1.Tirezsurlacouronnejusqu’audeuxième
déclicpourlamettreenpositionC.
2.Tournezlacouronnedanslesensdes
aiguillesd’unemontrepourréglerlejour.
3.Enfoncezlacouronnepourlaremettreen
positionApourconrmer.
REMARQUE:L’aiguilledujourtourneradans
lemêmesensquel’aiguilledesheureset
l’aiguilledesminutes.Tournezlacouronne
jusqu’àcequelejourdesirésoitatteint.
REGLAGE DE L’HEURE :
1.Tirezsurlacouronnejusqu’audeuxième
déclicpourlamettreenpositionC.
2.Tournezlacouronnepourréglerl’heure.
3.Enfoncezlacouronnepourlaremettreen
positionApourconrmer.
REGLAGE DE LA DATE:
1.Tirezsurlacouronnejusqu’aupremier
déclicpourlamettreenpositionB.
2.Tournezlacouronnedanslesenscontraire
desaiguillesd’unemontrepourréglerla
date.
3.Enfoncezlacouronnepourlaremettreen
positionApourconrmer.
REMARQUE:Neréglezpasladatelorsqu’ilest
entre21:00et1:00.
Autrement,ladatepourranepassechanger
correctementlejoursuivant.S’ilestnéces-
sairedechangerladatedurantcettetranche
horaire,changeztoutd’abordl’heureàune
heureautrequedanscettetranchehoraire,
puisréglezladateetréglezdenouveaul’heure
correcte.
1.Trotteuse2.Aiguilledeladate
3.Aiguille24heures
REGLAGE DE L’HEURE :
1.Tirezsurlacouronnejusqu’audeuxième
déclicpourlamettreenpositionC.
2.Tournezlacouronnepourréglerl’heure.
3.Enfoncezlacouronnepourlaremettreen
positionApourconrmer.
REMARQUE:L’aiguille24Heuresseraégale-
mentrégléedurantleréglagedel’heure.
REGLAGE DE LA DATE:
1.Tirezsurlacouronnejusqu’aupremier
déclicpourlamettreenpositionB.
2.Tournezlacouronnedanslesenscontraire
desaiguillesd’unemontrepourrégler
ladate.
3.Enfoncezlacouronnepourlaremettreen
positionApourconrmer.
REMARQUE:Neréglezpasladatelorsqu’ilest
entre21:00et1:00.
Autrement,ladatepourranepassechanger
correctementlejoursuivant.S’ilestnéces-
sairedechangerladatedurantcettetranche
horaire,changeztoutd’abordl’heureàune
heureautrequedanscettetranchehoraire,
puisréglezladateetréglezdenouveaul’heure
correcte.
MODELES MULTI-FONCTIONS A TROIS
FENETRES
1.Aiguilledesheures2.Aiguilledesminutes
3.Trotteuse4.Aiguilledeladate
5.Aiguilledujour6.Aiguille24heures
REGLAGE DU JOUR (DE LA SEMAINE):
1.Tirezsurlacouronnejusqu’audeuxième
déclicpourlamettreenpositionC.
2.Tournezlacouronnedanslesensdes
aiguillesd’unemontrepourréglerlejour.
3.Enfoncezlacouronnepourlaremettreen
positionApourconrmer.
REMARQUE:L’aiguilledujourtourneradans
lemêmesensquel’aiguilledesheureset
l’aiguilledesminutes.Tournezlacouronne
jusqu’àcequelejourdesirésoitatteint.
REGLAGE DE L’HEURE :
1.Tirezsurlacouronnejusqu’audeuxième
déclicpourlamettreenpositionC.
2.Tournezlacouronnepourréglerl’heure.
3.Enfoncezlacouronnepourlaremettreen
positionApourconrmer.
REMARQUE:L’aiguille24Heuresseraégale-
mentrégléedurantleréglagedel’heure.
REGLAGE DE LA DATE:
1.Tirezsurlacouronnejusqu’aupremier
déclicpourlamettreenpositionB.
2.Tournezlacouronnedanslesensdes
aiguillesd’unemontreoucontrairepour
réglerladate.
3.Enfoncezlacouronnepourlaremettreen
positionApourconrmer.
REMARQUE:Lesensderotationutilisé
pourréglerladatevarieselonlesdifférents
modèlesdemontre.
REMARQUE:Neréglezpasladatelorsqu’ilest
entre21:00et1:00.
Autrement,ladatepourranepassechanger
correctementlejoursuivant.S’ilestnéces-
sairedechangerladatedurantcettetranche
horaire,changeztoutd’abordl’heureàune
heureautrequedanscettetranchehoraire,
puisréglezladateetréglezdenouveaul’heure
correcte.
MODELES CHRONOGRAPHE AVEC TROIS
FENETRES
1.Aiguilledesheures2.Aiguilledesminutes
3.Trotteuse4.Aiguille24heures
5.Aiguilledesminutesduchronographe
6.Aiguilledessecondesduchronographe
7.Indicateurdeladate
S1–Boutondedémarrage/arrêtduchro-
nographe
S2–Boutonderéinitialisationdu
chronographe
POUR AJUSTER LA POSITION DES AIGUILLES
DU CHRONOGRAPHE:
Avantderéglerl’heure,vériezquel’aiguille
dessecondesduchronographeetl’aiguille
desminutesduchronographesontorientées
sur12heures.
Pourutiliserlechronographe,appuyezsurle
boutonselonl’ordresuivantpourleréinitialiser
etvériezquelesaiguillesduchronographe
sontorientéessur12heures.
Silechronographeestenmarche:S1 S2
Silechronographeestarrêté:
S2
Danslecasoùuneouplusieursaiguillesdu
chronographenesontpasenpositionzérodû
àuneraisonparticulière(parexemple,après
leremplacementdelapile),leréglageenposi-
tionzérodoitêtreeffectué.
1.Tirezsurlacouronnejusqu’audeuxième
déclicpourlamettreenpositionC.
A B A B
A B C A B C
A B C
A B C
A B C
A B C
A B C
2013 Freestyle-QA-AG9613-INST-R00.indd 8 1/7/13 2:47:13 PM

®
rapidement.
3.Enfoncezlacouronnepourlaremettreen
positionA.
REGLAGE DE L’HEURE:
1.Tirezsurlacouronnejusqu’aupremierdéclic
pourlamettreenpositionB.
2.Tournezlacouronnedanslesensdes
aiguillesd’unemontrepourréglerl’heure.
3.Enfoncezlacouronnepourlaremettreen
positionA
REMARQUE:L’aiguille24Heuresseraégale-
mentrégléedurantleréglagedel’heure.
UTILISATION DU CHRONOGRAPHE
(CHRONOMETRE):
Pourmesureruntempsécoulé.
1.AppuyezsurleboutonS1pourdémarrerle
chronomètre.
2.Pourarrêterlechronomètre,appuyezunefois
surleboutonS1.Appuyezdenouveausurle
boutonS1pourremettrelechronomètreen
marcheaupointoùilaétéarrêté.
3.Pourréinitialiserlechronomètreàzéro,
appuyeztoutd’abordsurleboutonS1pour
arrêterlechronomètre,puisappuyezsurle
boutonS2.
REMARQUE:Lechronographeestcapablede
mesureretd’afcherl’heureparunitéd’une
secondejusqu’àunmaximumde29minutes
et59secondes.Lechronographes’arrêtera
automatiquementaprèsavoirfonctionnéen
continupendant30minutes.
UTILISATION DU RETRO-ECLAIRAGE:
Certainsmodèlesdemontresontéquipésd’un
éclairageélectroluminescent(LE).Pouractiver
lerétro-éclairage,appuyezsurleboutondu
rétro-éclairage.
S’iln’yapasdeboutonderétro-éclairage
séparé,appuyezsurlacouronnepouractivele
rétro-éclairage.
COURONNE A VIS DE REGLAGE:
Certainsmodèlesdemontresontéquipésd’une
couronneàvisderéglage.
Assurez-vousdedévisserlacouronneavantde
tirersurlacouronnepourprocéderauréglage,
puisrevissezsolidementlacouronneunefois
leréglageterminé,pouréviterquedel’eaune
s’inltreàl’intérieurdelamontre.
UTILISATION DE LA BOUSSOLE
E
S
N
W
L’aiguillerougedelaboussoleindiqueladirec-
tionduNordmagnétique(N).
Aveclaréférencedel’aiguillerouge,vous
pouvezensuitelocaliserlesdirectionsdel’Est,
duSudetdel’Ouest.
Pourréduirel’émissiondecarbone
dansl’atmosphère,cesinstructions
Freestylesontimpriméesavecdes
encresdesojasurdupapierrecyclé.
FRANÇAIS
2.AppuyezsurleboutonS1pourrégler
l’aiguilledessecondesduchronographe.
Maintenezleboutonpressépouravancer
rapidement.
3.Enfoncezlacouronnepourlaremettreen
positionApourconrmer.
REGLAGE DE L’HEURE :
1.Tirezsurlacouronnejusqu’audeuxième
déclicpourlamettreenpositionC.
2.Tournezlacouronnepourréglerl’heure.
3.Enfoncezlacouronnepourlaremettreen
positionApourconrmer.
REMARQUE:L’aiguille24Heuresseraégale-
mentrégléedurantleréglagedel’heure.
REGLAGE DE LA DATE:
1.Tirezsurlacouronnejusqu’aupremier
déclicpourlamettreenpositionB.
2.Tournezlacouronnedanslesenscontraire
desaiguillesd’unemontrepourréglerla
date.
3.Enfoncezlacouronnepourlaremettreen
positionApourconrmer.
REMARQUE:Neréglezpasladatelorsqu’il
estentre21:00et1:00.Autrement,ladate
pourranepassechangercorrectementlejour
suivant.S’ilestnécessairedechangerladate
durantcettetranchehoraire,changeztout
d’abordl’heureàuneheureautrequedans
cettetranchehoraire,puisréglezladateet
réglezdenouveaul’heurecorrecte.
UTILISATION DU CHRONOGRAPHE (CHRO-
NOMETRE):
Pourmesurerladuréeécoulée,
1.AppuyezsurleboutonS1pourdémarrerle
chronomètre.
2.Pourarrêterlechronomètre,appuyezune
foissurleboutonS1.Appuyezdenouveau
surleboutonS1pourreprendrelecompte
oùilaétéarrêté.
3.Pourréinitialiserlechronomètreàzéro,
appuyezsurleboutonS1pourarrêterle
chronomètrepuisappuyezsurleboutonS2.
1.Aiguilledesheures2.Aiguilledesminutes
3.Trotteuse4.Aiguille24heures
5.Aiguilledesminutesduchronographe
6.Aiguilledessecondesduchronographe
7.Calendrier
S1– Boutondedémarrage/arrêtdu
chronographe
S2– Boutondetempsintermédiaire/
relâchementdutempsintermédiaire
/réinitialisationduchronographe
POUR AJUSTER LA POSITION DES AIGUILLES
DU CHRONOGRAPHE:
Avantderéglerl’heure,vériezquel’aiguille
dessecondesduchronographeetl’aiguille
desminutesduchronographesontorientées
sur12heures.
Pourutiliserlechronographe,appuyezsurle
boutonselonl’ordresuivantpourleréinitialiser
etvériezquelesaiguillesduchronographe
sontorientéessur12heures.
Silechronographeestenmarche:S1
S2
Silechronographeestarrêté:
S2
Siletempsintermédiaireestafché:S2
S1 S2
Danslecasoùuneouplusieursaiguilles
duchronographenesontpasorientéessur
12heures,dûàuneraisonparticulière(par
exemple,aprèsleremplacementdelapile),le
réglagesur12heuresdoitêtreeffectué.
1.Tirezsurlacouronnejusqu’audeuxième
déclicpourlamettreenpositionC.
2.AppuyezsurleboutonS1ouS2pourrégler
manuellementl’aiguilledessecondeset
l’aiguilledesminutesduchronographe(liées
mécaniquement).Enappuyantsurlebouton
S1ouS2,lesaiguillestournerontdansle
senscontrairedesaiguillesd’unemontre
oudanslesensdesaiguillesd’unemontre
respectivement.
3.Enfoncezlacouronnepourlaremettreen
positionA.
REGLAGE DE L’HEURE:
1.Tirezsurlacouronnejusqu’audeuxième
déclicpourlamettreenpositionC.
2.Tournezlacouronnepourréglerl’heure.
3.Enfoncezlacouronnepourlaremettre
enpositionA.
REMARQUE:L’aiguille24Heuresseraégale-
mentrégléedurantleréglagedel’heure.
REGLAGE DE LA DATE:
1.Tirezsurlacouronnejusqu’aupremier
déclicpourlamettreenpositionB.
2.Tournezlacouronnedanslesensdes
aiguillesd’unemontrepourréglerladate.
3.Enfoncezlacouronnepourlaremettreen
positionA.
REMARQUE:Neréglezpasladatelorsqu’il
estentre21:00et1:00.Autrement,ladate
pourranepassechangercorrectementlejour
suivant.S’ilestnécessairedechangerladate
durantcettetranchehoraire,changeztout
d’abordl’heureàuneheureautrequedans
cettetranchehoraire,puisréglezladateet
réglezdenouveaul’heurecorrecte.
UTILISATION DU CHRONOGRAPHE (CHRO-
NOMETRE):
Pourmesurerletempsécoulé,
1.AppuyezsurleboutonS1pourdémarrerle
chronomètre.
2.Pourarrêterlechronomètre,appuyezune
foissurleboutonS1.Appuyezdenouveau
surleboutonS1pourreprendrelecompteoù
ilaétéarrêté.
3.Pourréinitialiserlechronomètreàzéro,
appuyezsurleboutonS1pourarrêterle
chronomètrepuisappuyezsurleboutonS2.
Pourmesurerlestempsintermédiaires:
1.AppuyezsurleboutonS1pourdémarrerle
chronomètre.
2.Alorsquelechronomètreestenmarche,
appuyezunefoissurS2pourenregistrer
untempsintermédiaire.Lechronomètre
continueàtournerdanslefond.
Pourafcherlestempsaccumulésencours,
appuyezdenouveausurS2.Lesaiguillesdu
chronomètreavancerontrapidementpour
indiquerletempsmesuréencours.
3.Répétezladernièreétapejusqu’àcequetous
lestempsintermédiairessoientenregistrés.
4.Pourréinitialiserlecompteuràzéro,appuyez
surleboutonS1pourarrêterlecompteur
puisappuyezetmaintenezleboutonS2.
REMARQUE:Lechronographepeutcompter
jusqu’à60minutes.
JS50
A B
1.Aiguilledesheures
2.Aiguilledesminutes
3.Trotteuse
4.Aiguille24Heures
5.Aiguilledessecondesduchronographe
6.Aiguilledesminutesduchronographe
S1–Boutondedémarrage/arrêtdu
chronographe
S2-Boutonderéinitialisationduchronographe
POUR AJUSTER LA POSITION DES AIGUILLES
DU CHRONOGRAPHE:
Avantderéglerl’heure,vériezquel’aiguille
dessecondesetl’aiguilledesminutesdu
chronographesontenpositionzéro.
Pourutiliserlechronographe,appuyezsurle
boutonselonl’ordresuivantpourleréinitialiser
etvériezquelesaiguillesduchronographe
sontenpositionzéro.
Silechronographeestenmarche:S1 S2
Silechronographeestarrêté:
S2
Danslecasoùuneouplusieursaiguillesdu
chronographenesontpasenpositiondûà
uneraisonparticulière(parexemple,aprèsle
remplacementdelapile),leréglageenposition
zérodoitêtreeffectué.
1.Tirezsurlacouronnejusqu’aupremierdéclic
pourlamettreenpositionB.
2.AppuyezsurleboutonS1pourréglerl’aiguille
dessecondesetl’aiguilledesminutesdu
chronographe(associéesmécaniquement).
Maintenezleboutonpressépouravancer
A B C
CLAUSEDENONRESPONSABILITÉ-La
boussolen’estpasuninstrumentable
pourdéterminerl’emplacementprécis,la
proximité,ladistanceouladirection.Deplus,
certainesrégionsontdesinterférencesmag-
nétiquespluspuissantesqued’autres.Ces
interférencespeuvententraînerunedistorsion
supplémentairedelecturedelaboussole.
Cetteboussoleestconçuepourpointervers
lenordmagnétique,etnonverslevrainord.
Veuillezprendreenconsidérationleniveau
deladéclinaisonenfonctiondevotreposition
danslemonde.
2013Freestyle_QA_AG9613-R00
2013 Freestyle-QA-AG9613-INST-R00.indd 9 1/7/13 2:47:13 PM

®
ITALIANO
ISTRUZIONI
OROLOGIO ANALOGICO
AL QUARZO
MODELLI CON DUE / TRE LANCETTE
1.Lancettadeisecondi
1
PER IMPOSTARE L’ORA:
1.Tirarefuorilacoronanoalprimoclick
nellaposizione“B”.
2.Girarelacoronaperimpostarel’ora
3.Spingeredentrolacoronanellaposizione“A”
MODELLI DUE / TRE LANCETTE E DATA
1.Indicatoredidata
PER IMPOSTARE L’ORA:
1.Tirarefuorilacoronanoalsecondoclick
nellaposizione“C”.
2.Girarelacoronaperimpostarel’ora
3.Spingeredentrolacoronanellaposizione“A”
PER IMPOSTARE LA DATA:
1.Tirarefuorilacoronanoalprimoclick
nellaposizione“B”.
2.Girarelacoronainsensoantiorarioper
impostareladata.
3.Spingeredentrolacoronanellaposizione“A”
NOTA:Noneseguirel’impostazionedelladata
frale9:00PMele1:00AM.Altrimenti,ladata
potrebbenoncambiarecorrettamente.Se
dovesseesserenecessariocambiareladata
durantequell’ora,primadituttocambiare
l’orasuun’oraqualsiasialdifuoridiquella
gamma,poiimpostareladataeimpostare
l’oracorretta.
MODELLI GIORNO-DATA A TRE LANCETTE
1.Indicatoredelgiorno(dellasettimana)
2.Indicatoredidata
PER IMPOSTARE L’ORA:
1.Tirarefuorilacoronanoalsecondoclick
nellaposizione“C”.
2.Girarelacoronaperimpostarel’ora
3.Spingeredentrolacoronanellaposizione“A”
PER IMPOSTARE IL GIORNO (DELLA SET-
TIMANA):
1.Tirarefuorilacoronanoalprimoclick
nellaposizione“B”.
2.Girarelacoronainsensoorarioperimpo-
stareladata.
3.Spingeredentrolacoronanellaposizione“A”
NOTA:Noneseguirel’impostazionedelladata
frale9:00PMele1:00AM.Altrimenti,ladata
potrebbenoncambiarecorrettamente.Se
dovesseesserenecessariocambiareladata
durantequell’ora,primadituttocambiare
l’orasuun’oraqualsiasialdifuoridiquella
gamma,poiimpostareladataeimpostare
l’oracorretta.
PER IMPOSTARE LA DATA:
1.Tirarefuorilacoronanoalprimoclick
nellaposizione“B”.
2.Girarelacoronainsensoantiorarioper
impostareladata.
3.Spingeredentrolacoronanellaposizione
“A”.
NOTA:Noneseguirel’impostazionedelladata
frale9:00PMele1:00AM.Altrimenti,ladata
potrebbenoncambiarecorrettamente.Se
dovesseesserenecessariocambiareladata
durantequell’ora,primadituttocambiare
l’orasuun’oraqualsiasialdifuoridiquella
gamma,poiimpostareladataeimpostare
l’oracorretta.
MODELLI A DUE OCCHI MULTI-FUNZIONE
1.Lancettadeisecondi
2.Lancettagiorno
3.Lancettadata
PER IMPOSTARE IL GIORNO (DELLA SET-
TIMANA):
1.Tirarefuorilacoronanoalsecondoclick
nellaposizione“C”.
2.Girarelacoronainsensoorarioperimpo-
stareilgiorno.
3.Spingeredentrolacoronanellaposizione
“A”.
NOTA:Lalancettadelgiornosimuoveinsieme
allalancettadelleoreeaquelladeiminuti.
Continuareagirarelacoronanoachesi
raggiungeilgiornodesiderato.
PER IMPOSTARE L’ORA:
1.Tirarefuorilacoronanoalsecondoclick
nellaposizione“C”.
2.Girarelacoronaperimpostarel’ora.
3.Spingeredentrolacoronanellaposizione
“A”.
PER IMPOSTARE LA DATA:
1.Tirarefuorilacoronanoalprimoclicknella
posizione“B”.
2.Girarelacoronainsensoantiorarioper
impostareladata.
3.Spingeredentrolacoronanellaposizione
“A”.
NOTA:Noneseguirel’impostazionedelladata
frale9:00PMele1:00AM.Altrimenti,ladata
potrebbenoncambiarecorrettamente.Se
dovesseesserenecessariocambiareladata
durantequell’ora,primadituttocambiare
l’orasuun’oraqualsiasialdifuoridiquella
gamma,poiimpostareladataeimpostare
l’oracorretta.
1.Lancettadeisecondi
2.Lancettadata
3.Lancettadelle24ore
PER IMPOSTARE L’ORA:
1.Tirarefuorilacoronanoalsecondoclick
nellaposizione“C”.
2.Girarelacoronaperimpostarel’ora.
3.Spingeredentrolacoronanellaposizione
“A”.
NOTA:Anchelalancettadelle24oreviene
impostatadurantel’impostazionedell’ora.
PER IMPOSTARE LA DATA:
1.Tirarefuorilacoronanoalprimoclicknella
posizione“B”.
2.Girarelacoronainsensoantiorarioper
impostareladata.
3.Spingeredentrolacoronanellaposizione
“A”.
NOTA:Noneseguirel’impostazionedelladata
frale9:00PMele1:00AM.Altrimenti,ladata
potrebbenoncambiarecorrettamente.Se
dovesseesserenecessariocambiareladata
durantequell’ora,primadituttocambiare
l’orasuun’oraqualsiasialdifuoridiquella
gamma,poiimpostareladataeimpostare
l’oracorretta.
MODELLI A TRE OCCHI MULTI-FUNZIONE
1.Lancettadelleore
2.Lancettadeiminuti
3.Lancettadeisecondipiccola
4.Lancettadata
5.Lancettagiorno
6.Lancettadelle24ore
PER IMPOSTARE IL GIORNO (DELLA SET-
TIMANA):
1.Tirarefuorilacoronanoalsecondoclick
nellaposizione“C”.
2.Girarelacoronainsensoorarioperimpo-
stareilgiorno.
3.Spingeredentrolacoronanellaposizione
“A”.
NOTA:Lalancettadelgiornosimuoveinsieme
allalancettadelleoreeaquelladeiminuti.
Continuareagirarelacoronanoachesi
raggiungeilgiornodesiderato.
PER IMPOSTARE L’ORA:
1.Tirarefuorilacoronanoalsecondoclick
nellaposizione“C”.
2.Girarelacoronaperimpostarel’ora.
3.Spingeredentrolacoronanellaposizione
“A”.
NOTA:Anchelalancettadelle24oreviene
impostatadurantel’impostazionedell’ora.
PER IMPOSTARE LA DATA:
1.Tirarefuorilacoronanoalprimoclick
nellaposizione“B”.
2.Girarelacoronainsensoorarioo
antiorarioperimpostareladata.
3.Spingeredentrolacoronanellaposizione
“A”.
NOTA:Ladirezionedellacoronaper
l’impostazionedelladatavariainbaseaidif-
ferentimodellidiorologio.
NOTA:Noneseguirel’impostazionedelladata
frale9:00PMele1:00AM.Altrimenti,ladata
potrebbenoncambiarecorrettamente.Se
dovesseesserenecessariocambiareladata
durantequell’ora,primadituttocambiare
l’orasuun’oraqualsiasialdifuoridiquella
gamma,poiimpostareladataeimpostare
l’oracorretta.
MODELOS CON CRONÓMETRO Y TRES
ESFERAS
1.Lancettadelleore
2.Lancettadeiminuti
3.Lancettadeisecondi
4.Lancettadelle24ore
5.Lancettaminuticronografo
6.Lancettasecondicronografo
7.Indicatoredidata
S1–Tasto“Start/stop”cronografo
S2–Tasto“reset”cronografo
COME REGOLARE LA POSIZIONE DELLE
LANCETTE DEL CRONOGRAFO:
Primadiimpostarel’ora,controllareche
laLancettadeiSecondidelCronografoela
LancettadeiMinutidelCronografosianonella
posizioneore12.
Seilcronografoèinfunzione,premereiltasto
nell’ordineseguenteperresettarlo,epoi
controllarechelelancettedelcronografosiano
tornatenellaposizioneore12.
Seilcronografoèinfunzione:S1
S2
Seilcronografoèfermo:S2
Nelcasoincuiunaopiùlancettedel
cronografononsianosullozeroperalcune
A B A B
A B C A B C
A B C
A B C
A B C
A B C
A B C
2013 Freestyle-QA-AG9613-INST-R00.indd 10 1/7/13 2:47:14 PM

®
Perridurrel’impattoambientale,
questeistruzioniFreestylesono
stampateconinchiostridisoiasu
cartariciclata.
ITALIANO
ragioni(peres.inseguitoallasostituzione
dellabatteria),ènecessarioregolarle.
1.Tirarefuorilacoronanoalsecondoclick
nellaposizione“C”.
2.PremereiltastoS1perimpostarelalanc-
ettadeisecondidelcronografo.Premerea
lungoiltastofaràavanzarelalancettapiù
velocemente.
3.Spingeredentrolacoronanellaposizione
“A”.
PER IMPOSTARE L’ORA:
1.Tirarefuorilacoronanoalsecondoclick
nellaposizione“C”.
2.Girarelacoronaperimpostarel’ora
3.Spingeredentrolacoronanellaposizione
“A”.
NOTA:Anchelalancettadelle24oreviene
impostatadurantel’impostazionedell’ora.
PER IMPOSTARE LA DATA:
1.Tirarefuorilacoronanoalprimoclick
nellaposizione“B”.
2.Girarelacoronainsensoantiorarioper
impostareladata.
3.Spingeredentrolacoronanellaposizione“A”
NOTA:Noneseguirel’impostazionedelladata
frale9:00PMele1:00AM.
Altrimenti,ladatapotrebbenoncambiare
correttamente.Sedovesseesserenecessario
cambiareladatadurantequell’ora,primadi
tuttocambiarel’orasuun’oraqualsiasialdi
fuoridiquellagamma,poiimpostareladatae
impostarel’oracorretta.
PER USARE IL CRONOGRAFO (CRONOMET-
RO):
1.PremereiltastoS1periniziareilconteggio.
2.Perfermareilconteggio,premereunavolta
iltastoS1.PremeredinuovoiltastoS1per
riprenderedaldoveerastatointerrotto.
3.Perresettareazero,premereiltastoS1per
interrompereilconteggioepoipremere
iltastoS2.
1.LancettaOra
2.LancettaMinuti
3.LancettaSecondi
4.Lancetta24Ore
5.LancettaMinutiCronografo
6.LancettaSecondiCronografo
7.Calendario
S1–Tastostart/stopcronografo
S2–Tastosplit/splitrelease/reset
cronografo
COME REGOLARE LA POSIZIONE DELLE
LANCETTE DEL CRONOGRAFO:
Primadiimpostarel’ora,controllareche
laLancettadeiSecondidelCronografoela
LancettadeiMinutidelCronografosianonella
posizioneore12.
Seilcronografoèinfunzione,premereiltasto
nell’ordineseguenteperresettarlo,epoi
controllarechelelancettedelcronografosiano
tornatenellaposizioneore12.
SeilCronografoèinfunzione:S1 S2
SeilCronografoèfermo:S2
Sevienemostratoiltempo
intermedio:
S2 S1 S2
Seunaopiùlancettedelcronografononsono
nellaposizioneore12peralcuneragioni(per
es.inseguitoallasostituzionedellabatteria),
dovrannoessereregolate.
1. Tirarelacoronaalsecondoclicnella
posizioneC.
2. PremereiltastoS1oS2perimpostare
laLancettaSecondidelCronografoe
laLancettaMinutidelCronografo
(unitemeccanicamente).Premendo
itastiS1oS2,lelancettesimuover
annorispettivamenteinsensoantio
rariooorario.
3. SpingerelacoronanellaposizioneA.
COME IMPOSTARE L’ORA:
1. Tirarelacoronaalsecondoclicnella
posizioneC.
2. Girarelacoronaperimpostarel’ora.
3. SpingerelacoronanellaposizioneA.
NOTA:AnchelaLancetta24Oreverràim-
postatadurantel’impostazionedell’ora.
COME IMPOSTARE LA DATA:
1. Tirarelacoronaalprimoclicnella
posizioneB.
2. Girarelacoronainsensoorarioper
impostareilgiorno.
3. SpingerelacoronanellaposizioneA.
NOTA:Nonimpostareladatatrale9:00P.M.
e1:00A.M.altrimentiladatapotrebbenon
cambiarecorrettamenteilgiornoseguente.Se
ènecessarioimpostareladatainquellassodi
tempo,primacambiarel’ora,poiimpostarela
dataeinneripristinarel’oracorretta.
COME USARE IL CRONOGRAFO (STOPWATCH):
Permisurareiltempotrascorso:
1. PremereiltastoS1periniziareil
conteggio.
2. Perinterrompereilconteggio,premere
unavoltailtastoS1.PremeredinuovoS1
perriprenderedadoveerastatointerrotto.
3. Perresettareazero,premereiltasto
S1perinterrompereilconteggioepoi
premereiltastoS2.
Permisurareiltempointermedio:
1. PremereiltastoS1periniziareil
conteggio.
2. Mentreilcronografoèinfunzi-
one,premereunavoltailtastoS2
perregistrareungiro.Intantoilcro
nografocontinuaacontare.
Pervedereiltempoeffettivamente
accumulato,premeredinuovoiltasto
S2.Lalancettadelcronografoavan
zeràvelocementeperiltempochesi
stamisurando.
3. Ripeterel’ultimopassonoachesono
registratituttiigiri.
4. Perresettareazero,premereiltasto
S1perinterrompereilconteggioepoi
premereiltastoS2.
NOTA:Ilcronografoèingradodimisurareno
a60minuti.
mente).Tenendopremutoiltastosivelocizza
ilprocesso.
3.SpingerelacoronanellaposizioneA.
COME IMPOSTARE L’ORA:
1.Tirarelacoronaalprimoclicnellaposizione
B.
2.Girarelacoronaperimpostarel’ora.
3.SpingerelacoronanellaposizioneA.
NOTA:AnchelaLancetta24Oreverràim-
postatadurantel’impostazionedell’ora.
COME USARE IL CRONOGRAFO (STOPWATCH):
Comemisurareiltempotrascorso:
1.PremereiltastoS1periniziareilconteggio.
2.Perinterromperlo,premereunavoltail
tastoS1.PremeredinuovoiltastoS1per
riprenderedadoveerastatointerrotto.
3.Perazzerare,premereiltastoS1perinter-
rompereilconteggioquindipremereiltasto
S2.
NOTA:Ilcronografoèingradodimisuraree
mostrareiltempoin1unitàdisecondono
adunmassimodi29minutie59secondi.Il
cronometrosifermeràautomaticamentedopo
avercontatoininterrottamenteper30minuti.
COME USARE LA RETROILLUMINAZIONE
Alcunimodellidiorologiosonodotatidiuna
retroilluminazioneelettroluminescente(EL).
Peraccenderelaretroilluminazione,premereil
tastodellaretroilluminazione.
Senonesisteuntastodellaretroilluminazione
separato,premerelacoronaperattivarela
retroilluminazione.
CORONA A VITE:
Alcunimodellidiorologiosonodotatidi
unacoronaavite.Assicurarsidisvitarela
coronaprimaditirarlainfuoripereffettuarele
impostazioni,poiriavvitarebenelacoronaper
evitarequalsiasiingressodiacqua.
COME USARE LA BUSSOLA
E
S
N
W
Lapuntarossadellabussolarappresentala
direzionedelNordmagnetico(N).
Facendoriferimentoallapuntarossa,potete
individuareledirezionidiEst,SudedOvest.
A B C
DICHIARAZIONEDINONRESPONSABILITÀ-
Nonsidevefareafdamentosullabussolaper
stabilireconassolutaesattezzalaposizione,
prossimità,distanzaodirezione.Inoltre,
alcunezonehannointerferenzemagnetiche
superioriadaltre.Questainterferenzapuò
risultareinun’ulterioredistorsionedella
letturadellabussola.Questabussolaèproget-
tataperindicareilnordmagnetico,nonil
nordreale.Teneresempreinconsiderazione
illivellodideclinazionebasatosullavostra
posizioneterrestre.
JS50
A B
1.LancettaOra
2.LancettaMinuti
3.LancettaSecondi
4.Lancetta24Ore
5.LancettaSecondiCronografo
6.LancettaMinutiCronografo
S1–Tastostart/stopcronografo
S2–Tastoresetcronografo
COME REGOLARE LA POSIZIONE DELLE
LANCETTE DEL CRONOGRAFO:
Primadiimpostarel’ora,controllarechela
LancettadeiSecondidelCronografoelaLanc-
ettadeiMinutidelCronografosianosullozero.
Seilcronografoèinfunzione,premereiltasto
nell’ordineseguenteperresettarlo,epoi
controllarechelelancettedelcronografosiano
tornatesullozero.
Seilcronografoèinfunzione:S1
S2
Seilcronografoèfermo:S2
Seunaopiùlancettedelcronografononsono
sullozeroperalcuneragioni(peres.inseguito
allasostituzionedellabatteria),dovranno
essereregolate.
1.Tirarelacoronaalprimoclicnellaposizione
B.
2.PremereiltastoS1perimpostarelaLan-
cettaSecondidelCronografoelaLancetta
MinutidelCronografo(unitemeccanica-
2013Freestyle_QA_AG9613-R00
2013 Freestyle-QA-AG9613-INST-R00.indd 11 1/7/13 2:47:15 PM

®
PORTUGUÊS
INSTRUÇÕES
RELÓGIO DE QUARTZO
ANALÓGICO
MODELOS DE DUAS OU TRÊS CORDAS
1.Segundacorda
1
PARA ACERTAR A HORA:
1.PuxeacordaparaforaparaaposiçãoBdo
primeiroclique.
2.Rodeacordaparaacrtarahora.
3.PonhaacordadevoltanaposiçãoA.
MODELOS DE DATA DE DUAS OU TRÊS
CORDAS
1.Indicadordedata
PARA ACERTAR A HORA:
1.PuxeacordaparaforaparaaposiçãoCdo
segundoclique.
2.Rodeacordaparaacrtarahora.
3.PonhaacordadevoltanaposiçãoA.
PARA ACERTAR A DATA:
1.PuxeacordaparaforaparaaposiçãoBdo
primeiroclique.
2.Rodeacordaparaaesquerdaparaacertar
adata.
3.PonhaacordadevoltanaposiçãoA.
NOTA:Nãoacerteadataentreas9.00ea1.00
damanhã.Casocontrárioadatapodenãose
alterardemodoadequadonodiaseguinte.
Sefornecessárioacertaradataduranteesse
período,mudeprimeiroahoraparauma
qualquerforadesseintervalo,depoisacertea
dataeentãoinicializeparaahoracerta.
MODELOS DIA-DATA DE TRÊS CORDAS
1.Indicadordedia(dasemana)
2.Indicadordedata
PARA ACERTAR A HORA:
1.PuxeacordaparaforaparaaposiçãoCdo
segundoclique.
2.Rodeacordaparaacrtarahora.
3.PonhaacordadevoltanaposiçãoA.
PARA ACERTAR O DIA (DA SEMANA):
1.PuxeacordaparaforaparaaposiçãoBdo
primeiroclique.
2.Rodeacordaparaaesquerdaparaacertar
OdIa.
3.PonhaacordadevoltanaposiçãoA.
NOTA:Nãoacerteodiaentreas9.00ea1.00
damanhã.Casocontrário,odiapodenãose
alterardemodoadequadonodiaseguinte.
Sefornecessárioacertaradataduranteesse
período,mudeprimeiroahoraparauma
qualquerforadesseintervalo,depoisacerteo
diaeentãoinicializeparaahoracerta.
PARA ACERTAR A DATA:
1.PuxeacordaparaforaparaaposiçãoBdo
primeiroclique.
2.Rodeacordaparaaesquerdaparaacertar
adata.
3.PonhaacordadevoltanaposiçãoA.
NOTA:Nãoacerteodiaentreas9.00ea1.00
damanhã.Casocontrário,odiapodenãose
alterardemodoadequadonodiaseguinte.
Sefornecessárioacertaradataduranteesse
período,mudeprimeiroahoraparauma
qualquerforadesseintervalo,depoisacerteo
diaeentãoinicializeparaahoracerta.
MODELOS MULTIFUNÇÃO DE DOIS MOSTRA-
DORES
1.Segundacorda
2.Cordadodia
3.Cordadadata
PARA ACERTAR O DIA (DA SEMANA):
1.PuxeacordaparaforaparaaposiçãoCdo
segundoclique.
2.Rodeacordaparaaesquerdaparaacertar
OdIa.
3.PonhaacordadevoltanaposiçãoA.
NOTA:Nãoacerteodiaentreas9.00ea1.00
damanhã.Casocontrário,odiapodenãose
alterardemodoadequadonodiaseguinte.
Sefornecessárioacertaradataduranteesse
período,mudeprimeiroahoraparauma
qualquerforadesseintervalo,depoisacerteo
diaeentãoinicializeparaahoracerta.
PARA ACERTAR A HORA:
1.PuxeacordaparaforaparaaposiçãoCdo
segundoclique.
2.Rodeacordaparaacrtarahora.
3.PonhaacordadevoltanaposiçãoA.
PARA ACERTAR A DATA:
1.PuxeacordaparaforaparaaposiçãoBdo
primeiroclique.
2.Rodeacordaparaaesquerdaparaacertara
data.
3.PonhaacordadevoltanaposiçãoA.
NOTA:Nãoacerteodiaentreas9.00ea1.00
damanhã.Casocontrário,odiapodenãose
alterardemodoadequadonodiaseguinte.
Sefornecessárioacertaradataduranteesse
período,mudeprimeiroahoraparauma
qualquerforadesseintervalo,depoisacerteo
diaeentãoinicializeparaahoracerta.
1.Segundacorda
2.Cordadadata
3.Cordade24horas
PARA ACERTAR A HORA:
1.PuxeacordaparaforaparaaposiçãoCdo
segundoclique.
2.Rodeacordaparaacrtarahora.
3.PonhaacordadevoltanaposiçãoA.
NOTA:Acordade24horastambémserá
mudadaduranteoacertodashoras.
PARA ACERTAR A DATA:
1.PuxeacordaparaforaparaaposiçãoBdo
primeiroclique.
2.Rodeacordaparaaesquerdaparaacertara
data.
3.PonhaacordadevoltanaposiçãoA.
NOTA:Nãoacerteodiaentreas9.00ea1.00
damanhã.Casocontrário,odiapodenãose
alterardemodoadequadonodiaseguinte.
Sefornecessárioacertaradataduranteesse
período,mudeprimeiroahoraparauma
qualquerforadesseintervalo,depoisacerteo
diaeentãoinicializeparaahoracerta.ladatae
impostarel’oracorretta.
MODELOS MULTIFUNÇÃO DE TRÊS MOSTRA-
DORES
1.Cordadehoras2.Cordademinutos
3.Segundacorda4.Cordadadata
5.Cordadodia6.Cordade24horas
PARA ACERTAR O DIA (DA SEMANA):
1.PuxeacordaparaforaparaaposiçãoCdo
segundoclique.
2.Rodeacordaparaaesquerdaparaacertar
odia.
3.PonhaacordadevoltanaposiçãoA.
NOTA:Acordadodiamove-seem
conjuntocomadahoraedosminutos.
Continuearodaracordaatéchegaraodia
desejado.
PARA ACERTAR A HORA:
1.PuxeacordaparaforaparaaposiçãoCdo
segundoclique.
2.Rodeacordaparaacrtarahora.
3.PonhaacordadevoltanaposiçãoA.
NOTA:Acordade24horastambémserá
mudadaduranteoacertodashoras.
PARA ACERTAR A DATA:
1.PuxeacordaparaforaparaaposiçãoBdo
primeiroclique.
2.Rodeacordaparaaesquerdaoudireita
paraacertaradata.
3.PonhaacordadevoltanaposiçãoA.
NOTA:Adirecçãoderodagemdacordavaria
segundodiferentesmodelosderelógio.
NOTA:Nãoacerteodiaentreas9.00ea1.00
damanhã.Casocontrário,odiapodenãose
alterardemodoadequadonodiaseguinte.
Sefornecessárioacertaradataduranteesse
período,mudeprimeiroahoraparauma
qualquerforadesseintervalo,depoisacerteo
diaeentãoinicializeparaahoracerta.
MODELOS CON CRONÓMETRO Y TRES
ESFERAS
1.Cordadehoras
2.Cordademinutos
3.Segundacorda
4.Cordade24horas
5.Cordademinutosdocronómtero
6.Segundacordadocronómetro
7.Indicadordedata
S1-Botãodeinício/paragemdocronómetro
S2–Botãodereinicializaçãodocronómetro
AJUSTAMENTO DA POSIÇÃO DOS PONTEIROS
DO CRONÓGRAFO:
Antesdeacertarashoras,veriqueseoPon-
teirodosSegundosdoCronógrafoeoPonteiro
dosMinutosdoCronógrafoseencontramna
posiçãodas12horas.
Seocronógrafoestiveraserusado,primao
botãonaordemseguinteparaoreiniciare
depoisveriqueseosponteirosdocronógrafo
regressaramàposiçãodas12horas.
Seocronómetroestiveracontar:S1 S2
Seocronómetroestiverparado:S2
Precisarádeserajustadonocasodevários
ponteirosdecronógrafonãoestaremna
posiçãozerodevidoaváriasrazões(porex.
apósmudançadepilha).
A B CA B C
A B C
A B C
A B C
A B C
A B C
A B A B
2013 Freestyle-QA-AG9613-INST-R00.indd 12 1/7/13 2:47:16 PM

®
Parareduziraemissãodecarbono,
estasinstruçõesFreestyleforam
impressascomtintadesojaempapel
reciclado.
PORTUGUÊS
1.PuxeacordaparaforaparaaposiçãoCdo
segundoclique.
2.CarreguenobotãoS1paraacertaro
SegundoPonteirodoCronómetro.Mantero
botãocarregadoaceleraoavançorápido.
3.PonhaacordadevoltanaposiçãoA.
PARA ACERTAR A HORA:
1.PuxeacordaparaforaparaaposiçãoCdo
segundoclique.
2.Rodeacordaparaacrtarahora.
3.PonhaacordadevoltanaposiçãoA.
NOTA:Acordade24horastambémserá
mudadaduranteoacertodashoras.
PARA ACERTAR A DATA:
1.PuxeacordaparaforaparaaposiçãoBdo
primeiroclique.
2.Rodeacordaparaaesquerdaparaacertar
adata.
3.PonhaacordadevoltanaposiçãoA.
NOTA:Nãoacerteodiaentreas9.00ea1.00
damanhã.Casocontrário,odiapodenãose
alterardemodoadequadonodiaseguinte.
Sefornecessárioacertaradataduranteesse
período,mudeprimeiroahoraparauma
qualquerforadesseintervalo,depoisacerteo
diaeentãoinicializeparaahoracerta.
USAR O CRONÓGRAFO:
1.CarreguenobotãoS1parainiciaraconta-
gem.
2.Parapararacontagem,carreguenobotão
S1umavez.
CarreguenobotãoS1denovoparacon-
tinuarondeparou.
3.Parareporazero,carreguenobotãoS1
parapararacontagemedepoisprimaS2.
1.PonteirodasHoras
2.PonteirodosMinutos
3.PonteirodosSegundos
4.Ponteiro24Horas
5.PonteirodosMinutosdoCronógrafo
6.PonteirodosSegundosdoCronógrafo
7.Calendário
S1– Botãoiniciar/parardoCronógrafo
S2– Botãodividir/lançardividir/reiniciar
doCronógrafo
AJUSTAMENTO DA POSIÇÃO DOS PONTEIROS
DO CRONÓGRAFO:
Antesdeacertarashoras,veriqueseoPon-
teirodosSegundosdoCronógrafoeoPonteiro
dosMinutosdoCronógrafoseencontramna
posiçãodas12horas.
Seocronógrafoestiveraserusado,primao
botãonaordemseguinteparaoreiniciare
depoisveriqueseosponteirosdocronógrafo
regressaramàposiçãodas12horas.
SeoCronógrafoestiverem
contagem: S1 S2
SeoCronógrafoestiverparado: S2
Seforvisualizadootempodividido: S2 S1 S2
Casoumouváriosponteirosdocronógrafo
nãoseencontremnaposiçãodas12horas
pordeterminadasrazões(porexemplo,após
amudançadepilha),estesnecessitamdeser
ajustados.
1.Puxeacoroaparaosegundocliqueda
posiçãoC.
2.PrimaobotãoS1ouS2parareporo
PonteirodosSegundosdoCronógrafo
eoPonteirodosMinutosdoCronógrafo
(acopladosmecanicamente).Aopremiro
botãoS1ouS2,osponteirosmover-se-ão
nosentidoanti-horárioounosentidodos
pon-teirosdorelógiorespectivamente.
3.EmpurreacoroaparaaposiçãoA.
ACERTAR A HORA:
1. Puxeacoroaparaosegundocliqueda
posiçãoC.
2. Rodeacoroaparaacertarashoras.
3. EmpurreacoroaparaaposiçãoA.
NOTA:OPonteirodas24Horastambémserá
ajustadoduranteoacertodashoras.
ACERTAR A DATA:
1. Puxeacoroaparaoprimeirocliqueda
posiçãoB.
2. Rodeacoroanosentidodoponteiro
dosrelógiosparaacertaradata.
3. EmpurreacoroaparaaposiçãoA.
NOTA:Nãoacerteadataentreas9:00P.M.e
1:00A.M.,poisadatapoderánãomudarcor-
rectamentenodiaseguinte.Sefornecessário
acertaradataduranteaqueleperíodode
tempo,primeiroaltereahoraparaqualquer
horaforadaqueleperíodo,depoisacerteadata
eentãoacerteahoracorrecta.
UTILIZAR O CRONÓGRAFO:
Paramedirotempodecorrido,
1. PrimaobotãoS1parainiciaraconta
gem.
2. Parapararacontagem,primaobotão
S1umavez.PrimaobotãoS1denovo
pararetomarapartirdeondeparou.
3. Parareporazero,primaobotãoS1
parapararacontagemedepoisprima
obotãoS2.
Paraamediçãodotempodividido,
1. PrimaobotãoS1parainiciaraconta-
gem.
2. Enquantoocronógrafoestiverem
funcionamento,primaobotãoS2uma
vezpararegistarumavolta.O
cronógrafocontinuaemfunciona
mentoemsegundoplano.
Paravisualizarotempoacumulado
actual,primadenovoobotãoS2.
Osponteirosdocronógrafoavançarão
rapidamenteparaotempomedido
actual.
3. Repitaoúltimopassoatéquetodasas
voltastenhamsidoregistadas.
4. Parareporazero,primaobotãoS1
parapararacontagemedepoisprima
obotãoS2.
NOTA:Ocronógrafopodemediraté60
minutos.
JS50
A B
1.PonteirodasHoras
2.PonteirosdosMinutos
3.PonteirodosSegundos
4.Ponteiro24horas
5.PonteirodosSegundosdoCronógrafo
6.PonteirodosMinutosdoCronógrafo
S1–Botãoiniciar/parardoCronógrafo
S2–Botãoreiniciardocronógrafo
PARA ACERTAR A POSIÇÃO DOS PONTEIROS
DO CRONÓGRAFO:
Paraacertarashoras,veriqueseoPonteiro
dosSegundosdoCronógrafoeoPonteirodos
MinutosdoCronógrafo.
Seocronógrafoestiveremuso,primaobotão
pelaseguinteordemparareiniciar,edepois
veriqueseosponteirosdocronógraforegres-
saramàposiçãozero.
Seocronómetroestiveracontar:S1 S2
Seocronómetroestiverparado:S2
Casoumoumaisponteirosderelógionãose
encontremnaposiçãozerodevidoa
determnadasrazões(ex:apósamudançade
umabateria),issoprecisadeserajustado.
1. Puxeacoroaparaaposiçãodoprimeiro
cliqueB.
2. PrimaobotãoS1paraacertaroPonteiro
dosSegundosdoCronógrafoeoPonteiro
dosMinutosdoCronógrafo(acoplados
mecanicamente).Semantiverobotão
premidoaceleraráoavanço.
3. EmpurreacoroaparaaposiçãoA.
PARA ACERTAR AS HORAS:
1. Puxeacoroaparaaposiçãodoprimeiro
cliqueB.
2. Rodeacoroaparaacertarashoras.
3. EmpurreacoroaparaaposiçãoA.
Nota:OPonteiro24horastambémserá
ajustadoduranteoacertodashoras.
PARA USAR O CRONÓGRAFO (CRONÓMETRO:
Paracontarotempodecorrido.
1. PrimaobotãoS1parainiciaracontagem.
2. Pararetomaracontagem,primaobotão
S1.Primadenovoaobotão.Primaobotão
S1pararetomardeondeparou.
3. Parareporazero,primaobotãoS1para
interromperacontagemedepoisprimao
botãoS2.
Nota:Ocronógrafopodemedireapresentar
ashorasemunidadesdossegundosdeum
minutoatéummáximo.Ocronógrafoirá
automaticamenteparardepoisdefuncionar
continuamentedurante30segundos.
USAR A LUZ DE FUNDO
Algunsmodelosderelógiosestão
equipadoscomumaretroiluminação.Para
desligarluzdefundo,carreguenobotãode
retroiluminação.
Senãoexistirnenhumbotãode
retroiluminaçãoemseparado,carreguena
cordaparaacrivaraluzdefundo.
CORDA DESAPARAFUSÁVEL:
Algunsmodelosderelógioestãoequipados
comumacordadesaparafusável.Certique-se
quedesaparafusaacordapuxando-apara
foraparaacerto,depoisaparafuse-adevolta
levementeapósoacertoparaevitaraentrada
deágua.
UTILIZAR A BúSSOLA
E
S
N
W
Oindicadorvermelhodabússolarepresentaa
direcçãomagnéticaNorte(N).
Tendocomoreferênciaoindicadorvermelho,
podeentãolocalizaroEste,oSuleoOeste.
A B C
AVISOLEGAL-Abússolanãoéávelpara
determinaralocalizaçãoprecisa,proximidade,
distânciaoudirecção.Alémdisso,algumas
áreastêmmaiorinterferênciaelectromag-
néticadoqueoutras.Estainterferênciapode
resultarnumamaiordistorçãodaleiturada
bússola.Estabússolafoiconcebidaparaindi-
caronortemagnético,nãoonorteverdadeiro.
Porfavor,tomeemconsideraçãoonívelde
declinaçãonasuaposiçãoglobal.
2013Freestyle_QA_AG9613-R00
2013 Freestyle-QA-AG9613-INST-R00.indd 13 1/7/13 2:47:17 PM

®
日本語
クオーツアナログ時計説明書
2針モデル / 3針モデル
1.秒針
1
時刻の設定:
1. リューズを1段目のB位置まで引き出し
ます。
2. リューズを回して時刻を合わせます。
3. リューズをA位置に押し戻し、設定を終了
しま す。
2針日付表示モデル / 3針日付表示モデル
1.日付計
時刻の設定:
1. リューズを2段目のC位置まで引き出し
ます。
2. リューズを回して時刻を合わせます。
3. リューズをA位置に押し戻し、設定を終了
しま す。
日付の設定:
1. リューズを1段目のB位置まで引き出し
ます。
2. リューズを逆時計回りに回し、日付を合
わせます。
3. リューズをA位置に押し戻し、設定を終了
しま す。
注: 午後9時から午前1時の間に日付の設定
を行わないようにしてください。日付が正しく
変更されないことがあります。 この時間帯に日
付の設定を行う必要がある場合は、はじめに
時刻をこの時間帯外に合わせます。それから日
付を設定を行い、時刻を正しい時間に合わせ
て設定するようにしてくだ さい 。
3 針 曜 日・日 付 モ デ ル
1. 曜日計 2. 日付計
時刻の設定:
1. リューズを2段目のC位置まで引き出し
ます。
2. リューズを回して時刻を合わせます。
3. リューズをA位置に押し戻し、設定を終了
しま す。
曜日の設定:
1. リューズを1段目のB位置まで引き出し
ます。
2. リューズを時計回りに回し、日付を合わ
せます。
3. リューズをA位置に押し戻し、設定を終了
しま す。
注: 午後9時から午前1時の間に日付の設定
を行わないようにしてください。日付が正しく
変更されないことがあります。 この時間帯に日
付の設定を行う必要がある場合は、はじめに
時刻をこの時間帯外に合わせます。それから日
付を設定を行い、時刻を正しい時間に合わせ
て設 定 するようにしてください 。
日付の設定:
1. リューズを1段目のB位置まで引き出し
ます。
2. リューズを逆時計回りに回し、日付を合
わせます。
3. リューズをA位置に押し戻し、設定を終了
しま す。
注: 午後9時から午前1時の間に日付の設定
を行わないようにしてください。日付が正しく
変更されないことがあります。 この時間帯に日
付の設定を行う必要がある場合は、はじめに
時刻をこの時間帯外に合わせます。それから日
付を設定を行い、時刻を正しい時間に合わせ
て設 定 するようにしてください 。
多機能二つ目モデル
1. 秒針 2. 曜日針 3. 日付針
曜日の設定:
1. リューズを2段目のC位置まで引き出し
ます。
2. リューズを時計回りに回し、曜日を合わ
せます。
3. リューズをA位置に押し戻し、設定を終了
しま す。
注: 曜日針は、長針と短針に合わせて動きま
す。 曜日が 合うところまでリューズ を回して
ください。
時刻の設定:
1. リューズを2段目のC位置まで引き出し
ます。
2. リューズを回して時刻を合わせます。
3. リューズをA位置に押し戻し、設定を終了
しま す。
日付の設定:
1. リューズを1段目のB位置まで引き出し
ます。
2. リューズを逆時計回りに回し、日付を合わ
せます。
3. リューズをA位置に押し戻し、設定を終了
しま す。
注: 午後9時から午前1時の間に日付の設定
を行わないようにしてください。日付が正しく
変更されないことがあります。 この時間帯に日
付の設定を行う必要がある場合は、はじめに
時刻をこの時間帯外に合わせます。それから日
付を設定を行い、時刻を正しい時間に合わせ
て設 定 するようにしてください 。
1. 秒針 2. 日付針 3. 24時間針
時刻の設定:
1.リューズを2段目のC位置まで引き出します。
2.リューズを回して時刻を合わせます。
3.リューズをA位置に押し戻し、設定を終了
します。
注: 24時間針は時刻設定時にも設定されます。
日付の設定:
1. リューズを1段目のB位置まで引き出し
ます。
2. リューズを逆時計回りに回し、日付を合わ
せます。
3. リューズをA位置に押し戻し、設定を終了
しま す。
注: 午後9時から午前1時の間に日付の設定
を行わないようにしてください。日付が正しく
変更されないことがあります。 この時間帯に日
付の設定を行う必要がある場合は、はじめに
時刻をこの時間帯外に合わせます。それから日
付を設定を行い、時刻を正しい時間に合わせ
て設 定 するようにしてください 。
多機能三つ目モデル
1. 短針 2. 長針 3. 小秒針
4. 日付針 5. 曜日針 6. 24時間針
曜日の設定:
1. リューズを2段目のC位置まで引き出し
ます。
2. リューズを時計回りに回し、曜日を合わ
せます。
3. リューズをA位置に押し戻し、設定を終了
しま す。
注: 曜日針は、長針と短針に合わせて動きま
す。 曜日が 合うところまでリューズ を回して
ください。
時刻の設定:
1. リューズを2段目のC位置まで引き出し
ます。
2. リューズを回して時刻を合わせます。
3. リューズをA位置に押し戻し、設定を終了
しま す。
注: 24時間針は時刻設定時にも設定されます。
日付の設定:
1. リューズを1段目のB位置まで引き出し
ます。
2. リューズを時計回りまたは逆時計回りに回し
て、日付を合わせます。
3. リューズをA位置に押し戻し、設定を終了
しま す。
注: 日付設定のリューズの回転方向は時計のモ
デ ル に よって 異 なりま す 。
注: 午後9時から午前1時の間に日付の設定
を行わないようにしてください。日付が正しく
変更されないことがあります。 この時間帯に日
付の設定を行う必要がある場合は、はじめに
時刻をこの時間帯外に合わせます。それから日
付を設定を行い、時刻を正しい時間に合わせ
て設 定 するようにしてください 。
三 つ 目 クロノグラフ モ デ ル
1. 短針 2. 長針 3. 秒針 4. 24時間針
5. ストップウォッチ分針
6. ストップウォッチ秒針
7. 日付計
S1 – ストップウォッチ スタート/ストップボタン
S2 – ストップウォッチ リセットボタン
ストップウォッチの針位置を調節する:
時刻の設定を行う前に、ストップウォッチの秒
針と分針が12時の位置を指しているかを確認
してください。
ストップウォッチ使用中の場合は、以下の順に
ボタンを 押してリセットしてください 。そ の後、
ストップウォッチの針が12時の位置に戻ってい
るかを確認してください。
ストップウォッチがカウントしている場合: S1 S2
ストップウォッチがカウントしている場合: S2
ストップウォッチの針が、何らかの原因(電池
交換など)で、ゼロの位置に戻っていない場合
は調整が必要です。
1. リューズを2段目のC位置まで引き出し
ます。
2. S1ボタンを押してストップウォッチ秒針を
合わせます。 ボタンを長押しすると針が早
く進みます。
3. リューズをA位置に押し戻し、設定を終了
しま す。
A B A B
A B C A B C
A B C
A B C
A B C
A B C
A B C
2013 Freestyle-QA-AG9613-INST-R00.indd 14 1/7/13 2:47:18 PM

®
日本語
カーボンフットプリントの減少を目的と
してFreestyleの取扱説明書は大豆イ
ンキとリサイクル 紙 を 使 用 して い ま す
時刻の設定:
1. リューズを2段目のC位置まで引き出し
ます。
2. リューズを回して時刻を合わせます。
3. リューズをA位置に押し戻し、設定を終了
しま す。
注: 24時間針は時刻設定時にも設定されます。
日付の設定:
1. リューズを1段目のB位置まで引き出し
ます。
2. リューズを逆時計回りに回し、日付を合
わせます。
3. リューズをA位置に押し戻し、設定を終了
しま す。
注: 午後9時から午前1時の間に日付の設定
を行わないようにしてください。日付が正しく
変更されないことがあります。 この時間帯に日
付の設定を行う必要がある場合は、はじめに
時刻をこの時間帯外に合わせます。それから日
付を設定を行い、時刻を正しい時間に合わせ
て設 定 するようにしてください 。
ストップウォッチの使用:
1. S1ボタンを押して測定を開始します。
2. 測定をストップするにはS1ボタンを1回押し
ます。 もう一度S1ボタンを押すと、ストップ
した時点から再び測定が始まります。
3. ゼロにリセットするには、S1ボタンを押
して測定をストップしてからS2ボタンを
押しま す。
1. 時間針 2. 分針 3. 秒針 4. 24時間針
5. ストップウォッチ分針
6. ストップウォッチ秒針
7. カレンダ ー
S1 – ストップウォッチスタート/ストップ
ボタン
S2 – ストップウォッチスプリット/スプリット
解 除/リセットボタン
ストップウォッチの針位置を調節する:
時刻の設定を行う前に、ストップウォッチの秒
針と分針が12時の位置を指しているかを確認
してください。
ストップウォッチ使用中の場合は、以下の順に
ボタンを 押してリセットしてください 。そ の後、
ストップウォッチの針が12時の位置に戻ってい
るかを確認してください。
ストップウォッチがカウント中の場合 S1
S2
ストップウォッチがストップしている場合 S2
スプリットタイムが表示されている場合 S2 S1 S2
ストップウォッチの針が、何らかの原因(電池
交換など)で、12時の位置に戻っていない場合
は調整が必要です
1. リュウズを2段目のC位置まで引き出します。
2. S1ボタンあるいはS2ボタンを押してストッ
プウォッチ秒針と分針を合わせます(2つの
針は対になって動きます。)
S1ボタンあるいはS2ボタンを押すと、針は
反時計回りあるいは時計回りに動きます。
3. リュウズをA位置に押し戻し、設定を終了し
ます。
時刻を合わせる:
1. リュウズを2段目のC位置まで引き出します。
2. リュウズを回して時刻を合わせます。
3. リュウズをA位置に押し戻し、設定を終了し
ます。
注: 24時間針は時刻設定時にも設定さ
れます。
日付を合わせる:
1. リュウズを1段目のB位置まで引き出します。
2. リュウズを時計回りに回し、日付を合わせま
す。
3. リュウズをA位置に押し戻し、設定を終了し
ます。
注: 午後9時から午前1時の間に日付の設
定を行わないようにしてください。日付が正し
く変更されないことがあります。この時間帯に
日付の設定を行う必要がある場合は、はじめに
時刻をこの時間帯外に合わせます。それから日
付を設定し、時刻を正しい時間に合わせて設
定 するようにしてくだ さい 。
ストップウォッチの使用:
タイムの測定
1. S1ボタンを押すとカウントが始まります。
2. カウントをストップするにはS1ボタンを1回
押します。もう一度S1ボタンを押すと、ストッ
プした時点から再び測定が始まります。
3 . ゼロ にリセットする には 、S 1 ボタンを 押して
測 定を ストップして からS 2 ボタンを 押しま
す。
スプリットタイム の 測 定 は 以 下 の ように 行
い ます。
1. S1ボタンを押すとカウントが始まります。
2. ストップウォッチがカウントしている間にS2
ボタンを 1回 押してラップを 登録しま す。そ
の間もストップウォッチは同時にカウントを
継続しています。
その時点での合計タイムを表示する場合
は、S2ボタンをもう一度押します。ストップウ
ォッチの針が、測定(中)の合計タイムのとこ
ろまで すーっと進 み ます。
3. 全てのラップの登録が終わるまで、先ほどの
ステップ を繰り返してくだ さい 。
4 . ゼロ にリセットする には 、S 1 ボタンを 押して
測 定を ストップして からS 2 ボタンを 押しま
す。
注: ストップウォッチでは60分まで計測が
可能です。
JS50
A B
1. 短針 2. 長針 3. 秒針 4. 24時間針
5. クロノグラフ秒針 6. クロノグラフ分針
S1 – クロノグラフスタート/ストップボタン
S 2 – クロノグラフリセットボタン
クロノグラフの針位置を調節する:
時刻の設定を行う前に、クロノグラフの秒針
と分針がゼロの位置を指しているかを確認し
てください。
クロノグラフ使用中の場合は、以下の順にボタ
ンを 押してリセットしてくだ さい 。そ れ から、スト
ップウォッチの針がゼロの位置に戻っているか
を確認してください。
ストップウォッチがカウントしている場合: S1 S2
ストップウォッチがカウントしている場合: S2
クロノグラフの針が何らかの原因(電池交換
など)でゼロの位置に戻っていない場合は調
整が必要です。
1. リュウズを1段目のB位置まで引き出します。
2. S1ボタンを押してクロノグラフ秒針と分針(
これらは対になっています)を合わせます。
ボタンを長押しすると針が早く進みます。
3. リュウズをA位置に押し戻します。がある場
合は、はじめに時刻をこの時間帯外に合わ
せます。それから日付を設定を行い、時刻
を正しい時間に合わせて設定するようにし
てください。
時刻の設定:
1.リュウズを1段目のB位置まで引き出します。
2.リュウズを回して時刻を設定します。
3.リュウズをA位置に押し戻します。
注: 24時間針は時刻設定時にも設定さます。
クロノグラフ を 使 う:
経過タイムの測定
1. S1ボタンを押して測定を開始します。
2. 測定をストップするにはS1ボタンを1回押し
ます。もう一度S1ボタンを押すと、停止した
A B C
時点から再び測定が始まります。
3. ゼロにリセットするには、S1ボタンを押
して測定をストップしてからS2ボタンを
押しま す。
注: ストップウォッチでは、1秒刻みで最高
29分59秒まで測定・表示することができます。
ストップウォッチは30分を過ぎると自動的に
止 まりま す 。
バ ックラ イト の 点 灯
モデルによってはELバックライトを内蔵してい
ます。バックライトを点灯する場合はバックラ
イトボタンを 押してくだ さい。
バックライトボタンがない場合は、リュウズを
押 スト バ ック ラ イトを 点 灯 す る こと が で き ま す 。
スクリュ ー ダ ウン 式 リュウ ズ :
モデル によってはスクリューダウン式 のリュウ
ズがついています。必ずリュウズのネジを緩め
てからリュウズを引き出して設定を行うように
してください。設定が終了したら水分の浸入を
防ぐためにリュウズのネジを元の位置にしっか
りと閉めてください。
コンパスの使い方
E
S
N
W
赤のポインターは磁北を指しています。
赤のポインターから、東、南、西の方向が分
かります。
免責事項 – このコンパスに依存して、正確な位
置、近さ、距離、方角を決定してはいけません。
また、場所によっては、磁気の干渉が他の場所
より強い場合もあります。このような干渉によ
って、コンパスの示す方位がずれることがあり
ます。 このコンパスは真北ではなく磁北を指し
示す設計です。使用する場所の地球位置に基
づいて偏角を考慮してください。
2013Freestyle_QA_AG9613-R00
2013 Freestyle-QA-AG9613-INST-R00.indd 15 1/7/13 2:47:18 PM
-
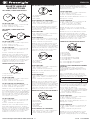 1
1
-
 2
2
-
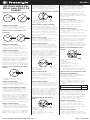 3
3
-
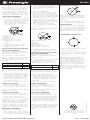 4
4
-
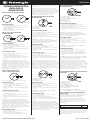 5
5
-
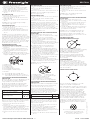 6
6
-
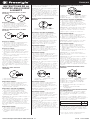 7
7
-
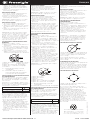 8
8
-
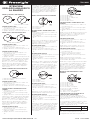 9
9
-
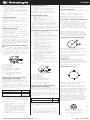 10
10
-
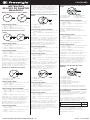 11
11
-
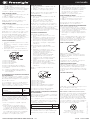 12
12
-
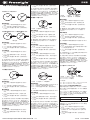 13
13
-
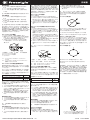 14
14


Freestyle Avalon Le manuel du propriétaire
- Taper
- Le manuel du propriétaire
- Ce manuel convient également à
dans d''autres langues
- italiano: Freestyle Avalon Manuale del proprietario
- español: Freestyle Avalon El manual del propietario
- Deutsch: Freestyle Avalon Bedienungsanleitung
- português: Freestyle Avalon Manual do proprietário
- 日本語: Freestyle Avalon 取扱説明書
Documents connexes
-
Freestyle fs84871 Le manuel du propriétaire
-
-
-
-
-
-
Autres documents
-
Festina IFMFS00-01 Manuel utilisateur
-
Festina F16826 Le manuel du propriétaire
-
Citizen 6S11 Manuel utilisateur
-
timberland VX3J Manuel utilisateur
-
-
 Executive Double Breasted Le manuel du propriétaire
-
-
Bulova EI700ATNB Manuel utilisateur
-
-
Braun AW75 Manuel utilisateur
