
JAM TUNER Tuner Metronome Rhythm
RU10
OWNER’S MANUAL
Caution
● To avoid short circuit, electric shock or malfunction:
Do not disassemble for repair.
Do not place in high temperature and humid space such as
electric heater, direct sunlight, bathroom, wet floor etc.
Do not place in excessive vibration.
Do not place in dusty or dirty space.
Do not operate the tuner with wet hands.
● To avoid breakdown
Do not handle all controls with excessive power.
Do not drop the tuner.
● Cleaning
Do not use thinner or alcohol for cleaning.
Use only dry and clean cloth.
● To prevent battery loss
Remove the battery when the tuner is not in use for a long
time.
Turn the power button off when the tuner is not in use.
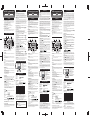
Functions and Features
1 POWER
Slide the POWER switch to turn ON/OFF.
2 VOLUME
Controls the volume of Tuner, Metronome, Rhythm Play and
AUX Input.
3 GAIN
Use this to adjust the amount of distortion. By turning clock-
wise all the way till it clicks, you will be able to turn off the
built-in distortion effect.
4 LEVEL
Use this knob to adjust the level of guitar sound indepen-
dently from the level of METRONOME or RHYTHM PATTERN.
5 MODE
Pressing the MODE button will switch the mode between
TUNER, METRONOME and RHYTHM PLAY. In TUNER
mode, you will get the function of a CHROMATIC TUNER.
6 FUNCTION
● In TUNER mode
Pressing the FUNCTION button will switch between PITCH
and FLAT.
● In METRONOME mode
Pressing the FUNCTION button will switch between BEAT,
TEMPO, TAP, and RHYTHM.
● In RHYTHM PLAY mode
Pressing the FUNCTION button will switch between TEMPO
and RHYTHM PATTERN.
7 SOUND/MUTE
● In TUNER mode
When you press the SOUND button, the LCD will indicate
"NOTE" and the speaker will output a note of the pitch you
select. You can change the pitch by the
button.
If you press the FUNCTION button to select FLAT, the
speaker will output the flatted pitch in the range of
~ for the current note.
The SPEAKER icon is shown in the LCD while the RU10 is
producing sound.
● In METRONOME mode
This button functions as a MUTE button.
The SPEAKER icon is shown in the LCD while the RU10 is
producing sound.
● In RHYTHM PLAY mode
This button switches ON/OFF the output (rhythm pattern)
from the built-in speaker. The SPEAKER icon is shown in
the LCD while the RU10 is producing sound.
8 ADJUST
Use the ADJUST buttons to adjust the values of the mode
you selected.
● In TUNER mode
PITCH : 435Hz ~ 445Hz
FLAT :
~
● In METRONOME mode
BEAT :0 ~ 7 beats
TEMPO :
= 40 ~ 208 beats per minute
TAP : The tempo at which you press the
button will be displayed
RHYTHM PATTERN :
● In RHYTHM PLAY mode
TEMPO : Quarter note = 40 ~ 208 beats per
minute
RHYTHM PATTERN : 20 preset RHYTHM PATTERNS. (De-
scribed in the appendix)
9
Tuning guide LEDs
The green LED in the center will light when your instrument
matches the displayed note. The red LED at the left will light
if your instrument is flat, and the red LED at the right will
light if your instrument is sharp.
Operation
[TUNER]
Slide the POWER ON/OFF switch to turn the power on.
Press the TUNER button to enter TUNER mode.
In this mode, the RU10 functions as a chromatic tuner.
Connect the output of your instrument to the input jack. You
can choose PITCH or FLAT by the FUNCTION button and use
buttons to change the settings. When you turn on the
power, the RU10 is automatically set to PITCH=440 Hz. By using
the built-in microphone, you can also tune an acoustic guitar or
similar instrument.
If the pitch of your instrument is more than 50 cents away from
the correct pitch, tune your instrument until the correct note name
appears in the LCD and one of the guideline LEDs is lit. If the
pitch is within 50 cents of the correct pitch, watch the meter and
tune your instrument so that the needle stops at the "0" position.
When the needle stops at "0" and the center LED is lit, your
instrument is tuned correctly.
● Tuning by sound
When you press the SOUND button, the NOTE will indicate "A"
and the note "A" will sound.
As necessary, use the FUNCTION button and the but-
tons to change the NOTE and/or FLAT settings to the desired
note, and tune your instrument.
[METRONOME]
Slide the POWER ON/OFF button to turn the power on.
Press the MODE button to enter METRONOME mode.
In this mode the RU10 functions as a metronome.
You can use the FUNCTION button and
buttons to change
the BEAT, TEMPO, TAP, and RHYTHM settings.
● BEAT setting
Use the FUNCTION button to select BEAT, and use
to
select a beat (time signature) in the range of 0 ~7 beats.
● TEMPO setting
Use the FUNCTION button to select TEMPO, and use to
adjust the tempo in the range of 40 ~ 208.
● TAP setting
Use the FUNCTION button to select TAP. Then press the
button several times to get the desired tempo. The RU10 will
detect the tempo and display it.
If the detected tempo is less than 40, the display will indicate
"LO".
If it is 209 or higher, the display will indicate "HI".
● RHYTHM setting
Use the FUNCTION button to select RHYTHM, and use but-
ton to select the desired rhythm.
[RHYTHM PLAY]
Slide the POWER ON/OFF button to turn the power on.
Press the MODE button to enter RHYTHM PLAY mode.
In this mode you can play your guitar along with the preset
RHYTHM PATTERNS.
● TEMPO setting
Use the FUNCTION button to select TEMPO, and use to
adjust the tempo in the range of 40 ~ 208.
● RHYTHM PATTERN setting
There are 20 different preset RHYTHM PATTERNS. Use
to select the desired RHYTHM PATTERN.
Input the signal from your guitar into RU10 INPUT, play along
with RHYTHM PATTERN, and you can enjoy a more powerful
guitar sound by using the DISTORTION EFFECT.
SPEAKER
Guitar sound out of RU10 is as much as the micro speaker can produce.
Depending on the output level of your guitar's pickup, you may
hear distorted sound even when the gain switch is off.
Installing or replacing the battery
Specifications
● TUNER
Tuning range A0 (27.50 Hz)~C8 (4,186 Hz)
Notes A, A#, B, C, C#, D, D#, E, F, F#, G, G#
Flat tuning
, , ,
Accuracy +/-1 cent
Calibration 435~445 Hz
Display LCD, LED
● METRONOME
Tempo range 40~208 beats per minute
Beat range 0~7 beats
Rhythm
● RHYTHM PLAY
Tempo range 40~208 beats per minute
Rhythm pattern
● Input INPUT, MICROPHONE, AUX IN
● Output SPEAKER, PHONE
●
Power supply 9V 006P x 1
AC ADAPTER Ibanez AC109
* If used with AC power supply, be sure to use Ibanez AC
Adapter AC109. Usage of different AC Adapter may cause
malfunction or could be the reason for a breakdown.
● Dimensions 115(W) x 74(D) x 29.2(H) mm
● Weight 158 g (including batteries)
* Design and specifications are subject to change without
notice for improvement of the product.
JAM TUNER-Stimmgerät, Metronom, Rhythmusmaschine
RU10
BEDIENUNGSANLEITUNG
Achtung
● Kurzschlüsse, elektrische Schläge und Fehlfunktionen
vermeiden:
Öffnen Sie niemals das Gerät.
Lagern Sie das Gerät nicht an extrem heißen oder feuchten
Orten, wie beispielsweise auf einer Heizung, im direkten
Sonnenlicht, im Bad oder auf einem feuchten Fußboden.
Setzen Sie das Gerät keinen starken Erschütterungen aus.
Lagern Sie das Gerät nicht an staubigen oder verschmutz-
ten Orten.
Bedienen Sie das Gerät nicht mit nassen Händen.
● Schäden vermeiden
Bedienen Sie die Steuerelemente nicht mit übermäßiger
Kraft.
Achten Sie darauf, das Stimmgerät nicht fallen zu lassen.
● Reinigung
Verwenden Sie kein Lösemittel oder Alkohol zur Reinigung,
sondern nur ein trockenes, sauberes Tuch.
● Batterieverbrauch minimieren
Nehmen Sie die Batterie aus dem Stimmgerät heraus, sollte
es längere Zeit nicht benutzt werden.
Schalten Sie das Stimmgerät immer aus, wenn es nicht be-
nutzt wird.
Funktionen und Leistungsmerkmale
1 POWER
Bewegen Sie den POWER-Schalter, um das Gerät ein- und
auszuschalten (ON/OFF).
2 VOLUME
Steuert die Lautstärke von Tuner, Metronom, Rhythmus-
wiedergabe und AUX-Eingang.
3 GAIN
Stellen Sie hier die Stärke der Verzerrung ein. Durch Drehen
im Uhrzeigersinn bis zum Einrasten schalten Sie den einge-
bauten Verzerrer-Effekt (Distortion) aus.
4 LEVEL
Verwenden Sie diesen Regler, um den Pegel des Gitarren-
sounds unabhängig vom Pegel METRONOME oder RHYTHM
PATTERN einzustellen.
5 MODE
Durch Drücken der MODE-Taste schalten Sie den Modus (die
Betriebsart) zwischen TUNER (Stimmgerät), METRONOME
(Metronom) und RHYTHM PLAY (Rhythmuswiedergabe) um.
Im TUNER-Modus erhalten Sie die Funktion eines chromati-
schen Stimmgeräts.
6 FUNKTION
● Im TUNER-Modus
Durch Drücken der FUNCTION-Taste schalten Sie um zwischen
PITCH und FLAT.
● Im METRONOME-Modus
Durch Drücken der FUNCTION-Taste schalten Sie um zwischen
BEAT, TEMPO, TAP und RHYTHM.
● Im RHYTHM-PLAY-Modus
Durch Drücken der FUNCTION-Taste schalten Sie um zwischen
TEMPO und RHYTHM PATTERN.
7 SOUND/MUTE
● Im TUNER-Modus
Wenn Sie die SOUND-Taste drücken, zeigt die LCD-Anzeige
"NOTE" an, und aus dem Lautsprecher erklingt eine Note in
der ausgewählten Tonhöhe. Sie können die Tonhöhe mit den
Tasten
ändern.
Wenn Sie die FUNCTION-Taste drücken, um FLAT zu wählen,
gibt der Lautsprecher die verminderte Tonhöhe ("Flat")
bis
für die aktuelle Note aus.
Das SPEAKER-Symbol erscheint im LCD, während das RU10
den Ton ausgibt.
● Im METRONOME-Modus
Diese Taste funktioniert als MUTE-Taste.
Das SPEAKER-Symbol erscheint im LCD, während das RU10
den Ton ausgibt.
● Im RHYTHM-PLAY-Modus
Diese Taste schaltet die Ausgabe (Rhythmus) vom eingebau-
ten Lautsprecher ein und aus. Das SPEAKER-Symbol er-
scheint im LCD, während das RU10 den Ton ausgibt.
8 ADJUST
Verwenden Sie die ADJUST-Tasten (Einstelltasten) zum
Einstellen der Werte des aktuellen Modus.
● Im TUNER-Modus
PITCH : 435 Hz bis 445 Hz
FLAT : bis
● Im METRONOME-Modus
BEAT :0 - 7 Schläge
TEMPO :
= 40 ~ 208 Schläge pro Minute
TAP : Es wird das Tempo angezeigt, in
dem Sie die Taste drücken
RHYTHM :
● Im RHYTHM-PLAY-Modus
TEMPO : Viertelnote = 40 - 208 Schläge pro
Minute
RHYTHM PATTERN : 20 vorgegebene RHYTHM PATTERNS.
(Beschrieben im Anhang)
9 Stimm-LEDs
Die grüne LED in der Mitte leuchtet auf, wenn Ihr Instrument auf
die angezeigte Note gestimmt ist. Die rote LED links leuchtet
auf, wenn Ihr Instrument zu tief gestimmt ist, die rote LED rechts
leuchtet auf, wenn es zu hoch gestimmt
ist.
Bedienung
[TUNER]
Bewegen Sie den POWER-Schalter, um das Gerät einzuschalten (ON).
Drücken Sie die TUNER-Taste, um in den TUNER-Modus zu
schalten.
In diesem Modus arbeitet das RU10 als chromatisches
Stimmgerät.
Verbinden Sie den Ausgang Ihres Instruments mit der
Eingangsbuchse. Mit der FUNCTION-Taste können Sie zwischen
PITCH oder FLAT wählen, und mit den Einstelltasten
können Sie die Einstellungen ändern. Wenn Sie das Gerät
einschalten, ist das RU10 automatisch auf die Tonhöhe (PITCH)
440 Hz eingestellt. Mit dem eingebauten Mikrofon können Sie auch
eine akustische Gitarre oder ähnliche Instrumente stimmen.
Wenn die Tonhöhe Ihres Instruments mehr als 50 Cents von der
richtigen Tonhöhe abweicht, stimmen Sie Ihr Instrument, bis die
richtige Note im LCD erscheint und eine der Stimm-LEDs leuchtet.
Wenn die Tonhöhe weniger als 50 Cents von der richtigen Tonhöhe
abweicht, beobachten Sie die Messanzeige und stimmen Sie Ihr
Instrument so, dass die Nadel in der Position "0" bleibt. Wenn die
Nadel bei "0" stoppt und die mittlere LED leuchtet, ist Ihr Instru-
ment richtig gestimmt.
● Stimmen nach Gehör
Wenn Sie die SOUND-Taste drücken, wird bei NOTE "A"
angezeigt, und die Note "A" erklingt.
Verwenden Sie die FUNCTION-Taste und die Einstelltasten
wie erforderlich, um die Einstellungen für NOTE und/oder FLAT
auf die gewünschte Note einzustellen, und stimmen Sie Ihr In-
strument.
[METRONOME]
Bewegen Sie den POWER-Schalter, um das Gerät einzuschalten (ON).
Drücken Sie die MODE-Taste, um in den METRONOME-Modus
zu schalten.
In diesem Modus arbeitet das RU10 als Metronom.
Mit der FUNCTION-Taste und den Einstelltasten
können
Sie die Einstellungen der Funktionen BEAT (Schlag), TEMPO, TAP
(Klopfen) und RHYTHM (Rhythmus) ändern.
● BEAT-Einstellung
Wählen Sie mit der FUNCTION-Taste die BEAT-Funktion aus, und
stellen Sie mit
eine Schlaganzahl (ein Taktmaß) im Bereich
von 0 - 7 Schlägen ein.
● TEMPO-Einstellung
Wählen Sie mit der FUNCTION-Taste die TEMPO-Funktion aus,
und stellen Sie mit
ein Tempo zwischen 40 - 208 Schlägen
pro Minute ein.
● TAP-Einstellung
Wählen Sie mit der FUNCTION-Taste die TAP-Funktion aus.
Drücken Sie dann mehrmals die Taste im gewünschten Tempo, um
dieses einzustellen. Das RU10 erkennt das Tempo und zeigt es an.
Wenn das erkannte Tempo langsamer als 40 BPM ist, erscheint im
Display
”
LO“ (
”
Low“ = niedrig).
Wenn es 209 oder höher ist, erscheint im Display
”
HI“ (
”
High“ = hoch).
● RHYTHM setting
Wählen Sie mit der FUNCTION-Taste die RHYTHM-Funktion aus,
und wählen Sie mit der Taste
den gewünschten Rhythmus aus.
[RHYTHM PLAY]
Bewegen Sie den POWER-Schalter, um das Gerät einzuschalten
(ON).
Drücken Sie die MODE-Taste, um in den RHYTHM-PLAY-Modus
zu schalten.
In diesem Modus können Sie mit Ihrer Gitarre zu den
voreingestellen Rhythmen (RHYTHM PATTERNS) spielen.
● TEMPO-Einstellung
Wählen Sie mit der FUNCTION-Taste die TEMPO-Funktion aus,
und verwenden Sie die Tasten
zum Einstellen des Tempos
im Bereich von 40 ~ 208.
● RHYTHM-PATTERN-Einstellung
Es gibt 20 verschiedene vorgegebene RHYTHM PATTERNS.
Wählen Sie mit
das gewünschte RHYTHM PATTERN aus.
Führen Sie das Signal Ihrer Gitarre zum Eingang (INPUT) am RU10,
und spielen Sie zum RHYTHM PATTERN. Einen kräftigeren
Gitarrensound erhalten Sie durch Einsatz des DISTORTION-Effekts.
SPEAKER
Der vom RU10 ausgegebene Gitarrensound entspricht dem
Sound, der vom Mikrolautsprecher ausgegeben werden kann.
Abhängig vom Ausgangspegel des Tonabnehmers Ihrer Gitarre,
hören Sie möglicherweise verzerrten Sound, sogar wenn der
GAIN-Schalter ausgeschaltet ist.
Einsetzen oder Austauschen der Batterie
Technische Daten
● TUNER
Stimmbereich A0 (27,50 Hz) - C8 (4.186,00 Hz)
Stimmbare Noten A, A#, B, C, C#, D, D#, E, F, F#, G, G#
Flat-Tuning
, , ,
Genauigkeit +/-1 cent
Kalibrierung 435~445 Hz
Anzeigen LCD, LED
● METRONOME
Tempobereich 40 - 208 Schläge pro Minute
Taktmaßzähler 0~7 beats
Rhythmus
● RHYTHM PLAY
Tempobereich 40 - 208 Schläge pro Minute
Rhythmus-Pattern
● Eingabe INPUT, MICROPHONE, AUX IN
● Ausgabe SPEAKER, PHONE
●
Spannungsversorgung
1 x 9 V, Typ 006P
AC ADAPTER Ibanez AC109
* Bei Einsatz mit Netzadapter verwenden Sie ausschließlich den
Netzadapter AC109 von Ibanez. Die Verwendung eines anderen
Netzadapters kann Fehlfunktion zur Folge haben oder einen
Ausfall des Gerätes verursachen.
●
Abmessungen
115(B) x 74(T) x 29.2(H) mm
● Gewicht 158g (einschließlich Batterie)
*
Ausführung und Technische Daten können sich aus Gründen
der Weiterentwicklung des Produkts ohne Ankündigung ändern.
1. Turn off the power switch
firstly when the battery is
replaced.
2. Pull the battery cover in
the direction of the arrow
to remove.
3. Insert the battery in the
correct polarity and re-
place the battery cover.
1.
Stellen Sie den POWER-
Schalter vor dem
Batteriewechsel in Aus-Stellung.
2.
Ziehen Sie die
Batteriefachabdeckung in
Pfeilrichtung ab, um sie zu
entfernen.
3.
Legen Sie die Batterie mit der
richtigen Polarität ein, und setzen
Sie die Batteriefachabdeckung
wieder auf.
JAM TUNER - Accordeur métronome boîte à rythmes
RU10
MANUEL DE L'UTILISATEUR
Prudence
● Pour éviter des court-circuits, des électrocutions ou des
dysfonctionnements:
N’essayez jamais de démonter cet appareil.
Evitez de placer l’appareil dans des endroits soumis à une
chaleur ou une humidité excessive. Exemples: près d’un ra-
diateur, en plein soleil, dans une salle de bains, sur un sol
humide, etc.
Evitez de soumettre l’appareil à de fortes vibrations.
Evitez les endroits poussiéreux et sales.
Ne manipulez jamais cet accordeur avec des mains mouillées.
● Pour éviter des dysfonctionnements
Manipulez les commandes avec soin.
Ne laissez jamais tomber cet accordeur.
● Nettoyage
N’utilisez jamais de détergent ou du benzène pour le net-
toyage.
Nettoyez l’appareil avec un chiffon sec et doux.
● Pour économiser la pile
Si vous ne pensez pas utiliser cet appareil durant une longue
période, retirez la pile.
Mettez l’accordeur hors tension tant que vous n’en avez pas
besoin.
Fonctions de l'accordeur
1 POWER
Ce commutateur permet de mettre l'appareil sous/hors tension.
2 VOLUME
Permet de régler le volume de l'Accordeur, le Métronome, la
Lecture de rythme et l'Entrée AUX.
3 GAIN
Cette molette permet de régler la quantité de distorsion.
Tournez-la au maximum dans le sens des aiguilles d'une
montre pour désactiver l'effet de distorsion intégré.
4 NIVEAU
Cette mollette permet de régler le niveau sonore de la guitare
indépendamment du niveau du METRONOME ou du
RHYTHM PATTERN.
5 MODE
Si vous appuyez sur ce bouton, vous passez en mode
TUNER, METRONOME ou RHYTHM PLAY. En mode
TUNER, vous disposez des mêmes fonctions qu'un accordeur
chromatique.
6 FUNCTION
● En mode TUNER
Si vous appuyez sur le bouton FUNCTION, vous passez en
mode PITCH ou FLAT.
● En mode METRONOME
Si vous appuyez sur le bouton FUNCTION, vous passez en
mode BEAT, TEMPO, TAP ou RHYTHM.
● En mode RHYTHM PLAY
Si vous appuyez sur le bouton FUNCTION, vous passez en
mode TEMPO ou RHYTHM PATTERN.
7 SOUND/MUTE
● En mode TUNER
Lorsque vous appuyez sur le bouton SOUND, "NOTE"
apparaît sur l'écran LCD et le haut-parleur reproduit une note
de la hauteur sélectionnée. Vous pouvez modifier la hauteur
à l'aide des boutons
.
Si vous appuyez sur le bouton FUNCTION pour sélectionner
FLAT, le haut-parleur reproduit la hauteur abaissée dans la
plage de
~ pour la note actuelle.
L'icône SPEAKER s'affiche sur l'écran LCD lorsque le RU10
produit le son.
● En mode METRONOME
Ce bouton fonctionne comme le bouton MUTE.
L'icône SPEAKER s'affiche sur l'écran LCD lorsque le RU10
produit le son.
● En mode RHYTHM PLAY
Ce bouton permet d'activer/de désactiver la sortie (modèle
rythmique) du haut-parleur intégré. L'icône SPEAKER
s'affiche sur l'écran LCD lorsque le RU10 produit le son.
8 ADJUST
Ces boutons permettent de régler les valeurs du mode
sélectionné.
● En mode TUNER
PITCH : 435 Hz ~ 445 Hz
FLAT : ~
● En mode METRONOME
BEAT :0 à 7 temps
TEMPO :
= 40 à 208 temps par minute
TAP :Tempo suivant lequel vous appuyez
sur le bouton s'affiche
RHYTHM :
● En mode RHYTHM PLAY
TEMPO : Noire = 40 à 208 temps par minute
RHYTHM PATTERN : 20 modèles rythmiques préréglés
(décrits dans l'annexe)
9
Témoins de référence pour l'accordage
Le témoin vert au centre s'allume lorsque votre accordage
correspond à la note affichée. Si la note est trop basse, le
témoin rouge de gauche s'allume. Si elle est trop haute, le
témoin rouge de droite s'
allume.
Fonctionnement
[ACCORDEUR]
Déplacez le commutateur POWER ON/OFF pour mettre l'appareil
sous tension.
Appuyez sur le bouton TUNER pour passer en mode TUNER.
Le RU10 fonctionne alors comme un accordeur chromatique.
Branchez la sortie de votre instrument dans la prise d'entrée.
Vous pouvez choisir PITCH ou FLAT à l'aide du bouton FUNC-
TION et utiliser les boutons
pour modifier les réglages.
Lorsque vous mettez le RU10 sous tension, il est
automatiquement réglé sur PITCH=440 Hz. Le microphone
intégré vous permet également d'accorder une guitare acoustique
ou un instrument similaire.
Si la hauteur de votre instrument est éloignée de plus de 50
cents par rapport à la hauteur juste, accordez votre instrument
jusqu'à ce que le nom de la note correcte s'affiche sur l'écran
LCD et que l'un des témoins indicateurs s'allume. Si la hauteur
se situe dans une fourchette de 50 cents de la hauteur juste,
observez l'aiguille de l'indicateur et accordez votre instrument
pour qu'elle s'arrête sur "0". Lorsque l'aiguille se trouve dans
cette position et que le témoin indicateur central s'allume, votre
instrument est correctement accordé.
● Accord à l'oreille
Lorsque vous appuyez sur le bouton SOUND, NOTE indique "A"
et la note "A" est émise.
Au besoin, utilisez le bouton FUNCTION et les boutons
pour modifier les réglages NOTE et/ou FLAT afin d'obtenir la
note souhaitée et accordez votre instrument.
[METRONOME]
Déplacez le bouton POWER ON/OFF pour mettre l'appareil sous tension.
Appuyez sur le bouton MODE pour passer en mode
METRONOME.
Le RU10 fonctionne alors comme un métronome.
Vous pouvez utiliser le bouton FUNCTION et les boutons
pour modifier les réglages BEAT, TEMPO, TAP et RHYTHM.
● Réglage BEAT
Utilisez le bouton FUNCTION pour sélectionner BEAT et les
boutons pour sélectionner un temps (signature rythmique)
dans une plage de 0 à 7 temps.
● Réglage TEMPO
Utilisez le bouton FUNCTION pour sélectionner TEMPO et les
boutons
pour régler le tempo dans une plage de 40 à 208.
● Réglage TAP
Utilisez le bouton FUNCTION pour sélectionner TAP. Appuyez
ensuite plusieurs fois sur le bouton
pour obtenir le tempo
souhaité. Le RU10 détecte le tempo et l'affiche.
Si le tempo détecté est inférieur à 40, "LO" apparaît sur l'écran.
S'il est supérieur ou égal à 209, "HI" apparaît sur l'écran.
● Réglage RHYTHM
Le bouton FUNCTION permet de sélectionner RHYTHM. Le
bouton
permet de sélectionner le rythme souhaité.
[LECTURE DE RYTHME]
Déplacez le bouton POWER ON/OFF pour mettre l'appareil sous tension.
Appuyez sur le bouton MODE pour passer en mode RHYTHM PLAY.
Vous pouvez alors jouer de la guitare sur les modèles rythmiques
préréglés.
● Réglage TEMPO
Utilisez le bouton FUNCTION pour sélectionner TEMPO et les
boutons
pour régler le tempo dans une plage de 40 à 208.
● Réglage RHYTHM PATTERN
Il existe 20 modèles rythmiques préréglés différents. Utilisez les
boutons
pour sélectionner le modèle rythmique souhaité.
Transmettez le signal de votre guitare dans la prise INPUT du
RU10, jouez sur le modèle rythmique sélectionné et bénéficiez
d'un son plus puissant grâce à l'effet de distorsion.
SPEAKER
Le son de la guitare produit par le RU10 correspond au maxi-
mum pouvant être produit par le micro haut-parleur.
En fonction du niveau de sortie du micro de votre guitare, le son
pourrait être distordu même si le gain de distorsion est désactivé.
Installation ou remplacement de la pile
Fiche technique
● TUNER
Fréquences reconnues A0 (27,50 Hz) - C8 (4.186,00 Hz)
Notes A, A#, B, C, C#, D, D#, E, F, F#, G, G#
Accord bémol
, , ,
Précision +/-1 cent
Calibrage 435~445 Hz
Affichage Écran LCD, témoin indicateur
● METRONOME
Plage de tempo 40 - 208 temps par minute
Plage de battements
0~7 beats
Rythme
● RHYTHM PLAY
Plage de tempo 40 - 208 temps par minute
Modèle rythmique
● Entrée INPUT, MICROPHONE, AUX IN
● Sortie SPEAKER, PHONE
● Alimentation
9 V 006P x 1
Adaptateur secteur Ibanez AC109
*
En cas d'alimentation secteur, veillez à utiliser l'adaptateur secteur
AC109 d'Ibanez. L'utilisation d'adaptateurs secteur différents peut
provoquer un disfonctionnement ou être à l'origine d'une
défaillance.
● Dimensions 115(L) x 74(P) x 29.2(H) mm
● Poids 158 g (pile comprise)
* Les caractéristiques et la présentation sont susceptibles d'être
modifiées sans avis préalable pour l'amélioration du produit.
1. Mettez le commutateur
d'alimentation en position
d'arrêt avant de
remplacer la pile.
2. Retirez le couvercle en le
faisant glisser dans le
sens de la flèche.
3. Insérez la pile en respectant
la polarité et remettez le
couvercle en place.
The RU10 fully conforms to the protection
requirements of the following EC Council
Directives.
2004/108/EC : ELECTROMAGNETIC
COMPATIBILITY
1 Rock 1
2 Rock 2
3 Rock 3
4 Rock 4
5 Metal 1
6 Metal 2
7 Metal 3
8 Metal 4
9 POP 1
10 POP 2
No.
Category
11 Ballad 1
12 Ballad 2
13 Dance 1
14 Dance 2
15 Dance 3
16 Blues
17 Fusion
18 Country
19 Rockabily
20 Disco
No.
Category
1 Rock 1
2 Rock 2
3 Rock 3
4 Rock 4
5 Metal 1
6 Metal 2
7 Metal 3
8 Metal 4
9 POP 1
10 POP 2
No.
Category
11 Ballad 1
12 Ballad 2
13 Dance 1
14 Dance 2
15 Dance 3
16 Blues
17 Fusion
18 Country
19 Rockabily
20 Disco
No.
Category
1 Rock 1
2 Rock 2
3 Rock 3
4 Rock 4
5 Metal 1
6 Metal 2
7 Metal 3
8 Metal 4
9 POP 1
10 POP 2
No.
Category
11 Ballad 1
12 Ballad 2
13 Dance 1
14 Dance 2
15 Dance 3
16 Blues
17 Fusion
18 Country
19 Rockabily
20 Disco
No.
Category
La page est en cours de chargement...
-
 1
1
-
 2
2


dans d''autres langues
- italiano: Ibanez RU10 Manuale del proprietario
- English: Ibanez RU10 Owner's manual
- español: Ibanez RU10 El manual del propietario
- Deutsch: Ibanez RU10 Bedienungsanleitung
- 日本語: Ibanez RU10 取扱説明書
Documents connexes
Autres documents
-
 Tama RW200 Rhythm Watch Manuel utilisateur
-
Korg PX4 Le manuel du propriétaire
-
Roland MICRO CUBE RX Le manuel du propriétaire
-
-
Roland MICRO CUBE BASS RX Le manuel du propriétaire
-
-
-
Boss TU-88 Le manuel du propriétaire
-
-
