Danby DDR70A3GDB Le manuel du propriétaire
- Catégorie
- Déshumidificateurs
- Taper
- Le manuel du propriétaire

Mod el • M odèle • Modelo
OWNER’S USE AND CARE GUIDE
GUIDE D’UTILISATION ET SOINS DE PROPRIÈTAIRE
GUÍA DE UTILIZACIÓN Y CUIDADO PARA EL PROPIETARIO
MODEL • MODÈLE • MODELO
DANBY PRODUCTS LIMITED, ONTARIO, CANADA N1H 6Z9
DANBY PRODUCTS INC., FINDLAY, OHIO, USA 45840
V2.19.11.13
PORTABLE DEHUMIDIFIER
DÉSHUMIDIFICATEUR PORTATIF
DESHUMIDIFICADOR PORTÁTIL
DDR70A3GDB

TO OBTAIN WARRANTY SERVICE YOU MUST PROVIDE A VALID PROOF OF
PURCHASE. PLEASE STAPLE YOUR RECEIPT TO THIS PAGE FOR FUTURE
REFERENCE.
-------------------------------------------------------------------------------------------------------------------
POUR OBTENIR LE SERVICE SUR GARANTIE VOUS DEVEZ FOURNIR UNE
PREUVE D’ACHAT VALIDE. VEUILLEZ AGRAFER VOTRE REÇU À CETTE PAGE
POUR RÉFÉRENCE FUTURE.
-------------------------------------------------------------------------------------------------------------------
PARA OBTENER SERVICIO DE GARANTÍA, DEBE PROVEER UN RECIBO
ORIGINAL. POR FAVOR ENGRAPE SU RECIBO A ÉSTA PÁGINA EN CASO QUE
NECESITE HACER UN RECLAMO.
This product is factory equipped with a power supply cord that has a three-pronged grounded plug. It must
be plugged into a mating grounding type receptacle in accordance with the National Electrical Code and
applicable local codes and ordinances. If the circuit does not have a grounding type receptacle, it is the
responsibility and obligation of the customer to exchange the existing receptacle in accordance with the
National Electrical Code and applicable local codes and ordinances. The third ground prong should not,
under any circumstances, be cut or removed.
IMPORTANT - GROUNDING METHOD
Ce produit arrive d’origine avec un cordon d’alimentation équipé d’une prise à trois fi ches. Il doit être
branché dans une prise avec une fi che de mise à la terre en conformité avec le Code National de l’Électricité
et les codes et règles locales applicables. Si le prise murale n’a pas de mise à la de terre, il est de la
responsabilité et l’obligation du client de changer la prise existante pour la rendre conforme aux Codes
Nationaux de l’Électricité, aux codes et règles locaux applicables. La fi che de la mise à la terre ne doit pas,
en aucune circonstance, être coupée ou retirée.
IMPORTANT - MÉTHODE POUR LA MISE À LA TERRE
Este producto viene equipado con un cable eléctrico que tiene un enchufe de tres patas con conexión
a tierra. Este debe colocarse en una toma de corriente con conexión a tierra de acuerdo con el Código
nacional de electricidad y códigos y ordenanzas locales correspondientes. Si el circuito no cuenta con
una toma de corriente con conexión a tierra, es responsabilidad y obligación del cliente sustituir la toma
de corriente actual de acuerdo con el Código nacional de electricidad y códigos y ordenanzas locales
correspondientes. Bajo ninguna circunstancia se debe cortar o eliminar la tercera pata de conexión a tierra.
IMPORTANTE - MÉTODO DE CONEXIÓN A TIERRA

CONTENTS
PORTABLE DEHUMIDIFIER
Owner’s Use and Care Guide ..........................................1-12
• Important Safety Information
• Installation Instructions
• Features
• Operating Instructions
• Cautions
• Care and Maintenance
• Troubleshooting
• Warranty
DÉSHUMIDIFICATEUR PORTATIF
Manuel d’utilisation et d’entretien du propriétaire
...............13-24
• Consignes de sécurité importantes
• Consignes d’installation
• Caractéristiques
• Consignes d’utilisation
• Précautions
• Soins et entretien
• Dépannage
• Garantie
DESHUMIDIFICADOR PORTÁTIL
Guía del utilización y cuidado para el propietario...........25-36
• Instrucciones de seguridad importantes
• Instrucciones de instalación
• Características
• Instrucciones operadoras
• Precauciones
• Cuidado y mantenimiento
• Diagnósticos de problemas
• Garantía
CAUTION
PRÉCAUTION
PRECAUCIÓN
Read and follow all safety rules and
operating instructions before fi rst use of this
product.
Veuillez lire attentivement les consignes
de sécurité et les instructions d’utilisation
avant l’utilisation intiale de ce produit.
Lea y observe todas las reglas de seguridad
y las instrucciones de operación antes de
usar este producto por la primera vez.

WELCOME
1
Welcome to the Danby family. We’re proud of our quality products, and we believe in dependable service, like you will fi nd
in this Owner’s Use and Care Guide, and like you will receive from our friendly customer service department. Best of all,
you will experience these values each and every time you use your Danby appliance. That’s important, because your new
appliance will be a part of your family for a long time.
Note the information below; you will need this information to obtain service under warranty.
To receive service, you must provide the original receipt.
Model No:
Serial No:
Date Purchased:
NEED HELP?
Before you call for service, here are a few things you can do to
help us serve you better:
Read this Owner’s Use and Care Guide:
It contains instructions to help you use and maintain your
appliance properly.
If you received a damaged appliance:
Immediately contact the retailer (or builder) that sold you the
appliance.
Save time and money:
Check the Troubleshooting section at the end of the guide
before calling. This section helps you solve common problems
that may occur.
If you do need service, you can relax, knowing help is only a
phone call away.
Tel: 1-800-26-
(1-800-263-2629)
WARNING
Improper connection of the grounding plug can result in risk of
Fire, Electric Shock and/or injury to Persons associated with the
appliance. Check with a qualifi ed service representative if in doubt
that the appliance is properly grounded.

NOTE
The WARNING instructions issued in this manual are not meant to cover all possible conditions and situations that may
occur. Person(s) installing, maintaining, or operating the appliance must exercise caution and care. Failure to install,
maintain, and/or operate the equipment according to the manufacturer’s instructions may result in conditions which can
produce personal injury and damage to your unit and/or property damage. Contact your dealer, service agent, and/or the
manufacturer about any problems or conditions you do not fully understand. For Danby Customer Service call (1-800-
263-2629).
To reduce the risk of fi re, electric shock, or personal injury, all wiring and grounding must conform with the latest edition of
Local and National Electrical codes.
• It is the customer’s responsibility to have the wiring and fuses checked by a qualifi ed electrician to make sure adequate
electrical power is available.
• This appliance is designed to operate on an effectively grounded, separately branched, polarized, 3-wire, 120 Volt
60 Hertz (alternating current) circuit protected by a 15 ampere fuse, equivalent fuse or circuit breaker.The three-prong
grounding plug on the power cord should be plugged directly into the aforementioned receptacle rated 110/120 V.A.C.
• Do not connect the dehumidifi er to a multiple socket outlet that is also being used for other electrical appliances.
FOR YOUR SAFETY: To reduce the risk of fi re or explosion, do not store or use gasoline or other fl ammable va-
pors or liquids in the vicinity of this or any other appliance.
ELECTRICAL
REQUIREMENTS
Improper connection of the equipment-grounding conductor can result in a risk of electrical shock. Check with a qualifi ed
electrician or serviceperson if you are in doubt as to whether your appliance outlets are properly grounded.
• This appliance must be grounded. In the event of malfunction or breakdown, grounding will reduce the risk of electrical
shock by providing a path of least resistance for electrical current. This appliance is equipped with a cord that has an
equipment-grounding conductor and 3 prong grounding plug. The plug must be connected into an outlet that is properly
installed and grounded in accordance with all local codes and ordinances.
• Do not modify the plug provided with this appliance. If it will not fi t the outlet, have a proper outlet installed by a qualifi ed
electrician.
• If the household electrical supply does not meet the above specifi cations, or if you are not sure your home has an
effective ground, have a qualifi ed electrician or your local electrical utility company check it and correct any problems.
SAVE THESE INSTRUCTIONS
2
IMPORTANT SAFETY INFORMATION
READ AND FOLLOW ALL SAFETY INSTRUCTIONS
FOR YOUR SAFETY: Read these instructions carefully before operating the unit.
GROUNDING
INSTRUCTIONS

IMPORTANT SAFETY INFORMATION
READ AND FOLLOW ALL SAFETY INSTRUCTIONS
FOR YOUR SAFETY: Read these instructions carefully before operating the unit.
SAFETY PRECAUTIONS
When using this dehumidifi er, always follow basic safety precautions, including the following:
• Use this appliance only for its intended purpose as described in this Owner’s Manual.
• This dehumidifi er must be properly installed and grounded as described in this manual before it is used.
• Never operate this dehumidifi er in an area that is likely to accumulate standing water. If this condition develops, for your
safety disconnect the power supply before stepping into the water.
• Never unplug your dehumidifi er by pulling on the power chord. Always grip the plug fi rmly and pull straight out from the
receptacle.
• Replace immediately all electric service cords that have become frayed or otherwise damaged. A damaged power
supply cord must be replaced with a new power supply cord obtained from the manufacturer and not repaired. Do not
use a cord that shows cracks or abrasion damage along its length or at either the plug or connector end.
• If the receptacle does not match the plug, the receptacle must be changed out by a qualifi ed electrician.
• Turn the dehumidifi er OFF and unplug it before cleaning.
• For your safety, do not store or use combustible materials, gasoline or other fl ammable vapors or liquids in the vicinity of
this or any other appliance.
• All dehumidifi ers contain refrigerants, which under federal law must be removed prior to product disposal. If you are
disposing of a product with refrigerants, check with the company handling disposal about what to do. Check for
local regulatory compliance regarding the approved and safe disposal of this appliance.
• Do not use outdoors.
• This dehumidifi er is intended for indoor residential applications only. This dehumidifi er should not be used
for commercial or industrial applications.
3
SAVE THESE INSTRUCTIONS

• Soft touch (Electronic)Control Key Pads
• Auto-Sensing Humidity Control
• Adjustable Humidity Settings (30% - 90%)
• 2 Fan Speed Settings (High/Low)
• Delay Start Protection (Compressor)
• Auto-Defrost (De-Icer)
INSTALLATION INSTRUCTIONS
4
• Full Bucket Indicator Light
• Easy Roll Castors (4)
• Front Mounted Water Tank(Removable)
• Direct Drain Option
• Quiet Operation
• Removable Air Filter
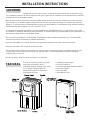
• Select a suitable location, making sure you have easy access to an electrical outlet (avoid the use of extension cords).
If it is absolutely necessary to use an extension cord, use an approved “air conditioner” heavy duty extension cord ONLY
(available at most local hardware stores).
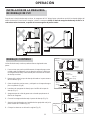
• Make sure there are no obstructions restricting airfl ow through the front air intake grill. Maintain a minimum clearance
of at least 20 cm (8”) between adjacent walls and the back of the unit, to allow for proper air circulation and maximum
effi ciency. To achieve maximum operating effi ciency from your dehumidifi er, the recommended (room ambient) operating
temperatures should be between 5°C (41°F) and 35°C (95°F).
• It is important to remember the effi ciency of a dehumidifi er will be affected/infl uenced by the rate at which new humid
air (moisture) is allowed to infi ltrate the same space/area. To maintain effi ciency, the dehumidifi er must be operated in an
enclosed area. Keep all doors and windows closed.
• Do not use this unit outdoors. This dehumidifer is intended for indoor residential applications only. This dehumidifi er
should not be used for commercial or industrial applications.
• Place the dehumidifi er on a smooth, level fl oor strong enough to support the unit with a full bucket of water.
• Place the unit where it has access to an electrical outlet.
• This unit has 4 castors which can move freely. Do not force castors to move over carpet, and refrain from moving the
unit with water in the bucket (the unit may tip over and spill water). Protect wood fl oors from possible spillage or
scratches when moving unit.
• Remove accessory bag from bucket and store it in a safe place.
LOCATION
FEATURES

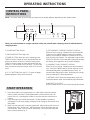
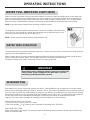
NOTE: The control panel of the unit you purchased may be slightly different depending on the model number.
When you push the button to change operation modes, the unit will make a beeping sound to indicate that it is
changing modes.
1) POWER BUTTON: On/Off
2) FAN SPEED BUTTON: High/ Low
3) TIMER BUTTON: When the unit is operating, press
TIMER to set the number of hours desired until the unit
will shut off. When the unit is in stand-by mode, press
TIMER to set the number of hours desired until the unit
will turn on. Set the timer from 1-24 hours. To cancel the
timer, proceed as above but set the “timer off” to zero (0)
hours.
4) º C/ º F BUTTON: Press the º C/ º F button to toggle
between degrees Celsius and Fahrenheit.
5) SET HUMIDITY/ CURRENT HUMIDITY DISPLAY:
When the unit is running, it displays the current humidity.
Press the UP or DOWN buttons to select the humidity
setting. The humidity is adjusted in increments of 5% by
each pressing of the button. The adjustable range is within
30% RH to 90% RH. 10 seconds after setting the humidity,
the display will change back to the current humidity.
6) CURRENT TEMP/ TIMER SET DISPLAY:
When the unit is running, it displays the current tempera-
ture. Press the TIMER button to set the machine to shut
off automatically after a specifi ed amount of time. 10
seconds after displaying the timer, the display will change
back to showing the current temperature.
7) DEFROST LIGHT: When the temperature is low, the
unit enters defrost mode, and the defrost light illuminates.
8) BUCKET FULL LIGHT
When the water tank is full, the bucket full light illuminates.
OPERATING INSTRUCTIONS
5
CONTROL PANEL
INSTRUCTIONS
START OPERATION
1. Place the product in an upright position on a fl at, stable, and heat-resistant
surface. Make sure there is nothing fl ammable or heat sensitive within 39
inches (100 cm). Operating the product in any other position could cause a
hazard.
2. Insert the plug into a suitable wall socket. The dehumidifi er is suitable for
operating on an electricity supply having the same voltage as that shown on its
rating label.
3. Make sure the water tank is correctly positioned. After switching the unit on for
the fi rst time, if the ``Bucket Full`` light illuminates, pull out the water tank and
check that the ``fl oat`` lever is able to move freely. Then return the water tank
to the correct position (Fig. 1).

The water tank should be carefully removed from the machine by sliding it outward from the
front of the unit, and it should be emptied. When the empty tank is replaced properly in the
machine, the unit will start up and run normally (Fig. 2).
NOTE: Please use both hands to carefully empty the water tank.
OPERATING INSTRUCTIONS
6
WATER FULL INDICATOR LIGHT (RED)
When the bucket is full and/or incorrectly positioned inside the cabinet, the water full red light turns on and remains on
until such time as the bucket is emptied and/or correctly re-positioned. This condition will result in the immediate shut
down of the dehumidifying system (both compressor and fan motor operation are terminated). This is a safety feature.
When the bucket is emptied and/or correctly re-positioned, the dehumidifi er will resume operation automatically.
NOTE: It may take several minutes before operating conditions resume.
WATER TANK OPERATION
The water tank holds accumulated condensed water and, by means of a safety switch, controls both the water level and
operation of the dehumidifi cation process.
When the water tank is full and/or accidentally displaced insider the cabinet, the fl oat switch actuator (inside the tank)
breaks contact with the safety swtich. This condition results in the immediate shut down of the
compressor and fan motor system, preventing moisture from being condensed.
IMPORTANT
Never tamper with or attempt to defeat the water level (safety) fl oat
switch system. Proper installation of the water tank is crucial in
maintaining reliable dehumidifi er operation.
DEHUMIDIFYING
Dehumidifying is a means of removing moisture from the air. A dehumidifi er will help to protect your home and valued
possessions from damage (swelling) caused by moisture in the air. Essentially a dehumidifi er removes moisture from the
air as the moist air passes over a dehumidifying (evaporator) coil. Moisture is condensed on the evaporator coil, drained,
and collected inside an internal (removable) water tank located at the front of the unit. The exhausted air being returned
into the room environment is elevated several degrees, causing the surrounding air temperature to increase
(slightly). This process also contributes to lowering the relative humidity of the surrounding air.
DEHUMIDIFYING MODE SELECTION:
1) To turn the unit on, press the ON / OFF button.
2) Press the humidity
or buttons to select a desired RH operating value (30%-90%).
FAN SPEED SELECTION:
Select a fan speed on the keypad. The speed you select is identifi ed by the (illuminated) indicator light located directly
above the selection made.

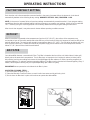
Your dehumidifi er features a removable Air Filter. This fi lter is located at the front of the unit (behind the air intake grill)
directly above the water tank compartment. The air fi lter plays an important role in helping to reduce (minimize) dust/
dirt particles from the surrounding environment. A blocked/clogged air fi lter reduces air intake, impacting negatively on
operating effi ciency. To maintain maximum operating effi ciency, the fi lter must be checked and cleaned regularly (every 2
weeks). More frequent cleaning may be required depending upon indoor air quality.
IMPORTANT: Never operate the unit without the air fi lter in place.
AIR FILTER CLEANING STEPS:
1) Pull the air fi lter out gently (Fig. 3).
2) Clean the fi lter with a vacuum cleaner, or wash it with clean water and dry with a dry cloth.
3) Put the clean air fi lter back in place and continue to operate the dehumidifi er.
OPERATING INSTRUCTIONS
7
AIR FILTER
FACTORY DEFAULT SETTING
Each time the unit is disconnected/re-connected and/or in the event of a power failure, the electronic circuit board
automatically defaults to the following factory setting: HUMIDITY SETTING - 60%, FAN SPEED - LOW.
NOTE: In the event of a power failure, all previous settings are automatically erased/cancelled. If your program setting
was different from the above (default setting) it will be necessary to re-program your settings. When the unit is switched
“OFF” manually (using the on/off keypad) the unit will always default to the last program setting that was used.
After the unit has stopped, it may take several minutes before operating conditions resume.
DEFROST
When the machine is operated at low temperatures (less than 18°C (64.4°F)), the surface of the evaporator may
accumulate a layer of frost which would reduce the effi ciency of the machine. When this happens the machine will go into
periodic defrost mode. The machine will operate in temperatures down to 5°C (41°F). The time taken to defrost may vary.
If the machine freezes up, it should be turned off at the power supply and re-started. If the room temperature remains
below 5°C (41°) the machine should be switched off.

OPERATING INSTRUCTIONS
8
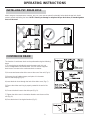
CONTINUOUS DRAIN
The function of continuous drain can be performed using the following
steps:
1) To save having to periodically empty the water tank, this unit
can be confi gured for continuous drain. You can use the supplied
drain hose to connect to the continuous drain connector.
2) Unscrew and remove the drain cover at the rear of the unit (Fig. A).
3) Remove the soft rubber stopper, and place it in the water
tank for safe keeping (Fig. B).
4) Insert the drain hose through the hole of the drain cover (Fig. C).
5) Ensure the rubber seal ring is properly seated in the end of the
hose.
6) Connect the drain hose to the drain port (Fig. D).
7) Tighten the drain cover in clockwise direction onto the rear of the
unit (Fig. D).
8) Place the bucket in its original location (Fig. E).
When using the continuous drain function, the PVC hose must be placed horizontally below the drainage hole. Avoid
uneven ground and folding the hose. NOTE: Should you damage or misplace the pvc drain hose, a standard garden
hose can be used.
INSTALLING PVC DRAIN HOSE

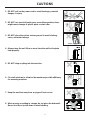
CAUTIONS
1. DO NOT pull on the power cord to avoid breakage, potential
danger, or injury.
2. DO NOT use insect/oil/paint spray around the machine; these
might cause damage to plastic parts or start a fi re.
3. DO NOT place the unit on uneven ground to avoid shaking,
noise, and water leakage.
4. Always keep the unit 20cm or more from the wall to dissipate
heat properly.
5. DO NOT drop anything into the machine.
6. Close all windows to allow for the maximum possible effi ciency
for removing moisture.
7. Keep the machine away from any type of heat source.
8. When moving or putting in storage, do not place the dehumidi-
fi er on its side or upside down to avoid shaking.
9

CARE AND MAINTENANCE
CAUTION:
Before attempting to clean and/or service this unit, always disconnect the power
supply cord from the electrical power supply / outlet.
10
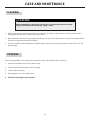
CLEANING
1. DO NOT use gasoline, benzene, paint thinner, or any other chemicals to clean this unit, as these substances will
damage/deform the plastic components and luster fi nish.
2. Never attempt to clean the unit by pouring water directly over any of the surface areas, as this will cause deterioration
of electrical components and wiring insulation.
3. Use only a mild dish washing detergent, lukewarm water, and a soft cloth to wipe the exterior surface of the unit and
dry thoroughly.
STORAGE
When the dehumidifi er is not being used for long time periods, please follow these instructions:
1. Disconnect the power cord from the power supply.
2. Empty the water tank and wipe (clean) thoroughly.
3. Clean air fi lter thoroughly.
4. Re-package the unit in its original carton.
5. Store the unit upright in a dry location.

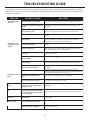
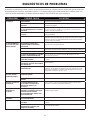
PROBLEM
POSSIBLE CAUSE
SOLUTION
The dehumidifier is unplugged.
The fuse is blown/circuit breaker is
tripped.
Dehumidifier has reached its preset
level or bucket is full.
Bucket is not in the proper position.
Power failure
Dehumidifier does
not start.
Dehumidifier does
not dry the air as it
should.
Did not allow enough time to
remove the moisture.
Airflow is restricted.
Dirty filter.
The Humidity Control may not be
set low enough.
Doors and windows may not be
closed tightly.
Clothes dryer may be blowing mois-
ture-laden air into the room.
Dehumidifier runs too
much
Area to be dehumidified is too
large.
Doors and windows are open.
Frost appears on the
coils
Controls cannot be
set
Fan noise
Water on floor
Dehumidifier has been recently
turned on, or room temperature is
below 41°F (5°C).
The compressor will turn off and
the fan will automatically continue
to run for approximately 3 minutes
at a fixed setting.
Air is moving through the
dehumidifier.
Hose connection may be loose.
Intend to use the bucket to collect
water, but a hose is attached.
• Make sure the dehumidifier’s plug is pushed completely into the outlet.
• Check the house fuse/circuit breaker box and replace the fuse or reset
the breaker.
• The dehumidifier automatically turns off when either condition occurs.
Change to a lower setting or empty the bucket and replace properly.
• The bucket must be in place and securely seated for the dehumidifier to
operate.
• There is a protective time delay (up to 3 minutes) to prevent tripping of the
compressor overload. For this reason, the unit may not start normal
dehumidifying for 3 minutes after it is turned back on.
• When first installed, allow at least 24 hours to maintain the desired
dryness.
• Make sure there are no curtains, blinds or furniture blocking the front or
back of the dehumidifier. See the Location section.
• See the Air Filter section.
• For drier air, press the button and set to a lower percent value (%).
• Check that all doors, windows and other openings are securely closed.
• Install the dehumidifier away from the dryer. The dryer should be vented to
the outside.
• The capacity of your dehumidifier may not be adequate.
Room temperature is too low.
• Moisture removal is best at higher room temperatures. Lower room
temperatures will reduce the moisture removal rate. Models are designed
to be operated at temperatures above 41°F (5°C).
• Close all doors and windows to the outside.
• This is normal. Wait approximately 3 minutes and set the fan as desired.
• This is normal. Frost will usually disappear within 60 minutes. See the
Defrost section.
• This is normal.
• Check the hose connection. See the Continuous Drain section.
• Disconnect the hose if using the bucket to collect water. See the
Continuous Drain section.
Occasionally, a problem is minor and a service call may not be necessary- use this troubleshooting guide for a possible
solution. If the unit continues to operate improperly, call an authorized service depot or Danby’s Toll Free Number 1-800-
263-2629 for assistance.
TROUBLESHOOTING GUIDE
11

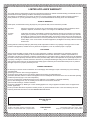
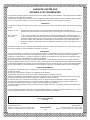
LIMITED IN-HOME APPLIANCE WARRANTY
This quality product is warranted to be free from manufacturer’s defects in material and workmanship, provided that the unit is used under the normal operating
conditions intended by the manufacturer.
This warranty is available only to the person to whom the unit was originally sold by Danby Products Limited (Canada) or Danby Products Inc. (U.S.A.) (hereafter
“Danby”) or by an authorized distributor of Danby, and is non-transferable.
TERMS OF WARRANTY
Plastic parts, are warranted for thirty (30) days only from purchase date, with no extensions provided.
First Year
During the rst twelve (12) months, any functional parts of this product found to be defective, will be repaired or replaced, at warrantor’s
option, at no charge to the ORIGINAL purchaser.
To obtain
Danby reserves the right to limit the boundaries of “In Home Service” to the proximity of an Authorized Service Depot. Any app liance
Service
requiring service outside the limited boundaries of “In Home Service” , it will be the consumer’s responsibility to transport the appliance (at
their own expense) to the original retailer (point of purchase) or a service depot for repair. See “Boundaries of In Home Serv ice” below.
Contact your dealer from whom your unit was purchased, or contact your nearest authorized Danby service depot, where service
must be performed by a qualied service technician.
If service is performed on the units by anyone other than an authorized service depot, or the unit is used for commercial appli cation, all
obligations of Danby under this warranty shall be void.
Boundaries of
If the appliance is installed in a location that is 100 kilometers (62 miles) or more from the nearest service center your unit must be
In Home Service
delivered to the nearest authorized Danby Service Depot, as service must only be performed by a technician qualied and certif ied for
warranty service by Danby. Transportation charges to and from the service location are not protected by this warranty and are t he
responsibility of the purchaser.
Nothing within this warranty shall imply that Danby will be responsible or liable for any spoilage or damage to food or other c ontents of this appliance, whether due
to any defect of the appliance, or its use, whether proper or improper.
EXCLUSIONS
Save as herein provided, Danby, there are no other warranties, conditions, representations or guarantees, express or implied, m ade or intended by Danby or its
authorized distributors and all other warranties, conditions, representations or guarantees, including any warranties, conditio ns, representations or guarantees
under any Sale of Goods Act or like legislation or statue is hereby expressly excluded. Save as herein provided, Danby shall no t be responsible for any damages
to persons or property, including the unit itself, howsoever caused or any consequential damages arising from the malfunction o f the unit and by the purchase of
the unit, the purchaser does hereby agree to indemnify and hold harmless Danby from any claim for damages to persons or propert y caused by the unit.
GENERAL PROVISIONS
No warranty or insurance herein contained or set out shall apply when damage or repair is caused by any of the following:
1) Power failure.
2) Damage in transit or when moving the appliance.
3) Improper power supply such as low voltage, defective house wiring or inadequate fuses.
4) Accident, alteration, abuse or misuse of the appliance such as inadequate air circulation in the room or abnormal operating con ditions
(extremely high or low room temperature).
5) Use for commercial or industrial purposes (ie. If the appliance is not installed in a domestic residence).
6) Fire, water damage, theft, war, riot, hostility, acts of God such as hurricanes, oods etc.
7) Service calls resulting in customer education.
8) Improper Installation (ie. Building-in of a free standing appliance or using an appliance outdoors that is not approved for out door application).
Proof of purchase date will be required for warranty claims; so, please retain bills of sale. In the event warranty service is required, present this document to our
AUTHORIZED SERVICE DEPOT.
Danby Products Limited
PO Box 1778, Guelph, Ontario, Canada N1H 6Z9
Telephone: (519) 837-0920 FAX: (519) 837-0449
Danby Products Inc.
PO Box 669, Findlay, Ohio, U.S.A. 45840
Telephone: (419) 425-8627 FAX: (419) 425-8629
04/09
1-800-263-2629
Warranty Service
In-home
During the first twelve (12) months, any functional parts of this product found to be defective, will be
repaired or replaced, at warrantor’s option, at no charge to the ORIGINAL purchaser.
It will be the consumer’s responsibility to transport the appliance (at their own expense) to the original
retailer (point of purchase) or a service depot for repair. Contact your dealer from whom your unit was
purchased, or contact your nearest authorized Danby service depot, where service must be performed
by a qualified service technician. If service is performed on the unit by anyone other than an authorized
service depot, or the unit is used for commercial application, all obligations of Danby under this warranty
shall be void.
First Year
To obtain
service
LIMITED APPLIANCE WARRANTY
This quality product is warranted to be free from manufacturer’s defects in material and workmanship, provided that the unit is
used under the normal operating conditions intended by the manufacturer.
This warranty is available only to the person to whom the unit was originally sold by Danby Products Limited (Canada) or
Danby Products Inc. (U.S.A.) (hereafter “Danby”) or by an authorized distributor of Danby, and is non-transferable.
TERMS OF WARRANTY
Plastic parts, are warranted for thirty (30) days only from purchase date, with no extensions provided.
Nothing within this warranty shall imply that Danby will be responsible or liable for any spoilage or damage to food or other
contents of this appliance, whether due to any defect of the appliance, or its use, whether proper or improper.
EXCLUSIONS
Save as herein provided, by Danby, there are no other warranties, conditions, representations or guarantees, express or
implied, made or intended by Danby or its authorized distributors and all other warranties, conditions, representations or
guarantees, including any warranties, conditions, representations or guarantees under any Sale of Goods Act or like legislation
or statute is hereby expressly excluded. Save as herein provided, Danby shall not be responsible for any damages to persons
or property, including the unit itself, howsoever caused or any consequential damages arising from the malfunction of the unit
and by the purchase of the unit, the purchaser does hereby agree to indemnify and hold harmless Danby from any claim for
damages to persons or property caused by the unit.
GENERAL PROVISIONS
No warranty or insurance herein contained or set out shall apply when damage or repair is caused by any of the following:
1) Power failure.
2) Damage in transit or when moving the appliance.
3) Improper power supply such as low voltage, defective house wiring or inadequate fuses.
4) Accident, alteration, abuse or misuse of the appliance such as inadequate air circulation in the room or abnormal operating
conditions (extremely high or low room temperature).
5) Use for commercial or industrial purposes (ie. If the appliance is not installed in a domestic residence).
6) Fire, water damage, theft, war, riot, hostility, acts of God such as hurricanes, floods etc.
7) Service calls resulting in customer education.
8) Improper Installation (ie. Building-in of a free standing appliance or using an appliance outdoors that is not approved for
outdoor application).
Proof of purchase date will be required for warranty claims; so, please retain bill of sale. In the event warranty service is
required, present this document to our AUTHORIZED SERVICE DEPOT.
Warranty Service
Carry-In
Danby Products Limited
PO Box 1778, Guelph, Ontario, Canada N1H 6Z9
Telephone: (519) 837-0920 FAX: (519) 837-0449
Danby Products Inc.
PO Box 669, Findlay, Ohio, U.S.A. 45840
Telephone: (419) 425-8627 FAX: (419) 425-8629
1-800-263-2629
07/13

par notre service d'assistance à la clientèle.
important parce que votre nouvel appareil fera partie de votre famille pour longtemps.
S’il vous plaît écrivez informations ci-dessous; ces renseignements seront nécessaires si votre appareil a besoin
d'entretien ou pour les demandes de renseignements généraux. Pour bénéficier d'une opération de maintenance
ou dépannage, le reçu original sera exigé.
Numéro de modèle :
Numéro de série :
Date d'achat :
BESOIN D'ASSISTANCE ?
Veuillez trouver quelques conseils avant de faire appel à nos
services, cela nous aidera à mieux vous servir:
Lisez ce guide:
Il comprend des instructions pour l’utilisation et l’entretien
adapté de votre unité.
Si votre nouvel appareil est endommagé :
Contactez immédiatement le revendeur (ou le fabricant).
Gagnez du temps et de l'argent :
Avant de faire appel à nos services, consultez à nouveau
la section « “Dépannage ». Cette section vous aidera à
solutionner des problèmes courants. Si une réparation est
nécessaire, ne vous inquiétez pas, la solution est au bout de
l'appel téléphonique.
Tel: 1-800-26-
(1-800-263-2629)
13
AVERTISSEMENT :
Une fi che de mise à la terre mal branchée peut entraîner un risque d’incendie, de choc
électrique ou de blessures aux personnes qui utilisent l’appareil. Si vous n’êtes pas
certain que l’appareil est correctement mis à la terre, consultez un préposé du service
qualifi é.
BIENVENUE

REMARQUE
Les consignes d'AVERTISSEMENT publiées dans ce manuel ne sont pas supposées couvrir toutes les conditions et situations éventu-
elles qui peuvent se produire. La ou les personnes qui installent, entretiennent ou utilisent l’appareil doivent faire preuve de précaution
et de prudence. Si vous n’installez pas, n’entretenez pas ou n’utilisez pas l’appareil conformément aux instructions du fabricant, il peut
se produire des situations présentant des risques de blessures corporelles, de dommages à l’unité ou autres dommages matériels.
Communiquez avec votre concessionnaire, votre représentant ou le fabricant en cas de problèmes ou de conditions que vous ne com-
prenez pas bien. Pour parler au service à la clientèle de Danby, composez le (1-800-263-2629)
Afi n de réduire le risque d'incendie, de choc électrique ou de blessures, tout le câblage et toute la mise à la masse doivent se
conformer à la dernière édition des codes d'électricité locaux et nationaux.
• Il incombe au client de faire vérifi er le câblage et les fusibles par un électricien qualifi é pour s'assurer que l'alimentation électrique
disponible est appropriée.
• Cet appareil est conçu pour fonctionner avec un circuit bien mis à la masse, à branchement séparé, polarisé, à trois fi ls de 120 volts
et 60 hertz (courant alternatif). Ce circuit doit être protégé par un fusible de 15 ampères, un fusible équivalent ou un coupe-circuit.
La fi che à trois broches mise à la masse sur le cordon d'alimentation doit être branchée directement dans la prise susmentionnée de
puissance nominale 110/120 V (c.a.).
• Ne branchez pas le déshumidifi cateur à une prise femelle multiple qui sera également utilisée pour d'autres appareils électriques.
POUR VOTRE SÉCURITÉ : Afi n de réduire le risque d'incendie ou d'explosion, n'entreposez pas ou n'utilisez pas d'essence ou
d'autres vapeurs ou de liquides infl ammables à proximité de cet appareil.
ALIMENTATION
ÉLECTRIQUE
Le mauvais branchement d'un conducteur mis à la masse d'équipement peut résulter dans un risque de choc électrique. Vérifi ez avec
un électricien ou un technicien qualifi é si vous n'êtes pas certain que les prises de vos appareils sont bien mises à la masse.
Cet appareil doit être mis à la masse. En cas de mauvais fonctionnement ou de panne, la mise à la masse réduira le risque de choc
électrique en offrant un circuit avec le moins de résistance au courant électrique. Cet appareil est équipé d'un cordon électrique avec
un conducteur et une fi che à trois broches mis à la masse. La fi che doit être branchée dans une prise bien installée et mise à la masse
conformément aux codes et ordonnances locaux.
• Ne modifi ez pas la fi che livrée avec cet appareil. Si elle ne s'adapte pas à la prise, faites installer une prise adéquate par un
technicien qualifi é.
• Si l'alimentation électrique de votre maison ne satisfait pas aux spécifi cations susmentionnées ou si vous n'êtes pas certain que votre
maison a une mise à la terre effi cace, demandez à un technicien qualifi é ou à une compagnie d'électricité de le vérifi er et de rectifi er
tous les problèmes.
GARDEZ CES INSTRUCTIONS
14
CONSIGNES DE SÉCURITÉ IMPORTANTES
LISEZ ET RESPECTEZ TOUTES LES CONSIGNES DE SÉCURITÉ.
POUR VOTRE SÉCURITÉ : Lisez attentivement ces consignes avant d'utiliser l'appareil.
MISE À LA TERRE
CONSIGNES

CONSIGNES DE SÉCURITÉ IMPORTANTES
LISEZ ET RESPECTEZ TOUTES LES CONSIGNES DE SÉCURITÉ.
POUR VOTRE SÉCURITÉ : Lisez attentivement ces consignes avant d’utiliser l’appareil.
MESURES DE SÉCURITÉ
Lors de l’utilisation de ce déshumidifi cateur, suivez toujours les mesures de sécurité de base, y compris les suivantes :
• N’utilisez cet appareil qu’aux fi ns pour lesquelles il est conçu, tel que décrit dans ce guide d’utilisation.
• Ce déshumidifi cateur doit être installé et mis à la terre correctement, tel que décrit dans ce guide, avant d’être utilisé.
• Ne faites jamais fonctionner ce déshumidifi cateur à un endroit où de l’eau stagnante est susceptible de s’accumuler.
Dans une telle situation, pour votre sécurité, débranchez l’alimentation avant de marcher dans l’eau.
• Ne débranchez jamais votre déshumidifi cateur en tirant sur le cordon d’alimentation. Tenez toujours la fi che fermement
et tirez bien droit pour la retirer de la prise.
• Remplacez immédiatement tous les cordons d’alimentation effi lochés ou qui présentent d’autres dommages. Un
cordon d’alimentation endommagé doit être remplacé par un nouveau cordon obtenu auprès du fabricant; il ne doit
pas être réparé. N’utilisez pas un cordon qui présente des fi ssures ou des dommages causés par l’abrasion, soit sur le
cordon lui-même, soit à l’extrémité de la fi che ou du raccord.
• Si la prise ne correspond pas à la fi che, la prise doit être changée par un électricien qualifi é.
• Éteignez le déshumidifi cateur et débranchez-le avant de le nettoyer.
• Pour votre sécurité, n’entreposez et n’utilisez pas de matières combustibles, d’essence ou d’autres liquides ou vapeurs
infl ammables à proximité de cet appareil ou de tout autre appareil.
• Tous les déshumidifi cateurs contiennent des fl uides frigorigènes qui, en vertu des lois fédérales, doivent être enlevés
avant que le produit soit mis au rebut. Si vous vous débarrassez d’un produit contenant des fl uides frigorigènes,
demandez conseil à l’entreprise qui s’occupe de la mise au rebut pour connaître la marche à suivre. Vérifi ez le respect
des réglementations locales concernant la mise au rebut approuvée et sécurisée de cet appareil.
• N’utilisez pas cet appareil à l’extérieur.
• Le déshumidifi cateur est uniquement conçu pour des utilisations résidentielles à l’intérieur. Ce déshumidifi cateur ne doit
pas servir à des utilisations commerciales ou industrielles.
15
GARDEZ CES INSTRUCTIONS

• Clavier de commande tactile (éléctronique)
• Auto-détection de l’hygrométrie ambiante
• Réglage selon l’hygrométrie ambiante (30% - 90%)
• Ventilateur à 2 vitesses (Haut/Bas)
• Mise en marche temporisée- protection (compresseur)
• Auto-Dégivrage
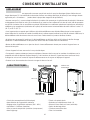
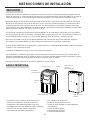
CONSIGNES D’INSTALLATION
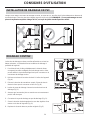
Diuseur d’air
déshumidié
Filtre à air
16
• Témoin «réceptacle plein»
• Roulettes pour déplacement facile (4)
• Réservoir d’eau situé sur l’avant (amovible)
• Option de drainage direct
• Fonctionnement silencieux
• Filtre à air amovible
• Choisissez un emplacement approprié et assurez-vous d’avoir accès à une prise électrique (évitez d’utiliser des ral-
longes électriques). S’il est absolument nécessaire d’utiliser une rallonge électrique, N’utilisez QU’une rallonge robuste
approuvée pour « climatiseur » (vendue dans la plupart des magasins de quincaillerie).
• Assurez-vous qu’il n’y a aucun obstacle limitant la circulation d’air passant par la grille frontale d’entrée d’air. Maintenez
un dégagement minimal d’au moins 20 centimètres (8 po) entre les murs adjacents et le dos de l’unité, afi n de permettre
une bonne circulation d’air et une effi cience optimale. Afi n d’obtenir un rendement opérationnel optimal pour votre déshu-
midifi cateur, les températures (ambiantes de la pièce) de fonctionnement recommandées devraient s’élever à entre 5 °C
(41 °F) et 35 °C (95 °F).
• Il est important de se rappeler que l’effi cience d’un déshumidifi cateur sera affectée/infl uencée par le taux auquel on
laisse infi ltrer de l’air nouveau et humide (humidité) dans le même espace/la même zone. Afi n de maintenir l’effi cience, le
déshumidifi cateur doit fonctionner dans une zone close. Gardez toutes les portes et fenêtres fermées.
• N’utilisez pas cet appareil à l’extérieur. Ce déshumidifi cateur ne doit être utilisé qu’à l’intérieur à des fi ns d’usage
résidentiel. Ce déshumidifi cateur ne doit pas être utilisé à des fi ns commerciales ou industrielles.
• Mettez le déshumidifi cateur sur un plancher lisse à niveau suffi samment robuste pour soutenir l’appareil avec un
réservoir d’eau plein.
• Placez l’appareil où vous avez accès à une prise électrique
• Cet appareil a quatre roulettes qui peuvent se déplacer librement. Ne forcez pas les roulettes à se déplacer sur la
moquette et évitez de déplacer l’appareil lorsqu’il y a de l’eau dans le réservoir (il peut basculer et renverser l’eau).
Protégez les sols en bois contre les risques de déversements ou de rayures en déplaçant l’appareil.
• Enlevez le sac d’accessoires du réservoir et rangez-le dans un lieu sûr.
EMPLACEMENT
CARACTÉRISTIQUES

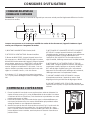
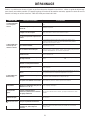
*REMARQUE : Le panneau de commande de l’appareil que vous avez acheté peut être légèrement différent en fonction
du numéro de modèle.
Lorsque vous poussez sur le bouton pour modifi er les modes de fonctionnement, l’appareil émettra un signal
sonore pour indiquer un changement de modes.
1) BOUTON D’ALIMENTATION: Marche/ Arrêt
2) VITESSE DU VENTILATEUR: Bouton Haut/ Bas
3) Bouton de MINUTERIE: Lorsque l’appareil est en fonc-
tion, appuyez sur « MINUTERIE» afi n de régler le nombre
d’heures de fonctionnement de l’appareil. Lorsque l’appareil
est en attente, appuyez sur « MINUTERIE» afi n de régler
le nombre d’heures avant que l’appareil ne se mette en
marche. Réglez la minuterie de 1 à 24 heures. Pour an-
nuler la minuterie, procéder comme décrit plus haut, mais
réglez la « minuterie à arrêt», c.à.d. zéro heures.
4) Le bouton º C/ º F: Appuyez sur le bouton interrupteur
º C/ º F pour passer des degrés Celsius aux degrés Fahren-
heit.
5) AFFICHAGE DE L’HUMIDITÉ REGLÉE/ L’HUMIDITÉ
ACTUELLE: Lorsque l’appareil fonctionne, elle affi che
l’humidite actuelle. Appuyez sur
ou pour selectionner
le réglage d’humidité. La plage d’ajustement est à
l’intérieur de 30% à 90% HR. 10 secondes après avoir
réglé l’humidité, l’affi chage retournera à l’humidité actuelle.
6) AFFICHAGE DE LA TEMPÉRATURE ACTUELLE/
MINUTERIE: Lorsque l’appareil fonctionne, elle affi che la
température actuelle. Appuyez sur le bouton «MINUTE-
RIE» afi n de régler l’appareil pour qu’il s’arrêt automa-
tiquement. 10 secondes après l’affi chage de la minuterie,
l’affi chage retournera à la température actuelle.
7) VOYANT LUMINEUX DE DÉGRIVAGE: Lorsque
la température est basse, l’appareil se met en mode
dégrivage et le boyant lumineux de dégrivage s’allume.
8) VOYANT LUMINEUX DE SEAU PLEIN: Lorsque le
réservoir d’eau est plein, le voyant lumineux de seau plein
s’allume.
CONSIGNES D’UTILISATION
17
CONSIGNES RELATIVES AU
PANNEAU DE COMMANDE
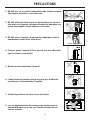
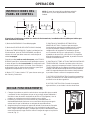
COMMENCEZ L’OPÉRATION
1. Placez le produit à la verticale sur une surface plane, stable et résistante à la
chaleur. Assurez-vous qu’il n’y a rien d’infl ammable ou de sensible à la chaleur
à l’intérieur de 100 cm (39 pouces). Faire fonctionner le produit dans une autre
position peut causer un risque.
2. Insérez la fi che dans une prise murale du bon type. Le déshumidifi cateur est
connu pour fonctionner avec une source d’alimentation qui possède le même
voltage qu’illustré sur son étiquette de classement.
3. Assurez-vous que le réservoir d’eau est bien en place (Fig. 1). Après avoir mis
en marche l’appareil pour la première fois, si le voyant lumineux de « seau
plein » s’allume, sortez le réservoir d’eau et vérifi ez que le levier du « fl otteur »
peut se déplacer sans encombre, ensuite replacez le réservoir d’eau dans sa
position initiale.
La page charge ...
La page charge ...
La page charge ...
La page charge ...
La page charge ...
La page charge ...
La page charge ...
La page charge ...
La page charge ...
La page charge ...
La page charge ...
La page charge ...
La page charge ...
La page charge ...
La page charge ...
La page charge ...
La page charge ...
La page charge ...
La page charge ...
La page charge ...
-
 1
1
-
 2
2
-
 3
3
-
 4
4
-
 5
5
-
 6
6
-
 7
7
-
 8
8
-
 9
9
-
 10
10
-
 11
11
-
 12
12
-
 13
13
-
 14
14
-
 15
15
-
 16
16
-
 17
17
-
 18
18
-
 19
19
-
 20
20
-
 21
21
-
 22
22
-
 23
23
-
 24
24
-
 25
25
-
 26
26
-
 27
27
-
 28
28
-
 29
29
-
 30
30
-
 31
31
-
 32
32
-
 33
33
-
 34
34
-
 35
35
-
 36
36
-
 37
37
-
 38
38
-
 39
39
-
 40
40


Danby DDR70A3GDB Le manuel du propriétaire
- Catégorie
- Déshumidificateurs
- Taper
- Le manuel du propriétaire
dans d''autres langues
- English: Danby DDR70A3GDB Owner's manual
- español: Danby DDR70A3GDB El manual del propietario
