KitchenAid KICO 3T133 PFES Mode d'emploi
- Catégorie
- Lave-vaisselle
- Taper
- Mode d'emploi

Instruction for use

2

3
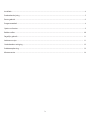
Installation ...............................................................................................................................................................................................4
Product description ..............................................................................................................................................................................5
First time use ........................................................................................................................................................................................... 6
Programs table .......................................................................................................................................................................................8
Options and functions .........................................................................................................................................................................9
Loading the racks ............................................................................................................................................................................... 10
Daily use ................................................................................................................................................................................................ 11
Advice and tips .................................................................................................................................................................................... 11
Care and maintenance ..................................................................................................................................................................... 12
Troubleshooting ................................................................................................................................................................................. 13
After-sales service .............................................................................................................................................................................. 14

4
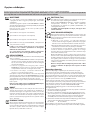
Installation
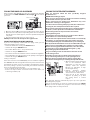
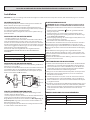
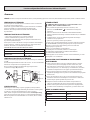
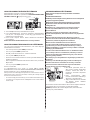
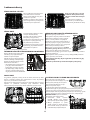
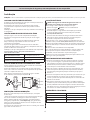
CONNECTING THE WATER SUPPLY
Adaptation of the water supply for installation should only be perfor-
med by a qualied technician.
The water inlet and outlet hoses may be positioned towards the right
or the left in order to achieve the best possible installation.
Make sure the dishwasher does not bend or squash the hoses.
CONNECTING THE WATER INLET HOSE
• Run the water until it is perfectly clear.
• Screw the inlet hose tightly into position and turn on the tap.
If the inlet hose is not long enough, contact a specialist store or an
authorised technician.
The water pressure must be within the values indicated in the Techni-
cal Data table - otherwise the dishwasher may be function properly.
Make sure the hose is not bent or compressed.
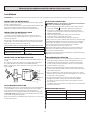
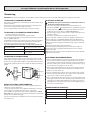
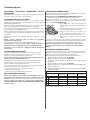
SPECIFICATIONS FOR THE CONNECTION OF THE WATER SUPPLY HOSE:
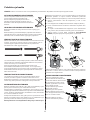
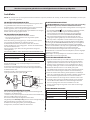
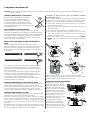
CONNECTING THE WATER OUTLET HOSE
Connect the outlet hose to a drain duct with a minimum diameter of
2 cm A.
The outlet hose connection must be at a height ranging from 40 to
80 cm from the oor or surface where the dishwasher rests.
Before connecting the water outlet hose to the sink drain, remove the
plastic plug B.
ANTI-FLOODING PROTECTION
Anti-ooding protection. To ensure oods do not occur, the dishwasher:
- is provided with a special system which blocks the water supply
in the event of anomalies or leaks from inside the appliance.
Some models are also equipped with the supplementary safety devi-
ce New Aqua Stop, which guarantees anti-ooding protection even
in the event of a supply hose rupture.
Under no circumstances should the water inlet hose be cut as it conta-
ins live electrical parts.
WATER SUPPLY cold or hot (max. 60°C)
WATER INTAKE 3/4”
POWER OF WATER PRESSURE
0,05 ÷ 1 MPa (0.5 ÷ 10 bar)
7,25 – 145 psi
MIN 40 cm
MAX 80 cm
ATTENTION: If the appliance must be moved at any time, keep it in an upright position; if absolutely necessary, it may be tilted onto its back.
Before using the appliance carefully read the Safety Instruction.
ELECTRICAL CONNECTION
WARNING: Under no circumstances should the water inlet hose
be cut as it contains live electrical parts.
Before inserting the plug into the electrical socket, make sure that:
• The socket is earth and complies with current regulations;
• The socket can withstand the maximum load of the appliance
as shown on the data plate located on the inside of the door (see
PRODUCT DESCRIPTION).
• The power supply voltage falls within the values indicated
on the data plate on the inside of the door.
• The socket is compatible with the plug of the appliance.
If this is not the case, ask an authorised technician to replace the plug
(see AFTER-SALES SERVICE). Do not use extension cables or multiple
sockets. Once the appliance has been installed, the power supply
cable and the electrical socket should be easily accessible.
The cable should not be bent or compressed.
If the power supply cable is damaged, have it replaced by the ma-
nufacturer or its authorised Technical Assistance Service in order
to prevent all potential hazards.
The Company shall not be held responsible for any incidents, if these
regulations are not observed.
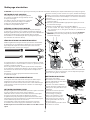
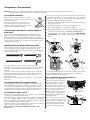
POSITIONING AND LEVELLING
1. Position the dishwasher on a level sturdy oor. If the oor is uneven,
the front feet of the appliance may be adjusted until it reaches
a horizontal position. If the appliance is levelled correctly, it will
be more stable and much less likely to move or cause vibrations
and noise while it is operating.
2. Before recessing the dishwasher, stick the adhesive transparent
strip under the wooden shelf in order to protect it from any conden-
sation which may form.
3. Place the dishwasher so that its sides or back panel are in contact
with the adjacent cabinets or the wall. This appliance can also be re-
cessed under a single worktop.
4. To adjust the height of the rear foot, turn the red hexagonal
bushing on the lower central part at the front of the dishwa-
sher using a hexagonal spanner with an opening of 8 mm. Turn
the spanner in
a clockwise direction to increase the height and in an anticlockwise
direction to decrease it.
DIMENSIONS AND CAPACITY:
WIDTH 598 mm
HEIGHT 820 mm
DEPTH 555 mm
CAPACITY 14 standard place-settings

5
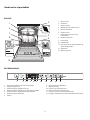
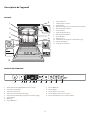
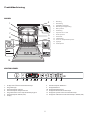
Product description
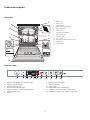
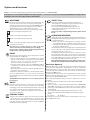
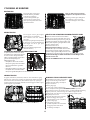
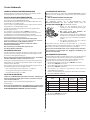
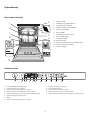
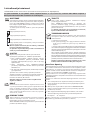
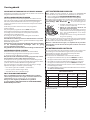
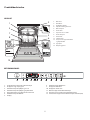
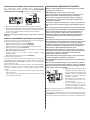
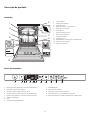
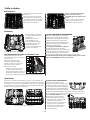
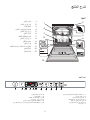
APPLIANCE
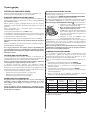
CONTROL PANEL
1 2 3
4
5 6 7
8 9 10 11 12 13
1. ON-OFF/Reset button with indicator light
2. Program selection button
3. Salt rell indicator light
4. Rinse Aid rell indicator light
5. Program number and delay time indicator
6. Tablet indicator light
7. Display
8. Multizone indicator lights
9. Multizone button
10. Delay button
11. Boost button with indicator light
12. Dynamic Clean button with indicator light
13. START/Pause button with indicator light / Tab
0000 000 00000
Service:
1
4
5
6
11
13
7
12
10
8
9
2
3
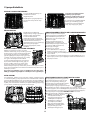
1. Upper rack
2. Cutlery rack
3. Foldable aps
4. Upper rack height adjuster
5. Upper spray arm
6. Lower rack
7. Dynamic Clean support
8. Lower spray arm
9. Filter Assembly
10. Salt reservoir
11. Detergent and Rinse Aid dispensers
12. Rating plate
13. Control panel

6
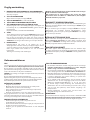
First time use
ADVICE REGARDING THE FIRST TIME USE
After installation, remove the stoppers from the racks and the retaining
elastic elements from the upper rack.
WATER SOFTENER SETTINGS
Before starting the rst wash program, set the hardness level
of the water from the mains supply FILLING THE SALT RESERVOIR.
First load the softener tank with water, then introduce about 1 kg
of salt. It is perfectly normal for water to ow out.
As soon as this procedure is complete, run a program without loading.
The “Pre-wash” program alone is NOT sucient.
Residual saline solution or grains of salt can lead to deep-down
corrosion, irreparably damaging the stainless steel components.
The guarantee is not applicable if faults are caused by such circumstances.
Only use salt that has been specically designed for dishwashers.
After the salt has been poured into the machine, the SALT REFILL
indicator light switches o.
If the salt container is not lled, the water softener and the heating
element may be damaged as a result of limescale accumulation.
Using of Salt is recommended with any type of dishwasher
detergent.
WATER SOFTENING SYSTEM
Water softener automatically reduces water hardness, consequently
preventing scale buildup on heater, contributing also to better cleaning
eciency.
This system regenerates itself with salt, therefore it is required
to rell salt container when empty.
Frequency of regeneration depends on water hardness level setting -
regeneration takes place once per 6 Eco cycles with water hardness
level set to 3.
Regeneration process starts in nal rinse and nishes in drying phase,
before cycle ends.
• Single regeneration consumes: ~3.5L of water;
• Takes up to 5 additional minutes for the cycle;
• Consumes below 0.005kWh of energy.
REFINED SALT AND RINSE AID
If you are using a multi-function product, we recommend that you
add salt in any case, especially if the water is hard or very hard
(follow the instructions given on the packaging).
If you do not add salt or rinse aid, the SALT REFILL and RINSE AID
REFILL indicator lights will remain lit.
FILLING THE SALT RESERVOIR
The use of salt prevents the formation of LIMESCALE on the dishes
and on the machine’s functional components.
• It is mandatory that THE SALT RESERVOIR NEVER BE EMPTY.
• It is important to set the water hardness.
The salt reservoir is located in the lower part of the dishwasher
(see PRODUCT DESCRIPTION) and must be lled when the SALT REFILL
indicator light in the control panel is lit.
1. Remove the lower rack and unscrew the
reservoir cap (anticlockwise).
2. Only the rst time you do this: ll the salt
reservoir with water.
3. Position the funnel (see gure) and ll the salt
reservoir right up to its edge (approximately
1 kg); it is not unusual for a little water to leak
out.
4. Remove the funnel and wipe any salt residue
away from the opening.
Make sure the cap is screwed on tightly, so that no detergent can
get into the container during the wash program (this could damage
the water softener beyond repair).
Whenever you need to add salt, it is mandatory to complete
the procedure before the beginning of the washing cycle to avoid
corrosion.
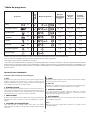
SETTING THE WATER HARDNESS
To allow the water softener to work in a perfect way, it is essential
that the water hardness setting is based on the actual water hardness
in your house. This information can be obtained from your local water
supplier.
The factory sets the default value for the water hardness.
• Switch on the appliance by pressing the ON/OFF button.
• Switch o the appliance by pressing the ON/OFF button.
• Hold down button P for 5 seconds, until you hear a beep.
• Switch on the appliance by pressing the ON/OFF button.
• The current selection level number and the salt indicator light both ash.
• Press button P to select the desired hardness level (see WATER
HARDNESS TABLE).
• Switch o the appliance by pressing the ON/OFF button.
Setting is complete!
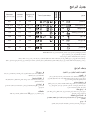
Water Hardness Table
Level
°dH
German degrees
°fH
French degrees
°Clark
English degrees
1 Soft 0 - 6 0 - 10 0 - 7
2 Medium 7 - 11 11 - 20 8 - 14
3 Average 12 - 16 21 - 29 15 - 20
4 Hard 17 - 34 30 - 60 21 - 42
5 Very hard 35 - 50 61 - 90 43 - 62

7
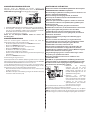
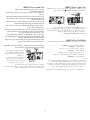
FILLING THE RINSE AID DISPENSER
Rinse aid makes dish DRYING easier. The rinse aid dispenser A should
be lled when the RINSE AID REFILL indicator light in the control
panel is lit.
1. Open the dispenser B by pressing and pulling up the tab on the lid.
2. Pour in the rinse aid (max.110 ml), making sure it does not overow
from the dispenser. If this happens, clean the spill immediately with
a dry cloth.
3. Press the lid down until you hear a click to close it.
NEVER pour the rinse aid directly into the appliance tub.
ADJUSTING THE DOSAGE OF RINSE AID
If you are not completely satised with the drying results, you can
adjust the quantity of rinse aid used.
• Switch the dishwasher on using the ON/OFF button.
• Switch it o using the ON/OFF button.
• Press button P three times - a beep will be heard.
• Switch it on using the ON/OFF button.
• The current selection level number and rinse aid indicator light ash.
• Press button P to select the level of rinse aid quantity to be supplied.
• Switch it o using the ON/OFF button
Setting is complete!
If the rinse aid level is set to ZERO (ECO), no rinse aid will be supplied.
The LOW RINSE AID indicator light will not be lit if you run out of rinse aid.
A maximum of 5 levels can be set according to the dishwasher model.
The factory setting is specic to the model, please follow instruction
above to check this for your machine.
• If you see bluish streaks on the dishes, set a low number (1-2).
• If there are drops of water or limescale marks on the dishes, set
a mid-range number (3-4).
A
B
FILLING THE DETERGENT DISPENSER
Only use detergent which has been specically designed
for dishwashers.
DO NOT USE washing up liquid.
Using excessive detergent may result in foam residues remaining
in the machine after the cycle has ended.
Usage of detergent not designed for dishwashers may cause
malfunction or damage to the appliance.
To achieve the best washing and drying results, the combined use
of detergent, rinse aid liquid and rened salt is required.
We recommend using detergents that do not contain phosphates
or chlorine, as these products are harmful to the environment.
Good washing results also depend on the correct amount
of detergent
being used.
Exceeding the stated amount does not result in a more eective
wash and increases environmental pollution.
The amount can be adjusted to the soil level. In the case of normally
soiled items, use approximately either 35g (powder detergent)
or 35ml (liquid detergent) and additional tea spoon of detergent
directly inside the tub. If tablets are used, one tablet will be enough.
If the crockery is only lightly soiled or if it has been rinsed with
water before being placed in the dishwasher, reduce the amount
of detergent used accordingly (minimum 25 g/ml) e.g. skip
the powder/gel putted inside the tub.
For good washing results also follow the instructions shown
on the detergent box.
For further questions please ask the detergent producers.
To open the detergent dispenser use the opening device C.
Introduce the detergent into the dry dispenser D only. Place
the amount of detergent for pre-washing directly inside the tub.
1. When measuring out the detergent
refer to the mentioned earlier
information to add the proper
quantity. Inside the dispenser
D there are indications to help
the detergent dosing.
2. Remove detergent residues
from the edges of the dispenser
and close the cover until it clicks.
3. Close the lid of the detergent
dispenser by pulling it up until
the closing device is secured
in place.
The detergent dispenser automatically opens up at the right time
according to the program.
If all-in-one detergents are used, we recommend using the TABLET
button, because it adjusts the program so that the best washing
and drying results are always achieved.
C
D

8
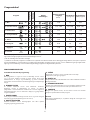
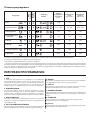
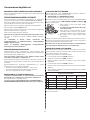
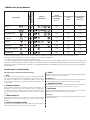
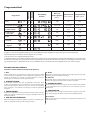
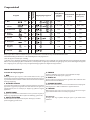
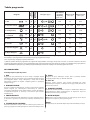
Programs table
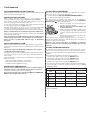
PROGRAMS DESCRIPTION
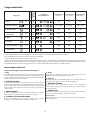
ECO program data is measured under laboratory conditions according to European Standard EN 60436:2020.
Pre-treatment of the dishes is not needed before any of the programs.
*) Not all options can be used simultaneously.
**) Values given for programs other than the program Eco are indicative only. The actual time may vary depending on many factors such as temperature
and pressure of the incoming water, room temperature, amount of detergent, quantity and type of load, load balancing, additional selected options
and sensor calibration. The sensor calibration can increase program duration up to 20 min.
Instructions on wash cycle selection.
1 ECO
Eco programme is suitable to clean normally soiled tableware, that
for this use, it is the most ecient programme in terms of its combined
energy and water consumption, and that it is used to assess complian-
ce with the EU Ecodesign legislation.
2 DYNAMIC SENSOR
For normally soiled dishes with dried food residues. Senses the level of
soiling on the dishes and adjusts the program accordingly. When the
sensor is detecting the soil level an animation appears in the display
and the cycle duration is updated.
3 PROFESSIONAL
Program recommended for heavily soiled crockery, especially suitable
for pans and saucepans (not to be used for delicate items).
4 FAST WASH&DRY
Normally soiled crockery. Everyday cycle, that ensures optimal cleaning
performance in shorter time.
5 GLASS
Program for delicate items, which are more sensitive to high temperatu-
res, for example glasses and cups.
6 FAST 30’
Program to be used for half load of lightly-soiled dishes with no dried
food residues. Does not have drying phase.
7 DYNAMIC HYGIENE
Normally or heavily soiled crockery, with additional antibacterial wash.
Can be used to perform maintenance of the dishwasher.
8 PRE-WASH
Use to refresh crockery planned to be washed later. No detergent
to be used with this program.
Notes:
Please note that cycle Fast 30’ is dedicated for lightly soiled dishes.
Program
Drying
phase
Auto Door
Opening
Available
options
*)
Duration
of wash
program
(h:min)
**)
Water
consumption
(litres/cycle)
Energy
consumption
(kWh/cycle)
1. Eco 50°
3:10 9,5 0,85
2. Dynamic Sensor
50-60°
1:25 - 3:00 7,0 - 14,0 0,90 - 1,40
3. Professional
65° -
2:27 16,5 1,70
4. Fast Wash&Dry 50°
1:25 11,5 1,10
5. Glass
45°
2:05 11,5 1,20
6. Fast 30’ 50°
-
-
0:30 9,0 0,50
7. Dynamic
Hygiene
65° -
1:40 10,0 1,30
8. Pre-Wash
- -
-
0:12 4,5 0,01

9
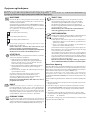
Options and functions
OPERATION INDICATOR
A LED light projected on the oor indicates that the dishwasher is
working. One of the following operating modes can be selected:
a) Disabled function.
b) When the cycle starts the light goes on for few seconds,
stays o during the cycle and ashes at the end of the cycle.
c) The light stays on during the cycle and ashes at the end
of the cycle (default mode).
If the delayed start was set, the light goes on either for the rst
few seconds or the entire duration of the countdown, based
on whether mode b) or c) was set.
The light goes o every time the door is opened. To select
the mode you prefer, switch on the machine, hold down
button P until one of the three letters appears on the display,
press button P until you reach the desired letter (or mode),
hold down button P to conrm the selection.
Note: If Auto Door Opening is active and it opens the door,
then Operation Indicator will not ash at the end of cycle.
MULTIZONE
If there are not many dishes to be washed, a half loading may
be used in order to save water, electricity and detergent.
Select the program and then press the MULTIZONE button:
the symbol of the chosen rack will appear on the display.
By default the appliance washes dishes in all racks.
To wash only the specic rack, press this button repeatedly:
shown on the display (only lower rack)
shown on the display (only upper rack)
shown on the display (only cutlery rack)
shown on the display (option is OFF and the appliance will
wash dishes in all racks).
Remember to load the upper or lower rack only,
and to reduce the amount of detergent accordingly.
If upper rack is removed, please apply detergent directly
to tub instead of detergent dispenser.
Auto Door Opening
Auto Door Opening is a convection drying system which automatically
opens the door during/after drying phase to ensure exceptional
drying performance every day. Door opens at the temperature that
is safe to your kitchen furniture, thus door will not be opened when
the option of BOOST is on.
As additional steam protection, special designed protection foil is added
together with the dishwasher. To see how to mount protection foil
please refer to (INSTALLATION GUIDE).
Auto Door Opening functionality could be disabled by the user
as follows:
1. Go to the Dishwasher software menu pressing and holding P
button (6 sec).
2. You are currently in Light Control Menu (please refer to OPERATION
INDICATOR description), if you don’t want to change anything
please press and hold P button (
until one of the two letters appears
on the display).
3. You switched to Auto Door Opening Control Menu, you could
change status of Auto Door Opening functionality by pressing P
button:
E – enabled d – disabled
To conrm the change and exit from the Control Menu please press
and hold P button (3 sec).
TABLET (Tab)
This setting allows you to optimize the performance
of the program according to the type of detergent used.
Press the START/PAUSE button for 3 seconds
(the corresponding symbol will light up) if you use
combined detergents in tablet form (rinse aid, salt
and detergent in 1 dose).
If you use powder or liquid detergent, this option should
be o.
DYNAMIC CLEAN
Thanks to the additional power jets this option provides
a more intensive and powerful wash in the lower rack,
in the specic area. This option is recommended for washing
pots and casseroles. Press this button to activate DYNAMIC
CLEAN (the indicator lights up).
BOOST
The boost option delivers a cut 25%-67% of the duration
for main cycles, while ensuring an optimal level of washing
and drying. In order to do that it will require water and energy
consumption compared to the regular full-lenght cycle.
The option can be selected on programs: Eco 50°, Dynamic
Sensor 50-60°, Glass 45°.
DELAY
The start time of the program may be delayed for a period
of time between 1 and 12 hours.
1. Press the DELAY button: the corresponding «h» symbol
appears on the display; each time you press the button,
the time (1h, 2h, etc. up to max. 12h) from the start
of the selected wash cycle will be increased.
2. Select the wash program, press the START/PAUSE button
and within 4 seconds close the door: the timer will begin
counting down.
3. Once this time has elapsed, the indicator light «h» switches
o and the wash cycle begins.
To adjust the delay time and select a shorter period of time,
press the DELAY button. To cancel it, press the button
repeatedly until the selected delayed start indicator light «h»
switches o.
The DELAY function cannot be set once a wash cycle has
been started.
OPTIONS can be selected directly by pressing the corresponding button (see CONTROL PANEL).
If an option is not compatible with the selected program see PROGRAMS TABLE, the corresponding LED ashes rapidly 3 times
and beeps will sound. The option will not be enabled.

10
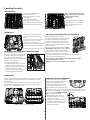
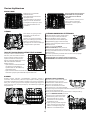
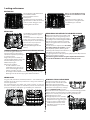
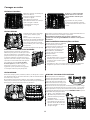
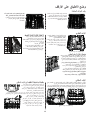
Loading the racks
UPPER RACK
Load delicate and light dishes:
glasses, cups, saucers, low salad
bowls.
The upper rack has tip-up supports
which can be used in a vertical
position when arranging tea/
dessert saucers or in a lower position
to load bowls and food containers.
(loading example for the upper rack)
FOLDABLE FLAPS WITH ADJUSTABLE POSITION
The side foldable aps can be fold
or unfold to optimize the arrangement
of crockery inside the rack. Wine glasses
can be placed safely in the foldable
aps by inserting the stem of each glass
into the corresponding slots.
Depending on the model:
– to unfold the aps there is needed
to slide it up and rotate or release
it from the snaps and pull it down.
– to fold the aps there is needed
to rotate it and slide aps down or pull
it up and attach aps to the snaps.
ADJUSTING THE HEIGHT OF THE UPPER RACK
The height of the upper rack can
be adjusted: high position to place bulky
crockery in the lower basket and low
position to make the most of the tip-up
supports by creating more space upwards
and avoid collision with the items loaded
into lower rack.
The upper rack is equipped with a Upper
Rack height adjuster (see gure), without
pressing the levers, lift it up by simply
holding the rack sides, as soon as the rack
is stable in its upper position. To restore
to the lower position, press the levers A at the sides of the rack
and move the basket downwards.
We strongly recommend that you do not adjust the height
of the rack when it is loaded.
NEVER raise or lower the basket on one side only.
LOWER RACK
For pots, lids, plates, salad bowls, cutlery etc. Large plates and lids
should ideally be placed at the sides to avoid interferences with
the spray arm.
The lower rack has tip-up supports which can be used in a vertical
position when arranging plates or in a horizontal position (lower)
to load pans and salad bowls easily.
(loading example for the lower rack)
DYNAMIC CLEAN IN LOWER RACK
Dynamic Clean uses the special water
jets in the rear of cavity to wash more
intensively the high dirty items.
The lower rack has a Dynamic Clean,
a special pull-out support in the rear
of the rack that can be used to support
frying pans or baking pans in upright position, thus taking up less space.
Placing the pots/casseroles faced to the Dynamic Clean® component
please activate the DYNAMIC CLEAN on the panel.
How to use Dynamic Clean:
1. Adjust the Dynamic Clean area
(G) folding down the rear plate
holders to load pots.
2. Load pots and casseroles inclined
vertically in Dynamic Clean area.
Pots have to be inclined towards
the power water jets.
The third rack was designed
to house the cutlery.
Arrange the cutlery as shown
in the gure.
A separate arrangement
of the cutlery makes collection
easier after washing and improves
washing and drying performance.
CUTLERY RACK
Knives and other utensils with
sharp edges must be positioned
with the blades facing
downwards.
The geometry of the rack makes
it possible to place such small
items as coee cups in the area
in the middle.

11
Daily use
Advice and tips
TIPS
Before loading the baskets, remove all food residues from the crockery
and empty the glasses. You do not need to rinse beforehand under
running water.
Arrange the crockery so that it is held in place rmly and does not tip
over; and arrange the containers with the openings facing downwards
and the concave/convex parts placed obliquely, thus allowing the water
to reach every surface and ow freely.
Warning: lids, handles, trays and frying pans do not prevent the sprayer
arms from rotating.
Place any small items in the cutlery basket.
Very soiled dishes and pans should be placed in the lower basket
because in this sector the water sprays are stronger and allow a higher
washing performance.
After loading the appliance, make sure that the sprayer arms can rotate
freely.
UNSUITABLE CROCKERY
• Wooden crockery and cutlery.
• Delicate decorated glasses, artistic handicraft and antique crockery.
Their decorations are not resistant.
• Parts in synthetic material which do not withstand high temperatures.
• Copper and tin crockery.
• Crockery soiled with ash, wax, lubricating grease or ink.
The colours of glass decorations and aluminium/silver pieces can
change and fade during the washing process. Some types of glass (e.g.
crystal objects) can become opaque after a number of wash cycles too.
DAMAGE TO GLASS AND CROCKERY
• Only use glasses and porcelain guaranteed by the manufacturer
as dishwasher safe.
• Use a delicate detergent suitable for crockery
• Collect glasses and cutlery from the dishwasher as soon as the wash
cycle is over.
TIPS ON ENERGY SAVING
• When the household dishwasher is used according
to the manufacturer’s instructions, washing tableware
in a dishwasher usually consumes less energy and water than
hand dishwashing.
• In order to maximize dishwasher eciency it is recommended
to initiate the wash cycle once dishwasher is fully loaded.
Loading the household dishwasher up to the capacity indicated
by the manufacturer will contribute to energy and water savings.
Information on correct loading of tableware can be found in Loading
chapter.
In case of partial loading it is recommended to use dedicated
wash options if available (Half load/ Zone Wash, Multizone), illing up
only selected racks. Incorrect loading or overloading the dishwasher
may increase resources usage (such as water, energy and time, as well
as increase noise level), reducing cleaning and drying performance.
• Manual pre-rinsing of tableware items leads to increased water
and energy consumption and is not recommended.
HYGIENE
To avoid odour and sediment which can be accumulated
in the dishwasher please run a high temperature program
at least one a month. Use a tea spoon of detergent and run it without
the loading to clean your appliance.
1. CHECK WATER CONNECTION
Check that the dishwasher is connected to the water supply
and that the tap is open.
2. SWITCH ON THE DISHWASHER
Open the door and press the ON/OFF button.
3. LOAD THE RACKS (see LOADING THE RACKS).
4. FILLING THE DETERGENT DISPENSER
5. CHOOSE THE PROGRAM AND CUSTOMISE THE CYCLE
Select the most appropriate program in accordance with the type
of crockery and its soiling level (see PROGRAMS DESCRIPTION)
by pressing the P button.
Select the desired options (see OPTIONS AND FUNCTIONS).
6. START
Start the wash cycle by pressing START/Pause button (led is
lit) and closing the door within 4 sec. When the program starts
you hear a single beep. If the door was not closed within 4sec.,
the alarm sound will be played. In this case, open the door, press
START/Pause button and close the door again within 4 sec.
7. END OF WASH CYCLE
The end of the wash cycle is indicated by beeps and by the ash-
ing of the wash cycle number on the display. Open the door
and switch o the appliance by pressing the ON/OFF button.
Wait for a few minutes before removing the crockery - to avoid
burns. Unload the racks, beginning with the lower one.
The machine will switch o automatically during certain extended
periods of inactivity, in order to minimise electricity consumption.
If the crockery is only lightly soiled or if it has been rinsed with
water before being placed in the dishwasher, reduce the amount
of detergent used accordingly.
MODIFYING A RUNNING PROGRAM
If a wrong program was selected, it is possible to change it, provided
that it has only just begun: open the door, press and hold the
ON/OFF button, the machine will switch o.
Switch the machine back on using the ON/OFF button and select
the new wash cycle and any desired options; Start the wash cycle
by pressing START/Pause button (led is lit) and closing the door within
4 sec.
ADDING EXTRA CROCKERY
Without switching o the machine, open the door (START/Pause
led starts blinking) (be ware of HOT steam!) and place the crockery
inside the dishwasher. Press the START/Pause button and close
the door within 4 sec., the cycle will resume from the point at which
it was interrupted.
ACCIDENTAL INTERRUPTIONS
If the door is opened during the wash cycle, or if there is a power cut,
the cycle stops. Press the START/Pause button and close the door
within 4 sec., the cycle will resume from the point at which it was
interrupted.

12
CLEANING THE DISHWASHER
Any marks on the inside of the appliance may be re-
moved using a cloth dampened with water and a little
vinegar.
The external surfaces of the machine and the control
panel can be cleaned using a non-abrasive cloth
which has been dampened with water. Do not use
solvents or abrasive products.
PREVENTING UNPLEASANT ODOURS
Always keep the door of the appliance ajar in order to avoid moisture
from forming and being trapped inside the machine.
Clean the seals around the door and detergent dispensers regularly
using a damp sponge. This will avoid food becoming trapped in the se-
als, which is the main cause behind the formation of unpleasant odours.
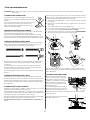
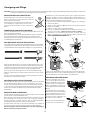
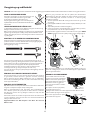
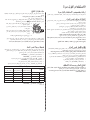
CHEKING THE WATER SUPPLY HOSE
Check the inlet hose regularly for brittleness and cracks. If damaged,
replace it by a new hose available through our After-Sales Service
or your specialist dealer. Depending on the hose type:
If the inlet hose has a transparent coating, periodically check if the co-
lour intensies locally. If yes, the hose may have a leak and should
be replaced.
For water stop hoses: check the small safety valve inspection win-
dow (see arrow). If it is red, the water stop function was triggered,
and the hose must be replaced by a new one.
For unscrewing this hose, press the release button while unscrewing
the hose.
CLEANING THE WATER INLET HOSE
If the water hoses are new or have not been used for an extended
period of time, let the water run to make sure it is clear and free of im-
purities before performing the necessary connections. If this precau-
tion is not taken, the water inlet could become blocked and damage
the dishwasher.
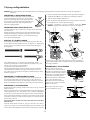
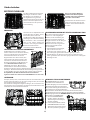
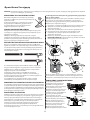
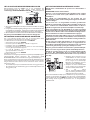
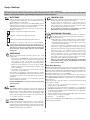
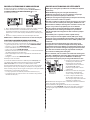
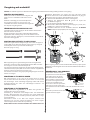
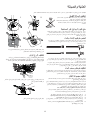
CLEANING THE FILTER ASSEMBLY
Regularly clean the lter assembly so that the lters do not clog
and that the waste water ows away correctly.
Using dishwasher with clogged lters or foreign objects inside ltra-
tion system or sprayarms may cause unit malfunction resulting in lose
of performance, noisy work or higher resources usage.
The lter assembly consists of three lters which remove food residues
from the washing water and then recirculate the water.
The dishwasher must not be used without lters or if the lter is
loose.
ATTENTION: Always unplug the appliance when cleaning it and when performing maintenance work.Do not use ammable liquids to clean
the machine.
At least once per month or after each 30 cycles, check the lter assembly
and if necessary clean it thoroughly under running water, using a non-
-metallic brush and following the instructions below:
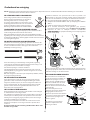
1. Turn the cylindrical lter A in an anti-clockwise direction and pull
it out (Fig 1).
2. Remove the cup lter B by exerting a slight pressure on the side
aps (Fig 2).
3. Slide out the stainless-steel plate lter C (Fig 3).
4. In case you nd foreign objects (such as broken glass, porcelain,
bones, fruit seeds etc.) please remove them carefully.
5. Inspect the trap and remove any food residues. NEVER REMOVE
the wash-cycle pump protection (black detail) (Fig 4).
After cleaning the lters, re-place the lter assembly and x it in po-
sition correctly; this is essential for maintaining the ecient operation
of the dishwasher.
CLEANING THE SPRAY ARMS
On occasions, food residue may be-
come encrusted onto the spray arms
and block the holes used to spray
the water. It is therefore recommended
that you check the arms from time
to time and clean them with a small
non-metallic brush.
To remove the upper spray arm, turn
the plastic locking ring in an anti-cloc-
kwise direction. The upper spray arm
should be replaced so that the side with the greater number of holes
is facing upwards.
The lower spray arm may be removed
by pulling it upwards.
21
43
A
C
A
B
Care and maintenance

13
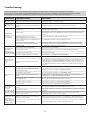
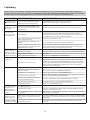
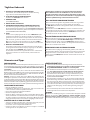
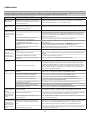
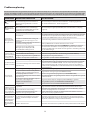
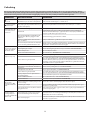
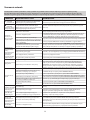
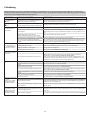
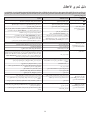
Troubleshooting
In case your dishwasher doesn’t work properly, check if the problem can be solved by going through the following list.
For other errors or issues please contact authorized After-sales Service which contact details can be found in the warranty booklet.
The manufacturer ensures the availability of spare parts for at least 10 years after production date of this appliance.
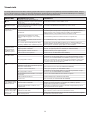
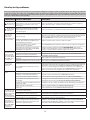
PROBLEMS POSSIBLE CAUSES SOLUTIONS
Salt
indicator is lit
Salt reservoir is empty. (After rell the salt in-
dicator may remain lit for several wash cycles).
Rell reservoir with salt (for more information - see page 2).
Adjust water hardness - see table, page 2.
Rinse aid
indicator is lit
Rinse aid dispenser is empty. (After rell the rin-
se aid indicator may remain lit for several wash
cycles).
Rell dispenser with rinse aid (for more information - see page 2).
The dishwasher
won’t start or does
not respond
to commands.
The appliance has not been plugged
in properly.
Insert the plug into the socket.
Power outage.
For safety reasons, dishwasher will not re-start automatically when power returns.
Open dishwasher door, press START/Pause button and close the door within 4
seconds.
The dishwasher door is not closed.
Auto Door Opening pin is not pulled in.
Vigorously push the door until you hear the “click”.
Cycle is interupted by door opening for more
than 4 seconds.
Press START/Pause and close the door within 4 seconds.
It does not respond to commands.
Display shows: 9 or 12 and On/O LED is
blinking rapidly
Switch o the appliance by pressing the ON/OFF button, switch it back on after
approximately one minute and restart the program. If problem persists, unplug
the appliance for 1 minute, then plug it back in.
The dishwasher
won’t drain.
Display shows:
3 and On/O LED
is blinking rapidly
The wash cycle has not nished yet. Wait until the wash cycle nishes.
The drain hose is bent. Check that the drain hose is not bent (see INSTALATION INSTRUCTION).
The sink drain pipe is blocked. Clean the sink drain pipe.
The lter is clogged up with food residues. Clean the lter (see CLEANING THE FILTER ASSEMBLY).
The dishwasher
makes excessive
noise.
The dishes are rattling against each Position the crockery correctly (see LOADING THE RACKS).
An excessive amount of foam has been pro-
duced.
The detergent has not been measured out correctly or it is not suitable for use
in dishwashers (see FILLING THE DETERGENT DISPENSER). Restart the current cycle
by switching OFF the dishwasher, then switch it on again, select a new program,
press START/Pause and close the door within 4 seconds. Please do not add any
detergent.
The dishes are not
clean.
The crockery has not been arranged properly. Arrange the crockery correctly (see LOADING THE RACKS).
The spray arms cannot rotate freely, being
hindered by the dishes.
Arrange the crockery correctly (see LOADING THE RACKS).
The wash cycle is too gentle. Select an appropriate wash cycle (see PROGRAMS TABLE).
An excessive amount of foam has been pro-
duced.
The detergent has not been measured out correctly or it is not suitable for use
in dishwashers (see FILLING THE DETERGENT DISPENSER).
The cap on the rinse aid compartment has not
been shut correctly.
Make sure the cap of the rinse aid dispenser is closed.
The lter is soiled or clogged. Clean the lter assembly (see CARE AND MAINTENANCE).
There is no salt. Fill the salt reservoir (see FILLING THE SALT RESERVOIR).
The dishwasher
does not ll
the water.
Display shows: H,
6 and On/O LED
is blinking rapidly
No water in the water supply or the tap is
closed.
Make sure there is water in the water supply or the tap running.
The inlet hose is bent.
Make sure the inlet hose is not bent (see INSTALLATION) reprogram the dishwasher
and reboot.
The sieve in the water inlet hose is clogged;
it is necessary to clean it
After having carried out the verication and cleaning, turn o and turn
on the dishwasher and restart a new program.
Dishwasher
nishes the cycle
prematurely.
Display shows: 15
and On/O LED is
blinking
rapidly
Drain hose positioned too low or siphoning
into home sewage system.
Check if end of drain hose is placed at correct height (see INSTALLATION).Check
for siphoning into home sewage system, install air admittance valve if necessary.
Air in water supply. Check water supply for leaks or other issues letting air inside.

14
Policy and standard documentation and additional product information can be found by:
• Visiting our website docs.kitchenaid.eu
• Using QR Code
• Alternatively, contact our After-sales Service (See phone number in the warranty booklet).
When contacting our After-sales Service, please state the codes provided on your product‘s
identication plate.
IEC 436
:
The model information can be retrieved using the QR-Code reported in the energy label.
The label also includes the model identier that can be used to consult the portal of the registry at https://eprel.ec.europa.eu
(available only on certain models).
After-sales service

15

EN
Printed in Italy
11/20
400011509129B

Brugsanvisninger

2

3
Installation ...............................................................................................................................................................................................4
Beskrivelse af produktet .....................................................................................................................................................................5
Ved første gangs brug .........................................................................................................................................................................6
Programtabel ..........................................................................................................................................................................................8
Indstillinger og funktioner ................................................................................................................................................................. 9
Fyldning af kurvene ........................................................................................................................................................................... 10
Daglig brug ........................................................................................................................................................................................... 11
Gode råd og tips ................................................................................................................................................................................. 11
Pleje og vedligeholdelse.................................................................................................................................................................. 12
Fejlnding ............................................................................................................................................................................................. 13
Service .................................................................................................................................................................................................... 14

4
Opstilling
BEMÆRK: Ved ytning af opvaskemaskinen skal den holdes i opretstående position. Hvis det er absolut nødvendigt, kan den lægges ned på ba-
gsiden.
Læs sikkerhedsanvisningerne med omhu, inden apparatet tages i brug.
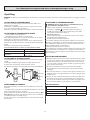
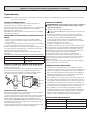
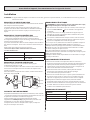
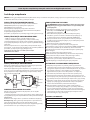
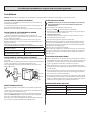
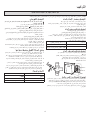
TILSLUTNING AF VANDFORSYNING
Tilpasning af vandforsyningen til installationen skal udføres af en
uddannet vvs-installatør.
Vandindløbs- og aøbsslangerne kan placeres til højre eller venstre
for at opnå den bedst mulige installation.
Kontroller, at slangerne ikke bøjes eller klemmes af opvaskemaskinen.
TILSLUTNING AF VANDINDLØBSSLANGEN
• Lad vandet løbe, til det er helt klart.
• Skru indløbsslangen godt fast, og åbn for hanen.
Hvis indløbsslangen ikke er lang nok, skal du kontakte en specialfor-
handler eller en autoriseret vvs-installatør.
Vandtrykket skal ligge inden for de værdier, der er angivet i tabellen
Tekniske data. I modsat fald fungerer opvaskemaskinen muligvis ikke
korrekt.
Kontroller, at slangen ikke er bøjet eller klemt.
SPECIFIKATIONER FOR TILSLUTNING AF VANDINDLØBSSLANGEN:
VANDFORSYNING kold eller varm (maks. 60°C)
VANDINDLØB 3/4"
VANDTRYK
0,05 ÷ 1 MPa (0,5 ÷ 10 bar)
7,25 – 145 psi
TILSLUTNING AF AFLØBSSLANGEN
Forbind aøbsslangen til en aøbsskakt med en diameter på mindst
2cm A.
Tilslutningen af aøbsslangen skal ske i en højde på 40 til 80 cm
fra gulvet eller det underlag, opvaskemaskinen står på.
Før aøbsslangen kobles til vaskens aøb, skal plastproppen B ernes.
OVERSVØMMELSESSIKRING
Oversvømmelsessikring. For at sikre mod oversvømmelse har opvaske-
maskinen:
- et særligt system, som blokerer vandindløbet i tilfælde af en unormal
situation eller utætheder inde i maskinen.
Nogle modeller har desuden en yderligere sikkerhedsanordning, New
Aqua Stop (Nyt vandstop), som sikrer beskyttelse mod oversvømmel-
se i tilfælde af brud på en indløbsslange.
Der må aldrig skæres i vandindløbsslangen, da den indeholder strøm-
førende dele.
TILSLUTNING TIL STRØMFORSYNINGEN
ADVARSEL: Der må aldrig skæres i vandindløbsslangen, da
den indeholder strømførende dele.
Før stikket sættes i kontakten, skal følgende kontrolleres:
• At kontakten er jordet og opfylder gældende lovgivning;
• At stikket kan holde til apparatets spidsbelastning som anført
i på typeskiltet indvendigt på lågen (se
PRODUKTBESKRIVELSE).
• At forsyningsspændingen er inden for de værdier, som er angivet
på typeskiltet indvendigt på lågen.
• At stikket passer til maskinens stikprop.
Hvis det ikke er tilfældet, skal stikproppen udskiftes af en autoriseret
elektriker (se ASSISTANCE). Der må ikke anvendes forlængerledninger
eller multistikdåser. Når maskinen er installeret, skal der være nem
adgang til stikkontakten og strømkablet.
Kablet må ikke bøjes eller presses sammen.
Hvis strømkablet er beskadiget, skal det udskiftes af producenten eller
dennes godkendte servicetekniker for at undgå alle potentielle farer.
Virksomheden er ikke ansvarlig for nogen hændelser, hvis disse regler
ikke er overholdt.
OPSTILLING OG NIVELLERING
1. Opvaskemaskinen skal stå på et vandret og robust gulv. Hvis gulvet
er ujævnt, kan maskinens forreste fødder justeres, til maskinen står
vandret. Hvis maskinen er nivelleret korrekt, står den mere stabilt,
og det er mindre sandsynligt, at den vil ytte sig og forårsage vibra-
tioner og støj, når den kører.
2. Montér den selvklæbende transparente lm under træhylden,
for at beskytte den mod eventuel kondens, før opvaskemaskinen
indbygges.
3. Placer opvaskemaskinen, så siderne eller bagpanelet berører de til-
stødende skabe eller væggen. Maskinen kan også indbygges under
et køkkenbord.
4. Drej på den røde, sekskantede bøsning forneden ved midten af va-
skemaskinens forside med en sekskantnøgle med en åbning på 8
mm, for at justere højden på den bagerste støtte. Drej nøglen med
uret, for at forøge højden, og imod uret, for at reducere den.
MÅL OG KAPACITET:
BREDDE 598 mm
HØJDE 820mm
DYBDE 555 mm
KAPACITET 14 standardkuverter
MIN 40 cm
MAX 80 cm
La page charge ...
La page charge ...
La page charge ...
La page charge ...
La page charge ...
La page charge ...
La page charge ...
La page charge ...
La page charge ...
La page charge ...
La page charge ...
La page charge ...
La page charge ...
La page charge ...
La page charge ...
La page charge ...
La page charge ...
La page charge ...
La page charge ...
La page charge ...
La page charge ...
La page charge ...
La page charge ...
La page charge ...
La page charge ...
La page charge ...
La page charge ...
La page charge ...
La page charge ...
La page charge ...
La page charge ...
La page charge ...
La page charge ...
La page charge ...
La page charge ...
La page charge ...
La page charge ...
La page charge ...
La page charge ...
La page charge ...
La page charge ...
La page charge ...
La page charge ...
La page charge ...
La page charge ...
La page charge ...
La page charge ...
La page charge ...
La page charge ...
La page charge ...
La page charge ...
La page charge ...
La page charge ...
La page charge ...
La page charge ...
La page charge ...
La page charge ...
La page charge ...
La page charge ...
La page charge ...
La page charge ...
La page charge ...
La page charge ...
La page charge ...
La page charge ...
La page charge ...
La page charge ...
La page charge ...
La page charge ...
La page charge ...
La page charge ...
La page charge ...
La page charge ...
La page charge ...
La page charge ...
La page charge ...
La page charge ...
La page charge ...
La page charge ...
La page charge ...
La page charge ...
La page charge ...
La page charge ...
La page charge ...
La page charge ...
La page charge ...
La page charge ...
La page charge ...
La page charge ...
La page charge ...
La page charge ...
La page charge ...
La page charge ...
La page charge ...
La page charge ...
La page charge ...
La page charge ...
La page charge ...
La page charge ...
La page charge ...
La page charge ...
La page charge ...
La page charge ...
La page charge ...
La page charge ...
La page charge ...
La page charge ...
La page charge ...
La page charge ...
La page charge ...
La page charge ...
La page charge ...
La page charge ...
La page charge ...
La page charge ...
La page charge ...
La page charge ...
La page charge ...
La page charge ...
La page charge ...
La page charge ...
La page charge ...
La page charge ...
La page charge ...
La page charge ...
La page charge ...
La page charge ...
La page charge ...
La page charge ...
La page charge ...
La page charge ...
La page charge ...
La page charge ...
La page charge ...
La page charge ...
La page charge ...
La page charge ...
La page charge ...
La page charge ...
La page charge ...
La page charge ...
La page charge ...
La page charge ...
La page charge ...
La page charge ...
La page charge ...
La page charge ...
La page charge ...
La page charge ...
La page charge ...
La page charge ...
La page charge ...
La page charge ...
La page charge ...
La page charge ...
La page charge ...
La page charge ...
La page charge ...
La page charge ...
La page charge ...
La page charge ...
La page charge ...
La page charge ...
La page charge ...
La page charge ...
La page charge ...
La page charge ...
La page charge ...
La page charge ...
La page charge ...
La page charge ...
La page charge ...
-
 1
1
-
 2
2
-
 3
3
-
 4
4
-
 5
5
-
 6
6
-
 7
7
-
 8
8
-
 9
9
-
 10
10
-
 11
11
-
 12
12
-
 13
13
-
 14
14
-
 15
15
-
 16
16
-
 17
17
-
 18
18
-
 19
19
-
 20
20
-
 21
21
-
 22
22
-
 23
23
-
 24
24
-
 25
25
-
 26
26
-
 27
27
-
 28
28
-
 29
29
-
 30
30
-
 31
31
-
 32
32
-
 33
33
-
 34
34
-
 35
35
-
 36
36
-
 37
37
-
 38
38
-
 39
39
-
 40
40
-
 41
41
-
 42
42
-
 43
43
-
 44
44
-
 45
45
-
 46
46
-
 47
47
-
 48
48
-
 49
49
-
 50
50
-
 51
51
-
 52
52
-
 53
53
-
 54
54
-
 55
55
-
 56
56
-
 57
57
-
 58
58
-
 59
59
-
 60
60
-
 61
61
-
 62
62
-
 63
63
-
 64
64
-
 65
65
-
 66
66
-
 67
67
-
 68
68
-
 69
69
-
 70
70
-
 71
71
-
 72
72
-
 73
73
-
 74
74
-
 75
75
-
 76
76
-
 77
77
-
 78
78
-
 79
79
-
 80
80
-
 81
81
-
 82
82
-
 83
83
-
 84
84
-
 85
85
-
 86
86
-
 87
87
-
 88
88
-
 89
89
-
 90
90
-
 91
91
-
 92
92
-
 93
93
-
 94
94
-
 95
95
-
 96
96
-
 97
97
-
 98
98
-
 99
99
-
 100
100
-
 101
101
-
 102
102
-
 103
103
-
 104
104
-
 105
105
-
 106
106
-
 107
107
-
 108
108
-
 109
109
-
 110
110
-
 111
111
-
 112
112
-
 113
113
-
 114
114
-
 115
115
-
 116
116
-
 117
117
-
 118
118
-
 119
119
-
 120
120
-
 121
121
-
 122
122
-
 123
123
-
 124
124
-
 125
125
-
 126
126
-
 127
127
-
 128
128
-
 129
129
-
 130
130
-
 131
131
-
 132
132
-
 133
133
-
 134
134
-
 135
135
-
 136
136
-
 137
137
-
 138
138
-
 139
139
-
 140
140
-
 141
141
-
 142
142
-
 143
143
-
 144
144
-
 145
145
-
 146
146
-
 147
147
-
 148
148
-
 149
149
-
 150
150
-
 151
151
-
 152
152
-
 153
153
-
 154
154
-
 155
155
-
 156
156
-
 157
157
-
 158
158
-
 159
159
-
 160
160
-
 161
161
-
 162
162
-
 163
163
-
 164
164
-
 165
165
-
 166
166
-
 167
167
-
 168
168
-
 169
169
-
 170
170
-
 171
171
-
 172
172
-
 173
173
-
 174
174
-
 175
175
-
 176
176
-
 177
177
-
 178
178
-
 179
179
-
 180
180
-
 181
181
-
 182
182
-
 183
183
-
 184
184
-
 185
185
-
 186
186
-
 187
187
-
 188
188
-
 189
189
-
 190
190
-
 191
191
-
 192
192


KitchenAid KICO 3T133 PFES Mode d'emploi
- Catégorie
- Lave-vaisselle
- Taper
- Mode d'emploi
dans d''autres langues
- English: KitchenAid KICO 3T133 PFES User guide
- Deutsch: KitchenAid KICO 3T133 PFES Benutzerhandbuch
- Nederlands: KitchenAid KICO 3T133 PFES Gebruikershandleiding
- português: KitchenAid KICO 3T133 PFES Guia de usuario
- dansk: KitchenAid KICO 3T133 PFES Brugervejledning
- polski: KitchenAid KICO 3T133 PFES instrukcja
- svenska: KitchenAid KICO 3T133 PFES Användarguide
- suomi: KitchenAid KICO 3T133 PFES Käyttöohjeet
Documents connexes
Autres documents
-
Whirlpool ADG 5520 Mode d'emploi
-
Whirlpool ADP 361 WH Mode d'emploi
-
HOTPOINT/ARISTON LFK 7M116 X FR Le manuel du propriétaire
-
Indesit DIFP 36 Le manuel du propriétaire
-
Hotpoint LLK 7M121 OCX EU Mode d'emploi
-
-
-
Bauknecht CBSIO 3C22 Mode d'emploi
-
Blaupunkt 5VF5X00EWE Manuel utilisateur
-