Crux 17195 Le manuel du propriétaire
- Catégorie
- Barbecues
- Taper
- Le manuel du propriétaire

www.cruxkitchen.com
Register your product and get support
12" X 16" SMOKELESS GRILL & GRIDDLE
PLANCHA & PARRILLERA SIN HUMO
GRIL ET PLAQUE DE CUISSON SANS FUMÉE DE 12 PO X 16 PO
Instruction manual and recipes / Manual de instrucciones y recetas / Manuel d’instructions et recettes
ARTISAN SERIES
17195_CRUX ARTISAN Smokeless Grill and Griddle_IM_r4.indd 117195_CRUX ARTISAN Smokeless Grill and Griddle_IM_r4.indd 1 12/8/20 4:08 PM12/8/20 4:08 PM

Contents
Índice
Table des matières
17195_CRUX ARTISAN Smokeless Grill and Griddle_IM_r4.indd 217195_CRUX ARTISAN Smokeless Grill and Griddle_IM_r4.indd 2 12/8/20 4:08 PM12/8/20 4:08 PM

Table of Contents
Important Safeguards ..........................................................................................................................................2
Additional Important Safeguards ................................................................................................................... 3
Notes On The Plug ................................................................................................................................................3
Notes On The Cord ...............................................................................................................................................3
Plasticizer Warning................................................................................................................................................3
Electric Power .........................................................................................................................................................4
Getting To Know Your 12” X 16” Smokeless Grill & Griddle .................................................................4
Temperature Control Probe ..............................................................................................................................4
Before Using For The First Time ..................................................................................................................... 5
Operating Instructions .........................................................................................................................................5
Time/Temperature Chart....................................................................................................................................6
Usda Cooking Guidelines ...................................................................................................................................6
User Maintenance Instructions .........................................................................................................................6
Care & Cleaning Instructions ............................................................................................................................6
Hints For Care And Use Of Non-Stick Surface ......................................................................................... 7
Steps For Stain Removal And Proper Care Of Your Non-Stick Coating ....................................... 7
Recipe Guide ....................................................................................................................................................... 8-9
Warranty .................................................................................................................................................................. 10
Índice
Medidas de seguridad importantes .............................................................................................................. 11
Otras medidas de seguridad importantes ................................................................................................ 12
Notas sobre el enchufe ..................................................................................................................................... 12
Notas sobre el cable ........................................................................................................................................... 12
Advertencia sobre plastificantes .................................................................................................................. 13
Corriente eléctrica ............................................................................................................................................... 13
Conozca su plancha & parrillera sin humo de 12” x 16” ....................................................................... 13
La sonda de control de temperatura .................................................................................................... 13-14
Antes de usar por primera vez ...................................................................................................................... 14
Instrucciones de uso ...........................................................................................................................................14
Carta de tiempos/temperaturas ................................................................................................................... 15
Guías según el usda ............................................................................................................................................ 15
Instrucciones de mantenimiento ................................................................................................................... 16
Instrucciones de cuidado y limpieza ........................................................................................................... 16
Consejos sobre el cuidado y uso de los revestimientos antiadherentes ..................................... 16
Instrucciones para la eliminación de manchas y el cuidado adecuado
de su recubrimiento antiadherente .............................................................................................................. 16
Recetas ................................................................................................................................................................17-18
Garantía .................................................................................................................................................................... 19
Table des matières
Consignes de sécurité importantes ............................................................................................................20
Consignes de sécurité importantes supplémentaires ......................................................................... 21
Remarques concernant la fiche ..................................................................................................................... 21
Remarques sur le cordon ................................................................................................................................. 21
Mise en garde concernant le plastifiant .................................................................................................... 22
Puissance électrique .......................................................................................................................................... 22
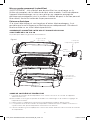
Apprendre à connaître votre gril et plaque de cuisson sans fumée de 12 po x 16 po ......... 22
Sonde de contrôle de température ......................................................................................................22-23
Avant la première utilisation .......................................................................................................................... 23
Mode d’emploi ...................................................................................................................................................... 23
Graphique de temps et température ........................................................................................................ 24
Directives de cuisine de l’usda ...................................................................................................................... 24
Instructions d’entretien pour l’utilisateur ................................................................................................. 25
Instructions d’entretien et de nettoyage .................................................................................................. 25
Conseils d’entretien et d’utilisation de la surface anti-adhésive .................................................... 25
Étapes permettant d’éliminer les taches et d’entretenir correctement
votre revêtement anti-adhésif ....................................................................................................................... 25
Recettes ............................................................................................................................................................26-27
Garantie ................................................................................................................................................................... 28
17195_CRUX ARTISAN Smokeless Grill and Griddle_IM_r4.indd 117195_CRUX ARTISAN Smokeless Grill and Griddle_IM_r4.indd 1 12/8/20 4:08 PM12/8/20 4:08 PM

2
IMPORTANT SAFEGUARDS
When using electrical appliances, basic safety precautions should always
be followed, including the following:
1. READ ALL INSTRUCTIONS.
2. Do not touch hot surfaces. Use handles or knobs. Use oven mitts or
potholders.
3. To protect against electrical shock, do not immerse cord or plugs or
temperature control probe in water or other liquid.
4. This appliance is not intended for use by persons (including children)
with reduced physical, sensory or mental capabilities, or lack of
experience and knowledge, unless they have been given supervision or
instruction concerning use of the appliance by a person responsible for
their safety.
5. Close supervision is necessary when any appliance is used by or
near children.
6. Turn unit Off and unplug from outlet when not in use and before cleaning.
Allow to cool before putting on or taking off parts, and before cleaning the
appliance.
7. Do not operate any appliance with a damaged cord or plug or after the
appliance malfunctions, or has been damaged in any manner. Return
appliance to the nearest authorized service facility for examination, repair
or adjustment.
8. The use of accessory attachments not recommended by the appliance
manufacturer may cause injuries.
9. Do not use outdoors.
10. Do not let cord hang over the edge of table or counter, or touch hot
surfaces.
11. Do not place on or near a hot gas or electric burner, or in a heated oven.
12. Extreme caution must be used when moving an appliance containing hot
oil or other hot liquids.
13. Always attach temperature control probe to appliance first, then plug
cord in the wall outlet.
To disconnect, turn temperature control probe to OFF, then remove plug
from wall outlet.
14. Do not use appliance for other than intended use.
FOR HOUSEHOLD USE ONLY
SAVE THESE INSTRUCTIONS
17195_CRUX ARTISAN Smokeless Grill and Griddle_IM_r4.indd 217195_CRUX ARTISAN Smokeless Grill and Griddle_IM_r4.indd 2 12/8/20 4:08 PM12/8/20 4:08 PM

3
ADDITIONAL IMPORTANT
SAFEGUARDS
CAUTION HOT SURFACES: This appliance generates heat and escaping
steam during use. Proper precautions must be taken to prevent the risk of
burns, fires or other injury to persons or damage to property.
CAUTION: This appliance is hot during operation and retains heat for
some time after turning OFF. Always use oven mitts when handling hot
materials and allow metal parts to cool before cleaning. Do not place
anything on top of the appliance while it is operating or while it is hot.
1. All users of this appliance must read and understand this Instruction Manual
before operating or cleaning this appliance.
2. The cord to this appliance should be plugged into a 120 V AC electrical
outlet only.
3. If this appliance begins to malfunction during use, turn unit Off and
immediately unplug the cord. Then remove the temperature control probe.
Do not use or attempt to repair the malfunctioning appliance.
4. Do not leave this appliance unattended during use.
5. To prevent fire hazards; the Grill or Griddle plate must be placed in the
proper position when plugged in.
6. WARNING: To prevent personal injury or property damage, the drip pan
must be in place during cooking.
NOTES ON THE PLUG
This appliance is equipped with a grounded-type 3-wire cord (3-prong plug).
This plug will only fit into an electrical outlet made for a 3-prong plug. This is
a safety feature. If the plug should fail to fit the outlet, contact an electrician
to replace the obsolete outlet. Do not attempt to defeat this safety feature.
NOTES ON THE CORD
a) A short power-supply cord (or detachable power-supply cord) is to be
provided to reduce risks resulting from becoming entangled in or tripping
over a longer cord.
b) Longer detachable power-supply cords or extension cords are available
and may be used if care is exercised in their use.
c) If a long detachable power-supply cord or extension cord is used:
1) The marked electrical rating of the detachable power-supply cord or
extension cord should be at least as great as the electrical rating of
the appliance;
2) If the appliance is of the grounded type, the extension cord should
be a grounding- type 3-wire cord;
3) The longer cord should be arranged so that it will not drape over the
counter top or table top where it can be pulled on by children or
tripped over unintentionally.
Plasticizer Warning
CAUTION:To prevent Plasticizers from migrating to the finish of the counter
top or table top or other furniture, place NON-PLASTIC coasters or place
mats between the appliance and the finish of the counter top or table top.
Failure to do so may cause the finish to darken; permanent blemishes may
occur or stains can appear.
17195_CRUX ARTISAN Smokeless Grill and Griddle_IM_r4.indd 317195_CRUX ARTISAN Smokeless Grill and Griddle_IM_r4.indd 3 12/8/20 4:08 PM12/8/20 4:08 PM

4
Electric Power
If the electrical circuit is overloaded with other appliances, your appliance
may not operate properly. It should be operated on a separate electrical
circuit from other appliances.
GETTING TO KNOW YOUR 12" X 16" SMOKELESS GRILL & GRIDDLE
Product may vary slightly from illustrations
Figure 1 Adjustable
temperature control
Unit
base
Cool touch handle
Grill Plate
Griddle
Plate
Smoke-less cooling
drip pan
TEMPERATURE CONTROL PROBE
1. The temperature control probe is the nerve center and brain of the appliance. Treat it carefully.
Dropping or banging it could change its calibration and make the temperature settings
inaccurate.
2. Rotate the dial to select the temperature as called for in the recipe.
3. The indicator light on the temperature control probe will illuminate as soon as the dial is
rotated. The light will go out once the selected temperature has been reached.
4. Allow the smokeless Grill or Griddle to cool before removing the temperature control probe.
5. To clean the temperature control probe, simply wipe down with a soft, damp cloth.
Make sure you dry it thoroughly before using again.
NOTE: The temperature control probe is not submersible.
CAUTION: Use the temperature control probe supplied with this appliance only.
The use of any other temperature control probe may cause fire, electric shock, or injury.
17195_CRUX ARTISAN Smokeless Grill and Griddle_IM_r4.indd 417195_CRUX ARTISAN Smokeless Grill and Griddle_IM_r4.indd 4 12/8/20 4:08 PM12/8/20 4:08 PM

5
Electric Power
If the electrical circuit is overloaded with other appliances, your appliance
may not operate properly. It should be operated on a separate electrical
circuit from other appliances.
GETTING TO KNOW YOUR 12" X 16" SMOKELESS GRILL & GRIDDLE
Product may vary slightly from illustrations
Figure 1 Adjustable
temperature control
Unit
base
Cool touch handle
Grill Plate
Griddle
Plate
Smoke-less cooling
drip pan
TEMPERATURE CONTROL PROBE
1. The temperature control probe is the nerve center and brain of the appliance. Treat it carefully.
Dropping or banging it could change its calibration and make the temperature settings
inaccurate.
2. Rotate the dial to select the temperature as called for in the recipe.
3. The indicator light on the temperature control probe will illuminate as soon as the dial is
rotated. The light will go out once the selected temperature has been reached.
4. Allow the smokeless Grill or Griddle to cool before removing the temperature control probe.
5. To clean the temperature control probe, simply wipe down with a soft, damp cloth.
Make sure you dry it thoroughly before using again.
NOTE: The temperature control probe is not submersible.
CAUTION: Use the temperature control probe supplied with this appliance only.
The use of any other temperature control probe may cause fire, electric shock, or injury.
BEFORE USING FOR THE FIRST TIME
1. Carefully unpack the 12” x 16” Smokeless Grill & Griddle and remove all packaging materials.
2. Place the unit on a clean, flat working surface.
NOTE: Some countertop and table surfaces, such as Corian® and other surfaces, are not
designed to withstand the prolonged heat generated by this Grill or Griddle. We recommend
placing a hot pad or trivet under the unit beforehand to avoid possible damage to the surface.
Be sure the sides and back of the unit are at least 4 inches away from any walls, cabinets, or
objects on the counter or table.
3. Before first use, see Hints For Care and Use of Non-Stick Surface and Care & Cleaning
Instructions sections of this Instruction Manual.
4. Before cooking in the 12” x 16” Smokeless Grill & Griddle for the first time, wash the non-stick
cooking plates in mild dishwashing soap, wipe and allow to dry.
5. Place the drip pan inside the unit base and place the Grill or Griddle plate over in a way that it
locks in place between the gaps. Add water to the drip tray up to the max line.
6. Turn the temperature control knob on probe to OFF position and attach securely in place.
7. Coat the non-stick surface with vegetable shortening before heating. If necessary, remove
excess oil with paper towel.
OPERATING INSTRUCTIONS
1. Place the drip pan inside the base and place the grill or griddle plate over in a way that it locks
in place between the gaps. Add water to the drip tray up to the max line.
2. Turn temperature control probe to the OFF position.
3. Plug the temperature control probe securely into unit’s control probe socket.
4. Plug cord into any standard 120 V AC wall outlet.
IMPORTANT: ALWAYS PLUG CORD INTO SMOKELESS GRILL & GRIDDLE FIRST, THEN INTO
WALL OUTLET.
5. Preheat the unit for approximately 10 minutes before cooking. To preheat, turn the temperature
control to desired temperature. The indicator light on the temperature control probe will
illuminate as soon as the dial is rotated. The light will go out once the selected temperature has
been reached.
6. Add food and cook according to the recipe. Adjust temperature control dial from 200ºF to
400ºF as necessary.
NOTE: During cooking, the light will go on and off indicating that the unit is maintaining
proper temperature.
CAUTION: Cooking surfaces are hot during use.
CAUTION: DO NOT USE COOKING SPRAYS. THEY CAN CAUSE A BUILD-UP ON THE COOKING
PLATES AND MAY AFFECT THE NON-STICK PERFORMANCE OF THE PRODUCT.
7. When cooking has been completed, turn the temperature control to the OFF position. The
indicator light on the temperature control probe will turn off.
8. Unplug cord from wall outlet. Let the unit cool completely.
9. Remove temperature control probe from the unit. Follow the Care & Cleaning Instructions
described in this Instruction Manual.
17195_CRUX ARTISAN Smokeless Grill and Griddle_IM_r4.indd 517195_CRUX ARTISAN Smokeless Grill and Griddle_IM_r4.indd 5 12/8/20 4:08 PM12/8/20 4:08 PM

6
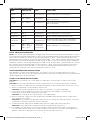
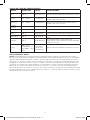
TIME/TEMPERATURE CHART
FOOD
TEMPERATURE
TIME DIRECTIONS
Chicken 350° F 20-25 minutes Rotate halfway into cooking time
Bacon 325° - 350° F 8-14 minutes Set to appropriate temperature –
turn as required
Sausage 325° - 350° F 20-30 minutes Set to appropriate temperature –
turn as required
French Toast 350° F 6-10 minutes Rotate halfway into cooking time
Hamburger 350° F 3-14 minutes Rotate halfway into cooking time
Ham Slices 350° F 14-18 minutes Rotate halfway into cooking time
Sandwiches 350° F 6-10 minutes Butter outside and brown both sides
Pork Chops 350° F 20-30 minutes
Brown both sides then reduce temperature
to 325° F. Rotate halfway into cooking time
Steaks
400° F – Rare
400° F – Medium
400° F – Well
4-6 minutes
7-12 minutes
13-18 minutes
Rotate halfway into cooking time
USDA COOKING GUIDELINES
NOTE: The United States Department of Agriculture recommends that meat and poultry be cooked
to the following internal temperatures to be sure any harmful bacteria has been killed. Ground turkey
and chicken should be cooked to an internal temperature of 165˚F / 74˚C and ground beef, veal,
lamb and pork be cooked to an internal temperature 160˚F / 71˚C. Whole chicken and turkey should
be cooked to an internal temperature of 180˚F / 82˚C; 170˚F / 77˚C for the breast. Goose and duck
should be cooked to an internal temperature of 180˚F / 82˚C. Fresh beef, veal and lamb, etc., should
be cooked to an internal temperature of at least 145˚F / 63˚C. Fresh pork should be cooked to an
internal temperature of at least 160˚F / 71˚C. When re-heating meat and poultry products, they
should also be cooked to an internal temperature of 165˚F / 74˚C.
USER MAINTENANCE INSTRUCTIONS
This appliance requires little maintenance. It contains no user serviceable parts. Do not try to
repair it yourself. Any servicing requiring disassembly other than cleaning must be performed by a
qualified appliance repair technician.
CARE & CLEANING INSTRUCTIONS
CAUTION: Do not immerse the cord, plug or temperature control probe in water or any other
liquid.
CAUTION: To avoid accidental burns, allow cooking plates to cool thoroughly before cleaning.
1. When cooking is completed, turn unit Off and unplug cord from wall outlet. Allow unit to cool.
2. Remove temperature control probe from the unit.
CAUTION: The probe may become hot after use. Allow to cool before handling.
3. If necessary, wipe temperature control case and probe with a damp, soft cloth. Dry
temperature control probe completely. Set aside.
CAUTION: The temperature control probe is not submersible.
4. Remove drip tray; empty contents. Wash Grill or Griddle plate and drip tray in soapy water;
rinse and dry thoroughly.
CAUTION: the content in the drip tray may become hot. Allow the drip tray and the content to
cool before removing it from the unit for cleaning.
5. To wash by hand, wash grill or Griddle plate with hot soapy water. Dry with towel.
CAUTION: Probe and probe receptacle must be completely dry before use.
6. For stubborn food particles, loosen with a plastic cleaning pad. Avoid hard scouring on the
non-stick finish as this may cause surface scratches. Do not use steel wool, scouring pads, or
abrasive cleaners on any part of the unit. Clean this unit after each use.
17195_CRUX ARTISAN Smokeless Grill and Griddle_IM_r4.indd 617195_CRUX ARTISAN Smokeless Grill and Griddle_IM_r4.indd 6 12/8/20 4:08 PM12/8/20 4:08 PM

7
HINTS FOR CARE AND USE OF NON-STICK SURFACE
• To avoid scratching the non-stick surface, do not stack objects on the Grill or Griddle cooking
plates.
CAUTION: DO NOT USE COOKING SPRAYS. THEY CAN CAUSE A BUILD-UP ON THE
COOKING
PLATES AND MAY AFFECT THE NON-STICK PERFORMANCE OF THE PRODUCT.
• Use medium to low heat for best cooking results. Very high temperatures can cause
discoloration and shorten the life span of any non-stick surface. If higher temperatures are
necessary, preheat on medium heat for a few minutes.
• For best results and preserve the non-stick coating longer, use nylon, plastic, wooden or rubber
utensils. Never cut food on the cooking surfaces.
• Remove stubborn stains with a plastic scouring pad and mild dish washing liquid;
DO NOT USE STEEL WOOL as it will damage the non-stick surface of the cooking plates.
• The Grill or Griddle plates are dishwasher safe. For best results, place in the top rack of
your dishwasher to clean.
STEPS FOR STAIN REMOVAL AND PROPER CARE OF YOUR NON-STICK COATING
1. Identify stained areas on the cooking surface and sprinkle some baking soda on the stains.
2. Moisten the baking soda to get a paste like texture by adding some water.
3. Let the paste stand for a few minutes on the stains (not more than an hour).
4. Rub with a soft damp cloth or lightly scrub with a plastic scouring pad, wipe clean and dry
thoroughly.
NOTE: Do not rub vigorously when using a plastic scouring pad and NEVER use a metal
scouring pad as this may damage the non-stick coating.
5. Repeat the cycle once again if necessary. The performance and non-stick property of the
non-stick coating will not be affected due to stains.
17195_CRUX ARTISAN Smokeless Grill and Griddle_IM_r4.indd 717195_CRUX ARTISAN Smokeless Grill and Griddle_IM_r4.indd 7 12/8/20 4:08 PM12/8/20 4:08 PM

Recipes
8
Grilled Corn with Chipotle and Lime Aioli
Servings: 5
Prep time: 5 minutes / Cook time: 15 minutes
5 ears of corn
2 cups mayonnaise
Juice of 1 lime
1/2 jalapeño, seeded and minced
2 garlic cloves, minced
1 chipotle pepper in adobo sauce, minced
1/4 teaspoon ground cumin
2 tablespoons butter, melted
Salt and pepper to taste
1. Preheat the Smokeless Grill. Turn the dial to 400F to preheat.
2. Brush the ears of corn with butter and place on the grill. Grill for 15 minutes, turning
every 5 minutes.
3. Add 1 cup of mayonnaise, the juice of one lime, and the minced jalapeño to a small bowl.
Add salt and pepper to taste and mix well.
4. Add the remaining cup of mayonnaise to another small bowl with the minced chipotle
and the ground cumin. Add salt and pepper and mix well.
5. Serve the grilled corn with both aioli and wedges of lime on the side.
Grilled Chicken, Avocado and Asparagus Power Bowl
Servings 2
Prep time: 5 minutes / Cook time: 30 min
2 avocados, halved
2 chicken breasts
10-12 asparagus spears
5 cups baby spinach
2 tablespoons flax seeds
3 tablespoons balsamic vinegar
3 tablespoons extra virgin olive oil
1 honey
1/2 teaspoon Dijon mustard
1/2 teaspoon garlic powder
Salt and pepper to taste
1. Preheat the Smokeless Grill. Turn the dial to 350F to preheat.
2. Add the balsamic vinegar, olive oil, honey, Dijon mustard, garlic powder, salt and pepper
to a mason jar. Shake well and set aside.
3. Brush the chicken breasts with olive oil and season with salt and pepper.
4. Place the chicken on the grill and cook for 20 minutes, flipping halfway.
5. At the 15 minute mark, brush the avocado with olive oil and grill for 5 minutes.
6. Remove the chicken and avocado. Brush asparagus with olive oil and grill
for 10-12 minutes or until tender.
7. Place half of the baby spinach in a bowl. Add one chicken breast, two avocado halves,
and half of the asparagus. Sprinkle one tablespoon of the flax seeds. Repeat for the
second bowl.
8. Shake the dressing once more and drizzle onto both bowls.
17195_CRUX ARTISAN Smokeless Grill and Griddle_IM_r4.indd 817195_CRUX ARTISAN Smokeless Grill and Griddle_IM_r4.indd 8 12/8/20 4:08 PM12/8/20 4:08 PM

Recipes
9
Lamb Skewers With Grilled Zucchini, Kalamata Olives, and Crumbled Feta
Serves 3-4
Prep time: 1 hour minutes / Cook time:
1 pound of lamb, 1” cubes
1 tablespoon fresh thyme, minced
1 tablespoon dried oregano
Juice of one lemon
2 tablespoons extra virgin olive oil
2 large zucchini, cut into 1/2” slices
length wise
3/4 cup Kalamata olives, sliced
3/4 cup crumbled feta
Salt and pepper
1. Add the cubed lamb, thyme, oregano, lemon, olive oil, salt and pepper to a resealable plastic bag.
Shake the bag to mix the marinade and set aside for at least an hour.
2. Meanwhile, soak wooden skewers in water.
3. Preheat the Smokeless Grill. Turn the dial to 375F to preheat.
4. Add 3-4 cubes of lamb to each skewer and grill for 10-12 minutes, turning halfway through.
5. Remove the lamb skewers. Brush olive oil on the zucchini,
season with salt and pepper, and grill for 2 minutes on each side.
6. Serve the skewers and grilled zucchini on a plate and top off with the crumbled feta and sliced
Kalamata olives.
17195_CRUX ARTISAN Smokeless Grill and Griddle_IM_r4.indd 917195_CRUX ARTISAN Smokeless Grill and Griddle_IM_r4.indd 9 12/8/20 4:08 PM12/8/20 4:08 PM

Limited TWO-YEAR Warranty
SENSIO Inc. hereby warrants that for a period of TWO YEARS from the date
of purchase, this product will be free from mechanical defects in material and
workmanship, and for 90 days in respect to non-mechanical parts. At its sole
discretion, SENSIO Inc. will either repair or replace the product found to be
defective, or issue a refund on the product during the warranty period.
The warranty is only valid for the original retail purchaser from the date of
initial retail purchase and is not transferable. Keep the original sales receipt,
as proof of purchase is required to obtain warranty validation. Retail stores
selling this product do not have the right to alter, modify, or in any way revise
the terms and conditions of the warranty.
EXCLUSIONS:
The warranty does not cover normal wear of parts or damage resulting from
any of the following: negligent use of the product, use of improper voltage
or current, improper routine maintenance, use contrary to the operating
instructions, disassembly, repair, or alteration by anyone other than qualified
SENSIO Inc. personnel. Also, the warranty does not cover Acts of God such as
fire, floods, hurricanes, or tornadoes.
SENSIO Inc. shall not be liable for any incidental or consequential damages
caused by the breach of any express or implied warranty. Apart from the
extent prohibited by applicable law, any implied warranty of merchantability
or fitness for a particular purpose is limited in time to the duration of the
warranty. Some states, provinces or jurisdictions do not allow the exclusion or
limitation of incidental or consequential damages, or limitations on how long
an implied warranty lasts, and therefore, the above exclusions or limitations
may not apply to you. The warranty covers specific legal rights which may
vary by state, province and/or jurisdiction.
HOW TO OBTAIN WARRANTY SERVICE:
You must contact Customer Service at our toll-free number: 1-866-832-4843.
A Customer Service Representative will attempt to resolve warranty issues
over the phone. If the Customer Service Representative is unable to resolve
the problem, you will be provided with a case number and asked to return the
product to SENSIO Inc. Attach a tag to the product that includes: your name,
address, daytime contact telephone number, case number, and description
of the problem. Also, include a copy of the original sales receipt. Carefully
package the tagged product with the sales receipt, and send it (with shipping
and insurance prepaid) to SENSIO Inc.’s address. SENSIO Inc. shall bear no
responsibility or liability for the returned product while in transit to SENSIO
Inc.’s Customer Service Center.
10
ARTISAN SERIES
17195_CRUX ARTISAN Smokeless Grill and Griddle_IM_r4.indd 1017195_CRUX ARTISAN Smokeless Grill and Griddle_IM_r4.indd 10 12/8/20 4:08 PM12/8/20 4:08 PM

11
MEDIDAS DE SEGURIDAD
IMPORTANTES
Cuando se usan artefactos eléctricos, se deben siempre seguir las
precauciones básicas de seguridad, incluso lo siguiente:
1. LEA TODAS LAS INSTRUCCIONES.
2. No toque las superficies calientes. Utilice las asas o los mangos. Use guantes
para el horno y agarraderas.
3. Para protegerse del riesgo de descarga eléctrica, no sumerja el cable, el
enchufe ni la unidad en agua ni en ningún otro líquido.
4. Este electrodoméstico no debe ser utilizado por personas (incluidos niños)
con capacidades físicas, sensoriales o mentales reducidas, o con falta de
experiencia y conocimientos, a menos que una persona responsable de su
seguridad les haya brindado supervisión o instrucciones sobre el uso de los
electrodomésticos.
5. Los niños deben ser supervisados para asegurarse de que no juegan con el aparato.
6. Apague la unidad y desenchufe el electrodoméstico del tomacorriente
cuando no esté en uso y antes de limpiarlo. Deje que el aparato se enfríe
antes de colocar o retirar piezas.
7. No opere ningún artefacto si el cable está dañado. No use este artefacto si
no funciona correctamente, si se cae o si se daña de alguna manera. de una
descarga eléctrica, nunca intente reparar la Parrilla de panini usted mismo.
Llévelo a un técnico calificado para su examen, reparación o ajuste eléctrico
o mecánico.
8. El uso de accesorios no recomendados o vendidos por el fabricante puede
causar fuego, descarga eléctrica o lesione.
9. No lo utilice en exteriores.
10. No permita que el cable cuelgue del borde de la mesa o encimera o toque
superficies calientes.
11. NO coloque el aparato encima de, cerca de o en un quemador eléctrico o de
gases calientes, ni dentro una estufa encendida.
12. Se debe tener extrema precaución al mover un aparato que contenga aceite
caliente u otros líquidos calientes.
13. Siempre conecte la sonda de control de temperatura al electrodoméstico
primero, luego enchufe el cable a la toma de corriente. Para desconectar,
coloque la sonda de control de temperatura en la posición OFF, luego retire
el enchufe del tomacorriente de la pared
14. No utilice el aparato para otro uso que no sea el previsto.
SOLO PARA EL USO DOMÉSTICO
GUARDE ESTAS INSTRUCCIONES
17195_CRUX ARTISAN Smokeless Grill and Griddle_IM_r4.indd 1117195_CRUX ARTISAN Smokeless Grill and Griddle_IM_r4.indd 11 12/8/20 4:08 PM12/8/20 4:08 PM

12
OTRAS MEDIDAS DE SEGURIDAD
IMPORTANTE
PRECAUCIÓN, SUPERFICIES CALIENTES: Este aparato emite calor y se
escape el vapor durante el uso. Se deben tomar las medidas necesarias
para evitar riesgos de quemaduras, incendios u otras lesiones a personas
o daños a la propiedad.
PRECAUCIÓN: Este aparato está caliente durante el funcionamiento y
retiene el calor durante algún tiempo después de apagarlo. Siempre use
guantes de horno cuando maneje materiales calientes y permita que las
partes metálicas se enfríen antes de limpiar. No coloque nada encima del
aparato mientras esté en funcionamiento o mientras esté caliente.
1. Todos los usuarios de este electrodoméstico deben leer y comprender
este manual de instrucciones antes de poner en funcionamiento o limpiar
el aparato.
2. El cable de este electrodoméstico sólo debe enchufarse en un tomacorriente
eléctrico de CA de 120 V.
3. Si el aparato comienza a funcionar mal durante el uso, apágalo y
desenchúfelo inmediatamente. Luego retire la sonda de control de
temperatura. No utilice ni intente reparar el aparato que funciona mal.
4. No deje este aparato desatendido durante el uso.
5. Para prevenir riesgos de incendio; la placa de la parrilla debe colocarse en
la posición correcta cuando esté enchufada
6. ADVERTENCIA: Para evitar lesiones personales o daños a la propiedad,
labandeja de goteo debe estar en su lugar durante la cocción.
Notas sobre el enchufe
Este electrodoméstico tiene un enchufe de tres clavijas con conexión a
tierra. Este enchufe solo cabe en un tomacorriente eléctrico hecho para un
enchufe de 3 clavijas. Esta es una medida de seguridad. Si el enchufe no entra
completamente en el tomacorriente, consulte a un electricista autorizado. No
realice ninguna modificación al enchufe.
Notas sobre el cable
A. Un cable corto de alimentación (o cable de alimentación desmontable)
es suministrado para reducir el riesgo de que se enreden o se tropiecen con
un cable más largo.
B. Cables de alimentación más largos y removibles o las alargadoras son
disponibles y se pueden utilizarlos si se ejerce cuidado.
C. Si un cable largo y removible o una alargadora sea usado:
1. La potencia eléctrica marcada del cordón o de la alargadora debe ser,
por lo menos, tan fuerte como la potencia eléctrica del aparato;
2. Si el aparato es del tipo con conexión a tierra, el cable o la alargadora
debe ser un enchufe de 3 hojas con conexión a tierra;
3. El cordón debe estar dispuesto de manera que no cuelga del borde
de la encimera o la mesa donde pueda ser tirado por niños o donde
alguien se tropiece involuntariamente con el cable.
17195_CRUX ARTISAN Smokeless Grill and Griddle_IM_r4.indd 1217195_CRUX ARTISAN Smokeless Grill and Griddle_IM_r4.indd 12 12/8/20 4:08 PM12/8/20 4:08 PM

13
Advertencia sobre los plastificantes
PRECAUCIÓN: A fin de evitar que los plastificantes se adhieran al
acabado de la encimera, la mesa u otro mueble, coloque un posafuentes
o salvamanteles que NO SEA DE PLÁSTICO entre el electrodoméstico
y la superficie de la encimera o mesa. Si no se hace esto, es posible que
el acabado se oscurezca, se formen marcas permanentes o aparezcan
manchas.
Corriente electrica
Si el circuito eléctrico está sobrecargado con otros artefactos, es posible
que el electrodoméstico no funcione correctamente. El electrodoméstico
debe funcionar en un circuito eléctrico separado de otros aparatos.
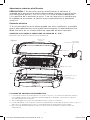
CONOZCA SU PLANCHA & PARRILLERA SIN HUMO DE 12” X 16”
El producto puede diferir levemente de las ilustraciones
Figura 1 Control de
temperatura ajustable
Base
Mango frío
al tacto
Placa de asar
Plancha
Bandeja de goteo
sin humo
(no mostrado)
LA SONDA DE CONTROL DE TEMPERATURA
1. La sonda de control de temperatura es el centro nervioso y el cerebro del artefacto. Maneje
con cuidado. Dejarlo caer o golpearlo podría cambiar su calibrado y hacer que los ajustes
de temperatura sean inexactos.
2. Gire el dial para seleccionar la temperatura como se pide en la receta.
3. La luz indicadora en la sonda de control de temperatura se iluminará tan pronto como se gire el
dial. La luz se apagará una vez que se haya alcanzado la temperatura seleccionada.
4. Deje que la plancha & parrilla sin humo se enfríe antes de quitar la sonda de control de
temperatura.
17195_CRUX ARTISAN Smokeless Grill and Griddle_IM_r4.indd 1317195_CRUX ARTISAN Smokeless Grill and Griddle_IM_r4.indd 13 12/8/20 4:08 PM12/8/20 4:08 PM

14
5. Para limpiar la sonda de control de temperatura, límpiela con un trapo suave y húmedo.
Asegúrese de secarla completamente antes de volver a usarla.
NOTA: La sonda de control de temperatura no es sumergible.
PRECAUCIÓN: Utilice la sonda de control de temperatura suministrada con este artefacto
únicamente. El uso de cualquier otra sonda de control de temperatura puede provocar
incendios, descargas eléctricas o lesiones.
ANTES DE USAR POR PRIMERA VEZ
1. Con cuidado, desenvuelva la plancha y parrillera sin humo y retire todo el material de embalaje.
2. Coloque la unidad antiadherente sobre una superficie de trabajo limpia y nivelada.
NOTA: Algunas superficies de encimeras y mesas, como Corian® y otras superficies, no están
diseñadas para resistir el calor generado por esta plancha. Recomendamos colocar una
almohadilla térmica o trivet debajo del artefacto para evitar posibles daños a la superficie.
Asegúrese de que los lados y la parte posterior de la parrilla estén al menos a 4 pulgadas de
distancia de cualquier pared, gabinete u objeto en el mostrador o la mesa.
3. Antes del primer uso, consulte las secciones Consejos sobre el cuidado y uso de los
revestimientos antiadherentes y las Instrucciones de cuidado y limpieza de este manual de
instrucciones.
4. Antes de cocinar en la parrilla por primera vez, lave las planchas antiadherentes con jabón
suave para lavar platos, límpiela y déjela secar.
5. Coloque la bandeja de goteo dentro de la base de la unidad y coloque la placa de asar o la
parrillera de manera que encaje en su lugar entre los huecos. Añada agua a la bandeja de goteo
hasta la línea máxima.
6. Gire el dial de control de temperatura en la sonda a la posición de APAGADO y colóquela
firmemente en su lugar.
7. Cubra la superficie antiadherente con manteca vegetal antes de calentar. Si es necesario, quite
el exceso de aceite con una toalla de papel.
INSTRUCCIONES DE USO
1. Coloque la bandeja de goteo dentro de la base y coloque la placa de asar o la parrillera de
manera que encaje en su lugar entre los huecos. Añada agua a la bandeja de goteo hasta la
línea máxima.
2. Gire la sonda de control de temperatura a la posición OFF (apagado).
3. Enchufe la sonda de control de temperatura de forma segura en el enchufe de la unidad.
4. Enchufe el cable a cualquier tomacorriente de pared estándar de 120V CA.
IMPORTANTE: SIEMPRE ENCHUFE EL CABLE A LA PLANCHA & PARRILLERA SIN HUMO
PRIMERO, LUEGO EN EL TOMACORRIENTE DE LA PARED..
5. Precaliente el artefacto por aproximadamente 10 minutos antes de cocinar. Para precalentar,
gire el control de temperatura a la temperatura deseada. La luz indicadora en la sonda de
control de temperatura se iluminará tan pronto como se gire el dial. La luz se apagará una vez
que se haya alcanzado la temperatura seleccionada.
6. Agregue comida y cocine según la receta. Ajuste el dial de control de temperatura de 200ºF a
400ºF según sea necesario.
NOTA: Durante la cocción, la luz se encenderá y se apagará indicando que el artefacto
mantiene la temperatura adecuada.
PRECAUCIÓN: Las superficies de la parrilla están calientes durante el uso.
PRECAUCIÓN: NO USE AEROSOLES PARA COCINAR. PUEDEN CAUSAR UNA ACUMULACIÓN
EN LAS PLACAS DE COCCIÓN Y PODRÍAN AFECTAR EL RENDIMIENTO DEL PRODUCTO.
7. Cuando haya terminado de cocinar, coloque el control de temperatura en la posición OFF
(apagado). La luz indicadora en la sonda de control de temperatura se apagará.
8. Desenchufe el cable del tomacorriente. Deje que la unidad se enfríe por completo.
9. Saque la sonda de control de temperatura de la unidad. Siga las Instrucciones de cuidado y
limpieza descritas en este manual de instrucciones.
17195_CRUX ARTISAN Smokeless Grill and Griddle_IM_r4.indd 1417195_CRUX ARTISAN Smokeless Grill and Griddle_IM_r4.indd 14 12/8/20 4:08 PM12/8/20 4:08 PM

15
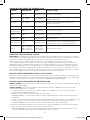
CARTA DE TIEMPOS/TEMPERATURAS
COMIDA
TEMPERATURA
TIEMPO INSTRUCCIONES
Pollo 350° F 20-25 minutos Dar la vuelta a la mitad del tiempo de cocción
Tocino 325° - 350° F 8-14 minutos Ajustar a la temperatura adecuada - dar la
vuelta según sea necesario
Salchicha 325° - 350° F 20-30 minutos Ajustar a la temperatura adecuada - dar la
vuelta según sea necesario
Tostada
francesa 350° F 6-10 minutos Dar la vuelta a la mitad del tiempo de cocción
Hamburguesa 350° F 3-14 minutos Dar la vuelta a la mitad del tiempo de cocción
Jamón 350° F 14-18 minutos Dar la vuelta a la mitad del tiempo de cocción
Sándwiches 350° F 6-10 minutos Enmantequillar el lado exterior y dorar a ambos
lados
Chuletas 350° F 20-30 minutos
Dorar ambos lados y luego reduzca la
temperatura a 325°F. Dar la vuelta a la mitad del
tiempo de cocción.
Bistecs
400° F –poco
cocido 400° F – al
punto 400° F – bien
hecho
4-6 minutos
7-12 minutos
13-18 minutos
Dar la vuelta a la mitad del tiempo de cocción
GUÍAS SEGÚN EL USDA
NOTA: El Departamento de Agricultura de los Estados Unidos (USDA) recomienda que la carne y
las aves sean cocinadas a las siguientes temperaturas internas para asegurarse de que se ha matado
cualquier bacteria dañina. El pavo molido y el pollo deben cocinarse a una temperatura interna de
165 °F/74 °C y la carne molida, ternera, cordero y cerdo deben cocinarse a una temperatura interna
de 160 °F/71 °C. El pollo entero y el pavo se deben cocinar a una temperatura interna de 180 °F/82
°C; 170 °F/77 °C para el pechuga. El ganso y el pato deben cocinarse a una temperatura interna de
180 °F/82 °C. La carne fresca de vaca, ternera y cordero, etc., debe cocinarse a una temperatura
interna de al menos 145 °F/63 °C. La carne de cerdo fresca debe cocinarse a una temperatura interna
de al menos 160 °F/71 °C. Al recalentar alimentos cárnicos y avícolas, también deben cocinarse a una
temperatura interna de 165 °F/74 °C.
17195_CRUX ARTISAN Smokeless Grill and Griddle_IM_r4.indd 1517195_CRUX ARTISAN Smokeless Grill and Griddle_IM_r4.indd 15 12/8/20 4:08 PM12/8/20 4:08 PM

16
INSTRUCCIONES DE MANTENIMIENTO
Este aparato requiere poco mantenimiento. No contiene piezas que el usuario pueda reparar.
Cualquier servicio que requiera el desmontaje que no sea la limpieza debe ser realizada por un
técnico calificado.
INSTRUCCIONES DE CUIDADO Y LIMPIEZA
PRECAUCIÓN: No sumerja el cable, el enchufe o la sonda de control de temperatura en agua ni en
ningún otro líquido.
PRECAUCIÓN: Para evitar quemaduras accidentales, deje que el artefacto se enfríe
completamente antes de limpiarla.
1. Cuando termine de cocinar, apague la unidad y desenchufe el cable de; tomacorriente. Permita
que la parrilla se enfríe.
2. Quite la sonda de control de temperatura de la unidad.
PRECAUCIÓN: La sonda puede calentarse después de su uso. Deje enfriar antes de manipular.
3. Si es necesario, limpie la caja de control de temperatura y la sonda con un trapo húmedo y
suave. Seque la sonda de control de temperatura por completo. Deje de lado.
PRECAUCIÓN: la sonda de control de temperatura no es sumergible.
4. Retire la bandeja de goteo; vacíe los contenidos. Lave la plancha de asar o la placa de la
parrillera y la bandeja de goteo en agua jabonosa; enjuague y seque completamente.
PRECAUCIÓN: Lo que está en la bandeja de goteo puede calentarse. Permita que la bandeja de
goteo y sus contenidos se enfríen antes de quitarlos del aparto para limpiarlos.
5. Para lavar a mano, lave la plancha de asar o la placa de la parrillera con agua caliente y jabón.
Seque con una toalla.
PRECAUCIÓN: El receptáculo de la sonda y la sonda debe estar completamente seco antes de
su uso.
6. Para piezas de comida difíciles, quitarlas con una almohadilla de limpieza de plástico. Evite
fregar duro en el revestimiento antiadherente ya que esto puede causar arañazos en la
superficie. No use lana de acero, estropajos o limpiadores abrasivos en ninguna parte de la
unidad. Limpie el artefacto después de cada uso.
CONSEJOS SOBRE EL CUIDADO Y USO DE LOS REVESTIMIENTOS ANTIADHERENTES
• Para evitar rayar la superficie antiadherente, no apile objetos sobre las placas de cocción
de la parrilla. PRECAUCIÓN: NO USE AEROSOLES DE COCCIÓN. PUEDEN CAUSAR
ACUMULACIONES EN LAS PLACAS DE COCCIÓN Y PODRÍAN AFECTAR EL RENDIMIENTO
SIN RESISTENCIA DEL PRODUCTO.
• Use fuego medio a bajo para obtener los mejores resultados de cocción. Las temperaturas muy
altas pueden causar decoloración y acortar la vida útil de cualquier superficie antiadherente. Si
son necesarias temperaturas más altas, precaliente a fuego medio durante unos minutos.
• Para obtener mejores resultados y conservar el recubrimiento antiadherente por más tiempo,
use utensilios de nylon, plástico, madera o goma. Nunca corte alimentos en la parrilla.
• Elimine las manchas difíciles con un estropajo de plástico y un líquido suave para lavar platos;
NO USE LANA DE ACERO ya que dañará la superficie antiadherente de las placas de cocción.
• Tanto la plancha para asar como la placa de parrillera son aptas para lavavajillas. Para mejores
resultados, colóquelo en la rejilla superior de su lavavajillas para limpiarlo.
INSTRUCCIONES PARA LA ELIMINACIÓN DE MANCHAS Y EL CUIDADO ADECUADO
DE SU RECUBRIMIENTO ANTIADHERENTE
1. Identifique las áreas manchadas en la superficie de cocción y espolvoree bicarbonato en las
manchas.
2. Humedece el bicarbonato agregando un poco de agua para obtener una textura similar a la
cola.
3. Deje reposar la cola durante unos minutos sobre las manchas (no más de una hora).
4. Frote con un trapo suave y húmedo o frote ligeramente con un estropajo de plástico, limpie y
seque completamente.
NOTA: No frote fuerte cuando use una almohadilla de plástico y NUNCA utilice una almohadilla
metálica, ya que podría dañar el recubrimiento antiadherente.
5. Repite todas estas etapas una vez más si es necesario. El rendimiento y las propiedades
antiadherente del recubrimiento antiadherente no se verán afectados debido a las manchas.
17195_CRUX ARTISAN Smokeless Grill and Griddle_IM_r4.indd 1617195_CRUX ARTISAN Smokeless Grill and Griddle_IM_r4.indd 16 12/8/20 4:08 PM12/8/20 4:08 PM

Recetas
17
Maíz a la plancha con alioli de lima y chipotle
Sirve 5 personas
Tiempo de preparación: 5 minutos / Tiempo de cocción: 15 minutos
5 mazorcas de maíz
2 tazas de mayonesa
Jugo de 1 lima
1/2 jalapeño, sin semillas y picado
2 dientes de ajo picados
1 pimiento chipotle en salsa de adobo, picado
1/4 cucharadita de comino molido
2 cucharadas de mantequilla fundida
Sal y pimiento al gusto
1. Precaliente la parrilla sin humo. Gire el dial a 400°F para precalentar.
2. Cepille las mazorcas de maíz con mantequilla y colóquelas en la parrilla. Ase en la parrilla
durante 15 minutos, volteándolo cada 5 minutos..
3. Agregue 1 taza de mayonesa, el jugo de una lima y el jalapeño picado en un tazón
pequeño.
Agregue sal y pimienta al gusto y mezcle bien.
4. Agregue la taza restante de mayonesa a otro bol pequeño con el chipotle picado y el
comino molido. Agregue sal y pimienta y mezcle bien.
5. Sirva el maíz a la parrilla con alioli y rodajas de limón en el costado.
Ensalada de pollo a la parrilla, aguacate y espárragos
Sirve 2 personas
Tiempo de preparación: 5 minutos / Tiempo de cocción: 30 minutos
2 aguacates, cortados a la mitad
2 pechugas de pollo
10-12 tallos de espárragos
5 tazas de espinaca
2 cucharadas de semillas de lino
3 cucharadas de vinagre balsámico
3 cucharadas de aceite de oliva
1 cucharada de miel
1/2 cucharadita de mostaza Dijon
1/2 cucharadita de ajo en polvo
Sal y pimienta al gusto
1. Precaliente la plancha y parrillera sin humo. Gire el dial a 350°F para precalentar..
2. Agregue el vinagre balsámico, el aceite de oliva, la miel, la mostaza de Dijon, el ajo en
polvo, la sal y la pimienta a un frasco. Agite bien y reserve.
3. Cepille las pechugas de pollo con aceite de oliva y sazone con sal y pimienta.
4. Coloque el pollo en la parrilla y cocine durante 20 minutos, volteando a la mitad de
cocción.
5. Después de 15 minutos, cepille el aguacate con aceite de oliva y cocine a la parrilla
durante 5 minutos.
6. Retire el pollo y el aguacate. Cepille los espárragos con aceite de oliva y ase a la parrilla
durante 10-12 minutos o hasta que estén tiernos.
7. Coloque la mitad de la espinaca en un bol. Agregue una pechuga de pollo, dos mitades
de aguacate y un mitad de los espárragos. Espolvoree una cucharada de semillas de lino.
Repita para el segundo bol.
8. Agite el aderezo una vez más y rocíe sobre los dos boles.
17195_CRUX ARTISAN Smokeless Grill and Griddle_IM_r4.indd 1717195_CRUX ARTISAN Smokeless Grill and Griddle_IM_r4.indd 17 12/8/20 4:08 PM12/8/20 4:08 PM

Recetas
18
Pinchos de cordero con calabacín a la parrilla, olivas de Kalamata y feta
Sirve 3-4 personas
Tiempo de preparación: 1 hora / Tiempo de cocción:
libra de cordero, cortado en cubos de 1”
1 cucharada de tomillo fresco, picado
1 cucharada de orégano seco
Jugo de limon
2 cucharadas de aceite de oliva
2 calabacines grandes, cortados en
rebanadas de 1/2 “de largo
3/4 de taza de olivas Kalamata, en rodajas
3/4 taza de queso feta desmenuzado
Sal y pimienta
1. Agregue el cordero en cubos, tomillo, orégano, limón, aceite de oliva, sal y pimienta a
una bolsa de plástico resellable. Agite la bolsa para mezclar el adobo y déjelo a un lado
durante al menos una hora.
2. Mientras tanto, remoje brochetas de madera en agua.
3. Precaliente la parrilla sin humo. Gire el dial a 375°F para precalentar.
4. Agregue 3-4 cubos de cordero a cada brocheta y ase a la parrilla durante 10-12 minutos,
volteando a la mitad de cocción.
5. Retire los pinchos de cordero. Cepille el aceite de oliva en el calabacín, sazone con sal y
pimienta y ase a la parrilla durante 2 minutos por cada lado.
6. Sirva los pinchos y el calabacín a la parrilla en un plato y complete con el queso feta
desmenuzado y las olivas de Kalamata en rodajas.
17195_CRUX ARTISAN Smokeless Grill and Griddle_IM_r4.indd 1817195_CRUX ARTISAN Smokeless Grill and Griddle_IM_r4.indd 18 12/8/20 4:08 PM12/8/20 4:08 PM
La page charge ...
La page charge ...
La page charge ...
La page charge ...
La page charge ...
La page charge ...
La page charge ...
La page charge ...
La page charge ...
La page charge ...
La page charge ...
La page charge ...
-
 1
1
-
 2
2
-
 3
3
-
 4
4
-
 5
5
-
 6
6
-
 7
7
-
 8
8
-
 9
9
-
 10
10
-
 11
11
-
 12
12
-
 13
13
-
 14
14
-
 15
15
-
 16
16
-
 17
17
-
 18
18
-
 19
19
-
 20
20
-
 21
21
-
 22
22
-
 23
23
-
 24
24
-
 25
25
-
 26
26
-
 27
27
-
 28
28
-
 29
29
-
 30
30
-
 31
31
-
 32
32


Crux 17195 Le manuel du propriétaire
- Catégorie
- Barbecues
- Taper
- Le manuel du propriétaire
dans d''autres langues
- English: Crux 17195 Owner's manual
- español: Crux 17195 El manual del propietario
Autres documents
-
Bella BLA14534 Mode d'emploi
-
Starfrit 0244120040000 Manuel utilisateur
-
-
 Power GR-200-5 Le manuel du propriétaire
-
George Foreman GRD6090B Mode d'emploi
-
-
-
-
George Foreman GRS6090B Mode d'emploi
-
