A C
Jeep
®
Trail Guide
™
B
1/2”
(12.5 mm)
5/32”
(4.0 mm)
• Disconnect and isolate the negative battery cable.
• Clean dash with isopropyl alcohol.
• Route cable behind separator in dash to avoid pinching cable.
CAUTION: Remove mount before drilling holes through the tray to avoid damaging the mount.
CAUTION
: Remove center bezel from dash before drilling holes through tray to avoid damaging dash.
• Débranchez et isolez le câble négatif de la batterie.
• Nettoyez le tableau de bord avec de l’alcool isopropylique
.
• Acheminezlecâblederrièreleséparateurandenepaspincerlecâble.
ATTENTION :
retirez le support avant de percer les trous dans le plateau, sans quoi vous pourriez endommager le
support.
ATTENTION :nepercezpaslestroussilafaçadecentraleestxéeàlaplanchedebordcarvouspourriezendommager
celle-ci.
October 2005 190-00542-03 Rev. A K6859389 Printed in Taiwan
#2
• Desconecte y aísle el cable negativo de la batería.
• Limpie el consola con el alcohol isopropilo.
• Encamine el cable detrás del divisor para evitar para pellizcar el cable.
ATENCIÓN
: retire el soporte antes de perforar la bandeja para no dañarlo.
ATENCIÓN
: no perfore la bandeja mientras el panel central esté instalado, ya que podría dañar algún
componente.
E N
F R
E S

Markholes.♦
Marquezl’emplacementdestrous.♦
Marca los agujeros.
Placemountontrayofcenterbezel.♦
Placezlesupportsurleplateaudelafaçadecentrale.♦
Coloque el soporte sobre la bandeja del panel central.
Remove mount. Determine and
markplacementforcenterhole.♦
Retirez le support. Déterminez et
marquez l’emplacement du trou
central.♦
Retire el soporte. Decida el lugar
dondevaaperforareloricio
central y márquelo.
3
4
A
1
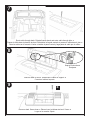
Removetherubbertrayliner,thecenterbezel,andtheradio.♦
Retirezlerevêtementintérieurencaoutchouc,lefacadecentrale,etlaradio.♦
Retire la bandeja de goma, el panel central de controles y la radio.
5/32”
(4.0 mm)
2

Drillholesthroughtray.♦Percezlestrousdansleplateau.♦
Taladre los orificios en la bandeja.
If you do not have a cigarette lighter, or if you have a 1997-1999
Jeep, cut the cable as shown. Connect the red wire to a fused
12 V ignition/accessory power source. Connect the black wire to
ground. Note: For 1997-1999 vehicles, the 12 V power wire to the
cigarette lighter is blue.
Si le véhicule n’est pas muni d’un allume-cigarette ou s’il s’agit
d’unmodèleJeepdesannées1997à1999,coupezlecâble
commedansl’illustration.Reliezlelrougeàunesource12volts
d’accessoireprotégéeparfusible,etreliezlelnoiràlamasse.
Remarque :danslesvéhiculesJeepdesannées1997à1999,le
ld’alimentation12voltsdel’allume-cigaretteestbleu.
Si no cuenta con un encendedor, o si su vehículo es un Jeep del
año 1997-1999, corte el cable como se indica. Conecte el cable
rojo a la fuente de alimentación de encendido / accesorio de 12 V.
Conecte el cable negro a tierra. Nota: para automóviles del año
1997-1999, el cable de alimentación de 12 V que se conecta al
encendedor es de color azul.
5/32”
(4.0 mm)
1/2”
(12.5 mm)
Removecigarettelighterpanel.Connectcables.♦
Retirezlepanneaudel’allume-cigarette.Connectezlescâbles.♦
Retire el panel del encendedor. Conecte los cables.
5
6
B
2000-2006 MY
1997-1999 MY, without cigarette lighter

Connectcabletomount.♦Branchezlecâbleausupport.♦
Conecte el cable al soporte.
9
Placeondash.Screwdown.♦Placez-lesurletableaudebord.Vissez.♦
Lugar en la consola. Sujete.
Snap♦Enclenchez♦
Encajarse
C
Routecablethroughdash.Reinstallcenterbezelandroutecablethroughhole.♦
Passezlecâbledanslaplanchedebord.Réinstallezlafaçadecentraleetpassezlecâbledansletrou.♦
Paseloscablesenlaconsola.Vuelvaainstalarelpanelcentralyhagapasarelcableporeloricio.
8
7
-
 1
1
-
 2
2
-
 3
3
-
 4
4