
00046685/03.08
All listed brands are trademarks of the corresponding companies. Errors and omissions excepted,
and subject to technical changes. Our general terms of delivery and payment are applied.
Hama GmbH & Co KG
D-86651 Monheim/Germany
www.hama.com
00046685bda.indd 2
00046685bda.indd 2
31.03.2008 10:22:56 Uhr
31.03.2008 10:22:56 Uhr

DIGITAL
00046685
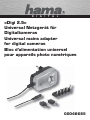
» Digi 2.5«
Universal Netzgerät für
Digitalkameras
Univer
sa
l mains adapter
fo
r digital cam
er
as
Bloc d‘alimentation universel
pour appareils photo numériques
00046685bda.indd 3
00046685bda.indd 3
31.03.2008 10:22:57 Uhr
31.03.2008 10:22:57 Uhr

d
Bedienungsanleitung
2
D ieses Netzgerät wurde speziell für die kameratypischen Spannungen entwickelt.
Durch den Weitbereichseingang von 100-240V 50/60Hz weltweit auch auf Reisen einsetzbar.
Je nach Kontinent und Land müssen eventuell noch Reiseadapter zwischen gesteckt werden,
um einen korrekten Anschluss an der landestypischen Steckdose zu gewährleisten.
Bei dem Netzgerät handelt es sich um eine stabilisierte Version. D.h. die eingestellte
Ausgangsspannung wird auch bei geringer Belastung gewährleistet. Beachten Sie vor der
Inbetriebnahme, dass der maximale Ausgangsstrom des Digi 2.5 nicht überschritten wird.
1. Wählen Sie den passenden Stecker aus den Universalsteckern und prüfen Sie den Sitz an
der Netzteilbuchse Ihrer Kamera. Die Universalstecker lassen sich nur in einer Richtung
aufstecken (dicker und dünner Stiftanschluss). Beachten Sie hierbei, dass die Polarität +
immer am Innenkontakt des Netzteilsteckers anliegt und nicht verändert werden kann!
2. Wählen Sie am Netzgerät die für Ihre Kamera erforderliche Ausgangsspannung gemäß
Bedienungsanleitung bzw. gemäß Beschriftung der DC Buchse (Netzteilbuchse).
Falsch eingestellte Spannung oder Polarität kann zum Defekt Ihrer Kamera führen!
Im Zweifelsfall kontaktieren Sie den Kamera-Hersteller oder Ihren Fachhändler.
3. Stecken Sie den Netzteilstecker nur an Ihre ausgeschaltete Kamera an!
4. Dann das Digi 2.5 in die Steckdose einstecken und anschließend die Kamera
einschalten.
Sicherheitshinweise:
• Gerät nur direkt an einer Steckdose betreiben.
Nicht an Verlängerungskabel, Tischsteckdosen oder Adapter anschließen.
• Gerät vor Schmutz, Feuchtigkeit und Überhitzung schützen und nur in trockenen Räumen
verwenden!
• Gerät nicht öffnen und bei Beschädigung nicht mehr betreiben.
• Nur vom Fachmann reparieren lassen!
• Zur Reinigung nur trockene, weiche Tücher verwenden.
• Vor Reinigung, Reparatur und bei längerem Nichtgebrauch unbedingt vom Netz trennen.
• Achung! Dieses Gerät gehört, wie alle elektrischen Geräte nicht in Kinderhände!
Die DC-In Universalstecker dürfen auf gar keinen Fall in die 100 - 240 V Steckdose
gesteckt werden.
d
B edienungsanleitung
P olarität /
Polarity
00046685bda.indd Abs1:2
00046685bda.indd Abs1:2
31.03.2008 10:22:58 Uhr
31.03.2008 10:22:58 Uhr

3
g
Operating Instruction
T his power supply unit was especially developed for typical camera voltages. The wide range
input of 100-240V 50/60Hz allows you to use it all over the world. Depending on the continent
and country a travel adapter may also need to be used to ensure a proper connection to the
country-specifi c power socket.
The power supply unit is a stabilized version. This means, the set output voltage is not excee-
ded even if the charge is low. Before commissioning for the fi rst time, ensure that the maximal
output current of the Digi 2.5 is not exceeded.
1. Select the matching plug from the universal plugs and check that the power supply unit
socket securely fi ts your camera. The universal plug can only be changed in one direction.
(Thicker and thinner pin connection). Ensure that the + (positive) polarity is always on the
inner contact of the power supply unit plug and cannot be changed!
2. Select the required output voltage for your camera according to the operating manual or
the marking on the DC socket (power supply unit socket). The incorrect voltage or polarity
setting can lead to damages to your camera! If in doubt, contact the camera manufacturer
or your specialised dealer.
3. Only plug the power supply unit plug into your camera when the camera is switched off!
4. First plug the Digi 2.5 in the power socket and then switch the camera on.
Safety instructions:
• The mains adapter must only be operated from a mains socket. Do not connect the
mains adapter to extension cables, table socket outlets or other adapters.
• Protect the mains adapter from dirt, moisture and overheating, and only use it in dry rooms!
• Do not open the mains adapter, nor should it be operated if it is damaged
• The mains adapter must only be repaired by a competent specialist.
• The mains adapter must only be cleaned with a dry soft cloth.
• Always disconnect from the mains prior to cleaning, repair or if it is not going to be used
for a prolonged period.
• Warning! The mains adapter, just as for all electrical appliances, must be kept away from
children!
The DC-in universal plug must never be inserted into a 100 - 240 V socket.
g
Operating Instruction
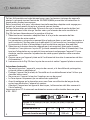
5 DC-Stecker/plugs:
0,75 x 2,4/1,4 x 3,5/1,7 x 4,0/1,7 x 4,75/2,1 x 5,5 mm + 2 Sony-Stecker/plugs
A usgangsspannung/
output voltage (V) 3,3 4,2 5,0 6,5 7,0 7,8 8,4
m ax. Ausgangsstrom/
max. ouput current 2500 mA 2000 mA 1700 mA
00046685bda.indd Abs1:3
00046685bda.indd Abs1:3
31.03.2008 10:22:59 Uhr
31.03.2008 10:22:59 Uhr

4
C e bloc d‘alimentation est spécialement conçu pour les tensions typiques des appareils
photos. La plage de tension d‘entrée de 100-240V 50/60Hz permet une utilisation dans le
monde entier pendant vos voyages.
Selon le continent et le pays, vous devez éventuellement des adaptateurs de voyage pour
garantir un branchement correct aux prises de courant locales.
Le bloc d‘alimentation est stabilisée. Cela veut dire que la tension de sortie réglée n‘est
pas dépassée sous faible charge. V
euillez noter que la tension de sortie maximale du
Digi 2.5 n‘est pas dépassée avant la première utilisation.
1. Sélectionnez un connecteur adapté et fi xez-le à la prise de connexion de bloc
d‘alimentation de votre caméra.
Les connecteurs universels ne peuvent être placés que dans un seul sens. (connecteur à
jack fi n et épais.) Veuillez noter que le pôle positif (+) est branché sur le contact intérieur
du connecteur du bloc d‘alimentation et que la polarité ne peut pas être modifi ée !
2. Sélectionnez la tension de sortie adéquate pour votre appareil photo selon le mode
d‘emploi ou l‘inscription sur la prise DC (prise de connexion de bloc d‘alimentation). Une
tension d‘alimentation ou une polarité incorrecte peut endommager l‘appareil.! En cas
de doute, veuillez consulter le producteur de votre appareil photo ou votre revendeur
spécialisé.
3. Assurez-vous que l‘appareil photo est à l‘arrêt avant de brancher le connecteur de bloc
d‘alimentation !
4. Insérez ensuite le Digi 2.5 dans la prise de courant et mettez l‘appareil photo en marche.
Instructions de sécurité:
• Ne jamais brancher l’appareil à une prise de courant, ni à des câbles de prolongation,
prises de tables ou adaptateurs!
• Protéger l’appareil de la saleté, de l’humidité ou du suréchauffement et ne l’utiliser que
dans des locaux secs!
• Ne pas ouvrir l’appareil et ne plus l’employer en cas de panne!
• Le faire réparer uniquement par un mécanicien spécialisé!
• Avant le nettoyage ou la réparation ou en cas d’une no nutilisation de longue durée,
en tout cas débrancher l’appareil du secteur.
• Attention! Comme tous les appareils électriques, le bloc secteur doit être conservé à
l’abri d’enfants!
Les connecteurs DC-In universels ne doivent en aucun cas être insérés dans une prise
à 100 - 240 V.
f
M ode d’emploi
5 fi ches CC: 0,75 x 2,4/1,4 x 3,5/1,7 x 4,0/1,7 x 4,75/2,1 x 5,5 mm
+ 2 fi ches sony
Tension de sortie (V) 3,3 4,2 5,0 6,5 7,0 7,8 8,4
Courrant de sortie maximal 2500 mA 2000 mA 1700 mA
Polarité
00046685bda.indd Abs1:4
00046685bda.indd Abs1:4
31.03.2008 10:22:59 Uhr
31.03.2008 10:22:59 Uhr

5
00046685bda.indd Abs1:5
00046685bda.indd Abs1:5
31.03.2008 10:22:59 Uhr
31.03.2008 10:22:59 Uhr
-
 1
1
-
 2
2
-
 3
3
-
 4
4
-
 5
5
-
 6
6


dans d''autres langues
- English: Hama 00046685 Owner's manual
- Deutsch: Hama 00046685 Bedienungsanleitung
Documents connexes
-
Hama 73046685 Le manuel du propriétaire
-
-
-
-
-
-
-
-
-