HyperX Pulsefire Haste RGB Wired Gaming Mouse Manuel utilisateur
- Catégorie
- Commandes de jeu
- Taper
- Manuel utilisateur

User Manual
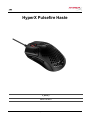
HyperX Pulsefire Haste
Find the language and latest documentation for your HyperX Pulsefire Haste here.
HyperX Pulsefire Haste User Manual
Simplied Chinese .....简体中文说明书
............ For instructions in English
. . . . . . . . . . . . . . . . . . Para instrucciones en Español
......... Für Anleitungen in Deutsch
. . . . . . . . . . . . . . . . . . Pour des instructions en Français
. . . . . . . . . . . . . . . . . . Per le istruzioni in Italiano
............ Por as instruções em Português
. . . . . . . . . . . . . . . . . . Instrukcje w jezyku Polskim
. . . . . . . . . . . . . . . . . . Для инструкции на Pусском
. . . . . . . . . . . . . . . . . . Turkce talimatlar icin
. . . . . . . . . . . . . . . . . .日本語マニュアル用
. . . . . . . . . . . . . . . . . .한국어 안내
. . . . . . . . . . . . . . . . . . คำ�แนะนำ�ภ�ษ�ไทย
. . . . . . . . . . . . . . . . . . Để xem hướng dẫn bằng tiếng Việt
Traditional Chinese ....繁體中文說明
ﻰﺑرﻋ. . . . . . . . . . . . .ﺔﯾﺑرﻌﻟا ﺔﻐﻠﻟﺎﺑ تﺎﻣﯾﻠﻌﺗﻟا ﻰﻠﻋ لوﺻﺣﻠﻟ

Document No. 480HMSH1-A-BK/G.A01
HyperX Pulsefire Haste
Page 1 of 6
HyperX Pulsefire Haste
Part Number
HMSH1-A-BK/G

Document No. 480HMSH1-A-BK/G.A01
HyperX Pulsefire Haste
Page 2 of 6
TABLE OF CONTENTS
Overview .................................................................................................................................... 3!
Specifications............................................................................................................................ 4!
Installation ................................................................................................................................. 5!
Grip Tape ............................................................................................................................................................... 5!
Replacement Skates .............................................................................................................................................. 5!
Function Keys ........................................................................................................................... 6!
HyperX NGENUITY Software .................................................................................................... 6!
Using with Console ................................................................................................................... 6!
Factory Reset ............................................................................................................................ 6!

Document No. 480HMSH1-A-BK/G.A01
HyperX Pulsefire Haste
Page 3 of 6
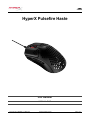
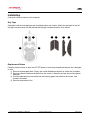
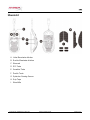
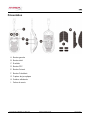
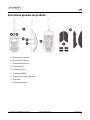
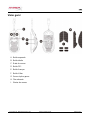
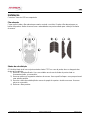
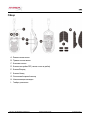
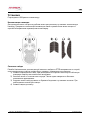
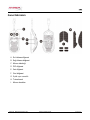
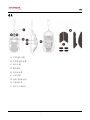
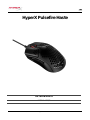
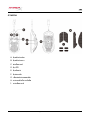
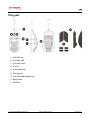
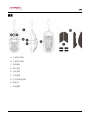
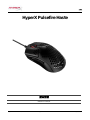
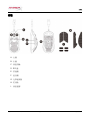
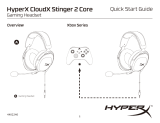
Overview
A. Left click button
B. Right click button
C. Mouse wheel
D. DPI button
E. Forward button
F. Back button
G. Optical gaming sensor
H. Grip tape
I. Mouse skates

Document No. 480HMSH1-A-BK/G.A01
HyperX Pulsefire Haste
Page 4 of 6
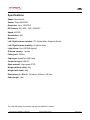
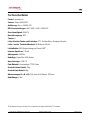
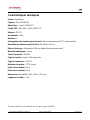
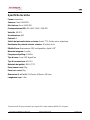
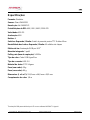
Specifications
Shape: Symmetrical
Sensor: Pixart PAW3335
Resolution: Up to 16000 DPI
DPI Presets: 400 / 800 / 1600 / 3200 DPI
Speed: 450 IPS
Acceleration: 40G
Buttons: 6
Left / Right buttons switches: TTC Golden Micro Dustproof Switch
Left / Right buttons durability: 60 million clicks
Light effects: Per-LED RGB lighting1
Onboard memory: 1 profile
Polling rate: 1000Hz
Cable type: HyperFlex USB Cable
Connection type: USB 2.0
Skate material: Virgin-grade PTFE
Weight (without cable): 59g
Weight (with cable): 80g
Dimensions (L x W x H): 124.2mm x 66.8mm x 38.2mm
Cable length: 1.8m
1Per-LED RGB lighting customizable with HyperX NGENUITY software.

Document No. 480HMSH1-A-BK/G.A01
HyperX Pulsefire Haste
Page 5 of 6
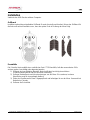
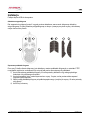
Installation
Connect the USB connector to the computer.
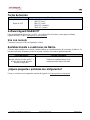
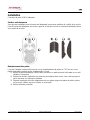
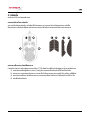
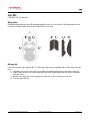
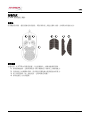
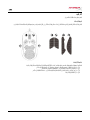
Grip Tape
Optionally install the included grip tape for added control and comfort. Attach the grip tape for the left
and right mouse buttons with the pointed end facing the forward direction of the mouse.
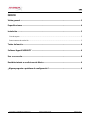
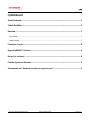
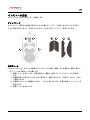
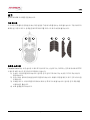
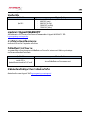
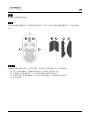
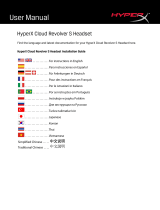
Replacement Skates
Pulsefire Haste includes an extra set of PTFE skates in case the preinstalled skates are lost, damaged,
or worn.
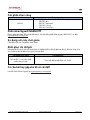
1) Remove the damaged skate. Gently use a small flathead screwdriver or similar tool if needed.
2) Remove adhesive residue and debris from the mouse. A clean dry surface will provide optimal
adhesion.
3) Peel the replacement mouse skate from the backing paper and install on the mouse. Use
tweezers if needed.
4) Remove the protective film.
2
1
3
4
1
2
3
4

Document No. 480HMSH1-A-BK/G.A01
HyperX Pulsefire Haste
Page 6 of 6
Function Keys
Function Keys
Secondary Feature
DPI button
Change between DPI presets. Default values are:
- 400 DPI (red)
- 800 DPI (blue)
- 1600 DPI (yellow)
- 3200 DPI (green)
HyperX NGENUITY Software
To customize lighting, DPI, and macro settings, download the HyperX NGENUITY software here:
hyperxgaming.com/ngenuity.
Using with Console
Connect the USB connector to Playstation or Xbox.
Factory Reset
If you are experiencing any issue with the mouse, you can perform a factory reset. Onboard memory
will be cleared, and all settings will revert back to default.
Function Keys
Secondary Feature
Hold DPI button + mouse wheel
button down for 5 seconds
Perform a factory reset on the mouse.
Questions or Setup Issues?
Contact the HyperX support team at: hyperxgaming.com/support/

Documento n.º 480HMSH1-A-BK/G.A01
HyperX Pulsefire Haste
Página 1 de 6
HyperX Pulsefire Haste
Número de referencia
HMSH1-A-BK/G

Documento n.º 480HMSH1-A-BK/G.A01
HyperX Pulsefire Haste
Página 2 de 6
ÍNDICE
Visión general .......................................................................................................................... 3
Especificaciones ..................................................................................................................... 4
Instalación ................................................................................................................................ 5
Cinta de agarre ....................................................................................................................................................... 5
Partes traseras de sustitución ................................................................................................................................ 5
Teclas de función .................................................................................................................... 6
Software HyperX NGENUITY .................................................................................................. 6
Uso con consola ...................................................................................................................... 6
Restablecimiento a condiciones de fábrica .......................................................................... 6
¿Alguna pregunta o problema de configuración? ................................................................ 6

Documento n.º 480HMSH1-A-BK/G.A01
HyperX Pulsefire Haste
Página 3 de 6
Visión general
A. Botón de clic izquierdo
B. Botón de clic derecho
C. Rueda del ratón
D. Botón de PPP
E. Botón de avance
F. Botón de retorno
G. Sensor óptico para juegos
H. Cinta de agarre
I. Partes traseras del ratón

Documento n.º 480HMSH1-A-BK/G.A01
HyperX Pulsefire Haste
Página 4 de 6
Especificaciones
Forma: Simétrico
Sensor: Pixart PAW3335
Resolución: Hasta 16.000 PPP
Preajustes de PPP: 400 / 800 / 1600 / 3200 PPP
Velocidad: 450 PPS
Aceleración: 40G
Botones: 6
Teclas de los botones izquierdo/derecho: Microtecla a prueba de polvo TTC Golden
Durabilidad de los botones izquierdo/derecho: 60 millones de clics
Efectos de luz: Iluminación RGB por LED1
Memoria integrada: 1 perfil
Velocidad de sondeo: 1.000 Hz
Tipo de cable: Cable USB HyperFlex
Tipo de conexión: USB 2.0
Material de la parte trasera: PTFE de grado virgen
Peso (sin cable): 59 g
Peso (con cable): 80 g
Dimensiones (L x An x Al): 124,2 mm x 66,8 mm x 38,2 mm
Longitud del cable: 1,8 m
1Iluminación RGB por LED personalizable con el software HyperX NGENUITY.

Documento n.º 480HMSH1-A-BK/G.A01
HyperX Pulsefire Haste
Página 5 de 6
Instalación
Conecta el conector USB al ordenador.
Cinta de agarre
Opcionalmente, instala la cinta de agarre incluida para mayor control y comodidad. Coloca la cinta de
agarre para los botones izquierdo y derecho del ratón con el extremo puntiagudo hacia la dirección de
avance del ratón.
Partes traseras de sustitución
Pulsefire Haste incluye un juego adicional de partes traseras de PTFE en caso de que las partes
traseras preinstaladas se pierdan, dañen o desgasten.
1) Extrae la parte trasera dañada. Usa un destornillador de punta plana pequeño o una
herramienta similar con suavidad si es necesario.
2) Retira los residuos de adhesivo y la suciedad del ratón. Una superficie limpia y seca
proporcionará una adhesión óptima.
3) Despega la parte trasera de repuesto del ratón del papel protector e instálalo en el ratón. Usa
pinzas si es necesario.
4) Extrae la película protectora.
2
1
3
4
1
2
3
4

Documento n.º 480HMSH1-A-BK/G.A01
HyperX Pulsefire Haste
Página 6 de 6
Teclas de función
Teclas de función
Función secundaria
Botón de PPP
Cambia entre los preajustes de PPP. Los valores predeterminados son:
- 400 PPP (rojo)
- 800 PPP (azul)
- 1600 PPP (amarillo)
- 3200 PPP (verde)
Software HyperX NGENUITY
Para personalizar la iluminación, los PPP y la configuración de la macro, descarga el software
HyperX NGENUITY aquí: hyperxgaming.com/ngenuity.
Uso con consola
Conecta el conector USB a la Playstation o Xbox.
Restablecimiento a condiciones de fábrica
Si tienes algún problema con el ratón, puedes realizar un restablecimiento de los ajustes de fábrica. Se
borrará la memoria integrada y todos los ajustes volverán a los valores predeterminados.
Teclas de función
Función secundaria
Mantén pulsado el botón de PPP +
el botón de la rueda del ratón
durante 5 segundos
Realiza un restablecimiento de la
configuración de fábrica del ratón.
¿Alguna pregunta o problema de configuración?
Ponte en contacto con el equipo de soporte de HyperX en: hyperxgaming.com/support/

Dokument Nr. 480HMSH1-A-BK/G.A01
HyperX Pulsefire Haste
Seite 1 von 6
HyperX Pulsefire Haste
Artikelnummer
HMSH1-A-BK/G

Dokument Nr. 480HMSH1-A-BK/G.A01
HyperX Pulsefire Haste
Seite 2 von 6
INHALTSVERZEICHNIS
Übersicht .................................................................................................................................. 3
Technische Daten .................................................................................................................... 4
Installation ................................................................................................................................ 5
Griffband ................................................................................................................................................................. 5
Ersatzfüße .............................................................................................................................................................. 5
Funktionstasten ....................................................................................................................... 6
HyperX NGENUITY Software .................................................................................................. 6
Nutzung mit Konsole ............................................................................................................... 6
Zurücksetzen auf Werkseinstellungen .................................................................................. 6

Dokument Nr. 480HMSH1-A-BK/G.A01
HyperX Pulsefire Haste
Seite 3 von 6
Übersicht
A. Linke Maustaste drücken
B. Rechte Maustaste drücken
C. Mausrad
D. DPI-Taste
E. Vorwärts-Taste
F. Zurück-Taste
G. Optischer Gaming-Sensor
H. Grip Tape
I. Mausfüße

Dokument Nr. 480HMSH1-A-BK/G.A01
HyperX Pulsefire Haste
Seite 4 von 6
Technische Daten
Form: Symmetrisch
Sensor: Pixart PAW3335
Auflösung: Bis zu 16.000 DPI
DPI-Voreinstellungen: 400 / 800 / 1600 / 3200 DPI
Geschwindigkeit: 450 IPS
Beschleunigung: 40G
Tasten: 6
Links-/Rechts-Tasten mit Switches: TTC Golden Micro Dustproof Switch
Links / rechts Tastenhaltbarkeit: 60 Millionen Klicks
Lichteffekte: RGB-Beleuchtung pro Einzel-LED1
Interner Speicher: 1 Profil
Abfragerate: 1000Hz
Kabeltyp: HyperFlex USB-Kabel
Anschlusstyp: USB 2.0
Pad-Material: Hochwertige PTFE-Pads
Gewicht (ohne Kabel): 59g
Gewicht (mit Kabel): 80g
Abmessungen (L x B x H): 124,2mm x 66,8mm x 38,2mm
Kabellänge: 1,8m
1RGB-Beleuchtung pro Einzel-LED, anpassbar mit HyperX NGENUITY Software

Dokument Nr. 480HMSH1-A-BK/G.A01
HyperX Pulsefire Haste
Seite 5 von 6
Installation
Verbinde den USB-Stecker mit dem Computer.
Griffband
Installiere optional das mitgelieferte Griffband für mehr Kontrolle und Komfort. Bringe das Griffband für
die linke und rechte Maustaste so an, dass das spitze Ende in Richtung der Maus zeigt.
Ersatzfüße
Die Pulsefire Haste enthält einen zusätzlichen Satz PTFE-Mausfüße, falls die vormontierten Füße
verloren gehen, beschädigt oder abgenutzt werden.
1) Entferne den beschädigten Mausfuß. Nutze bei Bedarf vorsichtig einen kleinen
Schlitzschraubendreher oder ein ähnliches Werkzeug.
2) Entferne Klebstoffreste und Verschmutzungen von der Maus. Eine saubere, trockene
Oberfläche sorgt für eine optimale Haftung.
3) Ziehe den Ersatzmausfuß vom Trägerpapier ab und befestigen ihn an der Maus. Verwende bei
Bedarf eine Pinzette.
4) Entferne die Schutzfolie.
2
1
3
4
1
2
3
4

Dokument Nr. 480HMSH1-A-BK/G.A01
HyperX Pulsefire Haste
Seite 6 von 6
Funktionstasten
Funktionstasten
Zweitfunktion
DPI-Taste
Wechsel zwischen DPI-Voreinstellungen. Standardwerte sind:
- 400 DPI (rot)
- 800 DPI (blau)
- 1600 DPI (gelb)
- 3200 DPI (grün)
HyperX NGENUITY Software
Zum Bearbeiten von Beleuchtung, DPI- und Makro-Einstellungen kannst du die HyperX NGENUITY
Software hier herunterladen: hyperxgaming.com/ngenuity.
Nutzung mit Konsole
Verbinde den USB-Stecker mit der Playstation oder Xbox.
Zurücksetzen auf Werkseinstellungen
Wenn du Probleme mit der Maus hast, kannst du sie auf die Werkeinstellungen zurücksetzen. Der
interne Speicher wird gelöscht und alle Einstellungen auf den Standard zurückgesetzt.
Funktionstasten
Zweitfunktion
DPI-Taste + Mausrad 5 Sekunden
gedrückt halten
Die Maus auf die Werkseinstellungen zurücksetzen.
Fragen oder Probleme bei der Einrichtung?
Wende dich an das HyperX Support-Team unter hyperxgaming.com/support/

Document No. 480HMSH1-A-BK/G.A01
HyperX Pulsefire Haste
Page 1 de 6
HyperX Pulsefire Haste
Référence
HMSH1-A-BK/G
La page est en cours de chargement...
La page est en cours de chargement...
La page est en cours de chargement...
La page est en cours de chargement...
La page est en cours de chargement...
La page est en cours de chargement...
La page est en cours de chargement...
La page est en cours de chargement...
La page est en cours de chargement...
La page est en cours de chargement...
La page est en cours de chargement...
La page est en cours de chargement...
La page est en cours de chargement...
La page est en cours de chargement...
La page est en cours de chargement...
La page est en cours de chargement...
La page est en cours de chargement...
La page est en cours de chargement...
La page est en cours de chargement...
La page est en cours de chargement...
La page est en cours de chargement...
La page est en cours de chargement...
La page est en cours de chargement...
La page est en cours de chargement...
La page est en cours de chargement...
La page est en cours de chargement...
La page est en cours de chargement...
La page est en cours de chargement...
La page est en cours de chargement...
La page est en cours de chargement...
La page est en cours de chargement...
La page est en cours de chargement...
La page est en cours de chargement...
La page est en cours de chargement...
La page est en cours de chargement...
La page est en cours de chargement...
La page est en cours de chargement...
La page est en cours de chargement...
La page est en cours de chargement...
La page est en cours de chargement...
La page est en cours de chargement...
La page est en cours de chargement...
La page est en cours de chargement...
La page est en cours de chargement...
La page est en cours de chargement...
La page est en cours de chargement...
La page est en cours de chargement...
La page est en cours de chargement...
La page est en cours de chargement...
La page est en cours de chargement...
La page est en cours de chargement...
La page est en cours de chargement...
La page est en cours de chargement...
La page est en cours de chargement...
La page est en cours de chargement...
La page est en cours de chargement...
La page est en cours de chargement...
La page est en cours de chargement...
La page est en cours de chargement...
La page est en cours de chargement...
La page est en cours de chargement...
La page est en cours de chargement...
La page est en cours de chargement...
La page est en cours de chargement...
La page est en cours de chargement...
La page est en cours de chargement...
La page est en cours de chargement...
La page est en cours de chargement...
La page est en cours de chargement...
La page est en cours de chargement...
La page est en cours de chargement...
La page est en cours de chargement...
La page est en cours de chargement...
La page est en cours de chargement...
La page est en cours de chargement...
La page est en cours de chargement...
La page est en cours de chargement...
-
 1
1
-
 2
2
-
 3
3
-
 4
4
-
 5
5
-
 6
6
-
 7
7
-
 8
8
-
 9
9
-
 10
10
-
 11
11
-
 12
12
-
 13
13
-
 14
14
-
 15
15
-
 16
16
-
 17
17
-
 18
18
-
 19
19
-
 20
20
-
 21
21
-
 22
22
-
 23
23
-
 24
24
-
 25
25
-
 26
26
-
 27
27
-
 28
28
-
 29
29
-
 30
30
-
 31
31
-
 32
32
-
 33
33
-
 34
34
-
 35
35
-
 36
36
-
 37
37
-
 38
38
-
 39
39
-
 40
40
-
 41
41
-
 42
42
-
 43
43
-
 44
44
-
 45
45
-
 46
46
-
 47
47
-
 48
48
-
 49
49
-
 50
50
-
 51
51
-
 52
52
-
 53
53
-
 54
54
-
 55
55
-
 56
56
-
 57
57
-
 58
58
-
 59
59
-
 60
60
-
 61
61
-
 62
62
-
 63
63
-
 64
64
-
 65
65
-
 66
66
-
 67
67
-
 68
68
-
 69
69
-
 70
70
-
 71
71
-
 72
72
-
 73
73
-
 74
74
-
 75
75
-
 76
76
-
 77
77
-
 78
78
-
 79
79
-
 80
80
-
 81
81
-
 82
82
-
 83
83
-
 84
84
-
 85
85
-
 86
86
-
 87
87
-
 88
88
-
 89
89
-
 90
90
-
 91
91
-
 92
92
-
 93
93
-
 94
94
-
 95
95
-
 96
96
-
 97
97


HyperX Pulsefire Haste RGB Wired Gaming Mouse Manuel utilisateur
- Catégorie
- Commandes de jeu
- Taper
- Manuel utilisateur
dans d''autres langues
- italiano: HyperX Pulsefire Haste RGB Wired Gaming Mouse Manuale utente
- English: HyperX Pulsefire Haste RGB Wired Gaming Mouse User manual
- español: HyperX Pulsefire Haste RGB Wired Gaming Mouse Manual de usuario
- Deutsch: HyperX Pulsefire Haste RGB Wired Gaming Mouse Benutzerhandbuch
- русский: HyperX Pulsefire Haste RGB Wired Gaming Mouse Руководство пользователя
- português: HyperX Pulsefire Haste RGB Wired Gaming Mouse Manual do usuário
- polski: HyperX Pulsefire Haste RGB Wired Gaming Mouse Instrukcja obsługi
- 日本語: HyperX Pulsefire Haste RGB Wired Gaming Mouse ユーザーマニュアル
- Türkçe: HyperX Pulsefire Haste RGB Wired Gaming Mouse Kullanım kılavuzu
Documents connexes
-
HyperX PF002 Mode d'emploi
-
HyperX Pulsefire Dart (HX-MC006B) Manuel utilisateur
-
HyperX HX-MC002B Mode d'emploi
-
-
HyperX Pulsefire Core RGB Gaming Mouse Mode d'emploi
-
-
-
-
HyperX Cloud MIX Mode d'emploi
-
Autres documents
-
Pulsar X2 Manuel utilisateur
-
 Hyper CloudX Stinger 2 Core Gaming Headset Mode d'emploi
-
Pulsar S0932I7F5C Mode d'emploi
-
Kingston Technology HyperX Cloud Headset - White Mode d'emploi
-
 Hyper X HyperX Cloud Revolver S gaming headset Manuel utilisateur
-
EVGA X20-RX01 Wireless Gaming Mouse Mode d'emploi
-
PDP Xbox Series X|S & PC White Afterglow Wave Controller Manuel utilisateur

