
1
Declaration
The information hereof has been carefully checked to be accurate before
publication. However, the check would not exclude all the printing or
translating mistakes. Please contact our customer service center, if you
find any of the mistakes.
Prior to using please read this user manual thoroughly. Use only the battery
and the accessories the original factory provides, in order to avoid
unanticipated damages. Once use this system not following the instruction
or connect the device with incompatible components, the damages might
even threaten your personal safety and should not be covered by our
warranty, for which the company hereof holds no liability.
For the transportation construction development, it possibly appears the
situation that the navigation electron map data with the actual
transportation instruction incompletely consistent. It is your sole
responsibility to place, secure and use these aids in such a manner that
they will not cause accidents, personal injury or property damage, or in any
manner obstructs your view. You, the user of this product, are solely
responsible for observing safe driving practices at all time. The company
hereby disclaims all liability for any use of this product in a way that may
cause accidents, damage or violation of the law.
Specifications are subject to change without prior notice. Any renewal or
upgrade, please check on related website. We reserve the right of final
interpretation of this user manual.
Please keep a backup for important data. Please note that the
manufacturer holds no liability for the data loss due to making no copy.
The pictures hereof are for your reference only, please subject to the real
products.

2
Remarks
1) Storage
a. Please avoid placing the device directly in sunshine, sharply changed
temperature, high temperature (above 60 ), low temperature (below ℃
-20℃), and high pressure, dusty or humid place.
b. Please avoid dropping or impacting upon the device.
c. Don’t let causticity liquid drop on the surface of the device.
d. Please avoid placing the device in the radiation produced by other
electronic device.
[NOTE] If you need to travel by air with the GPS navigator, we suggest you
to put the device together with your luggage for X ray detection when you
go through the security inspection gate in the airport. Please avoid
detecting the device by magnetic detector or magnetic rod which may
destroy the system data. Our company is not responsible for any loss
arising out of this.
2) Cleanup
a. Wipe the surface with a dry and soft cloth to keep it in clean condition.
b. Please wipe the screen gently by soft cloth with light glass cleanser.
c. Please disconnect the device from computer and turn it off before
cleaning.
3) Battery
a. Before using the navigator the battery will need to be charged. To
maximize the life of the battery the first charge must be fully charge the
battery.
b. Please use the battery of the same type when change the battery to
avoid the battery exploding. Please ask career men for help if necessary.
c. Please don’t disassemble any part of the unit. Any unauthorized

3
disassembly will cause the terminal of official warranty.
d. The battery contained in this unit must be recycled or disposed of
properly. Do not dispose of in household waste or burn.
4) SD/MMC Card
a. Do not press or fold SD/ MMC card; otherwise it would damage the card.
b. Avoid putting the card in humid or high temperature place or under direct
sunlight. Keep the card far away from liquid and corrosive material.
c. Do not insert the card in wrong way; otherwise the memory card slot may
be damaged.
5) Safety
a. When using your navigator while driving it is essential that you drive with
care an attention.
b. Never modify the settings or program of your navigator while driving.
c. Only look at the navigation map when it is safe to do so.
d. Only follow the system instruction when the road regulations allow you to
do so .
e. When mounting the navigator in your car make sure that it does not
obscure your view or impede the operation of any driving controls.
6) Usage
a. Please don’t use wet hand to plug /unplug or contact the device for
preventing shock or damage.
c. Please don’t judder; otherwise the device may be damaged.
d. Please ensure that the SD card has enough space to save new files.
e. Files or data stored in the device cannot completely avoid being
destroyed or lost due to improper use or other reasons. Please copy the
files and data to your computer when necessary.

4
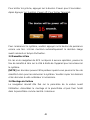
Caution
Do not leave your navigator on display in your car- it could be stolen.

5
Catalog Listing
Declaration.................................................................................................. 1
Remarks...................................................................................................... 2
Catalog Listing...........................................................................................5
1. Introduction............................................................................................ 7
1.1 Features.................................................................................................7
1.2 Package Checklist..................................................................................7
1.3 Buttons and Functions............................................................................ 7
2. Usage on the Computer......................................................................... 8
2.1 Data Transferring ...................................................................................9
2.2 Disconnection......................................................................................... 9
3. Basic Operation...................................................................................... 9
3.1 Battery.................................................................................................. 10
3.2 Power Button........................................................................................ 10
3.3 Reset.................................................................................................... 11
3.4 Car Mount ............................................................................................11
3.5 Touch Pen............................................................................................ 12
4. Mode Operation.................................................................................... 12
4.1 Navigation............................................................................................13
4.1.1 Function Features ............................................................................. 13
4.1.2 Key Instructions.................................................................................13
4.1.3 Operation Steps ................................................................................14
4.2 Media ................................................................................................... 14
4.2.1 Photo................................................................................................. 15
4.2.2 Music................................................................................................. 17
4.2.3 Video.................................................................................................19
4.3 EBook................................................................................................... 21
4.4 Setting..................................................................................................23

6
4.4.1 Volume..............................................................................................23
4.4.2 Power................................................................................................23
4.4.3 Backlight............................................................................................ 24
4.4.4 Date time........................................................................................... 24
4.4.5 Language .......................................................................................... 25
4.4.6 Sys Info............................................................................................. 25
5. Specifications....................................................................................... 28
6. FAQ........................................................................................................ 29
LIMITED PRODUCT WARRANTY............................................................ 30

7
1. Introduction
Thanks for purchasing the portable GPS navigator system GPD359. It is a
new type of portable GPS navigator, which combines digital movie & music
playing, photo browsing and eBook reading.
Before using it, please read the user manual carefully. This user manual is
applicable for GPD359 only.
1.1 Features
a. Support GPS navigation
b. Support movie files as WMV, AVI, ASF
c. Support WMA, MP3 and WAV audio files
d. Lyric (LRC file) display synchronously
e. Support photo browsing for JPG, BMP, GIF, TIF and PNG formats
f. Support eBook browsing for TXT formats
g. Support SD\MMC card
h. Built-in speaker
i. Mini USB port
1.2 Package Checklist
Please check that you have all of the following items. If any items are
missing, please contact the local agent or distributor.
1) Portable navigator GPD359
2) Touch pen
3) Car adapter
4) AC adapter
5) USB cable
6) Car mount
7) User manual
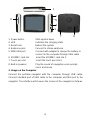
1.3 Buttons and Functions

2
6
3
1
4
5
8
1. Power button Start up/shut down
8
7
2. LED Indicates the charging state
3. Reset hole Reboot the system
4. Earphone jack Connect to stereo earphone
5. MINI USB port Connect with adapter to charge the battery or
connect to the computer through USB cable
6. SD/MMC card slot Insert the SD/MMC card into it
7. Touch pen slot Insert the touch pen into it
8. Built-in speaker Play the sound of navigation voice prompt,
music and movie
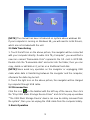
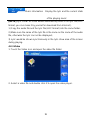
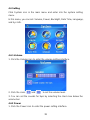
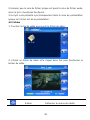
2. Usage on the Computer
Connect the portable navigator with the computer through USB cable.
Connect standard port of USB cable to the computer and Mini port to the
navigator. The interface will show on the screen of the navigator as follows.

[NOTE] The manual has been introduced on system above windows 98.
If your computer is running on Windows 98, you will need to instal Drivers,
which are not included with the unit.
2.1 Data Transferring
1. Touch the left icon on the above picture, the navigator will be connected
with your computer directly. Double click “My Computer”, you would find a
new icon named “Removable Disk” represents the SD card in GPD359.
Double click the “Removable disk” and enter into the folder, then you can
copy, delete or edit data in it, just as on a traditional hard disk.
[NOTE]Please avoid any operation on the navigator or unplugging USB
cable while data is transferring between the navigator and the computer,
otherwise the data may be lost.
2. Touch the right icon on the above picture, the navigator will be charged
by computer through USB cable.
2.2 Disconnection
Click the icon
on the taskbar with the left key of the mouse, then click
the “Stop USB Mass Storage Device-Driver” and click the pop-up window
“’The USB Mass Storage Device’ device can now be safely removed from
the system”, then you can unplug the USB cable from the computer safely.
3. Basic Operation
9

3.1 Battery
1. When the GPS navigator is used for the first time, you have to use the
adapter to fully charge the battery. GPD359 uses the built-in lithium battery.
Please connect the navigator with car adapter to charge for the battery.
[NOTE]During charging, the battery indicator light is showing the charge
state. Please do not unplug the adapter while charging is uncompleted.
2. Car adapter: When using your navigator we recommend you always use
the car adapter to power the unit, especially on long journeys.
1) Plug the USB port of the car adapter into the MINI USB port on
navigator.
2) Plug the other end on the adapter into the car cigar lighter socket with
negative grounding.
[NOTE] Please use the cigarette adapter after the vehicle cranks up to
avoid the damage to the device that may be caused by the shock of the
current when starting the vehicle.
3. When the battery is charging, the red charging indicator will light and you
will find an icon
at the top right of the screen. When the unit is fully
charged the indicator becomes green and the icon at the top right of the
screen becomes full. Generally, the fully charged battery can keep on
power supply for about 5 hours.
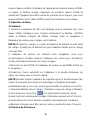
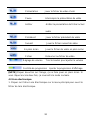
3.2 Power Button
To shut down the system, please press and hold the power button for 2
seconds and the interface is displays as follows.
10

Touch Sleep or Power Off. The screen would be shut off.
To start up the system, please press the power button again. The screen
will display the last picture showed before sleep automatically in the time of
starting up.
3.3 Reset
In case the GPS navigator doesn’t response to any operation, poke the
reset hole on the right side of the device to reboot the system.
[NOTE]The data may be lost when you poke the reset hole to restart the
system. Please copy the files and data to your computer when necessary.
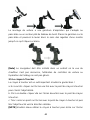
3.4 Car Mount
The navigator should be fixed on the windscreen of the car before using.
Assemble the mount and the bracket then fix the unit into the bracket as
shown below.
The car mount has a suction pad that fits to the windscreen or a flat area of
11

dashboard. Place the pad on the windscreen and push the lever clockwise
until it clicks into place.
[NOTE] The navigator must be mounted in a location that does not obscure
the driver’s vision, impede use of the car’s controls or impede the operation
of the car’s airbags.
3.5 Touch Pen
The touch pen is an important tool, please keep it carefully.
a. Single click: click the screen once with the pen point to choose the
wanted item.
b. Double Click: quickly click the screen twice with the pen point.
c. Drag: press a point on the screen with pen point and drag the touched
item to the desired direction.
[NOTE] Please use touch pen to write on the LCD screen rather than other
sharp objects when use the hand-writing function.
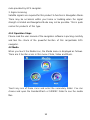
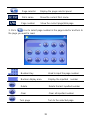
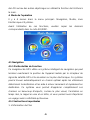
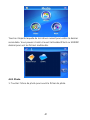
4. Mode Operation
There are 4 menus in the Main Menu: Navigation, Media, EBook and
System.
Before using these functions, please copy the correlative files into SD/MMC
card.
12

4.1 Navigation
4.1.1 Function Features
This GPS navigator uses intelligent navigation system which can pinpoint
the position of mobile device by GPS satellite signal receiver and show it
on the electronic map. The system will figure out an optimal path
automatically after the users set the destination and help them reach the
destination safely and quickly. The system makes you fully enjoy the charm
of it in many aspects such as visual map, real-time animation, voice and
letter reminding and enjoy a comfortable and happy trip.
4.1.2 Key Instructions
1. Map information
GPD359 navigator uses the newest electronic navigation map. But the
product will be incompletely accordance with the actual information after
produced because of the development of transportation construction.
Please be sure to drive according to actual transportation condition and
observe traffic rules and traffic control.
2. Navigation
This GPS navigator only provides the route for reference. Please decide by
yourself whether you will follow that route or not. The way chosen by the
driver who is familiar with the actual map may be more effective than the
13

route provided by GPS navigator.
3. Signal receiving
Satellite signals are required for this product to function in Navigation Mode.
There may be occasions within your home or building when the signal
strength is limited and Navigation Mode may not be possible. This is quite
normal for products of this type.
4.1.3 Operation Steps
Please read the user manual of the navigation software in packing carefully
and feel the charm of the powerful function of this car/portable GPS
navigator.
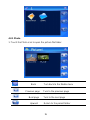
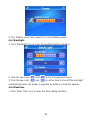
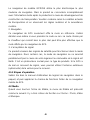
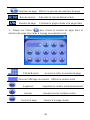
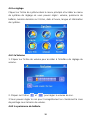
4.2 Media
When you touch the Media icon, the Media menu is displayed as follows.
There are 3 function icons in this menu: Photo, Video and Music.
Touch any one of these icons and enter the secondary folder. You can
choose and open the ResidentFlash or SDMMC folder to see the media
files.
14

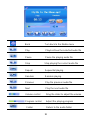
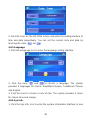
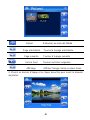
4.2.1 Photo
1. Touch the Photo icon to open the picture file folder.
Back Turn back to the Media menu
Previous page Turn to the previous page
Next page Turn to the next page
Upward Return to the parent folder
15

Display Display the chosen picture in full screen
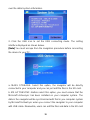
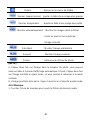
2. Select a picture file and double click it to open the photo browser.
Back Turn back to the Media menu
Zoom in Scaling up the current picture
Zoom out Scaling down the current picture
Auto Play Play all pictures in the selected folder
with full screen from the current picture
Previous Show the previous picture
Next Show the next picture
Folder Return to the photo folder
.[NOTE]
a. Double click the picture in the photo browser; it can also enter into the
16

auto playing mode. Then double click the picture played with full screen, it
will turn back to the normal mode.
b. The picture can be dragged by touch pen in any mode.
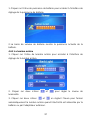
4.2.2 Music
1. Touch Music icon to open the audio file folder.
Back Turn back to the Media menu
Previous page Turn to the previous page
Next page Turn to the next page
Upward Return to the parent folder
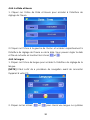
2. Select an audio file and double click it to open the audio player.
17

18
Back Turn back to the Media menu
Play Play/continue the selected audio file
Pause Pause the playing audio file
Stop Stop playing the current audio file
Repeat Sequential playing
Random Random playing
Previous Play the previous audio file
Next Play the next audio file
Volume control Drag the slider to adjust the volume
Progress control Adjust the playing progress
Folder Return to the audio folder

Music information Display the lyric and the current state
of the playing music
[NOTE] Lyric show: GPD359 would automatically search the lyric file (LRC
format, you can make it by yourself or download from Internet.).
1) Copy the audio file and the lyric file (LRC format) into the same folder.
2) Make sure the name of the lyric file is the same as the name of the audio
file, otherwise the lyric can not be displayed;
3) Lyric would be shown synchronously in the lyric show area of the screen
during playing.
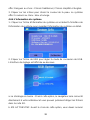
4.2.3 Video
1. Touch the Video icon and open the video file folder.
2. Select a video file and double click it to open the video player.
19

Back Turn back to the Media menu
Play Play the selected video file
Pause Pause the playing video
Stop Stop playing the current video
Previous Play the previous video file
Next Play the next video file
Full screen Play the video file with full screen
Folder Return to the video folder
Volume control Drag the slider to adjust the volume
Progress control Adjust the playing progress
[NOTE] Double click the picture; it would play in full screen mode. Double
20
La page charge ...
La page charge ...
La page charge ...
La page charge ...
La page charge ...
La page charge ...
La page charge ...
La page charge ...
La page charge ...
La page charge ...
La page charge ...
La page charge ...
La page charge ...
La page charge ...
La page charge ...
La page charge ...
La page charge ...
La page charge ...
La page charge ...
La page charge ...
La page charge ...
La page charge ...
La page charge ...
La page charge ...
La page charge ...
La page charge ...
La page charge ...
La page charge ...
La page charge ...
La page charge ...
La page charge ...
La page charge ...
La page charge ...
La page charge ...
La page charge ...
La page charge ...
La page charge ...
La page charge ...
La page charge ...
La page charge ...
La page charge ...
La page charge ...
La page charge ...
La page charge ...
-
 1
1
-
 2
2
-
 3
3
-
 4
4
-
 5
5
-
 6
6
-
 7
7
-
 8
8
-
 9
9
-
 10
10
-
 11
11
-
 12
12
-
 13
13
-
 14
14
-
 15
15
-
 16
16
-
 17
17
-
 18
18
-
 19
19
-
 20
20
-
 21
21
-
 22
22
-
 23
23
-
 24
24
-
 25
25
-
 26
26
-
 27
27
-
 28
28
-
 29
29
-
 30
30
-
 31
31
-
 32
32
-
 33
33
-
 34
34
-
 35
35
-
 36
36
-
 37
37
-
 38
38
-
 39
39
-
 40
40
-
 41
41
-
 42
42
-
 43
43
-
 44
44
-
 45
45
-
 46
46
-
 47
47
-
 48
48
-
 49
49
-
 50
50
-
 51
51
-
 52
52
-
 53
53
-
 54
54
-
 55
55
-
 56
56
-
 57
57
-
 58
58
-
 59
59
-
 60
60
-
 61
61
-
 62
62
-
 63
63
-
 64
64


dans d''autres langues
Documents connexes
Autres documents
-
Sylvania SGPD430 Manuel utilisateur
-
danew GS 140 Le manuel du propriétaire
-
Takara GP12 Le manuel du propriétaire
-
BMW NAVIGATOR IV - REV A Le manuel du propriétaire
-
Hip Street HS-016 Manuel utilisateur
-
Snooper Syrius S7000 Manuel utilisateur
-
 Yoo Digital YOO MOVE 3001 Manuel utilisateur
-
Magellan RoadMate 66 Series Manuel utilisateur
-
-
