
Issue 3 170322
Information for the Product user:
1. Please note the requirement to dispose of Waste Electrical & Electronic Equipment separately from household waste (WEEE marked with crossed
out wheelie bin symbol).
2. Please consider your role in contributing to re-use and recycling by returning this product at end of life to a collection centre for waste electrical
equipment or a Civic Amenity site, or to a retail outlet from which you are purchasing a replacement.
3. This equipment may contain substances that are hazardous to health and the environment if disposed of carelessly. It is important that it is separated
from normal household waste and recycled in the WEEE chain
4. The “crossed out wheelie bin symbol” on a product indicates this equipment must not be disposed of in normal household waste, but should be
disposed of according to local WEEE regulations
RHA2WEMST-PSU
INSTRUCTION MANUAL
HARBOUR 2W, 3HOUR PLUG-IN EMERGENCY PACK WITH LiFePO4
AND SELF-TEST
PLEASE READ INSTRUCTION BEFORE COMMENCING INSTALLATION AND RETAIN FOR FUTURE REFERENCES. ! Electrical products can cause death or injury,
or damage to property.
The Installation must be carried out by a qualified electrician
.
Note:
The luminaire must be disconnected before carrying out any insulation resistance testing. Product technical information and specification may change over time
without prior notification. For the latest technical information please visit our web site www.robus.com or robusdirect.com
EN
Page 1
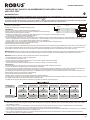
Installation
-10°C < Ta < +40°C, 220V – 240V ~ 50/60Hz, Class II, IP20, battery warranty 3 years
Luminaire is non-dimmable
Suitable for mounting on a normally flammable surface.
1. Ensure mains supply is switched off before commencing work
2. Safety note! The power supply cord must not be exposed to mechanical damage.
3. Disassemble the fitting base from the fitting.
4. Choose the suitable location on aluminium plate. Align the holes on the emergency pack and aluminium plate,
insert the push rivets into the holes and rotate 90 degree.
5. Fix the emergency indicators into aluminum plate.
6. Connect the wires as per figure 1 & 4. Connect wires from un-switched supply to terminals: Brown/Live to SL, Blue/Neutral to N and Green/ Yellow to
earth. For fitting always on, link terminal “SL” to terminal “PL”. When controlled by switch connect switched live wire to terminal SL and permanent
live to PL. Note: if “SL” isn’t connected, the light fitting would be non-maintained.
7. Remove battery cover. Connect battery. Attach battery cover. Write installation date on emergency pack.
8. Refit aluminum plate to base and ensure that it fits securely.
9. Attach diffuser to base using clips provided.
This is a maintained and non-maintained emergency fitting, when main power is connected, the green charging LED should come on and indicating the
correct battery has Started. When main power is lost, the fitting will go into emergency mode, the ermergency LEDs will be on. Press test button once,
the emergency LEDs will come on for a short period of time. Testing and inspection must be in accordance with local codes of practice.
Manual Test: Enter the manual test mode by switching the functions switch towards MT. Press the test button once, the emergency LEDs will come on
for a short period of time. Note: Mains power supply and the battery must be disconnected when switching between Manual and Self-Test functions.
Self-Test: Enter the Self-Test mode by switching the functions switch towards ST.
1. Green LED indicator comes on: Normal charging mode
2. 1-Month Self-Test: Test duration 10s
Manual 1-Month Test: Hold and press test button for 3s and then release, there will be 2 beeps
3. 6-month Self-Test: Test duration 3 hours
Manual 6-month Test: Press and hold test button for 6s and then release, you will hear 3 beeps
LED Indicators
4. Red LED flashes (unit will beep every 45s): Battery fault or battery failure AND emergency LED failure
5. Yellow LED flashes, (unit will beep every 45s): Emergency LED failure
6. Clear memory and re-set test schedule: Disconnect supply to Live terminal, fitting will go into emergency mode. Press in and hold the test button for
more than10s and then release, the emergency LED will then go out. New schedule will start when supply to fitting is connected
After installation, the battery will charge for 24 hours. The self-test function will perform a 3-hour test within the next 24 hours. After the initial test, the
fitting will enter 1-Month Test and 6-Month Test schedules.
1. Daily check that charge indicator LED is working.
2. Monthly check: The status of LED indicator and emergency battery discharge.
3. 6-Month and one-year check: The self-test operation is working, that the LED indicators the Emergency LEDs come on and last for a minimum 3 hours
4. Complete record sheet on installation and retain in maintenance file.
5. Update file with ongoing test records for inspection by fire officer or other duly authorised person
Start: 24-Hour
Charge 1-Month Test
10s discharge
30th day
Emergency battery
During test, all LED
indicators are off.
After the test
green LED back on
10s discharge
30th day
Emergency battery
During test, all LED
indicators are off.
After the test
green LED back on
10s discharge
30th day
Emergency battery
During test, all LED
indicators are off.
After the test
green LED back on
10s discharge
30th day
Emergency battery
During test, all LED
indicators are off.
After the test
green LED back on
10s discharge
30th day
Emergency battery
During test, all LED
indicators are off.
After the test
green LED back on
3hour discharge
30th day
Emergency battery
During test, all LED
indicators are off.
After the test
green LED back on
2-Month Test 3-Month Test 4-Month Test 5-Month Test 6-Month Test
( Half a Year )
3-hour discharge
within the next 24hour
LN
220/240V
~50/60Hz Figure1
+ Red
- Black From LED
Driver
+ Red
- Black
External Test Switch
Switch functions
Output
to LED
LED indicator
ST
Switch functions
MT

-10°C < Ta < +40°C, 220V – 240V ~ 50/60Hz, Class II, IP20, Batterij Garantie: 3 Jaar
Niet-dimbare armatuur.
Niet-dimbare armatuur. Geschikt voor montage op normal ontvlambaar oppervlakte
Installatie
LEES DE INSTRUCTIES VOORDAT U BEGINT MET DE INSTALLATIE EN HOU ZE BIJ VOOR LATER.
! Elektrische producten kunnen de dood of letsel veroorzaken of eigendommen beschadigen.
De installatie dient te worden uitgevoerd door een elektricien
.
Opmerkingen:
De lamp moet worden losgekoppeld voordat de isolatieweerstand wordt getest. Technische gegevens en specificaties van dit product kunnen zonder
voorafgaande kennisgeving wijzigen. Ga voor de meest recente technische gegevens naar onze website www.robus.com of robusdirect.com
Informatie voor de gebruiker van het product:
1. Hou bij het verwijderen van afval rekening met de regeling voor afgedankte elektrische en elektronische apparatuur, gescheiden van gewoon
huishoudelijk afval (AEEA, pictogram van een kliko met een kruis erdoorheen).
2. Neem uw verantwoordelijkheid op het vlak van hergebruik en recycling door dit product aan het einde van zijn levenscyclus in te leveren bij een
inleverpunt voor elektronisch afval, een milieupark of een winkel waar u een nieuw product koopt.
3. Deze apparatuur kan stoffen bevatten die gevaarlijk zijn voor de gezondheid en het milieu indien ze onachtzaam wordt weggegooid. Het is belangrijk
dat ze gescheiden gehouden wordt van het normaal huishoudelijk afval en gerecycled wordt in het netwerk voor AEEA.
4. Het pictogram van een kliko met een kruis erdoorheen op een product betekent dat dit apparaat niet samen met het gewone huishoudelijk afval mag
worden weggegooid, maar dat het dient te worden verwijderd in overeenstemming met de lokale regelgeving voor AEEA (afgedankte elektrische en
elektronische apparatuur).
RHA2WEMST-PSU
HARBOUR 2W, 3 UUR PLUG-IN NOODVERLICHTINGSPACK MET LiFePO4 EN ZELFTEST
NL
Page 2
Start: 24 uur
laden
3 uur ontladen in de
volgende 24 uur
1 maand test
10 s ontladen 30ste
dag noodbatterij
Tijdens de test zijn alle
LED-indicatoren uit.
Na de test gaat de
groene LED terug aan
2 maand test
Zelftestfunctie
10 s ontladen 30ste
dag noodbatterij
Tijdens de test zijn alle
LED-indicatoren uit.
Na de test gaat de
groene LED terug aan
3 maand test
10 s ontladen 30ste
dag noodbatterij
Tijdens de test zijn alle
LED-indicatoren uit.
Na de test gaat de
groene LED terug aan
4 maand test
10 s ontladen 30ste
dag noodbatterij
Tijdens de test zijn alle
LED-indicatoren uit.
Na de test gaat de
groene LED terug aan
5 maand test
10 s ontladen 30ste
dag noodbatterij
Tijdens de test zijn alle
LED-indicatoren uit.
Na de test gaat de
groene LED terug aan
6 maand test
3uur ontladen 30ste
dag noodbatterij
Tijdens de test zijn alle
LED-indicatoren uit.
Na de test gaat de
groene LED terug aan
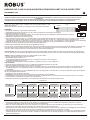
1. Zorg dat de netvoeding is uitgeschakeld voordat ubegint
2. Veiligheidsopmerking! Het stroomsnoer mag niet worden blootgesteld aan mechanische beschadiging.
3. Demonteer de basis van de armatuur
4. Kies de geschikte locatie op aluminium plaat en lijn vervolgens de gaten op het noodpakket en de aluminiumplaat uit, steek de
druknagels in de gaten en draai deze 90 graden.
5. Bevestig de noodindicator in een aluminium plaat.
6. Sluit de draden aan zoals in figuur 1 & 4. Sluit de draden van de ongeschakelde voeding aan op de klemmen: bruin / live naar SL, blauw / neutraal
naar N en groen / geel naar aarde. Koppel voor aansluiting altijd aan klem "SL" aan klem "PL". Wanneer bestuurd door schakelaar, sluit
geschakelde live-draad aan op terminal SL en permanent live op PL. Opmerking: als "SL" niet aangesloten is, werkt de verlichting als niet-zelfstandig
7. Verwijder het deksel van de batterij. Sluit de batterij aan. Bevestig de batterijhoes. Schrijf de installatiedatum op het noodpakket.
8. Plaats de aluminium plaat terug op de basis en zorg dat deze goed vast zit.
9. Bevestig de lichtverspreider aan de basis met de bijgeleverde klemmen.
Dit is een al dan niet onderhouden noodaansluiting, wanneer de hoofdvoeding is aangesloten, moet de groene oplaad-LED branden en aangeven dat
de juiste batterij is gestart. Wanneer de stroom uitvalt, gaat de fitting in de noodmodus. Druk eenmaal op de testknop, de nood-LED's zullen kort
oplichten. Tests en inspecties moeten in overeenstemming zijn met de lokale praktijkcodes.
Handmatige test: Ga naar de handmatige testmodus door de functieschakelaar op MT te zetten. Druk één keer op de testknop, de noodleds lichten
even op. Opmerking: de netvoeding en de batterij moeten worden losgekoppeld wanneer tussen de functies Handmatig en Zelftest wordt geschakeld.
Zelftest: activeer de zelftestmodus door de functieschakelaar op ST te zetten.
1. Groene LED-indicator gaat aan: Gewone laadmodus
2. Maandelijkse zelftest: Testduur 10 s
Handmatige maandelijkse test: Houd de testknop 3 s ingedrukt en laat los, u hoort 2 pieptonen
3. 6-maandelijkse zelftest: Testduur 3 uur
Handmatige 6-maandelijkse test: Houd de testknop 6 s ingedrukt en laat los, u hoort 3 pieptonen
LED-indicatorren
4. Rode LED knippert (eenheid piept om de 45 s): Batterfout of batterijstoring EN storing nood-LED
5. Gele LED knippert (eenheid piept om de 45 s): Storing nood-LED
6. Wis het geheugen en stel het testschema opnieuw in: Koppel de voeding van de stroomklem af, de armatuur schakelt over op noodmodus. Houd
de testknop langer dan 10 s ingedrukt en laat los, de nood-LED gaat uit. Het nieuwe schema start wanneer de voeding van de armatuur wordt
ingeschakeld
Na installatie laadt de baterij 24 uur op. De zelftestfunctie voert in de volgende 24 uur een test van 3 uur uit. Na de initiële test, worden de mandelijkse
test en 6-maandelijkse test geactiveerd.
1. Dagelijkse controle: de indicator-LED werkt.
2. Maandelijkse controle: De status van de LED-indicator en de ontlading van de noodbatterij.
3. 6-Maandelijkse en jaarlijkse controle: De zelftest is bedrijfsklaar, de LED-indicatoren en nood-LED’s gaan aan en blijven minstens 3 uur branden
4. Vul het formulier in bij installatie en bewaar in de onderhoudsmap.
5. Actualiseer het formulier bij volgende tests voor inspectie door de brandweer of een ander bevoegd persoon.
LN
220/240V
~50/60Hz Figuur1 + Rood
- Zwart Van LED-
driver
+ Rood
- Zwart
Functies wisselen
Uitvoer
naar LED
LED-indicator
Externe testschakelaar
ST
Functies wisselen
MT

RHA2WEMST-PSU
HARBOUR 2W, 3 STUNDEN PLUG-IN NOTFALLPAKET MIT LiFePO4 UND SELBSTTEST
DE
LESEN SIE DIE ANLEITUNG, BEVOR SIE MIT DER INSTALLATION BEGINNEN, UND BEWAHREN SIE SIE FÜR DIE SPÄTERE VERWENDUNG AUF.
! Elektronikprodukte können Tod, schwere Verletzungen oder. Sachschaden verursachen.
Die Installation muss von einem Elektriker vorgenommen werden
.
Hinweis:
Vor der Durchführung von Isolationswiderstandsprüfungen muss die Leuchte vom Strom getrennt werden. Technische Produktinformationen und Angaben
können sich im Lauf der Zeit ohne weitere Mitteilung ändern. Besuchen Sie unsere Webseite www.robus.com oder robusdirect.com für aktuelle technische
Informationen.
Page 3
Informationen für den Benutzer:
1. Beachten Sie, dass die Entsorgung von ausgedienten Elektro- und Elektronikgeräten getrennt vom Hausmüll erfolgen muss (die Geräte sind mit dem
Symbol einer durchgestrichenen Tonne gekennzeichnet).
2. Beachten Sie Ihre Rolle im Wiederverwendungs- und Recycling-Zyklus, indem Sie dieses Produkt am Ende der Nutzungsdauer bei einer
Sammelstelle für. Elektronikaltgeräte oder einer städtischen Müllkippe, oder einer Verkaufsstelle, wo Sie einen Ersatz besorgen, entsorgen.
3. Dieses Gerät kann Substanzen enthalten, die gesundheits- und umweltschädlich sind, falls sie achtlos entsorgt werden. Es ist wichtig, dass es vom
normalen Hausmüll getrennt und in der Kette der Elektro-Altgeräte recycelt wird
4. Das „durchgestrichene Tonnen-Symbol“ auf einem Produkt bedeutet, dass dieses. Gerät nicht mit dem normalen Hausmüll, sondern gemäß der
Entsorgungsvorschriften für Elektro-Altgeräte entsorgt werden muss
-10°C < UT < +40°C, 220-240V ~ 50/60Hz, Klasse II, IP20, Batterie-Garantie: 3 Jahre
Leuchte ist nicht dimmbar.
Leuchte ist nicht dimmbar. Kann auf normal entflammbaren Oberflächen montiert werden.
Installation
Start: 24-Stunden
-Aufladung
3-stündige Entladung
innerhalb der
nächsten 24 Stunden
1-monatiger Test
10 Sek. Entladung 30.
Tag Notfallbatterie
Während des Tests
sind alle LED-Anzeigen
aus. Nach dem Test
leuchtet die grüne LED
wieder auf.
10 Sek. Entladung 30.
Tag Notfallbatterie
Während des Tests
sind alle LED-Anzeigen
aus. Nach dem Test
leuchtet die grüne LED
wieder auf.
10 Sek. Entladung 30.
Tag Notfallbatterie
Während des Tests
sind alle LED-Anzeigen
aus. Nach dem Test
leuchtet die grüne LED
wieder auf.
10 Sek. Entladung 30.
Tag Notfallbatterie
Während des Tests
sind alle LED-Anzeigen
aus. Nach dem Test
leuchtet die grüne LED
wieder auf.
10 Sek. Entladung 30.
Tag Notfallbatterie
Während des Tests
sind alle LED-Anzeigen
aus. Nach dem Test
leuchtet die grüne LED
wieder auf.
3 Stunden. Entladung
30. Tag Notfallbatterie
Während des Tests
sind alle LED-Anzeigen
aus. Nach dem Test
leuchtet die grüne LED
wieder auf.
2-monatiger Test 3-monatiger Test
Funktion Selbsttest
4-monatiger Test 5-monatiger Test 6-monatiger Test
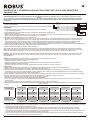
1. Vergewissern Sie sich, dass das Versorgungsnetz ausgeschaltet ist, ehe Sie
mit der Installation beginnen
2. Sicherheitshinweis! Das Stromkabel darf keinen mechanischen Zerstörungen ausgesetzt sein.
3. Lampensockel abmontieren
4. Wählen Sie die geeignete Stelle auf der Aluminium platte und richten Sie dann die Löcher in der Notverpackung und der Aluminiumplatte aus,
Setzen Sie die Drucknieten in die Löcher ein und drehen Sie sie um 90 Grad.
5. Befestigen Sie die Notfallanzeigen in der Aluminiumplatte.
6. Schließen Sie die Kabel gemäß Abbildung 1 und 4 an. Schließen Sie die Kabel von der nicht geschalteten Stromversorgung an die Klemmen an:
Braun / Live an SL, Blau / Neutral an N und Grün / Gelb an Erde. Verbinden Sie für eine ständige Montage die Klemme „SL“ mit der Klemme „PL“.
Wenn die Steuerung über einen Schalter erfolgt, schließen Sie die geschaltete stromführende Leitung an die Klemme SL und die dauerhafte
stromführende Leitung an PL an. Hinweis: Wenn "SL" nicht angeschlossen ist, funktioniert die Installation im Nicht-Wartungs-Modus
7. Entfernen Sie die Batterieabdeckung. Batterie anschließen. Batterieabdeckung befestigen. Schreiben Sie das Installationsdatum auf das Notfallpaket.
8. Aluminiumplatte am Sockel anbringen, dabei darauf achten, dass alles fest sitzt.
9. Diffusor mithilfe der beiliegenden Clips am Sockel befestigen.
Dies ist eine gewartete oder nicht gewartete Notstromversorgung. Wenn die Hauptstromversorgung angeschlossen ist, sollte die grüne Lade-LED
aufleuchten und anzeigen, dass der richtige Akku gestartet wurde. Bei Stromausfall geht die Armatur in den Notbetrieb. Drücken Sie die Test-Taste
einmal. Die Notfall-LEDs leuchten kurz auf. Prüfung und Inspektion müssen in Übereinstimmung mit den örtlichen Vorschriften erfolgen.
Manueller Test: Der manuelle Testmodus wird aufgerufen, indem man den Funktionsschalter auf MT stellt. Drücken Sie die Testtaste einmal, die
LED-Notbeleuchtung leuchtet kurz auf. Hinweis: Beim Umschalten zwischen den Funktionen „Manuell“ und „Selbsttest“ müssen Strom und Akku
abgeschaltet sein.
Selbsttest: Der Selbsttestmodus wird aufgerufen, indem man den Funktionsschalter auf ST stellt.
1. Die grüne LED-Anzeige leuchtet auf: normaler Auflade-Modus
2. 1-Monats-Selbsttest: Testdauer 10 Sek.
Manueller 1-Monats-Test: Taste 3 Sek. lang gedrückt halten und dann loslassen. Es ertönen 2 Pieptöne.
3. 6-Monats-Selbsttest: Testdauer 3 Stunden
Manueller 6-Monats-Test: Taste 6 Sek. lang gedrückt halten und dann loslassen. Es ertönen 3 Pieptöne.
LED-Anzeigen
4. Rotes LED blinkt (die Einheit piept alle 45 Sek.): Batteriefehler oder Batteriefehler UND Ausfall der LED-Notbeleuchtung
5. Gelbes LED blinkt (die Einheit piept alle 45 Sek.): Ausfall der LED-Notbeleuchtung
6. Speicher löschen und Testzeitplan zurücksetzen: Stromversorgung der stromführenden Klemme trennen, die Leuchte geht in den Notbetrieb.
Testtaste länger als 10 Sek. lang gedrückt halten und dann loslassen, dann schaltet sich die LED-Notbeleuchtung aus. Der neue Zeitplan beginnt,
wenn die Stromversorgung der Leuchte wieder angeschlossen ist.
Nach der Installation wird die Batterie 24 Stunden lang aufgeladen. Die Selbsttest-Funktion führt innerhalb der nächsten 24 Stunden einen 3-stündigen
Test durch. Nach dem ersten Test startet die Leuchte mit dem Zeitplan für den 1-Monats- und den 6-Monat-Test.
1. Kontrollieren Sie täglich, dass die LED-Anzeige für den Aufladestatus funktioniert.
2. Monatlicher Test: Zustand der LED-Anzeige und Entladung der Notbatterie.
3. Test nach 6 Monaten und einem Jahr: Der Selbsttestbetrieb funktioniert, sodass die LED-Anzeigen der Notfall-LEDs leuchten und mindestens 3
Stunden halten.
4. Füllen Sie das Protokollblatt über die Installation aus und bewahren Sie es in der Wartungsakte auf.
5. Aktualisieren Sie die Datei mit den laufenden Prüfprotokollen zur Überprüfung durch den Brandschutzbeauftragten oder eine andere autorisierte
Person.
LN
220/240V
~50/60Hz Abbildung1
+ Rot
- Schwarz Vom
LED-Treiber
+ Rot
- Schwarz
Externer Testschalter
Funktionen wechseln
Ausgabe
auf LED
LED-Anzeige
ST
Funktionen wechseln
MT

RHA2WEMST-PSU
HARBOUR 2W, PACK DE SÉCURITÉ 3 HEURES DOTÉ DE LiFePO4 ET AUTO-VÉRIFICATION
Page 4
VEUILLEZ LIRE LES INSTRUCTIONS AVANT DE COMMENCER L’INSTALLATION ET CONSERVEZ-LES POUR TOUTES UTILISATIONS FUTURES.
Les produits électriques peuvent causer la mort, de graves blessures ou des dégâts matériels.
L’installation doit être effectuée par un électricien qualifié
.
Remarque :
Le luminaire doit être déconnecté avant d'effectuer tout test de résistance a l’isolation. Les informations techniques et caractéristiques peuvent changer au fil du temps
sans notification préalable. Pour rester informé de ces possibles modifications, veuillez consulter le site internet www.robus.com ou robusdirect.com
Informations pour l’utilisateur du produit :
1. Veuillez, s’il vous plait, noter l’importance de disposer des Déchets d’Equipement Electriques et Electroniques séparément des déchets ménagers
(DEEE représenté par une poubelle barrée d’une croix).
2. Veuillez tenir compte de l’importance de votre contribution à la réutilisation et au recyclage de ce produit en fin de vie en le retournant dans un centre
de collecte de déchets des équipements électriques ou dans le point de vente à partir duquel vous effectuez l’achat du produit de remplacement.
3. Cet équipement peut contenir des substances dangereuses pour la santé et l’environnement s’il est jeté n’importe où. Il est important de le séparer
des ordures ménagères et le recycler dans une consigne DEEE appropriée.
4. La “poubelle barrée d’une croix” présent sur le produit indique que cet appareil ne doit pas être jeté dans les ordures ménagères mais doit être éliminé
conformément à la réglementation DEEE locale.
FR
-10°C < Ta < +40°C, 220-240V ~ 50/60Hz, Classe II, IP20, Batterie Garantie: 3 Ans
Ce luminaire est à intensité variable.
Ce luminaire est non-dimmable. Convient à une installation sur une surface
normalement inflammable
Installation
Début : charge de
24 heures
Décharge de 3 heures
dans les prochaines
24 heures
Test à 1 mois
10 s décharge 30 jours
batterie d'urgence
Pendant le test, tous
les voyants sont
éteints. Après le test,
la LED verte
10 s décharge 30 jours
batterie d'urgence
Pendant le test, tous
les voyants sont
éteints. Après le test,
la LED verte
10 s décharge 30 jours
batterie d'urgence
Pendant le test, tous
les voyants sont
éteints. Après le test,
la LED verte
10 s décharge 30 jours
batterie d'urgence
Pendant le test, tous
les voyants sont
éteints. Après le test,
la LED verte
10 s décharge 30 jours
batterie d'urgence
Pendant le test, tous
les voyants sont
éteints. Après le test,
la LED verte
3heures décharge 30
jours batterie d'urgence
Pendant le test, tous
les voyants sont
éteints. Après le test,
la LED verte
Test à 2 mois Test à 3 mois
Fonction d'auto-test
Test à 4 mois Test à 5 mois Test à 6 mois
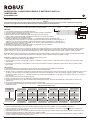
1. Assurez-vous que l’alimentation est coupée avant de commencer
2. Consigne de sécurité ! Le cordon d’alimentation ne doit pas être exposé aux risques de dommages mécaniques.
3. Séparez la base du luminaire
4. Choisissez l’emplacement approprié sur une plaque d’aluminium puis aligner les trous sur le pack d'urgence et la plaque d'aluminium,insérer les
rivets de poussée dans les trous et les faire pivoter à 90 degrés.
5. Fixez l'indicateurs d'urgence dans la plaque d'aluminium.
6. Connectez les fils comme indiqué dans les figures 1 et 4. Connectez les fils de l’alimentation non commutée aux bornes: Brown / Live à SL, Bleu /
Neutre à N et Vert / Jaune à la terre. Pour un montage permanent, reliez la borne “SL” à la borne “PL”. Lorsqu'il est contrôlé par un commutateur,
connectez le fil sous tension commuté à la borne SL et votre point permanent à PL. Remarque: si “SL” n’est pas connectée, le luminaire fonctionne
de manière « non-permanente »
7. Retirez le couvercle de la batterie. Connectez la batterie. Attachez le couvercle de la batterie. Inscrivez la date d'installation sur le pack d'urgence.
8. Remontez la plaque d'aluminium sur la base et vérifiez qu’elle est fermement fixée.
9. Fixez le diffuseur sur la base à l’aide des clips fournis.
Il s’agit d’un branchement d’urgence maintenu ou non entretenu. Lorsque l’alimentation principale est connectée, le voyant de charge vert doit s’allumer
et indiquer que la batterie correcte a démarré. En cas de coupure de courant, l'appareil passera en mode d'urgence. Appuyez une fois sur le bouton de
test, les voyants d’urgence s’allument pendant une courte période. Les tests et les inspections doivent être conformes aux codes de pratique locaux.
Essai manuel : basculer le sélecteur de fonction sur MT pour activer le mode essai manuel. Appuyer une fois sur la touche de test pour allumer
brièvement les LED d’urgence. Remarque : il faut couper l’alimentation sur secteur et sur piles pour activer alternativement le mode Manuel et la
fonction Autotest.
Autotest : basculer le sélecteur de fonction sur ST pour activer le mode Autotest.
1. Le voyant vert s’allume : mode de charge normal
2. Autotest de 1 mois : Durée du test 10 secondes
Test manuel sur 1 mois : maintenez le bouton de test enfoncé pendant 3 secondes, puis relâchez-le. Deux bips retentissent.
3. Autotest de 6 mois : Durée du test 3 heures
Test manuel de 6 mois : maintenez le bouton de test enfoncé pendant 6 secondes, puis relâchez-le, vous entendrez 3 bips
Indicateurs LED
4. Le voyant rouge clignote (l'appareil émettra un bip toutes les 45 s): panne de batterie et panne de voyant d'urgence
5. La LED jaune clignote (l'appareil émet un bip toutes les 45 s): défaillance de la DEL d'urgence
6. Effacez la mémoire et rétablissez le programme de test: déconnectez l'alimentation du terminal, l'ajustement passe en mode d'urgence. Appuyez sur
le bouton de test et maintenez-le enfoncé pendant plus de 10 secondes, puis relâchez-le, le voyant d'urgence s'éteint. Le nouvel horaire
commencera lorsque l'alimentation au raccord sera connectée
Après l'installation, la batterie se chargera pendant 24 heures. La fonction d’autotest effectuera un test de 3 heures au cours des 24 prochaines heures.
Après le test initial, l'ajustement entrera dans les programmes de test à 1 mois et à 6 mois.
1. Vérifiez quotidiennement que le voyant indicateur de charge fonctionne.
2. Vérification mensuelle : état de l'indicateur LED et de la décharge de la batterie d'urgence.
3. Vérification tous les 6 mois et tous les ans: le test automatique fonctionne, les voyants LED s'allument et les voyants d'urgence s'allument et durent
au moins 3 heures.
4. Complétez la fiche d'enregistrement lors de l'installation et conservez-la dans le fichier de maintenance.
5. Mettez à jour le fichier avec les enregistrements de test en cours pour l'inspection par l'agent des incendies ou une autre personne dûment autorisée.
LN
220/240V
~50/60Hz Figure1
+ Rouge
- Noire Du conducteur
de LED
+ Rouge
- Noire
Commutateur de
test externe
Fonctions de commutation
Sortie
vers LED
Indicateur LED
ST
Fonctions de commutation
MT

Informacije za uporabnika:
1. Prosimo, upoštevajte uredbo o ravnanju z odpadno električno in elektronsko opremo (WEEE, simbol s prekrižanim smetnjakom).
2. Prosimo, prispevajte k varovanju okolja tako, da po preteku življenjske dobe vrnete izdelek v zbirni center za odpadno električno in elektronsko
opremo ali trgovino, kjer ste izdelek kupili.
3. Izdelek lahko vsebuje snovi, ki so nevarne za človekovo zdravje in okolje, zato ga ne smemo odvreči v gospodinjske odpadke. Upoštevajte ločeno
shranjevanje odpadne električne in elektronske opreme, skladno z WEEE.
4. »Simbol« s prekrižanim smetnjakom« pomeni, da se ta izdelek ne sme odvreči med navadne gospodinjske odpadke, temveč v skladu z uredbo o
ravnanju z odpadno električno in elektronsko opremo.
RHA2WEMST-PSU
HARBOUR 2W, 3-URNI ZASILNI MODUL Z BATERIJO LiFePO4 IN
SAMODEJNIM
PRED MONTAŽO SKRBNO PREBERITE NAVODILA ZA UPORABO IN JIH SHRANITE NA VARNO MESTO, SAJ JIH BOSTE POZNEJEMORDA ŠE POTREBOVALI.
! Električne naprave lahko povzročijo telesne poškodbe, smrt in materialno škodo.
Priklop sme izvesti le strokovnjak za elektrotehniko
.
Opomba:
Pred preizkusi izolacijske upornosti svetilko obvezno izključite. Pridržujemo si pravico do sprememb proizvoda in tehničnih specifikacij brez predhodnega
obvestila. Za najnovejše tehnične informacije obiščite našo spletno stran www.robus.com ali robusdirect.com
SL
Page 5
Montaža
-10°C < Ta < +40°C, 220V – 240V ~ 50/60Hz, Razred II, IP20, Garancija na baterijo: 3 leta
Svetilka nima možnosti zatemnitve. Primerno za montažo na vnetljive površine.
1. Pred začetkom montaže mora biti napajanje izključeno.
2. Varnostno opozorilo! Napajalni kabel ne sme biti izpostavljen mehanskim poškodbam.
3. Razstavite svetilko in ločite spodnji del ohišja.
4. Izberite ustrezno pozicijo na aluminijasti plošči. Poravnajte odprtine na zasilnem
modulu s tistimi na aluminijasti plošči, vstavite potisne zakovice in jih obrnite za 90 stopinj.
5. Pritrdite LED indikatorje na aluminijasto ploščo.
6. Povežite napajalne žice kot je prikazano na slikah 1 in 4. Priključite žice na vhode: Rjava/Faza na SL,
Modra/Ničla na N in Zeleno/Rumena na ozemljitev. Če želite stalno delovanje svetilke, povežite priključek “SL” s
priključkom “PL”. Za upravljanje s stikalom povežite napajalno žico stikala na priključek SL in napajalno žico
svetilke na priključek PL. Opomba: če priključek “SL” ni povezan, potem svetilka deluje kot s pripravnim spojem.
7. Zapišite datum montaže na zasilni modul.
8. Namestite aluminijasto ploščo v spodnji del ohišja in se prepričajte, da je varno pritrjena.
9. S sponkami pritrdite difuzor na spodnji del ohišja.
Zasilni modul lahko deluje s trajnim ali s pripravnim spojem. Ko je napajanje vključeno mora svetiti zelen LED indikator polnjenja, kar pomeni, da se je
baterija začela pravilno polniti. V primeru prekinitve napajanja bo svetilka prešla v zasilni način delovanja in LED diode bodo svetile. Ob enkratnem
pritisku na testni gumb se bodo LED diode prižgale za kratek čas. Testi in inšpekcijski pregledi se morajo izvajati v skladu z lokalnimi predpisi.
Ročni test: Odprite način ročnega testa tako, da preklopiti funkcijsko stikalo proti MT. Enkrat pritisnite na gumb, za kratek čas bodo zasvetile svetilke
LED v sili. Pomni: Preden preklopite med funkcijami Ročni in Samotest, obvezno izključite omrežno napajanje in baterijo.
Samotest: Odprite način samotesta tako, da preklopite funkcijo stikalo proti ST.
1. Zeleni LED indikator sveti: običajno polnjenje baterije
2. Samodejni test na 1 mesec: Trajanje testa 10 sekund. Ročni test na 1 mesec: Pritisnite in držite testni gumb 3 sekunde, nato ga spustite in slišali
boste 2 piska
3. Samodejni test na 6 mesecev: Trajanje testa 3 ure. Ročni test na 6 mesecev: Pritisnite in držite testni gumb 6 sekund, nato ga spustite in slišali
boste 3 piske.
LED indikatorji
4. Rdeči LED indikator utripa (modul piska vsakih 45 sekund): Okvara baterije ali okvara baterije in LED svetilke
5. Rumeni LED indikator utripa (modul piska vsakih 45 sekund): Okvara LED svetilke
6. Čiščenje spomina in ponastavitev urnika testov: Izključite napajanje in svetilka bo prešla v zasilni način delovanja. Pritisnite in držite testni gumb več kot
10 sekund , nato ga spustite in LED svetilka bo ugasnila. Nov urnik testov bo vzpostavljen, ko bo znova vključeno napajanje svetilke. Po končani
montaži se bo baterija polnila 24 ur. V naslednjih 24 urah se bo izvedel 3-urni samodejni test. Po tem testu bo vzpostavljen urnik testov na 1 mesec in
na 6 mesecev.
1. Dnevno preverite delovanje LED indikatorja polnjenja.
2. Mesečno preverjanje: Delovanje LED indikatorja polnjenja in izpraznjenost baterije.
3. Preverjanje na 6 mesecev in na 1 leto: Delovanje funkcije samodejnega testiranja, delovanje LED indikatorjev in LED svetilke, ki morajo svetiti
najmanj 3 ure.
4. Ob montaži izpolnite evidenčni list in ga spravite k servisnim dokumentom.
5. V evidenčni list zapisujte rezultate vseh opravljenih testov, da bodo podatki pripravljeni za pregled s strani požarnega inšpektorja ali druge
pooblaščene osebe.
Začetek 24-urnega
polnjenja
Test po 1 mesecu
3-urno
praznjenje 30.
dan delovanja baterije
Test po 2 mesecu Test po 3 mesecu Test po 4 mesecu Test po 5 mesecu Test po 6 mesecih
(po pol leta)
3-urno praznjenje v
naslednjih 24 urah
Običajni potek samodejnega testa
10-sekundno
praznjenje 30.
dan delovanja baterije
10-sekundno
praznjenje 30.
dan delovanja baterije
10-sekundno
praznjenje 30.
dan delovanja baterije
10-sekundno
praznjenje 30.
dan delovanja baterije
10-sekundno
praznjenje 30.
dan delovanja baterije
Med testom noben
LED indikator ne sveti.
Po testu se znova prižge
zelen LED indikator.
Med testom noben
LED indikator ne sveti.
Po testu se znova prižge
zelen LED indikator.
Med testom noben
LED indikator ne sveti.
Po testu se znova prižge
zelen LED indikator.
Med testom noben
LED indikator ne sveti.
Po testu se znova prižge
zelen LED indikator.
Med testom noben
LED indikator ne sveti.
Po testu se znova prižge
zelen LED indikator.
Med testom noben
LED indikator ne sveti.
Po testu se znova prižge
zelen LED indikator.
LN
220/240V
~50/60Hz Slika 1
+ Rdeča
- Črna
Povezava z
LED driverjem
+ Rdeča
- Črna
Zunanje Testno
stikalo
Funkcije preklopa
Povezava
s svetilko
LED prikazovalnik
ST
Funkcije preklopa
MT

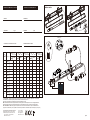
Installation and Maintenance Record: Installatie en onderhoud Record:
Installer
Installation Type
Installation test duration & Date
Installateur
Installatie Type
Installatie testduur & Date
Signed
Tekende
Month
Maand Test
Short
Short
Short
Short
Short
Short
Short
Short
Short
Short
Short
3Hr.
Short
1
2
3
4
5
6
7
8
9
10
11
12
Date
1st Year 1st Jaar
Date Date Date Date
Signed
Tekende
Signed
Tekende
Signed
Tekende
Signed
Tekende
2nd Year 2nd Jaar 3rd Year 3rd Jaar 4th Year 4th Jaar 5th Year 5th Jaar
IT: AVVERTENZA – I dispositivi elettrici possono causare lesioni gravi o la morte o danneggiare l’apparecchio. In caso di dubbi
sull’installazione o sull’utilizzo di questo prodotto, consultare un elettricista competente.
Assicurarsi che l’alimentazione principale sia spenta prima di effettuare interventi.
EST: HOIATUS! Elektritooted võivad põhjustada surma, raskeid vigastusi või varakahjustusi. Kui teil on toote paigaldamisel või
kasutamisel kahtlusi, küsige nõu asjatundlikult elektrikult. Enne töö alustamist veenduge, et elektrivool oleks välja lülitatud.
SLK: UPOZORNENIE - Elektrické výrobky môžu spôsobiť smrť, vážne zranenie alebo škodu na majetku. Ak máte akékoľvek
pochybnosti o inštalácii tohto výrobku, poraďte sa s kvalifikovaným elektrikárom. Pred začatím práce skontrolujte, že je hlavný zdroj
Page 6
Tel: +353 1 7099000
Fax: +353 1 7099060
Email: [email protected]
Website: www.robus.com
L.E.D Lighting & Electrical Distribution Group Ltd
IRE: Nangor Road, Dublin 12, D12 E7VP, Ireland
UK: Bracknell Enterprise & Innovation Hub, Ocean
House, 12th Floor, The Ring, Bracknell,
Berkshire RG12 1AX, UK
Harbour serise
2 3
4
Battery plug
N SL PL
-
 1
1
-
 2
2
-
 3
3
-
 4
4
-
 5
5
-
 6
6


dans d''autres langues
- English: Robus RHA2WEMST-PSU User manual
- Deutsch: Robus RHA2WEMST-PSU Benutzerhandbuch
- Nederlands: Robus RHA2WEMST-PSU Handleiding
Documents connexes
-
Robus RHA70406FT-24 Manuel utilisateur
-
Robus RSI4LST-01 Manuel utilisateur
-
-
-
-
-
-
-
-