Sylvania SCM2201 Manuel utilisateur
- Catégorie
- Téléviseurs
- Taper
- Manuel utilisateur
Ce manuel convient également à

LCD COMPUTER MONITOR
Installation & User's Manual
* Important Notice: Please read this manual carefully
MODEL: SCM1901/ SCM2001/SCM2201/ SCM2401

Contents
Package Contents.......................................................................................3
Hardware Setup.......................................................................................... 3
Hardware Installation..................................................................................4
Menu Control Buttons................................................................................. 5
On Screen Display (OSD) Menu Mode..................................................... 6-9
Display Modes........................................................................................... 10
Troubleshooting........................................................................................ 11
Maintenance.............................................................................................. 12
Precautions............................................................................................... 13
English

AC100-240V VGA
Package Contents
LCD Monitor
External Univ15 pin D-sub
(RGB Analog)
input signal cable
User's Manual
Power cord
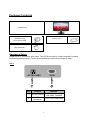
Hardware Setup
Handle the LCD monitor with care. Turn off the monitor's and computer's power
before beginning setup. Follow the installation instructions step by step.
Input
NO. Terminal Function
AC100~240V
AC power input
100~240V, 50/60HZ
VGA
connector
To PC VGA connector
1 2
n
u l
Ma
a
3

AC100-240V VGA
AC100-240V VGA
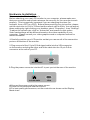
Hardware Installation
®
Please note for Windows User's
Before attaching your new LCD monitor to your computer, please make sure
that your resolution and refresh rates are set correctly for your monitor to work
properly. This is especially important if you are changing monitors (for
example, from a CRT to a LCD). Before disconnecting your old monitor, please
set the resolution to 1024 x 768 and set the refresh rate to 60Hz. You can adjust
these settings by right clicking your desktop, select “Properties”, then “Settings”.
To adjust the refresh rate, click on “Advanced” and search for this option.
Video card settings will be different based on the video capability of your
computer. Please consult your video graphics card or computer manual for
more information.
1.Carefully position your LCD monitor so that you can see all of the connection
ports on the bottom of the monitor.
2.Plug one end of the 15-pin D-Sub signal cable into the VGA connector
on the monitor and plug the other end of the cable into the 15-pin D-Sub
connector at the rear of your PC.
3.Plug the power connector into the AC In port port at the rear of the monitor.
4.Connect the power cord to the power source.
5.Power on the computer and the monitor.
6.For best quality performance, set the resolution as shown on the Display
Mode chart.
4

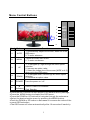
Menu Control Buttons
No. Button Function
1
AUTO
1. Automatically Adjusts the screen, when not in the
OSD menu.
2. To exit a submenu.
2
MENU
1. Show the main OSD menu.
2. To enter a submenu.
3
UP
1. To navigate up / right through the menu option
selection.
2. Increase an option value.
3. Select the image size of the screen (WIDE or 4:3)
when not in the OSD menu.
4
DOWN
1. To navigate down / left through the menu option
selection.
2. Decrease an option value.
5
POWER Turns the power on / off.
6
O
(indicator)
Green: Power LCD indicator.
Red: Standby
Press the AUTO button to auto adjust to the default factory settings.
Press the MENU button to display the OSD menu.
Press the DOWN or UP buttons to navigate through the submenus.
Select the desired option menu by pressing the MENU button.
Push the DOWN or UP button to decrease or increase the value of the
current OSD selection.
The OSD menu will close automatically after 16 seconds of inactivity.
5
6
1
2
3
4
5

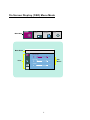
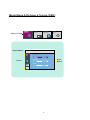
Main Menu
PICTUREPICTURE COLORCOLOR TRACKINGTRACKING
SETUPSETUP
Sub-
Menus
Menu Name
Icons
PICTURE
BRIGHTNESS
CONTRAST
GAMMA
50
50
0
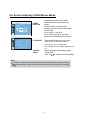
On Screen Display (OSD) Menu Mode
6

On Screen Display (OSD) Menu Mode
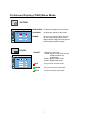
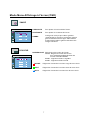
PICTURE
BRIGHTNESS
CONTRAST
GAMMA
PICTURE
BRIGHTNESS
CONTRAST
GAMMA
To adjust the brightness of the screen.
To adjust the contrast of the screen.
Set your own gamma value:-50 /0 /50
On the monitor, high gamma values
display whitish images and low gamma
values display blackish images.
PICTURE
50
50
0
PRESET
RED
GREEN
BLUE
Select the screen color.
SRGB: Set the screen color to fit the
sRGB standard color
specification.
6500K: Slightly reddish white.
Set your own red color levels.
Set your own green color levels.
Set your own blue color levels.
COLOR
COLOR
PRESET
RED
GREEN
BLUE
COLOR
9300K: Slightly bluish white.
50
50
50
7

On Screen Display (OSD) Menu Mode
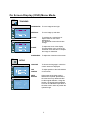
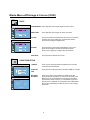
TRACKING
CLOCK
PHASE
SHARPNESS
To minimize any vertical bars or
stripes visible on the screen
background.
The horizontal screen size will also
change.
To adjust the focus of the display.
This item allows you to remove any
horizontal noise and clear or sharpen
the image of characters.
To adjust the clearness of the screen.
HORIZONTAL
VERTICAL
To move image left and right.
To move image up and down.
TRACKING
TRACKING
HORIZONTAL
VERTICAL
TRACKING
CLOCK
PHASE
SHARPNESS
50
50
50
50
5
SETUP
To choose the language in which the
control names are displayed.
To adjust position of the OSD window
on the screen.
LANGUAGE
OSD
POSITION
WHITE
BALANCE
If the output of the video card is
different the required specifications,
the color level may deteriorate due
to video signal distortion. Using this
function, the signal level is adjusted
to fit into the standard output level of
the video card in order to provide the
optimal image.
4:3 IN WIDE WIDE
1280 x 720 605Hz
SETUP
SETUP
LANGUAGE
OSD POSITION
HORIZONTAL
VERTICAL
ENGLISH
ANALOG
1280 x 720 60Hz
ANALOG
SETUP
WHITE BALANCE
POWER INDICATOR
FACTORY RESET
NO
NO
ON
50
50
8

On Screen Display (OSD) Menu Mode
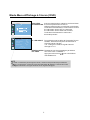
Press the , buttons to reset immediately.
Activate this function when white
and black colors are present in the
screen.
Restore all factory default settings except
“LANGUAGE.”
FACTORY
RESET
NOTE
If this does not improve the screen image, restore the factory default settings. If necessary, execute the
WHITE BALANCE function again. This function will be enabled only when the input signal is an analog
signal.
4:3 IN WIDE
WIDE:Switch to full scr een mode
acco rding to input imag e signal.
4:3 :Chang e the input imag e signal rat io to
4:3.
POWER
INDICATOR
Use this function to set the power
indicator on the front side of the monitor
to ONor OFF.
If you set OFF, it will go off.
If you set ON at any time, the power
indicator will automatically be turned on.
To select the image size of the screen.
4:3 IN WIDE WIDE
1280 x 720 60Hz
SETUP
LANGUAGE
OSD POSITION
HORIZONTAL
VERTICAL
ENGLISH
ANALOG
1280 x 720 60Hz
ANALOG
SETUP
WHITE BALANCE
POWER INDICATOR
FACTORY RESET
NO
NO
ON
50
50
9

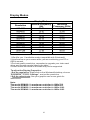
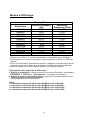
Display Modes
Display Mode
Resolution
Vertical Frequency
(Hz)
Horizontal
Frequency (KHz)
640x480 59.94 31.47
640x480 72.81 37.86
640x480 75.00 37.50
720x400 70.09 31.47
800x600 60.32 37.88
800x600 72.19 48.08
800x600 75.00 46.80
1024x768 60.00 48.36
1024x768 70.07 56.48
1024x768 71.92 58.04
1024x768 75.03 60.02
1.We offer you 11 available modes compatible with Windows®.
2.Interference on your screen while you are modulating your PC or
OSD is normal.
3.For best quality resolution, remember to upgrade your video card
driver and choose a mode listed in the table.
4.Other modes not listed on the table may not be supported.
To adjust the Display Properties:
1.Set the resolution: Right click on the Windows® desktop, choose
“Properties”, choose “Settings”, and set the resolution.
2.Set the refresh rate: See your graphic card's user guide for
instructions.
Note:
The model SCM1901 ’s maximum resolution is 1360x768.
The model SCM2001 ’s maximum resolution is 1600x900.
The model SCM2201 ’s maximum resolution is 1920x1080.
The model SCM2401 ’s maximum resolution is 1920x1080.
10

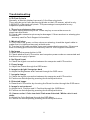
Troubleshooting
LCD Pixel Criteria
Normally, a Monitor display has nearly 3.8 million sub-pixels.
There may be up to 8 non-performing pixels on the LCD screen, which is only
0.000002% of the total sub-pixels. This percentage is acceptable for any
inspection specifications.
1. There is no picture on the screen
A. Power saving mode may be on. Press any key or move the mouse to
deactivate this mode.
B. Signal cable connector pins may be damaged. If there are bent or missing pins
consult the
warranty card for Tech Support information.
2. Missing Colors
A. If any of the red, green, or blue colors are missing, check the signal cable to
make sure it is tightened securely at both ends.
B. The pins in the cable could be loose and cause a bad connection. If there are
bent or missing pins consult the warranty card for Tech Support information.
3. No image
A. Make sure the power button is ON.
B. Check whether the LCD monitor and computer power cords are connected and
that there is a supply of power.
4. No Signal Input
A. Check the signal connection between the computer and LCD monitor.
5. Fuzzy image
A. Adjust the Phase through the OSD menu.
6. Image too bright / Image too dark
A. Adjust the Brightness and Contrast through the OSD menu.
7. Irregular image
A. Check the signal connection between the computer and LCD monitor.
B. Perform an Auto Adjust by pressing the Auto Adjust button.
8. Distorted image
A. Reset the LCD monitor by choosing the Reset function through the OSD menu.
9. Image is not centered
A. Adjust the H. Position and V. Position through the OSD Menu.
B. Perform an Auto Adjust by pressing the Auto Adjust button.
10. Uneven color / Color too dark / Dark area distorted / White color is not
white
A. Adjust the Color Settings through the OSD Menu.
B. Perform an Auto Adjust by pressing the Auto Adjust button.
11

Maintenance
To clean your monitor, please refer to the instructions below:
NOTE: To prevent electrical shock, do not open the LCD monitor casing. Leave
repair of the monitor to qualified personnel, please see the tech support
information in the warranty.
1. Unplug the power
Unplug the LCD monitor from the AC socket before cleaning the monitor.
2. Check the cover
Check to see if the LCD monitor and accessories are damaged, broken, or strained.
If so, please consult the warranty card for Tech Support information.
3. Clean
Never spray or pour any liquid directly onto the screen or case.Avoid allowing any
water or liquid from entering the LCD monitor or accessories.
4. Cleaner
Use water or non-ammonia/non-alcohol based glass cleaner. Do not use harsh or
abrasive cleaners such as ketene (such as acetone), ethanol, toluene, acetic acid,
methane, chloride, or other detergents to clean the monitor, these chemicals can
damage the LCD monitor.
5. Screen
To clean your LCD monitor screen or case, use water or a mild cleaner, as listed
above. Moisten a soft, clean cloth or if possible, use a special screen cleaner sheet
or a solution suitable for static electricity application. Using any cleaner other than
water or a mild cleaner may damage your monitor and will not be covered under the
warranty.
6. Storage of Unit
If the LCD monitor is not in use for a long time, please unplug it and store it in its
original box in order to avoid any damage.
7. Disclaimer
Any damage resulting from use of any cleaner that is not mentioned above is not
covered under the terms of the warranty on this product.
Cleaning Your Monitor
1.Gently wipe the screen with a clean soft lens brush or a soft clean lint-free cloth.
This removes dust and other particles that can scratch the screen.
12

2.Do not apply pressure to the screen surface when wiping it clean.
3.Do not pour or spray any liquid directly onto the screen or case of the LCD
monitor. Chemical cleaners may damage the screen or the LCD monitor.
Precautions
1.Read all of these instructions and save this manual for later use.
2.Follow all warnings and instructions on the product.
3.Do not cover or block the ventilation holes in the case.
4.Do not insert sharp objects or spill liquid into the LCD monitor through the
cabinet slots; this
may cause accidental fire, electric shock or failure.
5.Unplug the unit when not in use for an extended period of time.
6.Do not attempt to service this product yourself, as opening or removing the
cover may expose
you to potential electric shock. Only a qualified technician should service
this product.
7.Do not touch the screen directly with your fingers as it may damage the
screen; the oil from
your skin is difficult to remove.
8.Do not apply pressure to the screen, the LCD is very delicate.
9.Keep the monitor away from extreme heat, cold or humid places.
10.Do not place directly under sunlight, dusty surroundings or near
equipment which may
generate strong magnetic fields.
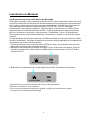
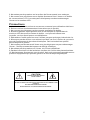
CAUTION
RISKOF ELECTRIC SHOCK
DO NOT OPEN
CAUTION:TO REDUCE OF RISK OF ELECTRIC SHOCK.DO NOT REMOVE COVER
(OR BACK)
NO USER-SERVICEABLEPARTS INSIDE.
REFER SERVICING TO QUALIFIED SERVICE PERSONNEL.
13

Contenu
Contenu du Paquet........................................................................................3
Configuration du Matériel..............................................................................3
Installation du Matériel..................................................................................4
Boutons de Contrôle du Menu........................................................................5
Mode Menu Affichage à l'écran (OSD)..........................................................6-9
Modes d'Affichage...................................................................................... 10
Dépannage.................................................................................................. 11
Maintenance................................................................................................12
Précautions.................................................................................................13
Française

AC100-240V VGA
Contenu du Paquet
Moniteur LCD
Univ15 pin D-sub Extérieur
(Analogique RGB)
Câble d'entrée de signal
Manuel de l'Utilisateur
Corde d'alimentation
Configuration du Matériel
Manipulez le moniteur LCD avec précautions. Eteignez la source de mise en marche du
moniteur et de l'ordinateur avant de commencer la configuration. Suivez les instructions
d'installation étape par étape.
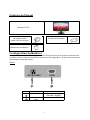
Entrée
1 2
n
u l
Ma
a
3
NO. Terminal Fonction
AC100-240V Entrée de courant AC
100-240V, 50/60HZ
Connecteur
VGA
Au connecteur PC VGA
1
2

AC100-240V VGA
AC100-240V VGA
Installation du Matériel
Veuillez noter pour les utilisateurs de Windows
Avant de connecter votre nouveau moniteur LCD à votre ordinateur, assurez-vous
que votre résolution et les taux de rafraîchissement sont configurés correctement
pour votre moniteur pour fonctionner convenablement. Ceci est très important si
vous changez de moniteurs (par exemple, d'un CRT à un LCD). Avant de
déconnecter votre ancien moniteur, veuillez régler la résolution au 1024x768 et
réglez le taux de rafraîchissement à 60Hz. Vous pouvez ajuster ses paramètres
par un clic droit sur le bureau, sélectionnez « Propriétés », puis « Paramètres ».
Pour ajuster le taux de rafraîchissement, cliquez sur « Avancé » et cherchez pour
l'option.
Les paramètres de la carte vidéo seront différents basé sur la capacité de la vidéo
de votre ordinateur. Veuillez consulter votre carte vidéo graphique ou le manuel de
l'ordinateur pour plus d'informations.
1.Positionnez avec soin votre moniteur LCD pour que vous puissiez voir tous les
ports de connexion sur le bas du moniteur.
2.Branchez un des bouts du câble de signal 15-pin D-Sub au connecteur VGA du
moniteur et branchez l'autre bout du câble dans le connecteur 15-pin D-Sub à
l'arrière du PC.
3.Branchez le connecteur de courant dans le port AC à l'arrière du moniteur.
4.Connectez la corde d'alimentation à la source d'alimentation.
5.Allumez l'ordinateur et le moniteur.
6.Pour une performance de meilleure qualité, configurez la résolution comme
montré sur la charte Mode d'Affichage.
4

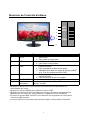
No. Bouton Fonction
1
AUTO
1. Ajustez automatiquement l’écran, si ce n’est pas en
menu OSD.
2. Pour quitter un sous-menu.
2 MENU 1. Affiche le menu OSD principal.
2. Pour entrer un sous-menu.
3
HAUT
1. Pour naviguer en haut/droite dans la sélection de
l’option de menu.
2. Pour augmenter la valeur d’une option.
3. Sélectionnez la taille de l’image de l’écran (LARGE
ou 4 :3) si ce n’est pas en menu OSD.
4 BAS 1. Pour naviguer en bas/gauche dans la sélection de
l’option de menu.
2. Pour diminuer la valeur d’une option.
5 ALIMENTATION Pour allumer ou éteindre l’appareil.
6 O
(indicateur)
Vert : indicateur de l’alimentation LCD.
Rouge : en veille
Boutons de Contrôle du Menu
Appuyez le bouton AUTO pour ajuster automatiquement par défaut les
paramètres de l'usine.
Appuyez le bouton MENU pour afficher le menu OSD.
Appuyez les boutons HAUT ou BAS pour naviguer à travers les sous-menus.
Sélectionnez le menu de l'option désirée en appuyant le bouton MENU.
Poussez le bouton BAS ou HAUT pour diminuer ou augmenter la valeur de la
sélection OSD actuelle.
Le menu OSD se fermera automatiquement après 16 secondes d'inactivité.
5
6
1
2
3
4
5

Menu principal
PICTUREPICTURE COLORCOLOR TRACKINGTRACKING
SETUPSETUP
Sous-
Menus
Nom du Menu
Icones
PICTURE
BRIGHTNESS
CONTRAST
GAMMA
50
50
0
Mode Menu Affichage à l'écran (OSD)
6

Mode Menu Affichage à l'écran (OSD)
PICTURE
BRIGHTNESS
CONTRAST
GAMMA
IMAGE
LUMINOSITE
CONTRASTE
GAMMA
Pour ajuster la luminosité de l'écran.
Pour ajuster le contraste de l'écran.
Configurez votre propre valeur gamma :
-50/0/50 Sur le moniteur, les hautes valeurs
gamma affichent des images blanchâtres
et les basses valeurs gamma affichent des
images noirâtres.
PICTURE
50
50
0
PREREGLAGE
ROUGE
VERT
BLEU
Sélectionnez la couleur de l'écran.
SRGB : Réglez la couleur de l'écran
pour s'adapter auSpécification de
couleur standard SRGB.
6500K : Légèrement blanc rougeâtre.
Réglez les niveaux de la couleur rouge de votre choix.
Réglez les niveaux de la couleur verte de votre choix.
Réglez les niveaux de la couleur bleu de votre choix.
COULEUR
COLOR
PRESET
RED
GREEN
BLUE
COLOR
9300K : Légèrement blanc bleuté.
50
50
50
7

Mode Menu Affichage à l'écran (OSD)
SUIVI
CLOCK
PHASE
NETTETE
Pour minimiser toutes barres verticaux ou bandes
visibles sur le fond d'écran.La taille de l'écran
horizontal changera également.
Pour ajuster le centrage d'affichage.Ceci vous
permet de supprimer tout bruit horizontal et
éclaircir ou aiguiser l'image des caractères.
Pour ajuster la clarté de l'écran.
HORIZONTAL
VERTICAL
Pour déplacer les images à gauche et à droite.
Pour déplacer les images en haut et en bas.
TRACKING
TRACKING
HORIZONTAL
VERTICAL
TRACKING
CLOCK
PHASE
SHARPNESS
50
50
50
50
5
CONFIGURATION
Pour choisir la langue dans laquelle les noms de
contrôle seront affichés.
Pour ajuster la position de la fenêtre OSD sur l'écran.
LANGUE
POSITION
OSD
BALANCE
BLANCHE
Si la sortie de la carte vidéo est différente des
spécifications requises, le niveau de couleur peut
détériorer dû à une distorsion de signal de vidéo.
En utilisant cette fonction, le niveau de signal est
ajusté pour s'adapter au niveau de sortie standard
de la carte vidéo dans le but de fournir une image
optimale.
4:3 IN WIDE WIDE
1280 x 720 605Hz
SETUP
SETUP
LANGUAGE
OSD POSITION
HORIZONTAL
VERTICAL
ENGLISH
ANALOG
1280 x 720 60Hz
ANALOG
SETUP
WHITE BALANCE
POWER INDICATOR
FACTORY RESET
NO
NO
ON
50
50
8
La page charge ...
La page charge ...
La page charge ...
La page charge ...
La page charge ...
-
 1
1
-
 2
2
-
 3
3
-
 4
4
-
 5
5
-
 6
6
-
 7
7
-
 8
8
-
 9
9
-
 10
10
-
 11
11
-
 12
12
-
 13
13
-
 14
14
-
 15
15
-
 16
16
-
 17
17
-
 18
18
-
 19
19
-
 20
20
-
 21
21
-
 22
22
-
 23
23
-
 24
24
-
 25
25


Sylvania SCM2201 Manuel utilisateur
- Catégorie
- Téléviseurs
- Taper
- Manuel utilisateur
- Ce manuel convient également à
dans d''autres langues
- English: Sylvania SCM2201 User manual
Autres documents
-
DGM L-1935W Manuel utilisateur
-
-
Sharp Computer Monitor LL-T1815 Manuel utilisateur
-
-
-
-
-