
Outdoor Full Color
Premium Light Strip
Installation Guide

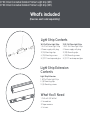
Light Strip Contents
16 ft. Full Color Light Strip
1. 16 ft. Full Color Light Strip
2. Power supply with plug
3. (15) Mounting clips
4. (15) Mounting screws
5. (1) PCS end cap and glue
32 ft. Full Color Light Strip
1. 32 ft. Full Color Light Strip
2. Power supply with plug
3. (30) Mounting clips
4. (30) Mounting screws
5. (1) PCS end cap and glue
Light Strip Extension
Contents
Light Strip Extension
1. 8ft Full Color Light Strip
2. (8) Mounting clips
3. (8) Mounting screws
What’s included
(Devices each sold separately)
What You’ll Need
1. Drill with 1/8” drill bit
2. Screwdriver
3. Tape measure
4. Scissors

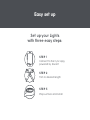
Easy set up
Set up your Lights
with three easy steps:
STEP 1
Connect to the Cync App,
powered by Savant
STEP 2
Trim to desired length
STEP 3
Prep surface and install

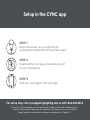
Setup in the CYNC app
For set up help, visit cyncsupport.gelighting.com or call 1-844-302-2943
GE and C by GE are trademarks of General Electric Company. Used under trademark license.
Amazon, Alexa, and all related logos are trademarks of Amazon.com, Inc. or its affiliates.
Google and other related marks and logos are trademarks of Google LLC.
STEP 1
Plug in and power on your light strip by
pressing the on/off button on the power supply.
STEP 2
Download the Cync App, powered by Savant
on your smartphone
STEP 3
Add your smart lights to the Cync App

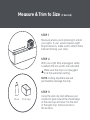
Measure & Trim to Size (If desired)
STEP 1
Measure where you’re planning to install
your lights. If your space requires Light
Strip Extensions, make sure to attach them
before trimming your strips.
NOTE: Cutting anywhere else will
permanently damage the strip.
STEP 2
With your Light Strip unplugged, safely
cutwhere the trim points are indicated.
Make sure the strip is not plugged
in at the wall when cutting.
STEP 3
Using the end cap and adhesive, put
a bead of glue around the inside edge
of the end cap and insert on the end
of the light strip. Hold in place for
30 seconds.
Glue End cap

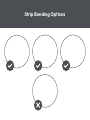
Strip Bending Options

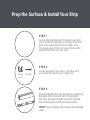
Prep the Surface & Install Your Strip
STEP 2
Install mounting clips every 13 inches until
you reach the end of your light strip.
STEP 1
Locate the starting point to install your light
strip. Install the first clip by drilling a 1/8-inch
hole and screwing in the provided screw.
The open ends of the clip should follow the
desired direction of your strip.
NOTE: The mounting clips/screws will damage
walls.
STEP 3
Mount the light strip into the clips by snapping
the light strip into each clip. To reposition
the strip, unsnap the light strip and reinstall
the mounting clip in the desired location.
Snap
joint Screw

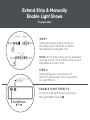
Extend Strip & Manually
Enable Light Shows
(If applicable)
NOTE: 16 ft. Outdoor Strip can be extended
up to 32 ft. total. 32 ft. Outdoor Strip can be
extended up to 64 ft. total.
STEP 1
Unplug the power supply. Screw on
the waterproof connector to attach
the extension to the light strip.
Light Effects
Button
STEP 2
Unplug/Plug your strip back in to
detect its new length. This is important
for Light Effects.
ENABLE LIGHT EFFECTS
Cycle through light show by pressing
the Light Effect button .

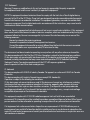
FCC Statement
Warning: Changes or modifications to this unit not expressly approved by the party responsible
for compliance could void the user’s authority to operate the equipment.
NOTE: This equipment has been tested and found to comply with the limits for a Class B digital device,
pursuant to Part 15 of the FCC Rules. These limits are designed to provide reasonable protection against
harmful interference in a residential installation. This equipment generates, uses and can radiate radio
frequency energy and, if not installed and used in accordance with the instructions, may cause harmful
interference to radio communications.
However, there is no guarantee that interference will not occur in a particular installation. If this equipment
does cause harmful interference to radio or television reception, which can be determined by turning the
equipment off and on, the user is encouraged to try to correct the interference by one or more of the
following measures:
Reorient or relocate the receiving antenna.
Increase the separation between the equipment and receiver.
Connect the equipment into an outlet on a circuit different from that to which the receiver is connected.
Consult the dealer or an experienced radio/TV technician for help
The device must not be co-located or operating in conjunction with any other antenna or transmitter.
This device complies with Part 15 of the FCC Rules. Operation is subject to the following two conditions:
(1) this device may not cause harmful interference, and (2) this device must accept any interference
received, including interference that may cause undesired operation.FCC RF Radiation Exposure
Statement Caution: To maintain compliance with the FCC’s RF exposure guidelines,
place the product at least 20cm from nearby persons.
IC statement
This device complies with RSS247 of Industry Canada. Cet appareil se conforme à RSS247 de Canada
d'Industrie.
This device complies with Industry Canada license-exempt RSS standard(s).
Operation is subject to the following two conditions:
(1) this device may not cause interference, and (2) this device must accept any interference, including
interference that may cause undesired operation of the device. appareils radio exempts de licence.
Son fonctionnement est sujet aux deux conditions suivantes: (1) le dispositif ne doit pas produire de
brouillage prejudiciable, et (2) ce dispositif doit accepter tout brouillage recu, y compris un brouillage
susceptible de provoquer un fonctionnement indesirable.
This equipment complies with IC RSS-102 radiation exposure limits set forth for an uncontrolled
environment. This transmitter must be installed to provide a separation distance of at least 20cm from all
persons and must not be collocated or operating in conjunction with any other antenna or transmitter.
Cet équipement est conforme aux limites d'exposition aux rayonnements IC RSS-102 définies pour un
environnement non contrôlé.Cet émetteur doit être installé pour fournir une distance de séparation d'au
moins 20 cm de toutes les personnes et ne doit pas être colocalisé ou fonctionner en conjonction avec une
autre antenne ou émetteur.

Like your new Outdoor Full Color
Premium Light Strip?
Share your experience!
Leave a review where you
purchased the product.
TM
-
 1
1
-
 2
2
-
 3
3
-
 4
4
-
 5
5
-
 6
6
-
 7
7
-
 8
8
-
 9
9
-
 10
10


dans d''autres langues
- English: GE Lighting 1622 Installation guide
Documents connexes
Autres documents
-
Innovative VTA380SB The Victrola Ellington Manuel utilisateur
-
Cync Ceiling Fan Smart Switch Guide d'installation
-
 Govee H6601 AI Gaming Sync Box Kit Manuel utilisateur
-
 Aqara E1 Curtain Driver Manuel utilisateur
-
Yale Assure Lock SL Key Free Touchscreen Deadbolt YRD256 Mode d'emploi
-
Asus ROG STRIX Z370-I GAMING Manuel utilisateur
-
-
-
Good Earth Lighting AC1275-RWF-24LFW Mode d'emploi
-
Harris XL-185M Guide d'installation

